Photographic Techniques
Night Photography
It’s getting to be that time of year where daylight photography is limited to holidays and weekends. A surprising number of photographers put up their gear until March or April, except for the routine indoor snapshots during the holidays. I’m always surprised at how many people aren’t comfortable shooting outside at night; you’re missing out on some great shots. If you haven’t, give it a try this winter. Your keeper rate will be lower at night (if I’m happy with one good night shot out of ten it’s a great shoot) but you can get some spectacular photos, especially when the holiday lights go up soon. I’m certainly not the world’s expert— I’m a first rate gearhead and a second rate photographer—but I’ll share a few tips for those of you who haven’t really tried your hand shooting in the dark. Those of you who are experienced night-shot photographers just move along, nothing to see here 🙂
When I first tried to learn about night photography by reading online it seemed that different articles were saying exactly the opposite thing. Then I realized they were actually describing two different types of photography and calling them both ‘night photography’. The first I call Shooting in the Dim and the second Shooting in the Dark.
Shooting in the Dim
“Dim” shooting is a lot like indoor photography: taking a picture where there’s still a fair amount of ambient light, like brightly lit city streets, the sky at dusk, objects lit by floodlights, etc. It is fairly intuitive: you want a nice wide aperture lens (f/2.8 or lower), preferably image stabilized/vibration controlled. When there’s reasonable ambient light autofocus and autoexposure functions on the camera generally work well. Exposure bracketing, or shooting several shots at exposures above and below what the camera thinks best is worthwhile. With a little luck (or a lot of shots) you can usually nail an exposure that shows off decorative lighting without blowing it out, but still preserves detail in the objects you’re shooting without losing them in shadow. Try, if at all possible, to keep the ISO down to 400 or so to minimize the inevitable noise that shooting in dim light tends to create.
Image stabilized wide angle lenses, or wide angle lenses on image stabilized camera bodies, are invaluable for shooting in the dim. (This shot was handheld at 1/6 of a second using a Canon 24-105 IS lens on a crowded street where a tripod would have been impractical. Notice the motion blur of the cars passing, but the building is quite sharp, even at 100%.) If there are unlit objects close to you in the picture, a bit of fill flash can be very useful. But just a bit (usually set manually and a little trial-and-error may be needed to get it right), to much and you lose all the ambient light you’re trying to capture. I usually try shooting in the dim on Aperture Priority mode first, letting the camera suggest an exposure time. If I don’t like the results I’ll switch to manual and set the exposure myself.
Shooting in the Dark
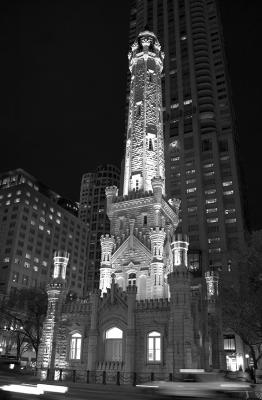
“Dark” is the term I use to describe true nightscape photography, which is mostly about the lights and the reflection of the lights.For shooting in the dark things like wide apertures and image stabilization generally don’t matter: the shot is going to require a long exposure no matter the aperture and ISO. A solid tripod is going to be necessary and other techniques to minimize shake help keep the images sharp. With shutter speeds slow to between 1/30 and 1/2 second, it’s also a good idea to enable mirror lock-up, which avoids the bit of vibration caused by the mirror slapping back and forth) and to use a cable release or the camera’s self-timer, which avoids motion from pressing the shutter button. That said, significantly longer exposures generally don’t benefit as much, because the effects of both don’t tend to last long.

What I found most counterintuitive about night photography is that you don’t want to shoot at a wide aperture. Rather f/8 to f/16 is preferable if at all possible. The reason for this is twofold. First, it’s difficult to focus at night, and a smaller aperture gives a greater depth of field, keeping more of the picture in focus and giving you more margin for error. Second, narrower apertures (f/11-f/16) give light sources a “starburst” effect and thus much more emphasis, while wider apertures (f/4-f/5.6) leave the lights a bit muddled. (They’re going to overexpose and lose all detail anyway.) The two photos here are a good example. The top image was shot at f/4, and the bottom at f/11. Notice how much cleaner the lights are in the second image. Similarly, a lower ISO results in less noise, and since noise is usually a problem with long exposures an ISO of 200 is often ideal.
Determining exposure time is the most difficult part of night shooting. Setting the autoexposure to “spot” and trying to expose for reflected light is a good solution—when it works. This will blow out the center of bright lights (which usually looks fine) but will bring out the most color and detail in most shots. You can use a lightmeter, all manner of calculations, etc. to try to determine exposure, but the simplest technique I’ve found is set up the tripod, take a two-second exposure, and look at the histogram of the resulting shot, doubling or halving the exposure time until the image on the LCD looks good. (Yes, all of you purists, I realize this is chimping and cheating. But it lets me get home with a shot.)
As mentioned earlier, focusing can be problematic at night. If the interesting objects are fairly close you may be able to get focus lock using the camera or flash’s built in IR focusing light. Another option is to light an object in the scene with a flashlight, let the camera autofocus and then switch to manual focus. Both of these techniques require objects of interest to be reasonablly close. Other options are to set your lens on manual focus and arbitrarily use the distance scale, manually focus using live view, or set the lens at its hyperfocal distance. The latter technique is what I prefer when using wide to medium angle lenses.
It can be a little frustrating, especially at first, when you get home with 100 images and find only 4 or 6 are really any good— but those 4 or 6 will give some unique photographs that are truly different and often beautiful. That bridge shot above shows a soybean field, a dirty stained bridge, and the abandoned Pyramid by day. By night, though, its pretty cool. Once you get a little comfortable with getting night images, there’s a number of cool techniques to add: light painting; star trails; abstracts and anything else you can think of.
Roger Cicala
Lensrentals.com
More Lensrentals Articles
Author: Roger Cicala
I’m Roger and I am the founder of Lensrentals.com. Hailed as one of the optic nerds here, I enjoy shooting collimated light through 30X microscope objectives in my spare time. When I do take real pictures I like using something different: a Medium format, or Pentax K1, or a Sony RX1R.
