How To's
A Few Easy Lens Dustings
I get asked about 15 times a week, “How can I get the dust out of my lens?” The right answer is you don’t. All lenses have dust in them and it doesn’t affect the images at all 99% of the time. Even if you clean it all out, it will be back after you use the lens a few times.
There are occasionally times that large dust specs very near the rear element are visible in an image, though. There also is the very real issue of resale value; a dusty lens tends to bring a lower price than one without much dust. The right answer in these cases is “send it in for factory service, they’ll disassemble it and clean it.” Doing it yourself is risky.
After I give all of those answers, a lot of people tell me they have an old lens no longer under warranty, not worth the cost of sending it in for factory cleaning, and they are really handy and want to do it themselves. For those people, we’ve put up this post showing how to get dust out of some fairly easy to reach locations.
More Than the Usual Warnings Apply
- If you open a lens you have completely voided the warranty. Don’t do this on any lens still in warranty.
- You can change a dusty lens into an unusable lens if things go wrong. And things do go wrong.
- If you mess up and strip a screw or tear a flex, factory service may (or may not) even attempt to repair it. If they do decide to repair it they will charge an additional “tampered with” fee in addition to the service charge. It is reasonable for them to do so. It’s way harder and more time consuming to repair a lens someone has messed up.
- If things go really wrong and you can’t reassemble the lens, nobody, and I mean nobody, will put it back together for you at any price. I get asked to do it occasionally, and I won’t even consider it. It’s one thing to reassemble a lens I’ve carefully disassembled, keeping the parts organized. It’s another to try to put together a 3 dimensional jigsaw puzzle of pieces.
- Chances are you really don’t need to do this anyway. Even a moderate amount of dust rarely has any effect on images.
Now, if you’ve read all of those warnings, have an appropriately old, out of warranty lens, and are certain the dust needs to be removed (even though it probably doesn’t), read on.
Tools Needed
You’ll need a good quality, J. I. S. (Japanese Industrial Standard) #00 or #000 screwdriver. Lens screws look like Phillips head, but they aren’t. A Phillips screwdriver may work but is far more likely to strip a screw. Read warning #3 – a stripped screw is a really bad thing.
You’ll really prefer a magnetized screwdriver so pick up a magnetizer when you go shopping for tools at Amazon or wherever.
You’ll also need a rocket blower or electric blower that does NOT use canned air with propellant. Getting propellant in the lens is way worse than dust. (Yes, I know That Guy used can air and his lens is fine. You might get away with it 20 times before you ruin a lens.) Plus, warning #3 will apply if you try to send the lens in for service with propellant coating the lens elements.
Finally, you’ll need a well lit workplace with room to keep screws and parts organized. My ‘well lit’ may be different than yours but I use three 100 watt halogen desk lamps on flexible arms.
Today’s Lenses:
Below are the lenses we’ll show how to dust out today, with lenses that are similar listed in parenthesis. Just click the lens to go straight to that section of the article.
- Nikon 24-70 f/2.8 AF-S (Many Nikon “D” primes)
- Canon 17-55 f/2.8 IS(Canon 24-105, 24-70 f/4 IS, 24-70 f/2.8 II)
- Canon 85mm f/1.2 L
- Canon 85mm f/1.8 (Canon 100m f/2)
- Canon 70-200 f/2.8 NON IS (Canon 70-200 f/2.8 IS I and II)
- Canon 100-400 IS L (Canon 28-300 IS L)
Here We Go
I’m giving examples of very easy to moderately easy places you can get dust out of in certain lenses. PLEASE DON’T EMAIL ME ABOUT HOW TO DUST A LENS NOT SHOWN HERE. Most lenses have front or rear centering elements that if removed, require factory recentering and recalibration. You can’t do that at home.
Nikon 24-70mm f/2.8 AF-S Rear Dust
Also applies to: many Nikon “D” prime lenses.
Difficulty: This is the easiest lens dusting of all.
As a rule, Nikon lenses are more difficult to get into, but the 24-70mm is an exception. It’s probably the easiest lens to remove rear dust from because the rear glass is a separate, fixed element that can be removed with just 3 screws.

Three small screws attach it to the side of the lens mount. Do NOT remove the small screws holding the electrical contacts in place.
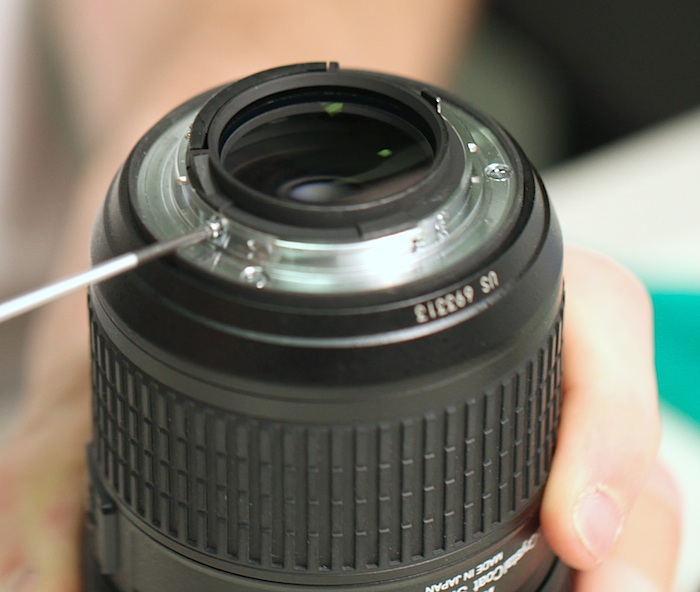
Once the screws are removed you can remove the rear element – lift it out or simply turn the lens upside down and let it fall into your palm.
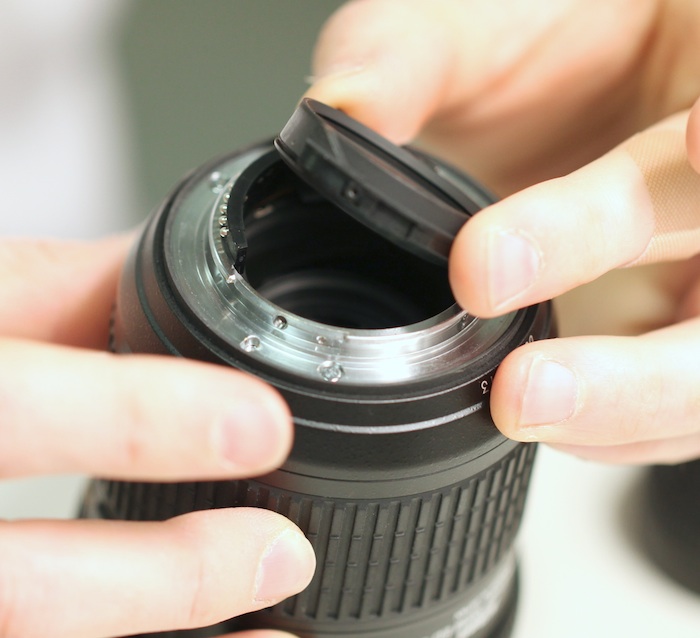
Blow the dust out and you’re done. Notice the spring for the aperture lever at 2 o’clock inside the lens – don’t mess with it.
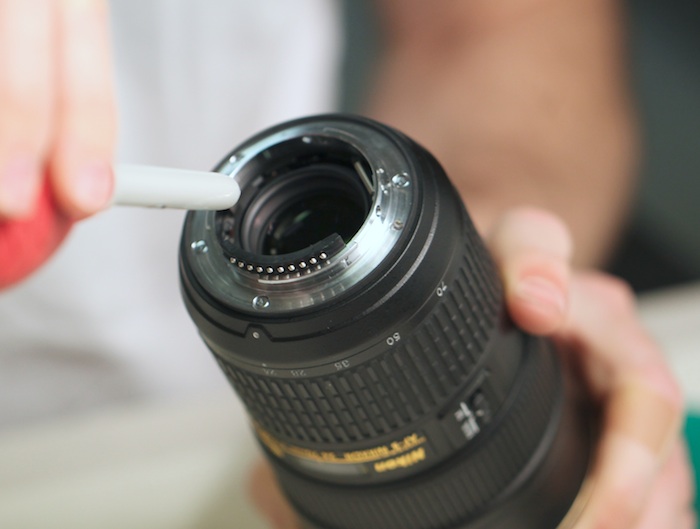
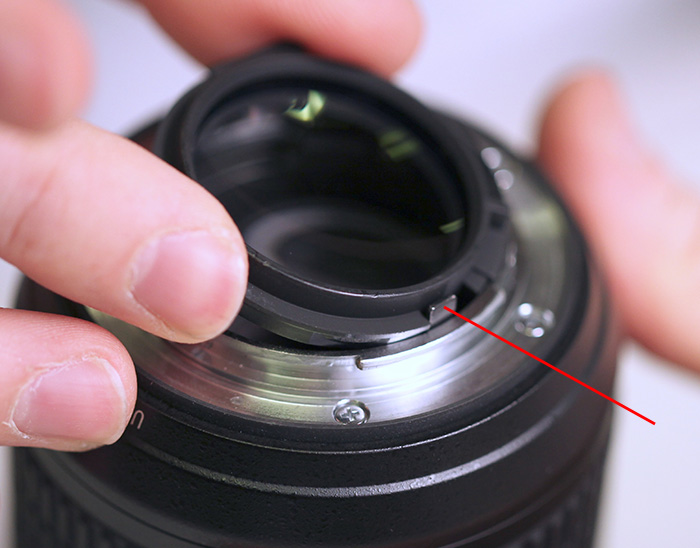
When you put the element back in place, be sure to line up the slot for the aperture lever (red arrow below). Bending the lever is probably the only risk with this one. Don’t forget to replace the screws. I did that once (that’s why I don’t take phone calls during the workday – I forget where I am in a disassembly).
Canon 17-55 f/2.8 IS EF-S Front Dust
Also applies to: Canon 24-105 f/4 IS, 24-70 f/4 IS, 24-70 f/2.8 II (although these have more screws holding the front element in)
Difficulty: Very easy
Most of you interested have probably seen this from a post I did a couple of years ago, but we’ll try to be a bit clearer with this one. It’s nearly as easy as the Nikon 24-70.
Start by using some sharp forceps or a small screwdriver to peel up the makeup ring. It’s stuck on with sticky adhesive and will stick right back on if you don’t set it sticky-side down on the counter.
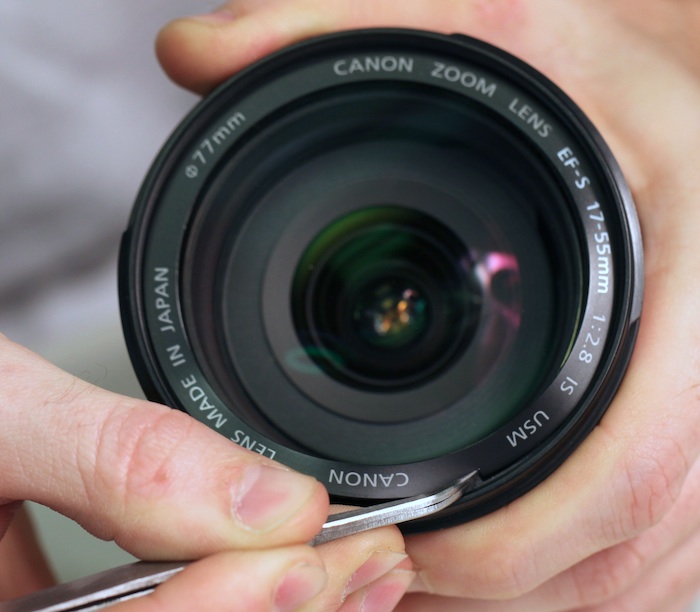
With the makeup ring removed you’ll see the three screws that hold the front element in place. At each screw location there are three possible holes for it to go in. You’ll want to remember which set of holes the screws go in (left, right, center) on your lens. The location of the front element will be apparent from the marks the screw head has made.
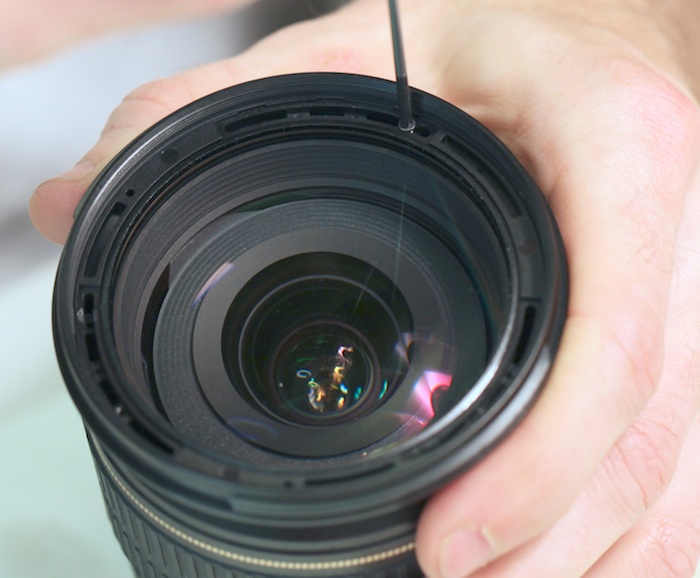
Here’s a front view with one screw removed. You can see the three possible holes (you might not in your lens, depending on the placement of the front element one or two may be outside of the slot). It’s important that the lens go back in exactly the position it was in before. In this lens the left (most clockwise) hole is used and you can see the mark the removed screw left in the front element. If you can’t see it clearly, or you’re OCD like Aaron, make a small scratch.
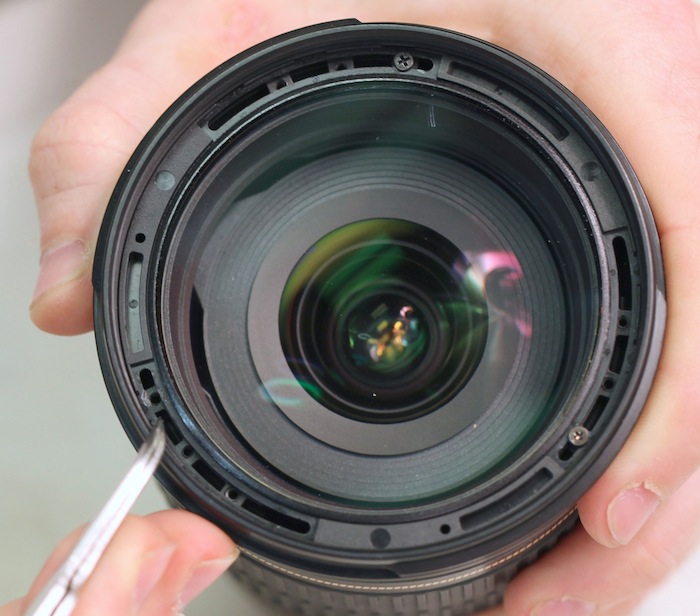
Once the screws are removed the front element comes out. If you don’t have a fancy suction bulb just drop it out into your palm. It’s fairly large.
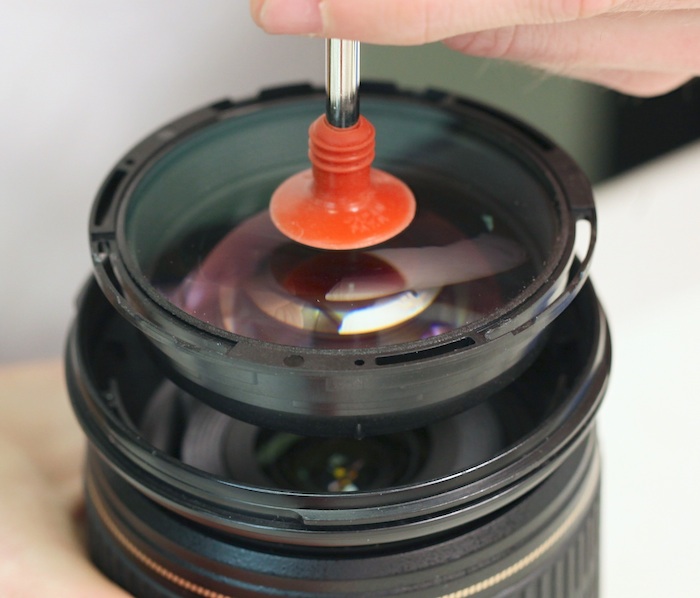
The front element chamber is pretty large, but you’ll be amazed at how that huge dust speck is really quite tiny without the front element to magnify it. BTW – the three screws at the bottom of the chamber hold the front barrel in place. As long as you’re here you might make sure they’re tight. The odd shape at 11 o’clock is where this group attaches to the focusing ring key.
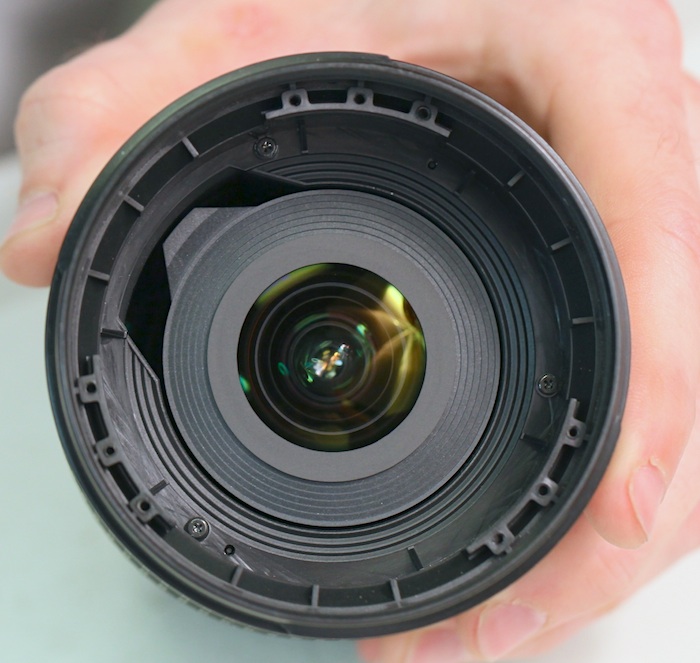
If you don’t have a suction bulb thingie, the simplest way to replace the front element after the dust is gone is to hold it upside down and put the lens down over it. After turning it upright you can rotate the front element to proper position before replacing the screws.
Canon 85mm f/1.2 Rear
Difficulty: Easy
It’s very easy to get rear dust out of the Canon f/1.2 prime lenses (the front is another matter entirely).
The 4 lens mount screws are removed. They are often glued in so be careful about stripping these — if the screw doesn’t come out fairly easily then quit.

Once the screws are remove you can tilt up the rear element on the side away from the electrical contacts and blow the dust out. Important: just tilt it. If you tear the contacts you will be in for a major repair cost.
Canon 85mm f/1.8 front and rear
Also applies to: Canon 100 f/2.0; Canon 50mm f/1.4
Difficulty: moderate
When these lenses get dust it tends to be on either side of the central group, so you generally need to do both the front and rear. This one is more time consuming and a bit more difficult than the previous ones, but still fairly straightforward.
Rear
Start by removing the two small screws that hold the electronic contacts to the rear mount.
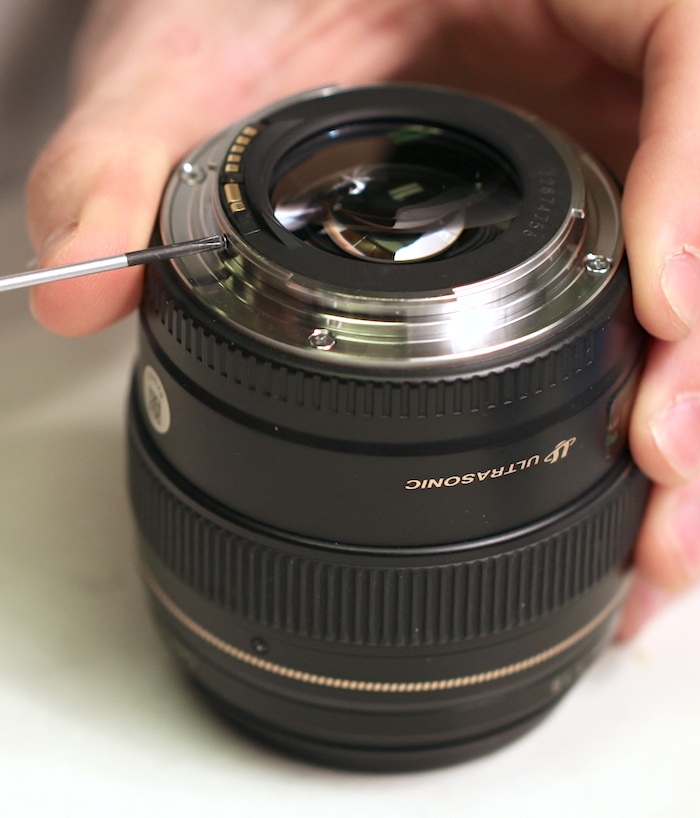
Then the 4 larger screws that hold the rear mount to the lens.
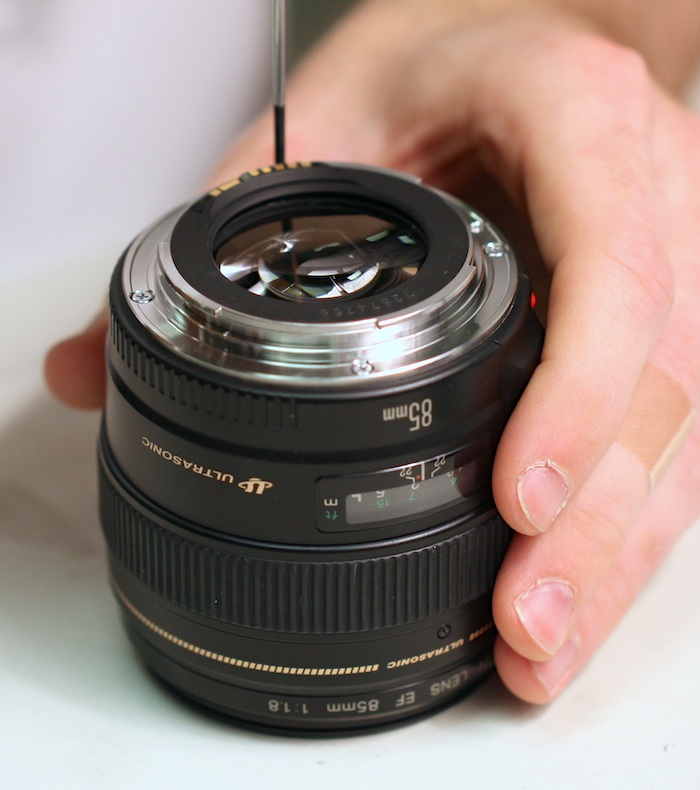
Once those are removed, lift the mount up just a bit on the side opposite the contacts, put a finger under the mount and while holding the mount firmly in your other hand use the finger to pop out the plastic rear baffle.
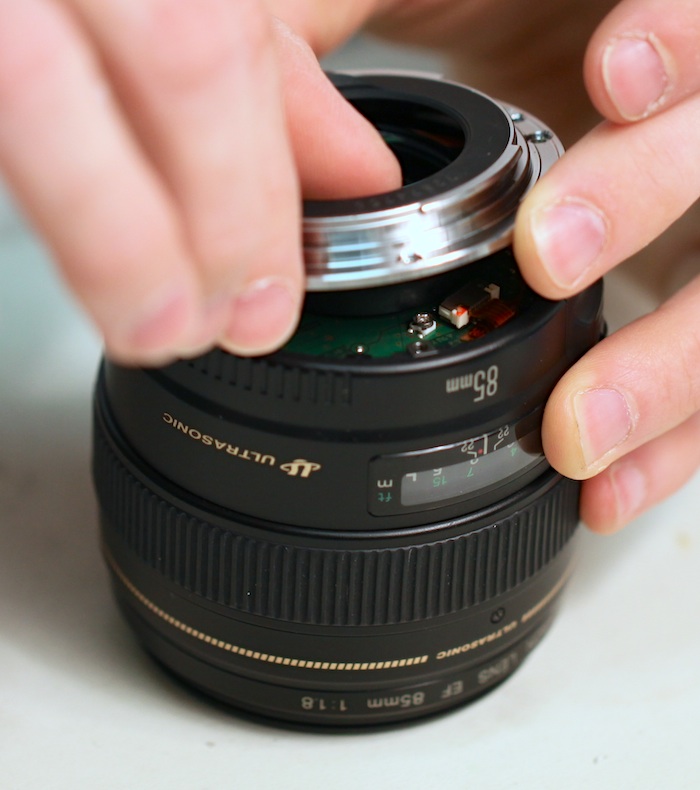
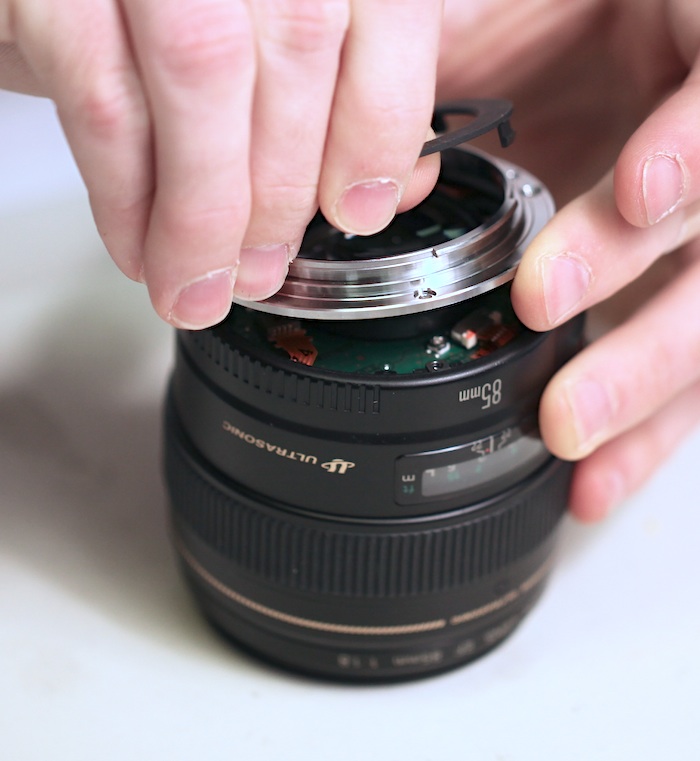
With the plastic baffle out, just slide the contact assembly away from the metal ring a bit (there a small post in the back that inserts into a hole in the metal ring) and remove the ring.
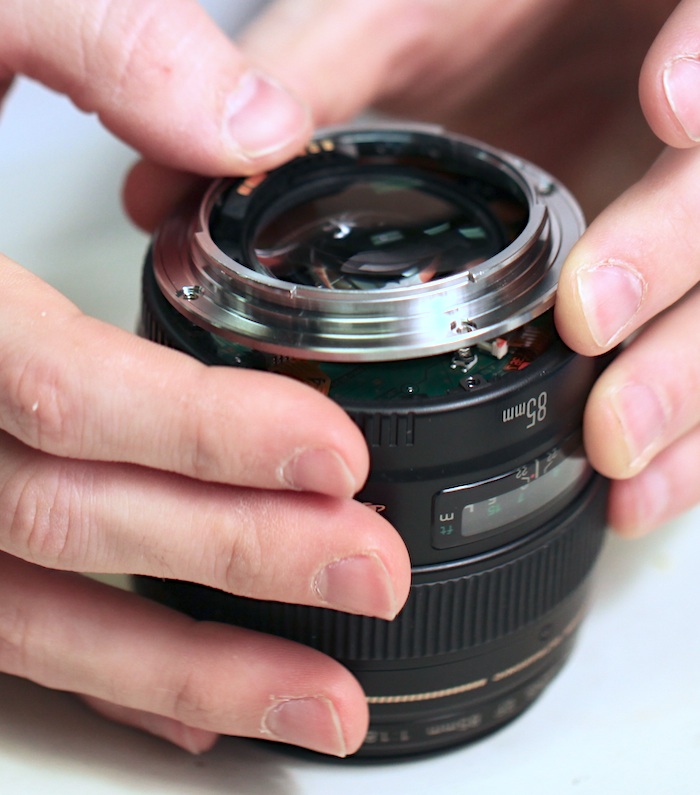
Now you can see the PCB and the rear element is exposed. The rear group has some notches around the plastic rim — you can see one lined up above the ’85’ on the lens barrel. Remember where it lines up (or make a tiny mark lined up with some landmark). You’ll need that later. Note the flexes and soldered wire attaching to the PCB. Your goal from this point forward is not to pull them.
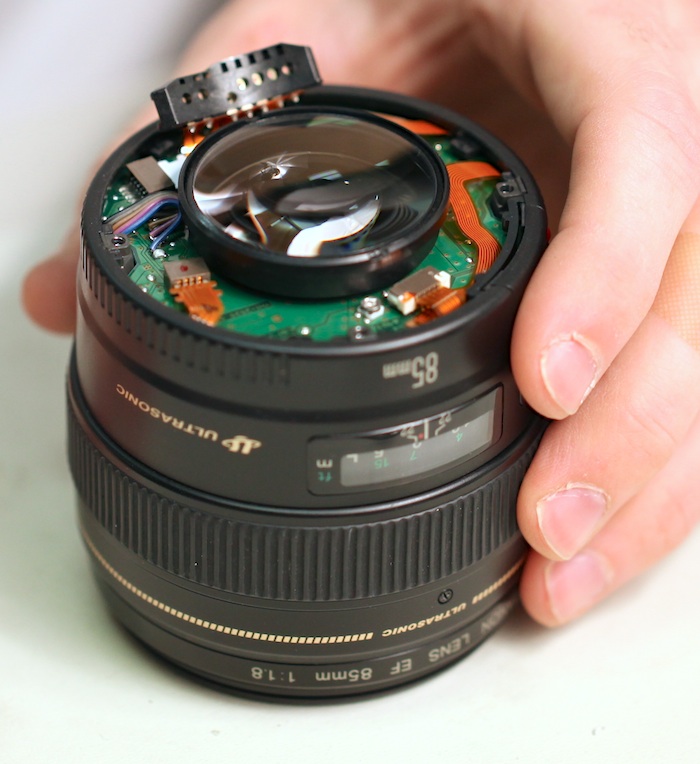
The rear element unscrews counter-clockwise several turns (you wanted to line up those landmarks so you know you have it fully tightened during reassembly). If you have a flat spanner wrench you can use that to unscrew the lens. But then again, if you have your own spanner wrench you probably don’t need me to show you how to do this.

Often you can unscrew the rear element by using your thumbnails in a couple of the slots in the rear element. One of those rubber ‘jar opener’ sheets works really well, too. Just remember – DO NOT PULL ON THE FLEXES OR WIRES while you do this. If you tear them, the lens is basically junk.
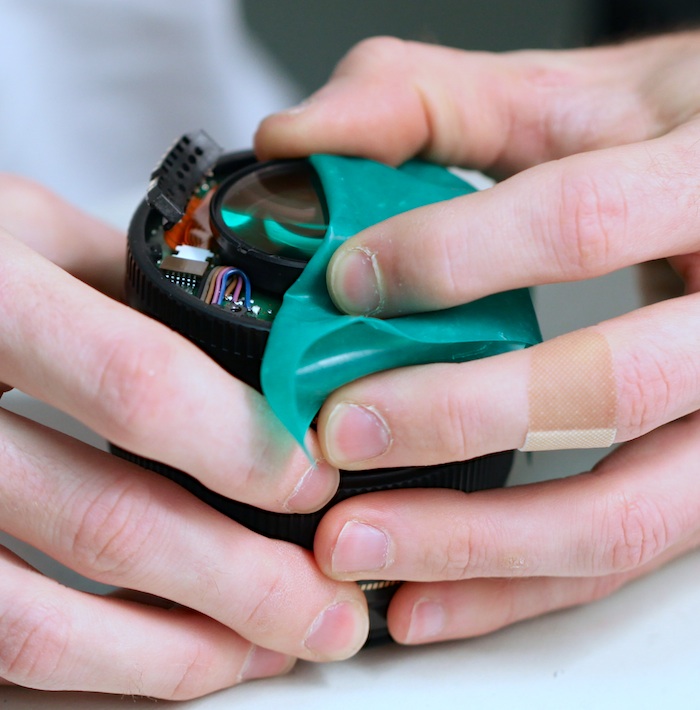
Once the rear element is unscrewed, lift it out, blow out the inside group and clean the rear group.
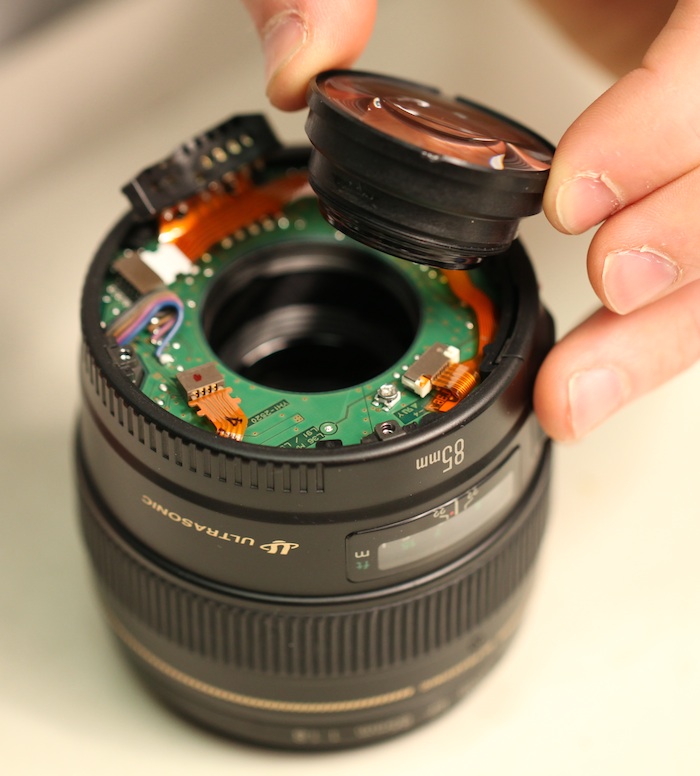
Reassembly is the reverse, of course. When you put the lens group back in, make sure it’s level and screws in with little resistance. If you cross-thread it the lens will be badly decentered. Tighten until you reach the mark you were at originally.
When you put the rear mount back on, I find it best to put the screws holding the electrical contacts in first (use the post in the contacts to line it up properly, then put in the screws) then put the mount screws into the lens. Finally pop the plastic light baffle back in.
Front
There are 3 screws that hold the front barrel cover onto the lens. Before you remove them make a mental note of which way the cover lines up (the distance window is a good landmark) so you put it back on correctly. It will still work fine if you put it on wrong, but someone (likely a future buyer or repair shop) will notice you’ve put it back wrong.

Once the three screws are removed the front barrel slides right off.

Inside the front barrel is some dust-catching sticky felt. Might as well clean that off while you’re here.
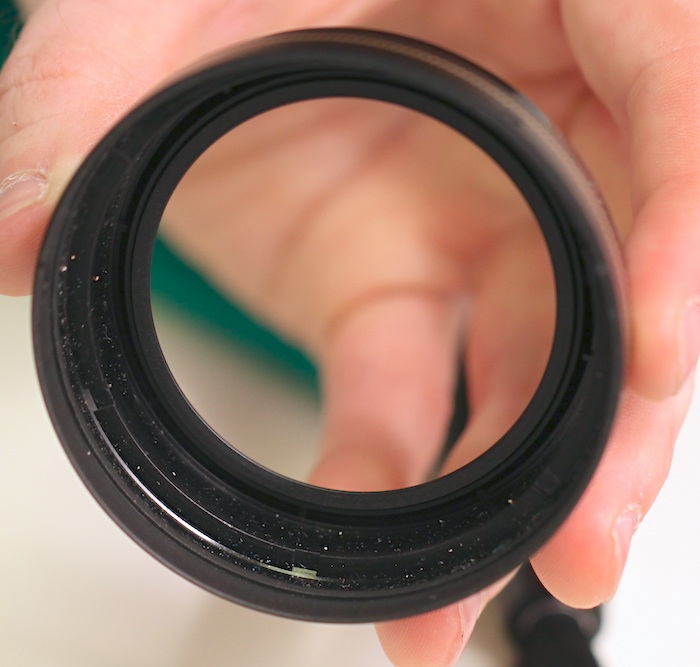
The front element is held on by 3 screws. As usual, you’ll find reassembly easier if you mark how the lens element should line up when reassembled.
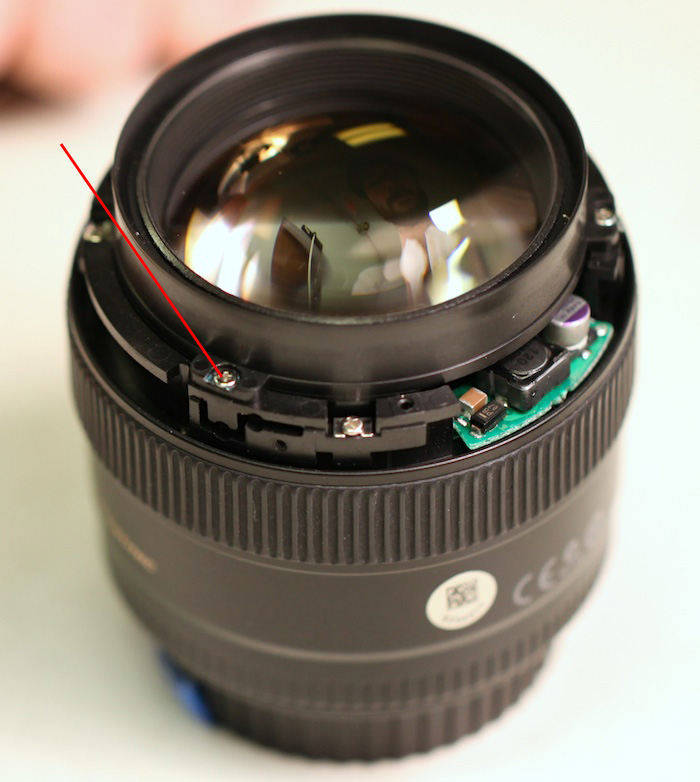
Under 1, 2 or all 3 or the lens screws you will notice small adjusting screws that the factory used to set the tilt of the front group to zero. Don’t touch them.
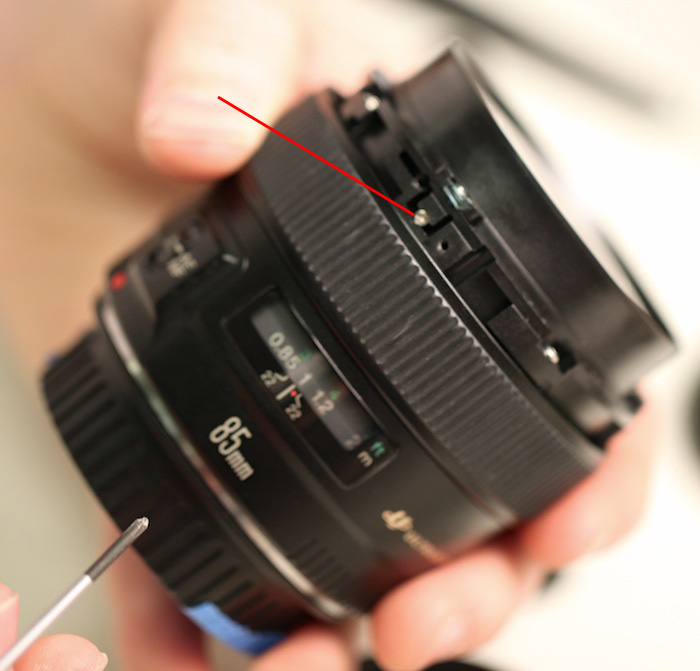
Once you’ve removed the three screws holding the front group in place it lifts right off. Blow dust out from inside and under the back glass of the front group and put everything back together.
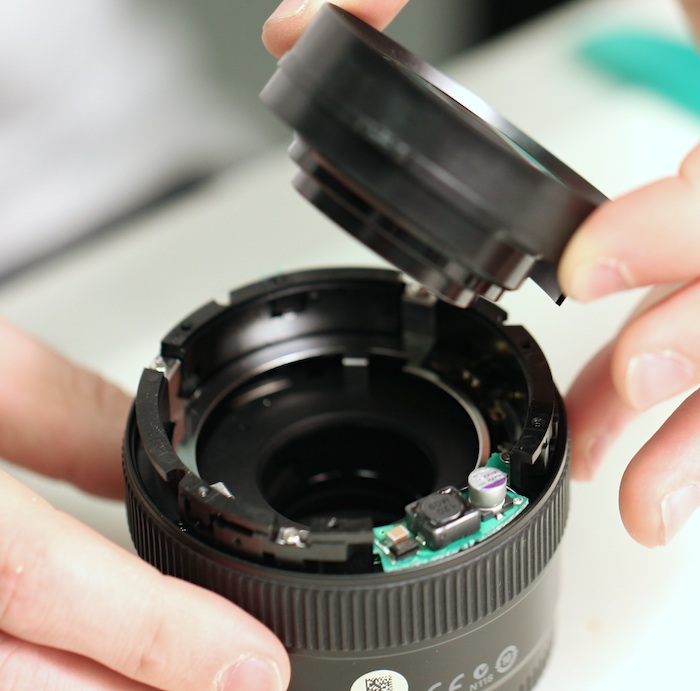
This one is a little more time consuming than the previous ones, but still pretty straightforward.
Canon 70-200 f/2.8 Non IS front
Also applies to: Canon 70-200 f/2.8 IS and IS II (with some modifications)
Difficulty: Easy, but you won’t get out all of the dust.
In general, getting dust out of a 70-200 f/2.8 lens is difficult, but most of the dust right under the front element can be removed fairly easily. Getting it all out, or getting out deeper dust, requires removing elements that require recalibration.

Really all we need to do is remove the filter ring barrel. To access it first either fold down (or remove) the focusing rubber. This exposes three holes in the focusing ring. Rotate the ring until the holes line up with the three screws (as shown below) that hold the filter ring barrel on. The IS II version has 5 screws rather than 3.
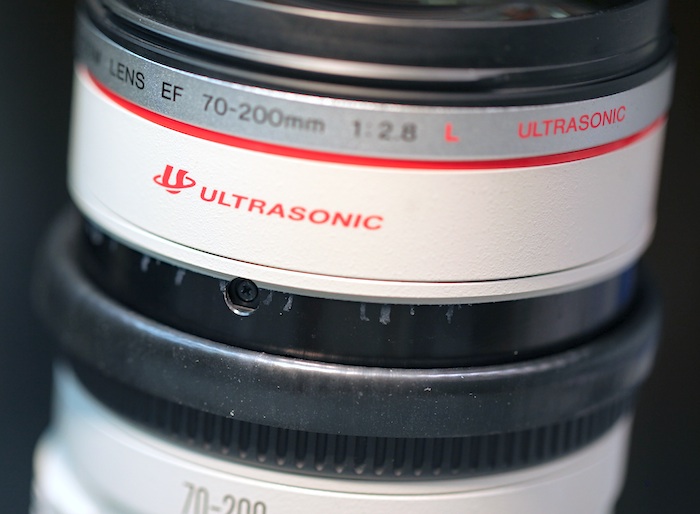
Remove the screws and the filter ring slides off. As always, you’ll want to remember how it aligns when you replace it (the red ultrasonic lines up along the distance scale window).
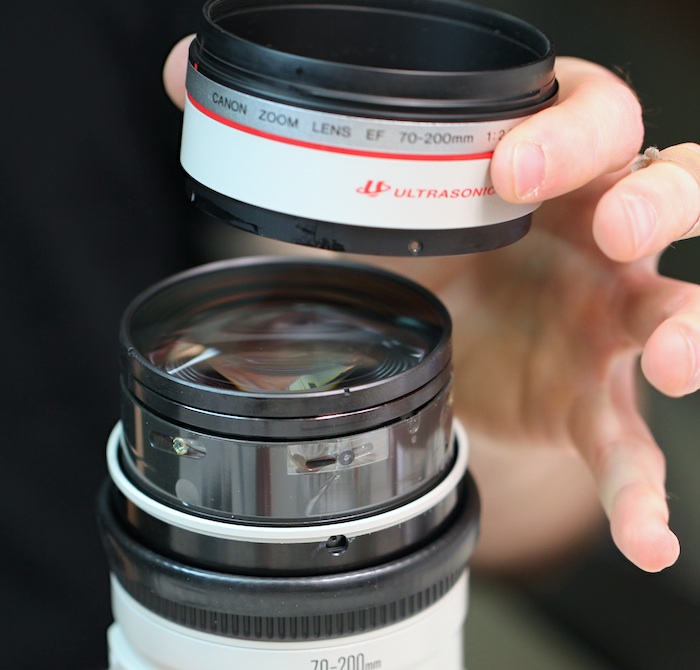
There is a layer of dust-protection / weather sealing tape around the inner barrel. Find the end and take it off.
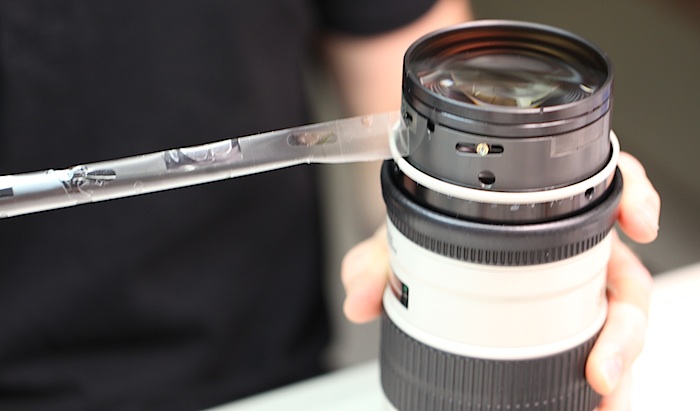
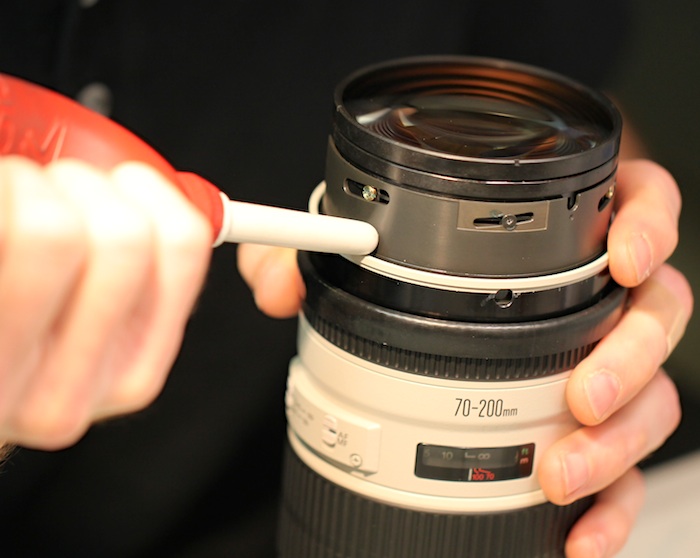
This allows you to access several openings in the inner barrel through which you can blow air to get dust out of the first chamber. Again, you won’t get every speck of dust out, but you can get most of it.
Canon 100-400 IS L front
Also applies to: Canon 28-300 IS L
Difficulty: Moderate
Let’s get this out first: You may or may not be able to get into this lens with simple tools. The screws are quite tight, glued in, and rather easy to strip. So try it, but if you find you are having trouble with the screws, quit before you strip them. You’ll need to apply a lot of downward force as you loosen them. If it wasn’t for the screws, this would be an easy one to do.
First a shot to show how various barrels line up when you reassemble.
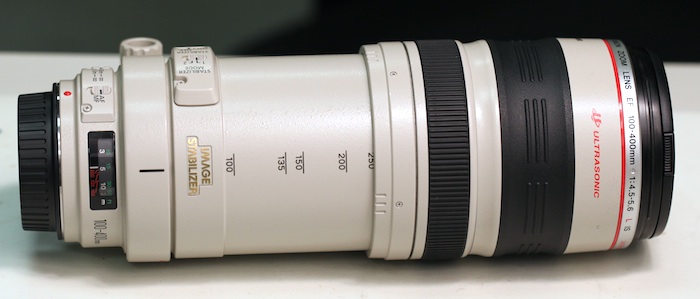
The first step is to remove the silver name ring. There are three very small slotted screws holding this in place.
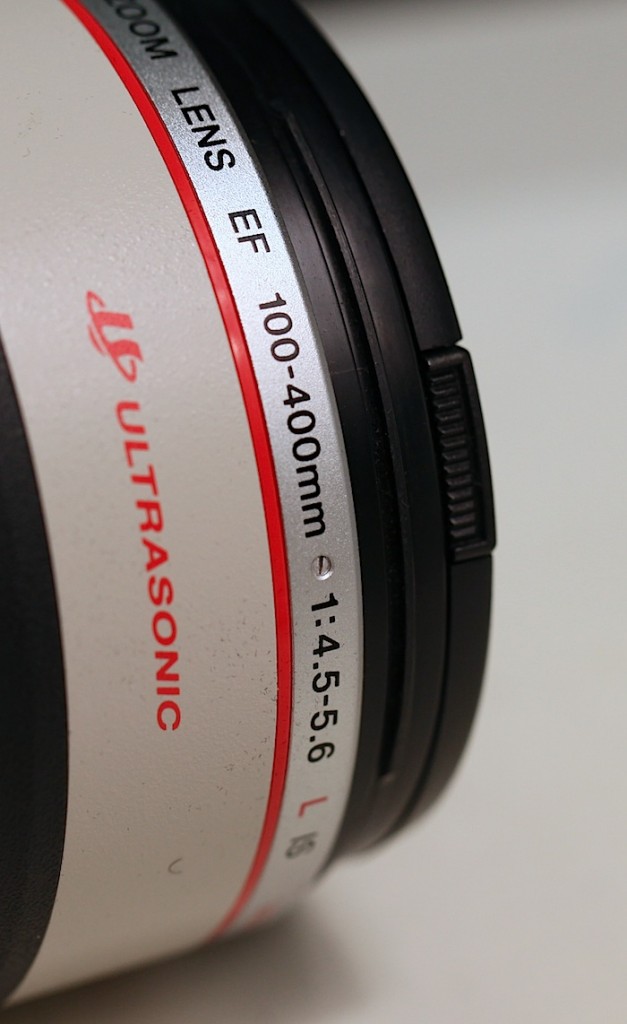
You’ll need a very small electronic flat head screwdriver (1.5mm or less) to remove these screws.
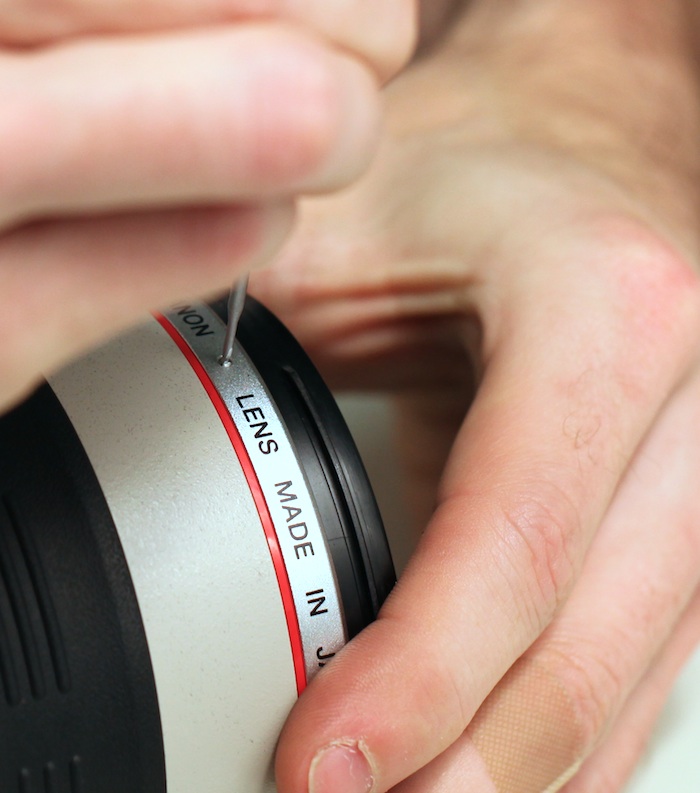
Once they are out you slide the silver name ring and the red “L” ring over the end of the lens. Under the name ring are three thick screws that hold on the filter barrel.
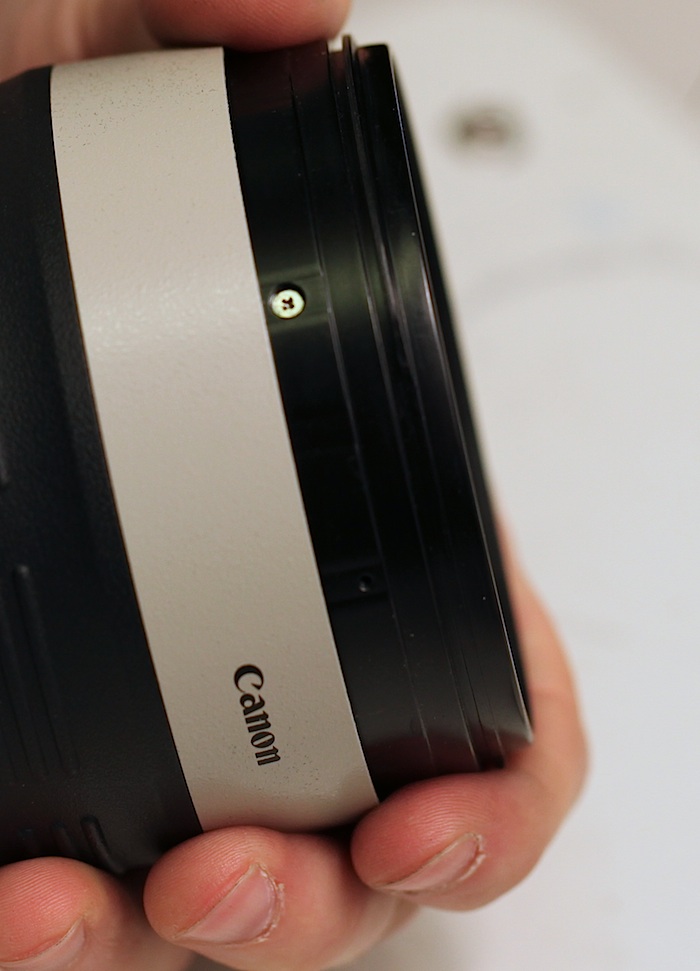
These are the screws most likely to strip. A very good screwdriver and a lot of downward pressure are the keys to removing them. If you want to be aggressive you can put a drop of alcohol on top of the screw and let it soak in to soften any glue, or touch the screw with a soldering iron tip to heat it a bit. I’d really advise, if they don’t come out easily, to just put the name ring back on and not worry about the dust unless it’s horrible.

Once these three screws are removed, the filter barrel also slides off of the end of the lens.
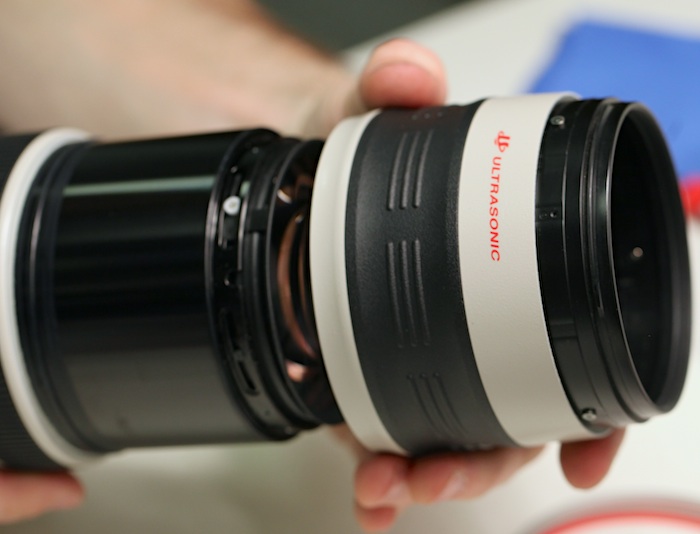
Underneath this is the focusing barrel – a single tube attached to the focus and smooth-tighten rings. It is held on by a single screw with a small brass color attaching it to the thin inner focusing ring. When you remove this hold things close to your worktable. These two parts fall on the floor and you probably won’t find them again.
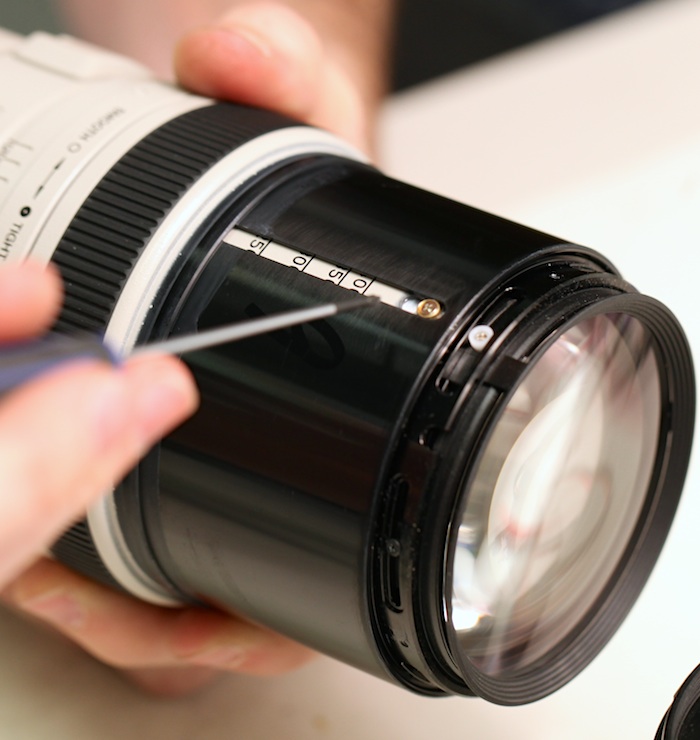
With the screw removed you can slide the focusing barrel right off, too.
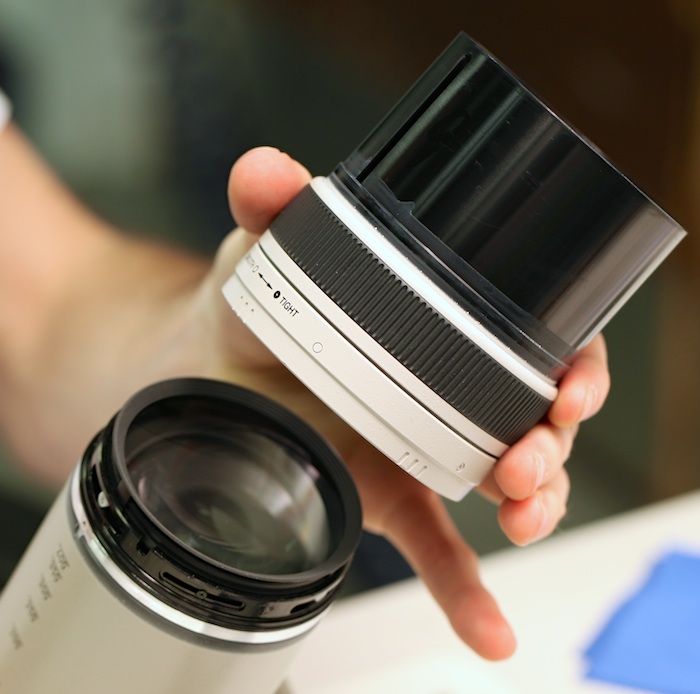
Once the outer barrels are off, you can pull on the front of the lens (not the plastic cosmetic ring on the very front, the sides, which are black metal) and extend the lens. This exposes all of the helicoid slots of the inner barrel. You can use your rocket blower at various locations and get most of the dust out of the front of the lens. (Just in case you are tempted, the element inside at the bottom of the front barrel is the IS unit. Don’t touch it. Don’t blow on it too hard.)
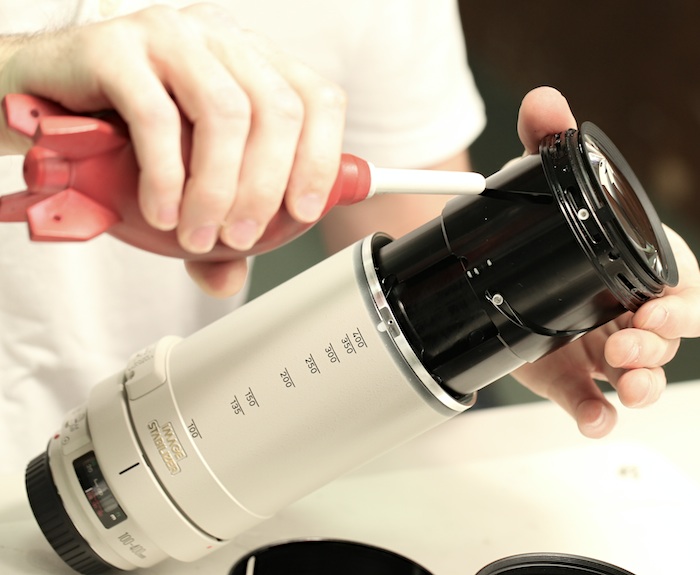
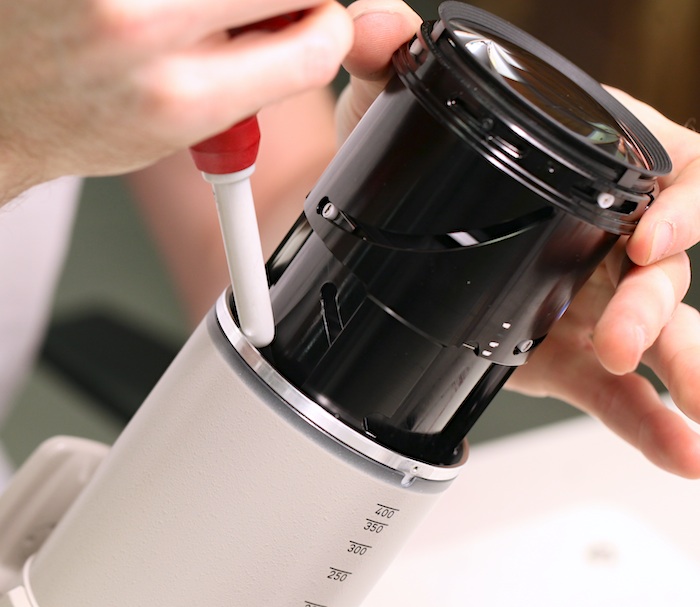
Let the barrel slide back into the sleeve of the lens, put things back in reverse order, and you’re all done. I will say reassembly is usually much easier than disassembly with this lens.
Conclusion
If you’re handy and have an appropriate lens, hopefully this will help you out. I can’t emphasize enough that dust really doesn’t impact images unless it’s really bad and you shoot stopped down. But for whatever reasons, everybody wants their lenses clean. This should help you accomplish that with at least a few of them. For a while. It will be back.
I want to emphasize again, these are the easy ones. Cleaning middle elements in any lens, and cleaning any elements at all in a lot of lenses, is complicated, time consuming, and has a lot of risks.
Roger Cicala and Aaron Cosz
Lensrentals.com
May, 2013
All images copyright Roger Cicala, 2013 except a couple that are copyright Aaron Closz.
All hands in images furnished by Aaron Closz, 2013 except a couple furnished by Roger Cicala.
Images may be reproduced IF you include credit and the article includes a link to this post.
Author: Roger Cicala
I’m Roger and I am the founder of Lensrentals.com. Hailed as one of the optic nerds here, I enjoy shooting collimated light through 30X microscope objectives in my spare time. When I do take real pictures I like using something different: a Medium format, or Pentax K1, or a Sony RX1R.
-
Eugene
-
Chris Clements
-
Vince
-
thomas
-
thomas
-
ray
-
rondhol
-
rayB
-
Bob Shott
-
Randy
-
Matt
-
Jay
-
John
-
George Griswold
-
Matthew Saville
-
Brian
-
Albert
-
jubilatu
-
SwampYankee
-
Sanjeev
-
Ivan Boden
-
Sam
-
bluto
-
m
-
asad
