Lenses and Optics

There Is No Free Lunch, Episode 763: Lens Adapters

Published September 26, 2013

Lens adapters can be useful things sometimes, letting you mount one brand of lens on another brand of camera.

One thing that has always bothered me, though, is the idea of doubling the number of lens-mount interfaces. When you look at the thick metal pieces on the front of the camera and the back of the lens, and then consider that they have to be lined up exactly parallel to the image sensor, it’s kind of amazing it works.

Although it doesn’t always work. Lloyd Chambers first reported years ago that with high-quality, wide-angle lenses you could detect very small misalignments in the camera-lens mount. Misalignment of 10 microns from side-to-side was enough to cause blur on the sides of the image. Since then a lot of other people have confirmed the same thing.

So when I hear people cavalierly talking about putting an adapter on their camera I tend to cringe. When a single camera-lens interface has enough variability to sometimes be visible, adding another large piece of metal with another mount interface seems a recipe for problems.

Don’t get me wrong. Generally, they’re acceptable or people wouldn’t use them. But I always am curious about what acceptable looks like in the lab.

Optical Bench Testing

We’ve been working a lot with our optical bench, testing large enough quantities of each lens to develop our acceptable ranges, since we plan to start adding this testing to the Imatest testing we currently use for quality assurance. An optical bench isn’t necessarily better than image-based testing programs like Imatest, but it has some specific advantages.

One big difference is that an optical bench tests at infinity (on wide-angle lenses, Imatest or DxOAnalytics may be testing at 4-6 feet focusing distance). Another is it tests the lens directly; the variability of a camera body is eliminated from the loop. There are some things a bench doesn’t do as well, too. For example you don’t get a full picture of the entire lens in one run; you get a line of data from one side to the other. You have to rotate the lens in its mount and do several lines to get a complete picture of the entire lens surface.

Since the information from our optical bench is different from the Imatest graphs I usually use for illustrations, let me go over one quickly.


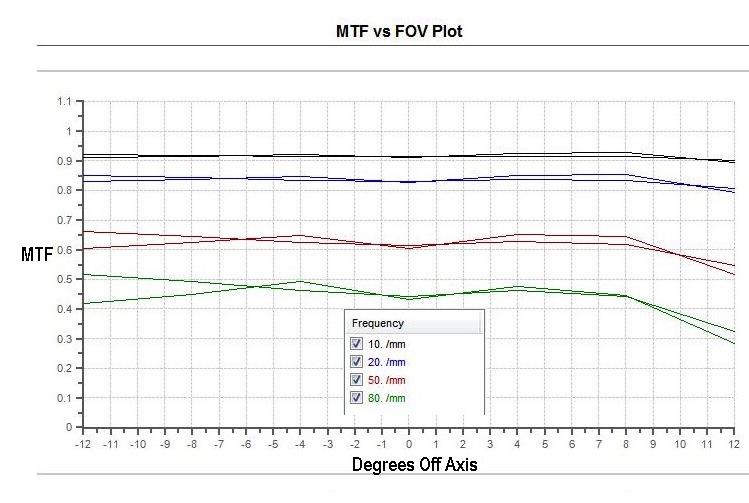
Wells Optical Bench printout of MTF by field of view and frequency.


The horizontal axis shows degrees off-center, with “0” the center of the lens. The vertical axis is the MTF reading (“1” being theoretical perfection and “0” being gray mush).

The charted colors show various frequencies. For this graph we chose to show the MTF at 10, 20, 50, and 80 line pairs per mm. Most manufacturers’ MTF graphs limit themselves to 10 and 30 or 10, 20, and 40 as frequencies. We’re including some higher frequencies just because we’re still learning about using this tool to identify bad lenses.

There are two charted lines at each frequency, one representing tangential and the other sagittal lines. When the two lines of the same color are separated, there is some astigmatism. (You don’t have to worry about the terms – just that if the two lines of the same color are widely separated, that’s not good, close together is good.)

The graph above is of a good copy of a good lens, the Zeiss 35mm f/2.0. There are some slight differences away from center with one side having a bit more astigmatism and the other a bit lower MTF at higher frequencies, but this is really minor stuff that wouldn’t show up in photograph.

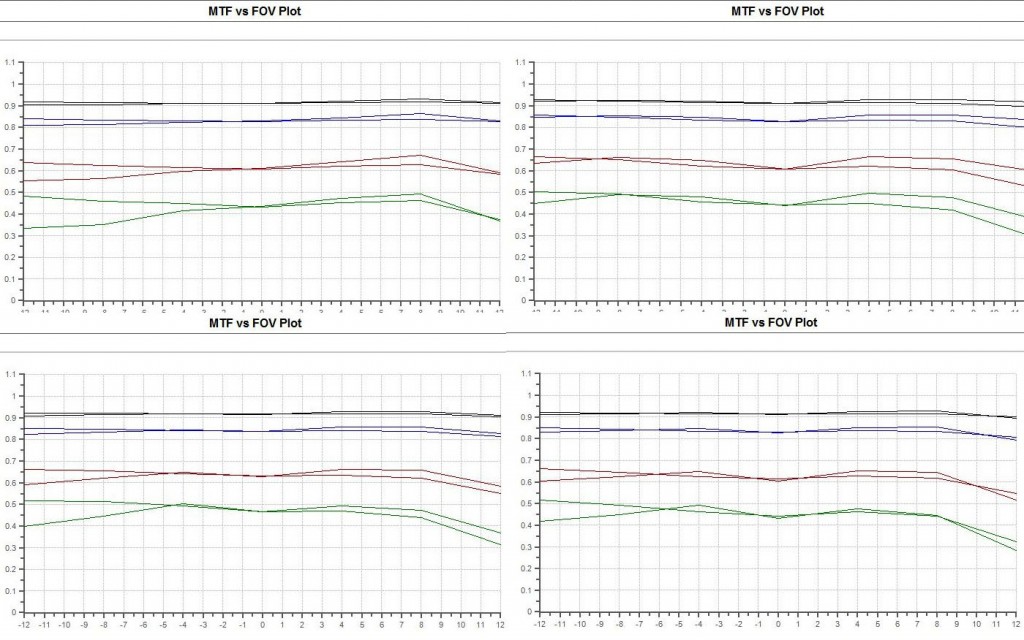
To give you a bit more experience with this kind of graph, below are printouts from 4 other Zeiss 35mm f/2.0 lenses – all of which are optically excellent as determined by Imatest and careful pixel-peeping.


Again, let me emphasize that what you’re seeing is normal (actually less than normal) copy-to-copy variation in good copies of the lens. Actual bench testing is almost like fingerprinting. No two copies are exactly the same. Notice the similarities. There is nearly no astigmatism right at the center and similar MTF values, particularly at the 10 and 20 /mm frequencies that are most critical.

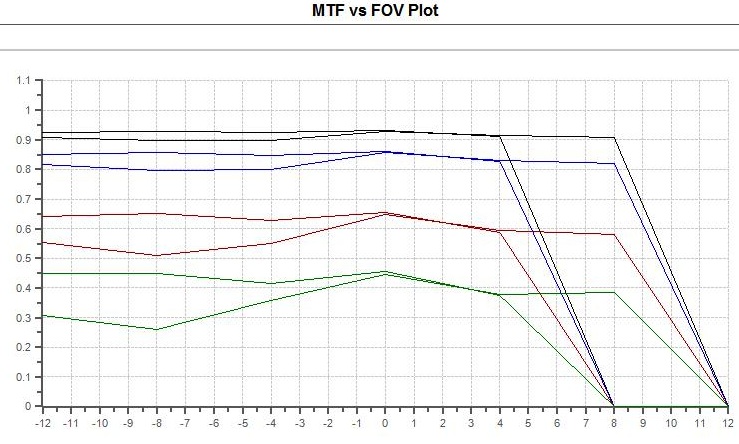
To give you some idea of what a not-so-good lens looks like on the same set of parameters, here’s one that’s not so good.

Notice this one is still quite good in the center, but has some major problems developing on the right side. The settings on the optical bench we used for this series make it look much worse than it really is. While the graph makes it look like the MTF drops to zero, that’s simply because the settings we’re using report zero if focusing distance changes greatly or vignetting become severe.  That makes a nice warning signal for ‘some human needs to come check this lens’.

Our parameters are pretty tight: the awful looking graph above actually is a lens that looks a little softer on the right side, but certainly not horrible. An online sized jpg would look perfectly fine, at 50% pixel-peeping or in a large print you’d notice it. I’ll go into more detail about what we can do with the optical bench in some later posts; I just wanted to give you a quick overview for now.

Using Adapters on the Optical Bench

One thing you probably haven’t thought about is that lenses have to be mounted on the bench in order to do these tests. That requires a separate, fairly expensive mount for each brand of lens. Obviously we had to pony up to get mounts for Canon, Nikon, NEX, and Micro 4/3 lenses. But, since I was already pretty unpopular in the accounting department, I hoped to avoid spending a few thousand more dollars to buy Leica, PL, and other mounts for lenses that we have a lower number of copies of.

I knew adapters might cause a problem, but thought, since we carry so many copies of various high-quality adapters, I could certainly find a few that were accurate enough to use. Once again, Roger’s assumptions were way off base. I won’t bore you with dozens and dozens of test results. But I’ll show you a good example. In this case, we took the lens in the upper right of the 4 examples at the top of the page and tested it on a number of Nikon to NEX adapters. Here are 6 examples.
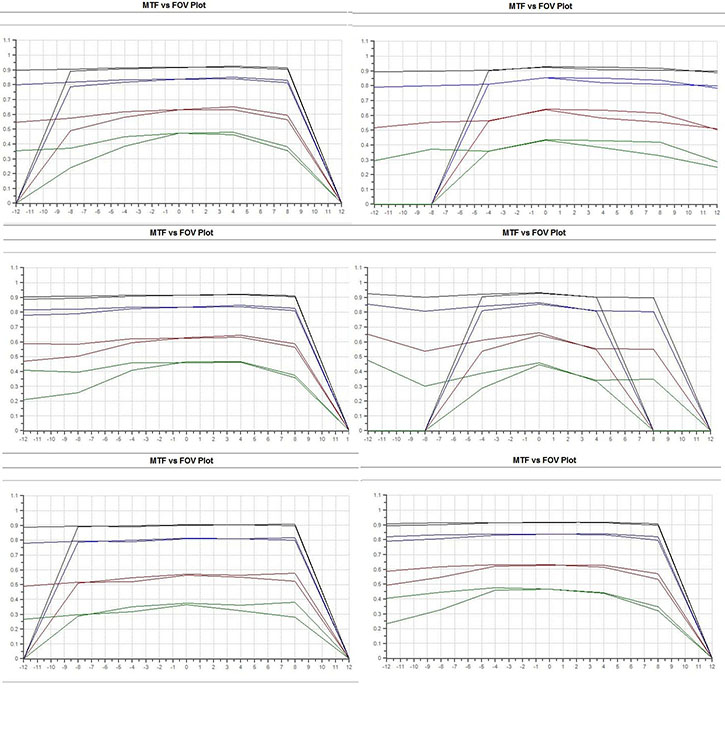
I won’t bore you with another 20 graphs that look pretty much like these. We tried Leica to NEX and Leica to Micro 4/3 adapters, Canon to NEX, etc. We tried different lenses on one adapter. It didn’t really matter. None of them would be acceptable for testing. Not one.

I’ll point out that we carry only name-brand, fairly expensive adapters, not eBay $29 adapters. All of them are tested frequently and used frequently and none of the ones I tested today had any problems. Still, not one of them would be acceptable for testing, so I guess I’m going to have to order those expensive lens mounts after all.

What Does It Mean in the Real World?

Like a lot of laboratory testing, probably not a lot. Adapters couldn’t all stink or people wouldn’t use them. Like a lot of tests, you can detect a very real difference in the lab that doesn’t make much difference at all in the real world.

Videographers are the primary users of adapters, and probably won’t notice the problems at all. Video and cinema cameras shoot at lower resolution (even 4K video) than photography and tend to concentrate on center-frame so they’re unlikely to see a problem.

Even photographers who use adapters are often adapting a larger format lens to a smaller format camera (Leica full-frame lens to Micro 4/3 or APS-C camera, for example). Assuming the lens is higher quality than a native lens they would otherwise be shooting, they might be perfectly happy. Still, I should point out that I  only tested these 35mm lenses out to +/- 12 degrees (their field of view is actually +/- 30 degrees). Even on a Micro 4/3 camera, the lens would have a field of view of +/- 15 degrees what we see here at 12 degrees should be noticeable.

In the examples above, though, center resolution is pretty much unchanged, it’s only when you get away from center that you start to see issues. So someone shooting portraits and centered subjects is unlikely to notice an issue. A landscape photographer, though, would likely see some problems along the edges of the image.

Putting a great lens on your camera via an adapter might still be better than an average native-mount lens. On the other hand, that great lens certainly wouldn’t be as good as it would be on its native-mount camera.


Roger Cicala

Lensrentals.com

September, 2013

Author: Roger Cicala

I’m Roger and I am the founder of Lensrentals.com. Hailed as one of the optic nerds here, I enjoy shooting collimated light through 30X microscope objectives in my spare time. When I do take real pictures I like using something different: a Medium format, or Pentax K1, or a Sony RX1R.

Posted in Lenses and Optics
  • Responding to what Morry Korman said:
    “I wonder how the old Tamron adaptall lens mounts fared…”

    This reminded me that in my comments above, I forgot to add that my 28-135mm f4-4.5 Tamron SP Adaptall II was also surprisingly good on MFT throughout its zoom range (although OOF areas in photos were often somewhat “strange” in appearance). I also forgot to say that infinity-focus with both adapters I use let the adapted lenses focus beyond infinity (but I consider this a minor problem since I focus adapted lenses using the available high-magnification manual-focus mode available on the camera body).

  • Tony Wong

    Very interesting initial findings. I’m hoping you can do a quick test/article on the strength of the mount and amount of deflection it can handle when a heavy lens is mounted on the camera.

    For example, would there be any visible image issues or deflection damage that could be caused by allowing a heavy lens (like a 400mm prime) be lifted by the camera body (lets say a 1D series) instead of the lens foot?

  • C Fynn

    This has implications for those who plan to use lenses with an adapter on the rumoured full-frame mirrorless cameras.

  • Michael Rose

    Perhaps this is too simplistic–
    1) Is it possible to learn what the correct Height (/Thickness) of a given adapter should be?

    2) If it’s too thin, then send it back and get another one…

    It would be possible to create ‘shim’ of the proper thickness, but I’m not sure where you could fasten it to the adapter?
    You would probably have to put it under the lens-side (F-bayonet)flange or glue it on top of the camera-side (M-bayonet) flange

    3) If it’s too thick, then shouldn’t it be possible to carefully ‘machine’ it to ‘evenly’ reduce the thickness, thereby correcting it?

    HTH

    PS Machining could be simple as a piece of 800 grit (or finer) sandpaper or crocus-cloth taped to a piece of plate glass, then oscillate and turn the adapter a ‘few’ times, and measure– repeat as necessary!

  • This is interesting, especially all the comments on how this doesn’t really track with real world results. Long before mirrorless people have been adapting lenses. It seems to me that mirrorless cameras improve upon this by allowing live preview at the aperture to be used, with magnified focus on the sensor.

    I wonder if one could see the softness of an adapter with focus peaking turned on, or if this is subtle enough to not even see it then?

  • Roger Cicala

    Anthony, these are physical mount adapters only, no optics.

  • Lobalobo

    Interesting report, but … Shooting landscapes with the sort of camera that most attracts adapters, such as m4/3 is an inherently imprecise practice, particularly if hand held. Doubt the lens adapter is going to make much difference. Shooting landscapes with a large format (or medium format digital) camera on a tripod, then yes, I can see caring about every ounce of sharpness (to mix metaphors), but does anyone use adapters for this?

  • Are these optical correction adapters, or just physical attachment adapters?
    i.e. optics or air inside the adapter itself?

    I ask because there’s a lot of adapting C-mount, B4 mount, and a lot of other lenses to Micro 4/3 and the vast majority of adapters are physical only. It’s unclear whether you’re testing physical adapting errors, or optical errors.

  • Carson Harding

    I was surprised when the issue I encountered with Leica to MFT adapters was with planarity, but with simple flange distance. Infinity was off in 3 out of 4 adapter brands I tried. And not pixel-peeping off, but visible-on-the-EP1-LCD-screen off. The first I tried was so far off zone focusing was impossible. The most expensive one was good enough. Putting them on the desk and looking at them edge on, the differences in thicknesses were visible.

  • Stephen

    OK, I see. Not infinity. There’s still something suspicious (in terms of it might be external light) about the shape of those curves. It might help to see the shape of the curves when calculated less finely and see if they are more rounded or have more relationship between tangential and sagittal.

  • Roger Cicala

    STephen, it’s not infinity. We set up a range of +/- 60 microns of focusing in each direction. It went outside of that, not to infinity.

  • I wonder how the old Tamron adaptall lens mounts fared in this bench test. There are still many around being used. I have a 17mm SP Tamron that I still use on a Pentax D100. I would rate it as not outstanding but quite good especially at F8 or F11.

  • Thank you very much for this testing, Roger. It confirms what I thought I had been observing for a long time. Having a substantial inventory of Leica lenses I have naturally attempted to mate them to NEX and Olympus m43 bodies with adapters. Although the most expensive adapter brands did make some difference in image quality it was not significant. Simply put, as only one example, a $7,000+ Leica 24mm Summilux casts a markedly inferior image on a NEX-7 compared to the E-Mount Sony/Zeiss 24mm with 1/7th the price.

    So in the end I decided that the inconveniences of adapting these costly lenses to other bodies was simply not worth the effort. The dirty little secret today is, of course, that today’s cameras actively compensate for the optical properties of the lenses they recognize. That, plus autofocus, make native lenses the right choice for today’s advanced cameras.

  • Stephen

    It seems to me that the adaptor tests where astigmatism goes to infinity on one side suggest a problem with your testing methodology. Also, do I understand correctly that you are saying that a lens which is soft on the right, when rotated 180 degrees is still soft on the right (that is, the other side of the lens)? If so, it looks like you may have a large enough light infiltration problem that the adaptor results could be showing glare on the inside surfaces of the adaptors.

  • This article may explain some things I found when adapting many Nikkor (and other) lenses to Panasonic MFT bodies. Oddly, lenses that generally performed well to the full-frame corners at optimum stops when used with film and when shooting infinity-subjects (see: http://www.donferrario.com/ruether/slemn.html) often would not cover sharply the full width of the far smaller digital MFT frame under the same conditions(!). This was true for most lenses shorter than 50mm (such as 20, 24, 28, 28PC, and 35mm), but longer lenses generally performed well everywhere in the MFT frame except when used at the widest stops (where they often performed well on film). Notable exceptions were the Nikkor 16mm *f3.5* fisheye and the 12mm f5.6 Voightlander lenses, both of which performed surprisingly well to the frame corners on MFT when used at f8.5. The Nikon-to-MFT and Leica-screw-to-MFT adapters used were cheap, but performance appeared not to relate to those so much as to the
    lenses themselves. Perhaps the quirks involved in using digital sensors with lenses designed in the film era has something to do with the above…?

  • Roger Cicala

    ssam – sometimes. It depends on the degree of tilt and if there is also a decentering element. Notice some of the results affect both sides.

  • Roger Cicala

    Craig, I don’t have any cheap adapter’s to test. We were using mostly Novoflex and Fotodiox adapters in this article.

  • Roger Cicala

    Craig, that was wide open, and I agree, stopping down would probably eliminate a lot of what we see.
    Roger

  • Oh, one more thing — unless I missed it, I don’t think you said what f-stop you test at (I would guess you test lenses wide open), nor do you indicate whether stopping down will improve performance (I would think it would, since it will increase depth of focus). The wonderfully sharp pictures I mentioned in my previous comment were mostly shot at f/8 and focused at infinity or the hyperfocal distance, at focal lengths ranging from 20mm to 300mm. Would this have been sufficient to eliminate softness caused by an imperfectly-aligned adapter?

  • This is very interesting. Still, I have to say that I’ve gotten some of my sharpest digital images using adapters. I went to Yosemite in 2010 and shot mostly with a Canon 5D Mark II using Nikkor F-mount lenses with a Fotodiox adapter. With the best lenses, such as the Nikkor 85mm f/2 AI-S and the Nikkor 28mm f/2 AI, I was getting images that looked amazingly sharp even at 100% view on-screen — even better than I usually got using auto-focus with L-series Canon EF lenses. The corners were less perfect, but still very good; and it’s hard to be sure that the adapter was to blame, since most lenses are better in the center than in the corners. That being the case, while I’m sure your measurements are legit, I have to agree that they probably don’t mean much in the real world. It would be interesting to compare the same lenses on Canon and Nikon full-frame DSLRs of similar resolution; that would show whether the adapter was noticeably worse than the native mount.

    What I was hoping for in this article is something I didn’t get, which was an assessment of which brands of adapters tend to be better, and quantifications of the differences. The $29 eBay adapter from Hong Kong probably isn’t as good as a Novoflex or a Fotodiox, but how much worse is it? (Then there’s the OTHER problem with cheap adapters, which is that some of them are very poor mechanically — either the fit is noticeably loose, or the bayonet mount doesn’t lock, or worse, you can’t get the lens off the adapter, or the adapter off the camera…)

  • Fred

    The real life equivalent of this test is taking a photo of a large painting on the wall at f2 aperture and seeing the edges slightly out of focus. With a live view finder, when a photos of any 3D object is focused on some part of the object within the frame, that part will be exactly in focus. For example, a portrait at f2 of a face in the left or right half of the frame should be fine if focused in composition rather than moving the camera and focusing at the center of frame.

  • Bill Layman

    Roger,

    PLEASE do this test on some Olympus MMF-3 (4/3 to micro 4/3) adapters. Many of us are planning to buy several (very expensive) Olympus 4/3 lenses for our new Olympus E-M1 bodies. You could save lots of people a lot of heartache if you showed us the effect of MMF-3 on Super High Quality Olympus lenses.

  • Helene

    Roger, is it possible for a test on a cheap eBay adapter? It would be a real eye opener if its graph was similar, but not worse, than the expensive adapters.

  • ssam

    I presume that if your adapter is not perfectly aligned it causes the plane that is in focus to be miss aligned. Similar to using a tilt+shift lens. If you took one of the examples where the resolution drops on one side, and refocused it could you get that side sharp? Is the miss alignment really only a problem if you shoot flat surfaces straight on?

  • Roger Cicala

    Steinar, I don’t disagree. But I think, given the number of ‘but what about this combination’ comments, that it served a purpose.

  • Roger Cicala

    John, I don’t see any reason it wouldn’t be, but we haven’t tested that combination.
    Roger

  • Steinar Knai

    Roger, thanks for all your good reports, but this one to me lacks substance and your conclusion is totally predictable, even without research. However, since your other reports really are eye-opening, you are excused. Entertaining blog, as always.

  • John M

    Would the results be the same for a Canon L lens used on the Canon EOS M with the Canon M adapter?

  • Peter

    There are two thing I’m curious about:
    * How does this mash with the very nice numbers for the SpeedBooster adapters? Those ought to have the same alignment issues, plus optics?
    * How about the Sony LEA1/LEA2 adapters? Those are the transition path from Alpha to E-mount? If my lenses stop working well if I change to E-mount, I’ll be sad.

  • I will add to my previous comment that my tests may not be able to catch tilt issues, since I look at corner sharpness in stills taken focusing at the corner.
    I have “focus plane” tests too, where I focus at the center and look at the top-right corner resolution, but that’s just one corner, the results are not posted online, and I must admit I don’t look at them as much as I should.

Follow on Feedly