A Peek Inside the 6D
Of course we had to do it. We tried limiting ourselves to some size comparisons with the 5D II and 5D III.
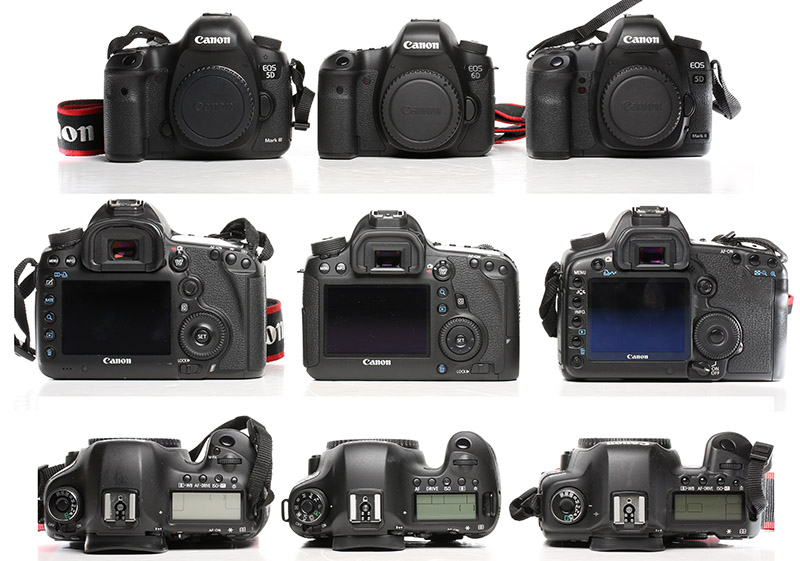
So, yeah, the 6d is smaller and all. But that wasn’t quite what we wanted to see. So, as is our habit, a few screws here and a few screws there and … .

Disassmebling
One thing was noted right away. Where the other Canon cameras tend to come apart in modules (you can take off the back, or take off the front, etc.) the 6D was a bit more interconnected. To get the back off required removing the sides and a bit of the bottom for example. A bit of a pain for the exploring types, but I would imagine it also gives more structural support.
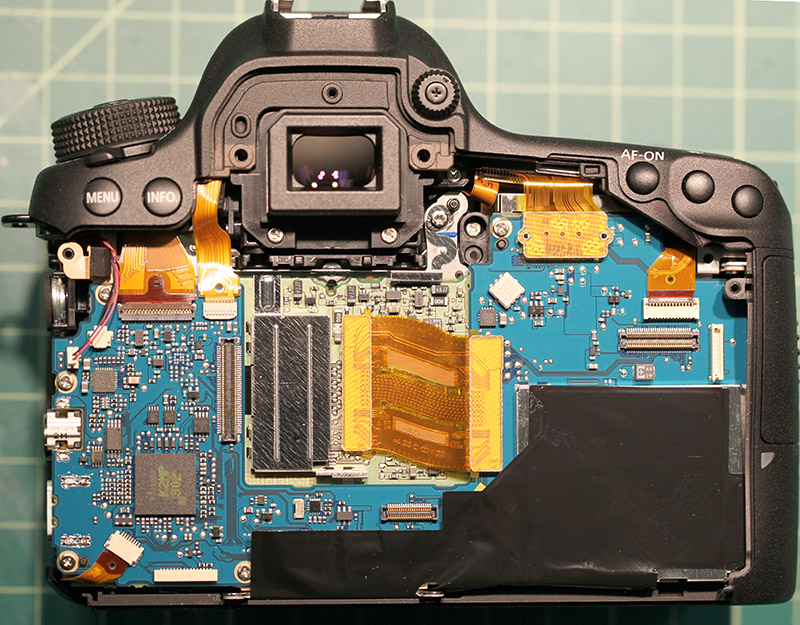
The body is basically plastic, but like most modern plastics it’s thick and solid. Never a thought that a screw was going to strip out during disassembly. Anyway, after a bit the back was off, and looks, from the inside, pretty similar to all the other Canon backs.

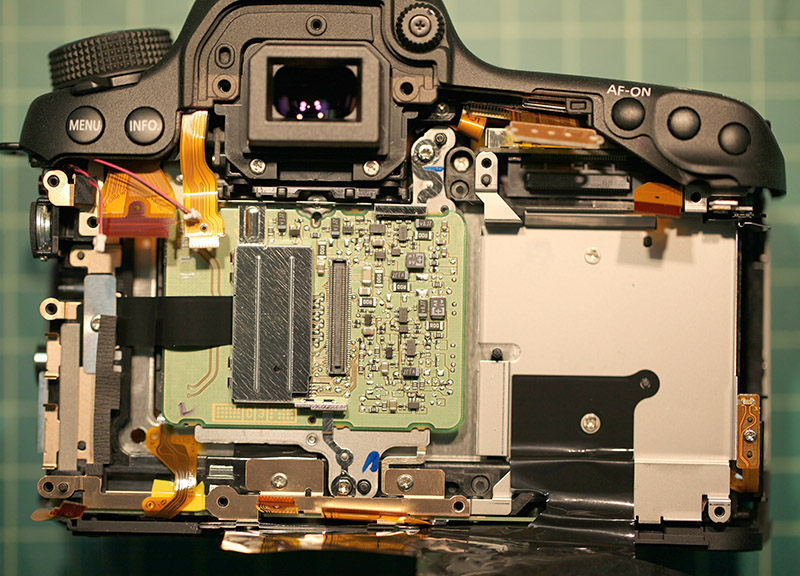
Back to the back of the camera, things are nicely laid out. Flexes have short, neat runs. The shield tape in the lower right isn’t just laid on top, it runs around to the bottom and sides of the assembly for 1/2 inch or so. Under the tape is both an aluminum shield and then a soft rubberized shield. It seems a lot of attention is payed to electrical isolation.
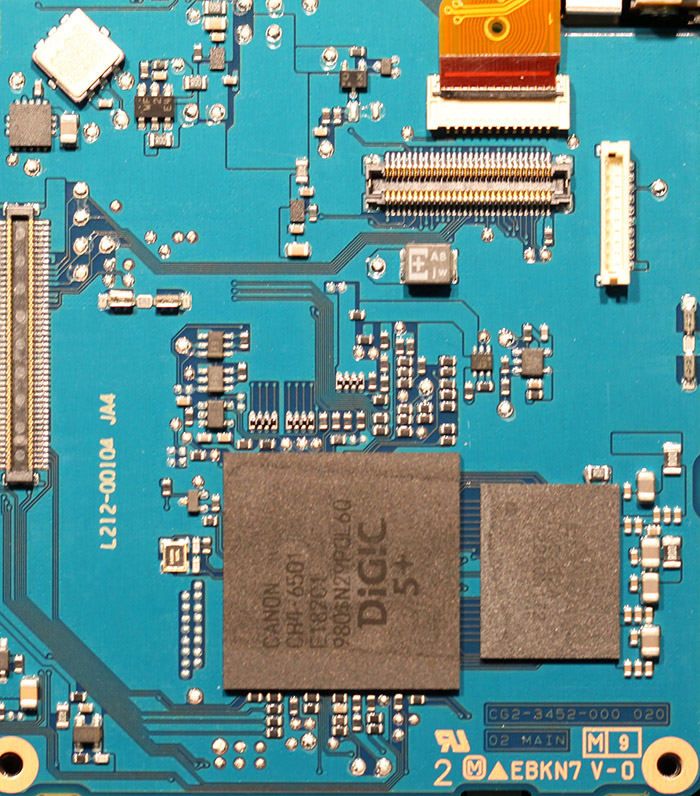
For the electroGeeky among us (you know who you are) a chip close up so you can tell us what the various chips are. I’m way too far behind today to look them all up.

And removing the shielding on the right side shows us that hefty Digic 5+ chip and a companion.
The SD card slot is affixed to the underside of the PCB, along with a few other chips.
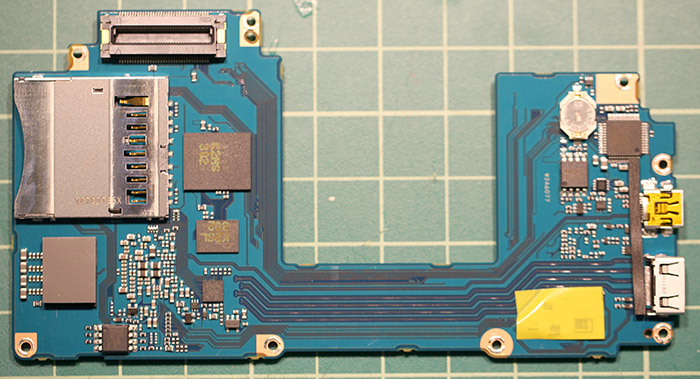
That appears to be the date-time battery over on the right, so you won’t be taking it out to do one of those ‘hard resets’ so often spoken of, yet so rarely successful.

Underneath the PCB, you can see how clean and nicely laid out all of this is. No long wire or flexes running hither and yon, every connection exactly where it needs to be when the board is reseated, and more metal shielding almost entirely separating the circuitry back here from the magnets and motors up front.
And, of course, none of this makes a bit of difference when you go out and take pictures. But I always like seeing nice clean engineering, and this is another example of it.
RogerCicala
Lensrentals.com
November, 2012
42 Comments
stevo ·
Thanks for posting. Where is the sensor?
Roger Cicala ·
Right beneath the circuit board in the center of the deeper teardown shot.
Patrick ·
Out of curiosity how does the 6D compare size-wise to the 60D? When Canon announced the camera they said it would be comparable.
Roger Cicala ·
Patrick,
It seems about mid way between the 5DII and 60D in size, but weight I think is about the same as the 60D.
Jim ·
Thanks for this geeky look. I have been using the original 5D since 2008, bypassing the Mark II and III. I look forward to hearing your impressions once you have spent more time with the camera.
Andre Recnik ·
Thanks for the post!
How would you say the weather/dust sealing looks on this camera? About the same as the 60D, the 5D2, or the 5D3?
Roger Cicala ·
Andre,
More like the 5DII than the 5DIII. I saw a more electrical shielding in the 6D than in other cameras though.
Yue ·
How much of the body is actually magnesium alloy?
Roger Cicala ·
Yue, the back half is mostly plastic. There appears to be a metal skeleton that reinforces most of the screws and separates the back half from the front.
Andre Recnik ·
I’ve caused a few old (~10 years old) Sony cameras to go on the fritz when near a cellphone. So I imagine having a WiFi radio in the body requires some extra internal shielding.
AlexDROP ·
Check out http://camerasize.com/compare/#100,312 for dimensions comparison. Hope it helps to feel the difference.
Ralph Conway ·
Thxs Roger. Do you take one with you and shoot some image samples over the weekend?
MayaTlab ·
Is it reasonable to make the hypothesis that the additional shielding comes because of the Wifi and GPS functions ?
Roger Cicala ·
Maya, that makes perfect sense. I don’t know, of course, but it’s certainly logical.
thomas ·
I am looking for a serious comparison between the 2 new FF cameras, 6D and D600. not none of this fan boy nonsense. I am in the market for a DSLR and looking for an objective review. What are your thoughts on the two cameras.
Roger Cicala ·
Thomas,
I’m no reviewer but I can say I’d be happy with either camera. If you already have a lens set, I’d stay with the brand you have and not read the rest of this.
If you’re starting from scratch, I think the Nikon sensor is clearly a bit better. Historically Nikon flash system has been, but Canon seems to have caught up there.
Other than that, I’d also look at specialty areas if any are pertinent to you. For example, Canon has better tilt-shift lenses. Certain lenses may be better in one system than the other. The Nikon 14-24 is clearly the best wide zoom. The Canon supertelephoto’s are a lot lighter to carry around, etc.
On the other hand, Nikon service is horrid and Canon’s is quite good. Most people think “I’ll never need that” up until the day they drop a camera or lens. But it can be critically important. We’re seeing a number of pros, who must have their equipment always available, change to Canon just for that reason.
So if you’re starting from scratch and have no specialty needs, I’d make the recommendation based on Canon’s better customer support. That’s sad, really. 3 or 4 years ago I would have said just the opposite.
Jack Zyberk ·
Rodger, Thnaks for all your articles which I find excellent.
Could you make, with your capable eyes, a quick assessment of the noise and DR? I’m sure there are many awaiting the news.
Thnaks again.
Roger Cicala ·
Jack, I can’t really. I haven’t done enough shooting to say from images and our testing setup isn’t able to do that. I’m like everyone else, I’ll wait for the reviewers to let us know the important stuff.
Neenowhia ·
Any problems with this new camera that plague the previous models, e.g., banding, light leakage, hot pix, etc?
Scott ·
Please look into how quickly it grabs focus in dim light, and whether the focus-assist lag people say is a problem on the 5D3. You have probably read the strings on CR and other places talking about that. I am very interested in the 6D, but this would be important to me.
-Thanks!
Carl ·
Roger, great pics of the disassembly!
My own opinion…I think the 6D will sell well, but like many others, I’m disappointed with a few things, like the AF sensor, the plastic body, the viewfinder…I could go on. Roger and others really need to test the claimed low light center point AF performance. If it’s not on par, if not clearly a bit better than that of the 5D3, then that’s a problem. The advantage Nikon obviously have, is they didn’t have to spend time and money designing, developing, and producing the sensor. They just pick it up off Sony’s shelf, and slap it in. However, if Canon decide to aggressively price the 6D to where it’s always $100 to $200 less than the D600…6D sales might soar into the stratosphere, at least for a while. For me, the true test for the value of the 6D will be, is it worth buying it as a stepping stone to a 5D3 or other up-market Canon body? Just how low will prices for this body go on the used market? The 5D2 on the used market is currently around, what, $1250+ ? If you see a good number of 6D bodies on the used market in summer 2013 going for under $1150, then frankly I don’t see the wisdom of using this body as an affordable alternative to the 5D3…unless of course those bodies were bought new for a much lower price than the “initial” $2099. Just my own thoughts, maybe I’m wrong.
juan ·
Hi Roger, in all places about 6d is written magnesium alloy body back and front, but reading your disasemble i uderstand that really it is not true.
Thnks
timon ·
Now Canon so addicted to black tape in large area using, too bad.
In past, Canon have ever had the best electronic process design, no so much black tape abused.
The black tape are able to be replaced with black flexible film, and fixed by screws together. (There were already screws existing)
Though other cameras or old Canon cameras also have some tapes, but it never abused like so much, merely in poor Pentax excepted.
Daniel ·
Hi Roger, i’m looking to use one of these Mosaic anti-aliasing filters with it.
http://store.mosaicengineering.com/
The area around the sensor, would you say it was closer to the 5dmkii, 7d or 60d in size and shape?
If there’s not one of these for the 6d specifically in the works i’ll be looking to improvise something with one of the existing filters. Thanks
Roger Cicala ·
Daniel, I believe it’s a slightly different size than the others.
Daniel ·
Thanks, from the photos I it looks quite close in size to the 5dmkii, perhaps close enough to experiment very carefully with the adapter intended for that camera, though the ones for the smaller sensors are a lot simpler in design.
Wideshot ·
Roger, about the first picture on this post (the one with cameras side by side) – is it made by you ? One week after your post, someone else posts the same thing and I wonder about foul-play 🙁
The culprit: http://www.product-reviews.net/2012/12/06/canon-6d-vs-5d-mark-iii-and-6d-internal-review/
Roger Cicala ·
Thank you, Wideshot. They have, indeed, copied my photo. Nasty email sent.
Regards,
Roger
photovit ·
The front and back parts of the body are indeed made of magnesium, please look at: http://www.engadget.com/gallery/canon-eos-6d-hands-on/5290675/
This should prevent any flexing of the body, when heavy lenses are attached.
Ron G ·
Did you attempt to reassemble, and if so, did it work? Looks like you would have been successful….
Roger Cicala ·
Of course on both counts, Ron.
Carlos Taylhardat ·
I am considering the 6D or the Sony
ThomasTCG ·
Gee thanks for that. I’m sure I will now take much tighter compositions, with more dramatic lighting, and less extraneous detail, now that I have studied these circuit layouts. Learning the complete circuit diagram, if you can post that too, will surely help me get the evening saturated orange colors on my prospective D6. Seeing these circuita has convinced me that the 6D is as good as fuji velvia on 35mm, but not on MF or 4X5, is that right??
Javier ·
You guys didn’t take apart anything! All you did was pull off the back cover and the PCB. That’s like pulling the vga card on an old PC and saying you took it apart! How sad!
Anisotropic ·
Thanks for the disassmebling. Did you realize, where is GPS chip?
Ching ·
Please kindly confirm the materials used for the base of the camera if its stainless steel or “engineering plastic”. Thank you very much
Jim ·
Jim! Can you please tell me if you used JIS screw driver or Philips to disassemble – and what sizes?? 0? 00? THANKS
Jim ·
Can you please tell me if you used JIS screw driver or Philips to disassemble – and what sizes?? 0? 00? THANKS
Roger Cicala ·
Jim, JIS and you need #00 for certain. A #000 can be sometimes useful, but isn’t necessary.
Roger
Jim ·
Thanks again Roger. I just tried to disassemble; but had a terrible time. I could not remove the face plate. I peeled back the grips and removed what I thought were all the screws on the sides/plus 3 in front; but there seems to be a “trick” or a secret screw particularly giving me problems at the bottom right side (near the battery area). I don’t want to force it. Do I have take out the screws on the bottom plate as well just to remove the front faceplate.
Roger Cicala ·
Jim, you do – at least the ones near the front. The rule of thumb is if you see a screw, remove the screw.
Jim ·
Thank you Roger.
By the way – do you think the 6d is on par/better/worse the 5d2 in regards to weather sealing? Mine got soaked in a rain storm for about 20 mins and has basically died (shttr is shwing err). I dried it off quick but still no joy. Trying to take apart as last effort to clean with contact cleaner.