The A7R teardown: A look inside Sony’s awesome full-frame mirrorless camera
- Do not try this at home. This post was made by semi-trained, semi-professional repair technicians who sort of know what they’re doing.
- The following blog post contains graphic images of the inside of a very nice camera. If such things make you squeamish, don’t read further.
- No cameras were harmed in the making of this blog post. The camera has been fully reassembled and is functioning normally.
Yeah, We Had to Do It
Ever since we first tested a Sony A7R, we were dying to take a look under the hood. Say what you will about Sony as a company, but they create some of the most elegantly-engineered camera bodies we’ve seen. Plus, the A7R is something of a groundbreaking camera, and we wanted to see how they crammed all that stuff into its little body. Oh, and finally, we’ve wanted a closer look at how thick the cover glass over the A7R’s sensor is, since there is some evidence that it may affect the edge performance of certain adapted lenses.
But we were a bit afraid of what we were getting ourselves into. Because Sony engineers its cameras so efficiently, they tend to be difficult to disassemble, let alone reassemble. And Tyler, knowing us like he does, had probably set computerized alarms on the inventory control system, notifying him the instant an A7R got sent to the repair department for any reason. But Tyler was out sick for half a day — and there were actually some A7R bodies in stock. So we did what we had to do.
A Quick SLR Comparison
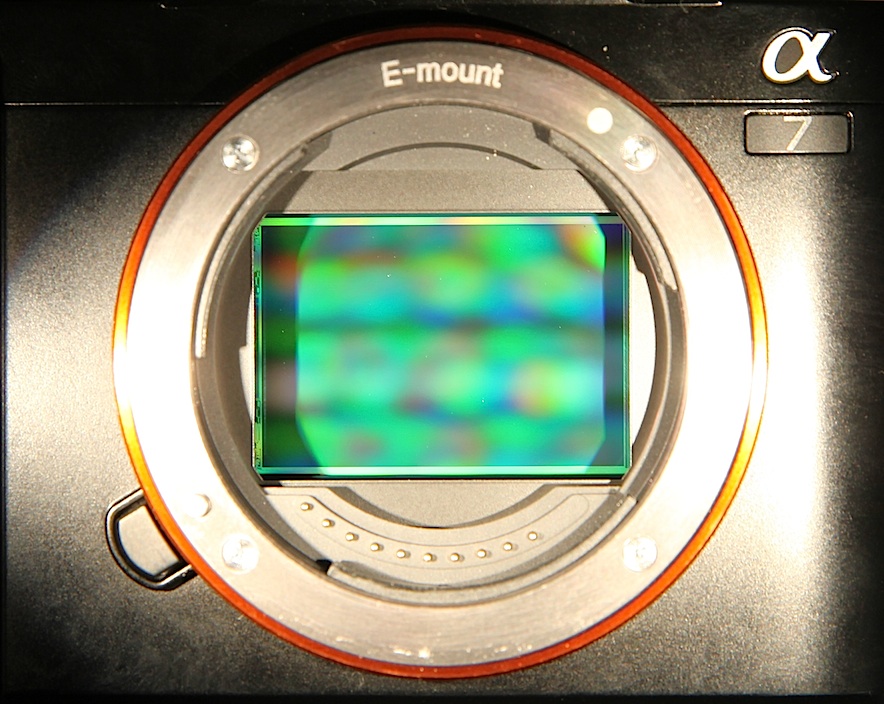
Mirrorless cameras tend to be simple and elegant compared to SLRs — in part, because they have a lot less stuff in them. Just to set the stage, let’s remove the body caps and compare the front of a Sony A7R with a Canon EOS 5D Mark II.
If you take the body cap off the A7R, here’s what you see:
Take the body cap off the 5D Mark II, and there’s a whole lot more to see.
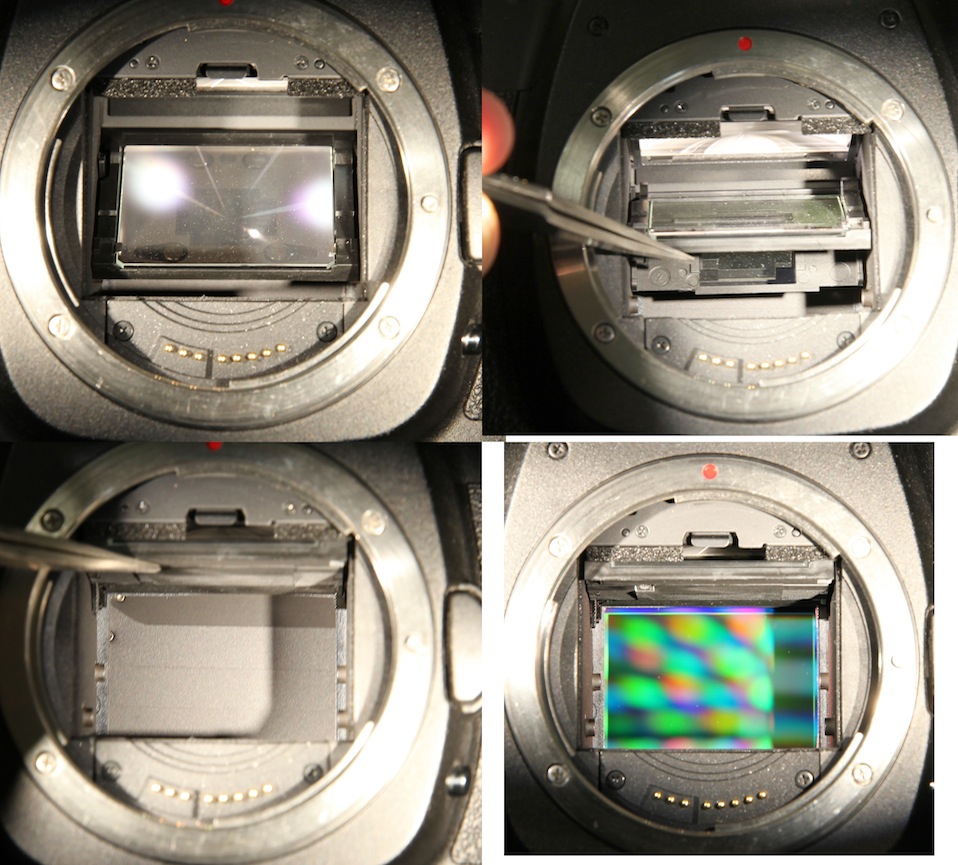
If you flip things around and look at the bottom of the mirror box, you can also see the phase-detection autofocus sensor.

This isn’t particularly important for today’s teardown, I’m just trying to show why a mirrorless camera can be simpler inside than an SLR ever could. If you’d like to compare this article to a teardown of an SLR, you might like our Nikon D7000 Teardown, or perhaps this teardown of a Sony NEX-3.
So Let’s Get To It!
As usual when we do these things, Aaron drives the screwdrivers, while I take the pictures and offer helpful comments or suggestions, like “Don’t tear that flex”. This teardown was a bit like Indiana Jones and the Temple of Doom, as we survived one near miss after another without quite destroying the camera. I’m sure my comments were most helpful.
The first trap we encountered was entirely of our own making. With almost every camera, you begin disassembly by peeling off the rubber grips to get to the screws beneath. Not with the A7R. The good news is that the A7R’s grips are completely bonded to the camera body, not held on with sticky tape, because there are no screws beneath them. They’re never going to come loose over time, unlike some cameras we know all too well. The bad news is that we found this out by spending half an hour trying to remove the unremovable grips.
Once we gave up on grip removal and started taking out the screws we could see, things progressed quickly, and the back was off in no time.

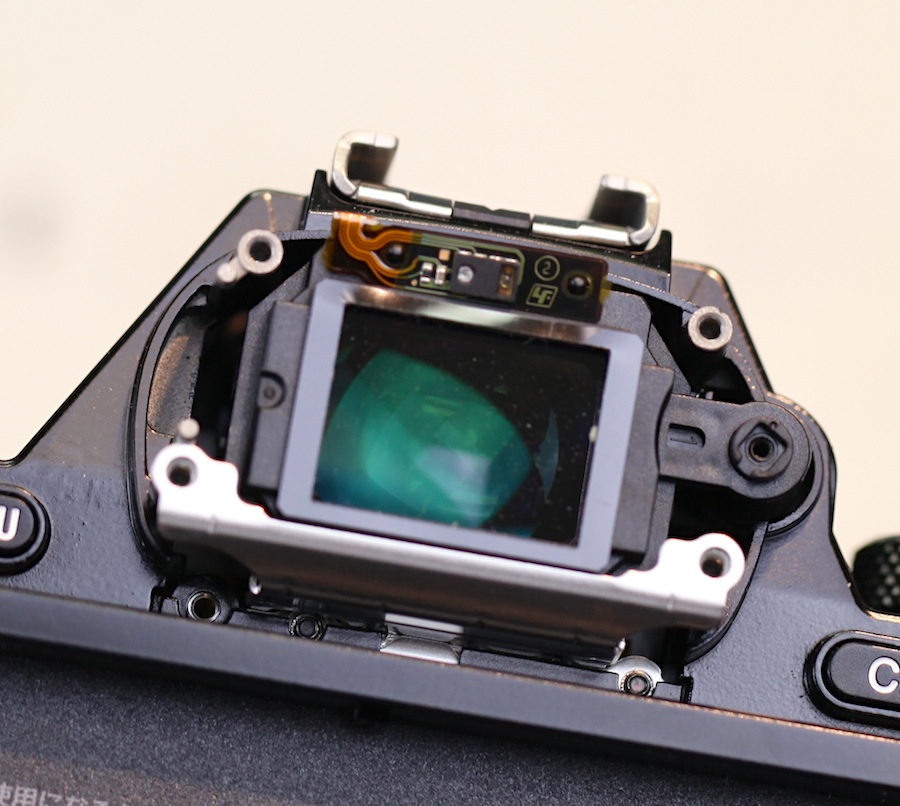
The electronic viewfinder cover came off just as easily. That’s the eye proximity sensor on the flex above the viewfinder.
A very nice thing — and one that’s quite typical of Sony engineering — was that there were only two different screw sizes used thus far: one size for the casing, and another for the EVF cover. A typical Nikon or Canon camera has four to seven different screw sizes by this point.

Back to the camera. With the back plate off, the LCD assembly is now exposed.

Removing a few more screws frees the LCD to be lifted up, showing the single large flex that connects it to the main PCB.

The LCD assembly is a very sturdy piece of metal that is totally rigid, even when taken out of the camera. That may seem inconsequential, but LCDs get pushed and pulled on quite a lot. When they’re weakly mounted, as we’ve seen on some very pricey DSLRs, they can get quite loose or even bent into the camera a bit.

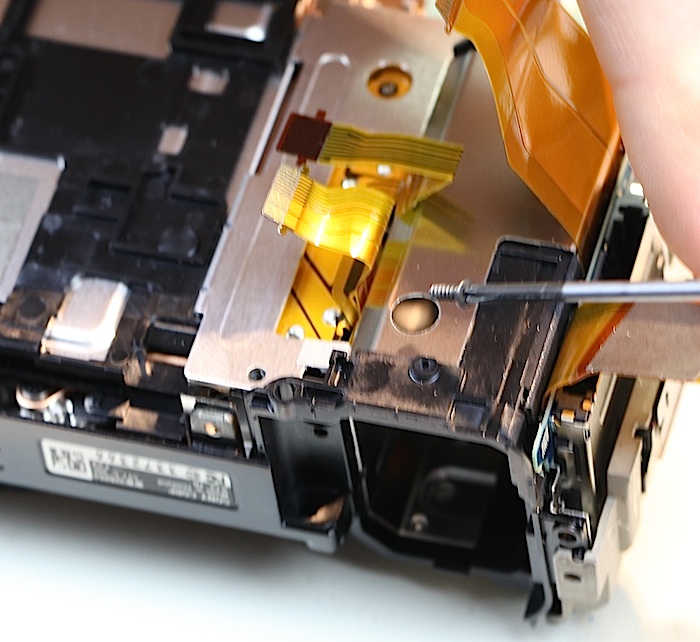
Near-doom adventure number two came as we started to peel back the thick shielding tape over the main PCB. On the right side, there are several flexes under the tape that badly wanted to tear themselves as it was removed.

But the tape came off without any major mishaps, showing a typically clean Sony layout. All flexes are arranged to have the shortest possible runs, with no wires winding across, around, or under the PCB as we see all too often in other brands. There’s even a nice little cutout to let the PCB on the bottom left come up through the board, rather than making it 10 times longer so that it can wind around the edge from underneath.

The nice layout continued as we lifted up the large flexes on the right, showing smaller flexes laid neatly under the larger ones, rather than winding their way around them. The lower flex leads to the memory card slot.

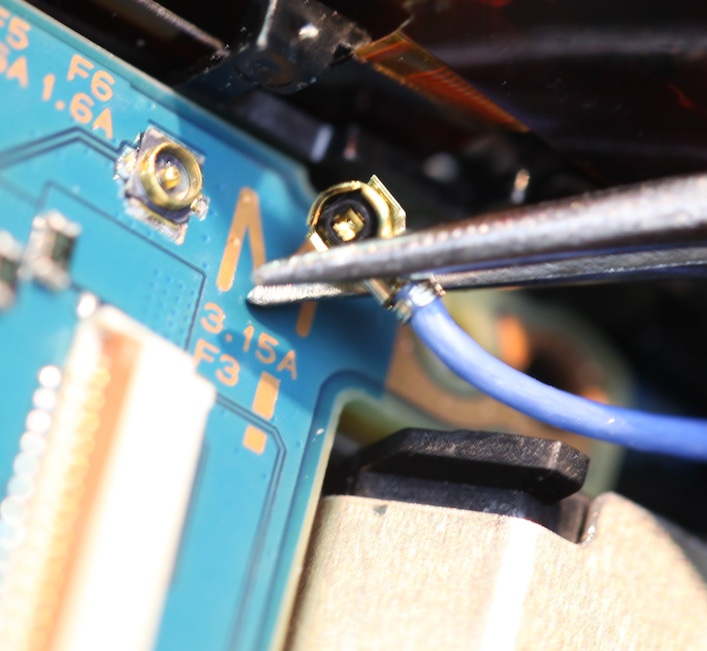
And a repair guy’s dream: That blue (I assume grounding) wire has a neat little snap connector, rather than being soldered to the board.
Disconnecting all the flexes lets us lift up the PCB, showing the input connectors and a couple more flexes coming in from underneath the board.

At this point, we thought we’d reached a dead end. The PCB was out, and so were all the screws, but neither the top nor the front would come off of the camera. We pried. We cursed. Finally, we realized that we’d been working so long that our caffeine levels were probably too low, so we went and had some coffee. And a snack. Once we came back, Aaron immediately discovered the Secret Screw of Sony, hidden away at the bottom of a hole in the right side of the camera.
Once the Secret Screw was removed, the grip came off. With the grip off, the top came right off. And at last, the deepest secrets of the A7R were ours!

For completeness, here’s a picture of the top assembly. This can be disassembled further, but reassembling it is another matter. (This is why when you break a button on your camera, the repair is usually listed as ‘Replaced top assembly’. It’s cheaper to do that than it is to pay someone to spend hours reassembling the multiple flexes and buttons in the top assembly.)

The Nice Surprises
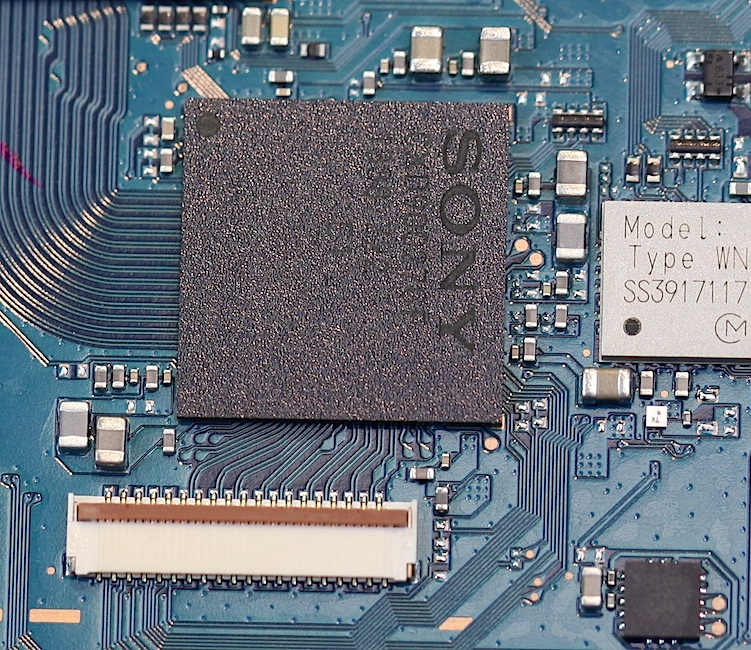
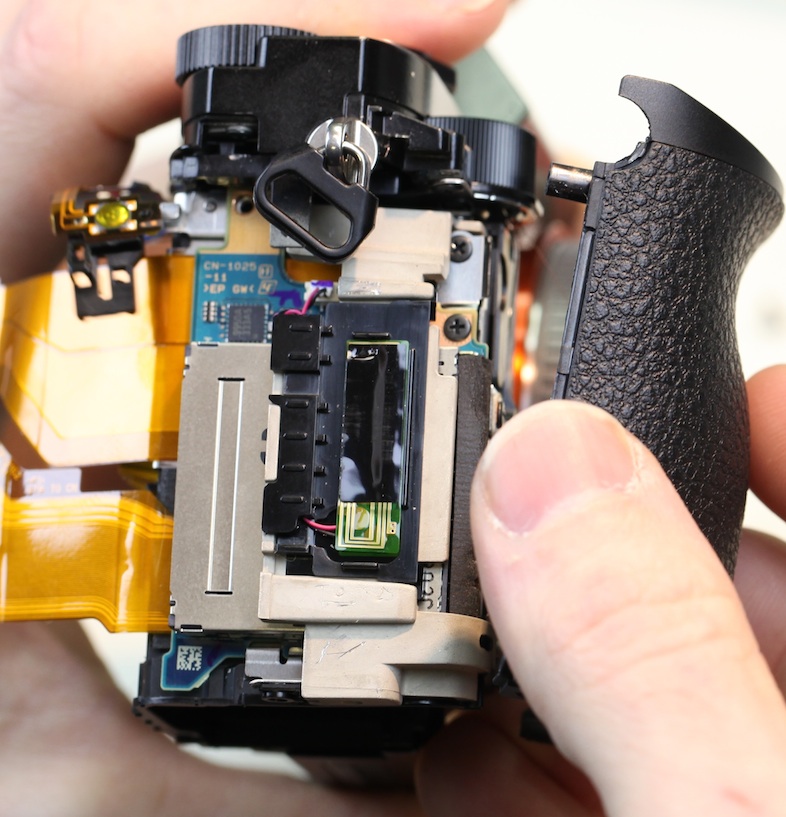
With our disassembly down to the core of the camera, things got even better. We had now exposed the back of that big, bad sensor, complete with heat sink tape and copper sink / shielding. (By the way, if you wondered who made the A7R’s shutter, now you know.)

A couple more screws, and the sensor can be removed from the main mount of the camera, exposing the shutter.

Note that the sensor doesn’t mount to the shutter. It mounts directly to the metal chassis of the camera, with shims in three locations to make sure that the sensor is properly aligned to the lens mount.
![]()
The simplicity of the design becomes easier to see with the shutter removed, and only the metal chassis of the camera left.

The sensor is mounted and shimmed on one side of the metal chassis, as indicated by the red arrow. The lens mount is attached directly to the other side, marked with a yellow arrow. There’s nothing else that needs to be calibrated or aligned.
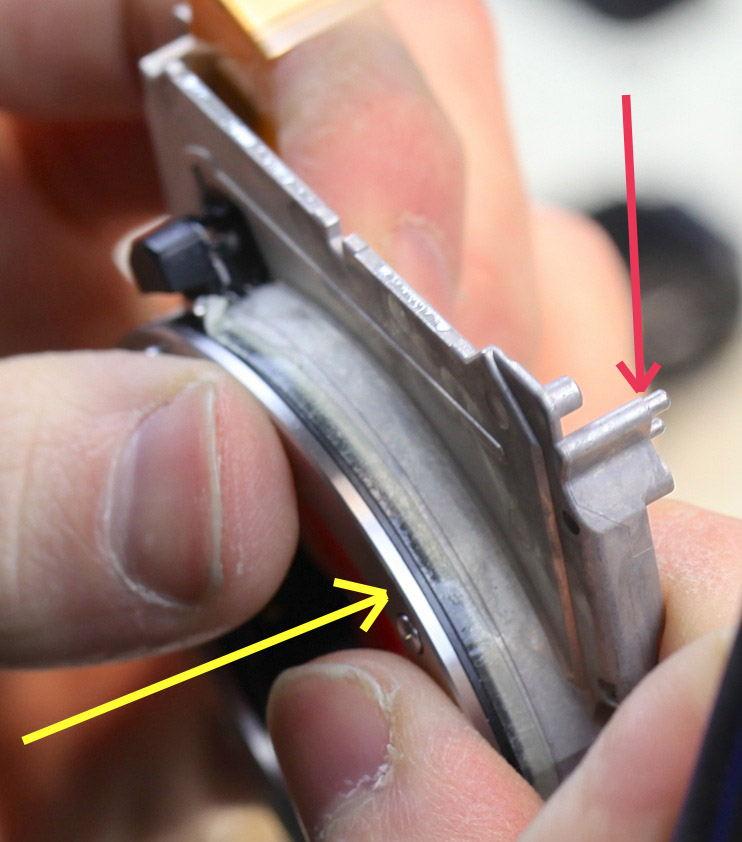
Compare that to the pictures of DSLR mirror-boxes at the start of this article, where there’s a lens mount, two mirrors, an autofocus sensor, the main image sensor, and the focusing screen, each of which must be aligned and calibrated to the other.
The Sensor
The sensor assembly is a nice, self-contained unit. One thing that was immediately apparent is that the cover glass on the sensor is held onto the assembly with three strong clips.
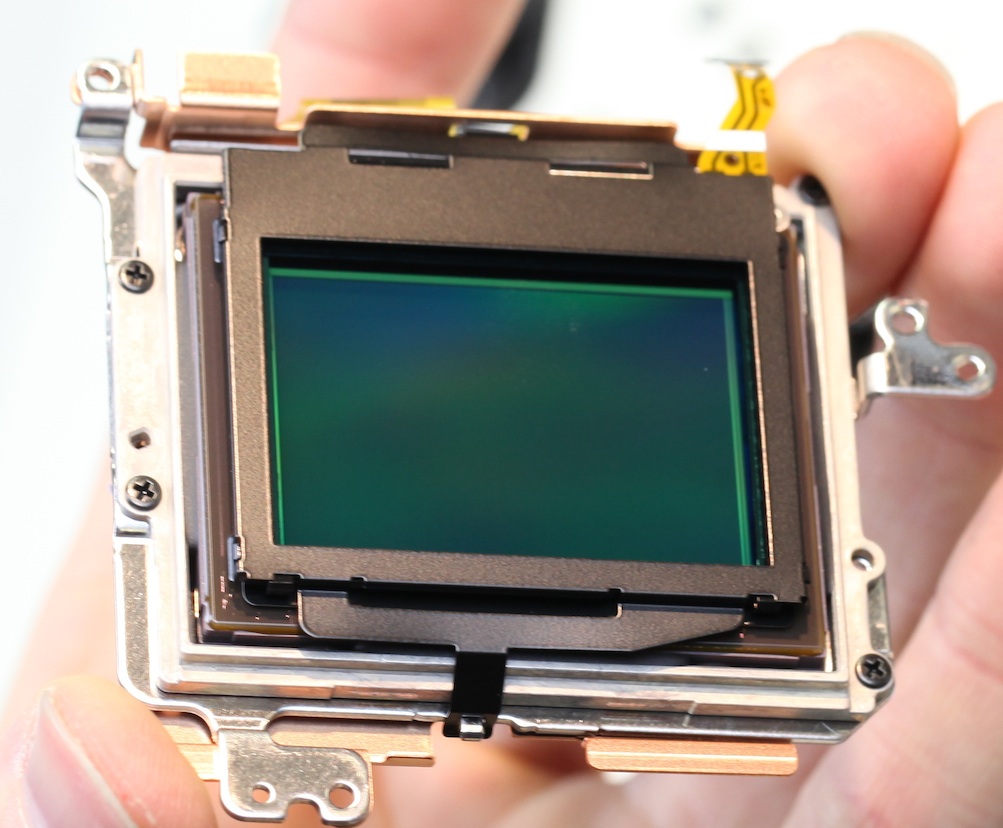
It does seem that — in theory, at least — replacing a scratched cover glass might be done without a complete sensor assembly replacement. Not to mention that there has been some discussion regarding removing or replacing the cover glass, possibly improving performance with adapted lenses in the process. I can’t say for certain, but it appears this should be a simple matter. But the clips didn’t pop off easily and we’d already pushed our luck with this camera enough, so we decided not to force the issue.

One Last Image

This is rather amazing. The completely disassembled Sony A7R consists of about a dozen major pieces, held together with 29 screws of just three different sizes. A typical DSLR has around 120 screws of 11 different sizes. You might not care less about that, but do you know what I thought about? How much easier it will be to fix this camera when it breaks. How much simpler it must be to perform all the calibration that must be done during assembly. And how much simpler it must be to assemble the A7R in the first place. In other words, how much cheaper it must be to make this camera, than to make a DSLR.
Roger Cicala and Aaron Closz
Lensrentals.com
Jnauary, 2014
Addendum: The A7r cover glass was about 1.5mm thick, compared to 0.75mm for a Canon 5D II.
87 Comments
John Leslie ·
I don’t think the blue wire is a grounding lead, more likely the WiFi antenna feed. Looks like a PCB waveguide coming off it. Nice job BTW 🙂
eths ·
OMG…
The blue wire clip looks a little like a coax connector, so I would also guess that it is a RF connection.
ScottyP ·
Oh, the humanity!
Sggs ·
Wonderfull!
I love to know the intimacy of machines, even if it seems a litlle risqué. But, at the end, how thick is the glass over the sensor?
Billy ·
Would you, pretty please, do a tear down of an X-Pro 1, X-E1, X-E2, or X100S? There is endless debate about the manufacturer of the sensor hidden beneath Fuji’s X-Trans CFA and you could spare the Internet endless arguments!
David ·
I love these strip-downs and have an A7R on order right now…
BTW, you can do these tear-down analyses but you cannot spell January :))
Joe Fotosiamo ·
Not gonna lie, that was pretty epic. Mine is coming on Friday and I can’t wait to use it!
Nqina Dlamini ·
Wow, you guys have strong stomachs. Just thinking of the number of things that could go wrong made feel a little dizzy.
Sweet design.
Slav ·
This pretty much clinches the economic case for mirrorless over SLRs, doesn’t it?
ScottD ·
you can knock Sony for a few things but production engineering is rarely 1 of them as this shows again.
rrr_hhh ·
The A7r is apparently to cameras what the Swatch are to the watches !
Well done Sony and thanks to Lensrentals for this interesting teardown.
PS : did you try this with an Olympus E-M5 ? I would like to know whether they are as clean as that !
pixelbart ·
I work in the software development business and I really started to love clean and elegant designs. My experience is that designs like this are only possible if the designers aren’t restricted to budgets and deadlines. Just put the brightest heads in a room with a minimal specification and wait what they come up with. That’s the only way to create a good and solid base product that has the flexibility for the marketing department and the other designers to add bells and whistles or to make a low budget version. Because in the end, the product must sell in a rapidly changing market.
SLR’s, just like most products, have had way too many incremental updates. I’ve once torn apart a Pentax *ist DL and found a film camera with electronics built into it. You could basically see the place where the film sprocket used to be, filled with electronics and wires and flexible PCB’s all over the place. It would be a nightmare to have to add features to such a monstrosity. But on the other hand, being able to do just that is a valuable talent that shouldn’t be underestimated. For the same reason as the previous paragraph: making sellable products is job number one.
A clean internal design is a strategic asset, not a selling point.
Peter ·
I cringed reading this.
Want to know the difference between semi-trained, semi-professional repair technicians and fully-trained, fully-professional ones?
The latter wear latex finger cots or gloves. If you’ve ever accidentally touched a sensor, a sensor cover glass, any of several OVF/EVF parts, etc. with your fingers, you know how easy it is to ruin.
Good teardown otherwise. I like the sensor protective glass. Do many cameras have that?
Roger Cicala ·
Peter, that’s an interesting observation. They do use them in assembly and to make publicity videos. But anyone who does this kind of stuff and doesn’t know to keep their fingers off of GMRs and other oil sensitive parts shouldn’t be doing it. Personally, I can’t afford the tactile loss that gloves give. I need every bit of feedback I can get to avoid stripping screws or tearing flexes.
Jon ·
Thanks Aaron & Roger, for having the wit to do this.
What are your thoughts on the environmental sealing of the A7R against rain/condensation water ingress?
Roger Cicala ·
Jon, I can’t say I’m totally impressed. Positives would be fewer screw holes, fewer pieces making up the shell, and an overlap of about 1/4″ in the lips of the plastic shell pieces. But I saw no watertight gaskets, etc. I won’t be taking mine out in anything other than a light mist. But then I don’t take any camera out in anything more than a light mist without covering it with a baggie or something.
Roger
BdV ·
Impressive job! I expect I might also be able to do this, with a near 100% certainty it won’t work after reassembling.
fiatlux ·
The a7 (not R) is said to be more forgiving with 3rd party lenses. Would it have a thinner glass cover?
Richard ·
Nice work, Roger & Aaron!
Nice engineering by Sony.
However, Sony should have mounted the external(i/o) connectors on a small board linked to the main PCB via a flex (an additional cost of perhaps $3 at the most). Then, when the i/o connectors get ripped off the PCB, replacement of the complete main PCB will not be required. Repair then would be quick and cheap. But alas, do they care? Cheap and quick to manufacture is what makers are after.
Richard
Roger Cicala ·
Richard, I agree, but then that applies to every manufacturer: they all mount connectors on the main board, soldered rather than in a chip holder, so any connector failure is always a PCB replacement.
Markus ·
Would be interesting to know if sth. like the OM-D E-M1 is also built around this sort of a ‘middle chassis’. If you look at pictures of the bare magnesium OM-D E-M1 body, at least to me it looks more like a front half and a back half screwed together (‘clam design’). Or are these parts usually also screwed onto a middle chassis?
I also thought, the A7r is the one with metal front and back while the A7 uses more engineering plastics?
Cheers,
Markus
P.S.: This post is really great, a lot of fun and highly interesting and it just makes VERY clear what a lot of peaople have already stated:
The days of SLRs as the mainstream cameras are over, simply because of complexity and alignment issues.
hades_ow ·
What do you do with these cameras after? Do you sell them as new, or refurbished on ebay?
Roger Cicala ·
Hades, this one will remain our testing camera for a while, just to make sure it’s perfect, then it goes back into the rental fleet.
GK1128 ·
“The A7r cover glass was about 1.5mm thick, compared to 0.75mm for a Canon 5D II”
Is it possible to remove the cover glass and fix the red shift problem for some rf lens ?
How about A7 ? is it possible to replace the cover glass on A7 with A7r one ? (without lpf)
Roger Musson ·
I’m curious to know what’s inside the EVF “hump”. Is it empty, or does it serve some purpose. Many people believe these humps are cosmetic only, to make the camera look like a dSLR.
Roger Cicala ·
Roger, it covers the EVF – you can see the EVF on the last picture and it fully fills the ‘hump’.
Samuel H ·
Seeing this, it’s clear that mirrorless is going to eat the market in just a few years, for everything except maybe wildlife and sports (depending on how on-sensor phase-detect AF evolves, and given that the size advantage of mirrorless goes away when you have a huge lens attached anyway).
Rory ·
Observing your home made arrows reminded me when, back in the day, I had to work for a living and I did a lot of documentation. I discovered a screen grabbing utility called Snagit, which includes a nifty editor to tweak the screen grab. The editor includes nice arrows and text and is very easy to use. Not sure if this is your cup of tea or (more likely) you know all about it, but thought I would pass it along.
Thanks for all your good works!
Phfatcat ·
You guys are too cool. You’re like a gunsmith, except for cameras…
AND, you are funny…what with the warnings posted up there at the beginning of this piece…
PLUS, you even got all those parts back together and made the camera work again?? That’s the part I could never get right…either too many parts left over, or several go missing…
ANYWAY, you guys are good! And entertaining! Vegas, Baby…
Deaner ·
Hmmm, will we see A7Rs converted for IR if the disassemble is relatively straight forward and the sensor cover seems to be accessible. Or is the filter elsewhere in the sensor stack.
I would also be curious to see how the construction of the A7 sensor stack compares, where is the AA filter.
KeithB ·
Billy:
The sensor is just a chip with no packaging. Since Fuji probably designed (layed out) the sensor to the foundry’s design rules, so there is no guarantee that the foundry’s name is on the chip. In fact, it could say Fuji, even if they don’t fab it.
Peter ·
I do know to keep my fingers off of oil-sensitive parts. I’m not always successful.
On a sidenote, with regards to shielding (perhaps more related to NEX than here), it does not help reliability; mostly, it nominally prevents interference with other devices. EMI is basically voodoo. You design a piece of electronics. You take it to TUV to do testing, and drop $50k. TUV tells you it didn’t pass. You add some EMI gaskets, ferrite beads, and swap out copper for aluminum. You do some in-house testing, say a prayer, and resubmit. You do this until it passes. Once it passes, you ship. Perhaps, if you make a million units, you try to redesign for lower cost at some point, and then ship, but it really has to be a lot of money. Each EMI test is big dollars.
How EMI ends up in testing really has to do with things like:
* Luck
* Whether signals are differential or single-ended
* Phase-of-the-moon
* Length of wires and how well boards are grounded
* Exactly where TUV happened to place your box relative to their machines, and whether they left a wrench out.
* If you smeared your clocks to spread out the spectrum.
* Etc.
I’ve never seen a company do additional shielding beyond what’s needed for regulatory compliance. Except in a lightning storm or maybe near a defibrillator, I’ve also never seen it impact reliability.
Roger Cicala ·
Peter, that’s interesting about the EMI part. I had imagined it to be more realistic and scientific. And I guess I’d assumed (that one always burns me, too) that it was more important for interference.
Mark ·
Great article.
I know Copal makes most of the shutter assemblies for todays cameras but are there any other suppliers of focal plane shutters? Does anyone still make their own?
EricE ·
Tyler needs an assistant (Guido) who’s been issued Shoot-to-Kill orders to protect his inventory…
MikeS ·
Thanks to you both for an informative and entertaining piece.
cpceter ·
Sony have been making high-quality, reliable yet repairable, COMPACT electronic devices for many decades so this strip-down offers no real surprises from an engineering point-of-view.
Sounds like the other guys are still playing catch-up.
Paul B ·
Roger and Aaron–thanks for letting us see the “innards” of the A7.
Great stuff!
Paul
Wiebe ·
Nice, with this teardown in hand it should not too much trouble to convert one for Infrared! it looks to be no more tedious than the NEX-6 which I also thought is neatly built. I am looking forward to see someone a an IR conversion (or if someone sends me a body I will and post a full report…:-) )
JTB ·
I dropped mine on the ground. Don’t try that. The mount became loose, but the camera still worked fine. I hope it’s not mine you have “repaired” 😉
Greg Hoyle ·
You guys are amazing. I took apart an old film camera once–with some electronics. Absolutely destroyed it in the process! Gives me great respect for your skill. Thanks. This was fun.
BenC ·
This makes me really curious about the sensor alignment process. It seems like it must be somewhat trial and error based. Perhaps they start with just the lens mount chassis, add three shims of equal thickness, place the sensor on them, attach the sensor lead to a test harness, temporarily secure it against the chassis, and then expose the sensor to a projected test pattern. The test harness analyses the image and recommends a different combination of shim thicknesses. The assembly person then swaps out the shims and repeats until it is “within spec”.
Max ·
Roger, any further info on the sensor glass scratches you reported about a month ago? Is the A7r more sensitive to these ?
Roger Cicala ·
Max it doesn’t seem to be, we haven’t had any more. The one thing I do have to report is the first one came back from Sony – and they gave us a new camera, saying they found a problem with that sensor’s glass. That’s amazing – I’ve never had any company do that before.
Charles ·
You mention that the top assembly is especially delicate in most cameras. I swore off Sony after the two control dials, close to if not on the top assembly, on two A700s went into intermittent malfunction. I paid Sony’s U.S. camera center for repair; it lasted about a month. A good number of other users report this dial problem on the Ax00 dSLRs.
Francis E. ·
Your shot of the logic board shows the “rechargeable internal battery”, marked ML621, at top left near the undercaffeinated thumb. This is the one Sony says keeps the clock running when you take the main battery out, and which takes a day to recharge if you let it run down by storing the camera without a battery in it.
They use the same scheme in several other cameras, including the RX1. And, as here, it is not user-changeable. Now we know that it is not a magic Sony battery, but a stock 33c part. Some quick research reveals that this is a manganese lithium rechargeable battery, but I have no idea how long it is supposed to last (in years) before it has to be replaced – and the camera dismantled to do so.
I guess (i) you know how to do that now, and (ii) you won’t keep the cameras long enough for it to be a problem. And I guess an interesting question for you would be whether the cameras should be stored with the main battery in or out.
me ·
Who is going to put it all back together?
How many “extra” pieces will remain at the end?
Great article!!
Kib ·
I always love your teardown 😉 using A7R it is nice to see how it is done inside.
Just a question : what do you think about tripod mount ? Is it robust like on DSLRs ?
Adam ·
I’m a bit curious why there is a physical shutter at all. I’m an old vidoe guy and pretty familiar with older Sony video cameras that had adjustable shutter speeds via an electronic shutter. (If you wan’t 1/100th of a second, well then the sensor is active for 1/100th of a second and off until the next frame.)
Granted videographers have to settle for fewer options in the shutter speed department. (You’re not gonna get a speed longer than your frame rate, and faster speeds aren’t helpful in eliminating camera shake when you’re shooting video.) Is there something about very fast or very slow shutter speeds that makes relying on an electronic shutter impractical? Or do you just need to hear a sound and feel something move to make it feel like you bought a “real” camera?
Levent ·
I had rented an A7R from you guys about three weeks ago. I really took great care of that camera, so the one you took apart had better not be the same one! Lol
Fascinating article and pictures. 🙂
mrc4nl ·
Ah, sometimes i think about how awesome it would be f i put the a7 electronics into a old Minolta body, with working stock top dials (XG9 X700)
i thought it was possible, but now i see this assembly i am not so sure.
Mathieu ·
Thats quite cool!
The blue wire is definitely a coaxial connector to connects an RF cable. It looks similar to an U.FL connector made by Hirose. Its surely used to feed the wifi antenna that needs to be out of these shields to radiate properly.
By the way, to answer Peter’s comment, EMI reduction is not that much of a black art, as some EMI engineers like to say. If you really know what your doing, and I’m pretty sure Sony’s engineers do, its usually not that difficult. They must use the same EMI tricks learn from previous designs anyway. And it do helps for reliability because it does not only shield EMI that can comes out, it also shields for external interferences that could comes in as well. It really helps to keep your camera from working properly when your cellphone is transmitting nearby for example.
Ray ·
Stamped steel and plastic. Hardly elegant but it works.
Do all those screws suggest Sony did not believe this camera would sell well?
Oskar Ojala ·
Nice one. Having some time ago disassembled a Sony camera myself, I admire their skills in electronics design; very clean, very compact. Still, all of this will probably look primitive in 10 years time.
A 1.5 mm cover glass is what I would expect, as IIRC, Nexes have something on the order of 1.7-1.8 mm. Performance would improve a lot going thinner and I’m surprised that Canon has 0.75 mm — they must be good and put effort into the filter design.
Silvio ·
Everything seems very neatly arranged, but at the same time your pictures convinced me that I’ll never be able to reassemble one by myself.
Sciman ·
Roger, I’m trying to understand why they didn’t add sensor stabilization. Now that you can see what’s squeezed inside,how much bigger would it have made the camera? Surely alot smaller as a combo when IS lenses are added to the equation? It seems ridiculous. What am I not understanding about their rationale.
Roger Cicala ·
Sciman,
I can’t think of a good logical answer other than this is a bit of a trial camera for them. I think they have several things they can consider: in-body IS, on-sensor phase detection, etc. in the next version. Or perhaps they want to go the Nikon and Canon route with in-lens stabilization.
One thing I find very interesting in the tear down: do you notice how modular everything is? As long as you get the outside dimensions and flex connections the same, any part could be easily replaced. Different sensor, shutter, PCB, even outside body and grip etc. would be very simple swaps. The cost of coming out with a new version of the camera is basically just designing the new part.
Doug Dunlap ·
Hi Roger,
I’m wondering if you can clarify some of the claimed waterproofing characteristics of A7/ARr made my other reviewers, such as:
Over at DPReview in the review of the A7 they claim on the first page that the camera has a:
“Weather-proof alloy and composite body”
later in the review they qualify the statement somewhat and say:
“The body and lenses are sealed against dust and moisture”
David Pogue, who is now at Yahoo Tech says, ( I would not take his technical opinion especially on cameras, but he is the most widely read of all the reviews I think.)
“you can use it in the rain.”
Over at imaging-resource their review of the A7 has this statement ( it’s way at the bottom)
Weather-sealing / cold-proofing. Although it doesn’t provide a count for the number of seals, Sony describes the A7’s magnesium-alloy body as both dust and moisture-resistant.
To be fair to Sony, I have looked through their description and specifications of the A7/r on their own site and I could find no claims of any kind of weather proofing, dust resistance, sealing built into the system for either camera. They do mention a method of cleaning the sensor of dust, but I don’t consider that dust sealing or proofing.
My rule of thumb is: If it has an interchangeable lens and it doesn’t have an “O-ring” on the lens or body you don’t have nothing.
So what do you think, Roger? There is obviously no provision for an O-ring but maybe there are other seals which you didn’t mention.
Please keep up the great work!
Roger Cicala ·
Doug, I haven’t seen any claims by Sony in writing, only the reviewers claims (which I assume came to them verbally from a rep). The top looks well sealed by itself, and that’s a positive thing. I saw no gaskets of any kind anywhere. So either the plastic shell is supposed to be so tight that it’s weather resistant, or it’s not weather resistant.
The magnesium alloy body being weather resistant particularly doesn’t make sense: there’s a strong magnesium alloy chassis inside a plastic shell. The body, other than the chassis, isn’t magnesium alloy.
It’s very possible Sony has designed some weather resistance via a method I don’t recognize, but it’s not gasketed. Until I see a Sony claim for weather resistance, I’m not taking mine out in the rain.
Oh, heck, even if Sony does make a claim for weather resistance I’m not taking mine out in the rain. My faith in weather resistance will reappear right after the Abominable Snowman rides in on his Unicorn and brings me a guarantee in writing from the manufacturer that a camera is weather sealed. You want to know how many ‘weather sealed’ cameras and lenses we write off for water damage every year?
Roger
PenGun ·
Kai poured a watering can full of water over a running one, no problem.
Max ·
Why don’t camera makers use synthetic sapphire (like a Rolex) to cover the sensor? The NEX7 and A7r are only going to take a few wet sensor cleanings before they are micro-scratched all to hell.
Rainer ·
The sensor cover glass on the A7 is 2.5mm thick according to the info from Zeiss! But it has no influence on the image qualties!
Dennis ·
I’m used to disassemble and repair old mechanical SLRs, so I’m wondering how difficult it is to remove the orange front ring? Is it accessable from the bayonet, or is it some integral part of the front housing?
Jamesm007 ·
I remember taking apart a Sony Walkman in the early 80s (yep a geek as a teen), its built very much like this. In fact most Japanese gear is built like this. What is like this? Like a big Swiss Watch, high quality and care at every point, well designed. And most of all very compact. It must be said I am not a mirroless fanboy.
I don’t know where this unit is made. But my bet is Japan. Being a USA guy in Detroit I did not like Japan stuff at first. But now I know its a badge of very high quality build. There stuff just did not break. You had to break it. Like taking it apart.
Oliver Baker ·
Do you know if the A7 will work without the shutter curtain module (not the motor module) being plugged in to the right hand side of the PCB board?
ccs_hello ·
Can you share a shot of the back of the sensor board, with its copper shield removed?
The picture should have a small window opening with the actual backside of the image sensor chip expose.
TIA.
ccs_hello
John ·
Gee, did you re-assemble the camera? if not, would you sell me the guts for my experiment?
Roger Cicala ·
John, it was reassembled and has been rented a dozen times since then.
Larry Gordon ·
Thanks Roger,
I have my A7s apart, but I’m floundering with the idea of leaving out the OLPF assembly. Do you know if the camera will function without it? My opinion, is that it is also the high speed shutter, as it has an LCD type connector. I’m thinking it is polarized at a high rate to change light throughput.
Also, even though I have a pictorial of the inside, I can’t figure out the OLPF flex cable position due to the copper frame that wants to crust it if I place it on top.
Wow! These buggers are a trip to reassemble!
Thanks Again,
Larry
Brad ·
Do you know whether an electronic (or some other) shutter could be substituted for the stock model? The stock model is loud and imparts a vibration mich like a mirror with some lenses.
Mike Rose ·
Any idea where I can get an a7s repaired? Sony authorizes Precision Camera in Enfield Ct. but all of the reviews are terrible. Audio quit working, internal and external. I believe that the input adapters have come loose from the board.
Roger Cicala ·
Mike, sadly I think that’s the only choice now. I will say they are better with cameras than with lenses. Some better.
Ying ·
Hello! I recently tried to replace the screen in my Sony A7r. Unfortunately once I put everything together I realized I lost the 4 screws! (two in the bottom and two in the back). Is there any way you can tell me what size the screws are? I’m hoping I can buy them somewhere online! Thanks!
Roger Cicala ·
Ying, I can’t I’m afraid. There are 7 different size screws in there (which is way less than an SLR). Most are 1.5, 1.7 or 2mm, but they can also be either coarse or smooth threads. I’d try to find an assortment somewhere.
Ying ·
Roger,
Thanks! I actually spent an hour with a huge magnet, magnifying glass, and LED light and scoured my floor until I found them! The last one was impossible to find! Thank you anyways! I always love your disassembly posts! Can’t wait for the next one!
EL ·
Roger, Thanks.
Question: is the teardown for the Sony a7 the same. I’m trying to take mine apart (hoping to change the main board and other parts due to water damage). I can’t even get the back frame off. The upper right of the grip on the back of the camera. It seems to be bonded to the camera. I have taken all visible screws out that I can see. Thanks!
Virtruvius ·
Thanks. I am looking for the pin out diagram for the contacts inside the battery compartment. The top has power connections but the side has a number of connectors for camera controls for the vertical grip. Any where I could find this?
Thanks
MunnyOwl ·
It would be a mistake to suggest that this was comprehensive or helpful
chaos215bar2 ·
Did you make a wrong turn on the way to the official Sony service manual?
Siboney Tabares king ·
Hi guys. Does anyone know what the blue cable inside is? Is it grounding?
Im having trouble with it. Cant connect it and now my camera does not let me adjust aperture. Could it be this cable? Thanks.
John ·
Hi. Thank you for sharing.
I would like to replace the back (the one you removed first). I removed 3 screws on the bottom (2 at display, 1 battery), 1 screw at the side (close to Wifi icon) and 3 short screws below the display. The back is still stuck somewhere. Do I have to remove the viewfinder first?
Do I have to worry about any cables? How is the LED of the SD card connected with the camera?
Thank you very much. Greetings,
John
Arild Barka ·
Anyone have a clue how much its gonna cost to replace the evf? Mine is dead, have sent a few emails to some repair stores, but hoping someone here might know.. Hoping its not gonna be too much..
kevin wadkin ·
Amazing to see how its all done and built up! I love my Sony cameras and lenses… I cant understand why I didn’t switch sooner. https://www.wadkinphotography.com/blog
Josh ·
what are the specific three screwdrivers needed? 🙂
PhotoWorks Interactive ·
That’s Informative. Thanks for sharing.
Lucas Sheen ·
Hey Roger, great post. My Sony a7s is with the shutter dial (front) malfunctioning, the thing is in my country I don’t have to many repair options. Can you tell me which piece I need to replace? I believe is the top assemble, right? This would greatly help me, because I need to import the piece from overseas.
Allyn Armonia-Bonilla ·
/disqus-blog.com/news/1908/v...