A while back I wrote a blog on Getting Sharp Telephoto Images when I realized a lot of our renters were using big telephoto lenses for the first time and didn’t know the tricks it took to get good telephoto images. We also see people struggle at the opposite end of the focal length range: they know that they want a wide angle lens because they are going somewhere with broad scenery, or need to get images in small, crowded areas, where they can’t step back. When they get home, they realize many of their ultra wide shots are awful, but they aren’t sure why. Other people just decide “I don’t shoot ultra wide” and never try it again. That’s too bad, because the ultra-wide lens, even more than the telephoto lens, can really put some punch into your photography.
What is Ultra-Wide?
The definitions are arbitrary, of course, but first let’s eliminate fisheye lenses: they are ultra-wide by strict definition, but are usually used for entirely different purposes. I’m going to limit this discussion to non-fisheye lenses. So, since back when cavemen made the first lenses by chipping milky quartz, it has commonly been considered that 50mm was the ‘standard’ focal length. Anything 35mm and lower was wide angle. Depending on who you read, ultra-wide angle lenses were less than 24mm or less than 20mm. (These are for full-frame cameras, of course. Back in those days all cameras were full-frame, because cavemen only had film. Neolithic photography was primitive.)
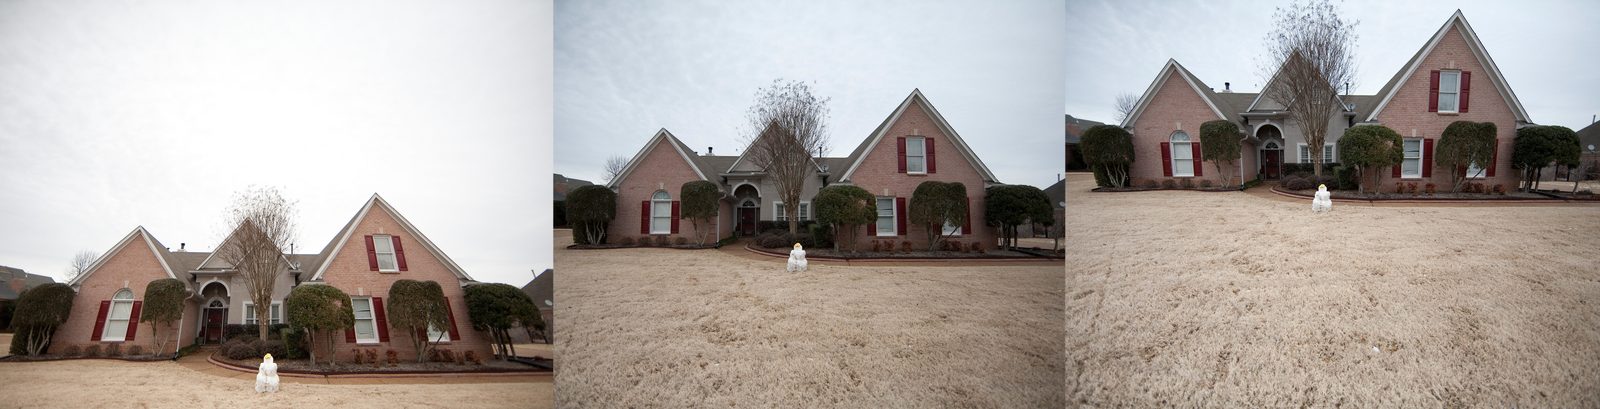
It’s important to realize that at the wide-angle end of things a couple of mm of focal length can make a huge difference in the angle of view. You get a much better idea of how wide an ultra-wide image will be if you think in angles, rather than mm. The photos below, for example, show the same scene from the same spot shot at 12mm (left) and 16mm (right) on a crop-frame camera.
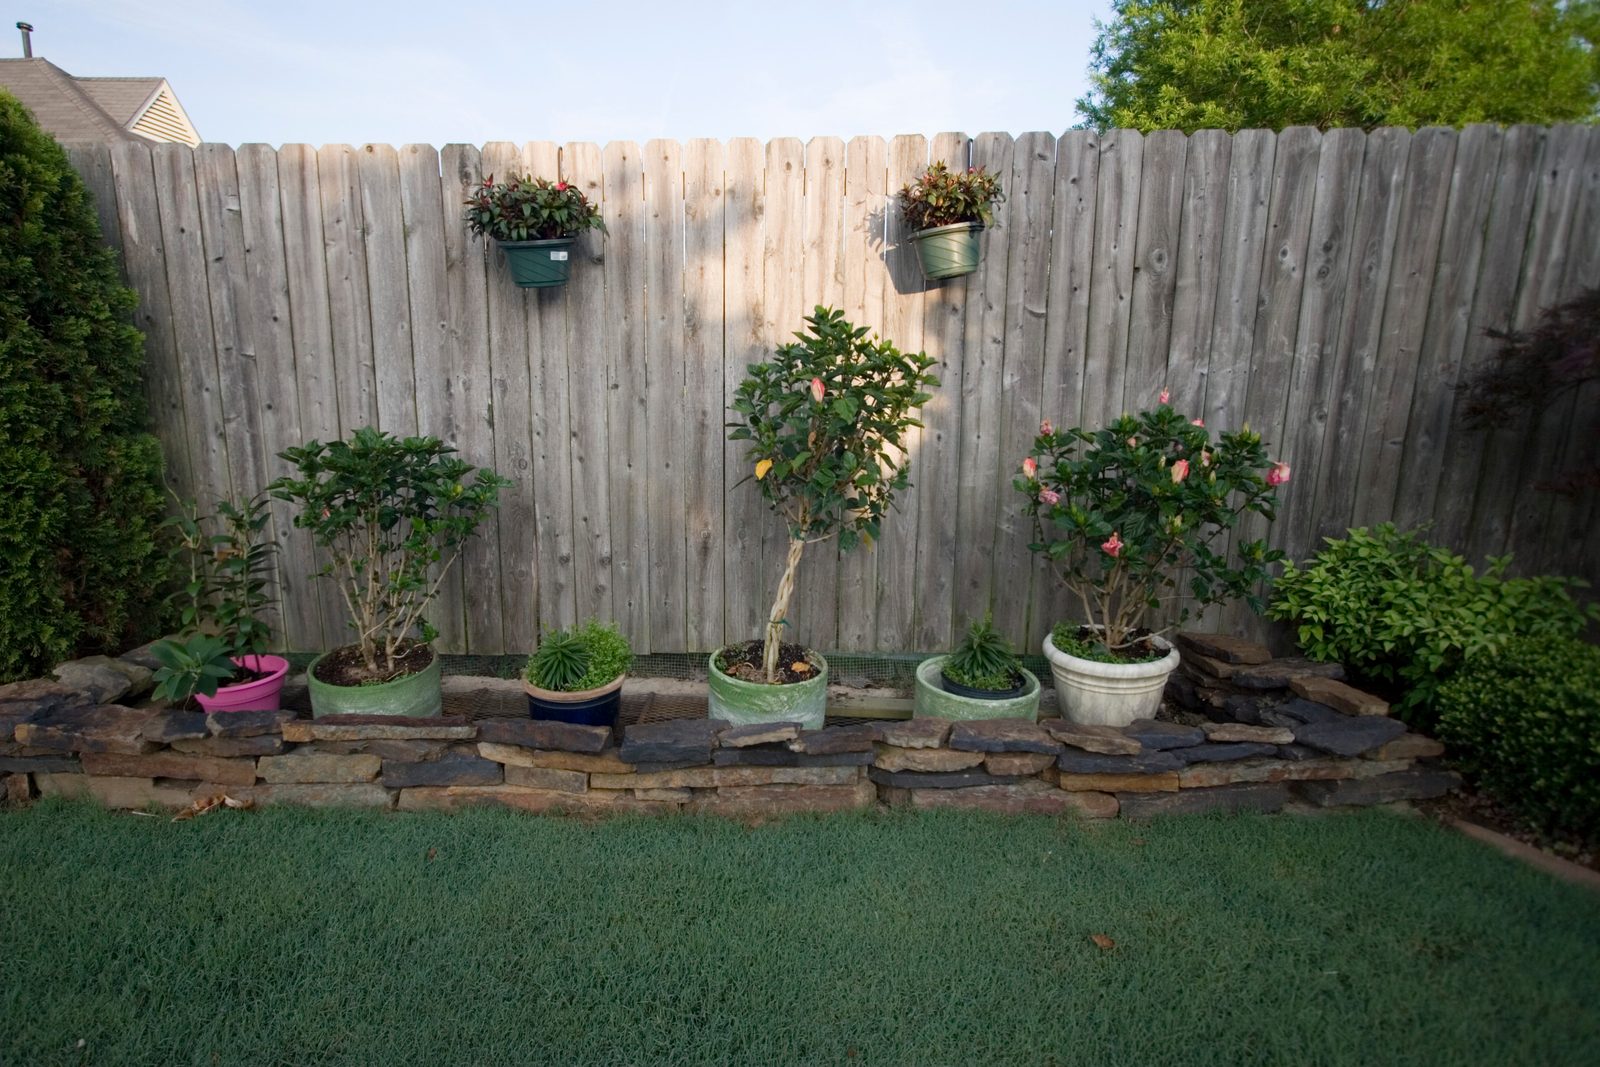
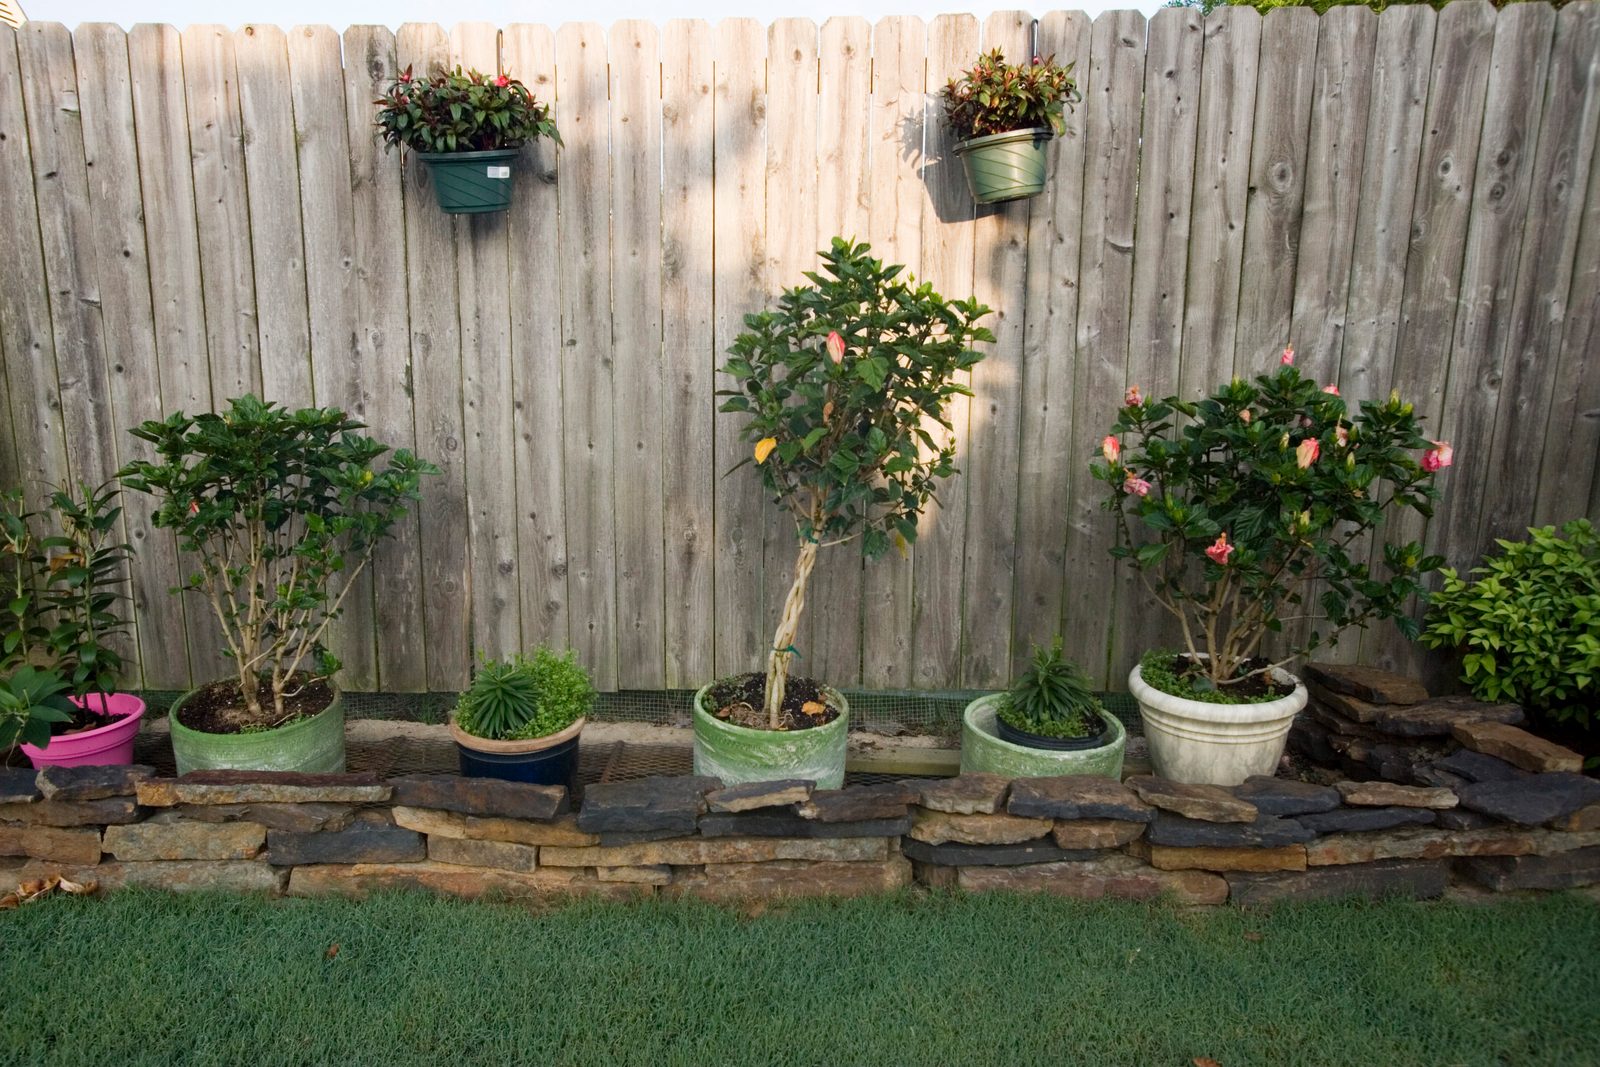
The 4mm difference is very significant, resulting in a change in angle of view from 83 degrees to 112 degrees. (The difference in angle of view between 12mm and 16mm is much greater than the difference between 50mm and 70mm, for example.) The table below gives you an idea of the angle of view at various focal lengths on both crop-sensor and full-frame bodies.
| focal length | AoV FF | AoVCropframe |
|---|---|---|
| 10 | NA | 96 |
| 12 | 112 | 85 |
| 16 | 96 | 69 |
| 20 | 83 | 58 |
| 24 | 73 | 49 |
| 30 | 62 | 40 |
| 50 | 39 | 25 |
The angle of view of various focal lengths on full frame and crop frame cameras. (Data for Canon 1.6x crop frames. Other bodies have slightly larger angle of view with 1.5x crop frames.)
Anyway, I define ultra-wide as 80 degrees or wider (twice the ‘normal’ 40 degree angle of view), which is about 21mm on a full-frame camera or about 14mm on a crop sensor. Down in these ranges, lenses behave differently, and, if you understand those differences, you can get interesting and unique images: not just a nice landscape, but some other dramatic shots.
So what’s so different with ultra-wide lenses?
Duh! The angle of view is wide. Here, I’ll show you:
But the difference is so obvious that you might miss the subtle meaning of it. That wide angle of view causes some different behaviors. Some differences are true at any distance, even out to infinity. Others really only are noticeable when working closer to the lens.
Differences at infinity
If all you shoot with a wide angle lens are landscapes where the subject is out at infinity (let’s say, where the little blue lines, that symbolize the angle of view, end), there would be only a few differences. But those few differences can be important, so let’s go over them.
- Light rays from the edges of the image are going to be bent a lot more passing through the lens elements in a wide angle lens than in a telephoto lens. This can cause more chromatic aberration if the lens doesn’t correct for it well. A good ultra-wide lens must have aspheric elements to correct for CA—an important thing to check for when choosing an ultra-wide lens.
- The extreme bending of light rays makes ultra-wide lenses to vignette (have dark corners). It’s like gravity—you can’t change it, you just have to live with it. Some lenses and (because of microlens arrangements on their sensors) some cameras are more prone to this than others.
- The sensor will “see” a lot more objects than usual. This means auto-exposure or white balance may be off. Wide angle shots with lots of bright sky often underexpose, because the camera is averaging all that bright sky in when calculating the exposure.
- Because the lens is so wide, the sun (or other bright lights) will often be in the image. Good flare control is more important in an ultra-wide lens than in other lenses.
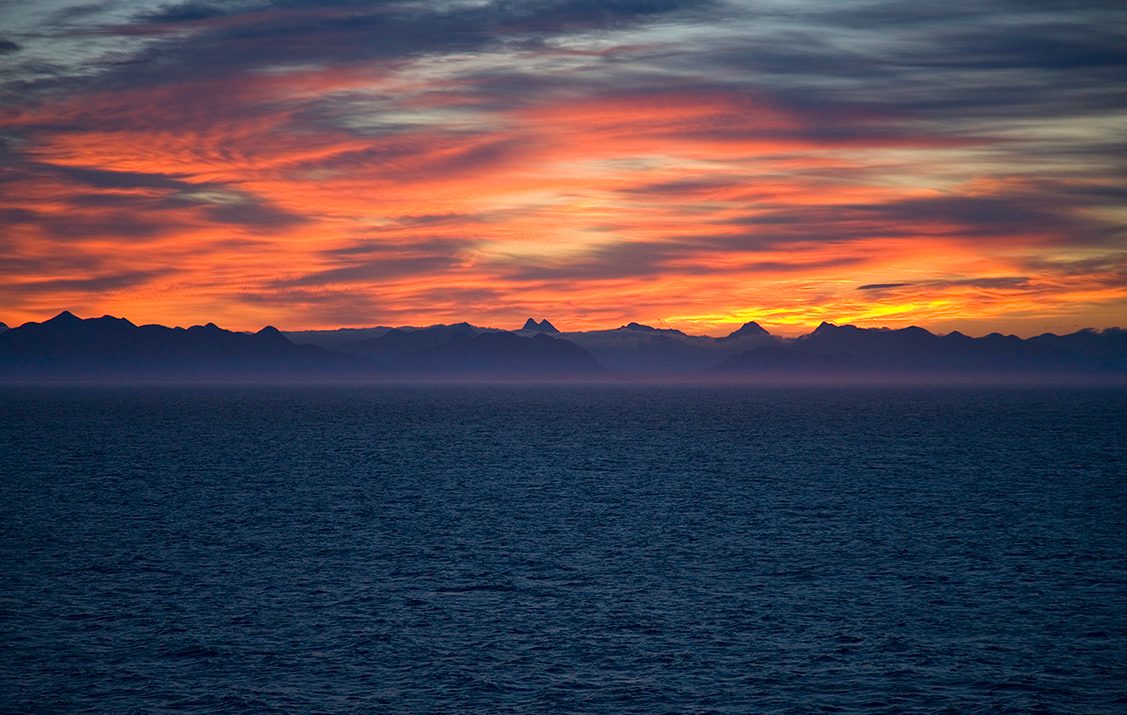
- Because the angle of view is so wide, the angle at which sunlight enters the sensor will vary from one side of the image to the other, unless the sun is behind you. For example, if the sun is to your left, the left side of the sky will appear lighter and less blue than the right. Wide angles love overcast days and lots of clouds. Pure blue sky—not so much.
- A polarizing filter only polarizes light entering at certain angles, so it can actually make this phenomenon worse. Unless you absolutely need it, a polarizer is generally a bad idea on an ultra-wide lens.
So, if all you do with your ultra-wide lens is shoot scenic shots at infinity (and for a lot of you that is all you do with them), that’s all you need to know: Shoot with the sun at your back. Pick your ultra-wide lens on the basis of good flare control, aspheric elements, and minimal vignetting rather than sharpness (all ultra-wides are sharp), and don’t use a circular polarizer. If you possibly can, shoot in RAW, so it’s easy to fix irregular sky colors and vignetting. Do that and you can get nice wide angle scenics with dramatic skies and forever stretching foregrounds.
But, if you’d like to do more than that with an ultra-wide, then read on and we’ll talk about working at closer distances, using the special characteristics of ultra-wides to get some cool effects and avoiding those same characteristics ruining our shots.
Optical differences
I’ve somewhat purposely started this section of with an incorrect term, because there are three terms that are broadly, and often incorrectly, used when discussing ultra-wide angle lenses. The first is optical differences: all lenses work on the same optical principles, although ultra-wide lenses seem to behave differently: they exhibit more distortion of subjects than other lenses. The second is perspective, Technically, from an optical physics point of view, changing from a telephoto to an ultra-wide lens doesn’t change perspective. But from a “looking at the picture” point-of-view, it sure does seem to change, so for the purposes of this article, I’m going to be politically incorrect and refer to the perspective changes that you can see, even if the physicists can explain that they aren’t really there. The third is depth of field. Ultra-wide lenses use the same depth of field formula as other lenses, but, from a practical standpoint, ultra-wide lenses have a very wide depth of field at most real-world shooting distances.
So the bottom line is: I’m going to use some terminology incorrectly to make things understandable for those of us who aren’t optical physicists. And I’ll try to use image examples to clarify my terminology, so that it doesn’t lead to more confusion.
Distortion of Perspective
Our eyes use the relative size of objects as one hint to determine distance. We see a large human and a tiny human in the same image, we believe the tiny human is further away, unless the image has other evidence to contradict that. But our brains are used to making that judgment at a roughly 45 degree field of view (ok, rather arguable point here, but go read The Camera vs The Eye for more detail). A very wide angle lens throws off that distance judgment.
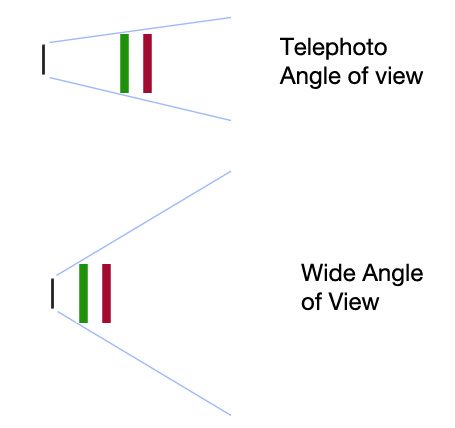
Look back at the telephoto/wide angle schematic drawing above. Let’s assume the green and red bars are two identically sized objects in our photograph. Notice that I’ve placed them so the green bar would completely fill the camera’s image. To do that, the green bar has to be closer to the camera with a wide angle lens. So if I take an image of an object, positioning the camera so that it is the same size on the sensor, it will have to be much closer with a wide angle. That’s obvious. But look at the red bar. It’s the same distance behind the green bar, and the same size as the green bar. With a telephoto lens, it still nearly fills up the field. It will appear close to the green bar in the image, and nearly the same size. In the wide angle image, though, it doesn’t fill up the image nearly as much, so it will appear much smaller than the green bar (which our vision may interpret as further away or just smaller, depending on the other visual clues in the image).
So what might that look like? Check out the three images below. On the left is the set-up as seen from the side: three shot glasses lined up on a counter, starting about 6 inches from the end. The second image is shot at right angles to the first with a 135mm lens on a full frame camera, the third shot with a 14mm with the camera repositioned so the subject (the first shot glass) is about the same size. Notice in the 135mm image how close the glass appears to the front edge of the counter, and how close the second glass appears to the first? In the 14mm shot, things look completely different, with the glass appearing far back from the edge and the second glass far back from the first.

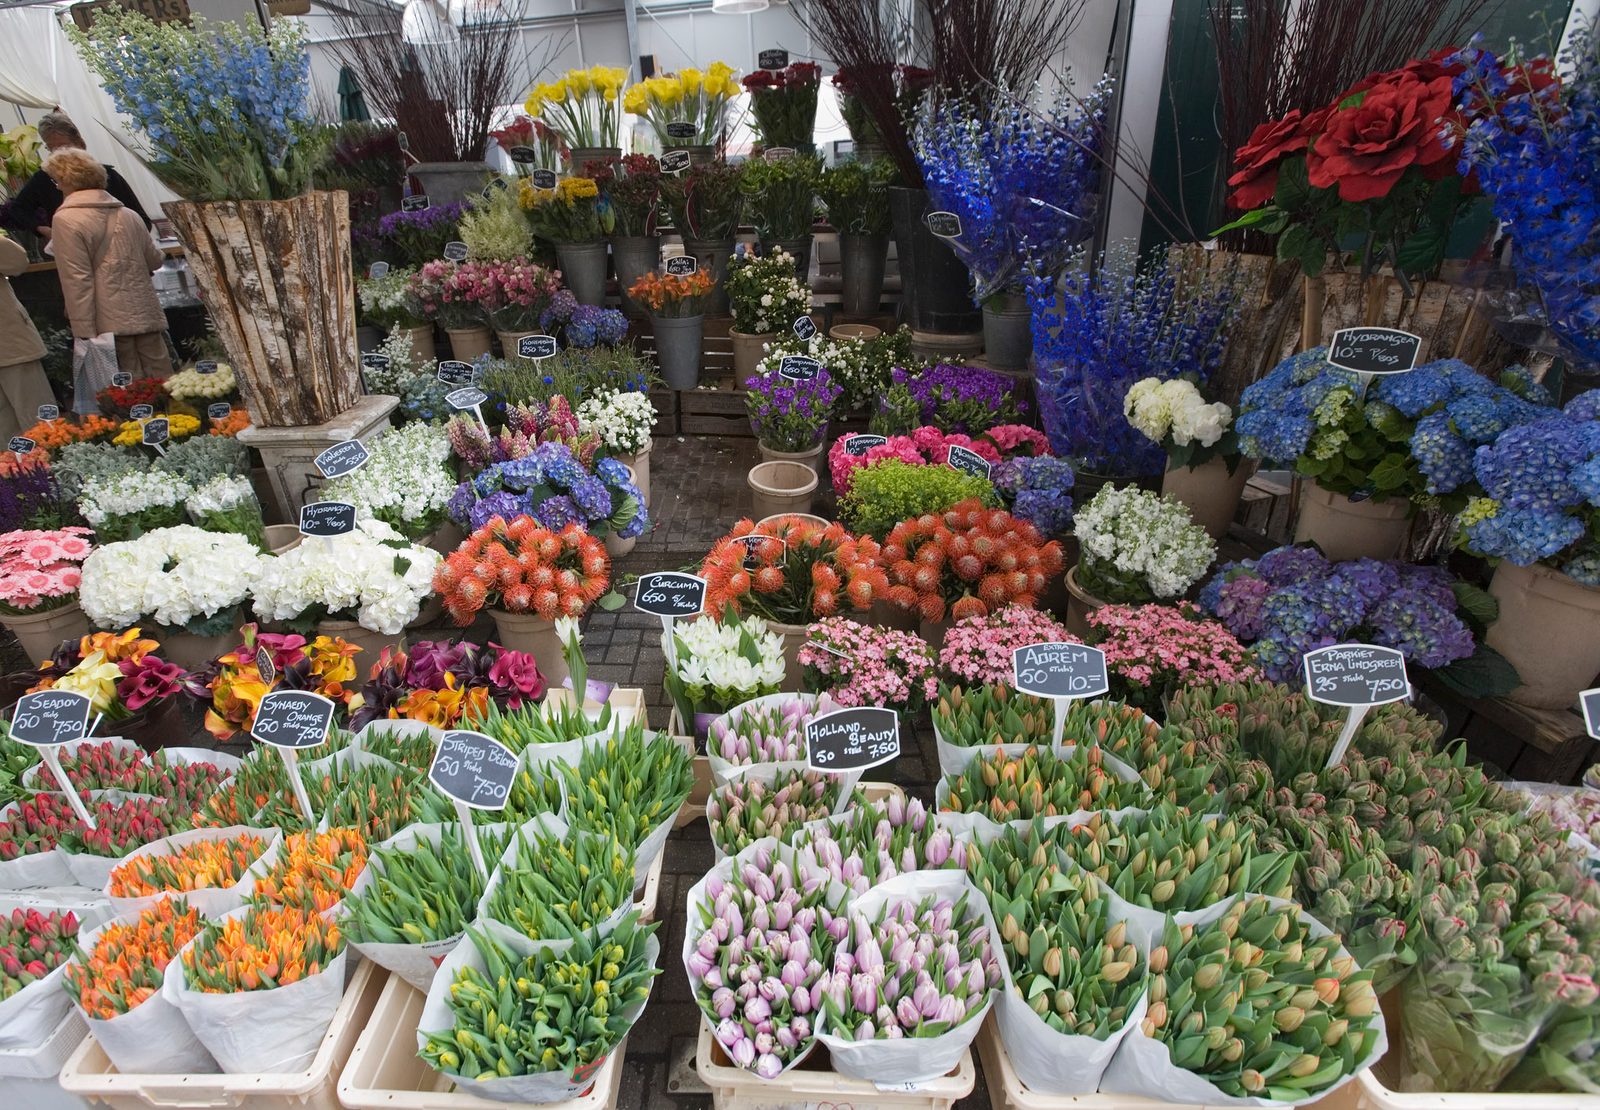
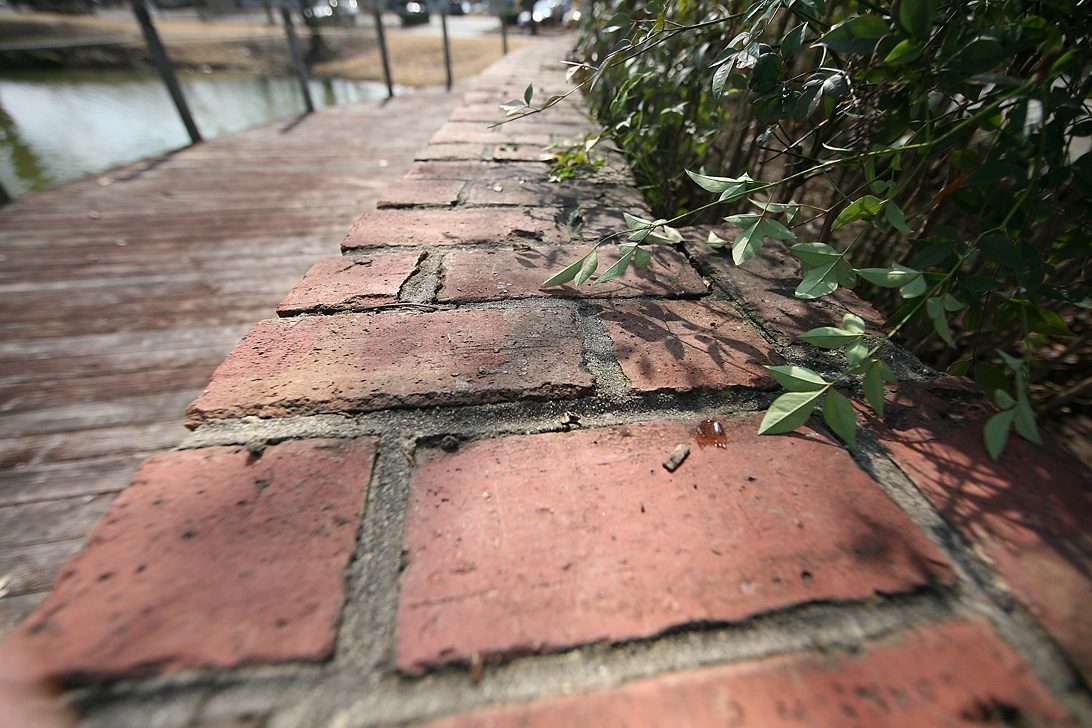
Shooting with an ultra-wide lens close up can create awesome photographs that make things look much larger than they actually are (a great trick for real-estate photography). In the image at left below, the entire shop is, perhaps, 12 feet deep. From the camera, I was about 4 steps away from the yellow flowers on the back wall, but the wide angle lens makes it seem larger. The bricks on the right seem to stretch away for quite a distance, but count them: each brick is less than 4 inches wide, so 12 bricks away (about as far as you can tell individual bricks) is 4 feet from the camera. The brick wall curves out of the picture about 8 feet away.
Apparent depth of field
While we’re looking at the shot glass images, we might as well also compare the apparent depth of field. The 135mm image is quite blurred everywhere but on the glass that was the focal object. The 14mm image has a much greater depth of field, even though both images are shot at f/2.8. We will not start the optical physics depth of field argument here. I’ll simply state that at normal working distances wide angle lenses will have a greater depth of field than telephoto lenses. This will hold true for 99% of all wide angle shots, so the physicists’ objections can be taken to a forum where they enjoy arguing about such things. (The practical summary of all those arguments is you can still get a narrow depth of field, but the focus point must be very close to the lens.)
In a nutshell, with ultra-wide lenses we’ve lost one tool we use to emphasize subjects in a photo (a narrow depth of field), but gained another (size perspective to enlarge the object of interest). The two photos of a holly bush below are both taken with a 14mm lens. On the left, the entire bush is about the same distance from the camera. On the right, the berries are about a foot away from the front element, the remaining leaves about 18 inches. By shooting a wide angle up close, we’ve used size distortion to create a point of emphasis (Note also that if we get really close like this, we can get a fairly narrow depth of field for further emphasis. The pictures of the holly berries below, and the brick wall above, where the camera was focused about a foot or so in front of the lens, show a fairly narrow depth of field at f/2.8.)


Distortion of objects (and people)
Perspective distortion can be a great tool when photographing two or three objects at different distances from the camera. But a single object (say, a person) can have parts that are at different distances from the camera. The closer parts will appear larger than the more distant parts. This is especially important to remember when photographing people with an ultra-wide lens. It can provide an interesting effect if not overdone (like the image on the left, below). But if you get too close to a face the nose will appear overly large and the features distorted, like the image below on the right. Heed my wisdom here: note that the subject of those images is a male child. He thinks the picture on the right looks cool. No female over the age of 6 will ever have that opinion of a wide-angle portrait. Just don’t do it. If, like I once did, you think it would be funny to take a picture of your wife bending over to pick up something on the floor with a wide angle lens—well, consider yourself warned.


You can sometimes make this kind of distortion useful, though. In the superbly artistic series “Self portrait with tilt-shift lens” shown below, simply extending the object to arms length with the camera in the same position dramatically changes the emphasis of the picture (well, it would if I had focused properly, but hey, it was after midnight and I wanted to finish this). It can be a very useful technique for product photography. And for you, wedding photographers, an engagement picture shot with an ultra-wide, the left hand extended like that, will make the diamond look the size of an egg (Aha! You hadn’t thought of that, had you?? ). Just be careful to keep the body and face all in one plane parallel to the camera to avoid distortion where you don’t want it. If I had kept my head tilted down a bit, there would have been a little less nostril emphasis, for example.
Converging verticals and curved lines
One issue that affects wide angle lenses, especially when shooting in tight quarters where there are lots of man-made objects, is converging/diverging vertical lines. When you keep the horizon at the midpoint of the image, the problem isn’t too noticeable. But, if you put the horizon (or point of interest) low in the photograph to capture lots of sky, the verticals will converge. Put the object of interest high in the frame to capture lots of foreground and the verticals will diverge. It can be an interesting effect in nature photographs with irregular shapes, but just looks silly when there are man-made objects that should have vertical lines in the image.
The effect of placing an object low (left) or high (right) when framing a picture with an ultra-wide lens
The obvious solution is to make sure you keep objects centered vertically in the frame. If you want to emphasize sky or foreground, the simplest solution is to crop the picture. The alternative solution is to use Photoshop’s Lens Correction filter or another distortion correction tool to fix it in post-processing, but this may cause a bit of image quality loss and still requires a little cropping. A totally different, and often more interesting solution, is to just avoid vertical lines. Tilt the camera, make everything diagonal. This doesn’t work well for cityscapes or pictures of entire buildings, but for closer shots of buildings and architectural details it can be a neat effect. Let the lens force you into rethinking the shot and you may come up with a more interesting photograph.
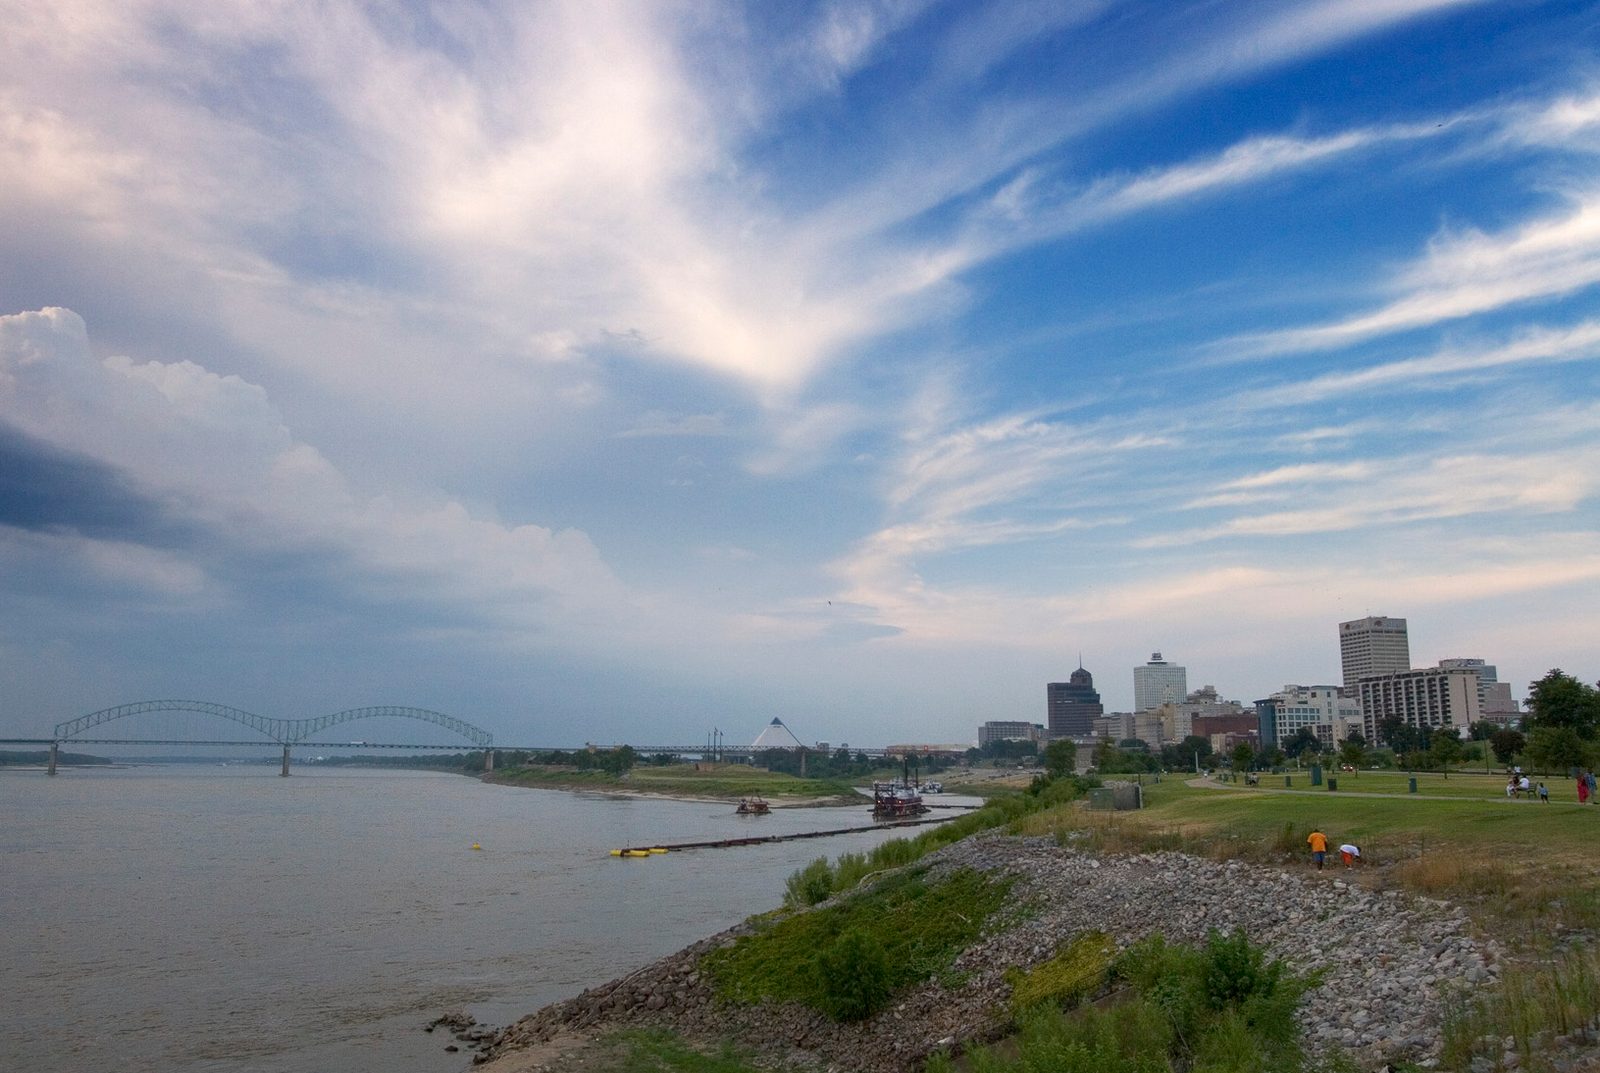
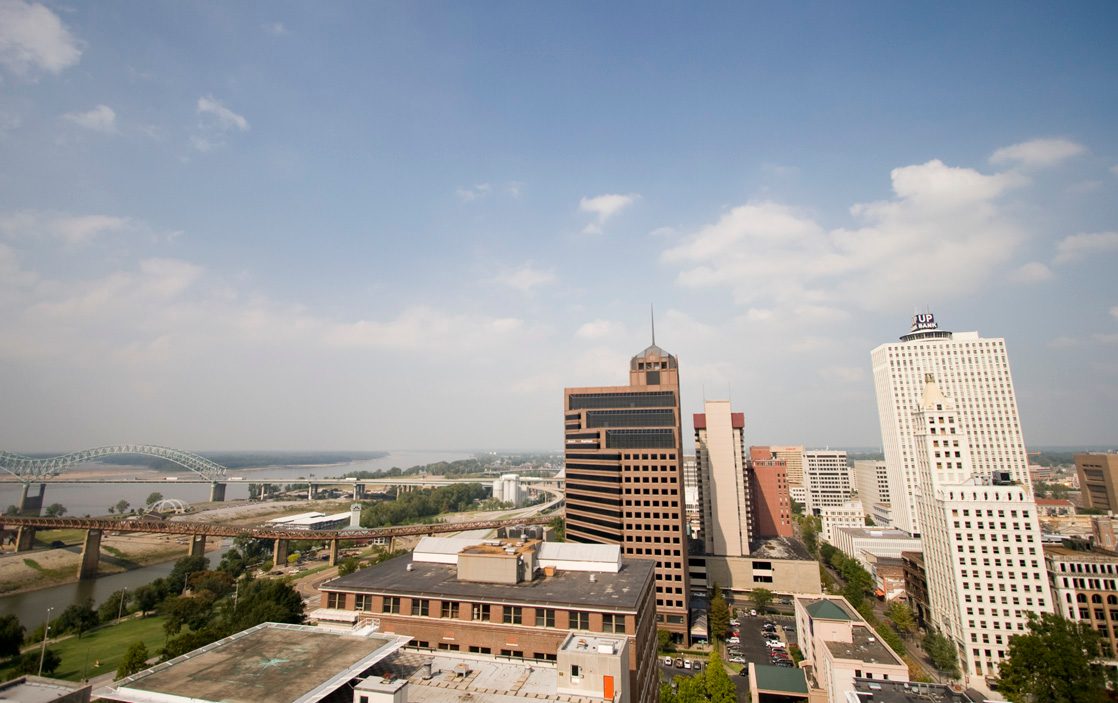
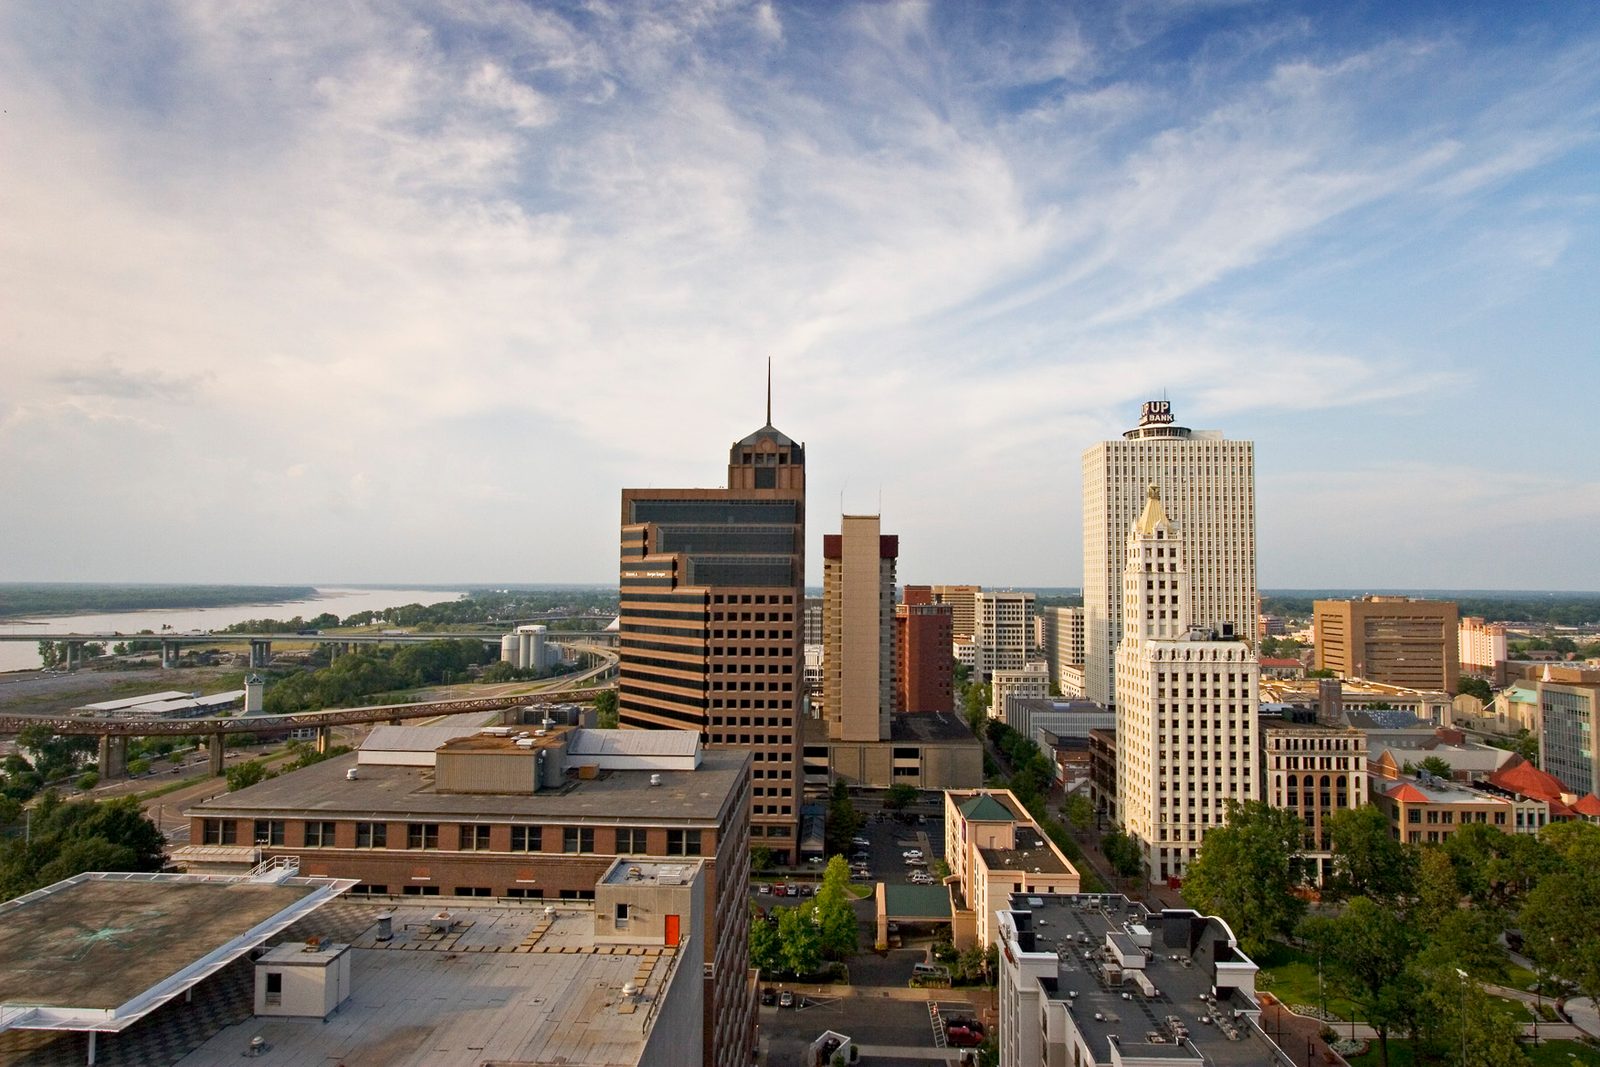
A similar problem can occur when you have long straight lines on the sides of the picture: even though ultra-wide lenses aren’t fisheyes, you will often get a little fisheye effect, curving the lines into the frame a little, as is obvious in the right side buildings in the picture below, left (the verticals are converging, but look at the lateral side of the larger white building. It’s also curved.). Reframing to bring the long vertical lines in away from the edge will correct this, as was done in the picture below, right. (The astute among you will notice that I had to shoot the second shot even wider to keep the river in the picture, but get the building away from the edge. The really astute will also notice from the sky that the second shot was taken on a different day than the first. I told you it takes some practice to learn to shoot ultra-wides.)
A few more Ultra-wide hints
Change your background
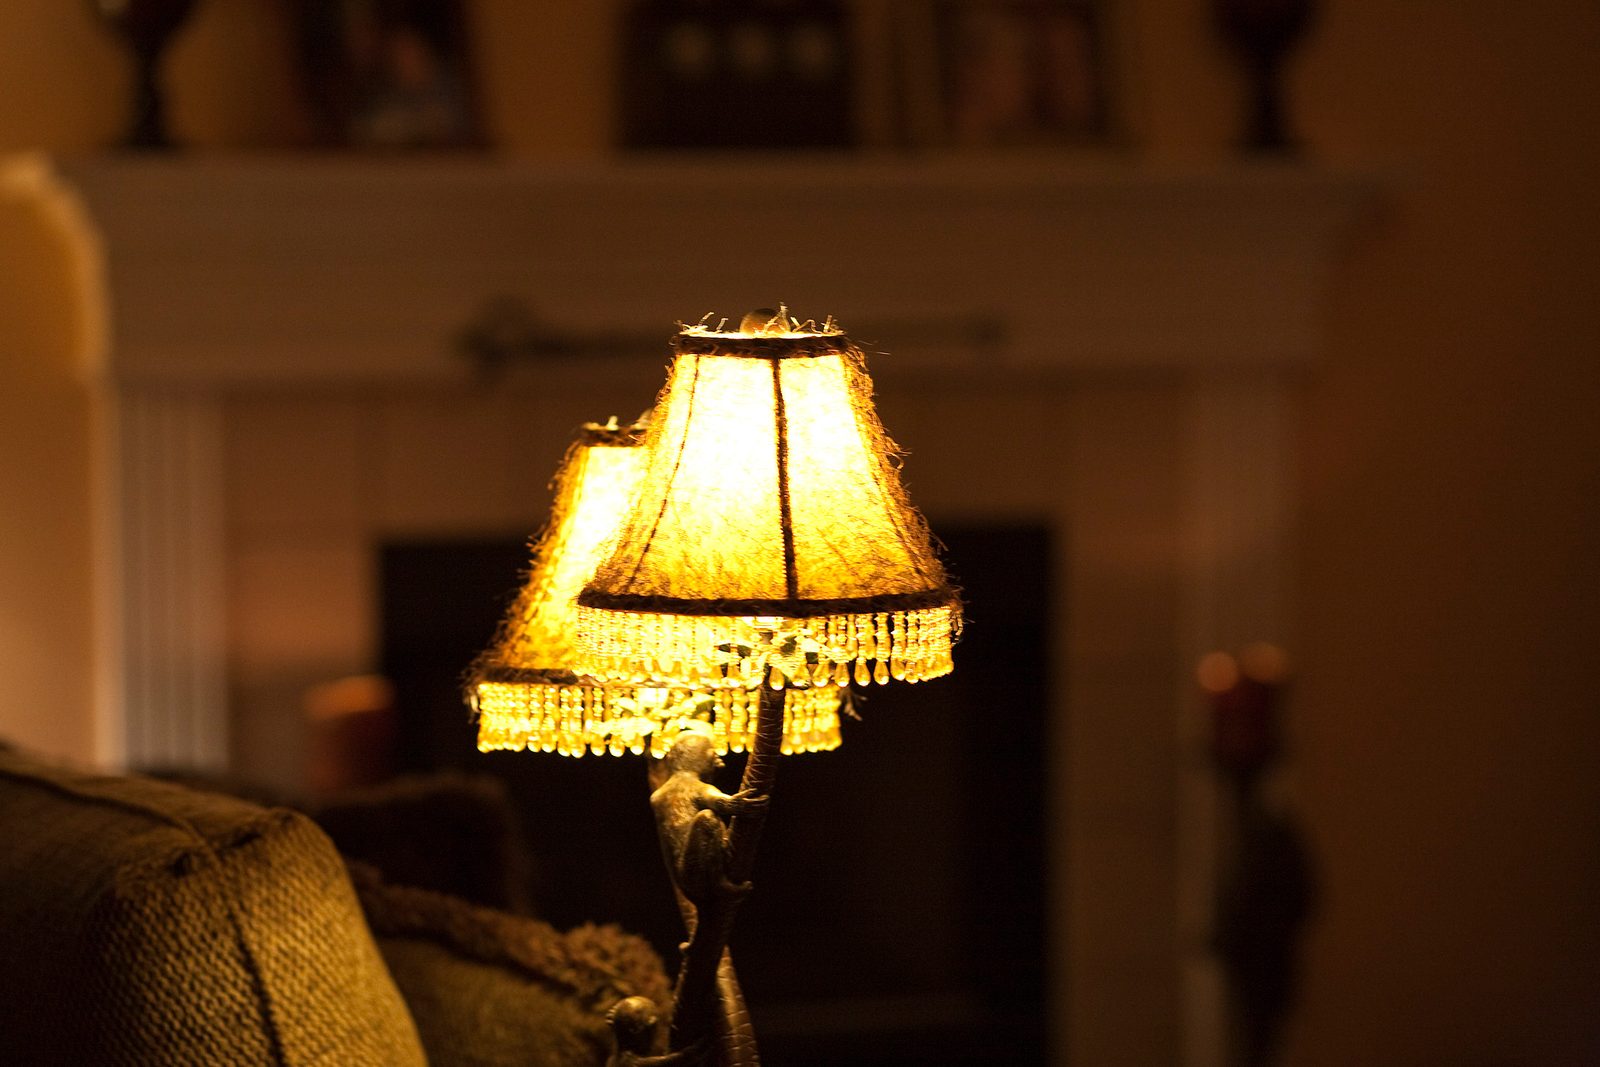
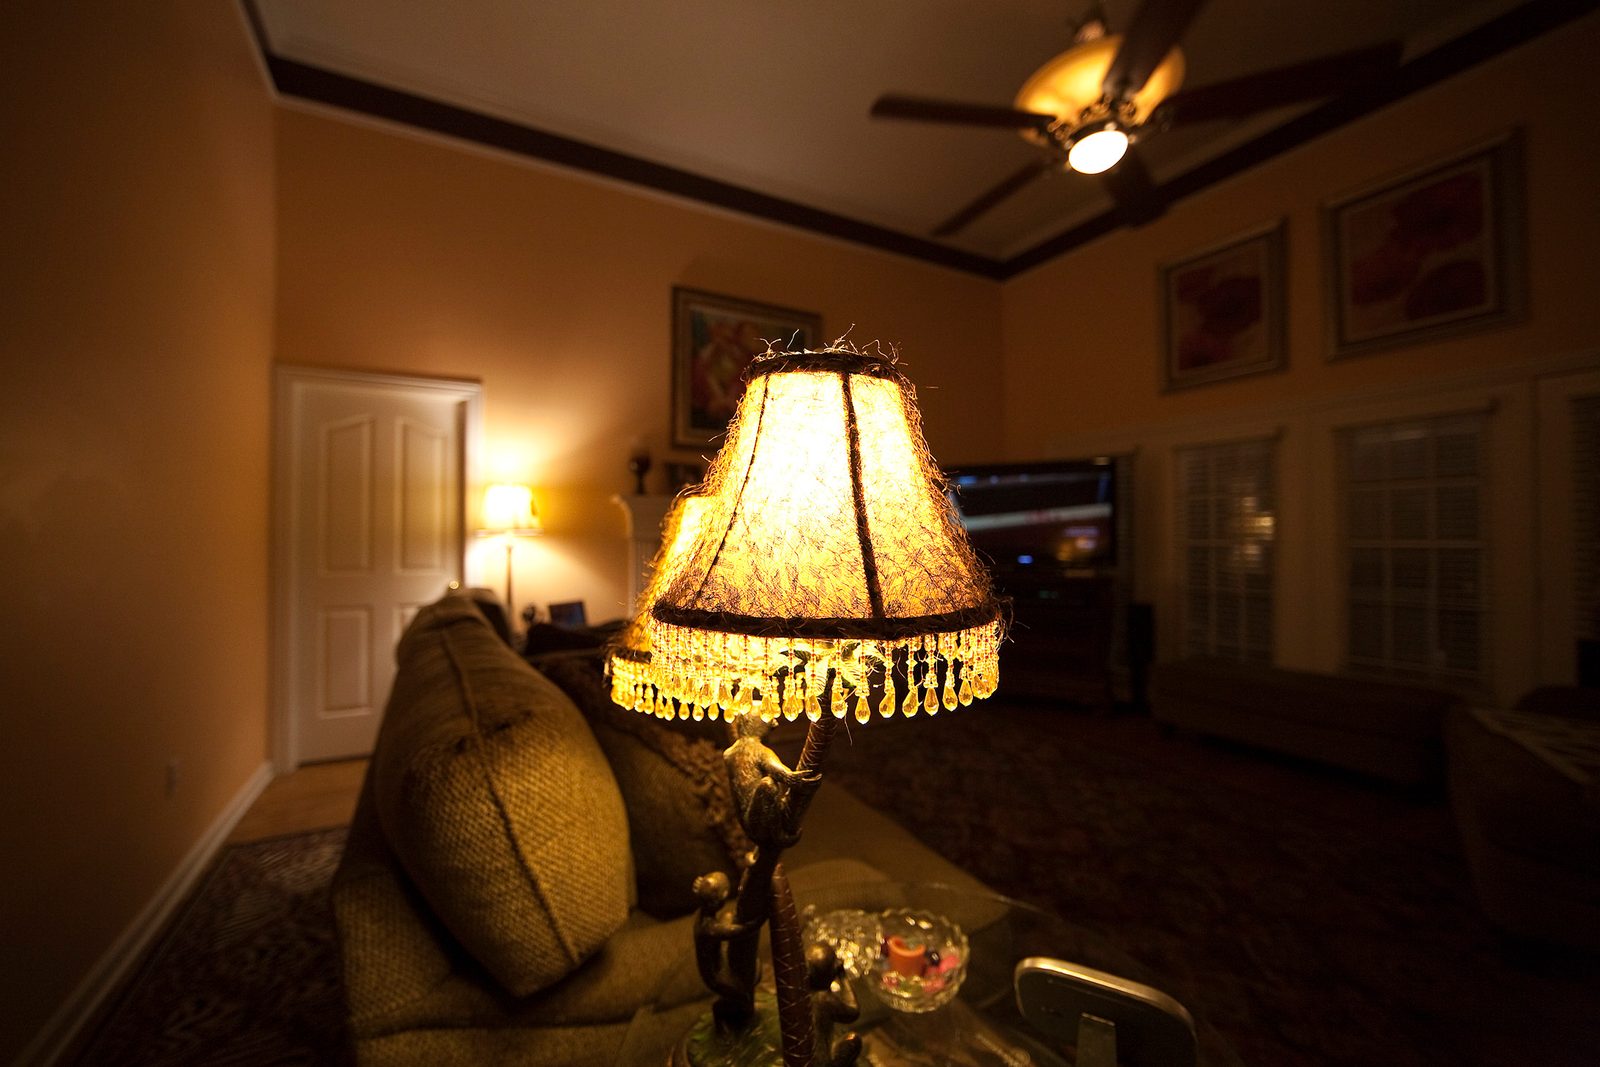
This is completely simple, but I still forget about this option sometimes. By switching from a standard range lens to an ultra-wide and reframing the shot, you can get a totally different background while keeping the object of interest roughly the same. There’s nothing artistic in the samples below, but they demonstrate the point: the lamp is roughly the same in the 135mm shot (left) and the 14mm shot (right), but the background is totally different, even though they are shot from the same direction (in the second shot you can barely see the edge of the fireplace to the left of the lamp).
Emphasize near objects and magnify the sense of distance
Shooting a scene with an ultra-wide places a lot of emphasis on near objects and creates a sense of distance like the shot on the left. Using the converging verticals discussed above on a centered object makes it appear longer and taller than it really is, like the shot on the right.


Use the enlargement of near objects to emphasize details
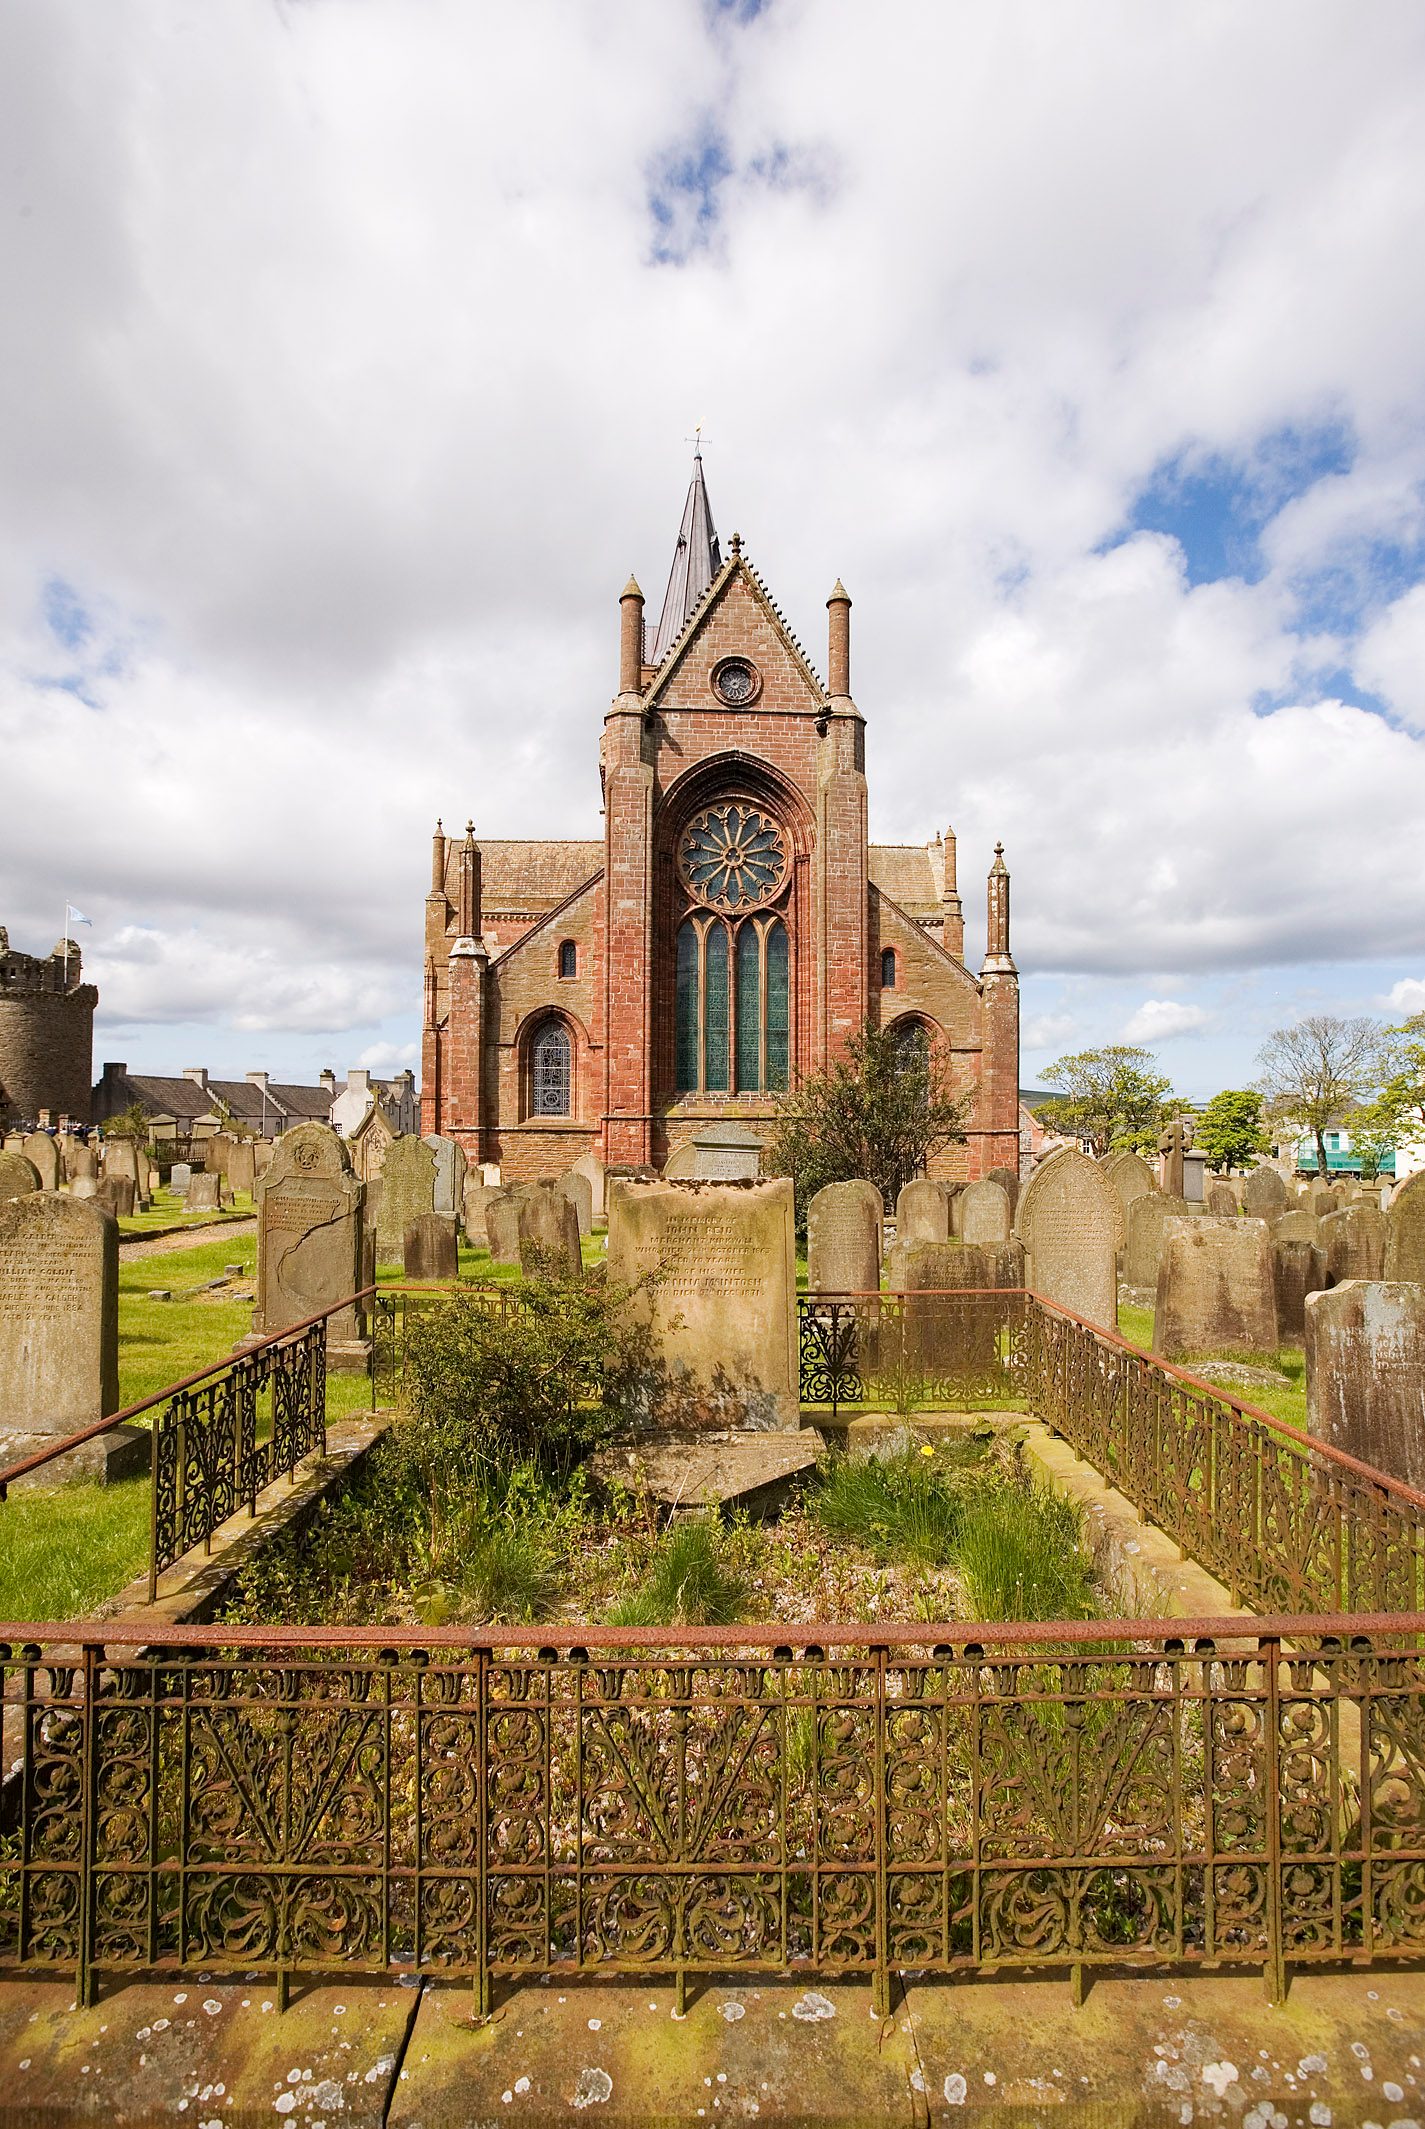
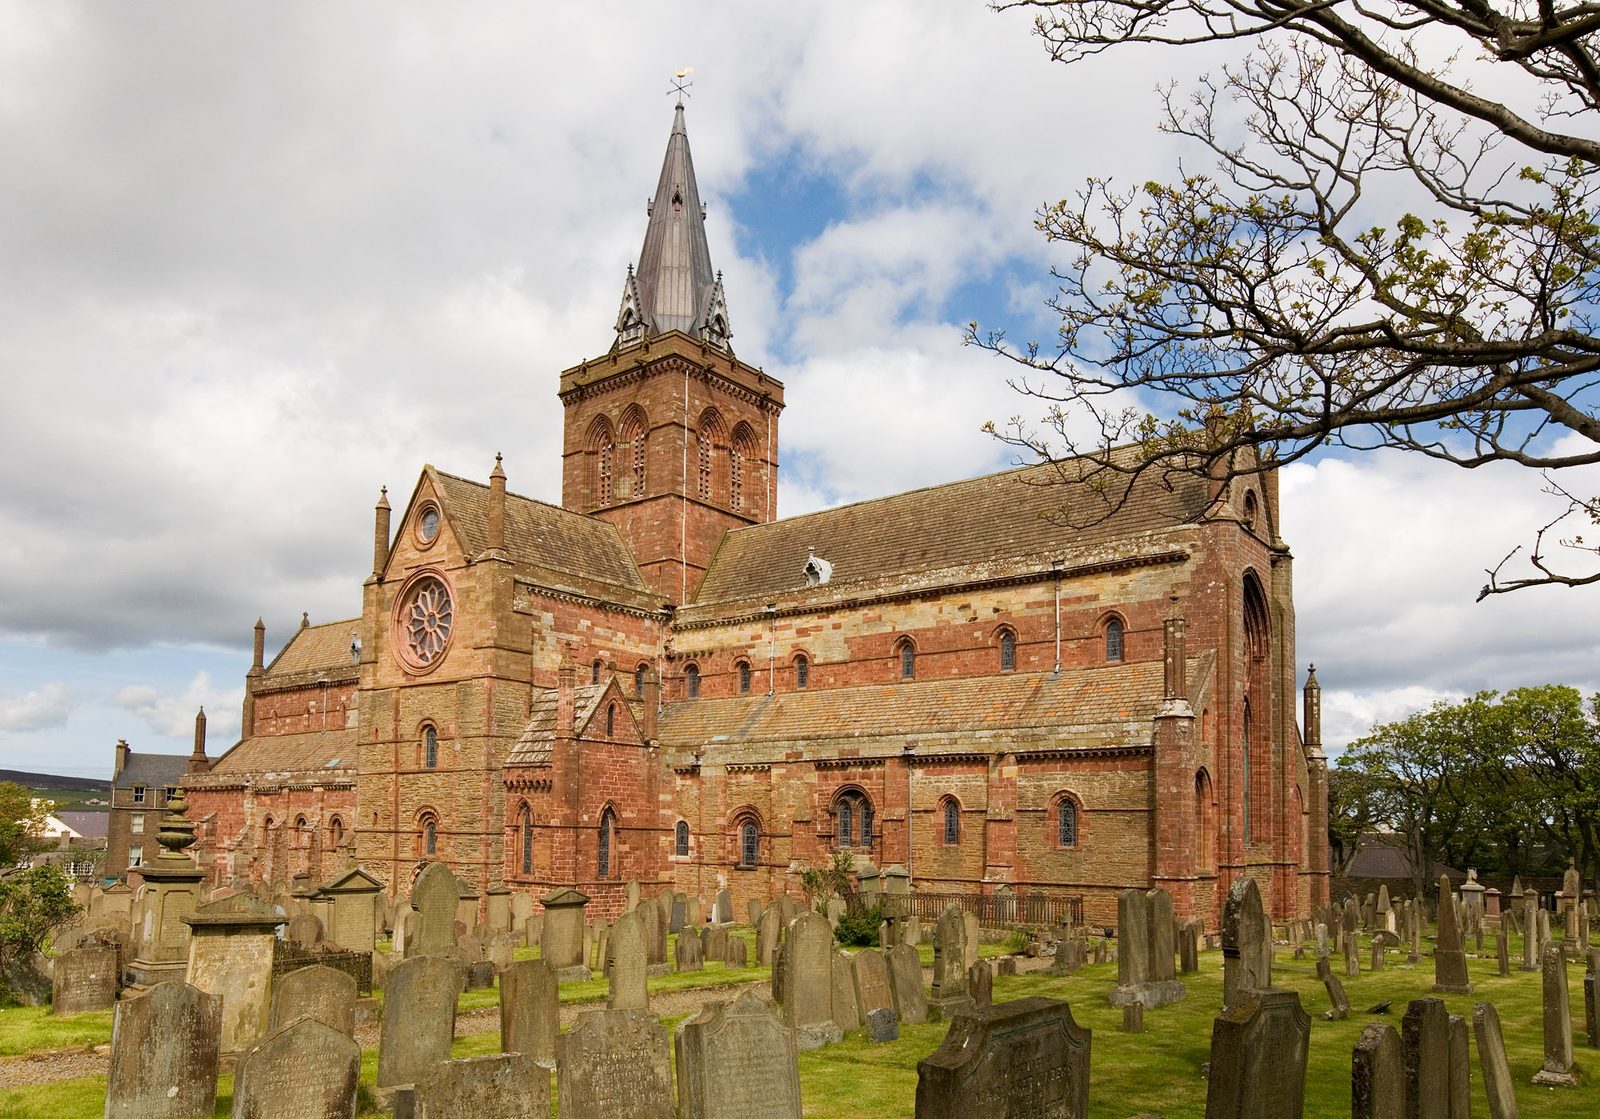
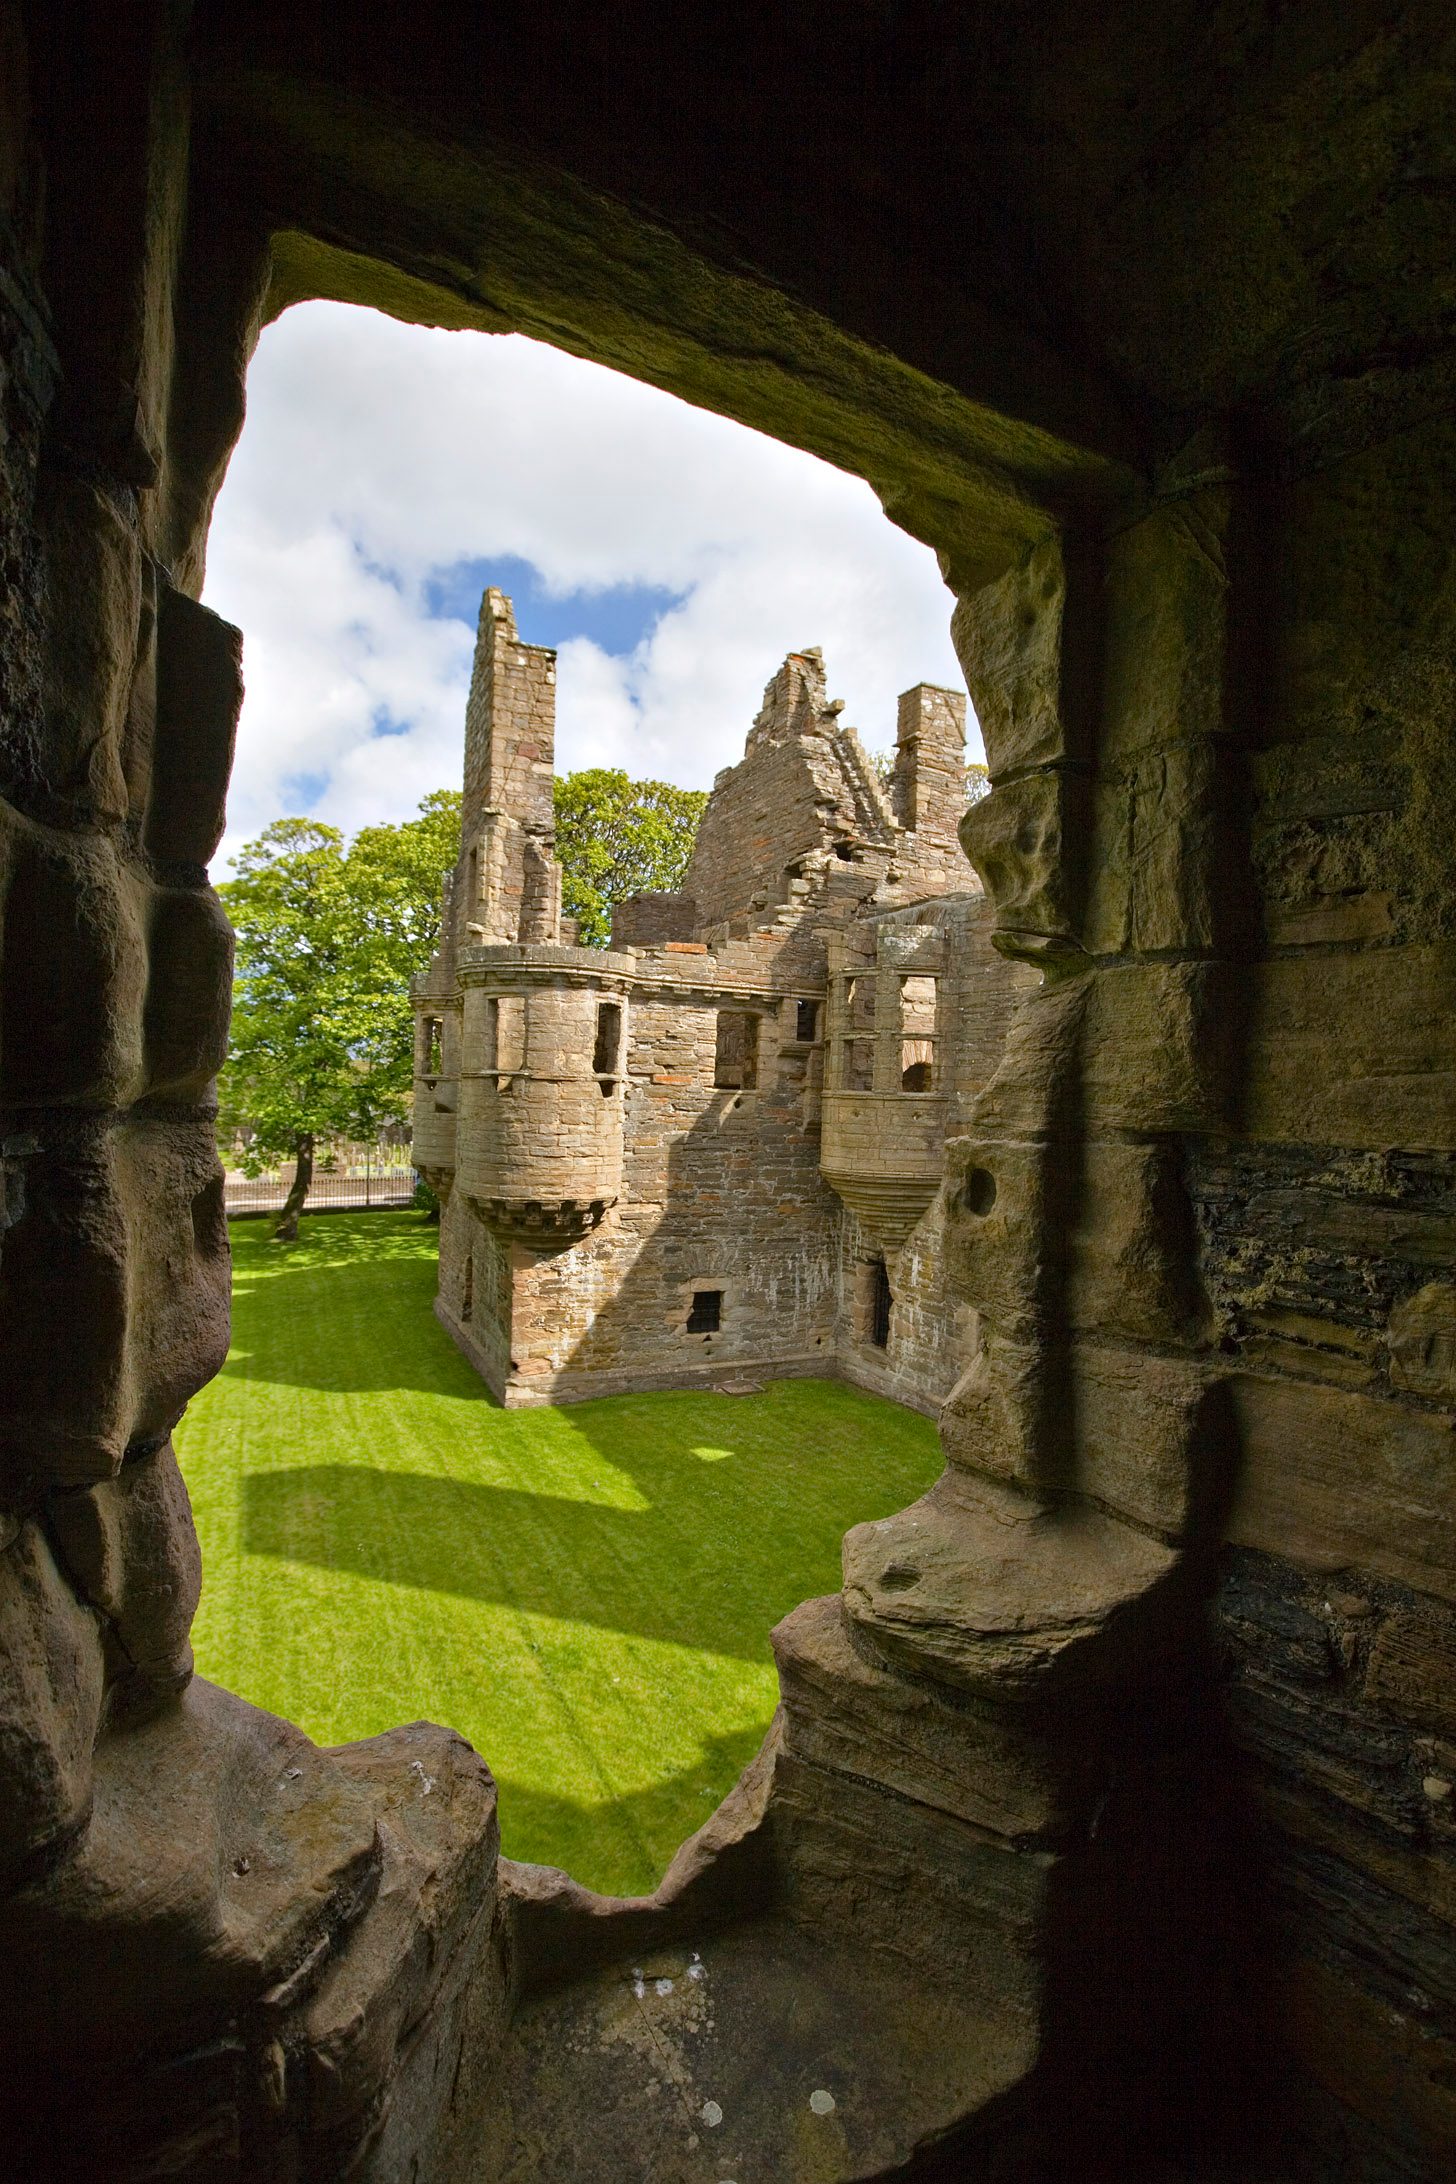
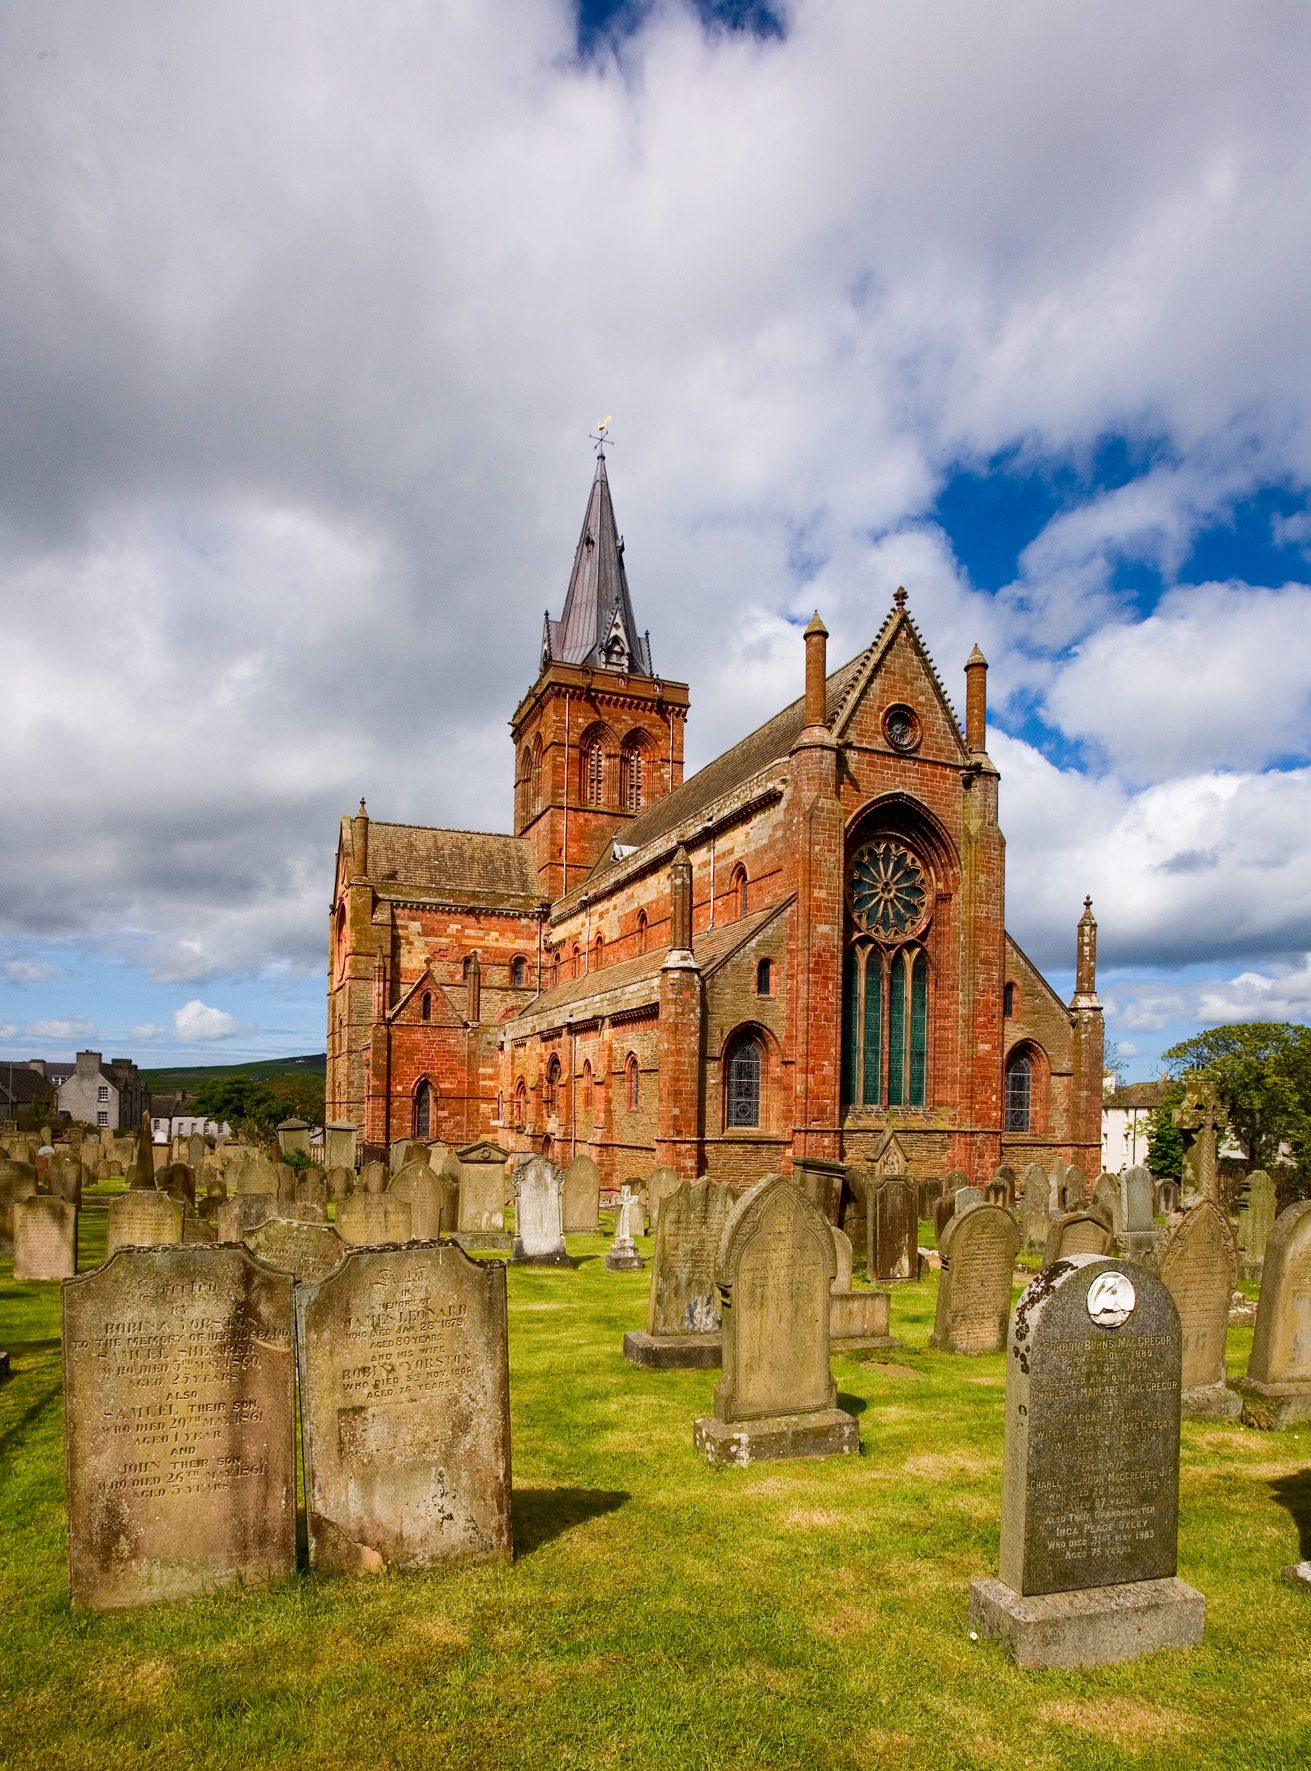
The shot on the left, in portrait frame at 16mm gives quite a different look than the 30mm landscape framed shot on the right. Although they are of the same location, one is an old grave in front of a church, the other is a church surrounded by a cemetery. Very different looks.
Use the depth of field to shoot near-far objects of interest
They cause the viewer’s eye to wander around the photograph, creating various areas of interest that are difficult to obtain with a standard length shot.
So there you have it. Everything I know about shooting with ultra-wide lenses, which are a much more useful tool in our bag than many people realize. I often travel without a telephoto lens, but I never travel without an ultra-wide.

14 Comments
S.horton ·
Best writeup of the subject I have seen in a long time.
Jim ·
This is just the information I needed now that I’ve purchased a Sigma 10-20mm lens for my Sony A700 (APS-C) camera. Thanks very much!
Kunal ·
Hi. I think that is an excellent article and essential for beginners like me. Read it a few times already. I need to buy a wide angle lens which is reasonably sharp and with the capability of capturing images of stars. Can you help me with a rough idea. Is the tokina 11-16mm f2.8 ok?
Roger Cicala ·
The Tokina would be my first choice: very nice lens. A touch soft wide open but very sharp at f3.5 and useful even completely wide open.
Andreas ·
A really interesting and comprehensive guide to wide angles!
Fantastic amount of information and great pictures to prove your points!
Just one advise: you should separate your business blog and the guides. It’s pretty hard to find other useful posts if I’m not interested in renting a lens 🙂
Chirag ·
A very interesting guide indeed. It would be very useful for people like me who have just bought an ultra-wide lens. I bought the NIKKOR 10-24mm. I read your write-up before buying and after buying. Will read many more times to better utilize the lens. Thanks once again!
Francis Teo ·
Thanks, Very useful tips.
Kathy ·
Great explanations and visuals. Thank you!
Cecil ·
Just found this and timing is right on. I am getting a 10 – 22 mm for Xmas for my 7D and your excellent explanation will help my understand of wide angle photography.
Gary Miller ·
Thanks Roger. I have a Tokina 11-16mm on the way and finding this before hand has probably saved me tons of wasted pixels and missed opportunities. Super job of making the concepts very understandable. It was also nice to see your enthusiastic recommendation of the lens in a follow-up.
Christoph ·
Thanks, Roger, especially for the first section of the post.I finally found what I’ve been looking for: that the 4mm between a 12 and a 16mm lens can make quite a bit of a difference. But now I’m wondering if it makes sense to go for the Sigma 12-24 instead of the Nikon 16-35 f4 as I had planned (to use on my d600). There are a lot of trade-off factors between the two, price being one (though not the most important for me), the others being speed, IS, build quality, and the possibility to use ordinary filters. On all of these (except for price, of course) the Sigma looses. It probably looses in image quality too, but I’m not sure. In any case, it wins in terms of price and field of view. Oh, and Nikon also wins in terms of range (which, I think makes it usable more widely).
I’d be interested to hear your opinion on this. Which would you prefer (and why)? And what are customers choosing most of the time?
I kniw you might say it all depends on your needs and preferences, but any reflections on the matt would be highly appreciated. I am not a pro, so I might be missing some basic arguments… All I know is that I keep bumping against the lower end of my nikon 28-300 and I want a lens to overcome that limitation and I don’t want the same to happen with the next lens, but neither do I want to be disappointed by the image quality so that I would revert to the 28mm Nikon anyway.
Ibrahim ·
Thanks for the guide. I really learned alot form your article. I have a canon 24-105 and I always woundered why I see large objects and interesting in other’s landscape photos but not in mine. Now I know I need uw lense. I’ll probably get the 17-40.
Thanks again.
Nick Lee ·
Hey Roger, thanks for the guide 😀 I went the prime route after shooting extensively with the 17-40 and then needing a faster wide prime. Stuck with the 24L and never looked back! I do occasionally rent wide zooms for events though and yes gotta watch those corners!
Daniel gingras ·
Left for a 3 week stay in Spain last spring with a 20mm and a 50mm on my Nikon D700. Never missed my telephoto lens. Great article. Thank you.