As soon as we optically tested the Canon 35mm f/1.4 Mk II lens we couldn’t wait to tear into one for a couple of reasons. One was that Canon has been making a lot of interesting advances in lens mechanics lately, so we’re always excited to look inside their new lenses. Another was that Canon claimed this lens had increased weather resistance and durability. You know I’m pretty cynical about claims like that until I see what’s inside for myself. And finally, well, it’s been really busy all fall and Aaron and I really just haven’t had time to tear apart some new lenses, so we were having withdrawal.
We got a little time this week, so we used it to take apart the new Canon 35mm f/1.4 Mk II. Those of you who like to follow along from home with your own lens go get your #2 JIS screwdriver and a spanner wrench and let’s get to work!
First the makeup decal on the front of the lens has to be peeled off.

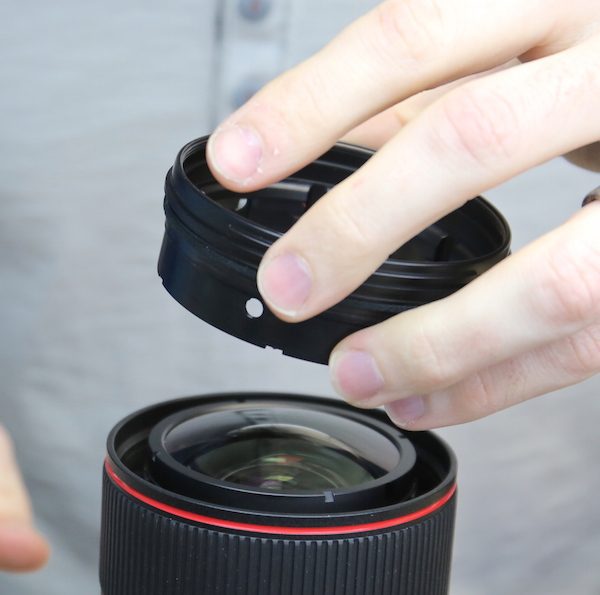
Next we use a spanner wrench to take off the front plastic ring.
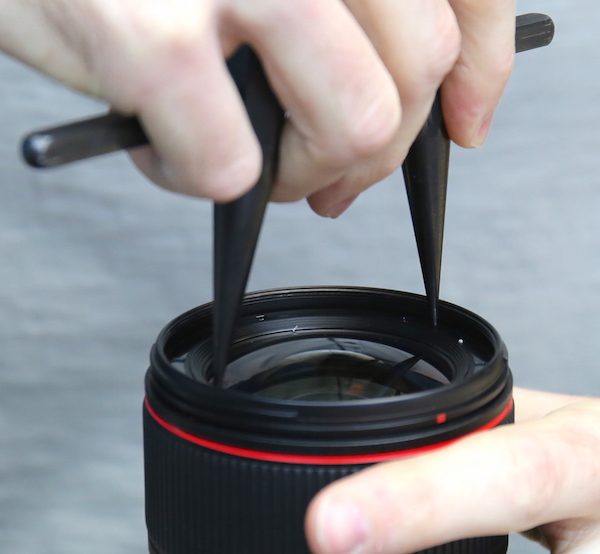
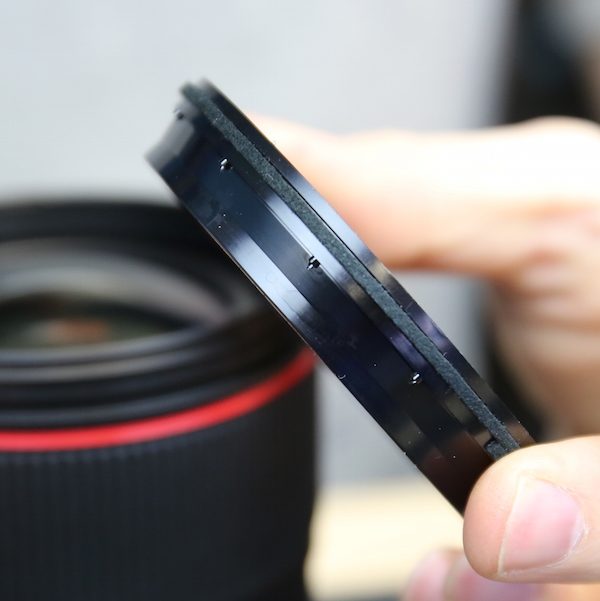
In most lenses rings like this hold the front element in place, but in this case, it seems the entire purpose of this ring is to improve weather resistance. (I refuse to use the term weather seal, and always will. No lens is weather sealed). It fits tightly around the glass and into the front barrel of the lens, and it has a rubber gasket for further sealing internally.
With the weather resisting ring removed, we can looking into the barrel front and see two sets of 6 screws. The brass ones that are open to view hold on the filter barrel. The partially covered set appear to be holding the front group in place.

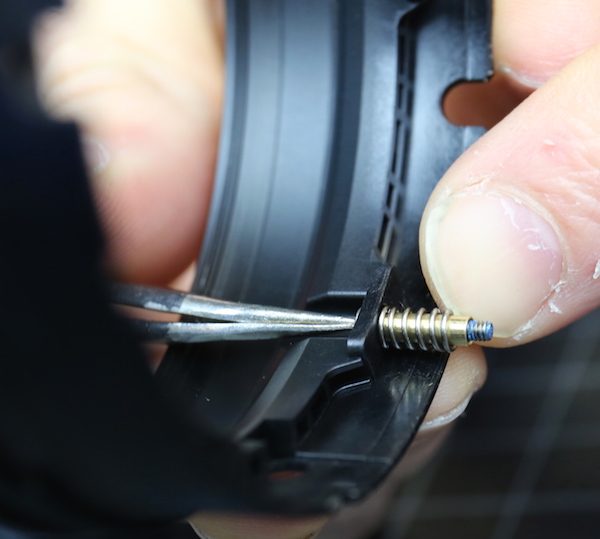
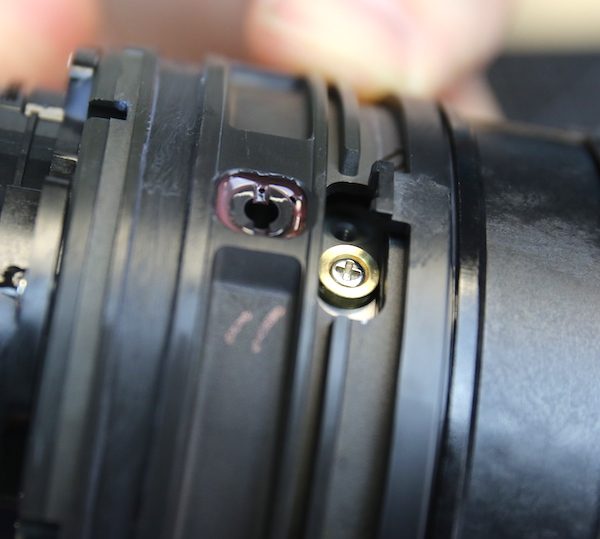
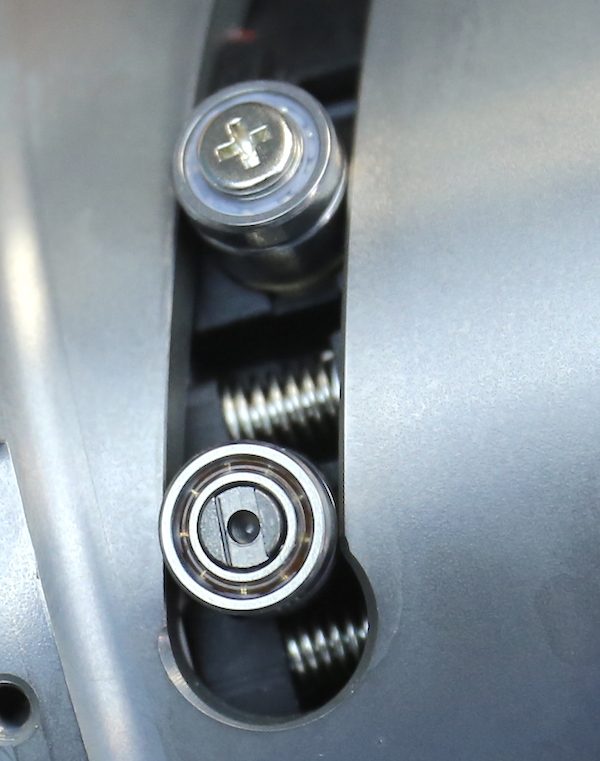
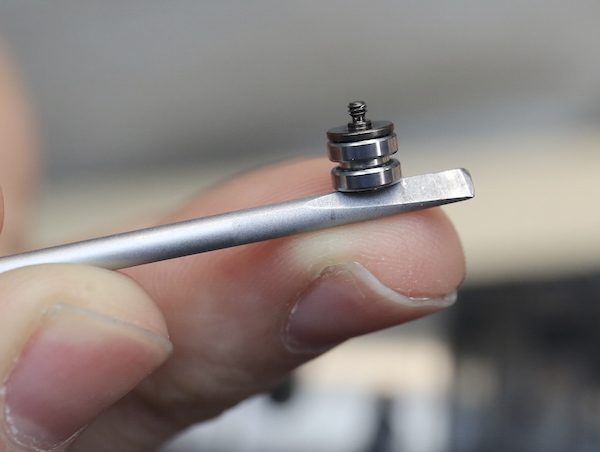
We were impressed with 6 screws to hold onto the filter barrel; most lenses use 3. We were even more impressed when we removed them. Each of the 6 screws is long, strong, and deeply threaded. Not the usual tiny screw assigned to a task like this.
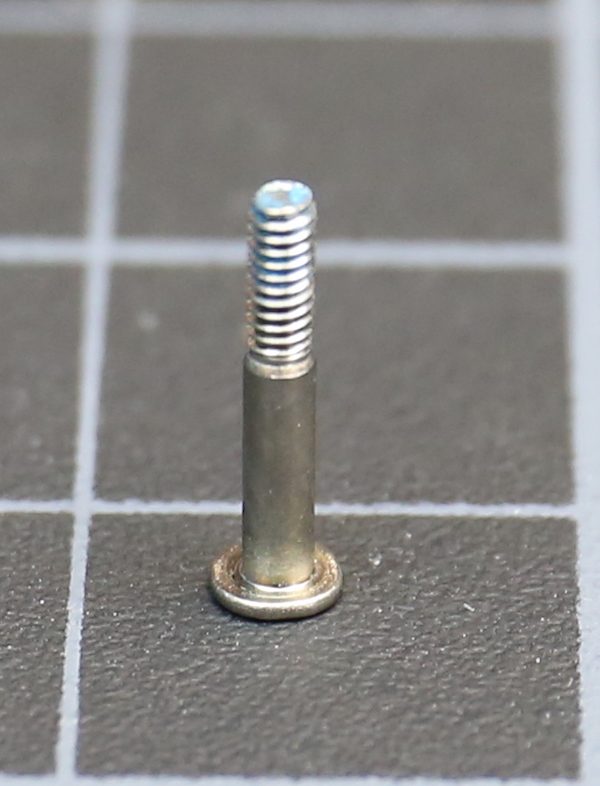
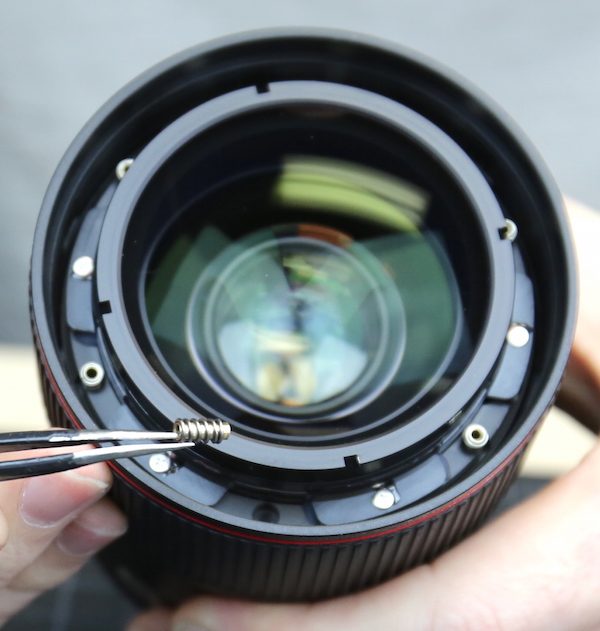
And when the screw was removed, we found that each hole contained a brass reinforcing spacer with a spring around it. So basically each of the 6 screws passes through the brass spacer and screws into the front barrel, with a spring maintaining tension. This is an expensive way to do things and obviously serves a purpose. It may be to maintain even tension on the focusing ring (which is right below the filter barrel), to provide a more even stress distribution, or probably is for something else entirely. But just because I don’t know what it’s for doesn’t mean I can’t appreciate the careful attention to detail taken here.
With the screws taken out the filter ring barrel comes right off. This will be a quick, simple replacement when the inevitable broken filter ring occurs.
With the filter barrel off, we can see that the front group is attached with 6 screws through 6 thick plastic tabs. It’s not visible in the picture, but there’s also a copious amount of loctite around the screws and silicone glue under the tabs.

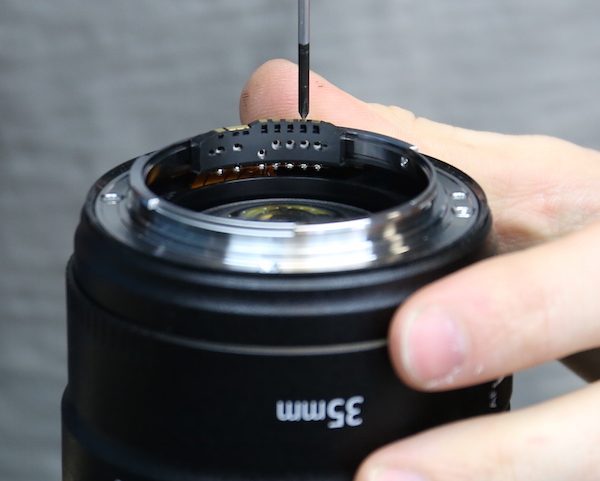
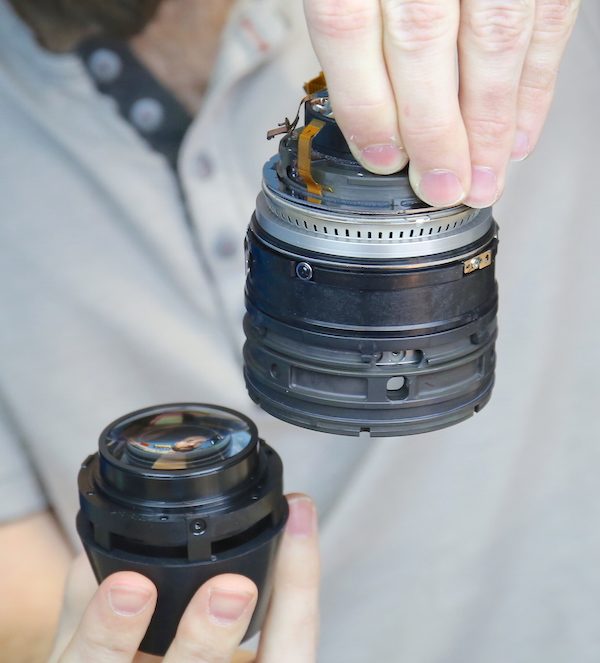
At this point, Aaron decided that the amount of glue on that element meant he might be doing some prying to get it out. Rather than do that blind, he decided to do some back-end disassembly first so we flipped the lens over and removed the bayonet mount.
There is the usual thick Canon rear weather gasket around the bayonet.
Underneath the bayonet is a black plastic spacing ring. The fact that it’s numbered suggests it comes in different thicknesses to adjust infinity focusing distance. Canon tends to use various-thickness bayonets or spacers like this rather than shims.
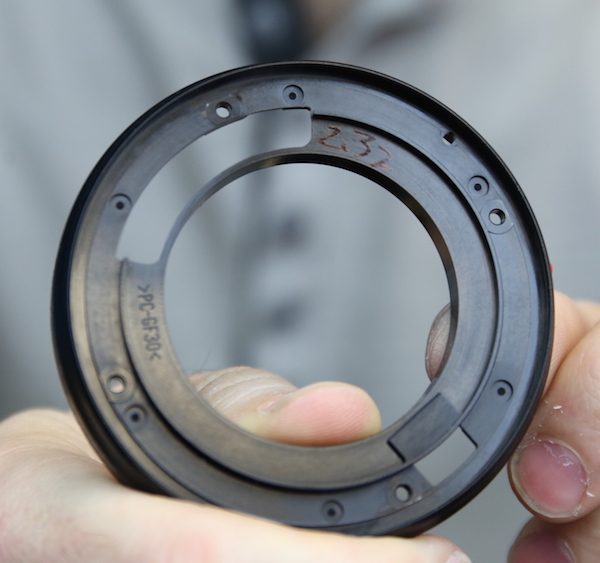
A fairly standard Canon PCB with lots of flex connections is underneath the spacing ring.
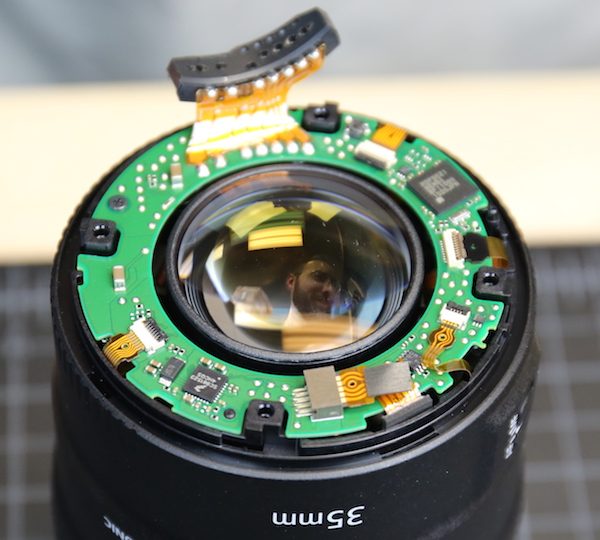
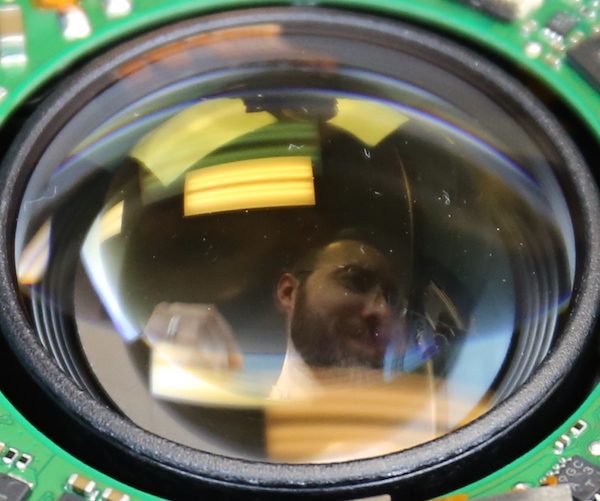
The rear glass does make a nice Selfie-Cam for Aaron.
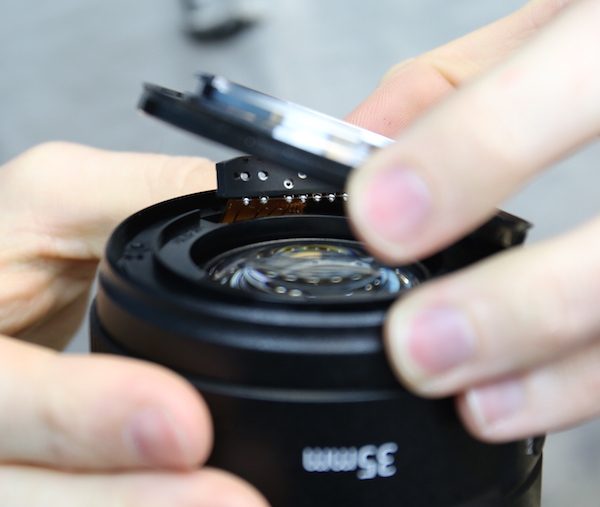
With the PCB off, the screws holding the rear barrel in place are evident – again, multiple robust screws are used, not the minimal 3 screws we usually see.
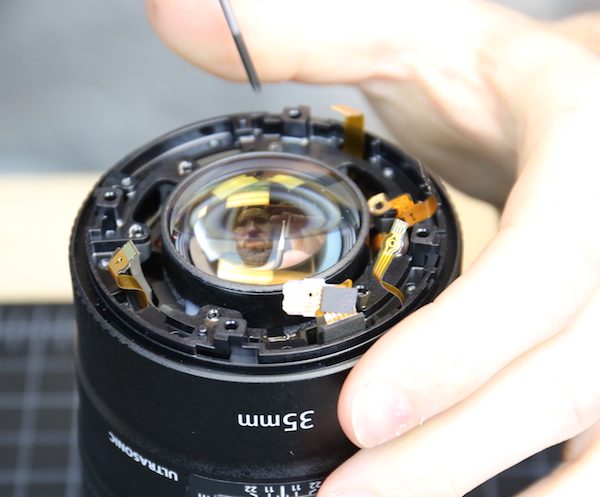
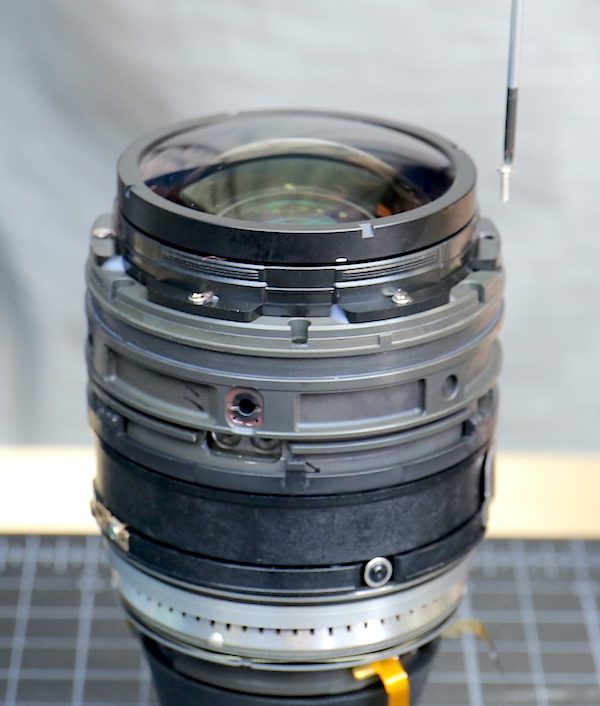
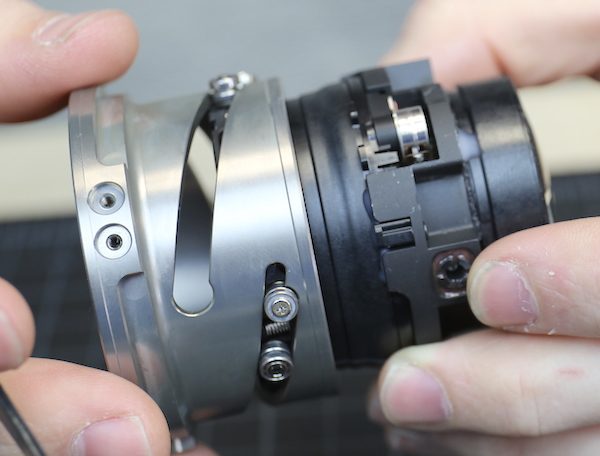
Removing those let us slide the rear barrel off and reveals the more interesting stuff; primarily at this point the rear group and focusing motor.

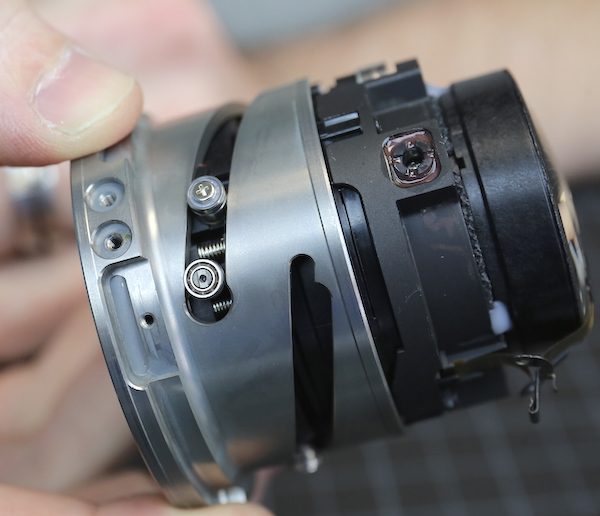
A closer look shows a couple of nice details. First there are two more layers of rubber felt sealing gaskets (red lines) between the rear of the lens and the AF Motor (green brackets). There’s also a very, very robust eccentric collar set (blue arrow) used to optically adjust the rear group. We consider thick nylon collars robust, brass collars very robust, but these massive heavy collars with a center locking screw are beyond anything we’ve seen outside of super telephoto lenses and the 70-200 f/2.8 IS II.
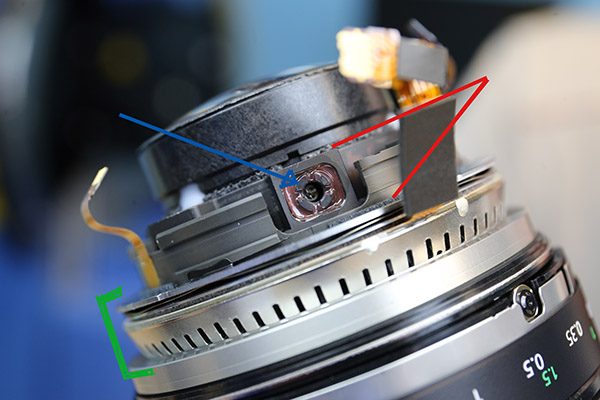
You can also see that once adjusted into position, Canon has sealed the adjustment collars in plastic cement to prevent them from moving. For you that means they’re not likely to get moved during the life of the lens. For us that means we’ll have to pick the plastic cement out when we do adjustments. That’s OK, the pink cement isn’t too hard to get out.
Rather than take out those adjustment collars we went back to the front of the lens and removed the focusing rubber. Underneath that the ring is completely sealed in tough tape, covering all the holes (you’d be amazed how many supposedly ‘weather resistant’ lenses have huge gaping holes under the rubber).

With the tape off, the three plastic keys (white and round in the picture below) that hold the focus ring in place are exposed.
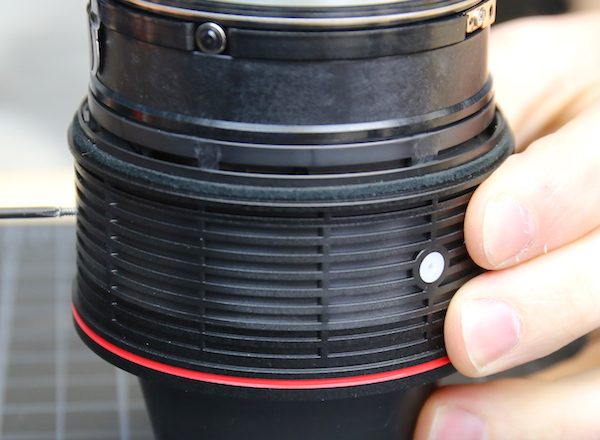
These are large and require a special tool to remove properly, but once they’re out the focus ring slides off the front of the lens. Notice the part of the lens in Aaron’s left hand still contains all of the optical elements. Basically, all we’ve done so far is remove the mount and coverings.
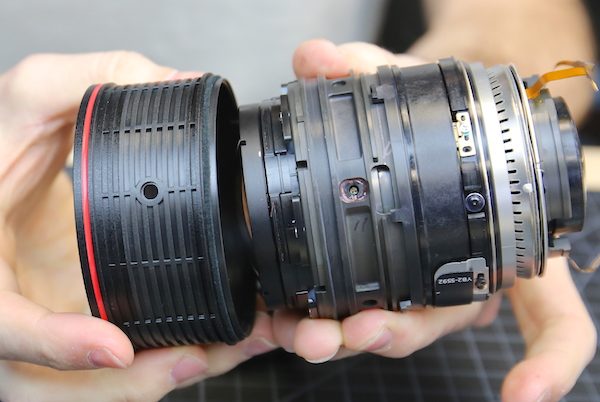
With the focus ring off, we can see another set of robust optical adjustment collars that adjust group 2. (Later experimentation hinted that these were primarily centering collars, with the rear collars primarily adjusting tilt.)
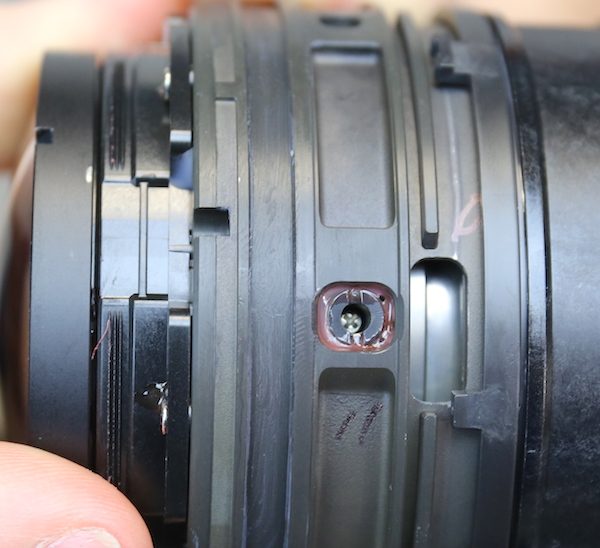
Turning the focus mechanism exposed the stays that the inner barrel rotates on. They aren’t the usual nylon bushings over screws, they are very large brass posts held in place by oversize screws. Again it’s something we’d expect to find in a large telephoto zoom, not a standard range prime.
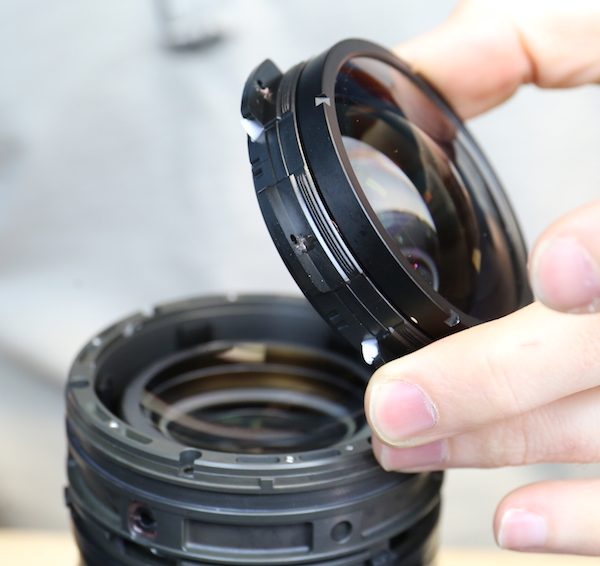
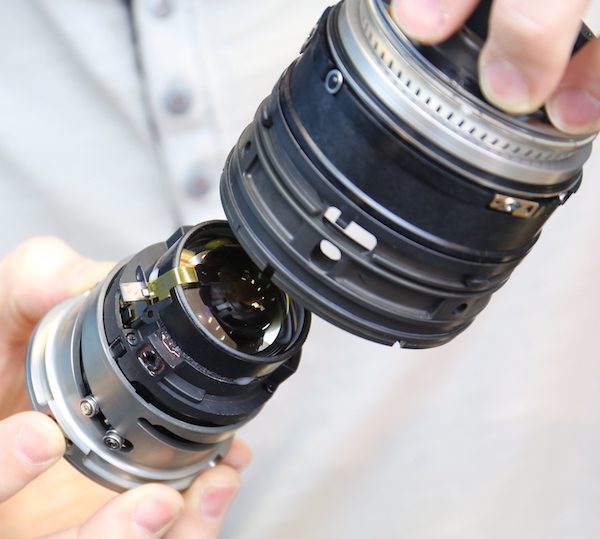
Since we discovered that group 2 and not group 1 was an adjustable group, we felt much more comfortable with prying up the glue and removing Group 1. At this point we weren’t at all surprised to find that not only was group 1 held in place by 6 screws (3 is the norm) but that they were some big, long screws at that.
With the screws removed and a little heat applied to the glue, we were able to pry group one up and remove it. You can see that the top of the front group has a spanner ring holding the first element in place, so a scratched front element can be replaced separately without having to replace the entire front group. That’s a good thing. While I don’t know the cost of a front element yet, front groups like this are expensive, costing as much as $700. Being able to replace just the front element is a good thing, it will be less expensive and the front group doesn’t have to be removed to do it.
Here’s a view inside the barrel with the front group removed. There are two points to make here. The first is minor, and hard to see from the photo, but the front of group 2 is really different and unusual. It’s a concave element with a large band of ground glass around the edge. It’s not important; just different, looks cool, and when one of these comes back dead from water damage I’m making a Christmas ornament out of it.
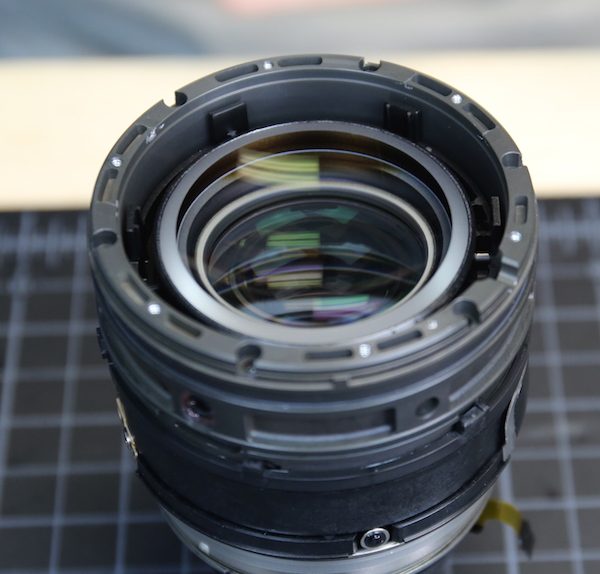
The more important part the thick gray barrel of this lens. That’s heavy gauge metal. All the pieces of lenses we’ve removed attach to this heavy metal center barrel. This is unusual, but it’s so logical I want to weep with joy just for having seen it. I have rolled my eyes for years when people say a lens is “Built like a tank” because it has a heavy metal shell. Then we open it up and see the insides are tiny little screws and weak nylon collars set in thin sheet metal helicoids. That kind of ‘built like a tank’ is probably useful if you want your lens to stop a bullet, but doesn’t make the lens reliable.
This is my kind of built like a tank. There is a flexible polycarbonate shell over a very solid metal core with really heavy-duty rollers, screws, and bearings. That’s a logical way to build things; make the core the strongest part, not the shell. It sounds so simple, but like I said, this is the first time we’ve ever seen this kind of construction in a prime lens of standard focal length. We take apart A LOT of lenses (we passed 20,000 in-house repairs some time ago) and this is the most impressively built prime I’ve seen. This is an engineer’s lens.
At this point we had to decide whether we wanted to take apart the optical core of the lens. Doing so meant removing the large adjustment collars for the front group, and having to readjust the lens optically during reassembly. I spoke at length about why we should just stop here and put things back together. Aaron took out the collars and large brass posts we showed you earlier while I was talking, so I guess he didn’t hear me. After that the front half of the optics came right out of the central barrel (it’s being held in a rubber cone which is not part of the lens in the picture below).
And rotating it to line things up, the rear group could slide out from the focusing motor and barrel as well.
With the USM motor and barrel off we can see the focusing helicoids and the heavy metal rollers that move the focusing elements within the helicoid. In almost every lens, these would be small nylon washers over a screw, not the relatively huge metal rollers we see in this lens.
When you look close up you see these aren’t just sliding posts, there are actually tiny ball bearings inside them. There’s also a spring tensioning system around one of the rollers. I keep repeating myself, but by this point I was really rather awestruck by the amount of careful over-engineering that went into making this lens. Nobody, and I do mean nobody, else is engineering lens mechanics like the newer Canon lenses.
Of course, we took one the rollers out to get a better look at it. This may look small to you, but the nylon collars used in other lenses are at most 1/4 of this size, aren’t metal, and don’t roll, they just slide.
I’ll close with another view of the internal barrels in extended position, this time also showing the aperture control motor.
OK, this concludes the disassembly portion of our program. Those of you who have been disassembling your own lenses at home, just reverse the steps and it will go right back together, probably. Since someone always freaks out when we do a teardown and thinks we’ve made a sacrifice to the lens gods, I will mention that the lens was fully reassembled, Aaron optically adjusted it back to perfection, it’s been completely retested by our techs, and is working fine. Yes, it’s back in the rental fleet and no, it’s not going to have problems. This is what we do all day long.
Comments
I’m sure you can tell we’re impressed with the Canon 35mm f/1.4 Mk II. The weather resistance appears better than most weather resistant lenses. (As always, I’ll add that weather resistance still means water damage voids the warranty.) The mechanical construction is beyond impressive. This lens is massively over-engineered compared to any other prime we’ve ever disassembled. It’s built like a tank where it counts; on the inside. Moving parts are huge and robust. Six big screws are used in locations where 3 smalls screws are common in other lenses. Heavy roller bearings move the focusing group, it doesn’t slide on little nylon collars.
It’s also designed thoughtfully and logically. Things that will inevitably get damaged on any lens, like the front element and filter ring, are designed to be replaced easily. There are some things inside, particularly with the tensioning screws and springs, that I’m not certain I understand the purpose of, but I am certain there is a purpose. If I had to summarize the mechanical design of this lens, I would say simply that no expense was spared, no corner was cut.
Sometimes things are expensive because they’re worth it. Sometimes they’re heavy because they’re so solidly constructed. This is one of those times.
Roger Cicala and Aaron Closz
Lensrentals.com
December, 2015.

58 Comments
JB ·
Excellent lens. I’m glad the fine construction bore that out.
Tim ·
Roger, that makes me feel a *little* bit better about spending so much for my 35L II. My son bought the Sigma Art 35mm and gives me all sorts of grief for throwing away money on the Canon. I’d love to see you take apart one of the Sigma Art 35mm lenses for comparison.
Andre Y ·
Cool teardown, and what a lens! Are those helicoid bearings similar to what Zeiss calls roller bearings when they talk about their cine and Otus lenses?
Roger Cicala ·
Andre, yes, very similar to what we see in large Cine lenses.
Lee Saxon ·
Considering how impressive this lens is in performance and build quality, one can’t help but compare it to the incredibly expensive Otus lenses. I guess it’s time to do a tear-down post on one of those! 😀
Mark A. ·
Great work, and THANK YOU!!!!
Andre Y ·
Yes, please: a teardown of an Otus or Master Prime. You know, so we have a benchmark. 🙂
Roger Cicala ·
OK, an Otus teardown is in the future. I’ve got the Sony 35 f/1.4 up next though.
CarVac ·
I’m surprised they left ground glass surface uncovered instead of painting it black…or is that something only Zeiss would do?
CarVac ·
Oh and: when things like the glue or the pink cement or that tape or the decal on the front get peeled off, what do you replace them with?
Roger Cicala ·
Carvac, well most makeup rings stick right back down, it’s a reusable sticky glue. But we also keep replacement ones in stock for repairs. The internal glues are trickier. We can often guess what they are, or at least what something equally functional will be. A lot of these are very similar to silicone calks or rubber cements, but you have to use things that don’t give off fumes that can fog the elements when they dry.
scott ·
Great teardown.
As I read and studied the pics of the deconstruction, I couldn’t help but to remember when I was a young boy and took things apart to see how they were made. I always had “spare parts” left over after assembly.
Hope you did better.
sek
Brandon ·
CarVac,
Applying lacquer to the edges of elements is done to prevent stray light and is done completely by hand, with a paint brush. It’s not exactly an accurate process; a skilled technician applies “an amount” of lacquer and it dries. In general, you don’t want anyone hand doing anything near an optical surface; the tolerances are too small for anyone to do reliably by eye. The centering tolerance is on the order of 0.1mm. I don’t know about you, but I can’t reliably paint that well, especially under pressure by management to produce as many pieces per day as I can 🙂
The ground edge also absorbs stray light (more accurately, scatters most it in a very broad fashion – it will dissipate to the point where it has no practical affect on image quality). Ground bevels also help prevent things like edge chipping.
If they’re done on a CNC optical grinder like those made by e.g. Optotech, Schneider, Optipro, Satisloh, etc, the achievable tolerance is about 10um. While CNC is faster on a per-part basis, traditional grinding and polishing you can perform on up to 6 elements at once, so it is faster in the end. Surfaces made through CNC generation are typically ~4x better than those by traditional methods, but the cost is also about 50% higher per optic, so I don’t know if Canon is using CNC generation for their entire line. They do a *TON* of in-house development for manufacturing (see: http://proceedings.spiedigitallibrary.org/proceeding.aspx?articleid=1008085 for an example).
Essentially, that edge being ground, while unique, is not a bad thing. In fact, it is most likely doing something very good to prevent flare.
Regards,
Brandon
Hakan ·
Another great teardown…i very much enjoy reading your teardowns and at the end, feel like my fav. series season is finished and waiting for next season…
with big hunger, waiting for your sony FE 35 F1.4 teardown, i hope it’s built quality is top notch, since you mentioned it cant be adjustable later :)….
Lee Saxon ·
These articles are really interesting. Keeping these in mind for the day in the (hopefully not too distant) future when my company ventures into photographic lenses.
Tony ·
Don’t forget the two Nikon 1 system lenses that can go underwater when mounted (properly) to the AW1.
Those should be considered fully weather proof.
Riley Escobar ·
I guess it’s the use of the word “weather” that’s questionable? Nikon uses waterproof and freezeproof, but I guess they’re not lightning proof or hurricane proof (thinking of other kinds of weather).
John MacLean Photography ·
I wonder if that’s the one I rented from you in October? Ha! When I could hit focus in low light at 1.4 it was UH-mazing! I compared it to the Sigma Art wide open and decided to rent this one. I hope to buy it one day.
Thanks for the breakdown.
http://tinyurl.com/Canon-Sigma-35mm
C Barry ·
I may not find Canon’s general photographic offerings even remotely interesting any more, but looking at these tear-downs it’s clear that they have some solidly built lenses, very impressive.
Dave Belcher ·
Interesting and informative. High quality stuff here, both with the lens and the tear-down. Do you have any tear-downs of Sigma lenses, particularly their Art series? I’ve been using a Sigma DP3 Merrill with its 50mm lens and the images are extraordinary when recorded with the Foveon sensor. My next projects will use a SD1 Merrill with a Sigma 70-300 Apo lens mounted on the GigaPan for recording rather large panoramas in the neighbourhood of 5-10 Gigapixels. Each of the Sigma images is 88.3 mb when converted to 16-bit .tiff from the original .RAW files. A typical GigaPan can contain up to 1000 separate shots. Only weakness is the short battery life, perhaps 100-200 shots max. Writing the .raw data to the card is time-consuming as well, on average about 10-12 seconds. BUT, when you see a finished print on canvas that’s 20 feet wide, you know that it’s worth the effort.
Fotograf nunta Brasov ·
Great teardown! Canon shows us another time this is the best lens manufacturer! Thank you for this great super review 🙂
Lynn Allan ·
Did you get to the Blue Spectrum Refractive Optics element? Any thoughts on it?
I’m very much looking forward to the tear-down on and Otus.
Also, the Zony FE 35mm f1.4 which seems problematic with q/c variance.
Samuel H ·
My guess for the purpose of the springs for the front mount: to absorb shocks in case you drop the lens, so it doesn’t get decentered.
obican ·
http://wordpress.lensrentals.com/media/2015/12/collar-closeup.jpg
This is the part that makes me buy the lens, disassemble it, take a shot of this part, print it VERY large and hang it on my wall. I won’t even care if I can’t put it back together.
Jaap van der Zaag ·
Interessting story, though nothing beats my zeiss zf2 collection in lens mechanics i think.
Btw how expensive is a roller ? 1 or lets say 5 dollar ?
Thats no justification for the high price when compared to a sigma art lens.
Jack Zhan ·
The rollers have more value in durability and engineering expertise than its raw material value. You pay more for better design. I think a zeiss user would know this.
Martin_MM ·
Excellent info value, that is a real review (together with copy consistency and the other measurements)! I think many of us are very interested esp. how Sigma ART line is engineered – any plans for that?
Nemo ·
Great to know my money was well spent! I literally bought the Sigma 35mm for a job the day before B&H had the Canon 35 in stock.I did a few dozen test frames with the Sigma. It was OK, but I was a little disappointed with its wide-open performance. The next day, B&H announced they had the Canon in stock, I exchanged the Sigma for the Canon and haven’t looked back. Unbelievably sharp near wide open with the 5Ds, with very little distortion. As I said, money well spent, knowing it’s capabilities and now build, even at nearly double the Sigma price. And yes, all that engineering IS worth what they charge. Thanks for the post Roger!
James ·
Cool teardown! How long did that take?
Roger Cicala ·
James, about an hour.
Michael D. Rubin ·
And how long to put it back together and calibrate it?
Oleg ·
Impressive! Thank you guys for your time doing the tear down and the review.
Alan B ·
Thanks for the teardown. Did you locate and/or make any observations about the magical Blue Spectrum Refractive Optics element?
LorinDuckman ·
Never saw anything like this post. Very informative and transformative. Knowing more about the lens brings the shooter closer to feeling the camera.
Roger Cicala ·
Alan, it’s the sealant used between two of the cemented elements in group 1. We can’t see it or get to it without destroying that group.
MPNavrozjee ·
Nice to see some old fashioned mechanical engineering standards. Many professionals working today, no fault of theirs, are unacquainted with durability standards and over-engineering techniques such as these. Hearkens back to camera gear of 50 years ago.
Lynn Allan ·
LR used to release “Repair Data” every six or twelve months. This last one was Aug 6, 2013, covering 12 months. Has there been one since then? I’d appreciate an update. Thanks.
Roger Cicala ·
Lynn, we are working on a much improved way of doing it and hopefully will have something out in a month or so. Truth is I always did it by hand and we’re just way to big for that to work anymore. The programmers are writing code to pull that data and analyze it.
Roger Cicala ·
Riley, it’s the use of the word “proof” and “sealed”. They aren’t sealed and they aren’t proof. Resistant I’ll buy, although that’s a very gray word with a very wide range of possibilities.
Roger Cicala ·
Michael, about an hour.
Brad A. ·
If I had to guess and understand the orientation of these parts, I’d say those long front screws backed by springs look like they’re intended to absorb impacts to the front of the lens at the filter ring by absorbing energy and allowing a bit of movement.
Neil Partridge ·
I feel a little bit sick seeing that … interesting but can imagine waking up after a nightmare based on a table of lens components. Hats off to you folk!
kimH ·
Roger, Aron – thanks again for yet another highly interesting teardown! I really enjoy reading and watching those. It did provoke me to ask 2 questions NOT related to this article.
Some time a go there were a few articles by Roger about how the AF performance appeared to have improved (2 years ago?) and the suggestion about a feedback loop in the AF system (sensor in the Lens would have location feedback to the AF system) – did this turn out to be the truth or was it AF improvements driven by something else?
ANDANDAND
when seeing this teardown, would it be unthinkable to teardown the 11-24 – I think it could be as exciting as the one we have here, maybe even better 🙂
Roger Cicala ·
KimH,
Phase detection AF in SLRs turned out to be so complex we decided we just couldn’t spend the 100s of hours it was going to take to tease out all the variables. I can’t say about the 11-24 for certain, but it is interesting and we may get around to it.
Mark Laing ·
Superb analysis!
kimH ·
Roger – i have tried to find somewhere to send you a mail, but here goes.
There is something odd with the/your blog-comments. I can only see older notes like 6-8 days ago on this teardown.
Occasionally newer ones pop up for a short moment (so I know you have answered one of my questions on the “A-Focus feedback”, but not managed to read the entire answer).
I have logged-in and logged-out, sorted as well as used iOS, W10, Mac and various browsers… to no avail.
Roger Cicala ·
Kim, I’m not sure what’s causing the issue, but I can always be reached at Roger at lensrentals dot com.
asiafish ·
Wow, very impressive. I’ve had mine for a month and don’t plan on taking it apart, but the quality is obvious every time I mount it to my 6D.
Dylan Howell ·
I wanted to take my 35L apart after dropping it and having it stop focusing.. after seeing these photos, I’ll pass.. haha.
A-Sign ·
The build quality of this Canon lens looks way more solid than the Nikon 105mm f/1.4E lens for over 2.000 € price tag. And i say this as a Nikon owner! My trust in the quality of Nikon products is sinking.
Enzio Ardesch ·
Did you guys notice any looseness in the focus ring? Do you know what kind of tool is needed to remove (tighten) the white ‘screws’ that hold the focus ring in place? My focus ring rattles but there aren’t normal screws to tighten….
Roger Cicala ·
Enzio, no we really don’t and those white things are just pegs that pop in, they aren’t screws and don’t tighten anything. If the focus ring is loose, there’s probably an underlying reason deeper in the lens.
Hernan ·
Hi Enzio… did you find a solution to this? I just bought this lens and I also have a rattle clancking sound in the focus ring (vertical axis)… So dissapointed with BQ.
Enzio Ardesch ·
Nope. I have had contact with Canon CPS whom checked their examples. Those lenses had the same movement. The shop where I bought the lens from unboxed 4 more 35mm’s, which also had the same movement. The optical quality is top notch, so I have accepted the rattling. And quite honestly had complete forgotten about it until your post.
Hernan ·
Wow! First of all, i sorry! just bought the lens, made a quick search about it and your comment came up… Guess is a normal condition of this premium lens… rattling loose clanking focus ring. Thanks for the reply!
Andre ·
Hi Enzio. After reading this whole review really want me to “fix” this focus ring looseness. For me it is quite annoying in a lens of this class. ( I loved manual focus). Maybe Roger could guides us?.
Jake Warrington ·
Great teardown review! This lens is tough. I was trying to place it back in the camera bag and accidentally dropped it three feet onto concrete at our son’s college graduation. The lens bounced numerous time down the stadium stairs and we were in the upper level. Fortunately, I had both lens caps on and the lens hood was in the reverse position, which provided some shock absorption. I was sick to my stomach! Once I retrieved the lens, I immediately checked that it still worked and it did. Built like a tank!
burgo ·
do ou have a teardown for the Canon 35mm f1.4 L version I ?