We tend to not publish tear-downs of super-telephoto lenses. They’re big and heavy, always well made and well engineered, like you would expect in something that costs as much as a used car. Big, heavy, and boring don’t make for an interesting teardown. So we take them apart, make our in-house repair manual, and don’t put it on the blog.
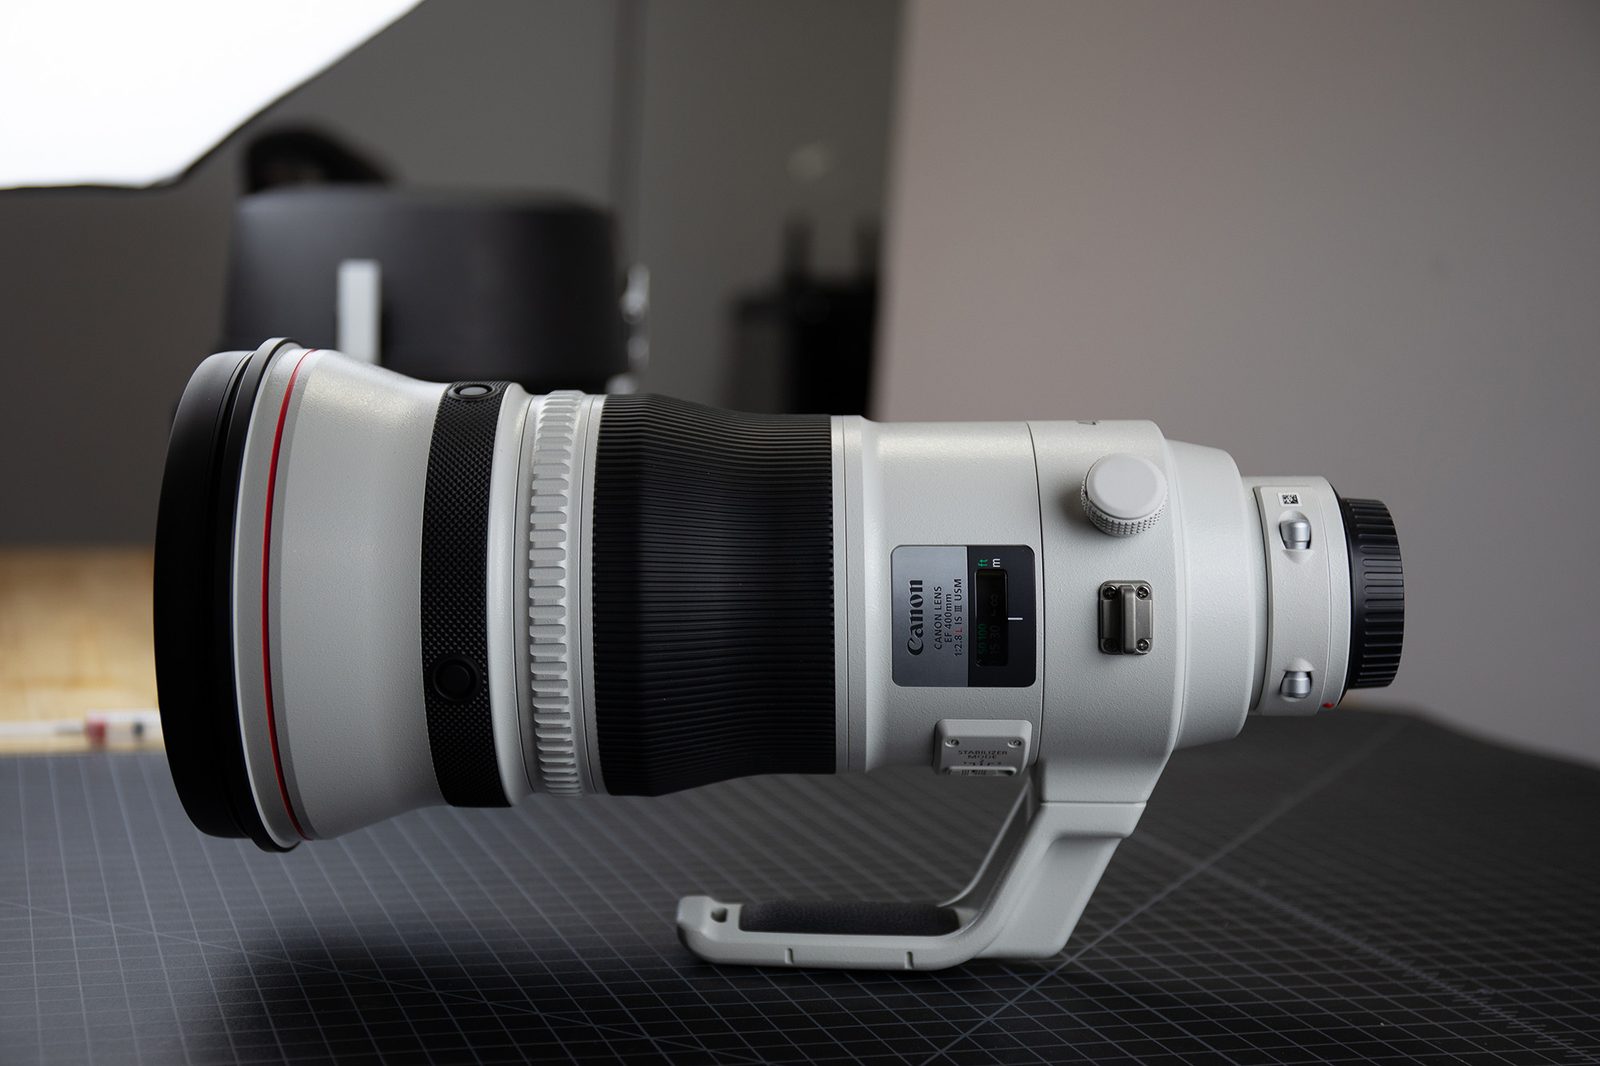
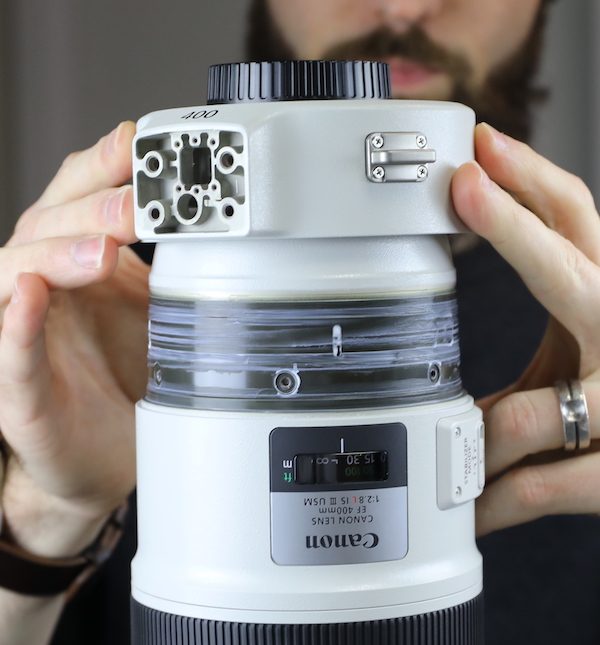
But when the new 400mm f/2.8 lenses were released we decided it was finally time to publish a teardown of one. Largely, because they are amazingly light (you see what I did there? largely light?) and we were really interested in how they did that. I remember when shooting a 400mm f/2.8 was not only a statement about your disposable income or professional status (or both). It was a statement that you were a manly man, able to toss around a massive piece of optics and mount it to a tripod sturdy enough to double as a small crane on a construction site. Now they have one I can handhold. For a couple of shots, at least.
In this case, there was also the added attraction that both Canon and Sony released nearly identical, lightweight, optically excellent 400mm f/2.8 lenses at the same time. So this gives a chance to compare the two. Sony lenses have lagged a bit behind Canon in lens’ build quality, but they’ve been catching up. This looks like a giant leap for them.
We’ll do the Canon 400mm f/2.8 IS III first because Canon has been at this a long time and because there were several of the Canons in stock today. Also, this will give the Sony fanpeople a full week to bash the Canon lens, because that does seem to be what they live for.
So, still stinging a bit from our near-disassembly of the Canon RF 50mm f/1.2 L, Aaron got out his favorite screwdrivers and hex wrenches and we began to open up $12,000 worth of Canon telephoto optics. (That we have favorite brands of screwdrivers and hex wrenches is a sad, complete, and accurate description of what kind of people we are. We’ve had 20-minute, bitter discussions on the relative merits of Wiha Precision vs Vessel Megadora screwdrivers that are as ugly as any Canon vs Nikon internet thread.)
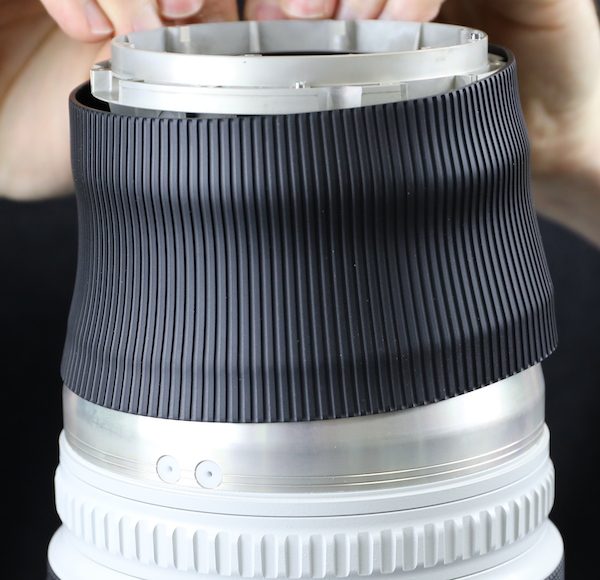
The Tripod Ring
You know it’s a super telephoto when disassembling the tripod ring gets its own section. But they really are rather complex and actually, this is the part of the post a lot of people might actually use – cleaning out a gritty tripod ring is pretty easy and straightforward.
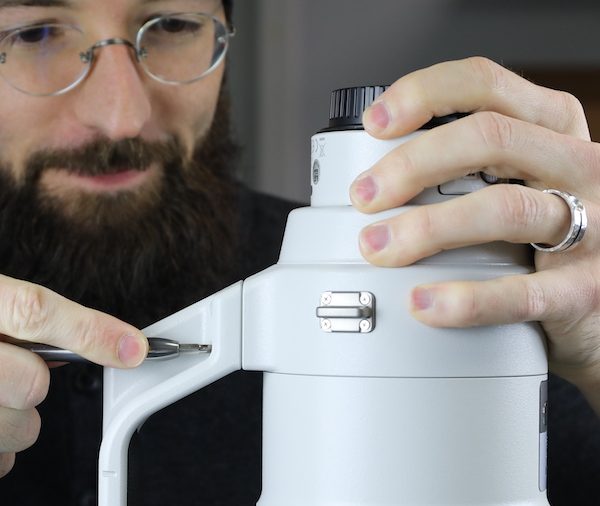
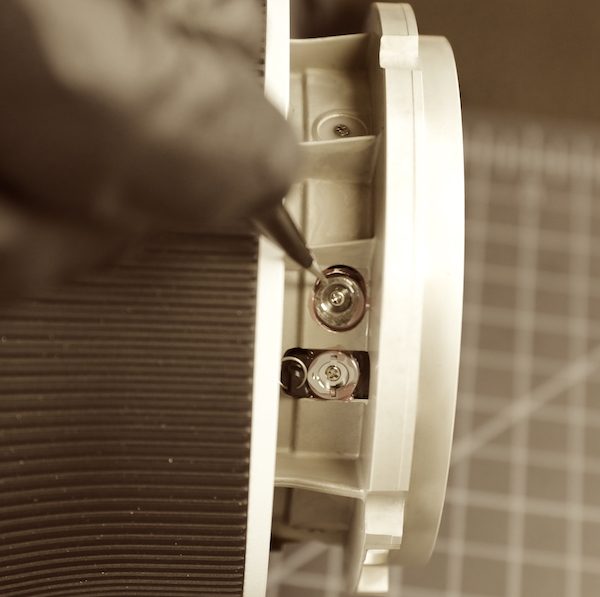
First, of course, we remove the tripod foot.
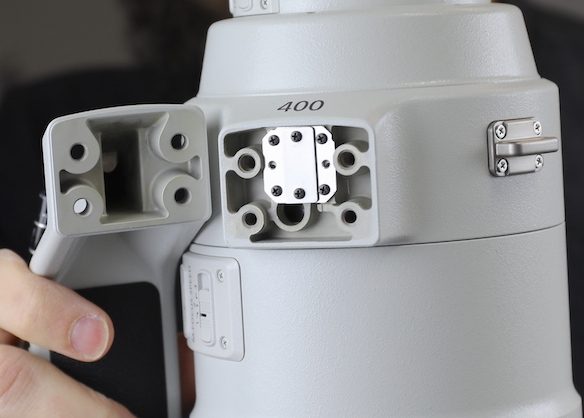
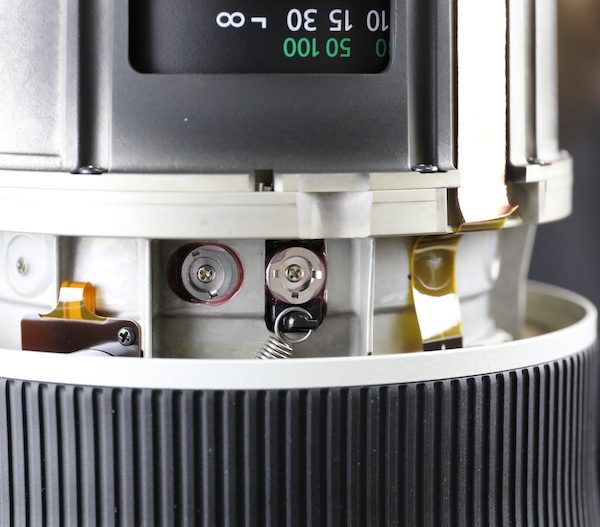
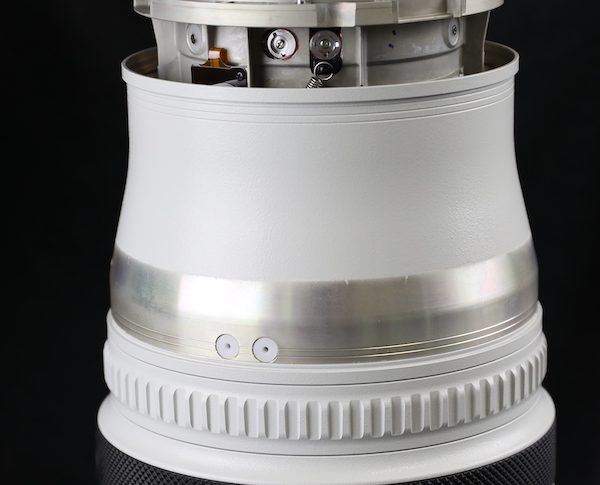
Underneath the foot is a couple of plates that cover the click assembly.
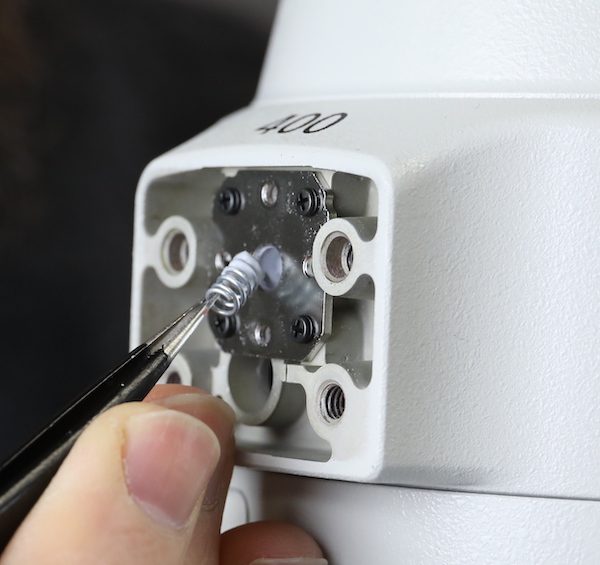
Taking off the upper plate releases the pressure spring. There’s plenty of lube in there, so the spring doesn’t try to leap across the room, as some springs do.
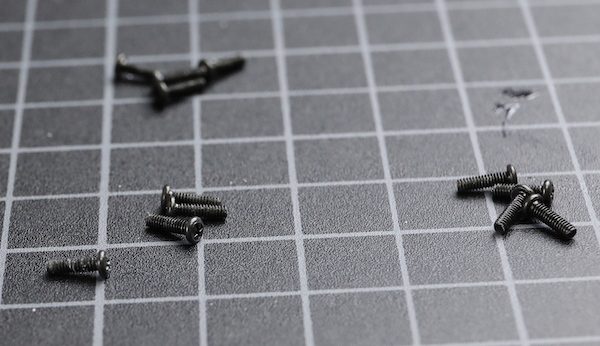
The other four screws hold in the click assembly.

This is a simple roller in a casing. The spring pushes the roller down against the lens barrel.
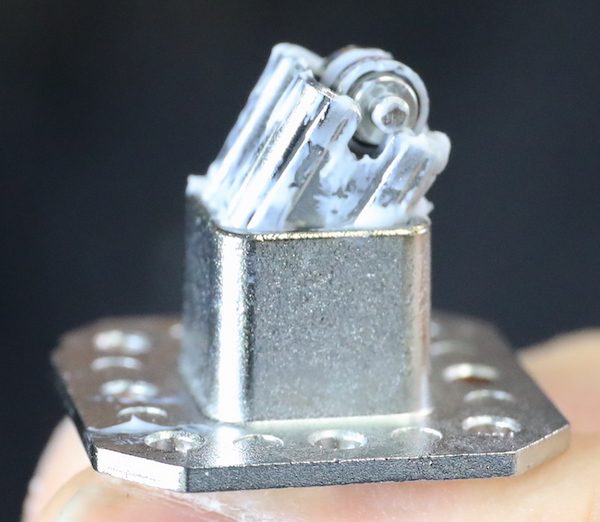
And as you turn the tripod ring around, you feel that satisfying little click every time the roller passes over one of the grooves in the lens barrel.
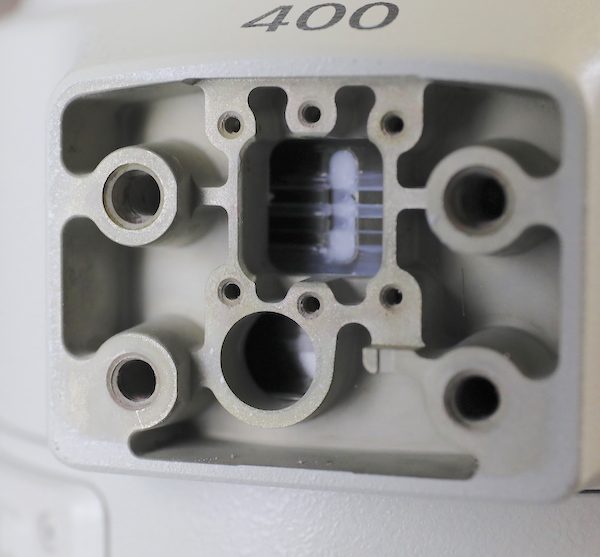
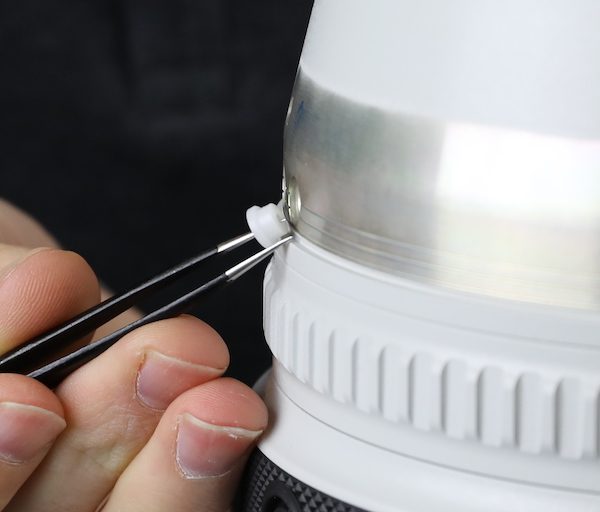
If you notice in the image above, there is a nice, round hole below the click mechanism. When you rotate the ring around you can line that hole up with the roller assemblies the tripod ring glides around on and remove them.
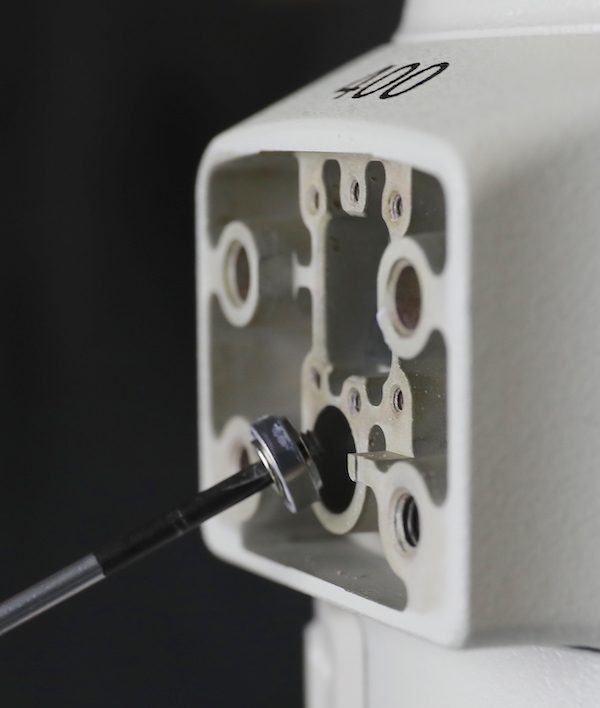
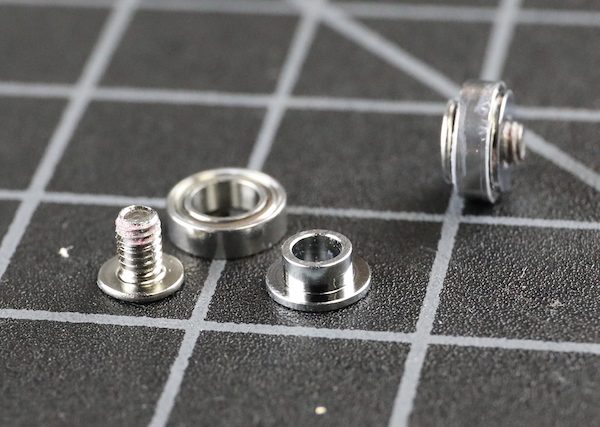
If your tripod ring starts to catch when you rotate it probably means that one of the roller screws got a little loose and backed out a bit. Simply tightening it should fix things. The rollers are in three pieces: the screw, a sleeve, and a ball-bearing roller.
Once the rollers are removed, the tripod ring slides off. This is nice — some super telephotos won’t let you remove the tripod ring without removing the rear barrel. You can see one of the click slots in the barrel, filled with white lubricant.
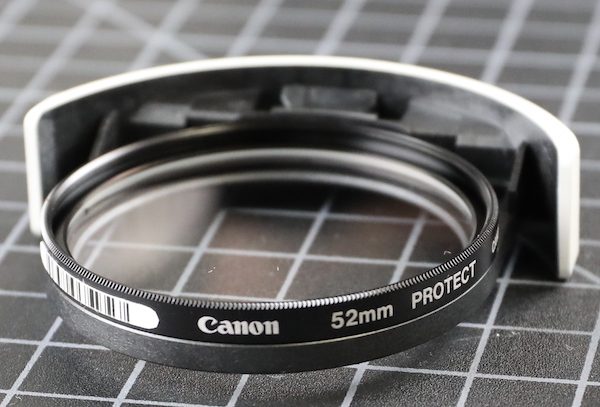
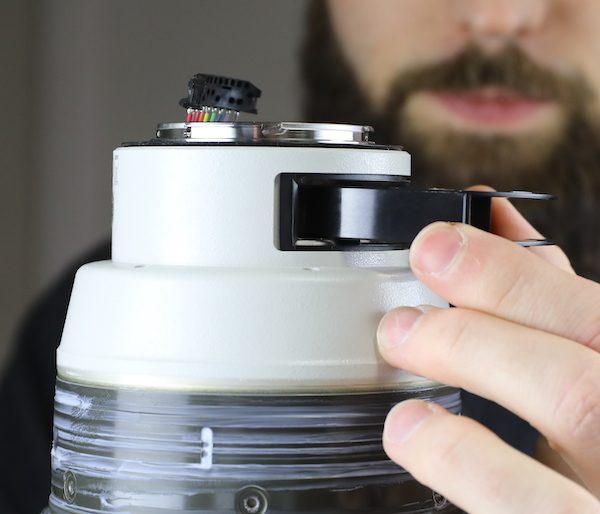
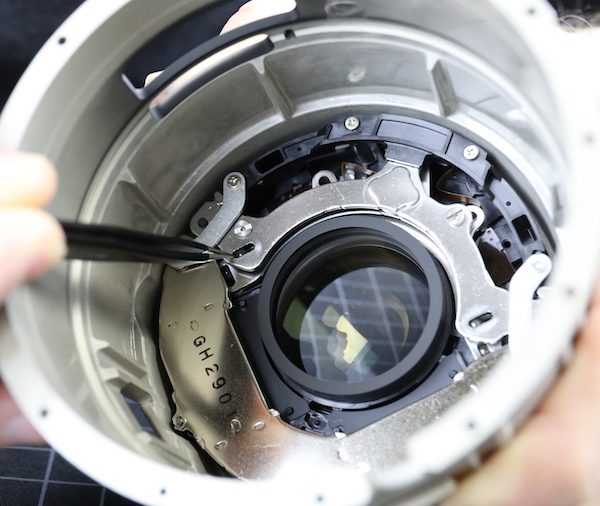
Before we get to the real disassembly, we took out the drop-in filter, which we really, really, really like. Why? Because instead of being a proprietary $200 filter, it’s a holder that you can attach any 52mm filter to. So if you scratch it or want a CP filter, just buy a standard 52mm replacement filter.
Opening Up the Back
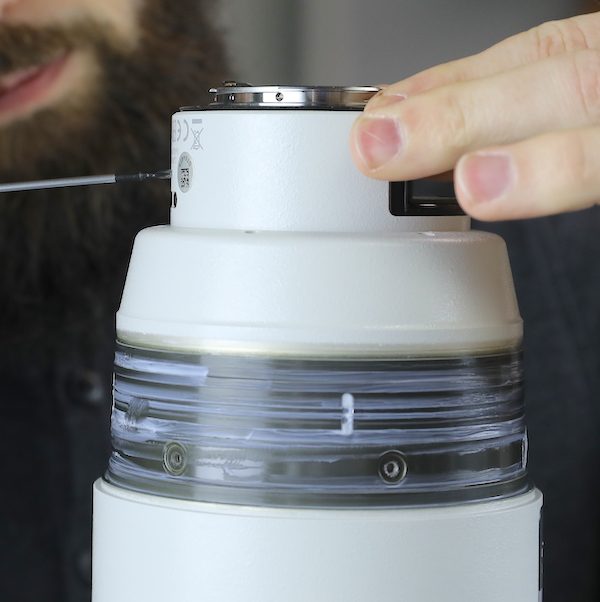
There’s a screw through the side of the lens that holds the filter holder assembly in place.
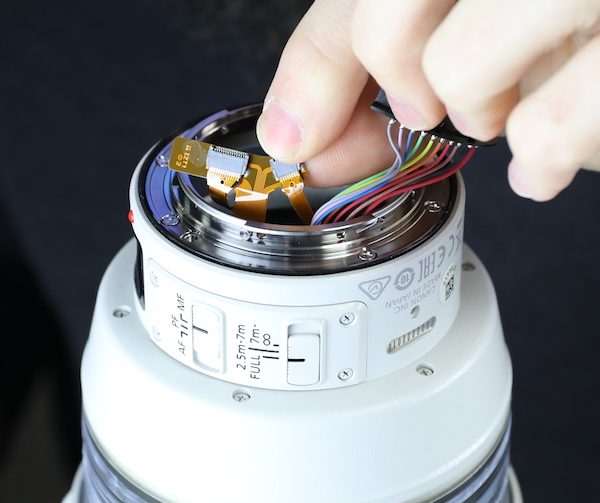
After this is removed, a couple of circuit connectors that are attached to the filter holder with double-sided tape must be freed up. We could have taken off the switch panel and disconnected the flexes there, but it wasn’t really necessary.
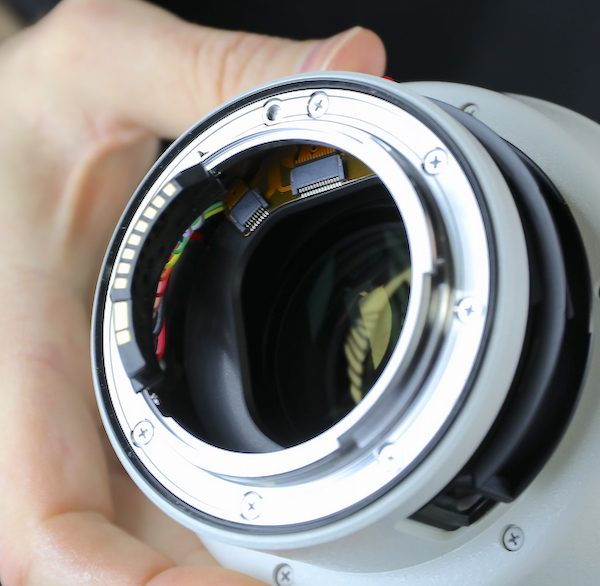
After that, the filter holder can be popped out; it snaps into and out of place.
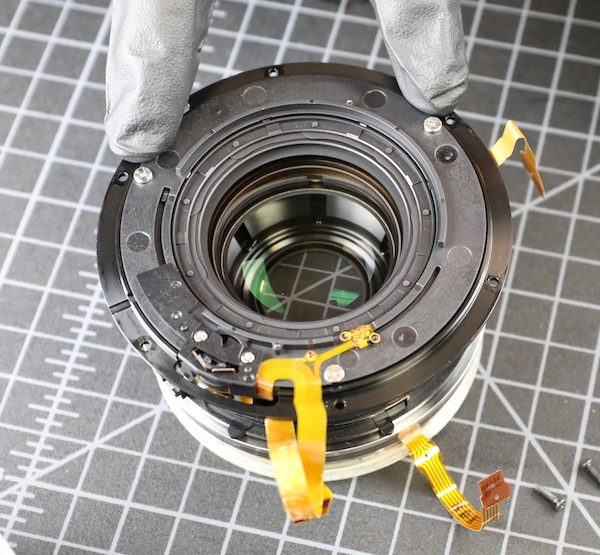
The electrical connectors are detached from the bayonet, and those circuit boards moved so the flexes are away from the barrel and free.
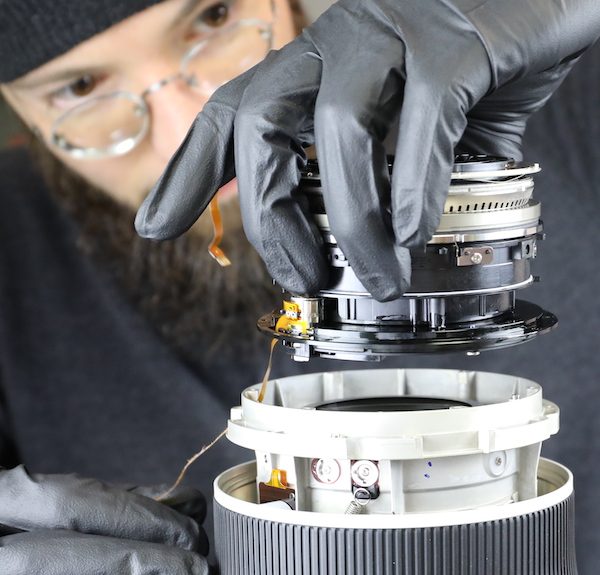
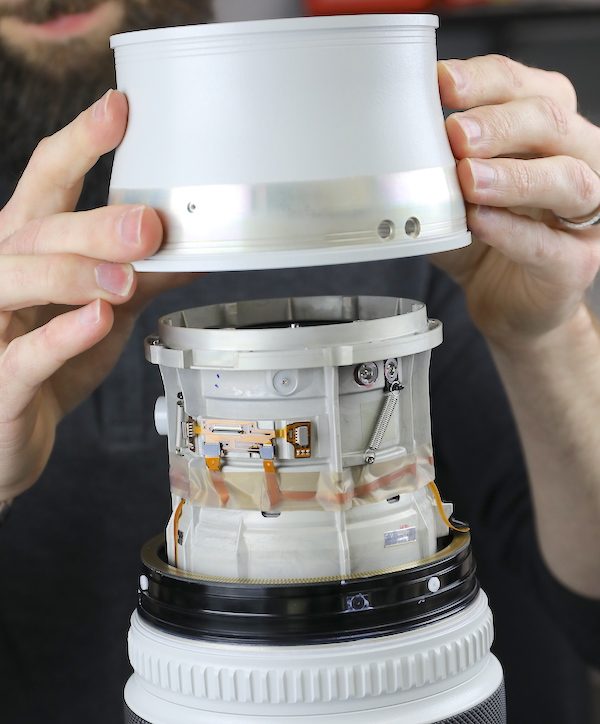
There’s no need to detach the bayonet mount or switch assembly from the rear barrel. The barrel is attached to the inner lens barrel with six large screws.
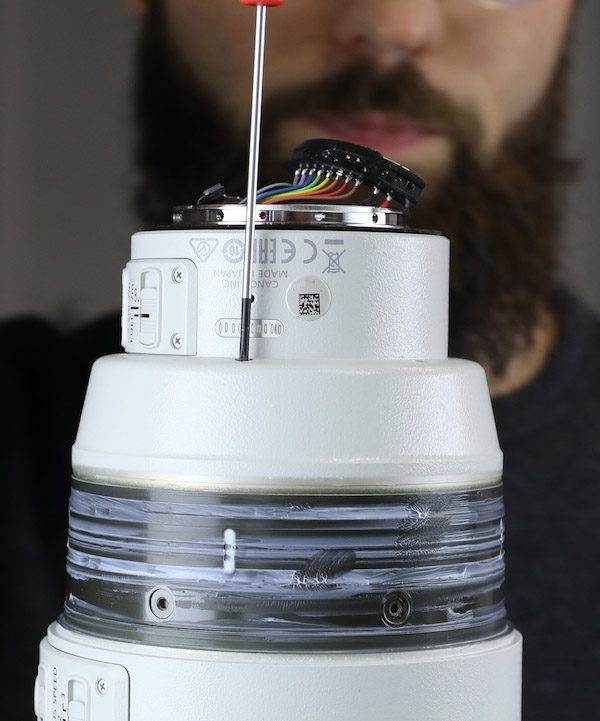
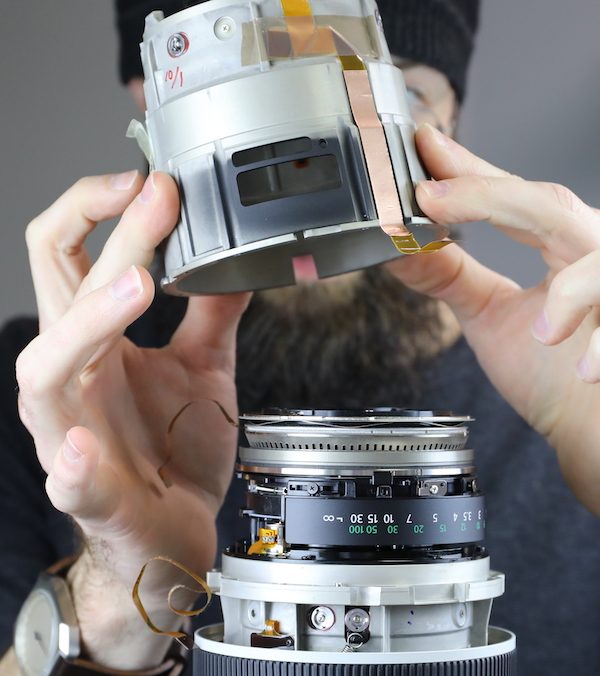
After those are removed, the rear outer barrel slides up off of the lens assembly.
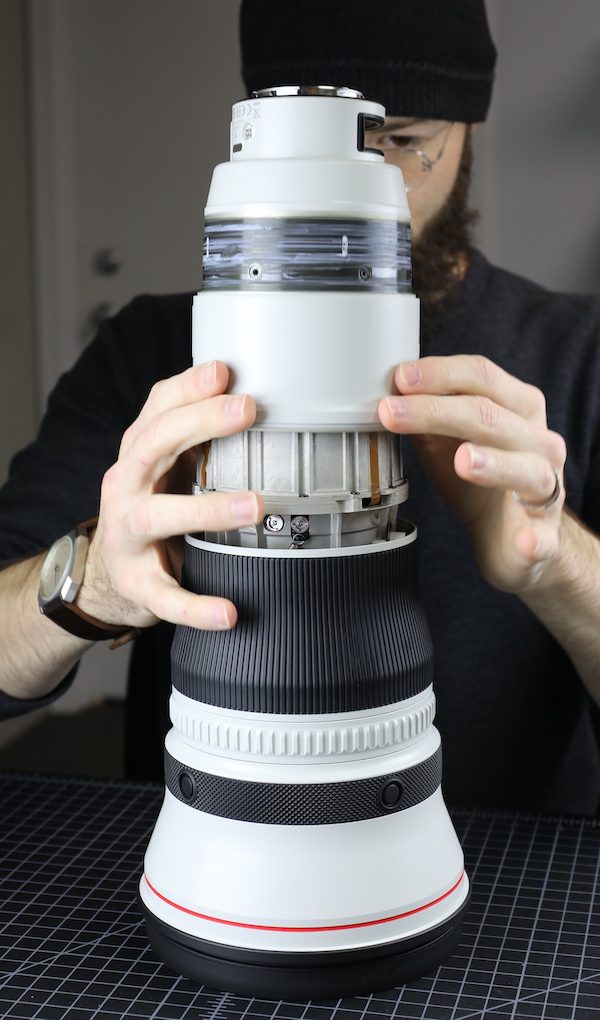
The lens is lightweight, but the inner, weight-bearing barrel is very sturdy magnesium alloy.
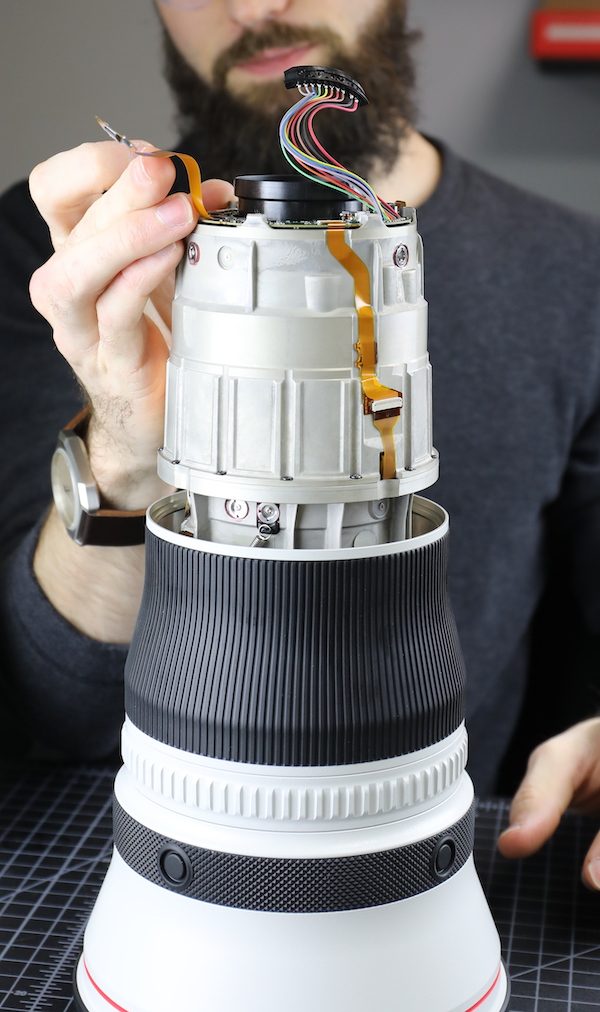
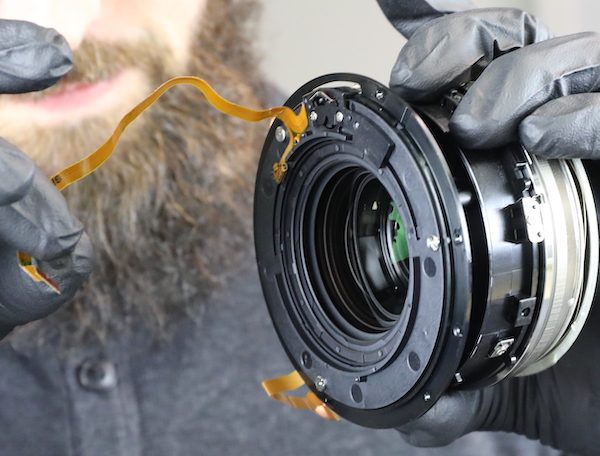
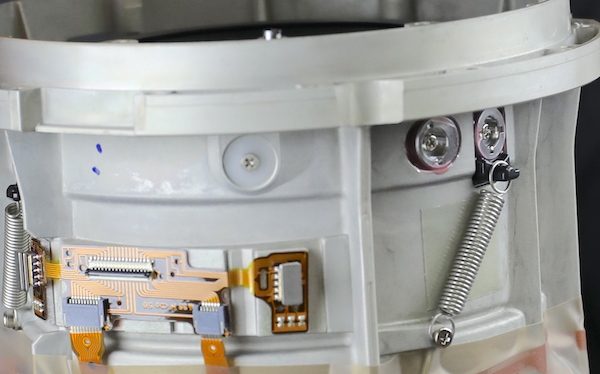
Already we see adjustable elements in two places. The first is just in front of the rear group. (The rear group you see poking up through the PCB is not adjustable.)

And another set of eccentric collars near where the two barrel halves join. A couple of interesting things are in this image. First, you see the two barrel halves are joined without shimming and held tightly together with 12 large screws – it’s a very strong joint with interlocking pieces. Also, as we saw with the RF 50mm f1.2 tear down, there are springs going down to the focusing ring, we assumed to put tension on a ball bearing ring for a smooth focusing feel in this electronically focused lens. We assumed wrong.
A quick view of the main PCB in place.
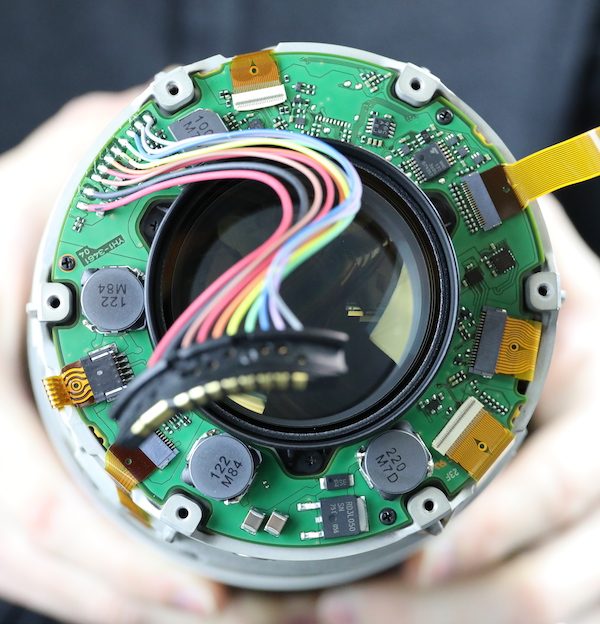
Before Aaron takes it out of place.
Next, we detached the flex connectors around the barrel and take out the 12 screws joining the two halves.
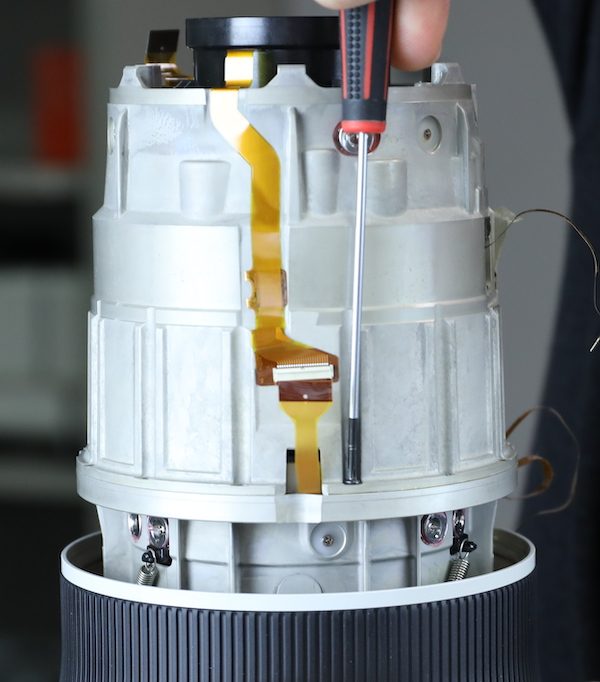
Yes, 12 screws. I meant what I said about Canon engineering for strength.
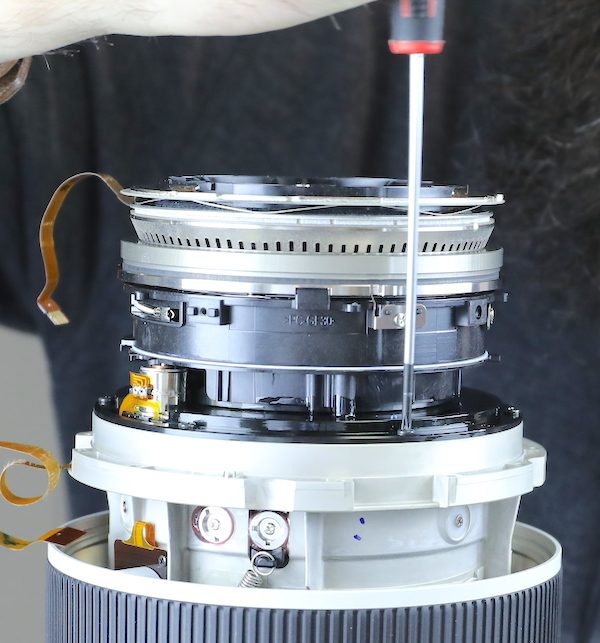
With those out the barrel comes apart.
Looking up into the upper half of the barrel we see the IS unit. This is what those rear eccentric collars adjust. It amazes me that people consistently believe stabilizers work on the principle of ‘and then magic happens’. They are optical elements that have to be corrected for tilt and centering like other critical parts of the lens’ optics.
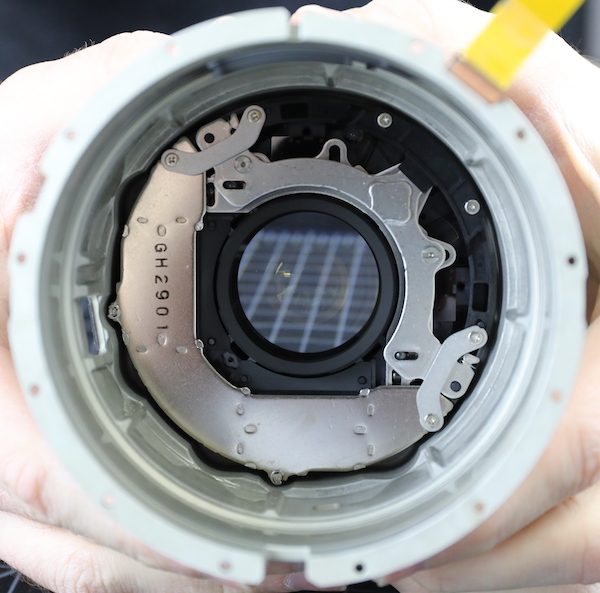
An angled view gives you a better idea of how large this IS unit is, it’s close to 2 cm thick, filled with electromagnets, springs and sensor inputs. And optical elements. Did I mention that stabilizers are optics?
Looking at the front half of the lens, we see the focus USM motor sitting proudly atop everything. It is, to all appearances, exactly the same motor we saw in the RF 50mm f/1.2 lens, with the same Tensioning Spring of Unknown Purpose along the side.

This is really interesting information, that the same motor and electronic focusing system is used in both lenses. Of course, the 50mm has a lot of glass to move around so it makes sense that it gets a big-boy motor. But both of these lenses are high precision focus-by-wire focusing systems. Both have the same spring tensioning system and position sensors in the focus barrel.
Obviously, there is a business advantage in using the same subsystem in several lenses. But putting the same electronic focusing system in this EF lens makes me think that going forward Canon lenses may have a lot of internal similarity in either RF or EF mount. Converting the Canon 400mm f/2.8 to an RF wouldn’t be quite as simple as a different rear element and an RF bayonet mount, of course. The additional electronics for the RF Control Ring would have to be stuffed in here and probably some optical tweaks made, but the core structure could be very similar.
Looking around some more, we start to see this is really the electronics barrel, not just the focusing motor. The aperture assembly and motor are here.
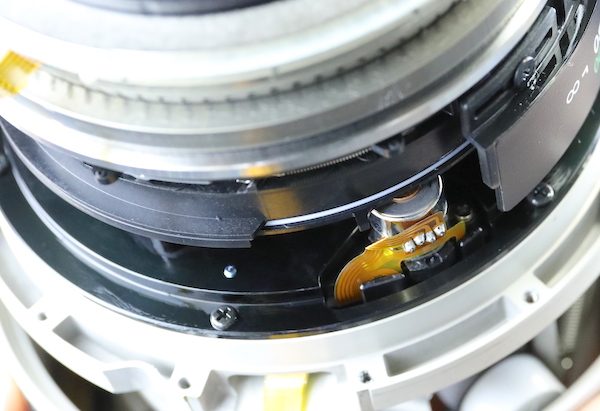
There are focusing position sensors mounted underneath the ring assembly, too.
And a number of lens elements inside the motor assembly. Not surprising, since Canon let us know they had moved the glass further back in the lens, as much as was possible.
Getting back to our disassembly, we have to take off the distance scale just because it’s in the way.
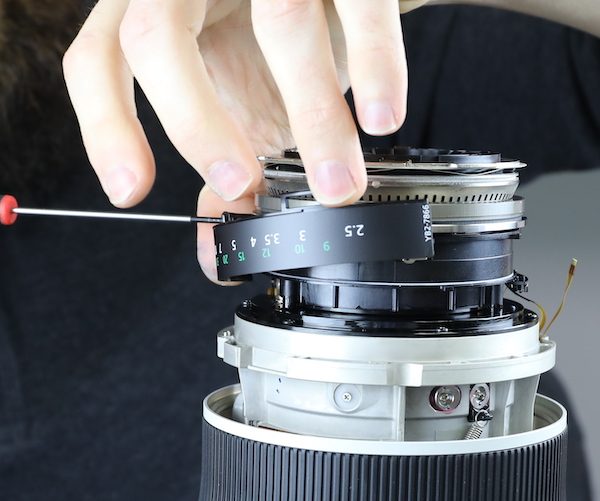
Then we can remove the screws holding the focus assembly onto the front of the lens. Just six smaller screws here, since this is not a load bearing assembly.
The entire module with focus motor and elements along with the aperture comes off as a single part.
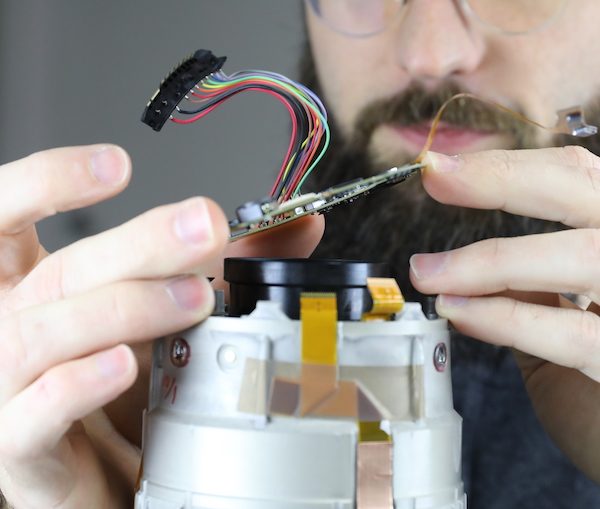
The long, winding flex to the aperture assembly is just begging to be torn, hence Aaron’s unusual degree of concentration.
The aperture assembly could be easily removed from the focusing portion of this part. It’s held in by three screws and obviously has its own electrical connections. But we really see no reason to take it off.
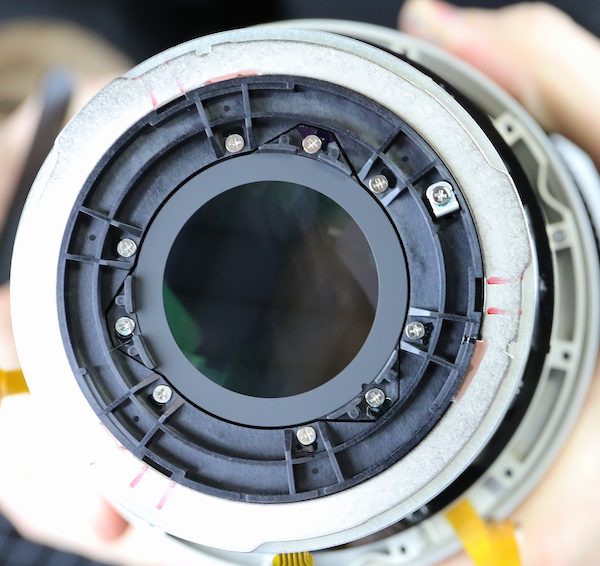
As expected, the lens has a nice, nearly circular aperture ring. The flex/sensor on the right side reads home position for wide open.
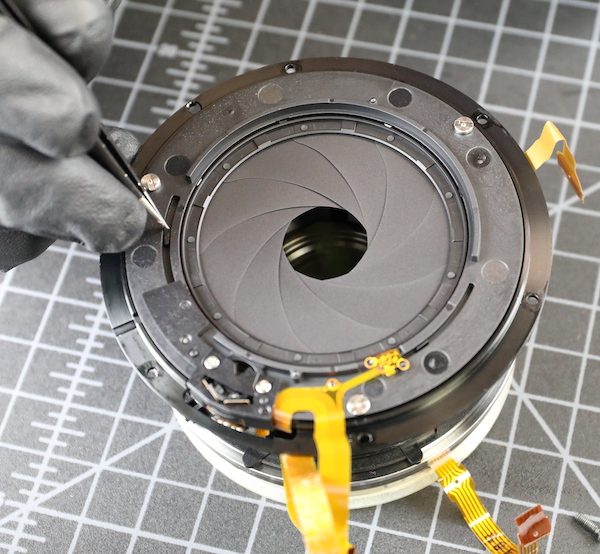
Looking towards the front of the lens we can see a good-sized fixed group. We can also peak down inside the focus ring where springs and rollers and such are apparent.
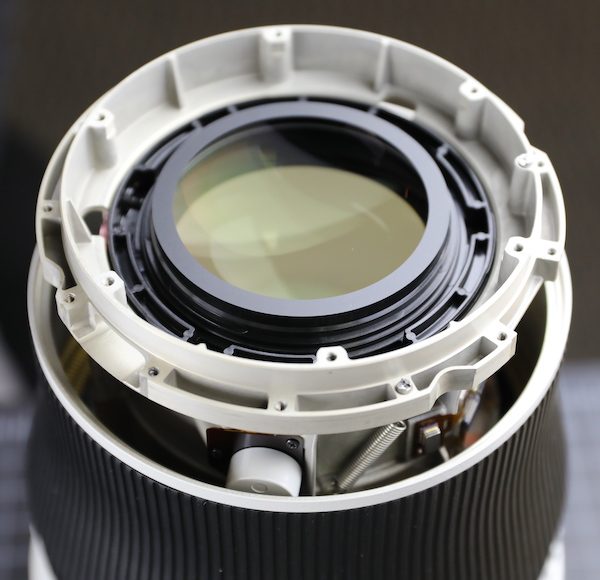
From the side, we can see that this is yet another adjustable element, with large eccentric collars in pairs to adjust centering and tilt.
The focus rubber does not come up without a fight, it’s accurately molded to the underlying ring.
Once it has been removed, we can see the nylon posts that hold the outer focusing barrel to the inner barrel.
There are two small flat-head screws, too.

The posts are pretty snuggly popped into place and have to be plucked out.
Once all the screws and posts have been removed, we can slide the outer focusing barrel off of the lens.
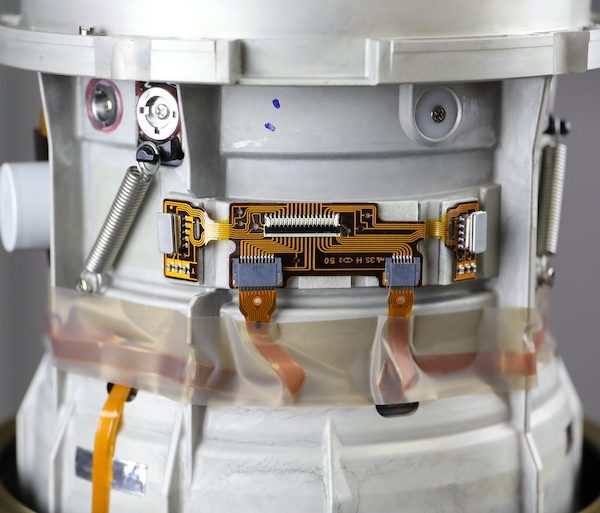
Now we get a good look at the springs and adjustable eccentrics. And then spent about 20 minutes trying to figure out how it all works, because it just wasn’t what we expected. You can see above that the spring we thought might tension the focusing ring actually moves from that adjustable element to a post on the side of the inner barrel. There are three sets of post-eccentric-spring eccentric around this element.
As best we can determine, the spring tension pulls the element toward the front of the lens. (To be clear, this isn’t an element that moves; it stays in one place. The eccentric at the spring adjust lens centering and the other eccentric adjusts tilt (and therefore moves the element against the spring’s resistance). We do not know why this is a better way than simply rotating an eccentric collar in a slot but we’ve seen it on a couple of Canon lenses recently.
Our best guess is it either allows a greater range of movement or works better with the separate glued in post. Actually, that’s Aaron’s guess. My guess is they just do it to confuse me. If that’s the case, they have succeeded. But one day we’ll spend 4 or 5 hours playing with them and figure it out. But don’t tell Canon that; they get aggravated when we do void-the-warranty stuff. Oh, wait, we already voided the warranty back when we first opened it up.
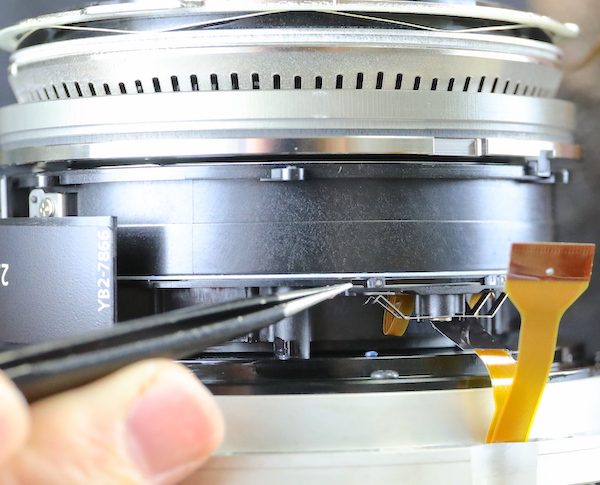
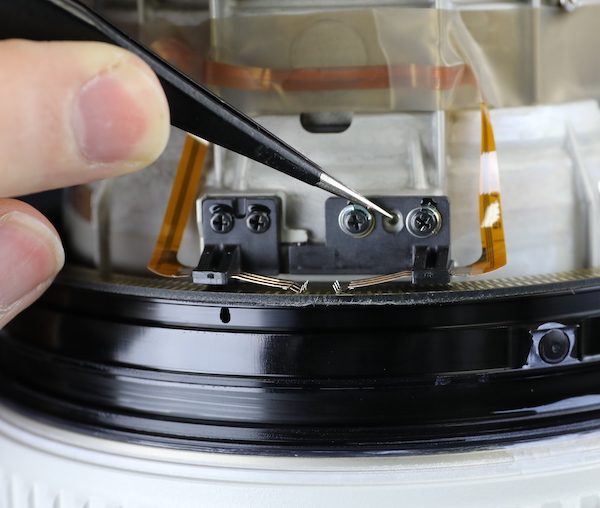
A couple of other sensors to show you before we go. Down at the bottom, there is an electrical brush sensor on the focusing ring. Why electrical rather than optical? Probably it has something to do with the large size of the ring, and perhaps because it may be a directional sensor.
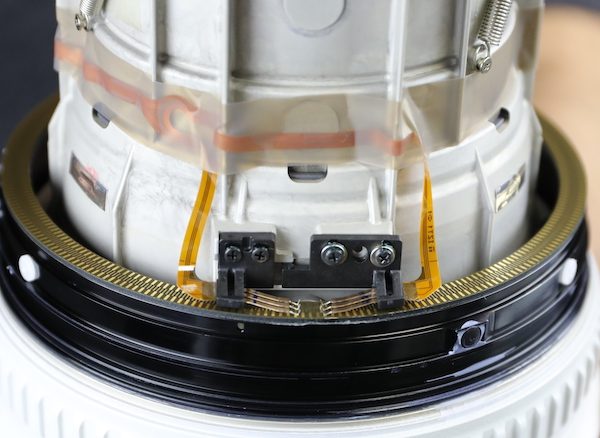
This is, like most electrical brush sensors, calibrated by slightly moving the sensor in relation to the ring and then fixing it in the proper position.
On the other side of the front barrel are some IS motion sensors.
Further disassembly, honestly, would mostly show you air and a big front element; Canon did a marvelous job of moving most of the glass back towards the camera, which makes the lens feel even lighter than it is. So we’ll call our disassembly done at this point.
So What Did We Learn Today?
Some things we were already aware of or assuming. The lens elements are moved towards the mount side of the lens. There are lots of optical adjustments like all Canon lenses. Despite being far lighter, it’s still very solidly built with a very strong frame, tons of big screws holding everything together, and no weak joints that we can see. It’s what we expected; Canon’s been building super telephotos for a long time.
There were some other, more interesting things. The spring-loaded adjustable collar collection is something of a mystery to us and will remain so until we can spend some days doing optical adjustments on one. The use of the same motor as the RF lens is very interesting in several ways. Only some more tear downs will tell us if this is just a superior motor type that Canon is going to use in all electrically focused lenses (I suspect this is probably the case), or just in lenses with a lot of glass in the focusing element (another likely thing).
Canon has really been very quiet about this lens, despite the known changes inside. I had a lot of trouble finding out which elements are fluorite (two of them are, apparently). There has been some talk about improved focusing speed and accuracy, which I assume has something to do with the new electronic focus system, but not much. But even if the marketing is simply ‘as good as before and 25% lighter’ that should be plenty to make this lens, and it’s 600mm sibling, very popular. Well, you know, super telephoto very popular.
Probably the more interesting teardown will be comparing this one to the Sony 400mm f/2.8 G lens. Hopefully, it is awesome and for once the Sonyfans* won’t line up 6 deep to explain how what I find is wrong again.
Roger Cicala and Aaron Closz
Lensrentals.com
December, 2018
Puritanism: The haunting fear that someone, somewhere, may be happy. H. L. Mencken, 1917
*Sonyfanism: The haunting fear that someone, somewhere, may be happy with other equipment. Roger Cicala, 2018

101 Comments
Ilya Zakharevich ·
Looks like the end of sentence is cut off…
Roger Cicala ·
Thank you, Ilya. I probably meant to say something, but can’t for the life of me think what it might have been, so I just took out the ‘and’
Roger Cicala ·
Thank you, Ilya. If I meant to add something, I’ve no idea now what it might have been, so I just chopped off the ‘and’.
Ilya Zakharevich ·
You mention something like “build quality of Sony lenses is going up gradually”.
I think you are in a unique position to influence such changes. It may be as “simple” as to return to 1-dimensional “grade of build variability”, and to publish a graph of how “average quality” of lenses changes with time of issue?—?with one curve per manufacturer.
Because of your fame, such a graph has a chance to be widely quoted?—?and then manufacturers would have a real incentive to improve on quality.
Of course, practically it may be a bit harder: since different “categories” of lenses have very different “expected variability”, to make this graph meaningful one should also break lenses in suitable categories, and use “variability of a lens relative to some base value in its category” instead of “absolute variability”.
l_d_allan ·
I’m also interested in a LensRentals “figure of merit” for variability / consistency, which LR previously included with reviews. I realize a single number was simplistic, but it was still valuable.
(and please consider using numbers such that higher is better for “consistency”, and lower is better for “variability”).
And thanks for the tear-down. I’m looking forward to the Sony article. How about Nikon?
grubernd ·
My wild guess for the spring-loaded adjustable collars: The black part works as a lever, keeping the collar in place. The spring applies the right amount of tension. By doing it from an angle the force is “twisted”, maybe some inner part is made of rubber or softer plastics.
The spring should be easy to apply after the adjustment. And no glue to break when service is required.
J.L. Williams ·
Thanks for another great tear down story. Looking at those focus position sensors got me wondering: How accurate are they really? For example, if you knew the exact distance from sensor plane to subject, would the sensors allow an accurate setting without requiring visual focusing? Seems like I’ve heard old-school cinematographers used to work this way…
Thom Hogan ·
Unfortunately, temperature gets in the way. That’s particularly true when you use ED type glass, as most of the exotics all do.
redwave18 ·
Not a true teardown unless all _individual lens elements are laid out on the table : )
Roger Cicala ·
We’ll call it an untrue teardown then. Because as William Gipson said, “Time be mos’ precious, mon.’
Ted ·
I think you want “fluorite,” not “fluoride” in that one sentence. Unless the 400/2.8 is also good for dental health. ?
Roger Cicala ·
I’m all for dental health. Also all for crowdsource editing. Thank you!
Mike ·
there are fluoride coatings for lens elements
Fillkay ·
Think you mean “fluorine.” Who knew chemical language could be so nuanced?
Scott ·
Take an organic chemistry course if you really want to pull your hair out.
Nick Podrebarac ·
Nah, I’m good. I’ll stick to the hellraiser puzzle box, it’s far more comprehensible.
Fillkay ·
I did. It’s grown back now!
Mike ·
“Fluorine” is a gas element, “fluoride” is a salt combines with other elements to form compounds. Magnesium fluorIDE is a common coating for optical lenses
Fillkay ·
Having a degree in chemistry, I’m very well aware of that. However, it’s officially what Canon calls their coating – https://global.canon/en/imaging/l-lens/technology/fluorine_coating.html
lordbaldric ·
P.O.E. Purity of Essence.
Richard ·
Calcium-fluorite, CaF is the material they use. A crystalline material whereas glass is just glass. There are hybrids, namely Schott FPL-53 and now 55 which are CaF/glass hybrids, sometimes referred to as fluoro-crown glasses. Though they are still not as good as pure calcium-fluorite for control of chromatic-aberration, they are easier to polish to a better finish.
Ronny Suyanto ·
How does it compare to the old 400 II in term of build quality? which one more robust?
Roger Cicala ·
I would call them equal or perhaps a slight nod to the III for more robust adustment mechanisms. On the other hand, much lighter with equal build quality is a major win.
acedrew ·
Wera, all the way.
Nick Podrebarac ·
Totally agree. They’re both awesome drivers, and ugly as sin 🙂
Alce ·
Are the spring to force a one way correction, like to adjust for thermal expansion?
Roger Cicala ·
Possible. We’ll have to take the mechanism apart to see more.
Tomáš Andraš?ík ·
Hi adjustable elements near IS unit on the rear off lens is for corection sharpness lens ? And on older super canon telephotos lens has only drop in gelatine filter holder may be reduce sharpness off the lens??
Roger Cicala ·
Correct on the first, but in all supertelephoto designs the drop-in filter is incorporated into the optical design.
Tomáš Andraš?ík ·
I thought Canon’s screw filter holder would be better for sharpness than a gelatin holder with plastic glass??
Tomáš Andraščík ·
Hi very nice work. ....adjustable elements near IS unit on the rear off lens is for corection sharpness lens ? And on older super canon telephotos lens has only drop in gelatine filter holder may be reduce sharpness resolution the lens??
padam ·
The lens design is here:
http://www.canon-asia.com/cplus/wp-content/uploads/2018/08/ef-400mm-f-2-8l-is-iii-usm-lens-construction.png
Roger Cicala ·
Thank you for that Padam. I had not found it – great interviews that answer some of the questions we had.
DrJon ·
I found this bit very interesting:
“The III series lenses use an internally-produced optical adjuster that was designed for super telephoto lenses. This enables us to carry out digital adjustment on many fine details, achieving a precision that is not possible through conventional manual methods.”
I assume they have a machine to adjust all those eccentric collars???
Bong SF ·
From the design it looks like there’s no more protective front element… Don’t know whether that’s good news.
Richard ·
Fewer air-glass surfaces is always better. You can always add a filter.
Benz Oberst ·
After Vessel discontinued the 00 Megadora they are dead to me. Unfortunately nothing else is quite as good.
Baconator ·
Very impressive. Nothing can stop you guys 🙂
GulliNL ·
I do not care for these lenses becoming lighter and lighter. How am I supposed to fend off burglars with this measly sub 3kgs bludgeon? Can we still call this a bludgeon? What are the minimum requirements for a club to be called a bludgeon?
Roger Cicala ·
On the other hand, there is much more room for solid fuel charges should you wish to use it as a projectile.
Volker Bartheld ·
Good one, Roger! I think in future teardowns, you should also discuss the option of sneaking explosives into such lenses while still keeping basic functionality. I guess those security folks at the airport won’t run any tests at minimal aperture or involving AF. I was always kinda amused when I watched folks wiggling their hand in front of my 70-200 to check, whether “there is foreign material inside”…
Thom Hogan ·
Canon’s left that to accessory makers. Expect a Bludgeon Attachment from RRS for US$499 (mounting plate not included).
obican ·
Roger Cicala (from Lensrentals.com) says that Canon is cheaping out on the build quality on their 400mm Telephoto lens by giving it the same focus motor as their 50mm lens, along with using air instead of actual glass elements and springs instead of dog collars.
Baconator ·
This time it was really funny 🙂
Lawrence Lee Huber ·
Sounds like a competitor’s rendition of the review. Very funny. Love it.
Joan D. Becker ·
1 year ago I decided to leave my previous job and I never felt this good…. I started working online, over a site I stumbled upon on-line, few hours every day, and I make much more than I did on my previous job… My paycheck for last 30 days was $9k… Awesome thing about it is that I have more free time with my family…and that the only requirement for this gig is basic typing and a stable internet connection… I am in a position to devote quality time with my family and friends and look after my children and also going on holiday break with them very frequently. Don’t miss this opportunity and try to respond quick. Check it out, what it is about… try it out
Cassandra Wilkinson ·
I generally earn almost $20,000-$21,000 monthly via internet. I ended up losing my job after working for the same organization for a long time. I required trustworthy earnings. I was not researching for the “get rich overnight” home programs you can see all over the net. Those are all type of ponzi sort of network marketing business systems wherein you need to first get prospective buyers after which sell a product to friends or relatives or anybody so that they will be in your team. Working via internet has many benefits like I am always home with the little ones and also enjoy lots of free time with my family members in various beautiful beaches of the world. Here’s the best way to start visit this exclusive offer here
Kelly Doyle ·
Taking a trip all around the world is an attractive and fascinating dream. We work twenty four hours a day in our office to change this dream into reality. However how many really able to make money? We bring to you, this awesome on-line job opportunity made in a way that it will help you to generate good money. Do the job on a daily basis and give your work small number of hours and gather up to $46000 every week. It provides you with possibility to work from anywhere with flexible time and able to dedicate some quality time with your family. The time has come to convert your life and bring growth and happiness. Now go and take a look at, impressive things waiting for you >>> SUPERB OPPORTUNITY!!!
Heather Bahringer ·
Taking a trip all across the globe is an excellent and intriguing dream. We work twenty four hours a day in our company to change this dream into reality. However how many really able to earn? We bring to you, this amazing internet based job opportunity designed in a way that it will help you to make great money. Do the job on a daily basis and give your work handful of hours and get as much as $22000 each and every week. It provides you with chance to work from anywhere with extremely flexible time and spend some quality time with all your family members. It is time to transform your life and bring growth and happiness and joy. Now go and take a look at, superb things waiting for you >>> SUPERB OPPORTUNITY!!!
Whitley Barbosa ·
On a journey all across the globe is an attractive and intriguing dream. We work 24 hours a day in our office to transform this dream into reality. However how many really able to earn? We bring to you, this amazing online opportunity created in a way that it helps you to receive a nice income. Work on a daily basis and give your work handful of hrs and get as much as $13000 weekly. It gives you opportunity to work from anywhere with flexible time and able to devote some quality time with all your family members. It is time to transform your life and bring growth and happiness and joy. Right now go and take a look at, amazing things waiting for you >>> SUPERB OPPORTUNITY!!!
Thelma ·
Opportunity never knocks the door twice, It is really necessary to make complete utilization of the opportunity. A job which offers you full convenience to work-from-home. Work that is online and you just have to commit handful of time into the work. It is not like internet scams you will see on on-line that promises to make you rich and later turned out to be some fraud selling schemes. It is genuine and trustworthy. It is simple to start and it also enables you to get wonderful earnings. Be your own boss and invest more precious time with the people you care about and get nearly $17000 per 30 days. It is time for you to have a look at this opportunity and change your life forever >>>>>>>>>>>>> https://bit.ly/2FBDESS
Alice ·
I basically earn almost $6,000-$8,000 a month through online. It’s adequate to comfortably replace my previous jobs salary, especially considering I just work about 20 hours in a single week from home.I lost my job after doing work for the same organization for several years, I wanted reliable earnings, I was not thinking about the “get rich quick” home packages as you can see all over the net. Those are typical pyramid schemes or stuff where you have to sell to your friends and family. I just required a legitimate way to earn a living for me and my family members. The most important part of working online is that I am always home with the kids, I save a good amount of money. Honestly,it is actually easier than you would think, all you need to do is fill out a simple form to receive front line access to the Home Profit System . I got the instructions kit and within four weeks I was generating over $4,000 a month. The instructions are pretty easy, you don’t have to be a computer whiz, but you should be aware how to use the internet. If you can fill up forms and surf websites, you can do it easily, You don’t need to sell anything at all and nobody has to purchase anything. It’s as easy as being on Facebook or twitter.Here’s how to start—> http://shortaz.com/qR7H6
Emiko ·
I generally gain close to $6,000-$8,000 monthly via internet. It is really enough to easily replace my old jobs income, especially considering I just work about twenty hour a week at home.I lost my job after doing work for the same company for years, I required trusted income, I was not thinking about the “get rich quick” home programs you can find all over the net. Those are typical pyramid schemes or stuff where you need to sell to your friends and family. I basically wanted a legitimate way to earn a living for me and my family members. The most exciting part of working on-line is that I am always home with the kids, I save a good amount of money. Honestly,it is actually easier than you would believe, all you need to do is fill out a very simple form to get front line access to the Home Profit System . You don’t have to be a computer whiz, but you should be aware how to use the net. If you can fill forms and surf web sites, you can do it quite easily, You don’t need to sell anything at all and nobody has to buy anything . It is as simple as being on Facebook.Here’s how you can get started=> PLEASE SEE
meatcurry ·
I’m waiting for this teardown!
https://uploads.disquscdn.com/images/8cfdc9c92d8c6fb524ead29e81718e00cbd141c43a1f318d42e51a4e026c7b91.jpg
DrJon ·
You’ll probably have to wait until they have 4-6 in stock…
Mike ·
How does it compare to the nikon? I’m surprised they were able to shave off close to 1000 grams more off a already lightened nikon. Fluorite elements aren’t that new, curious how these companies suddenly decided they can save a whole ton of weight at the same time
Mel Gross ·
I believe Canon was the first to use fluorite elements almost 50 years ago.
Chik Sum ·
Hi Roger. thanks for another really great teardown, it seems now that Canon is going on release EF lens for lens where the short flange distance of the RF mount can’t give it benefit and encourage the use of the adapter, as a geek I still recall on one of your early article where the conclusion was no adapter are good enough for optical bench test, actually will that worsen with such big lens and very shallow depth of field where it can be seen in image the alignment have problems?
Peter Bradin ·
Tearing down a $12,000 lens like this takes real brass ones, and a significant bank account or perfect credit score if it all goes wrong. Kudos to you guys for being curious and willing to share it with the rest of us. I just wish I could afford to even rent one of these things (2-year, 4-lawyer divorce took care of that, but now dirt poor, but happy).
Roger Cicala ·
Peter, you know the old joke about why divorce is so expensive? Because it’s worth it. Benn there, done that.
Baconator ·
It’s a very high quality SEO driver. Unlike some cheap clickbait you find on rumor sites or dpreview.
Scott ·
Are you guys hiring? I think I’d like to switch careers. It’s fascinating to see how these things are put together. The real acid test will come with Sony’s teardown. I’d suggest you guys get into a witness protection plan if you publish results that suggest one brand is better than the other! Ha ha.
In all seriousness, it is fascinating that Canon use the same focus motor as the 50mm lens. I would never have thought that, which is why I don’t design these things I guess. But it makes a lot of business sense, and does follow Canons pattern. They’ve used the same sensors in several camera models over the years, so it makes sense that they would do the same with lens internals. I imagine it saves a lot of money. I guess that’s why they’re the number one brand.
Sarah Müller ·
No word about the soldered wires?
Roger Cicala ·
To date, all supertelphotos have had a wire harness. I assume because of the longer runs they help prevent current drop.
Sarah Müller ·
I assumed so, too. My comment was tongue-in-cheek.
Roger Cicala ·
I still hate wires. A flex is so much more elegant. 🙂
Still thinking ·
Until the flex starts to tear…
Ross McLendon ·
Roger, thank you for making these teardowns so fun to read.
entoman ·
As per usual, extremely interesting, highly informative, and above all amusing. Thanks Roger.
“*Sonyfanism: The haunting fear that someone, somewhere, may be happy with other equipment. Roger Cicala, 2018”
“this will give the Sony fanpeople a full week to bash the Canon lens, because that does seem to be what they live for”
Hahaha
HF ·
In my opinion the name Sony here can be seen as just being a place holder for many manufacturers, including Canon and Nikon. But it gives some people obviously some feeling of superiority.
entoman ·
Yes, true. Fanboyism is rife, and particularly so among certain Canon and Sony owners who feel a need to justify their own purchasing decisions by belittling others. But like Roger, I can see the funny side of things.
ALEKCEN ·
entoman 5++
Panacea ·
Yes. When Roger calls out the specific thing that irritates him, he actually really means everything else. The specificity is just a funny little placeholder. Roger is funny, and this is his way of conveying what is really amusement and approval underneath the veneer of irritation couched as literary humor. We all laugh with Roger.
thelastredshirt ·
Do Canon/Nikon/Sony/etc. use JIS screws or are they just plain phillips?
Roger Cicala ·
JIS always
Lacknafta ·
Interesting teardown as usual even when I only understand a third of it. I really try to when you point out some new design detail and its potential benefits. I’m a Sony user and am expecting Kapton tape from the FE 400 2,8. Nothing inherently wrong with it, just not perhaps the level of finesse Canon’s thoroughbreds have. (The best 35mm lens between f/1,8 and f/2 for Sony E is arguably the EF 35/2 IS USM if one doesn’t mind using both hands and some AF noise).
Renaud Saada ·
Roger, Thanksfor this tear down. May I suggest an explanation for the TSoUP? Perhaps it makes no sense… anyway I’ll be pleased if it makes you smile. I have never made any optical adjustment nor am I working as an optical engineer or tech. But, usually, when you adjust (or trim?) a potentiometer with a screwdriver, if you change the direction of rotation, there is a kind of “hysteresis” before effectively changing the value. I don’t know if it is the same in the case of the eccentric collars, but the spring may be there to ensure that, as soon as you change the direction of adjustment, the whole element moves immediately in the right direction. Else, you probably have to move the element if you want to adjust as precisely as possible. And it could be difficult to do it with an automated bench.
Roger Cicala ·
That does make sense, Renaud, and we do know they have automated the adjustment process during assembly.
David Cockey ·
“Converting the Canon 400mm f/2.8 to an RF wouldn’t be quite as simple as a different rear element and an RF bayonet mount, of course.”
Why would conversion to an RF lens require a different rear element?
Roger Cicala ·
It would require some different optics. Assuming the rear element is a field flattener, it would be different for the shorter backfocus distance. If it’s not a field flattener, that might be done elsewhere. Or, I guess, if they knew they wanted to port, they might have designed the optics equal for either.
David Cockey ·
I was assuming an RF version would be longer by an amount equal to the difference between EF and RF flange to sensor distance. That would leave the optical elements in the same position relative to the sensor. The RF version would need a longer rear barrel with the RF mount.
anommal ·
Great teardown. Regarding fanpeople – I find it quite interesting, as I can usually see more bashing of Sony than any other brands.
Roger Cicala ·
annomal, I think it just depends where you go. My irritation comes because fairly suddenly (about 4 months ago) we started getting tons of ‘Sony is better’ comments about things that have nothing to do with Sony and are really stretches – comments on Sony sensor in articles about lens build quality, etc. And I notice a fair amount come from annonymized IPs, which makes me think bad thoughts.
NickNick ·
The weight saved by the new lens design (all but the first element are quite smaller and positioned rear in the barrel) is pretty significant. I never imagined to see a ~3kg 400/2.8 or 600/4 lens (with build quality they need and have) with just 3kg. Do you think it might be also beneficial for them from the financial point? After all, smaller glass elements are used, which might be possibly easier to manufacture (therefore cheaper, while the MSRP remains the same). In that case, that might be a win-win situation for Canon. Although, that is pure speculation, as the new design might need newer, tighter tolerances overall, or more specialised glass. Still, pretty much impressed.
disqus_XN9vf0ShQK ·
The weight saved by the new lens design (all but the first element are quite smaller and positioned rear in the barrel) is pretty significant. I never imagined to see a ~3kg 400/2.8 or 600/4 lens (with build quality they need and have) with just 3kg. Do you think it might be also beneficial for them from the financial point? After all, smaller glass elements are used, which might be possibly easier to manufacture (therefore cheaper, while the MSRP remains the same). In that case, that might be a win-win situation for Canon. Although, that is pure speculation, as the new design might need newer, tighter tolerances overall, or more specialised glass (they mention an additional Super UD element in the interview for the III, and there are seemingly more air-gapped, not cemented, element groups over the II). And the mentioned changes in the molding and materials might make the manufacture of a not-so-high volume item more expensive... Still, pretty much impressed. 1kg shaved from the weight!
Graham Stretch ·
Hi Roger.
I’m so disappointed, all along I thought you did these tear downs out of the kindness of your heart for our education and to point out to the manufacturers that you could work out how to adjust their lenses with your equipment as well or better than they could!
Now I find it is purely so that you can create an in house repair manual.
Thank you for another fascinating look in to a world that I might be able to join after they release IV when I can be 3 generations behind.
Cheers, Graham.
Still thinking ·
And I thought he was just doing it for a laugh!
Carleton Foxx ·
Like all modern people my entire world is held together by tiny screws that seem to be coming loose all the time…so who does make the best tiny screwdrivers?
Nelson Mouëllic ·
The use of focus by wire on all of the new lenses makes me wonder if they’re engineering in some compatibility with a future body with a larger sensor. Is there any indication that these lenses could physically focus past infinity?
Roger Cicala ·
Nelson, almost all SLR lenses can focus past infinity.
Nelson Mouëllic ·
So in theory, Canon could release a camera with a larger sensor set further back from the full-frame focusing plane, maintaining the same focal length, but losing a stop-or-so of light. An RF 28-70mm f2 would become a medium format 28-70mm ~f2.8ish? With focus by wire, the camera would tell the lens how to behave on different sensor sizes. Am I missing something or is this not entirely possible with these new RF lenses?
Roger Cicala ·
It is absolutely possible. It would probably be way less than ideal optically, in other words it would likely increase aberrations. It’s possible the optical design included compensations for that, but I doubt it. For example, Cine lenses that have interchangeable mounts and therefore the same lens can be tested at different backfocus distances. Almost all of them have a ‘best performance’ mount they were designed for and aren’t quite as good at other backfocus distances. Similarly we can test a lens focused past or just short of infinity on the optical bench by changing the backfocus distance and there is usually some fall-off of performance. Sometimes minor, sometimes dramatic.
Nelson Mouëllic ·
That makes perfect sense, thanks! This is the article that got me thinking about all this: https://dc.watch.impress.co.jp/docs/news/1158578.html
Seems like they might have something big in the works!
Nelson ·
That makes perfect sense, thanks! This is the article that got me thinking about all this: https://dc.watch.impress.co...
Seems like they might have something big in the works!
MisterWU ·
Attention !! Don’t do this at home and don’t show this article to yours childrens.
BTW very nice and interesting article
Volker Bartheld ·
“JDV Products Inc. is Vessel Japan’s Exclusive North American Distributor. […] JDV Products, Inc. is a WBENC (Woman-Owned Small Business) and has been manufacturing a broad line of wire wrapping and unwrapping tools for the past 30 years at our Fair Lawn, New Jersey facility. […] Does your Phillips® screwdriver “cam-out” and damage screws? If so, it may NOT be a US Phillips® screw – it may be a “JIS” (Japanese Industrial Standard) type! That is why you need VESSEL Japanese Cross-Point Screwdrivers! […]”.
OMG. So many things I have learned today. So what to do with my set of Wiha Precision Philips screwdrivers now? Correction: Seem to be Wiha PicoFinish, the 261P served me well resolving the dreaded CHA-Bug which infested my Nikon D70 decades ago. Got blisters on my hands from all those tiny bastards.
In any case, I’m rather the Wera Kraftform Chiseldriver type of guy (https://www-de.wera.de/en/great-tools/wera-chiseldriver/). Must be something with XXL hands and stuff. 😉
P.S.: No way, I would DIY a telephoto lens. When my 70-200 VR I F/2.8 Nikkor’s ultrasonic AF motor started sqeaking, I brought it right to my local Nikon dealer. Who – needless to say – replaced the whole unit. Free of charge, since it was oh-so-slightly within warranty.
Not THAT Ross Cameron ·
“Did I mention that stabilisers are optics”.
Wash your mouth out Mr Cicala. It’s now standard photographic lore that in-lens IS/VR is imbued by the Wand of Acuity ;~)
Mert ·
What size hex wrench is used to tighten tripod collar? What are hex wrench set is recommended?
Lionel Ng ·
Does the Image Stabilzer of the 400 mark 3 when unmounred or not in operation rattle more than the mark 2 lenses? Anyone noticed this?
Was wondering if this was normal.
Ben Langlotz ????? ·
You didn’t mention that the four screws that secure the tripod foot are aluminum, not steel, effectively reducing the weight from 9 to 3 grams. The foot is about 4 ounces.
Capture Creatively ·
@roger_cicala:disqus the springs probably function better thermally than their fixed in place counterparts, no?