I’ll start by saying I’m a wide-aperture prime nut. I love them. No zoom, not even the best zoom, can compare.
“Wait”, you say, “what about my $2,000 top grade f/2.8 Wonderzoom? People say it’s the best lens made.”
I’ll grant you it might be as sharp as a prime, at least at its sweet spot it might. But the difference between an f/2.8 aperture on that zoom and f/1.4 on the prime is two full stops of light. Shutter speeds 1/4 as long. Depth of field is remarkably narrow. You can do a lot of very cool things with those tools.
But probably no lenses cause more upset and disappointment with first-time users than a top-of-the-line wide aperture prime. The usual thought is “For this much money it should be perfect!” They aren’t perfect, just different.
I’ll give you an analogy: I have a really nice sedan. It fits 4 people in comfort, easy to drive, as fast as I could want it to be, handles corners and curves well, gets the oil changed every 3 months and needs no other work. Great car. I love it. My next-door neighbor has a track-ready Porsche racecar that costs three or four times as much as my sedan. It’s much faster and corners much better than my car. But he can’t drive it on the street, can only fit one person in it, and is working on it constantly. So it’s not necessarily a better car, it just does certain things much better. To take the analogy a step further, I’m sure he’d have no trouble driving my sedan, but if I took his Porsche for a spin, bad things would probably happen.
Wide aperture prime lenses are like that: fast and sexy, but there are some things they don’t do well, and they require a bit more care and a different skill set than regular lenses. But given that, you can get some spectacular images you could never get otherwise. Like driving a racecar, though, if you’ve never done it before then you need a bit of training and practice.
The Weaknesses of Wide Aperture
A little while ago I wrote an article on the 7 common lens aberrations. You don’t need to go read it, here’s the summary: 4 of the common aberrations (coma, astigmatism, spherical aberration, and lateral chromatic aberration) are all improved by stopping down the aperture to f/5.6 or more. For that same reason, they are all worsened, and more difficult for lens designers to correct, when the aperture is really wide. A couple of other issues, focus shift and spherocromatism (also called color shift) affect only wide aperture lenses.
To my knowledge, no ultra-wide aperture prime lens is free of problems, so it is important to know which ones affect the particular lens you are shooting with. Knowing the particular weakness of a lens allows you to plan your shots to avoid them. You can sometimes find this information in better lens reviews, and to some degree in online forums. But mostly you find out by shooting the lens and learning about it yourself.
Chromatic aberrations
Classic lateral chromatic aberration (purple fringing) affects some of the best wide-aperture primes in the corners and edges. Stopping down improves it, but that defeats some of the purpose of having a wide aperture lens. It can usually be corrected in post-processing, though, if you shoot in raw.
Spherochromatism (color shift) is quite different. It affects only the out of focus areas and the color is different in front of the depth of field than behind it. Unlike lateral chromatic aberration, it occurs in the center of the image as well as the edges. Only the out of focus areas are affected, however, and it is rarely noticeable in actual images (although it can easily be seen in test shots as shown below).
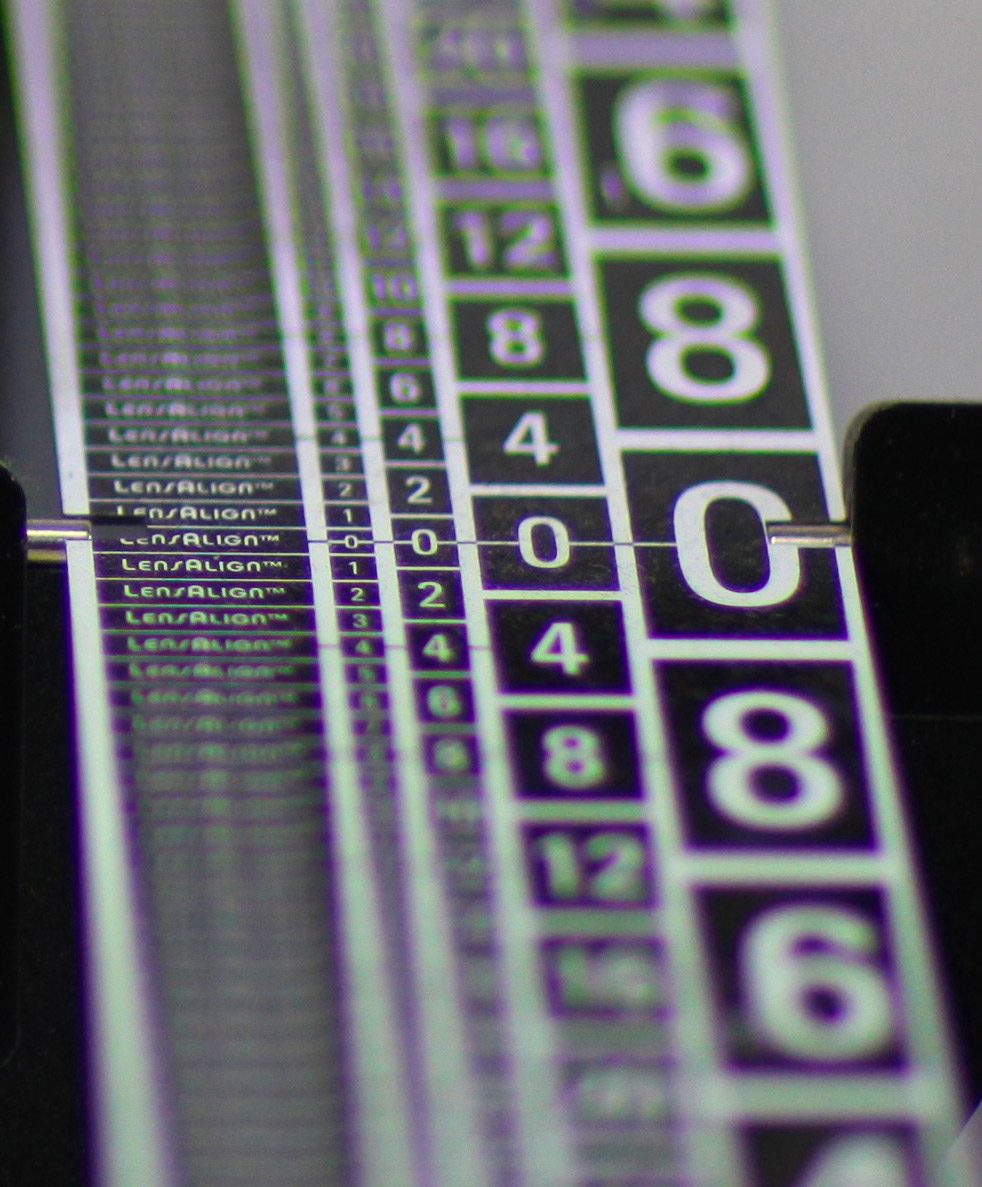
Figure 1: Color shift: note that the in focus area has no shift while areas behind the depth of field are greenish and in front of the depth of field are magenta.
Coma and Astigmatism
Both of these aberrations affect the edges and corners of the image, causing blurring, particularly of lights. It’s usually less of an issue in daylight shots because the areas away from center are often out of the depth of field and blurred anyway. In night shots, though, lights can appear obviously smeared along the edges of the image. And shooting objects of interest off center can make them appear blurred, even when properly focused.
Field Curvature
Curved lenses naturally want to make a curved image, but the sensor on your camera is flat. When a lens has field curvature it may be focused 6 feet away in the center of the image, but the focus would only be 5 feet away at the mid part of the image and 4 feet away at the edges.
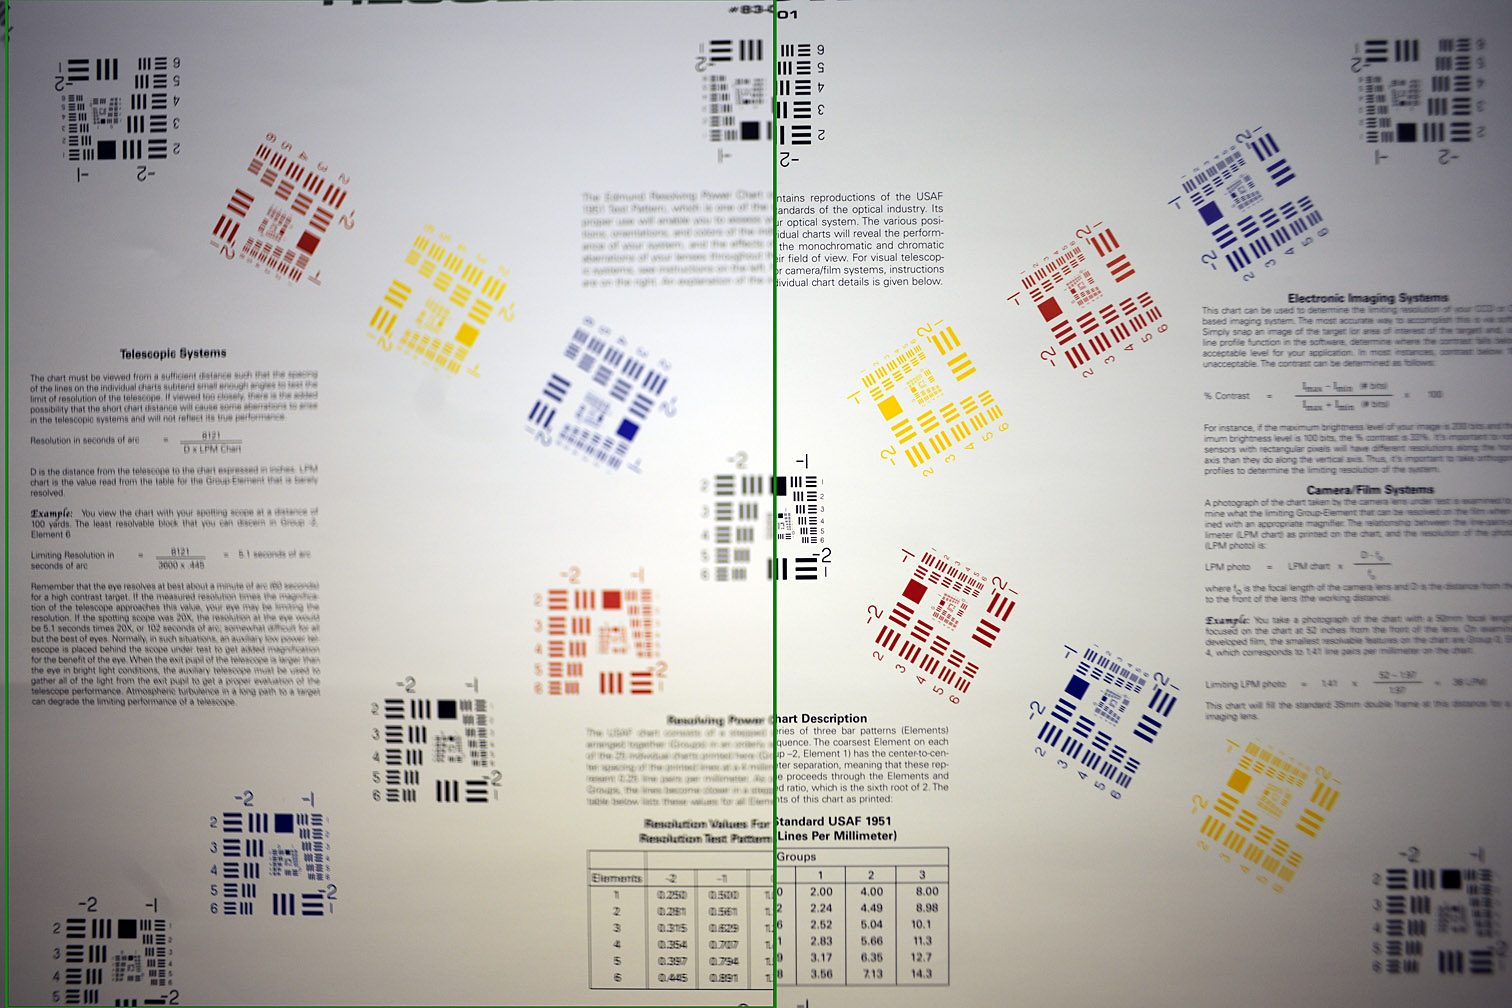
How to tell if your lens has field curvature? A simple test chart or brick wall will do. Focus the lens wide open on a tripod so the center of the image is sharp. Then without moving anything, change the lens to manual focus and take some shots a bit in front of and behind the best focus distance. If the edges are just soft they will get softer with focus moved forward or back. If the lens has field curvature, the edges will actually get sharper when the center is out of focus just a bit forward or (less commonly) behind the sharpest center focus.
When a lens has field curvature, don’t focus-recompose to put the object of interest off center. Instead crop the image later in post-processing. If you know, generally, what type of field curvature it has, you can sometimes position a set-up shot to keep objects in the field of focus. For example forming a group into an arc roughly along the curvature of the field may be effective. But you’re way more patient than I am if you pull this off.
Focus shift
Focus shift occurs in certain wide aperture lenses when they are stopped down just a little bit. Remember your camera always focuses with the lens at maximum aperture, then stops the lens down to the aperture you’ve set just before taking the image. In some wide aperture lenses, closing the aperture a bit causes the actual focus point of the lens to shift forward or backward just a bit. The depth of field of wide-aperture lenses is so narrow that this can be enough to throw the subject completely out of focus. After a certain point (usually f/2.8 or more), the depth of field has gotten so much wider that the focus shift isn’t noticeable anymore.
The clumsy solution to focus shift (at least with a still subject) is to focus manually using ‘focus bracketing’, shooting several shots manually moving the lens focus slightly forward of backward. One of the shots will probably be in focus. In reality, most of us simply shoot such lenses either wide open or stopped down to f/2.8 or f/4, but not anywhere in between. A few very good photographers know their lens well enough to compensate using manual focus: they autofocus, switch to manual focus and tweak the focus where it needs to be. Good for them. I’ve tried it (a lot) and haven’t managed to pull it off with any consistency.
Working with Narrow Depth of Field
All of the above problems only cause a fraction of the trouble people have when shooting for the first time with a wide aperture prime lens. At least 90% of the first-timer problems shooting at wide aperture have to do with controlling the very narrow depth of field (the area of the image in sharp focus). How narrow? An 85mm lens shot at f/1.4 on a full frame camera focused on an object 6 feet (72 inches) away has a depth of field just under 2 inches. Anything closer than 71 inches away is out of focus. Anything further away than 73 inches is out of focus.
I literally have a conversation once a week that goes “this lens is really soft, look at this image!”.
“Nope, it’s really sharp, look at those eyelashes. Its just that her nose and her ears are out of the field of focus. Only her eye is in the plane of focus.”
In order to use a wide aperture lens properly, the photographer must have a good grasp of what the depth of field is with the lens (s)he is using, and at the distance (s)he is shooting. There are a number of good online depth-of-field calculators and several iPhone and Droid apps that provide a calculator you can carry with you. If you want and in-depth discussion on depth of field, I wrote an entire article on it here.
But a few practical rules should help in most situations:
- For a given lens and aperture, depth of field is greater the further the subject is from the lens. The depth of field of the 85 f/1.4 I mentioned earlier was 2 inches when focused 6 feet away, but it’s 4 inches when focused 12 feet away, and 2 feet focused 30 feet away.
- Stopping down increases depth of field some, but not that much at these wider apertures. For instance, stopping down the lens above from f/1.4 to f/2.2 at 12 feet increases the depth of field from 4 to 6 inches.
- Wider focal length lenses focused at the same distance in front of the camera have a much greater depth of field. For example, a 35mm f/1.4 on a full frame camera has a depth of field of 9 inches when focused 6 feet away, a 3 foot depth of field when focused 12 feet away, and a 21 foot depth of field when focused 30 feet away.
The narrow depth of field makes focusing difficult, but, more importantly, the slightest bit of front or back focus can put the image entirely out of focus. Since every lens focuses slightly differently on every camera, I don’t recommend shooting a wide aperture lens unless your camera has autofocus microadjustment. Without it, getting perfect focus at such a narrow depth of field is a bit of a crap shoot. That also means, obviously, you need to actually use that feature and tune your camera and lens to focus optimally.
A Quick Guide for Shooting Wide Aperture
Before Shooting
- Adjust Microfocus for the lens and your body before shooting. If using more than one body, calibrate with both bodies. It will probably be a bit different on each.
- Check to see if the lens has focus-shift. If you can’t find out online, test by shooting the same target at widest aperture; f/1.4; f/1.8; f/2.2; and f/2.8. If focus changes then focus shift is present. Plan to shoot either wide open or stopped down, not in between.
- Before going out shooting, you may want to make a quick chart showing the depth of field wide open at various distances. Knowing the depth of field at various distances lets you frame the shot so your subject is entirely in focus, but the background is blurred enough to make the subject stand out.

When Shooting
- Keep subject and autofocus point in the center. Crop the image to change composition, don’t focus recompose.
- Unless you know the lens is coma and aberration free, night lights in the periphery of the image may be quite distorted. Night shooting is usually best done stopped down, anyway.
- If there are important elements in the edges or corners, shooting stopped down will usually help sharpen these areas markedly. Even half a stop can make a dramatic difference.
- Knowing the depth of field, pose the subject carefully. Plan your autofocus point so it’s in the middle of where you want your depth of field. If the subjects face is square to the camera, it will all remain in focus, while even the ears are beyond the depth of field.

If the face is tilted from the camera, for example, with the head tilted 45 degrees, don’t focus on the closest eye. Instead focus on the bridge of the nose so both eyes remain in focus (assuming that’s what you want, of course).
Sounds like kind of a pain, doesn’t it? It can be at first, but once you’ve used this kind of lens a few times, it becomes second nature. And the results are well worth it. When I’m trying to get my best possible shot, I’ve always got a wide aperture prime lens mounted on my camera. I may get fewer keepers, but the keepers I get are really, really special.

14 Comments
Bart ·
I just recently bought à 50mm F1.4 and I think this article Will really help me. Thanks!
Ed ·
Hi Roger,
Fabulous article. Something that helps with the focus-shift problem on fast primes is to use your depth-of-field preview button. You won’t notice viewfinder dimming until at least f/2.8, and it helps the phase-detect focus system get the correct focus since it now sees the shifted-focus image.
Rob ·
Can you recommend a good tutorial that can instruct me on how to properly pair my lens to camera body? Specifically on how to judge how much microfocus adjustments are needed and how to do it?
I am using an EF 85mm f/1.2L Mk II with a 5D Mk II
I’m getting pretty good results so far, but I do see some slight focus issues in the center when wide open.
Thanks for your help.
-Rob
Davide Rossi ·
“Remember your camera always focuses with the lens at maximum aperture”. No it does not. Nikons don’t go below F/2.8 (right in order to minimize focus shift), I guess other brands are similar in this respect.
Scintilla ·
If you’re talking about Live View, you may be right (my Pentax stops lenses down to f/4 or so during Live View for focusing and composing).
But if you’re talking about through the OVF, are you saying that if you look at the front of the lens, you can see it stop down when you autofocus on a Nikon? Because that seems incredibly implausible to me and counter to my experiences with Canon and Pentax. It’s my understanding that PDAF modules do better the more light they get.
Are you perhaps thinking of how a stock focusing screen will typically reflect DoF accurately only down to f/2.8?
Dan ·
Do you know of a way to manipulate the back round on the second image of the child , the close up, in stead of the round spots behind her. Not with a computer but in camera. Thank You
melissa ·
Thanks
Pattabiraman ·
The anology is very true. I am a novice and have rented a few, but never got it working.
Martin Hemsley ·
Excellent review, and really useful. I’m shooting a wedding soon with very dark rooms in a Castle, and am considering renting a fast prime lens to help. Thanks for your advice.
Cristian Ruboni ·
Why cropping? I think you can lose image quality doing that..
If you use the side autofocus points you may lose sharpness and if you use the center point you lose composition.
How do you avoid all these issues?
Nashrambler ·
Cristian — Reset your focus control to the button on the back of your camera under your thumb. On my Canon it says AF ON. You can do this in the menus. Then you can focus with that button using the center focus point which is the most sensitive, recompose keeping camera distance the same, and shoot using the shutter release button. You can re-set focus with the AF ON button in between shots as much as you like. Once you get used to it, you never go back.
Nara ·
Roger, great post as always. What are the best ways to calibrate a lens?
Harry Duns ·
Nashrambler, focus-recompose as you suggest is generally ill-advised when working at shallow DOF under any circumstances. It’s particularly important to note that this technique is especially ill-suited when using lenses that have field curvature, e.g. the 50L. Any movement after focusing with such a lens will throw your subject out of focus, regardless of camera distance to subject being maintained… hence the original poster’s advice about using your camera’s best AF point and cropping in post.
Michael ·
Hi Roger,
I am using Fuji XT3 shooting portraits in a studio with the Preview exp/wb turned off so I can see to focus when my lens is set to 1/250@f5.6 to f8.
I believe Fuji lenses focus stopped down in AF-C mode and wide open in AF-S mode?
In AF-C mode the focus is hunting slightly at the above settings and not really reliable for sharp focus. Will I get sharper images focussing in AF-S mode or get focus shift problems, which is the most reliable?
I would prefer to shoot with Eye AF but that bounces between the eyes at F5.6/f8, it is much more reliable at F2 ish.
Sorry its long winded but I would appreciate your advice