How To's
How to Test a Lens
If you read my articles very often, you may have realized I’m not one to let a lack of knowledge prevent me from writing on a topic. First-hand knowledge I mean. I write a lot of articles that I may spend 6 weeks researching before I feel knowledgeable enough to start writing. But this is one topic that I know well: its what I do for a living. About 8,000 new lenses have come through Lensrentals over the years, each one has to be tested, inspected, and accepted before it goes on the shelf. And every day 150 to 400 lenses return from rental and go through the same process before they ship out again.
I don’t mean to suggest we’re lens reviewers, dissecting and measuring every possible aspect and index of a lens. That takes days, tons of equipment, and a mindset that I don’t have: full-blown obsessive-compulsive nitpicking disorder. I’m glad there are people who do that. I’ll never be one of them.
(Don’t get me started on the whole are-lens-reviews-worthwhile thing. I find it very similar to measuring the height of one third-grader and then saying “all third graders are 4 feet, 7 inches tall and weigh 52 pounds.” Someday someone will start evaluating 20 copies of a given lens, include the copy-to-copy variation in their reviews, and in a short time will own the lens review business. But that’s another topic.)
Why Bother?
When we get that shiny new box home, we expect it to be perfect. And it probably will be. But after opening some 8,000 shiny new lens boxes I can assure not all of them are. Whether its quality control at the factory or getting knocked around in shipping our experience is about 2% of new lenses need to be exchanged. It varies by brand and it varies by lens complexity (an autofocus zoom with image stabilization is more likely to have problems than a manual focus prime). But every lens needs at least a basic checkout when you first get it home. Used lenses, of course, require it even more.
There are several levels of testing and examination one can do. The simplest is go take some pictures and see if they look okay. This works well, and has the advantage of getting to take pictures, but has some shortcomings, too. First, you may not notice a problem until it is too late to return or exchange the lens. Second, if something is wrong, simple photographs don’t usually determine what kind of problem the lens has. This lens is soft is a good article title, but not a good description of a problem.
(BTW – if you send a lens in to factory repair with “This lens is soft” as the only description of the problem, chances are extremely high that it won’t be fixed. Trust me on this. We have 20 lenses a week go in to factory service. We’ve learned.)
At the other end of the spectrum is Extreme Tester Guy (and you are a guy, there are no Extreme Tester females) who will spend 16 hours testing a lens in every way possible including the laser collimator he keeps in the garage. He’ll send back 6 copies to get the perfect lens which he won’t take pictures with because a new lens has just been released and he’s too busy getting a perfect copy of that one. This article will just bore Extreme Tester Guy, he really wants to be a lens reviewer.
But without taking it to extremes, a little basic testing does several things. It will let us know the lens we bought is what we expect it to be, that its assembled properly, functions as it should, and provides a reasonable match for our camera (if you don’t understand what I mean by that last statement, you might want to read the two “This Lens is Soft” articles).
Testing will also show us some important characteristics of the lens that weren’t listed on the B&H blurb or the manufacturer’s website. The marketers are quick to tell you it has +Supermicrosecretformula coating_, 4 aspherical, and 2 ultra-beyond-low reverse distortion elements. BUT do they ever tell you if it focuses using internal, rear or front element groups? If it is parfocal (if you zoom in on the subject is the lens still in focus, or does it need to be refocused)? Is the plane of focus flat or curved? How soft are the corners wide open and at what aperture to they get sharp? Does it have barrel or pincushion distortion? These are things a bit of testing will show us about the lens. And they are good things to know that will let us use the lens more effectively.
The manufacturer goes to great lengths to show the aspherical and low dispersion elements, but don’t show you which ones zoom or focus.
Step 1: Examining the Lens
But before we start optical testing, we need to do some basic hands-on, touchy-feely examining. Some of this is to make sure the lens is in good shape, some to make sure we know how it is going to work. More new lenses fail my touch-and-feel tests than actually fail optical testing.
The Barrel
If the lens is poorly assembled now, its not going to be better after a year of use. The lens barrel is made of several different cylinders assembled together. There’s usually a joint under the rubber zoom and focusing rings and often another near the end of the lens just under the filter ring. Gently move, rock or extend each segment of the lens and ask yourself the following questions:
- Are any sections loose from the next?
- Can you rock the filter ring?
- Do all the screw holes (including the ones at the lens mount) have screws in them?
- If there’s an extending internal barrel does it slide back and forth easily when you zoom and focus?
- Does the front ring accept a filter easily (more important to check in a used lens, but we’ve seen a few new ones with defective threads).
While we’re here, gently shake the lens and make sure there’s not a loose screw rattling around inside. Yes it happens. (If the lens has an image stabilizing/vibration reducing mechanism, this may rattle a bit when you shake the barrel. Don’t freak.)
The Focusing Mechanism
This isn’t for accuracy. That comes later. Set the lens on manual focus and run the ring back and forth a few times (even if you’ll never use manual focus).
- Does it move smoothly with no catches or gritty sensation? This is also the time to note what part of the lens moves when focusing: front element, rear element, or internal group (neither the front or rear elements move when focusing).
- If it’s a zoom lens, check the focusing at both extremes of the zoom. On the Canon 70-200 f2.8 IS II lens for example, the rear element doesn’t move during focusing when the lens is at 70mm, but moves a great deal with the lens at 200mm.
- If the front element moves, does it also rotate (makes it very hard to use polarizing filters) or is it nonrotating?
- Does the distance scale rotate properly when you move the focus ring?
- Is there a clutch for manual focus, a switch, or is the manual focus ring always active?
Then switch to autofocus, mount the lens to your camera, and repeat.
- Does it autofocus smoothly?
- Does the focus motor sound like your other lenses?
- Finally, autofocus on something close and then immediately on something at infinity. Then reverse the process. How long did it take?
A slow autofocus system doesn’t matter when you’re shooting Macros or portraits, but it can make a lens useless for sports or street shooting.
(For those of you with too much time on your hands, if you want to quantify focus speed do the near-far autofocus test right next to a microphone plugged into your computer. You can open file in an audio editing program and see exactly how long the lens motor was buzzing.)
Zoom Mechanism
Of course you want to test to see if the zoom mechanism is smooth, both going out and coming back. If the lens zooms by extending the front element (or extending an internal barrel) make sure there are no sharp, sudden catches or areas of high resistance. If there is an extending barrel, make sure the internal barrel is clean with no scratches that might indicate rubbing when zooming. Also check that the barrel isn’t loose when extended, it shouldn’t rock back and forth.
If the front element doesn’t extend, look at the rear element during zooming. If the rear element is part of the zoom mechanism it will move into and out of the barrel during zooming. Why is that important? Rear element zooms tend to have shorter than advertised focal lengths when focusing on near subjects. It may be 300mm at infinity, but only 240mm when focused 9 feet away.
Glass and internals
Look at (not through) the front and rear elements for scratches, coating defects, etc. Front element flaws are of minimal importance, but anything wrong with the rear element (scratch, coating flaw) may have a great impact. Then look through the lens while moving the focus and zoom rings. A bit of internal dust, even straight from the factory, isn’t unusual and is of no consequence. Things like a loose screw, piece of cloth, scrap of metal, or a broken internal element (yes, we’ve seen all of those in brand new lenses) probably are.
Mounting Ring
Mount and dismount the lens several times on the cameras and ask yourself the following questions:
- Does it go on easily but firmly?
- When seated is it firm with no looseness?
- Does the locking pin catch properly and then release easily when you push the camera’s dismount button?
Principles of Optical Testing
There are several principles to testing that are all too often ignored, but each is true (and obvious if you think about it a bit).
- If the fixed elements or mount of a lens are out of spec the lens will be bad at all parts of its zoom range and when focusing both near and far distances.
- With some lens designs an element 1mm too far forward or back will cause the lens to never focus sharply.
- An element tilted as little as 3 degrees from the plane of the lens can cause side-to-side or top-to-bottom issues sharpness differences.
- An element just a bit off center can cause chromatic aberration, astigmatism, coma and edge softness.
Modern lenses may have 15 or 17 elements, each of which could possibly be out of spec. - If the zoom elements are out of spec the lens may be excellent in one portion of its zoom range and horrid at another focal length. (But every zoom is usually slightly better at one end of its range than the other. I’m not talking about that, I’m talking about really bad in one part of the zoom range.)
- If the focusing elements are out of spec the lens may work fine on close objects but not at infinity, or vice versa.
- If the autofocus electronics and algorithms aren’t accurate or camera-lens communication isn’t good the lens may front or back focus.
The primary point of this is that you must test zoom lenses at least at both ends of the zoom range (and probably in the middle too), and test all lenses focusing on both close and distant targets. And a key point in testing your lens is comparing each quadrant to the other quadrants, not just “is it sharp”. In fact, center sharpness is probably the least important thing to consider when testing a lens.
Step 2: Front- and Back-Focus Testing
We start by testing autofocus accuracy because if the lens is not focusing accurately the other tests are meaningless. Even a manual focus lens should be tested for focus accuracy on an SLR – the viewfinder and sensor may not be exactly calibrated in the camera, and if the lens has “focus confirmation” electronics, that is, in our experience, more likely to be inaccurate than standard autofocus.
Set Up for Depth of Field and Focus Testing
This requires regularly marked surface set up at angles to a focusing object. We use a LensAlign Pro because it’s quick and very accurate, but its not necessary. The marked surface can be a ruler or yardstick set at angles to a focusing target for near testing and a fence (board, chain link, brick, doesn’t matter) with some obvious focusing target for the far testing.
A lot of people use computer generated moir? targets for autofocus microadjustment, and they are fine for that, but they don’t give all the information we need for lens testing so I don’t recommend them for this purpose.
Focus accuracy
Focus accuracy testing is done with a single focus point selected (center point unless you have some very odd reason to do otherwise). We begin with the lens at widest aperture and then repeat with the aperture stopped down a bit.
The process is quite simple: we autofocus the center point at the test target and then check to see where the sharpest focus actually is on the ruler or marked diagonal line. They should be very close. There are several things that need to be taken into consideration:
- Every lens can focus differently at near and far distances. Test at several distances.
- A zoom lens usually focuses slightly differently at the minimum and maximum zoom ranges (and sometimes in between too).
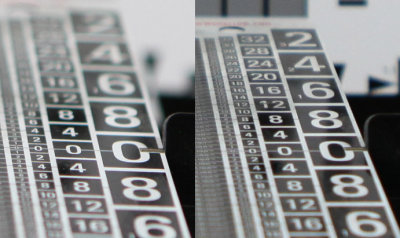
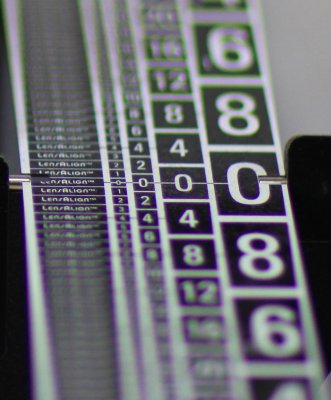
This 24-70 f2.8 focuses perfectly at 24mm (left) but backfocuses slightly at 70mm (right). - Some wide aperture prime lenses exhibit focus shift: they may focus accurately wide open, but then backfocus or frontfocus slightly as the lens is stopped down.

A wide aperture lens with no focus shift: note that the lens is a bit backfocused wide open (f1.2) and remains that way as the aperture is decreased. - Autofocus accuracy is an interaction between the camera (every copy of which is slightly different) and the lens (every copy of which is slightly different). Get over the fact that your camera is perfect because it is perfect with some other lens. Below are 5 focus checks done with the same Canon 85 f1.2 on 5 different 5D Mk II bodies, for example (look at the number 4s to see that no two are exactly the same).
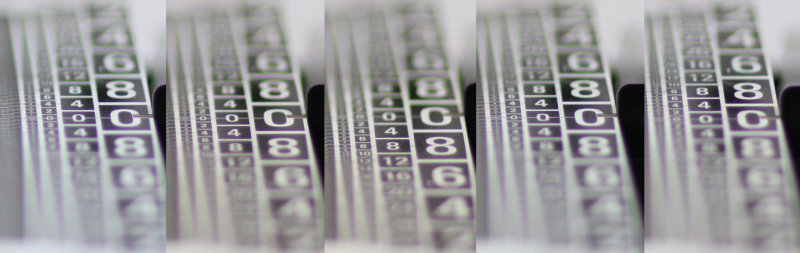
The same 85mm f1.2 lens tested on 5 different copies of the same camera body. Notice there are slight differences in front / backfocus with each body.
The summary of all this is we first have to check the lens at widest aperture and at least at both ends of the zoom scale and several different distances from the test target.
If our camera has autofocus microadjustment we then adjust it for the best compromise, getting it perfect where we want to use the lens. If I’m going to use my 24-70 zoom usually near 70mm for portrait shots 15 to 20 feet away, I’ll zero the adjustment there. If I’ll be shooting my 300mm prime lens on distant wildlife, I’ll zero it there.
If the lens is a wide aperture (f1.8 or lower) I’ll also do some sequential shots at various apertures to check for focus shift. When a lens has focus shift, the point of focus changes slightly as the aperture is stopped down from wide open. Eventually the larger depth of field from reducing aperture overcomes the focus shift, almost always by f2.2 or f2.8. This isn’t something I can correct, but its good to know that I can shoot my Sigma 50mm f1.4 either wide open, or at f2.2 or higher, but in between because it won’t focus accurately.
One other thing to check with a wide aperture lens is spherochromatism (also called secondary longitudinal chromatic aberration or longitudinal color shift). Spherochromatism occurs in many wide aperture lenses because while the lens is corrected for for chromatic aberration in the in-focus area, the out-of-focus areas in front of and behind the plane of focus can’t be corrected and will have magenta or green tints. There’s nothing to be done about it, but its good to know how severe it is. In problem lenses you can avoid large white areas if the foreground or background when framing your shot.
Example of a wide aperture lens with significant spherochromatism. Note the purple tinge in the forground and green tinge in the background.
Once we have the lens focusing as accurately as we can, we move on to Flat Field testing. Of course there is an occasional lens that needs so much autofocus adjustment that you don’t have to test further: if you have to set your camera to +/- 15 or more, it may be better to exchange for another lens. And of course if your camera doesn’t have microadjustment you have to decide what is, or is not, acceptable.
Flat Field Testing
This is the part of testing that will give you the most information about your lens, so its important to set it up correctly. The key to flat-field testing is that everything is flat (duh) and lined up accurately. How flat and accurate depends on depth of field of the lens, which changes with the aperture and the distance from the target. If you’re testing an f/1.4 prime lens at near distance it has to be very accurate. An f/5.6 lens at far distance, not quite so much.
Flat Field Set Up
A fairly large building (windows are great for detail) makes a superb far-distance target. You can assume the building side is perfectly vertical so using a bubble level to set the camera on tripod to vertical is very straightforward.
Any wall can be used for near-distance testing. I recommend downloading and printing some USAF 1951 test charts (they can be found online, including here ) You want one in the center of your image and at least one in each corner. A few pieces of cut up newspaper will work too.
If you want to be more complex, I recommend the simple Resolving Power chart from Edmund Optics that you can buy for less than $20. It may not be worthwhile to test one lens a year, but is certainly not a bad investment for a camera club. There are lots of other test targets available online and most do the job just fine.
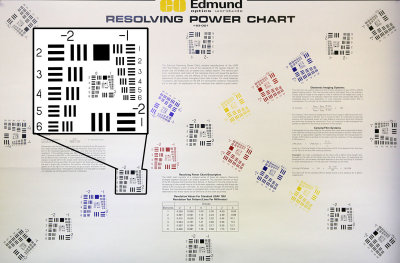
Edmund Optics Resolving Power Test Chart
Setting up the Near Distance Flat Field
- Assuming your wall is vertical and straight make sure your test targets are placed smoothly and tightly on the wall. If they’re lumpy and bumpy, they aren’t accurate.
- Place your camera on tripod so the center of the lens is level with the center of the test target. A laser pointer held along the lens barrel can be used for targeting and to confirm centering. A bubble level (built into the tripod or a more accurate hardware level) confirms the lens is lined up vertically.
- Make sure the camera is not pointed at an angle right or left: this could make one side of the target out of focus compared to the other. The simplest and fairly accurate way is to measure an appropriate distance from the wall (say 15 feet, but whatever is appropriate for the lens focal length) from either side of the test target. Then draw a chalk line between those two points. That line should be parallel to the wall. You can line up the camera with that line using a yardstick and drop string if you want to be a bit obsessive.

But let’s be honest: most of us are going to line up the lens so its centered on the tripod, use the bubble level on our tripod and eyeball judge the rest of it. And that will work just fine 95% of the time. If your results look bad, then you can always go back and measure carefully to make sure it’s the lens with the problem, not your setup.
Flat Field Optical Testing
Most people want to jump in and see how much resolution the lens provides at its center point, but unless the lens is horribly soft that isn’t going to tell us much. Photographing a centered resolution chart gives you almost no information about the lens.
- Center resolution is pretty good and fairly comparable on most lenses. A more expensive lens usually gets you more aperture or better resolution away from center.
- A wide angle lens won’t resolve as well as a standard or telephoto.
- A wide aperture prime doesn’t necessarily resolve better than a good zoom, although most do, at least when you close the aperture a stop or so.
- By f5.6 most lenses resolve well, by f8 some actually are losing resolution to diffraction(depends on your camera) and by f11 most are losing resolution.
But I realize everyone wants to know how well their new lens resolves. The AF1951 target you can find online and print for free, or whatever you are shooting, should give you a decent idea of how well the lens resolves.
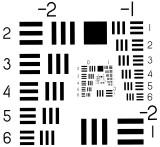
AF1951 Test Chart
If you want more detail, Norman Koren has posted some downloadable test charts along with detailed instructions for using them. Or you can buy detailed (and pricey) mutiple test charts like the Edmund 58940.
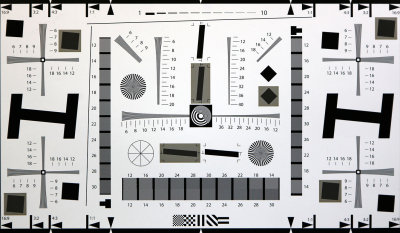
Edmund Optics 58940 Test Chart
The only real necessity is to have an idea what you expect from the other lenses you shoot and compare your new lens to them. Be reasonable, though: if you think your new f1.4 prime is going to be as sharp at f1.4 as your old lens is at f5.6 you may be rudely surprised. And that new f2.8 zoom may not be any sharper in the center than your old variable aperture zoom, but it will probably toast the old one on the edges and corners. If all you are interested in is how sharp the center of the lens is then just buy Macro lenses and don’t worry about it anymore.
The bottom line, though, is checking center sharpness doesn’t help too much with testing a lens. What really helps is comparing the quadrants of the image to each other. If they elements are all aligned and centered properly the different quadrants should be similar. If the corners are soft wide open, they should all be equally soft and begin softening a similar distance from center in every direction. Similarly any chromatic aberration should be equal on all sides, not worse on one than the other (assuming your target is equally lighted).
If you look at the 4 corner targets from the lens test below, its obvious that the right hand targets are softer than the left. If you look more carefully you’ll see that the right upper is even softer than the right lower and has a bit more chromatic aberration. This is the kind of thing that will show up if the lens has an element out of center or at a slight angle. The center sharpness on the lens, though, was excellent.
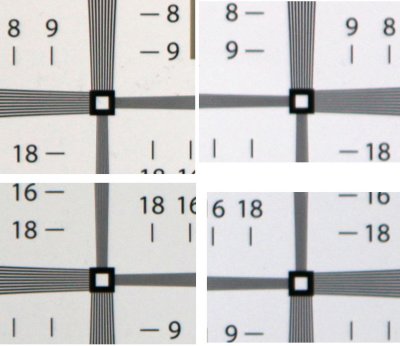
The four corner quadrants of a misassembled lens. Note how much softer the upper right quadrant is than the lower left.
When you see an image like this you want to make sure the effect isn’t caused by the camera not being square to the test target, which could cause some of this effect (probably not the CA). You might try shooting the camera in portrait mode: if its alignment the quadrant in the lower left will now be in the lower right and less sharp, the upper right quadrant will now be in the upper left and more sharp. If the image looks the same in both portrait and landscape mode, its probably the lens.
Once we’ve determined that all 4 quadrants look equivalent on our fist test shots its time to run the lens through a battery of fairly quick tests:
- Near distance widest aperture. Zooms should be checked at their widest, middle, and longest focal length.
- If your zoom is variable aperture, be sure to mark down at what distance the aperture changes. You know your f4-5.6 zoom is f4 at the wide end and f5.6 at the long end, but do you know when it changes? Its good to know that shooting at 160mm instead of 170mm will give you f4.
- At each location the lens should be checked with aperture wide open, and stopped down in incremental (1/2 or 1 stop) steps to f8. You can assume the lens has reached maximal sharpness by f8. Some may sharpen further in the corners at f11, but they’ll usually start sacrificing center sharpness there.
- The same tests should be repeated at far distance.
- Testing distances will vary depending on the lens, but I find it logical to test at the distances I’m likely to shoot at. I don’t shoot the 16-35 f2.8 at 4 feet away so near testing may be 10 or 12 feet for it.
- Unless you’re going to really shoot at the minimum focusing distance, don’t test there. The lens will usually be sharper a few feet away.
Vignetting
Is really part of flat field testing but can be more obvious when the target is a smooth, evenly lit light colored wall. It doesn’t require critical line up like the other parts of flat field testing, and you simply take exposures at various parts of the zoom range and several apertures. Any vignetting should be even in all four quadrants, of course. It is often more severe at one end of the zoom range than the other, and usually less severe when as you decrease the aperture.
Distortion Testing
You can buy accurate optical distortion targets, but they’re pretty expensive ($200-$300) and for all but quantitative work there are plenty of square things you can take pictures of to detect distortion. Squarely laid brick walls work (although most aren’t as square as you’d like), big windows or doors, basically anything that gives you parallel vertical and horizontal lines. You want it to be at your level, though: angling the shot up or down (or side-to-side) will cause its own distortion. You need the camera lined up near the center of the object you’re using to check distortion.
Barrel distortion is most common at the wide end of zooms and pincushion at the long end. More complex moustache distortion may be less evident, and is less common.
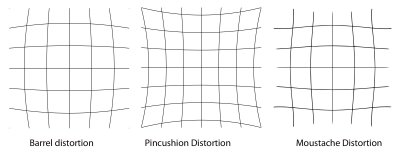

The common types of distortion (above) and an example of barrel distortion (below)
More Advanced Testing
Flare Testing
Flare testing simply requires some bright sunlight. You don’t shoot directly into the sun, but have it shining at an angle from one corner of the field of view. Examine the image for ghosts and flare, and to see how badly contrast is reduced. There are no standards here, but its good to know how the lens performs with the sun in the field.
Star Test
This one requires no more than a tripod and a clear night sky. Basically you simply take a long exposure of the sky in an area with fairly uniform stars. A few second’s exposure should give you fairly pinpoint stars and several minutes to an hour will give you star trails. Observing these you can see very quickly if the lens exhibits coma or severe astigmatism, which will show as blurry stars or star trails that fatten in the corners. With such a long exposure camera sensors and noise will play a part but you can get some simple information you might not otherwise.
Image Stabilization
This is difficult to standardize for a lens reviewer, but it’s a good thing to test with your own hands and shooting style. Simply shoot a test target using different shutter speeds (making sure some of the speeds should be sharp and some blurry when handheld) with the stabilization system on and off. See how many stops YOU get with your hands. Remember IS does not work equally well on every shot so repeat several shots at each range and speed with the IS on.
Don’t try to hold the lens to a made-up standard like “if its 4 stops of stabilization I should be able to hand hold a 1/20 second exposure”. Just see if it helps and how much. Every person gets slightly different results from the same IS system. The important thing is to see how much YOU get.
What Did We Learn Today?
When buying a new or used lens, its worth an hour of time to make sure it’s a good copy and to find out a little about how it works.
My absolute requirements for an acceptable lens are:
- Construction and function pass “look and feel” testing.
- Front / backfocus can be corrected with microadjustment of 2/3 of the camera’s range or less (leaving a bit of margin of error for future adjustment).
- Front / backfocus is similar throughout zoom range and at near and far focusing. How similar is a judgement call, but if it changes less than +/- 3 for a 4x zoom and +/- 5 for a 10x zoom throughout the zoom range, then I’m pretty happy.
- All 4 quadrants of the lens are equally sharp, vignette equally, and have similar chromatic aberration at maximum and minimum zoom, near and far focus.
- The lens doesn’t have severe loss of sharpness at one end of the zoom range or one end of the focusing range (20% decrease in resolution isn’t too unusual from the sharpest to softest part of a zoom, but 50% certainly suggests something is wrong.)
Most other things are going to be characteristics of the lens, not evidence of a good or bad copy. When you go examine your testing pictures on a monitor (no you can’t use the camera’s LCD) make yourself some notes on that lens. My notes for a made-up zoom might look like this:
- Maximally sharp at f/5.6 in center at wide end, f8 at long end
- Corners maximally sharp at f8 throughout the zoom range
- Wide open sharpness falls off at 1/2 of the distance to the corner in most of the range, but 1/3 at extreme telephoto end.
- Zoom is sharpest at wide end, begins to loose sharpness at the last 1/4 of its range.
- There is barrel distortion wide open, gone by 24mm. Slight pincushion at maximum zoom.
- The lens vignettes mildly wide open at the wide end of the zoom range, but not the long end. It disappears at f5.6.
- Image stabilization lets me handhold at 2 times the shutter speed expected from 1/focal length X crop.
The notes are specific for each lens. A wide aperture prime lens may have notes about when spherocromatism disappears. With a Macro lens, writing down at what aperture diffraction starts to cause softening may be the most important note I make, since I’m often shooting at high apertures to increase depth of field. If you only have a couple of lenses, you’ll probably throw the notes away after a few sessions with the lens, but if you shoot with a lot of different lenses like I do, its nice to have that note card to refer back to on a shoot.
Good photographers take advantages of these lens characteristics or learn work around them. They also are the fuel that feeds so many online arguments about lenses. For example, I love wide aperture primes and expect to see spherochromatism or soft corners wide open. I use them for center compositions and have learned to compose my shots to large light colored areas out of the foreground and background. But about once a week I get my feelings hurt when a renter tells me my recommendation of that lens stinks because the foreground looks magenta and the corners are soft.
Oh, and one last note. You’ll notice that nowhere in my testing do I say how to calculate “is my copy sharp”. It’s a meaningless calculation unless you have dozens of copies of the same lens like we do and are using some standard measurement of sharpness. I know, for example that on our test charts, at our standard distance of shooting, on the 5D II bodies we test with, that the 70-200 f2.8 IS II Canon lens should resolve about 20 lines/mm. The 16-35 f2.8 will resolve about 16 and the 300 f2.8 about 22 or 24. But these numbers are meaningless to your testing unless you had exactly the same set up as we do.
I also know that one copy of a lens may resolve slightly differently on one camera than another. My only point in all this is instead of worrying about “sharpest possible” just make certain its “sharp enough”. And you do that by examining your prints, not 100% magnification on your monitor. No one ever won a photo contest or award for owning the sharpest possible lens.
The copy is sharp if it resolves the detail you want to see in the prints you make. After you’ve tested the lens and know that its not defective and what its characteristics are, go take some pictures. That will tell you if the lens is sharp enough for you.
Author: Roger Cicala
I’m Roger and I am the founder of Lensrentals.com. Hailed as one of the optic nerds here, I enjoy shooting collimated light through 30X microscope objectives in my spare time. When I do take real pictures I like using something different: a Medium format, or Pentax K1, or a Sony RX1R.
-
alsh
-
Michael Clark
-
Mark
-
Oleg
-
Oleg
-
Oleg
-
Oleg
-
Oleg
-
Bruce Fairman
-
David Franklin
-
AJ
-
jil2
-
Seb
-
mike
-
Mike Fregeau
-
Tom Marron
-
Tom Marron
-
Tom Marron
-
Tom Marron
-
Tom Marron
-
Mats
-
bart de puij
-
roberto
