We all know that aberrations affect points of light off-center, making them blurred. We all know that some aberrations are worse the farther away from center we go. And we know that some aberrations are improved when we reduce the aperture.
Some of us even know the various rules-of-thumb for what makes an aberration worse or better. Astigmatism, field curvature, and distortion get exponentially worse as you move away from the center of the lens. Coma and lateral chromatic aberration get worse away from center, but not exponentially, and spherical aberration isn’t worsened at all as you move away from center. Reducing the aperture dramatically improves spherical aberration and coma, reduces field curvature and astigmatism to a lesser degree, but doesn’t have much effect at all on distortion or lateral chromatic aberration.
It gets pretty complex, doesn’t it? And since different lenses have very different amounts of the various aberrations, none of us really have any idea exactly how much improvement to expect when we stop down a bit. We do some trial and error (well, most of us do) and decide where the “sweet spot” for a given lens is. I know to shoot my Zeiss 50mm f/1.4 at f/5.6 if I want sharp images away from the center, for example, just because I’ve played with it and figured that out. On the other hand, I can shoot my Sigma 35mm at f/1.4 — it doesn’t really seem to get much sharper at f/2.8.
Since we’ve been using OLAF to look at how lenses render points of light off-axis, I thought it might make a fun demonstration to see how moving across the field of view affects how the lens “sees” a point of light, and how stopping down improves it.
The Sum of Aberrations
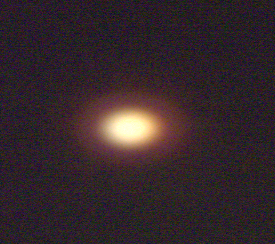
I chose 35mm lenses for this demonstration, mostly because I shoot at that focal length a lot, so I was interested in comparing those lenses. For those of you who haven’t followed the Geeky articles about OLAF, here’s a quick summary of what you’ll be looking at. We’re shining a 5 micron pinhole of light through the lens, then using a camera and collimator to see what that pinhole would look like to our camera. For any decent lens, if you do that right in the center, you see the image of a pinhole with some halo of light (basically, the lens’s point spread function) surrounding it. Not too surprising so far.
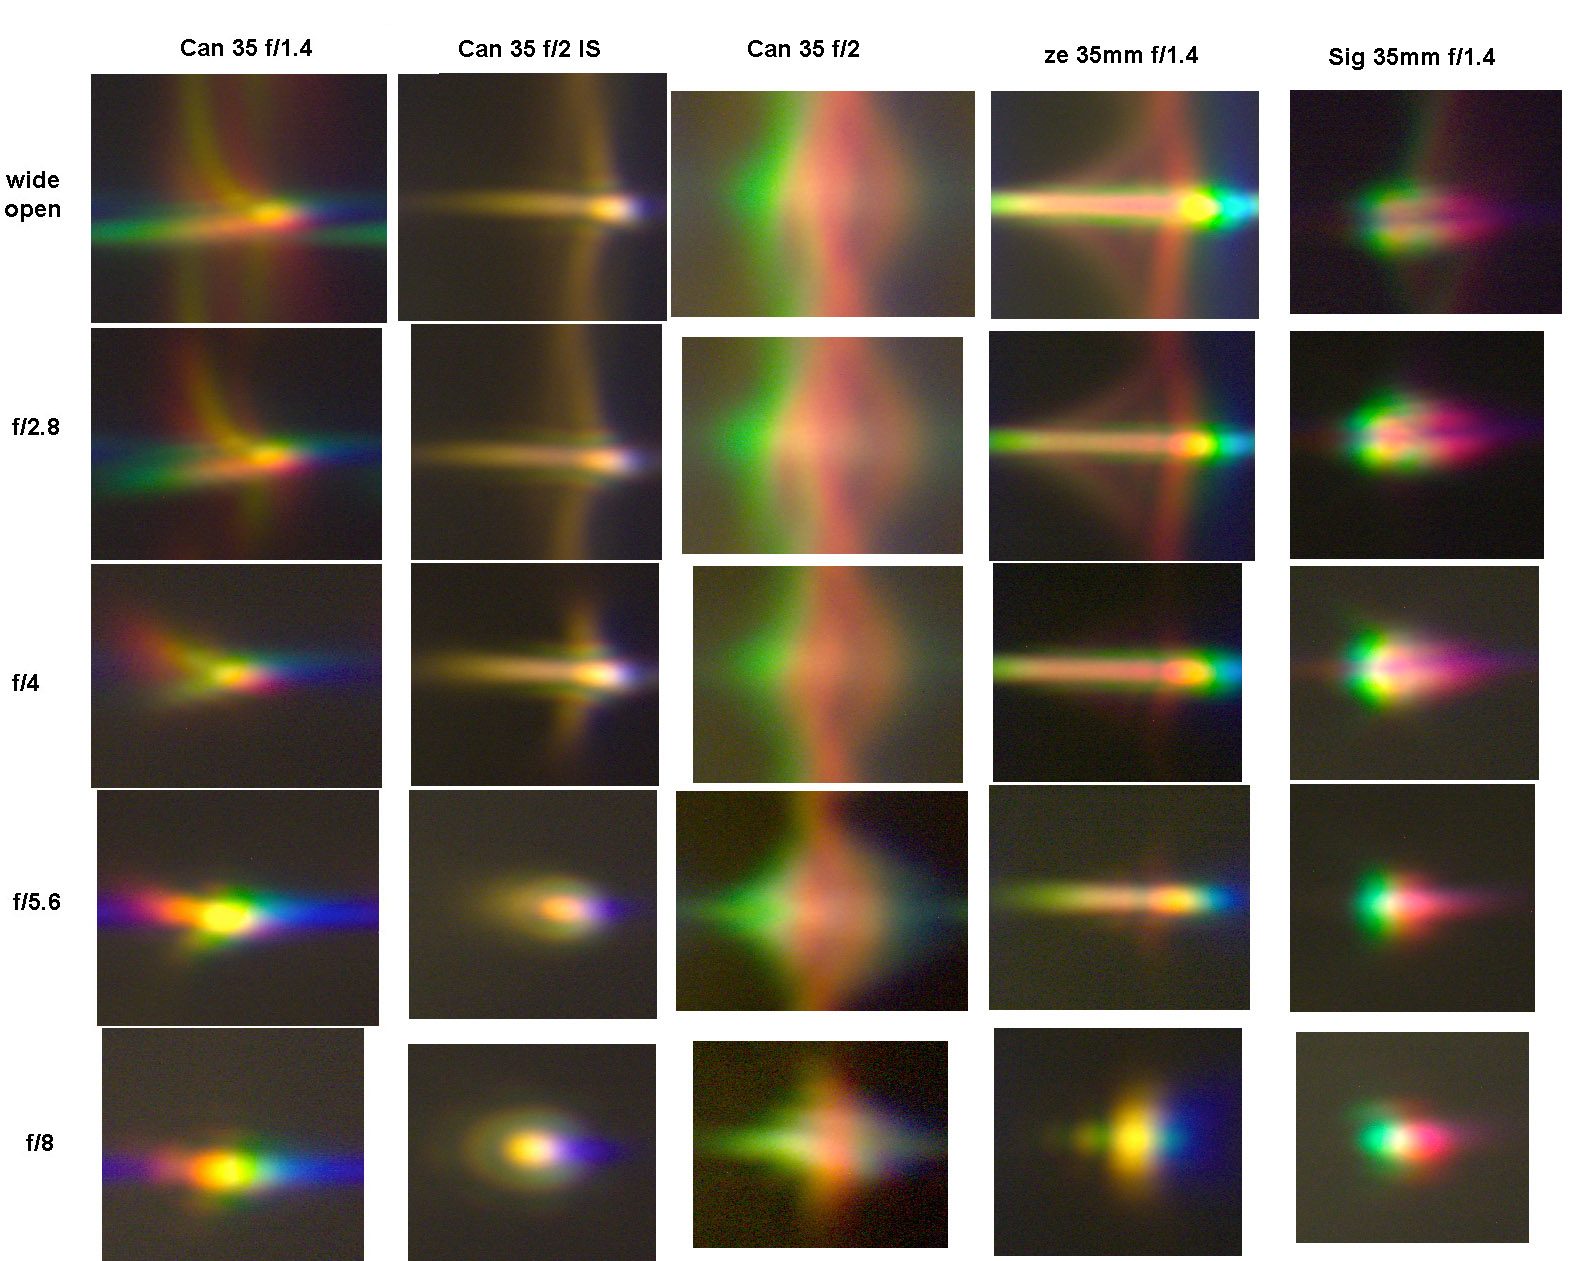
But as we start moving the camera off-center, the various aberrations of the lens become more evident, and our point starts looking less and less like a point. The 35mm lenses I’m playing with today have a field of view (the angle from one edge to the other) of about 62 degrees, so I can “see” roughly 30 degrees to either side of the center. The best resolving 35mm lens is the Sigma 35mm f/1.4 Art, so we’ll use that for an example. Here’s what that point of view looks like as we move from center (above) through 12 degrees to 30 degrees off-center (below).

Remember, OLAF is designed to make aberrations look bad — its purpose is to adjust bad lenses, so the more it shows us the better we can do that. Also, modern lenses are designed expecting that light will pass through cover glass, an IR filter, a Bayer array, and the sensor’s microlenses; all of which refract the light further, so the camera probably doesn’t “see” quite this degree of aberration. But this lens is as good as you can get at 35mm focal length and f/1.4 aperture.
What Happens When We Stop Down?
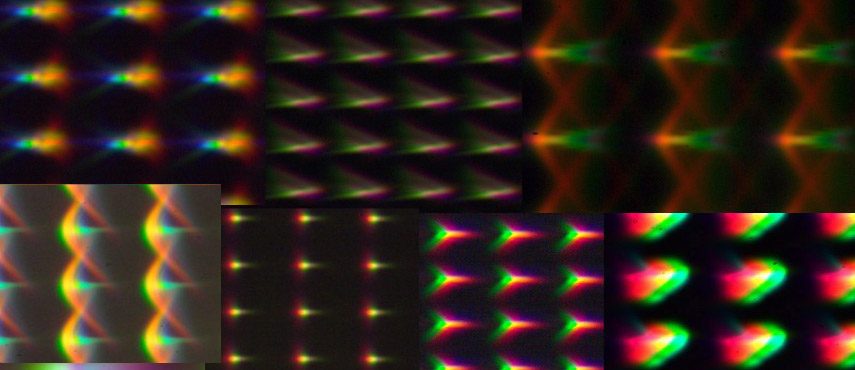
For aberrations, at least, good things should happen off-axis when we stop down. As mentioned above, spherical aberration and coma should improve a lot, and astigmatism should improve some. (Field curvature doesn’t count in this demonstration because I’ve focused on the off-axis points, not the center point.) I mentioned earlier, too, that different lenses have different aberrations contributing different amounts, so let’s put up a comparison of several 35mm lenses. I’ll just show the 30 degree points for each, since that’s the farthest from center where all of the lenses are at their worst.
A couple of points about the images above. First, in order to save some space and make the illustration nice and square, I started each lens at its widest aperture then moved to f/2.8, so the f/2 lenses have a bit of theoretic advantage on the widest aperture line. Second, OLAF’s cameras were set on automatic and made some brightness adjustments on their own, so you can’t judge relative brightness (or amount of vignetting) from the above images.
This isn’t a test of “best-lens-at-the-edge-of-the-image,” although I do think we can say it’s a reasonable test of the worst lens at the edge of the image. There are no surprises here. The Canon 35mm f/2 is a cheap, 20+ year-0ld design. If there’s a surprise, I think it’s how good the Canon 35mm f/2 IS points look off-axis. We knew the other three were all great lenses.
I do think it’s a nice illustration, though, of the way differently designed lenses have slightly different effects as you stop down. It’s also interesting that the designers of the different lenses have chosen slightly different aberrations (aberration-free is not possible). This gives slightly different patterns to the off-axis points, and closing the aperture down has slightly different effects.
You Want to See a Zoom?
Zoom lenses are way, way more complex than primes. With most of the zooms, the-off axis points have much more complex aberrations than these. But the Canon 24-70 f/2.8 Mk II is widely acclaimed to be “nearly as good as a prime” by lots of people (including me). So I thought, since it happens to work at 35mm, we might repeat the test with it to compare to the 35mm primes above. So here is the Canon 24-70 f/2.8 Mk II at 35mm, also 30 degrees off-axis, at various apertures.

The f/2.8 image gives you an idea of the increased complexity of aberrations with a zoom lens, but the bottom line is that even at f/2.8, at the very edge of the field of view, it still makes a reasonable sharp point. Stopped down it gets even clearer. Looking at just this one point, I have to say the Canon zoom at f/2.8 is pretty impressive. If you don’t believe me, below are 4 other zoom lenses shot at 35mm and f/2.8.

It’s Nothing You Don’t Already Know.
At least it shouldn’t be. But sometimes seeing the image is a lot better than interpreting all the geeky numbers we usually generate. But you number geeks don’t need to worry; it’s only a matter of time before we get software to generate MTF numbers from these point spread images.
Roger Cicala and Aaron Closz
Lensrentals.com
April, 2014

32 Comments
L.P.O. ·
Ever thought of selling aberration images as art prints?
Roger Cicala ·
L.P.O. not prints, but I do have some T-shirts coming 🙂
Samuel H ·
This new toy of yours is NICE.
Jose ·
Looking at these pictures, I remembered the aurora borealis and suddenly I realized that there must be some gigantic OLAF between the Sun and Earth.
Nqina Dlamini ·
The images do look arty. The Canon and the Zeiss images look like dragonfly in flight. Very arty.
Group W Tom ·
A picture is worth a thousand numbers
David Cockey ·
Any plans to investigate the effects of diffraction at small apertures with OLAF? Much of what has been written on the topic appears to be rehashing old theory. In contrast your previous blog on Overcoming My f / Entekaphobia was one of the best discussions of the topic. Photos of what diffraction does to points of light, particularly off-axis, could be very informative.
Roger Cicala ·
Good thought, David. I’ll start playing with that soon.
CarVac ·
One thing I’ve been terribly curious about is how some lenses have dramatically different resolution when stopped down supposedly past diffraction limitation, even in the center.
I don’t know many examples of this, but one I do know is the Contax 28/2.8 (I happen to own one) which is extremely sharp (high contrast? or high resolution?) at f/11 in spite of this “diffraction” thing that afflicts other lenses.
Could you test this on OLAF? And possibly correlate it with something (number and curvature of diaphragm blades, maybe)?
CarVac ·
The other cool thing you could do with OLAF is use these to generate point spread functions for deconvolution sharpening/CA elimination…
Christer Almqvist ·
Very informative, easy to grasp. Many thanks.
Joel M ·
CarVac, your point spread function suggestion gives me a headache just by thinking about it!
You would need to generate PSFs at many locations across the image circle (at a minimum, multiple distances off-axis for each quadrant), and do this for all focus distances and zoom settings for each lens! And the functions still wouldn’t take into account the effects of sensor architecture, debayering algorithms, etc. Finally, sample variation would mean all that work would only properly apply to the single copy of the lens you tested!
Although I must admit that if you could pull it off and write some very clever correction software, you could theoretically achieve a whole new level of pixel-peeping sharpness!
Arun H ·
Why is the 35mm f/2 IS’s result such a surprise? Looking at Canon’s MTF curves, my recollection is that they are actually better than those of the 35mm f/1.4, especially stopped down (I actually compared them before deciding which 35mm to purchase). That difference should show in the point spread function and it seems to.
Roger Cicala ·
Arun, surprising, I think, because it’s less expensive and doesn’t get much press. But I agree, for those of use who look at MTF curves, it’s not really surprising.
KimH ·
Impressive to see how you can actually match the performance of the 24-70LII with Primes – it visible – not a figment of someones imagination or a theoretical/best-case MTF.
Yet another great article, thanks! My wife now knows who the heck I am talking about when I say “Roger writes” – that’s something 🙂
PS: Your rows of single point images are tricky for some browsers to show. The ones way to the right side – outside the text-frame simply disappear
Roger Cicala ·
Kim, that’s more than I can say about my wife. She can’t understand why anyone would read what i write. Thanks for the head’s up on the images. I didn’t want to shrink them too much, but probably i should get them a bit smaller.
Mike ·
I wonder how large a pixel of a sensor would be if overlayed on these images.
For example, if the sensor pixel is as large as the image crops you are showing, it wouldn’t matter if the off-axis point is a point or a more distorted object. It’s still the same amount of light hitting the pixel.
Chris Livsey ·
On my Safari browser all the primes fit but I only see thee and a half of the zooms.
Roger Cicala ·
Thanks Chris, should be fixed now.
L.P.O. ·
I’m a bit short on T-shirts at the moment so I’d buy a T with some of these colourful images in a moment.
Also, Roger, great that you liked the idea of diffraction limit testing. It’s an interesting idea, and I’m eager to get to see your results. It would be extra nice if you could take it to an extreme, like e.g. testing a macro lens at f/40.
FW Scharpf ·
Perhaps a dumb question: When I use center-point focus, the center will of the image will be sharper than the edges. But how would aberrations differ if the focus point is shifted to an edge of the image? I suspect, curved-field problems would disappear, but what about the rest?
Roger Cicala ·
FW – the point where you put the focus point should be (off-center points are less accurate, so there’s more variation) in best focus. Field curvature (assuming there is some) will make the rest of the image softer, of course, but the point of focus should be sharp.
Carol ·
Uhg, speaking of lenses, that picture in the lenscap promo is soooo disturbing. Makes me wince every time I see it. O.o
Chris Livsey ·
Roger, I see the light 🙂
All fixed.
Interesting how f8 works its magic, the great leveller.
Andrew Burday ·
For people who are having trouble with the images on the right getting cut off: have you tried widening the window? This worked for me on my very creaky old MacBook. Widen the window as far as you can.
Roger, when you write, “Reducing the aperture … reduces field curvature”, do you mean that the focal surface actually changed to be closer to a plane, or do you just mean that increasing the depth of field makes curvature less visible? I always assumed that the effect was the latter, but your sentence sounds like the former. I hope that’s not too persnickety — I’m honestly curious about the answer. As always, it’s fun to read these articles and get insights that wouldn’t have been available to me without your lab setup.
Dr Croubie ·
Dear Roger,
Please put a Lensbaby in one of these.
That is all.
Mark Muse ·
Roger, Safari on iPad chops off most of the fourth image. Pinching the contents down in size, the fourth is still cut off.
Will Frostmill ·
Dear Roger,
Could you put some classic lenses on OLAF, too? I’m really curious to see what a good Tessar design (Like the Nikkor 45P, or Pentax’s 50/3.5) looks like. I’m really curious about what the relationship between real life bokeh and OLAF’s points is.
(Of course I’d love to see some Petzvals, Heliars, Dagors, etc. but whatever you can pull together would be awesome!)
Roger Cicala ·
Will, I hope to. The issue becomes getting them mounted to OLAF, and I have figured it out yet. I real life I use a Horseman Canon-to-viewcam bellows, but that won’t fit on OLAF.
Lynn Allan ·
Roger,
Any chance you and OLAF would participate in a discussion thread on DPReview regarding the resolution of a full-frame sensor that would be a suitable match for the Zeis Otus 50mm f1.4 ?
http://www.dpreview.com/forums/post/53559809
kevin conlon ·
I would be really interested to see Nikkor 58/1.4G on OLAF, in and out of focus.
Damien ·
Dear Roger,
Thank you for another very interesting article.
Would is be possible to add a scale to the OLAF images, probably in µm, to get a feel of how large the aberrations are compared to a sensor pixel ?
Regards.