
OK, I usually don’t respond to requests to disassemble things. I have a day job and the blog stuff is my hobby. But every so often the Bat Signal get’s raised over Gotham Internet and Aaron and I feel the need to fight the crime of massive overreaction and stomp out the flames of speculation-becoming-fact. I woke up yesterday to read that all Sony’s new 85mm f/1.4 G Master lenses made horrible grinding noises when focusing, were filled with metal shavings, had huge scrapes on their inner barrels, and caused cancer.
Before we get to myth busting, a couple of facts that I’ve gleaned from simply examining and testing 40+ copies of the 85mm f/1.4 GMaster.
- The Piezo (or SSM if you prefer) ring-linear drive does make noise. It’s noticeable. Every copy I’ve tried does to some degree, although some are louder than others. HOWEVER, if the camera is put in video mode the AF slows down and the noise is markedly reduced. So photo mode fast and noisy, video mode slower and quiet. That’s logical.
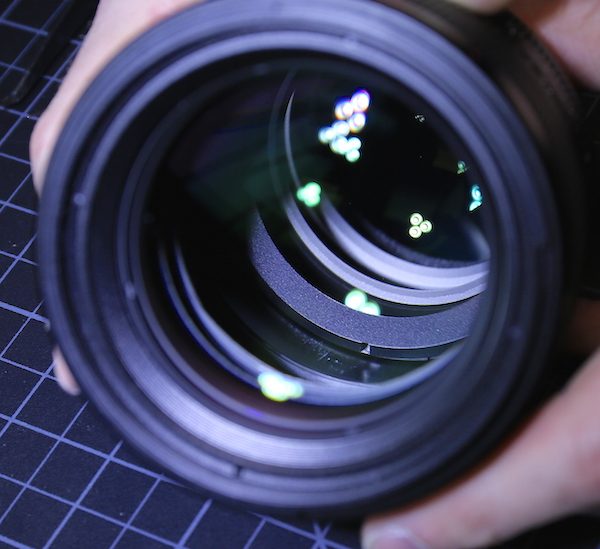
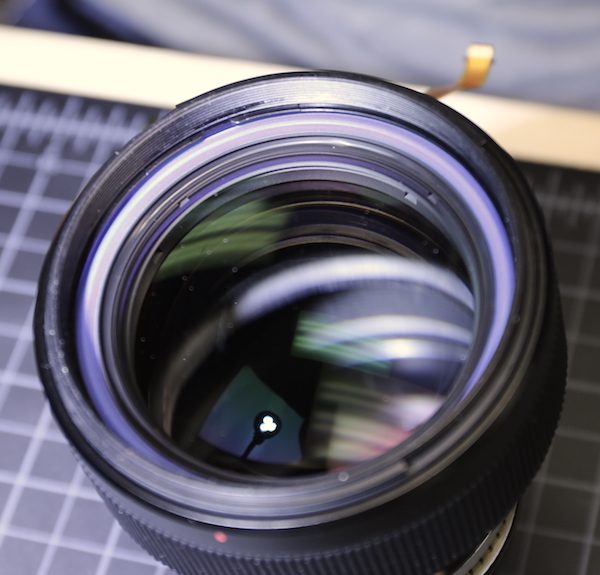
- Every 85mm wide-aperture lens I’ve ever looked in has some dust inside, NIB and no matter the brand. It’s partly because this type of lens has a front group that magnifies the interior. If yours doesn’t have dust in it then you don’t have a bright enough light to fuel your dust paranoia properly.
- Just over half of the 85mm f/1.4 G Master lenses I’ve looked at have some marks on the inner focusing barrel that look like either scrapes or lubricant. These don’t make any more or less noise than ones without marks. Also, a fair number have marks on only the lower part of the barrel. These are no noisier over the marked part than over the unmarked part. In other words, I didn’t find any association between barrel marks and noise.
So with all this in mind, Aaron and I put on our capes, grabbed our utility belts, went down to the Lens Cave and got to work. We picked a copy that had the typical ‘scrape’ marks that everyone is upset about.

Before we start let me mention that this is a rather urgent tear-down of a lens we had to get back in stock, so we didn’t do quite as much exploring as we sometimes do. Still, I think you’ll find it interesting.
So Let’s Look Inside
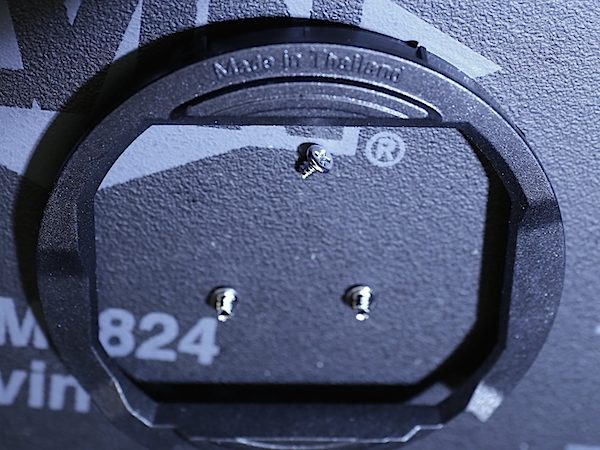
The rear light baffle comes off with three screws. Yes, I’m snarky for putting up this unnecessary picture.
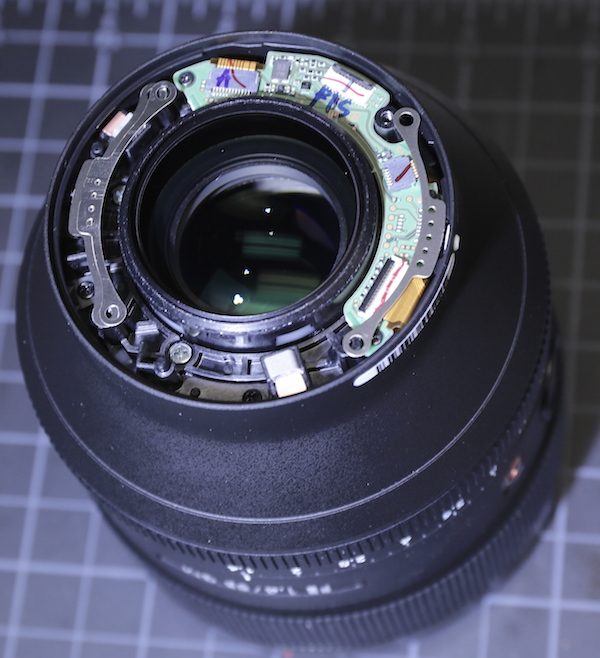
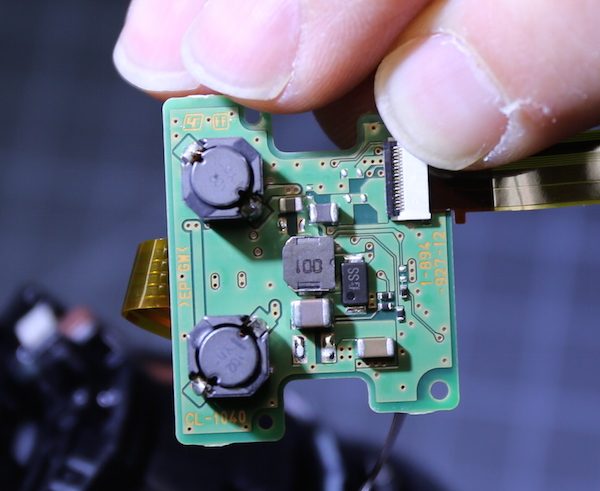
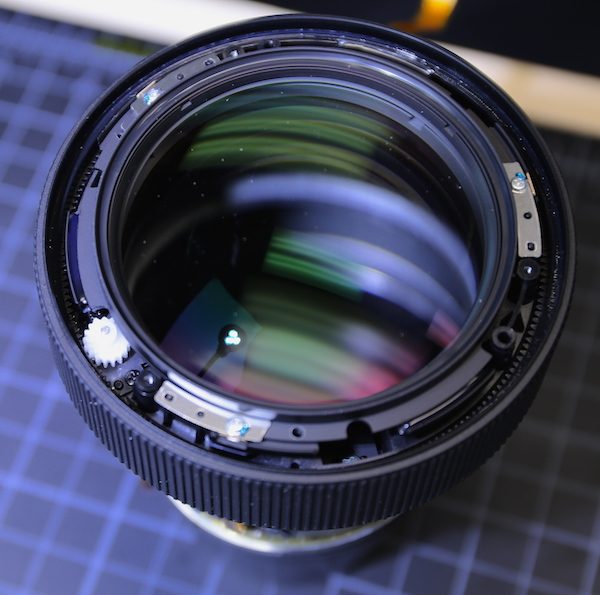
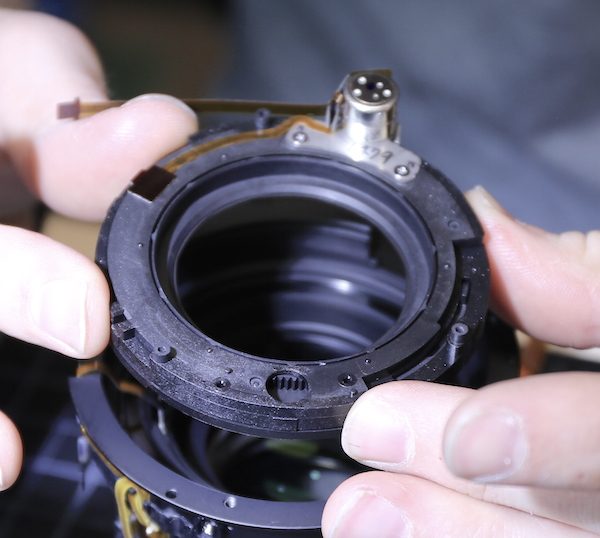
Next, the rear bayonet is removed in the usual fashion, exposing the rear of the lens. We noted the PCB is different than we’ve seen in other Sony FE lenses; It’s smaller and screw mounted to the rear, rather than with rubber bumpers like the others we’ve opened. There are also silver shims or spacers on each side of the lens, which we assume allow a tilt adjustment (you can see there are two on the left, one on the right).
Once the PCB is removed, taking out a few screws let us remove the rear barrel.
The inner rear barrel is now exposed. There are two (one shows in the pictures) long copper ground leads that go back up to the bayonet mount, and several flex connectors that went up to the main PCB, but not much else of interest showing at this point.
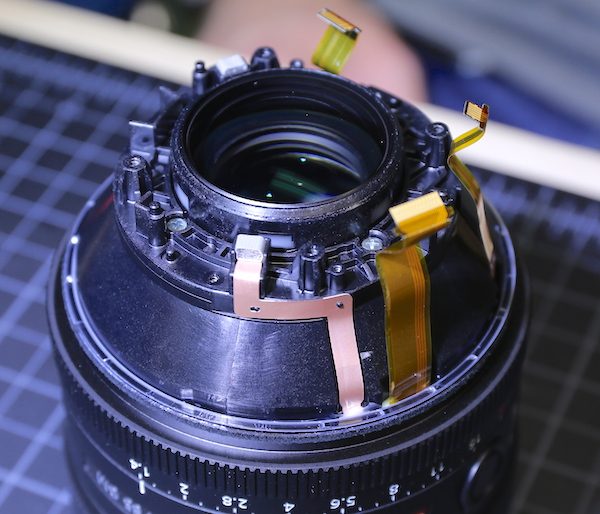
The aperture ring slides off now. It has a nice mechanical feel and you can see the usual click ball bearing inside, but it controls the aperture electronically.
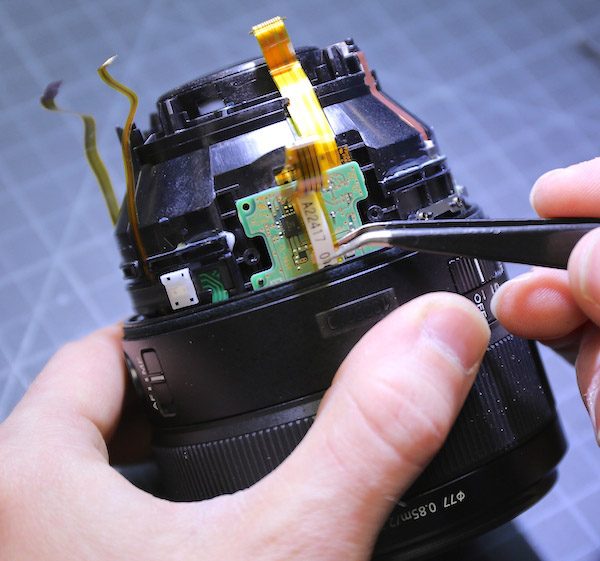
On the inner barrel is a wedge (forceps point to it) that moves the ball bearing in and out of ‘click’ position so that you can declick the aperture when you want. You can see the little silver lever right above the ‘click on-off’ switch that moves this when you flip the switch.
On the other side is the aperture position sensor that actually tells the camera what position the aperture ring is set to.
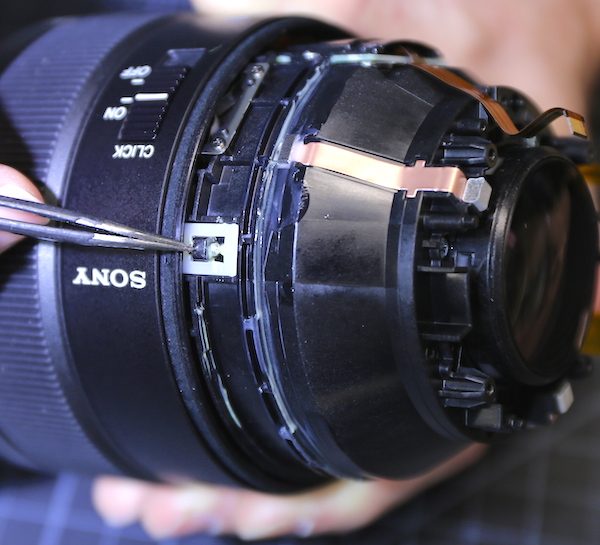
You might have noticed a black plastic cover over a second circuit board in the image above. Removing the cover shows us another circuit board tucked down around the barrel which caused Aaron to have some Nikon disassembly flashbacks.
Luckily it wasn’t that bad; there were not a bunch of soldered wires going to the second board, just flexes.
And once all of that stuff had been disconnected we could take out a few more screws and remove the inner rear barrel.
This gives us a good look at the SSM (aka ring-piezo) motor. This is smaller than the ring USM motors we’re used to seeing in other lenses, but otherwise very similar.
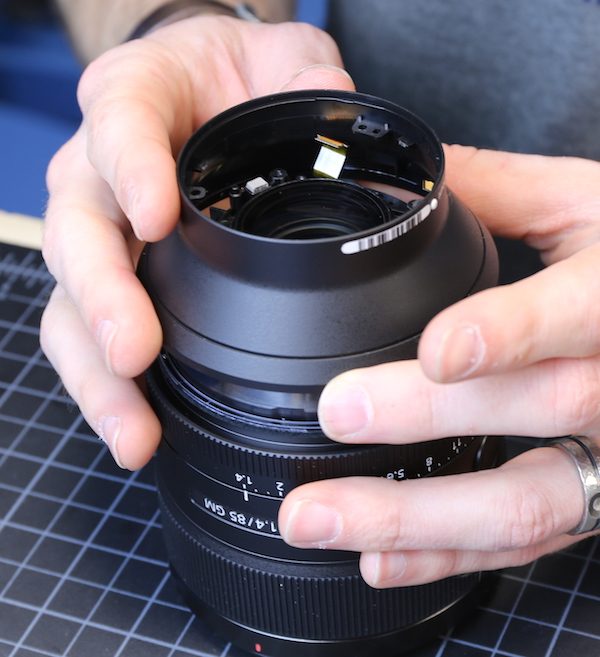
While we could have taken the rear group off now (you can see one of its mounting screws in the image above) it was obviously not going to get us where we wanted to be, so we turned the lens over and spannered off the front makeup ring.

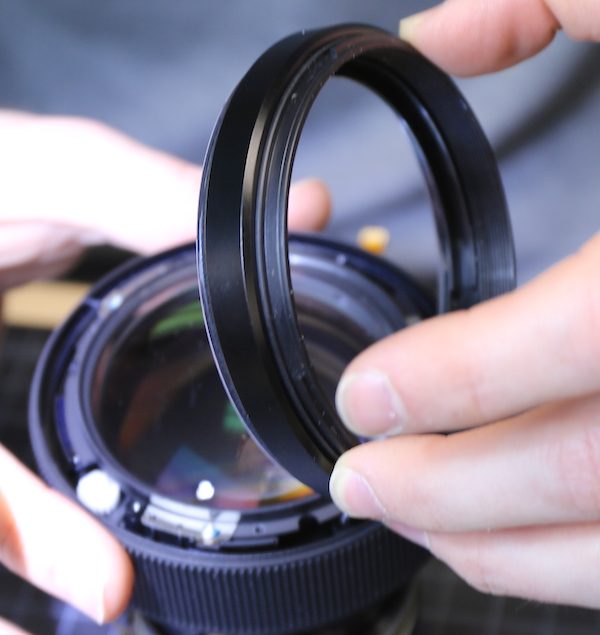
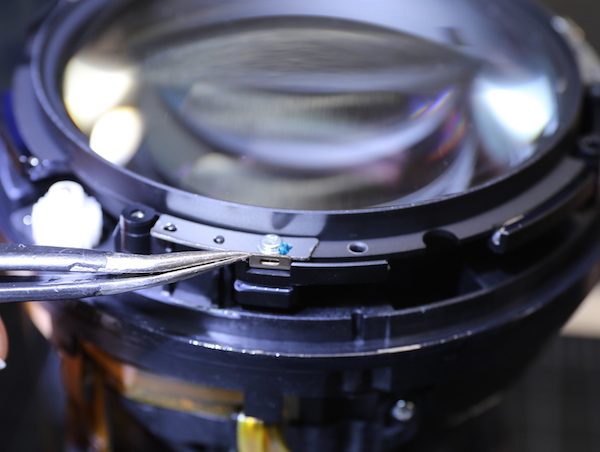
When it was removed we saw a nice, thick, rubber sealing ring around the front element. This is actually light blue in color in room light, but under the tungsten work lights, it takes on a rather cool purple color.
Peeling the sealing ring up showed us three screws that let us remove the filter ring. This is a good thing, meaning broken filter rings should be an easy, reasonable cost replacement. Should be.
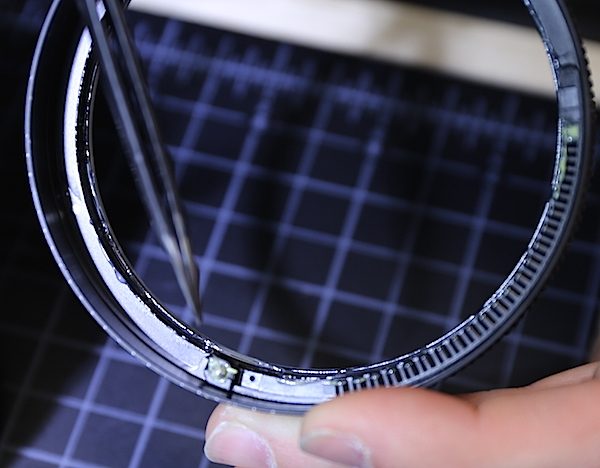
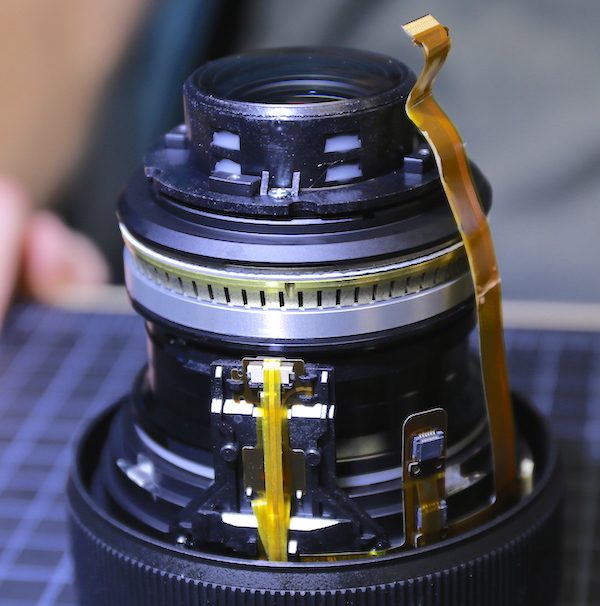
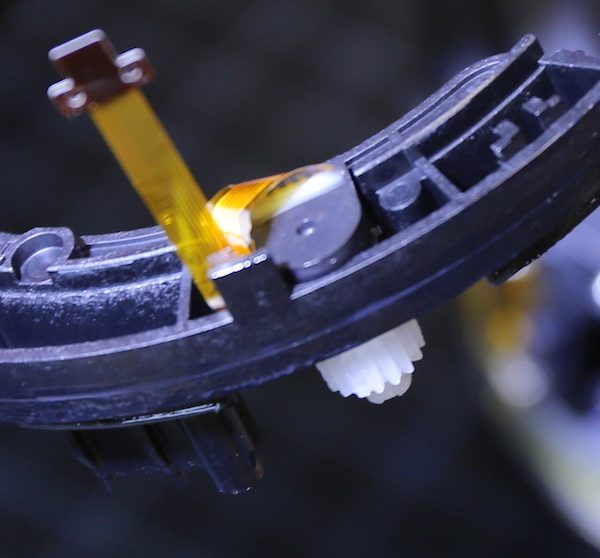
With filter ring off we can look down into the focus ring. This lens is ‘focus-by-wire’; there’s no mechanical linkage between the ring and the focusing element. But there is a gear in here that is turned when you turn the ring. A couple of people have said manual focus feels rough but autofocus is smooth. This gear is probably the culprit in those cases. It just turns an electrical actuator or position sensor, but it is a mechanical gear, so if it’s damaged or gets a piece of grit in it, it would make the focusing ring feel rough.
This should come later in the disassembly, but here’s an image of the underside of the gear, showing you it doesn’t move any mechanical parts, it just drives an electric actuator. If the gear jammed up entirely the lens would still autofocus just fine.
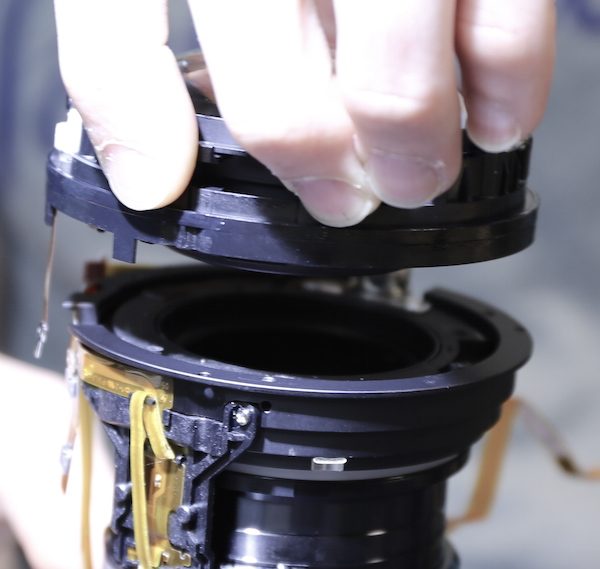
With the filter ring is off, we can lift the focus ring right off of the lens. You can see the gear teeth inside the ring that turn the white position sensing gear we showed you in the previous picture.

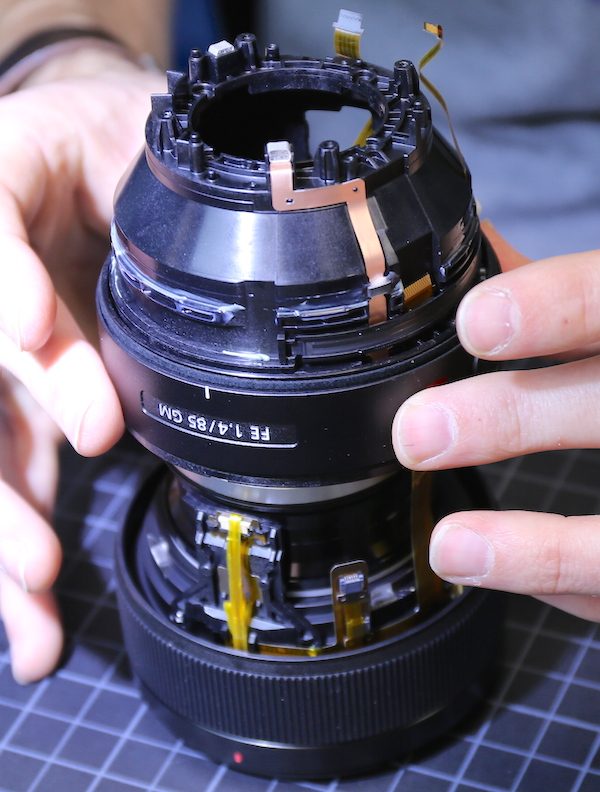
Now we’re making some progress. All of the external barrels are removed and the core of the lens is exposed. Just because someone will ask, all of these barrels are heavy-duty polycarbonate. You heavy-metal fans will be disappointed, but it’s really solidly assembled. The inner barrels you see below are plastic, too.
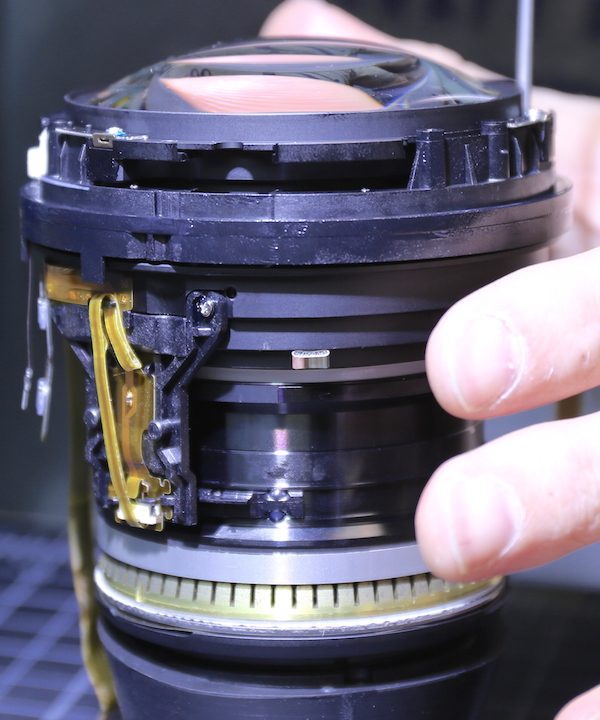
Looking for optical adjustments isn’t the primary purpose of this teardown, but I’ll point out that the front group also has a set of shims. There is yet another set at a different level.
In another nice touch, we can remove the front group at a slightly lower level than the shims, so we don’t have to disturb them.
Group 1 is a big group, the entire front portion of the lens. We could have separated this further, but there was no point in doing so.
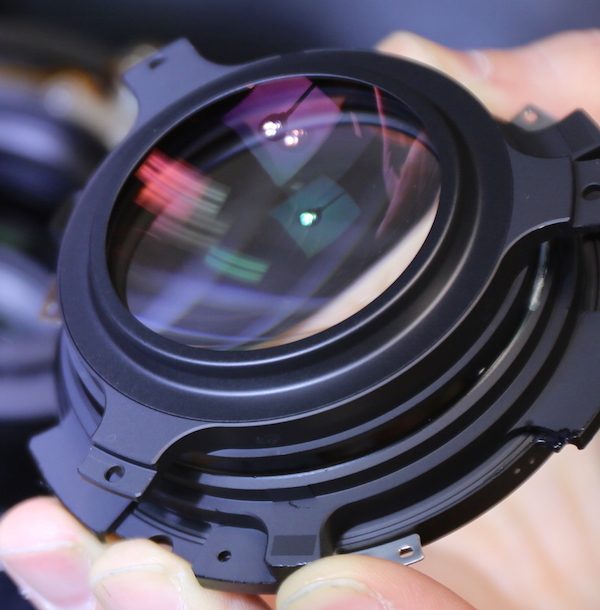
The aperture assembly just lifts out now. By the way, this lens has a lovely, very round, aperture. But you can see that without me showing you, it’s readily apparent looking through the lens.
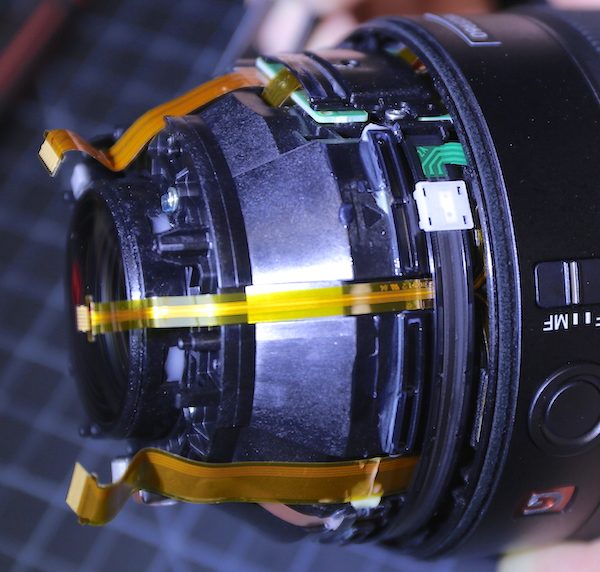
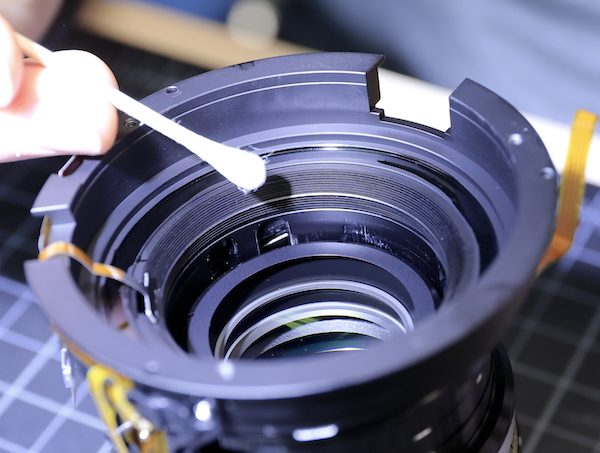
Now, after all of this, we can finally get to see those ‘scratches’ in the inner barrel. They didn’t visualize that well when we began, it’s hard to take a good image through that big front element. Now you can see them all around the inner focusing barrel; Aaron is pointing a Q-tip towards some of the worst ones.
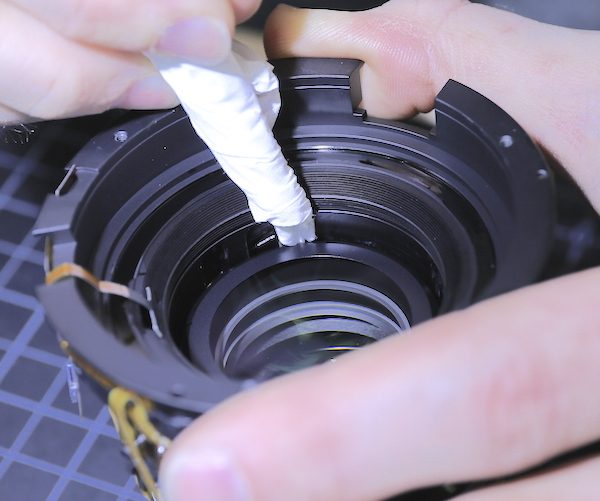
A quick swipe with a Kim-wipe takes them right off. Although they did look a lot like scratches it was just lubricant.
If you are like me, you’re just dying to know how that ring SSM motor is also called a linear focusing system. I would love to take the motor apart and show you, but that’s going to have to wait. We weren’t ready to disassemble a ring SSM because we weren’t certain we’d be able to restack it properly and this lens was needed. To be honest we shouldn’t have disassembled this lens at all, but, well, people were wrong on the internet and we couldn’t leave that alone.
I was able to get you a little picture down along the focusing group, though, showing you that it travels in straight-line grooves up and down; it doesn’t rotate in a helicoid assembly to move forward. I’ll add that while we were poking around we checked and the focusing group is surrounded by plastic. It’s not going to scrape the inner barrel.

Before I summarize, the usual: yes, we put it back together. Yes, we tested it mechanically, electrically and optically and it works perfectly. And, yes, it’s back in the rental fleet. I’m also certain someone will want to know this, too: No, we are not opening every copy up and cleaning out any visible lubricant. We have work to do fixing broken stuff, righting wrongs, and making the internet a safer place to live.
So, What Did We Learn Today?
Let’s start with what I know.
Focusing Noise
The Sony FE 85mm f/1.4 GM lens has a focusing system that makes some noise. It sounds a little like metal scraping or a linear piezo motor even though it’s an SSM motor. It’s much quieter in video AF mode. Nearly silent. But focuses slower.
It should sound and focus the same in manual or auto modes. If it doesn’t there may be a problem (probably some grit or dust) around the focus actuator gear (yes, I made that name up, but you know what I mean).
Barrel Markings
About half of these lenses have some visible lubricant on the inner focusing barrel that looks like scratches but isn’t. It is not scratches. Yes, I know the focusing sounds like scratches. Yes, I know the lubricant looks like scratches. And yes, I am certain that some person somewhere is going to have a lens with real scratches on the inner focusing barrel. Because given enough lenses, there will be one with anything.
Now let’s move on to what I think, but don’t know for certain.
It may be that over some time every single one of these lenses will have some lubricant show up on the inner barrel. Or it may smooth out over time to a beautiful, lustrous sheen that makes your bokeh glow like a sunrise in Yosemite. Sony may change assembly procedures or lubricant in future batches and it won’t be there anymore. But for right now, if you buy this lens you may see some lubricant in the inner barrel that looks like scratches.
Some people are absolutely certain they’ve seen metal shavings in their lens. That’s possible (see above comment about scratches) but I’m pretty sure that means someone added some metal shavings during assembly. There’s not much metal inside this lens, and what there is is surrounded by plastic parts that I can’t imagine are shaving metal. I am certain that everyone who looks carefully with a bright light is going to see some dust, though. It’s a wide aperture 85mm lens. Those all basically have dust you can see if you look carefully enough right out of the box. If you clean it all out, they’ll have some more in 3 days. Cope.
Does this mean the lens is problem free? Absolutely not. I don’t know if that lubricant might affect images (I doubt it, but it’s possible it could cause some glare when focusing close up). I suspect in a few cases lube will have gotten onto a lens element and caused a streak and that is much more likely to affect images. If you see streaks on a lens element than I’d return yours or send it in to be cleaned.
It might be that 6 months from now we find out that all of these lenses should be absolutely silent when focusing. I’ve looked at lots of them, but they obviously were all early production run lenses. There may be a fix Sony comes up with. I suspect, though, that a firmware fix will be slowing down AF to make it quieter.
In the meantime, optically this is a superb lens and a lot of people are making great images with it.
I’ll just mention that some of you are going to think I’m not being hard enough on Sony over this. You may be right, like everyone I have my own likes and dislikes. Sony is doing some new, really radical things with lenses (OK, probably not Sony, but people Sony is hiring and giving green lights to). I’m completely aware that when you do a bunch of radical new things some are going to have problems. It’s inevitable. But some are going to be great. That’s how progress happens. I’m all for progress.
And let’s be honest, guys (because us early-adopters are 99% guys). When we preorder something that’s never been seen before, we’re signing on for this kind of stuff. The logical people don’t buy anything until it’s been out a few months. But where’s the fun in that?
Roger Cicala and Aaron Closz
Lensrentals.com
April, 2016

61 Comments
Mr_A7s ·
You guys are the BEST.
Thank you
Freddo ·
Great work as usual Roger and Aaron! I can’t believe the amount of trolling there has been on the Internet for just some tiny bit of lube streaks.
Gwoping Yang ·
Thank you so much for doing this. I was one of the people posting on a few threads out there. I wasn’t trying to create panic…just asking questions. I feel much more comfortable with my purchase now.
Peter Kelly ·
Perfect and sensible throughout.
I still think the noise is most likely some form of resonance of the piezo vibration, amplified by the body of the lens, like some sound box. Unfortunate, but piezo motors work through vibration!
Omesh Singh ·
This is good news for A7 series shooters.
p.s. Loved the intro.
Hakann Vatansever ·
thanks for acting before Sony and ease all that crowd with many wrong informations. Sony owe you one.
EcoR1 ·
Big thanks for correcting people who are wrong at the internet! World is just a bit more better place.
J L Williams ·
“Every 85mm wide-aperture lens I’ve ever looked in has some dust inside, NIB and no matter the brand.” I’ve got an 85mm f/1.5 Canon rangefinder lens from circa 1951, and it amuses me to think that at least some of the amazing collection of muck inside might be original 65-year-old Rippongi dust. Someday these early Sonys might be geological time capsules!
Paul Gero ·
Right on Roger & Aaron!!
speedy fisher ·
Well that’s nowhere near as dramatic as the internet legends made it out to be. Had to go and spoil things, didn’t you? 🙂
Eric Vogler ·
Really cool of you guys to do this!
Lee ·
I dunno, man, that focus gear does not look confidence-inspiring.
ll-ll ·
Thanks to Roger and Aaron for taking valuable time to do this. It’s interesting to watch how mass hysteria forms. The Internet seems to be a perfect platform for the problem of group think. Starting with initial complaints, then theory and speculation, finally “confirmation” using circular citations. The behavior is understandable and due to the issue that hard data is lacking. You guys are the only people who bring reliable hard data to the Internet which ruins all the fanboy flamewar fun 🙂
I kind of feel sorry for camera companies as well as retailers these days. B&H will now have to deal with a flood of returns and eat the cost. Sony is partially to blame as their marketing dept should have accounted for noise as an important feature with customers. Car companies spend time and money to engineer the sound of their doors and engine.
Just of of curiousity, in your rushed teardown, did you happen to get some idea of whether the lower variance is due to better engineering (ie more tolerant and manufacturable design) or just tighter manufacturing tolerance on components ?
BVille ·
If you mass produce your products your guaranteed you’ll run into problems, the fact that Sony changes camera models every year is an insult to other manufacturers then again rather than doing firmware upgrades or improving their color algorithm they decide to put more technology and sell to a fool who must have the latest gadget.
seb ·
I dont think THIS was a mass hysteria. 🙂
And it has also nothing to do with the internet. The shop I bought my lens told me, there were several people coming into the store to check their copy. They just wanted to know, if anything is alright. The shop owner didn’t know it, he had to ask Sony.
When Sony or their testing artisans pointed on some noice while using AF, no one would ever put videos of it into the net. Very simple.
Roger Cicala ·
Totally agree, seb. This is the kind of thing that happens when marketing runs the release. Photographers can deal with limitations and use the tool. We get upset when we get no facts, just smoke.
mike kobal ·
Thank you!
Dr.Benzin ·
Thanks for your share. Could I translate this into Chinese and share it to Chinese?
Roger Cicala ·
Dr. Benzin, as long as you link back to the original and credit the photos that will be fine.
Dr.Benzin ·
ok
Gf ·
You are the master ,Roger.
Oleg ·
Thank you guys, you killed a few myths in one post 🙂
Reading the Sony marketing material http://www.bhphotovideo.com/c/product/1222775-REG/sony_sel85f14gm_fe_85mm_f_1_4_gm.html
“For controlling focus, a linear SSM (Super Sonic wave Motor) is employed that is _quick_ and _quiet_”.
Peter K Burian ·
Well, thankfully, the other Sony SSM lenses that I have used are fast and quiet re Autofocus.
Enrico Heller ·
Thanks!
Oleg ·
“people were wrong on the internet and we couldn’t leave that alone”
Peter K Burian ·
Amen! Gotta set them straight!
BVille ·
Sure, sure Sony’s got the nice sensor and all but that doesn’t mean it’s a great camera, It’s got a lot of problems.I’ve had the A7II for a year and it’s been serviced to a 3rd party warranty service 4 times, My 5D Mark III which I owned since the day it came out only required cleaning yearly, never had any problems with it, I ended up selling the A7II so cheap that I would never buy a Sony camera or lens ever, it’s Made in Thailand, not trying to be bias but it looks like the lens and cameras are made from the old Walkman factory. I’ll stick with Canon and Leica for now.
obican ·
Not all heroes wear capes…
seb ·
Is there an association between loudness and AF-speed/reliability? I think this would be the last critical point in that case.
Roger Cicala ·
That I can’t say because I haven’t tested reliability. But speed, yes, at least to some degree. Video AF is much quieter and slower.
seb ·
It’s also a good answer, if you can’t say it. Then it looks to me, that there is no significant difference in AF speed between your tested lenses. Thanks.
Flodder ·
lubricants, noises and maybe other stuff… nothing i am willing to pay so much money for.
Curtis Caulfield ·
Maybe you should look at a few more lens teardown posts, even your beloved Canikon lenses are plastic on the inside…troll
Hakann Vatansever ·
you’re a pure ignorant…heavy duty composite plastic materials are much more effective than metals in such constructions.
eric ·
just wondering if this lubricant is something unique to this lens or is it found on many/all lenses? is the possibility of it getting on a lens element more likely with this lens or the same as many/all others? thank you very much, eric.
Roger Cicala ·
eric, almost all lenses have some lubricant in them – helicoid rollers, AF motors, all of the rings that turn, etc. are usually lubed. Most of the time you don’t notice in on a barrel. This could be because less is used, or that it’s smeared evenly so you don’t notice it. But there is lube in most lenses.
SteveGJ ·
So people have been whining about whining? And this article is now whining about whining about whining?
Roger Cicala ·
Not at all. People have been whining. This article is whining about whining. You exaggerated by one whine.
SteveGJ ·
You missed the pun. The first whining is the noise made by the lens, the second those complaining about it and the third the complaining abou those complaing of the whining noise made by the lens.
Roger Cicala ·
You’re right, and I love puns. This is what happens when I read and answer too late at night. And it really is a good pun!
SteveGJ ·
There is no such thing as a good pun. I know, I’m addicted to them and I really ought to seek help.
intrnst ·
Oh, please, don’t punish yourself!
Thinkinginpictures ·
I appreciate the teardown. It’s brought a tear to my eye. I mean, all that glass and all that lovely polycarbonate. I felt like I was visually dining on a buffet of optical perfection. The screws, the baffles and the lube residue. I laughed, I cried…it was just epic.
Rick Harker ·
This story is confidence inspiring about the fastidious nature you apply to your business.
Gf ·
Thanks Roger for another great tear down article.
I have had the Batis 85 since last October and debating to replace it with this GM lens or not for about 8 weeks now. Have you compared the Sony GM vs the Batis?
Roger Cicala ·
I haven’t been able to get enough Batis to test a set of 10
Dr.Benzin ·
Hi,Roger, I almost finished job. Only a littet question I hope you can tell me.
#1· Every 85mm wide-aperture lens I’ve ever looked in has some dust inside, NIB and no matter the brand.
In this one, I have no idea about what the NIB is, could you tell me?
Roger Cicala ·
New In Box
Dr.Benzin ·
Thanks
Ieva Skrebele ·
“And let’s be honest, guys (because us early-adopters are 99% guys).”
It would be better if you didn’t use such language. I can agree that statistically women tend to do some things more or less often than men, but I doubt that 99% is an accurate statistic (it sounds like something pulled out of thin air, and there are a lot of female photographers out there and some of them must be preordering lenses), but whatever. With your own statistics, assuming that 1000 people read your blog, you have just offended one percent of them and that makes 10 offended people. There is a reason guests are addressed as “ladies and gentlemen” even when 99% of people in a room belong to the same gender. Although, to be honest, “ladies and gentlemen, intersex people and genderqueers” would be a much more appropriate and inclusive way of addressing everybody in the room rather than just those who fit neatly into gender stereotypes.
I happen to be a person whose hobbies, interests, job, personality, even choice of clothes and bags I wear and use are the very opposite of how somebody with my genitals “ought to behave”. Of course I am long used to religious and conservative fanatics abusing me in all possible ways, but it is even more disappointing to see educated and reasonable people claim that I don’t exist.
You see, it’s not pleasant to have people deny your very identity and claim that somebody like you cannot and does not exist. I assume you wouldn’t like it if somebody claimed that photo geeks do not exist and nobody can possibly be interested in how lenses work.
With this comment I am not trying to offend and bash you. I absolutely love your blog. I’m just trying to politely suggest that there is a reason not to use such language.
Damir ?olak ·
Dude get a life.
alexk ·
Hi Roger, great post, i just had and issue with a sony fe macro lens repair.
Roger, how do you deal with sony when they don’t make any part for this lens available for repair? it must be frustrating for a rental company.
they told me they offer no service for this lens just replacement
Roger Cicala ·
I haven’t tried to get one repaired yet, but yes, Sony repairs are a huge problem and one of the reasons rental prices are higher on Sony equipment. We’ve had to learn how to repair things ourselves. Parts are still an issue but we can at least keep some in service: One lens with a badly scratched front group may donate enough parts to fixe 3 or 4 others.
datavortex ·
Thanks for doing this.
I had to return a brand new one of these today after it showed up not working from Amazon. It wouldn’t focus and the motor was extremely loud. I should have the replacement tomorrow and hoping that one is good.
datavortex ·
I went through a bit of a saga with this lens. The replacement I got from Amazon had clearly been previously opened. So, although it worked well, I was paying for a new lens and I returned it. The third lens I received was also broken and didn’t focus! The motor noises on #3 were not quite as crunchy or as loud as lens #1. The fourth time was the charm – I finally got a working, new lens. The motor noise is still pretty loud, but seems within the range of normalcy.
Since having this glass for a couple of weeks I’ve been pretty happy with it. Low light performance is simply amazing. I’ve gotten some really impressive shots outdoors in the dead of night.
tom ·
Hi Roger.
Thanks for doing this.
I bought this lens a couple of days ago and unfortunately I picked up one which has a little more visible lubricant than the one you took apart. Would you recommend taking this back to the retailer and asking for them to swap it for another one in the hope I get a cleaner model or will it make no difference to the performance of the lens?
Thanks,
Tom
deadintentions ·
Hi guys! Have you ever noticed that the lens’ aperture is never fully open? Like it’s always at f/1.6. I’m wondering what the bokeh would look like if the iris is removed ?
disqus_ZMpXWIxH6l ·
Hi Roger. My 85 GM makes a squeaking noise instead of a scraping noise during autofocus especially when it hasn’t been used for a bit. Any thoughts on what this is?
disqus_ZMpXWIxH6l ·
Hi. My 85 GM is making a sqeaking noise when focusing rather than a grinding noise. Do you have any idea what this could be? Thanks.
Matias Brelaz ·
Hi Roger. First of all i want to thank you for share all this info with us. I appreciate it so much. You are a genius. I came to you because i fell down my Sony G 28-135 and the front get broke. So, im planing to fix it but i stucked in the first step, remove the decorative front ring, yes… it sounds like a dumb, im stucked in the first step.
I read in your post to be patient, use glass friendly tools and heat. But… really, im puting all my effort to remove this element and… nothing, it keep in the same place.
Can you give me a suggestion? Im going to aprecciate a lot your words.
Best regards