
A week or so ago, I started this production junket series with an article about how to budget and finance your short film. To continue that series, today I’m talking to you about part two of the multi-step process and talking to you about storyboarding your film. Putting a cohesive scene together isn’t something that just happens through sheer talent or assiduity of director and crew. Take it from a filmmaker that the term “movie magic” is just like any other magic in the world — it isn’t real (sorry Harry Potter fans), but rather a charming term wondrously masking a multitude of unseen and extremely well-rehearsed skill sets applied to hard work and preparation.
To pull a rabbit out of a hat, you must first master the steps involved, and they’re crucial. If even one of these steps is forgotten or not performed to an exact degree, you’ll more than likely find yourself empty-handed in front of your audience. Filmmaking is no different. In pre-production lies a number of steps we must give due diligence in order to successfully carry the filming stage across the allotted window of production time. Here, we’ll be focusing on one step in particular that I believe is the most effective vehicle in getting your vision from page to screen.
Storyboarding is, for me, the best way to get you and your crew on the same page of preparedness. It encompasses previous legwork such as dialogue, shot list, and elements of the script breakdown, while also serving as a visual template for production. You don’t have to be Michaelangelo either, so don’t let that be the reason you shy away from taking advantage of this method of prep. Similar to that ineligible (by anyone else’s standards) note scribbled in between the lines of any given scene in your script, storyboarding is effective as long as you yourself can understand the critical information obtained. Then again, if the goal is to also inform the surrounding crew and your stick figures are as abstract as my four-year-old niece, there are an abundance of sites which serve pre-made illustrations that are as easy to put together as a click-and-drag of the mouse. I’ll reference several of the more popular links (paid and free) at the end of this article.
Depending on your budget, you also have the option to hire a storyboard artist. If you don’t know of anyone working under this title, try your luck with local, freelance traditional/digital artists. You’ll likely find they’re willing and capable of excelling at the task more often than not, and the support put forth will undoubtedly be appreciated in the surrounding art scene.
Storyboarding 101
There are two main ways of crafting a storyboard, by illustrating rows/columns of pictures depicting your shot list either accompanied by or void of notes. Simple, right? Yes.. and no. I’m going to focus solely on the former and advise you to perform it to the fullest extent of detail imaginable. Whether you prepare the info beforehand or call the scenes with the camera as you go, the creative information comprising a storyboard’s DNA is needed to materialize at some point and is crucial to your overall success. For that reason, I propose that you allow the additional time drafting your ideas here on the side of thorough. In the end, I believe a more detail-oriented approach to this application is a prerequisite for discovering the best version of your story. And I’m not alone.
It’s no coincidence directors such as Steven Spielberg, Christopher Nolan, and Francis Ford Coppola are all well known to utilize exhaustively detailed storyboards. These legendary examples also have in common the fact that they mostly use the same artist for this process, similar to the more widely known relationship between director and editor. This relationship is tightly bound because both parties recognize the importance of utilizing visual information pre-existing to the filming process and in a mutual style. So please, take it from them if you’re still considering my advice. Ultimately, the goal here is to end up with a shot by shot visual guide that precisely represents the entirety of the information in your shot list as well as the intent for each recorded take.
Dissecting the Script
How do you visualize your script? The first step to creating a storyboard is to break your motion picture down to the cellular level of a still photo. Think of it as reverse engineering your imagination as you were either writing the script or reading it for the first time. Think about what you saw. To add to that, how do you want what you see in your head to be portrayed outwardly in order to tell the story to an audience better? We can begin to grip at this process of freeze-framing any and all important visuals by sectioning off each beat of the script as you see fit. For your movie, every shot should ideally have its own thumbprint.
This can easily be achieved with a pencil by drawing boundaries around separate visuals and bits of dialogue, but think of the process as a road map to your breakdown and shot list only. This bit consists of separating each stand-alone shot and sequence to get yourself in tune with your stance in the story before organizing anything further. Do not get this step confused with complete readiness. This is simply an effective way of forming the beginning of a foundation that will later serve your vision more clearly in the coming areas of preparation. Once lead-driven lines have made a mess of the pages in your script from cover to cover, you may begin organizing your thoughts into a more cohesive form of visual representation. Depending on preference, a more straightforward option for you might be to digitally dissect here. In this case, I would recommend the app Scriptation. Just as before, this allows you to create the same style of notes throughout the script but with more options and especially an improvement on organizing.
Shot List
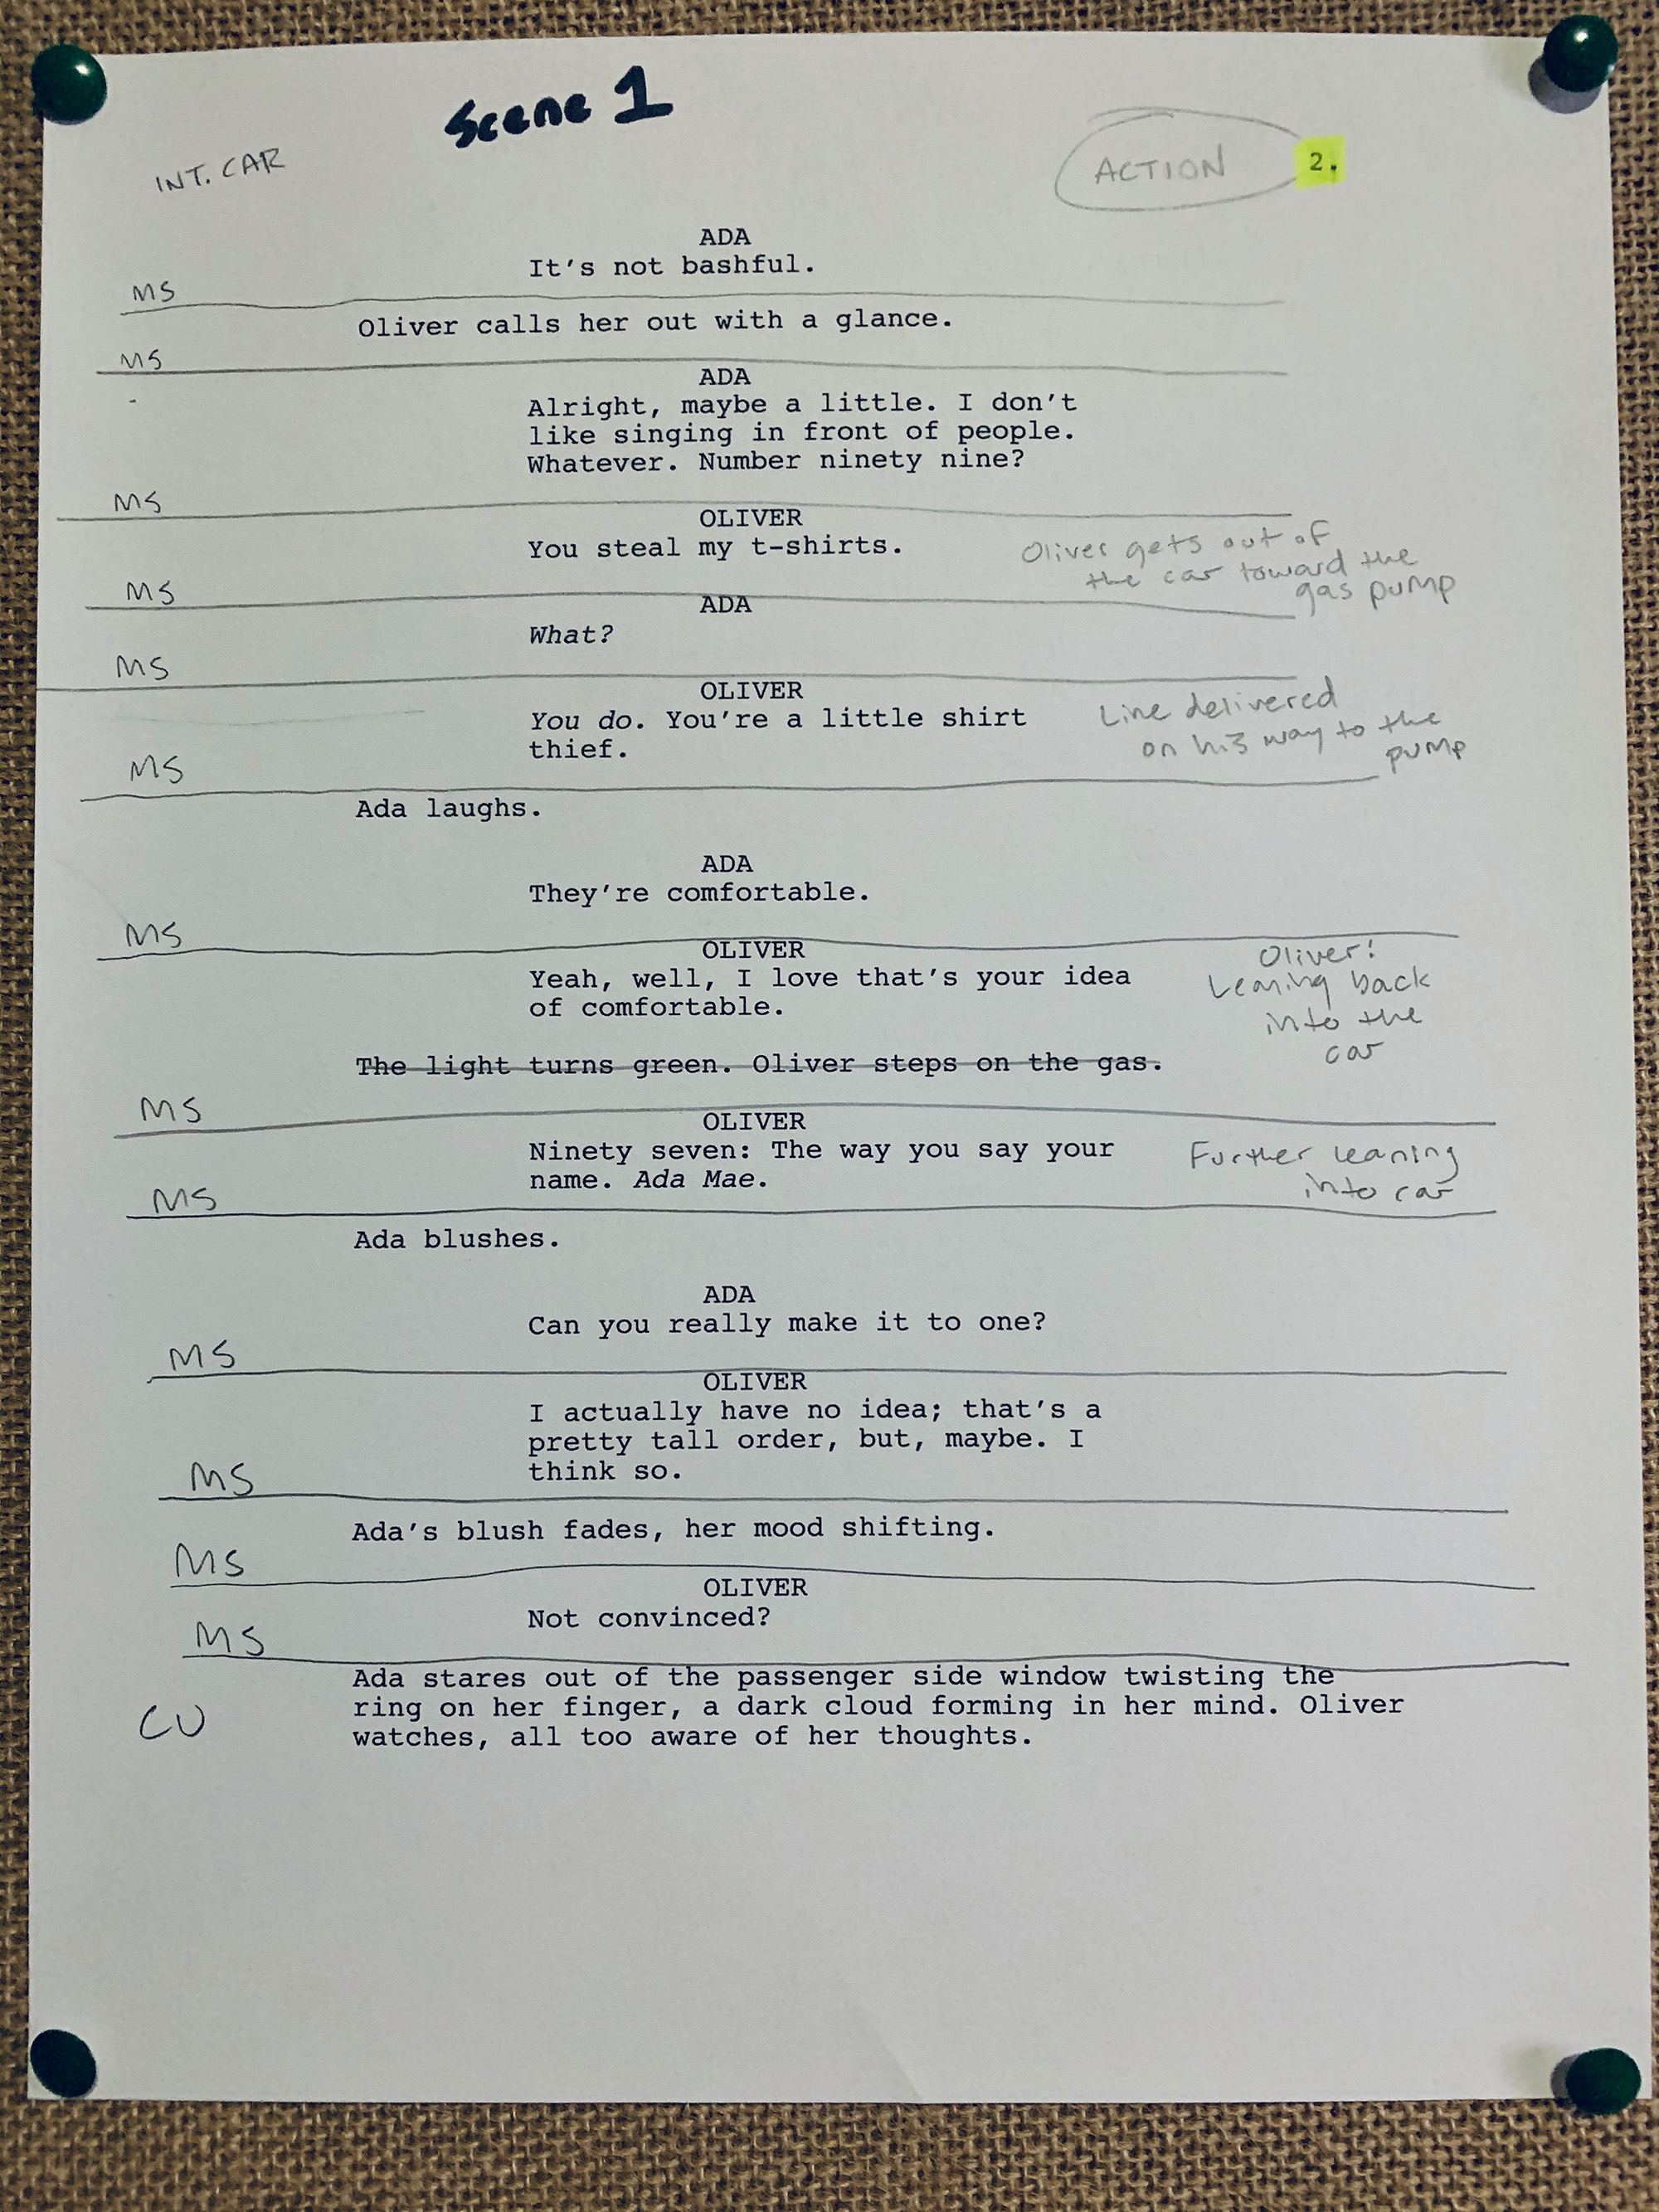
Although a script breakdown and shot list are similar in nature, the shot list will be more important here in that it serves as a direct precursor to the type of storyboard we’re addressing. Therefore, I will not get into the makings of a script breakdown past the point of telling you the main difference between the two is that a breakdown is a more involved dissection of each collective scene, including but not limited to all needed crew, locations, and materials, while a shot list focuses on the intent and how of your shots only. Thus, before drawing images on our storyboard, we’ll need to neatly and thoroughly list out an extended version of the information bordered off previously.
Put your pencil down, but keep it near. You’ll need it after this part. Here is where the focus should shift to the shots comprising your film. I can’t recommend enough the ease at which a digital method of shot listing can provide. There are plenty of apps at your convenience that will save you a lot of headaches by implementing a simple fill-in-the-blank style of editing while also maintaining a calculated order. For me, I’ve found the user-friendly Shot Lister to be both affordable and extremely effective. Generally, a shot list will be comprised of the following:
Shot Number:
The number assigned to each individual shot.
Shot Description:
The action and dialogue taking place in each frame. The more descriptive you are here can set up a greater volume of depth in each frame of the final film.
Shot Type:
The framing of your subject or background.
Examples include: Medium Shot (MS), Close Up (CU), Medium Close Up (MCU), Extreme Close Up (ECU), Over the Shoulder (OTS), Wide Shot (WS), Establishing Shot (ES), Point-Of-View (POV)…etc.
Camera Movement:
The direction and type of movement regarding your camera’s action, including none.
Equipment:
Any additional equipment involving the camera such as a tripod “sticks”, gimbal, or slider.
Actors:
All actors involved in the shot.
Notes:
Any additional information deemed important for relaying the shot or action.
Understanding these elements is paramount as they make up the very fabric of the illustration portion ahead, but first, there is one more step to figure out before moving forward with your best drawing hand. Deciding on an aspect ratio is critical to your understanding of what will and will not exist in the frame depending on your vision, the chosen lens, and shot type. More importantly, it is the defining border of the window to the world you’re hoping to create. What will the other side of this window look like for you?
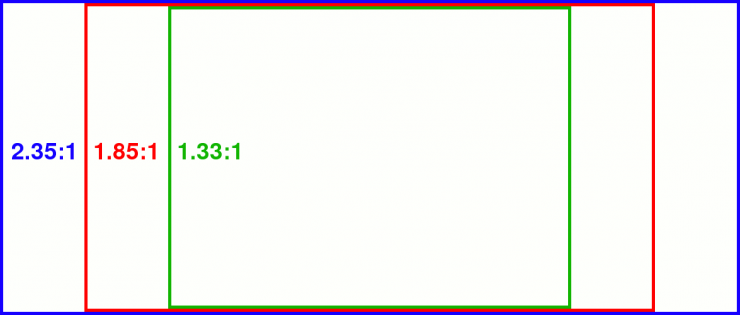
I’ve shot primarily within a 2.35:1 frame, but there will be an example of a 1.33:1 ratio as well in the storyboards to come. As in the case of all mentioned preliminary work, implementing this detail into your storyboard will further exact your vision come time to shoot as well as salvage valuable time for you and crew alike. For a very quick and easy to understand summary, the number to the left of the colon depicts the width of the frame, while the number to the right depicts the frame’s height. Where this gets confusing is — some will use different numbers to represent the same ratio, i.e. 4:3 and 1.33:1 are different ways of representing the same frame size. Currently, it’s more common to use the lower number ratio involving a 1 as in 1.33:1 instead of 4:3.
For a deeper dive, please refer to this breakdown by our friends at RED.
While I do take the initiative to illustrate my own storyboards, it’s more for functionality toward the big picture than any kind of stand-alone art project. Whether you choose to draw the storyboard yourself, hire an artist, or create one on a website or mobile app, the direction will ultimately come from you. Choose your own layout, but keep in mind the space for each page should be balanced between your still images and written information. This can be done by deciding generally on a layout that fits your entire story or by changing the layout from scene to scene, specifics pending. The choice is yours.
To digress, I thought it helpful to present some of my own examples.
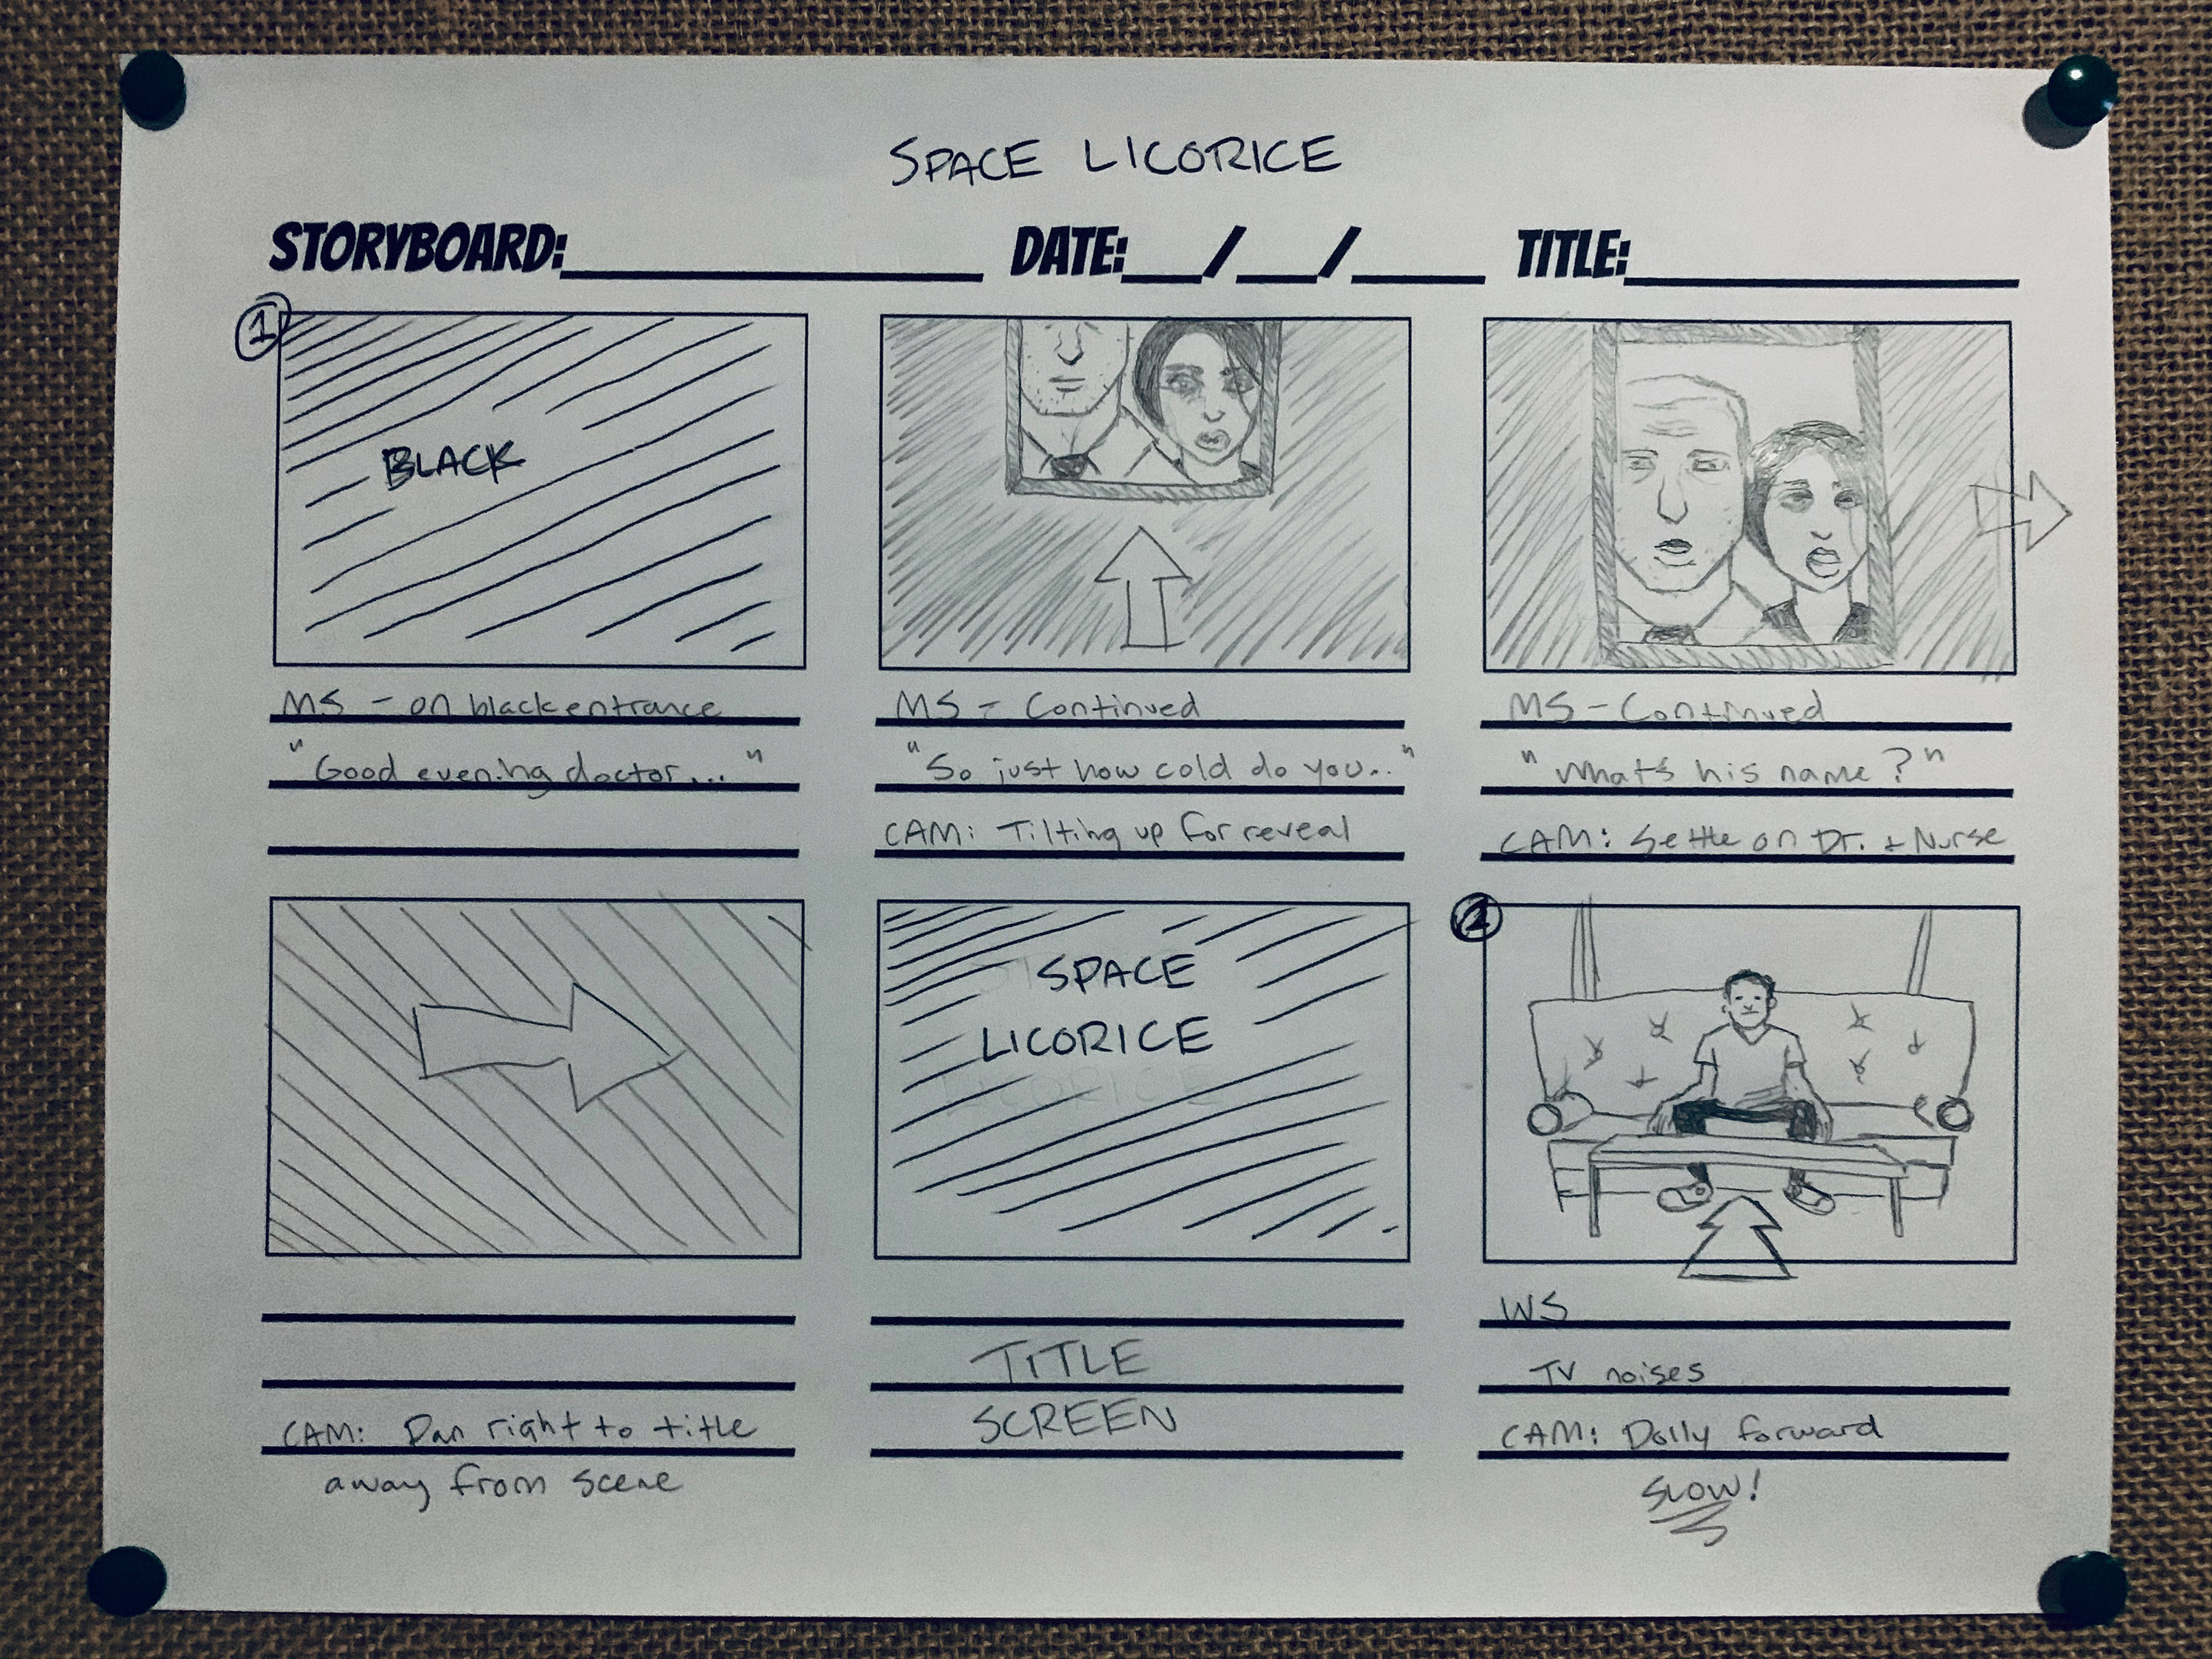
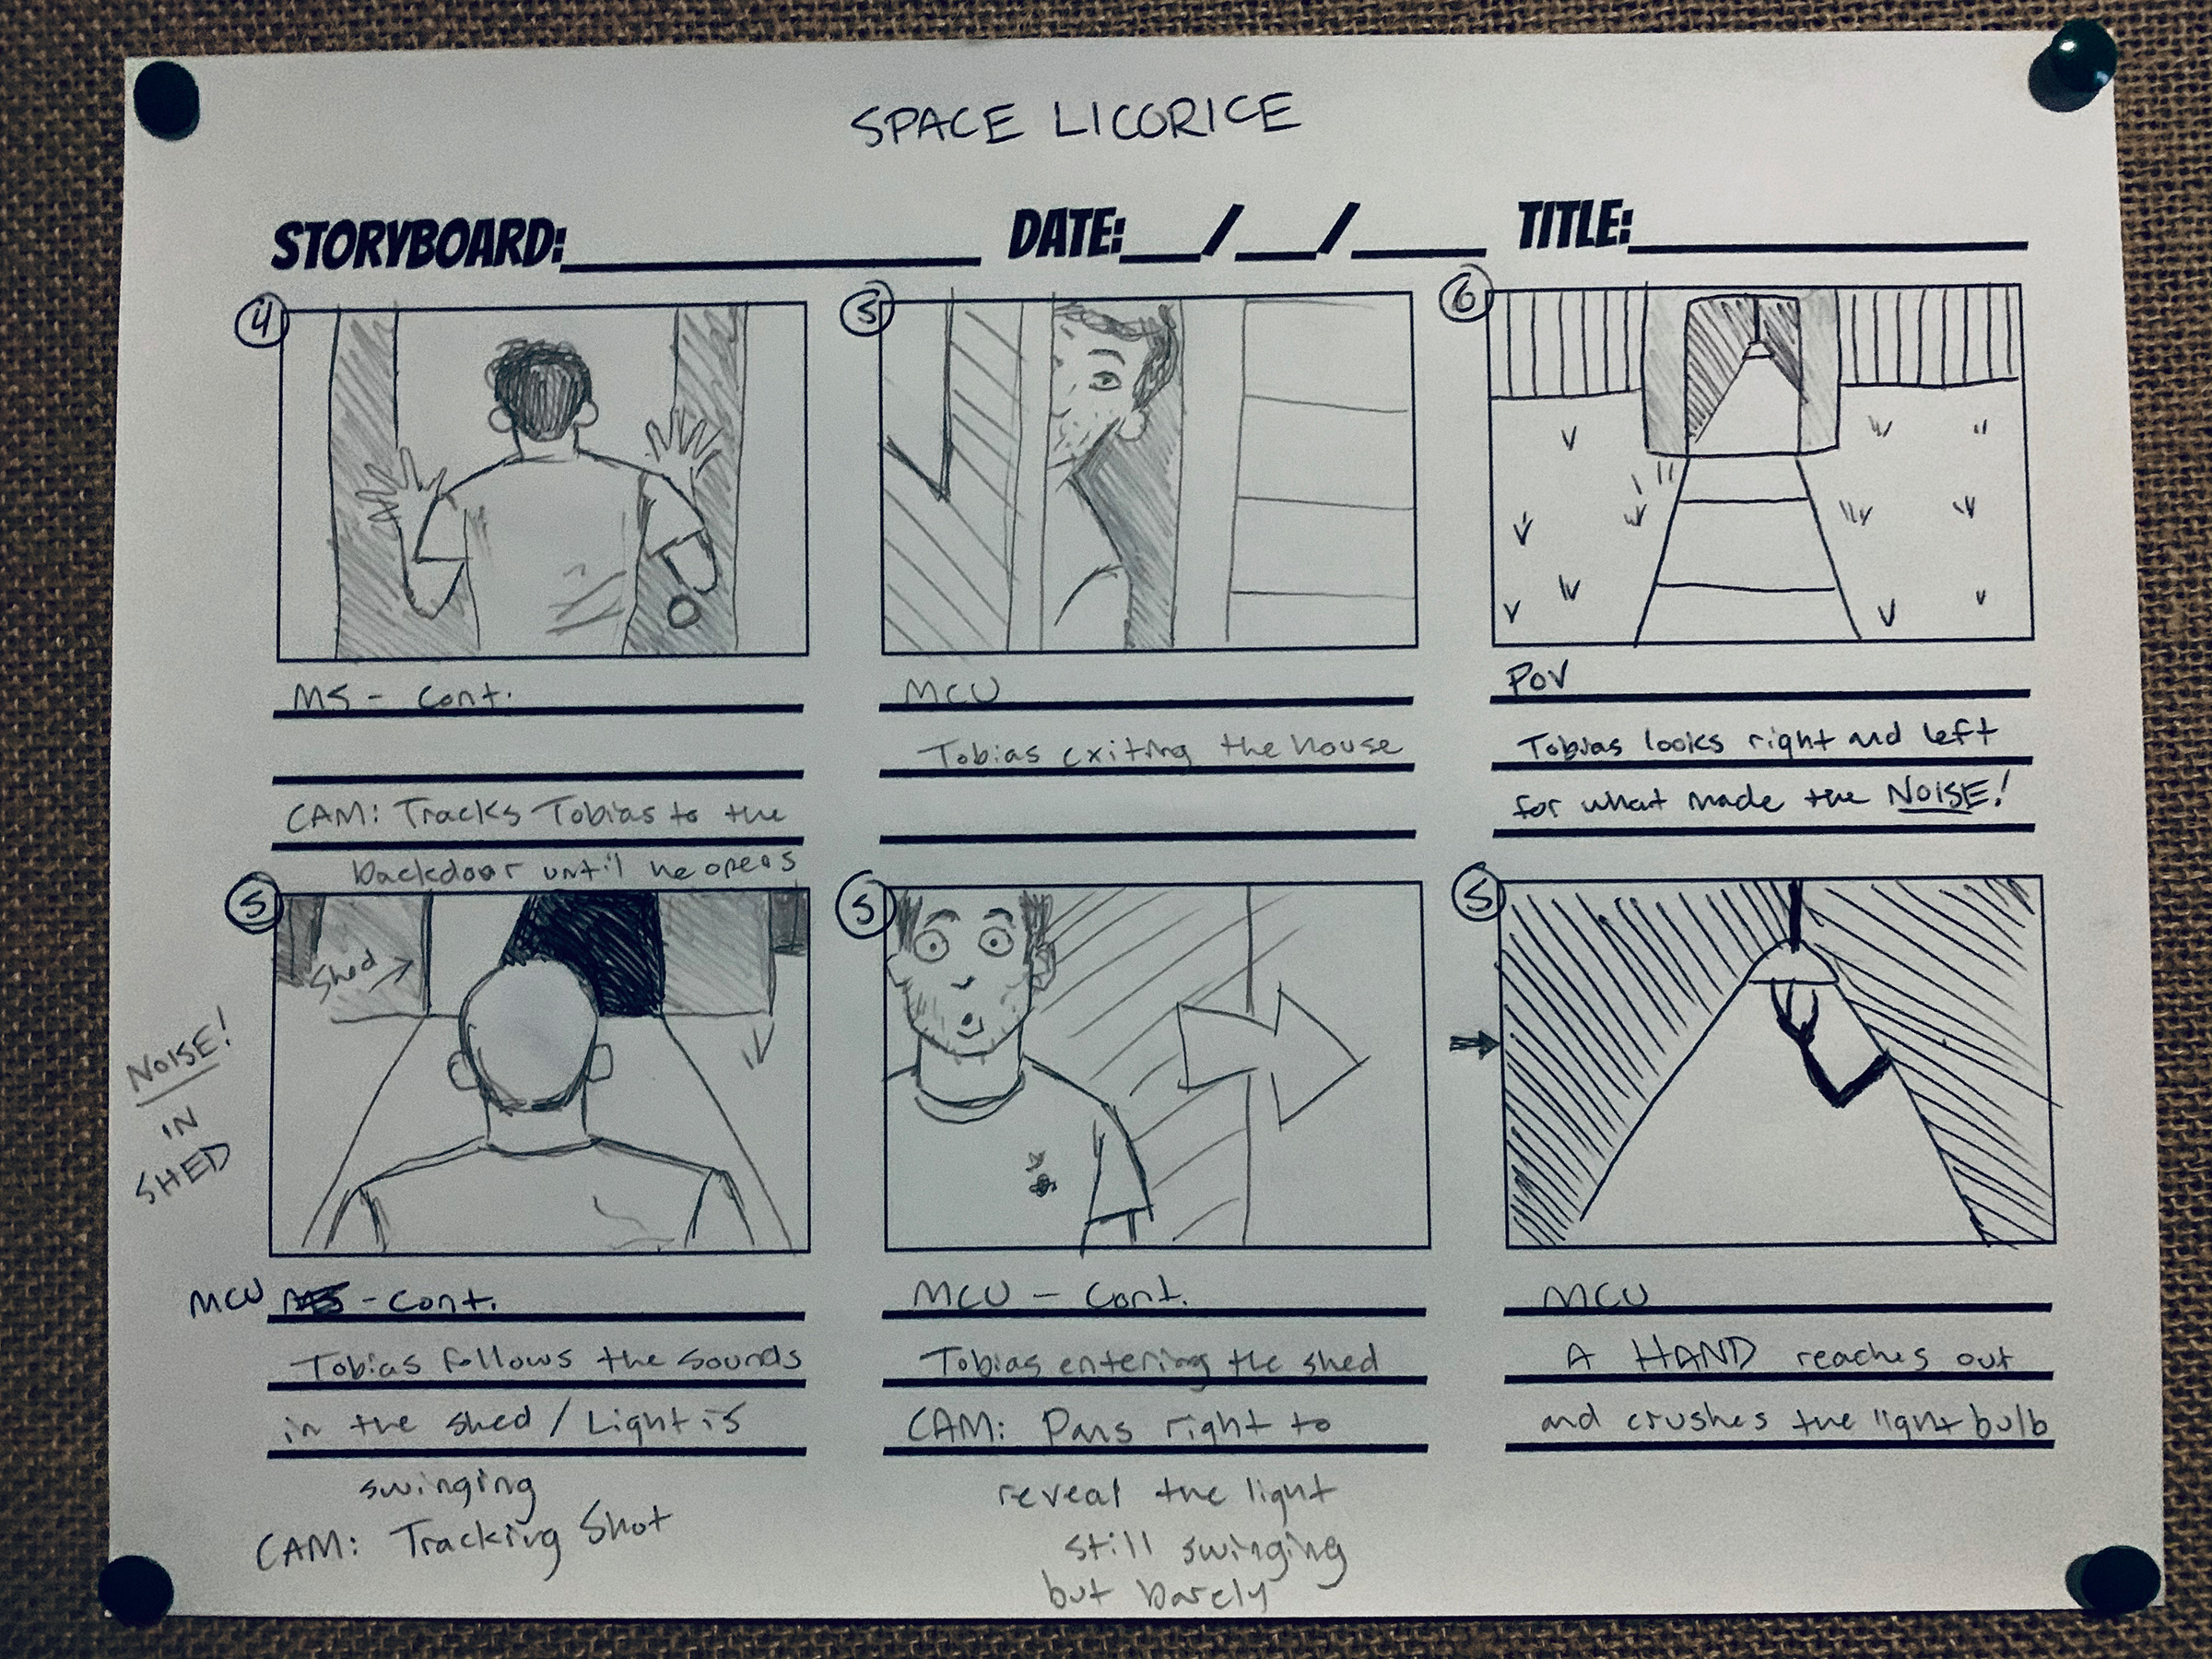
Camera Movement: Space Licorice
I found the benefits of pre-visualizing early in the development of my first film, Space Licorice (2014). Fully aware of the power of camera movement to assert information into the scene, I took advantage of the capability storyboarding allowed to set the tone for the film as a whole as well as the situation facing our protagonist, Tobias. This allowed me to extensively hash out the direction of the camera before rolling, thus freeing more time on set to focus on lighting, which would play an equal part in navigating tone.
The film begins in total isolation, symbolized by blackness revealed to be the color of a door leading to the outside world. It was intended to place the audience into a situation of claustrophobia as a tiny window creeps into the center of the frame by means of tilting the camera upward. As soon as we see Tobias in frame, the camera dollies forward to an uncomfortably close and intimate framing of his face. This time, the audience is trapped inside the room with Tobias’s internal struggle rather than the previous external. The ways we depict the difference between the two are important. The safe distance from a character we don’t yet know to a slow, creeping lack of negative space around our subject is intentionally uncomfortable.
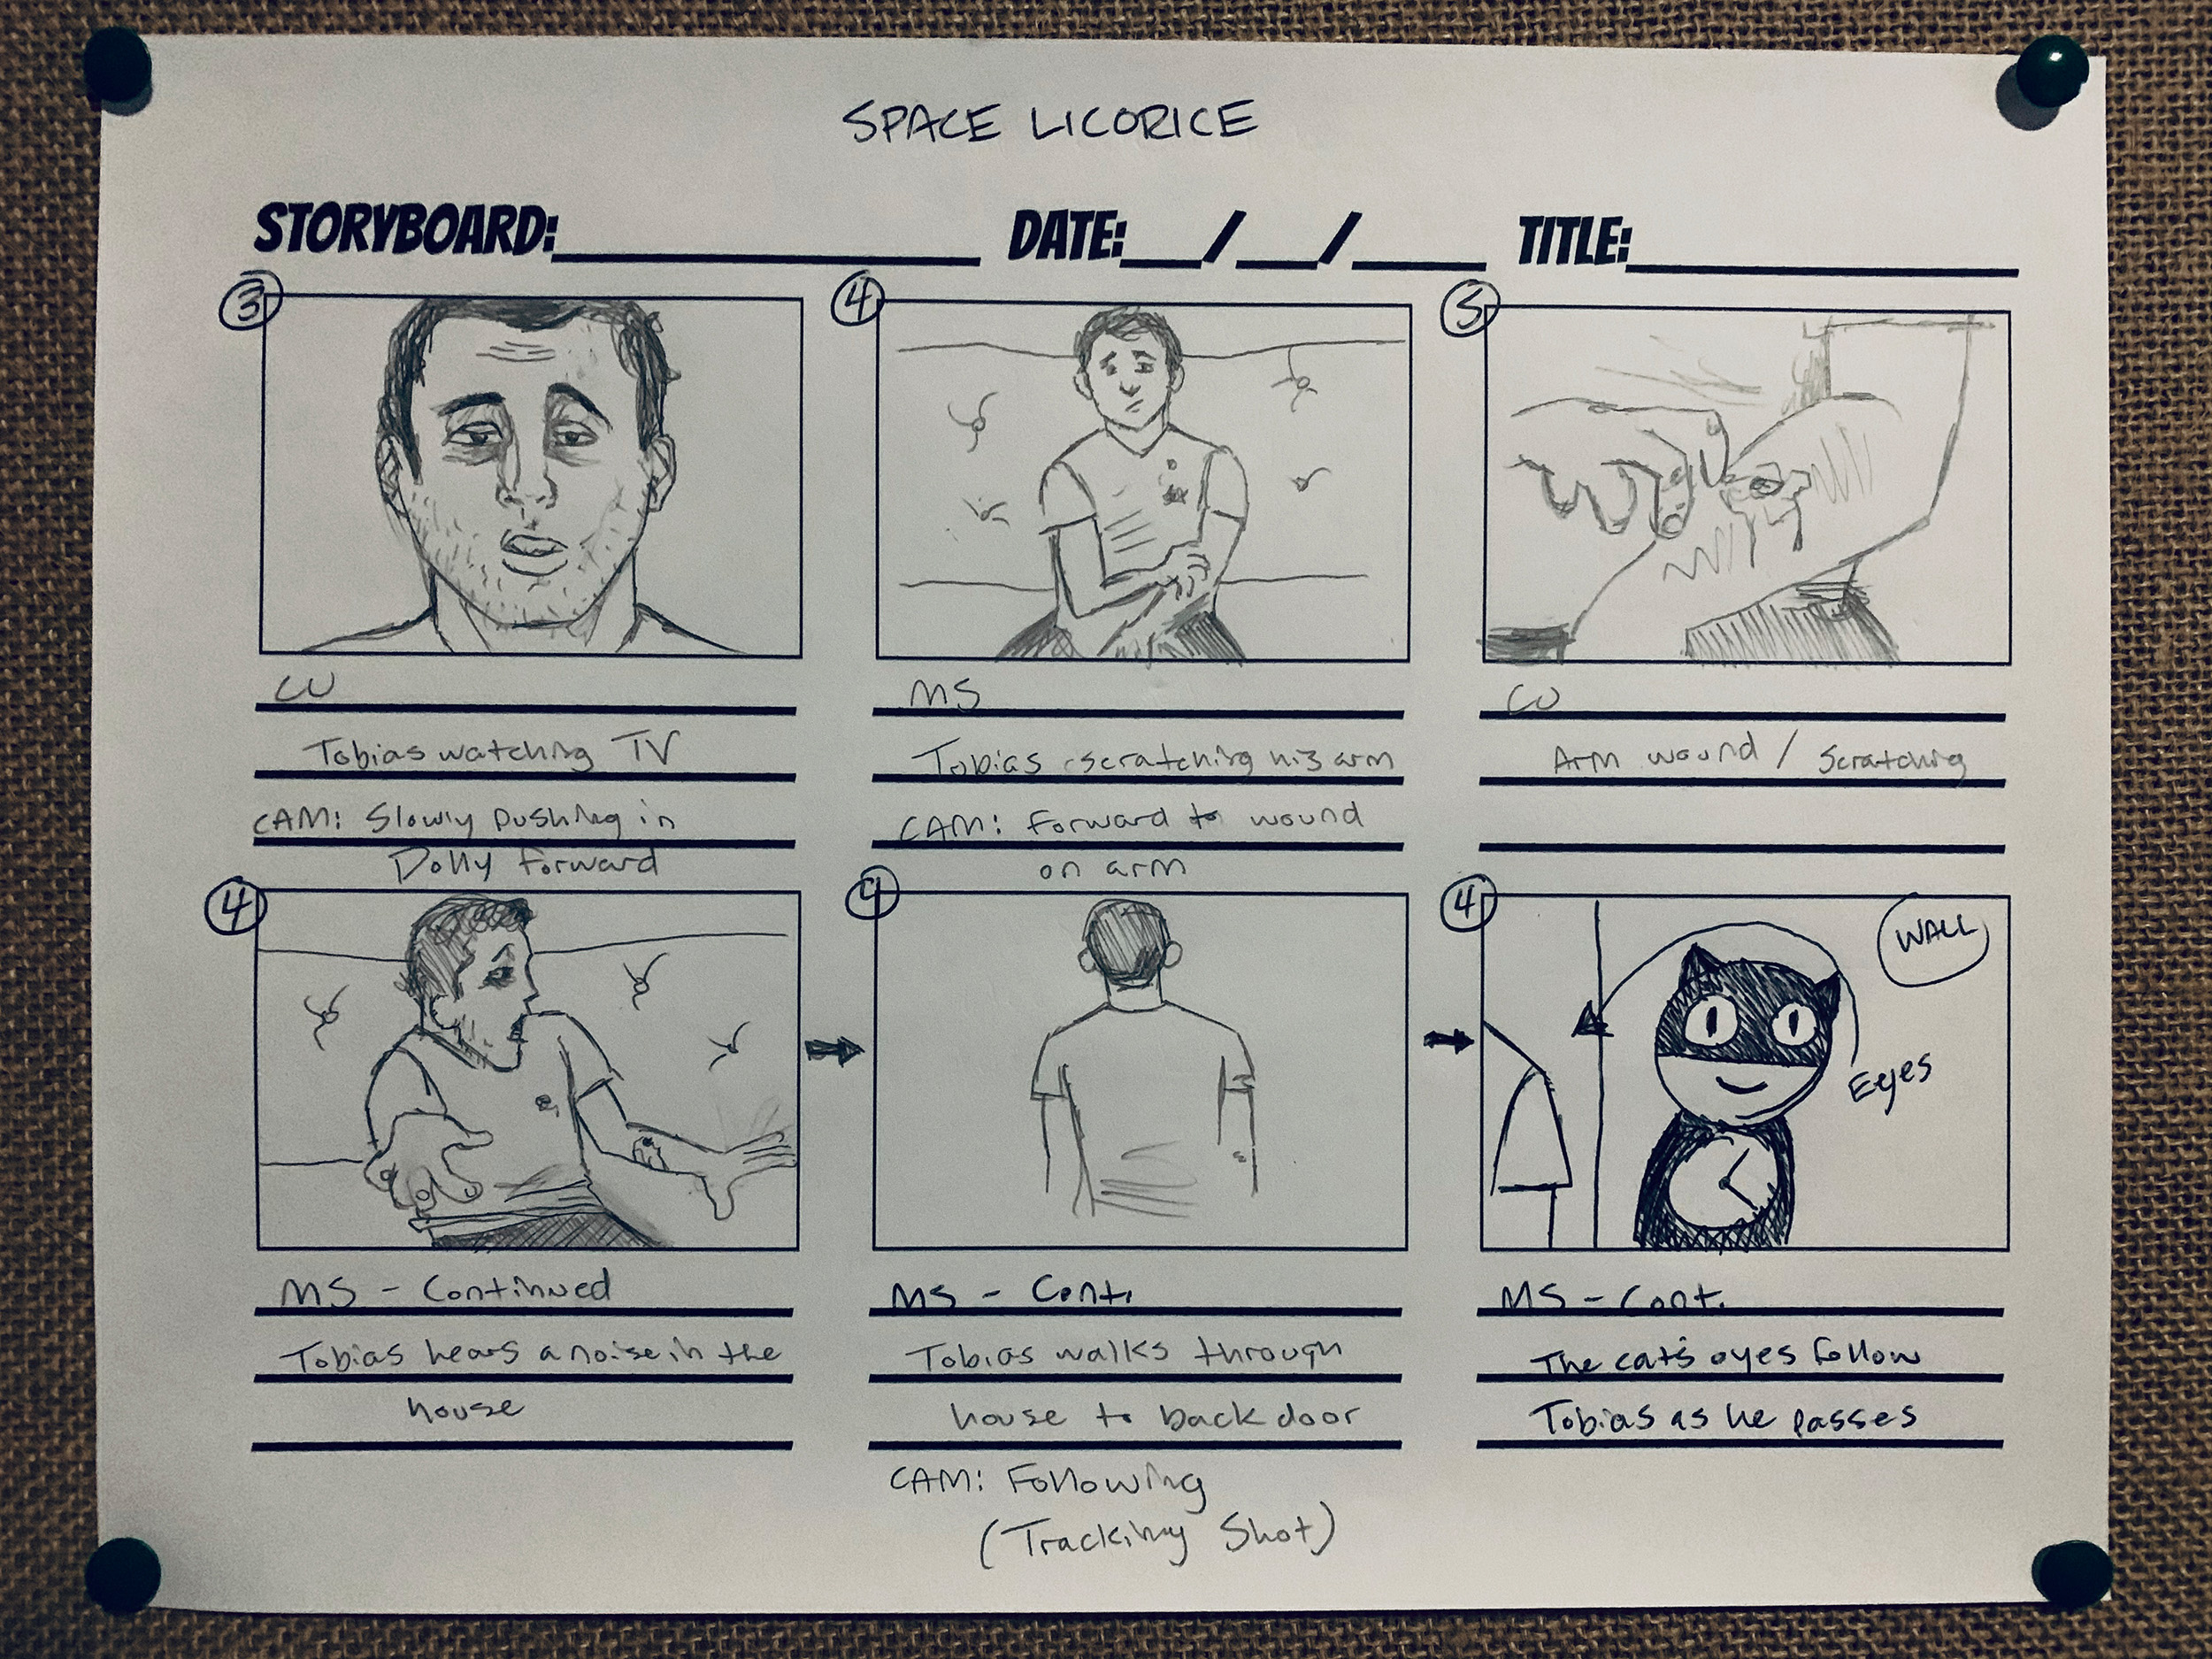
Once a sound is heard in the distance, the camera tracks his journey through the house and into the ominously lit tool shed in his backyard. By stalling the cuts in this sequence, we force the viewer to experience the fear of that walk from the couch toward an ominous unknown. This way, the experience is not broken up or lost.
You might also notice the 2.35:1 aspect ratio was not taken into consideration during the making of this storyboard. This was a lesson learned as I watched, bit by bit, the visions I had in my head and later onto the storyboard get trimmed throughout production. That’s okay if nothing crucial is happening around the space of your frame’s edges, but the wild variable certainly made me nervous enough to correct this as much as possible when choosing subsequent storyboard layouts. Having made the decision to add a letterbox in post-production, we used black tape to cover up where the frame’s height would crop inwards on our monitor.
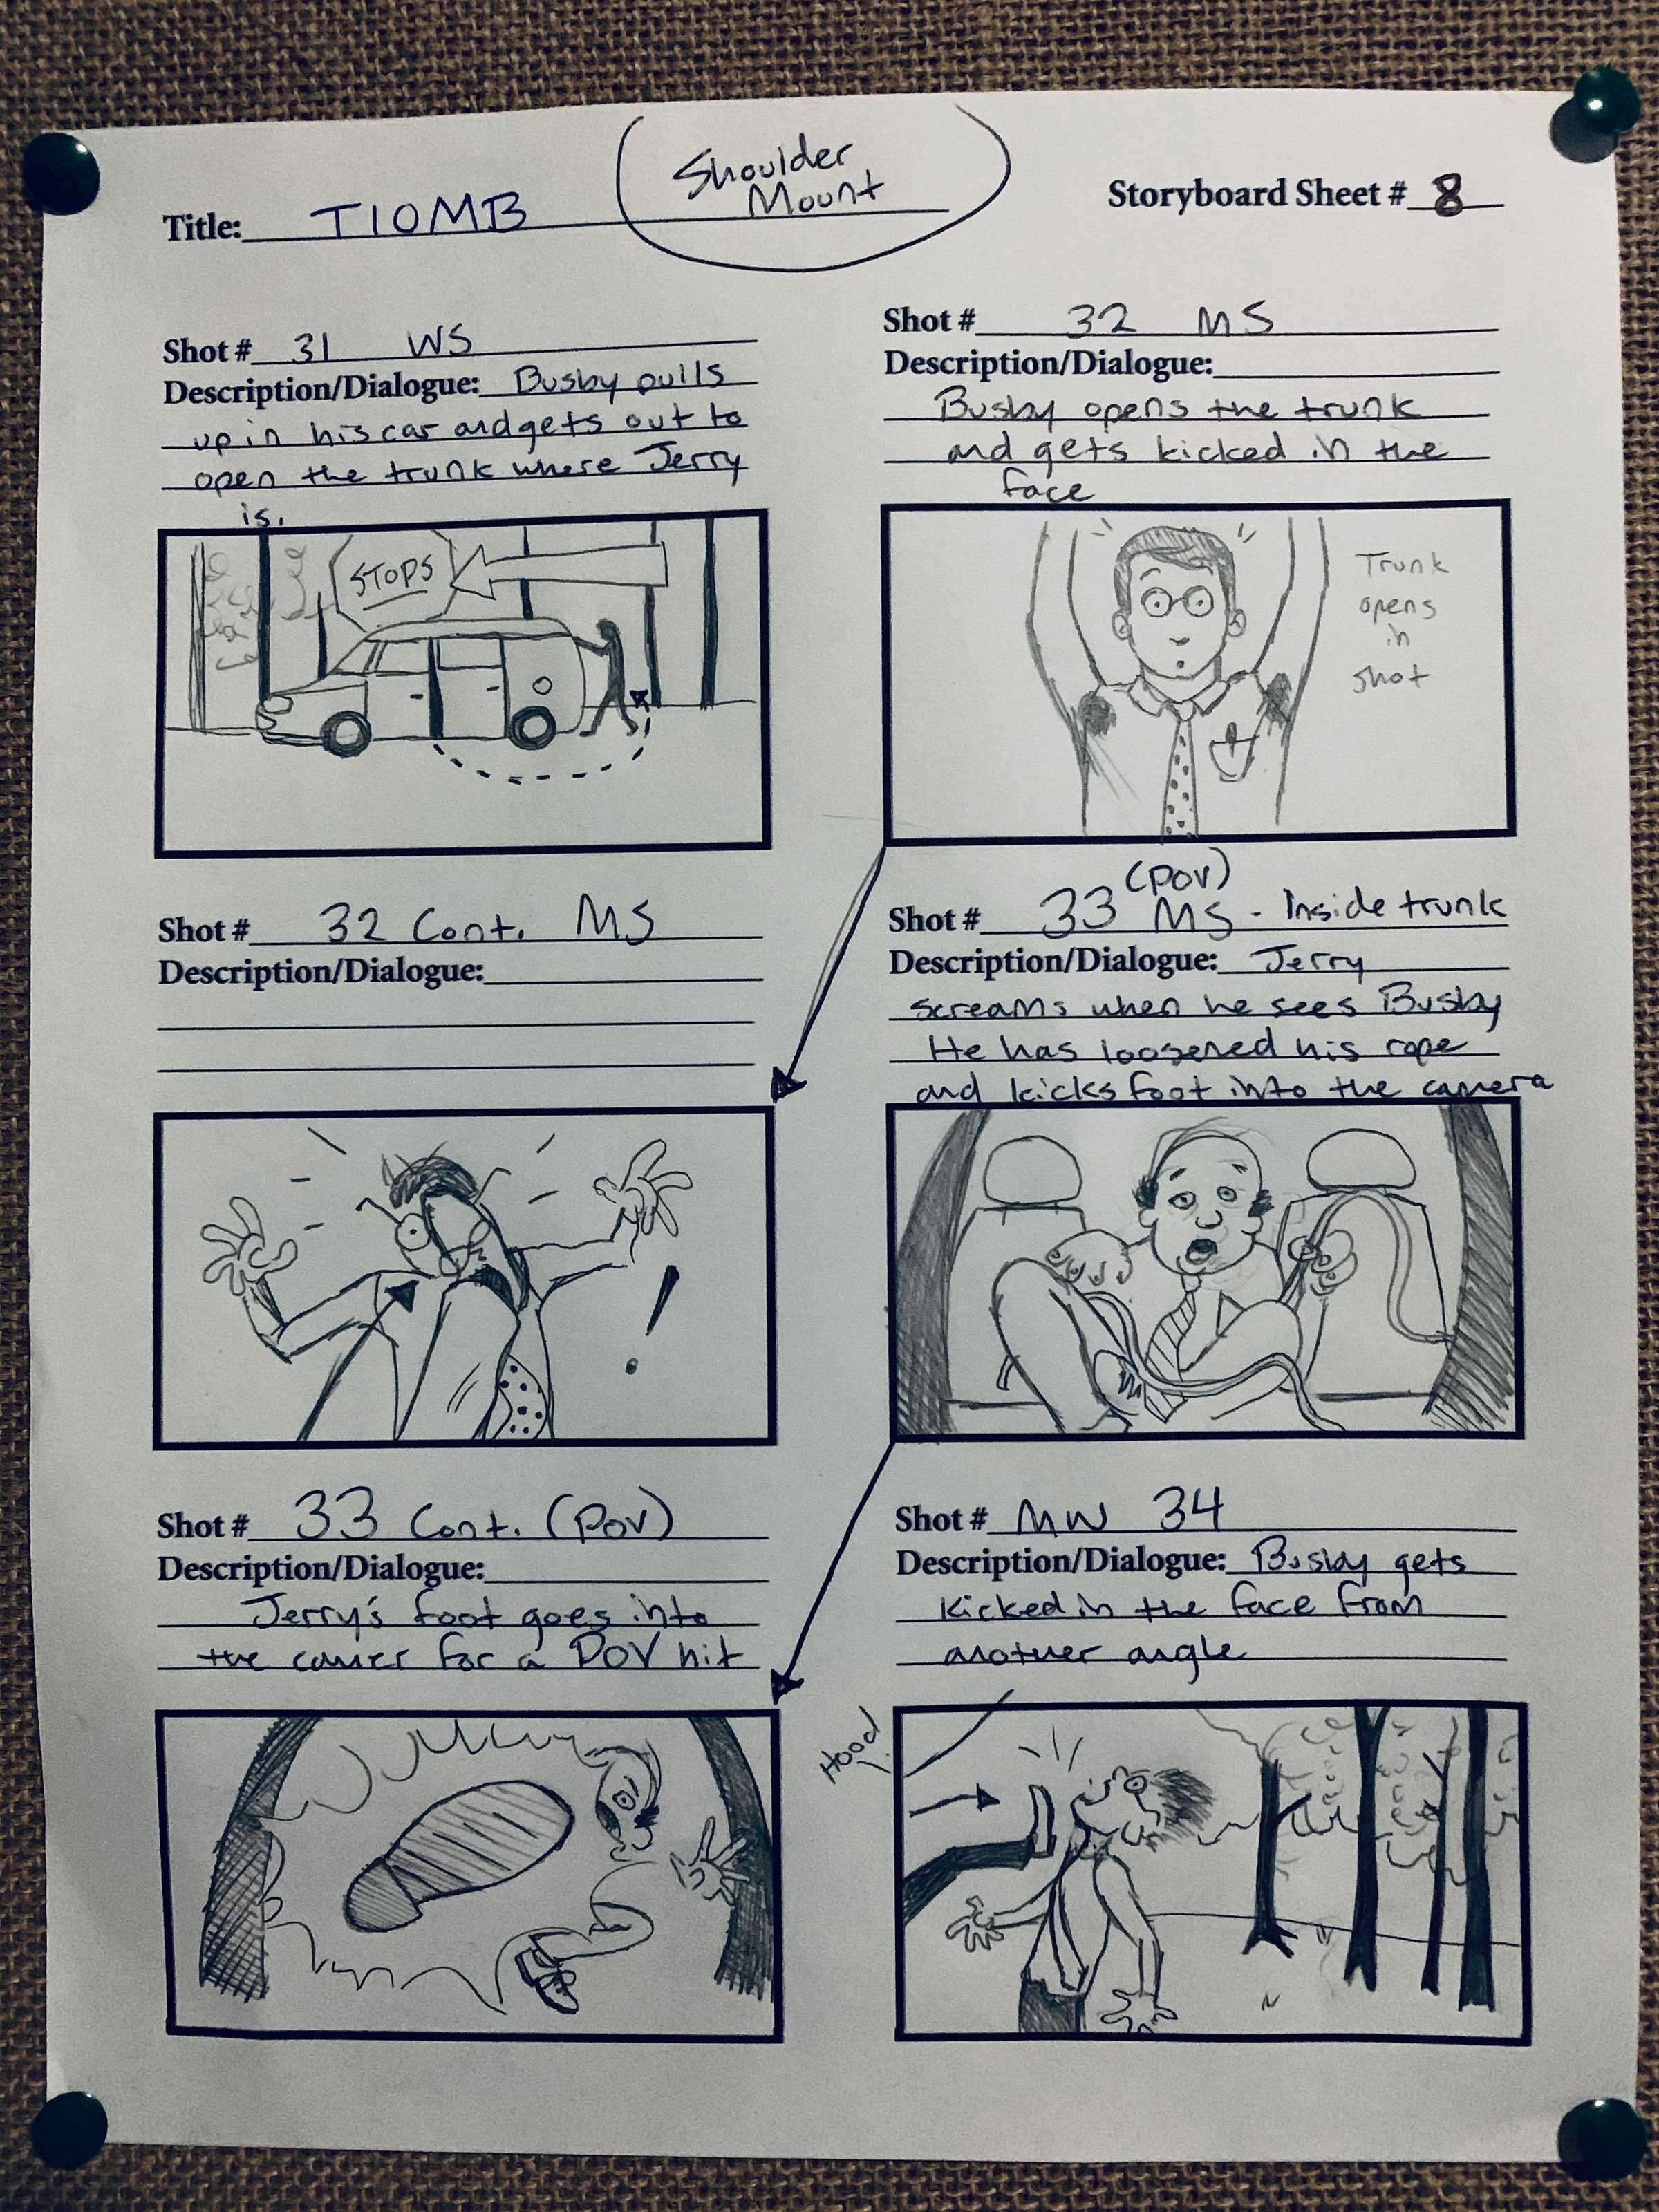
Character Action: The Indignation of Michael Busby
This sequence for The Indignation of Michael Busby (2020) doesn’t do anything fancy with the camera but simply cuts between different angles while the action in the scene takes the steering wheel. The opportunity to storyboard here gave me the option to block action soundly before we began any type of on-set rehearsals. Again, this ability to save time is detrimental when daily rates and rental fees are adding up.
The use of a shoulder rig took attention away from the camera, allowing for the action to take center stage while the rig’s movement added subtle but kinetic energy to the humorous confrontation. If you’ll notice, for this section here, I included a blanket note for camera equipment and used the panel areas to relay the movement within the frame instead of the other way around. Something else to keep in mind — though this might resemble a comic book, it is not, so don’t pump the brakes for any details that aren’t critical to the information needed to acquire your shot. It doesn’t matter that you’ve failed to dress the set in your panel’s background unless it’s important to either the scene or your artistic vision. Let the world-building take place in your film instead of the panels and if a contoured subject is able to convey your shot information, so be it. That’s the main objective here.
This scene is the beginning step towards the reveal of our title character’s true purpose, the stairs of which climb steeply in the script. The goal here was to reveal that not only has Busby kidnapped his boss and is keeping him tied up in the back of his SUV, but his boss has gotten out of his restraints and is escaping — And the whole dilemma was intended to play out before or as quickly as the audience could process the plot flare involved. So, I relied on the panels to map out effective angles that would cut together swiftly and sizeably contain the necessary information to explain the situation, all while unraveling humorously.

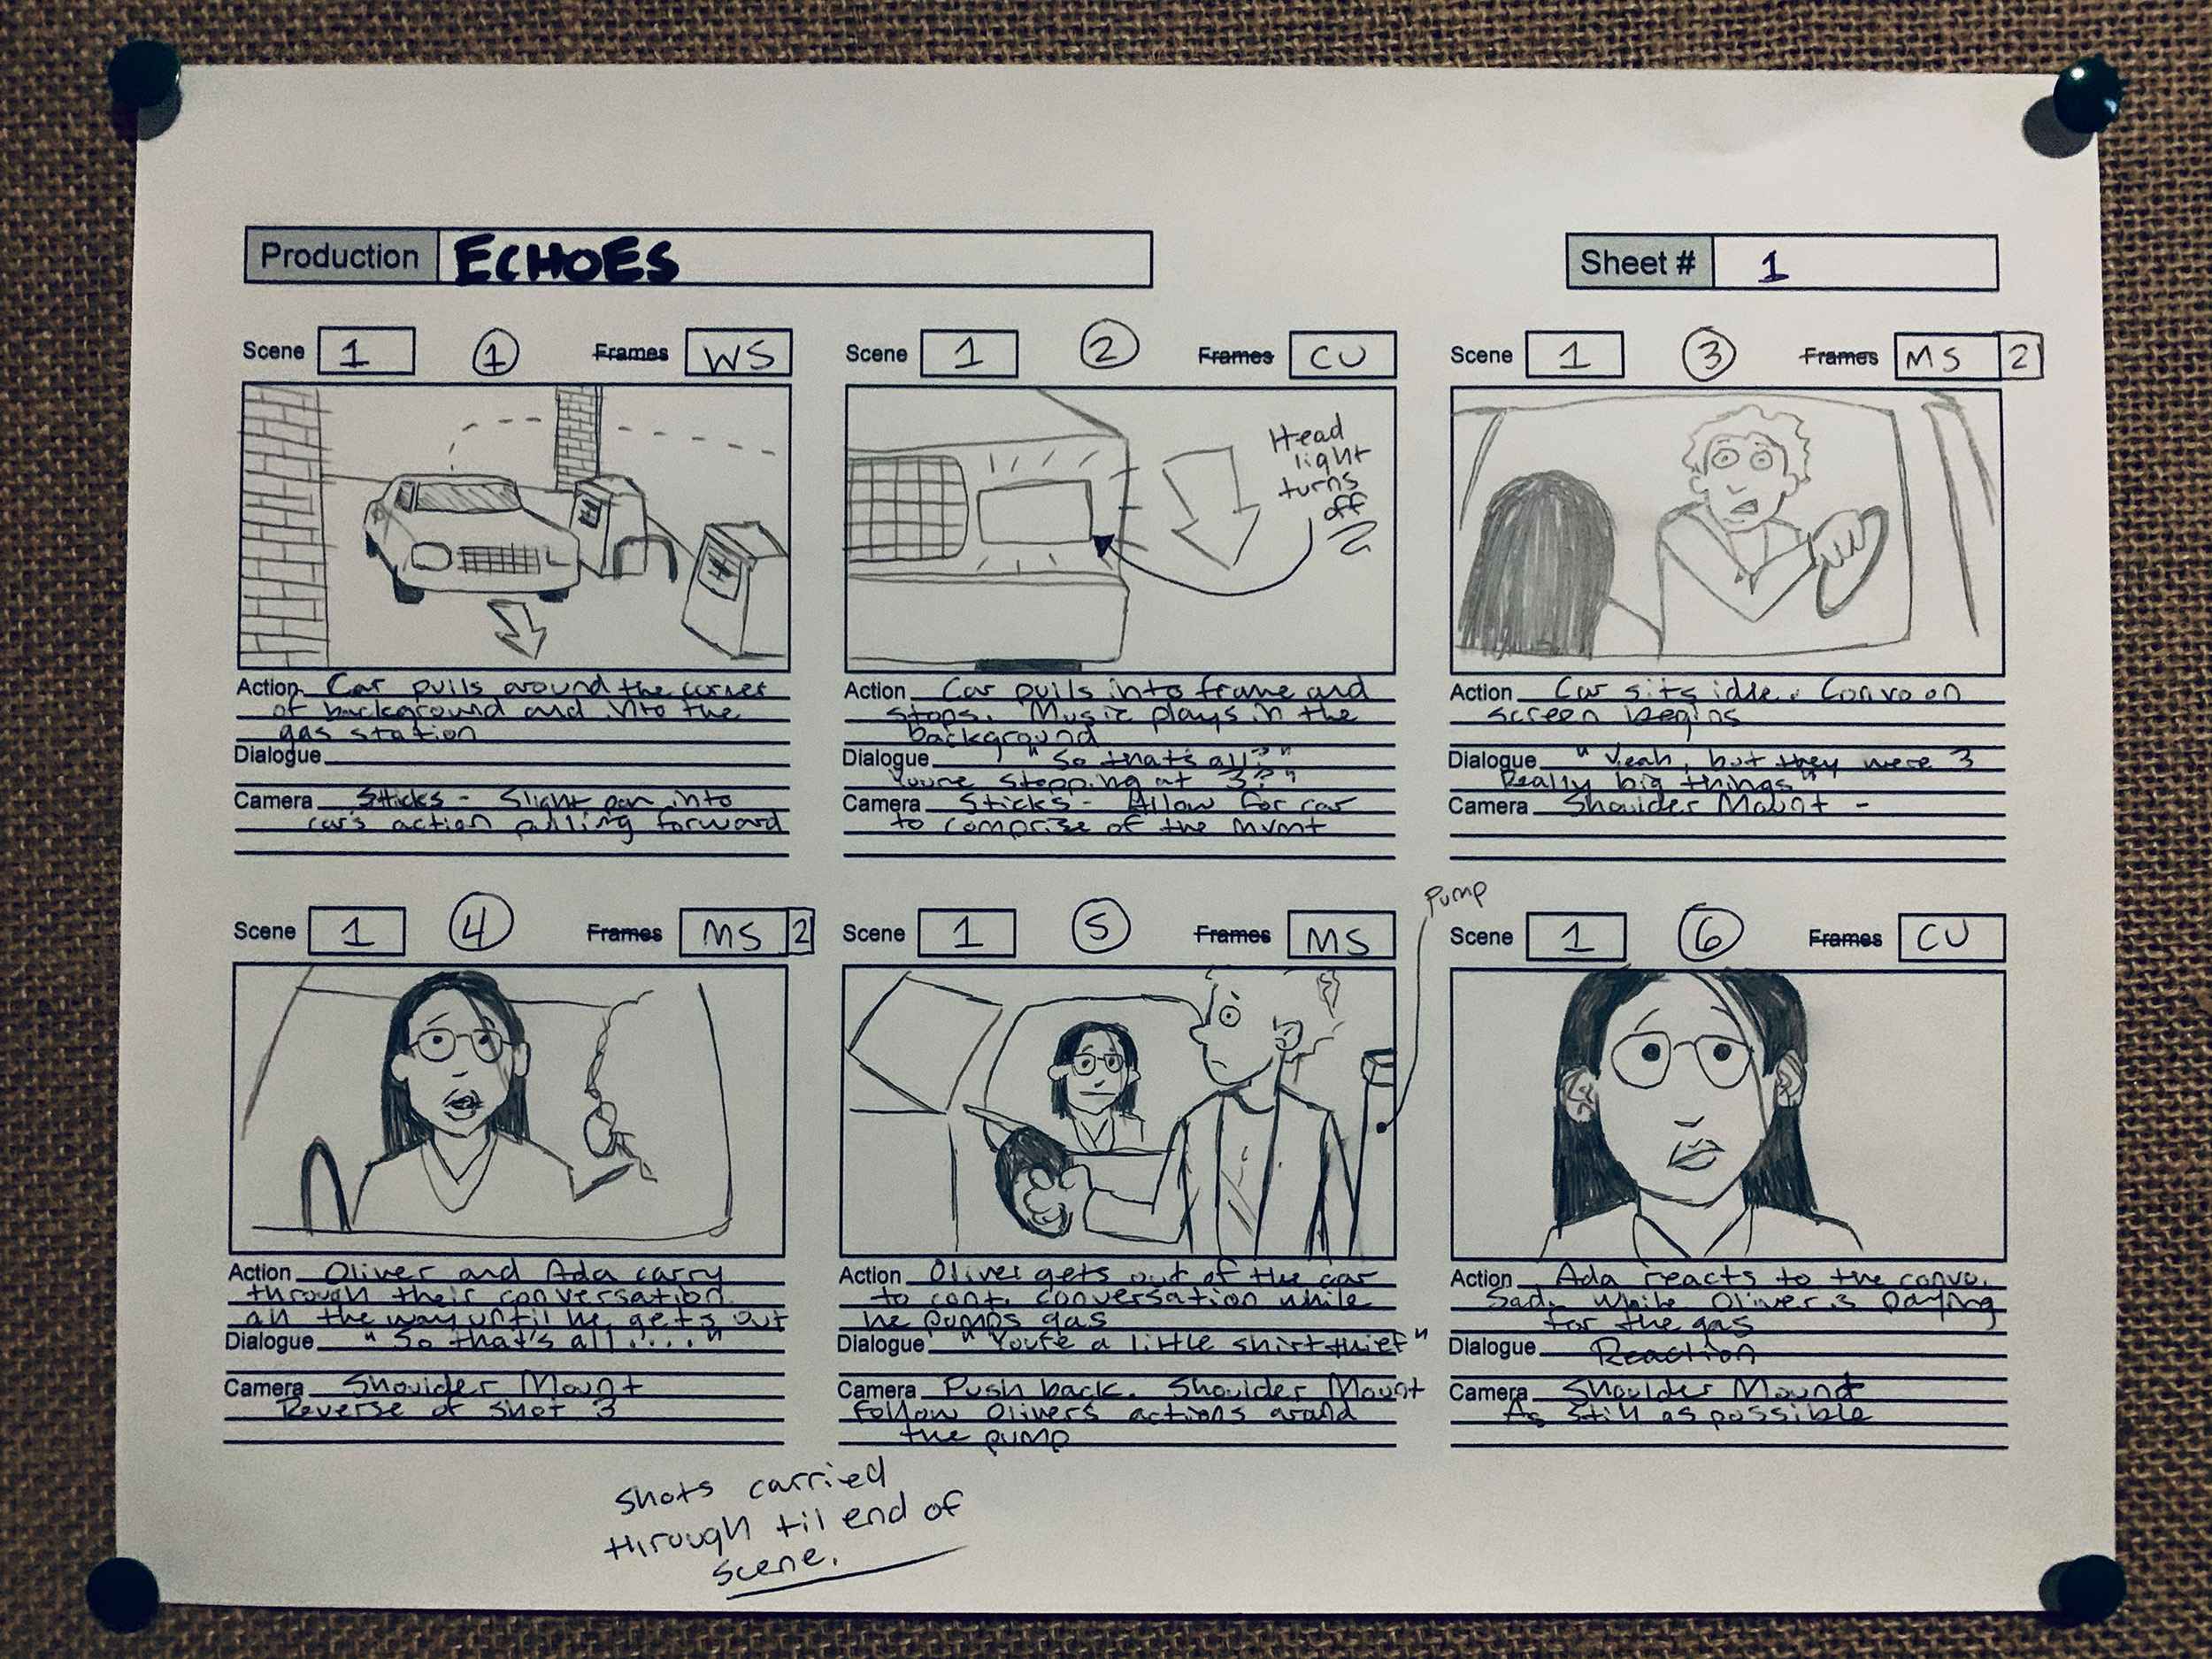
Shot Detail: Echoes
For my recent short film Echoes (2020), I had the privilege of intricately familiarizing myself with a vast majority of the locations beforehand. This isn’t always the case in independent filmmaking due to potentially fluctuating circumstances (weather, the position of light, availability, budget, etc). While I’ve addressed the significance of including as much detail into the storyboard as your mind is capable of mustering up, perhaps no part of the film is as much a testament to these benefits as the film’s opening scene. When it came time to roll this scene, there was nothing left to include in our storyboard since gaining the knowledge of the time available for obtaining the shots.
In order to be granted access to our chosen location of a picture perfect, old-timey gas station, the roads leading to the surrounding town square had to be blocked off by local police and fire departments to ensure the safety of our set. For this reason, we were given permission so long as we wrapped everything up by sunrise the following morning. That’s a lot of setups in a single night for a scene involving the introduction of our three leads, followed by a fist-turned-knife-fight, followed by a UFO abduction…
In hopes of keeping the storyboard’s frames precise, I visited the location to take photos of the shot list in mind, adjusting framing as needed. It was for this reason, I believe (this and an A-team cast and crew), that the night was a success and the overall goal of the scene was achieved. By sunrise, we ended up with a vast majority of the shots we planned for after carefully selecting them by the matter of importance to the scene and factoring in the setup time for each as we went. We also filmed minimal takes so that no inertia was not lost as we trailed through the shot list.
Storyboarding Sites/Software:
Boords.com (Digital/printable storyboard templates and software directory – Free, with Plus option)
https://boords.com/storyboard-template#photoshop-storyboard-templates
Celtx.com (Complete online pre-production toolset – Paid)
https://www.celtx.com/index.html
Studiobinder (Paid)
Toon Boom Storyboard Pro (Paid)
Storyboarding Apps:
Celtx.com (Paid)
Make Storyboard (Free)
Shotpro (iOS) (Paid)
Storyboarder (Free)
Prolost Boardo (Paid)

3 Comments
Nicholas Bedworth ·
In one of his online master classes, David Lynch suggests using about seventy-five 3 x 5 cards for planning out a feature film, at least at a high level. What’s cool about that is one can always shuffle them and see what happens. 🙂
Your blog was certainly informative and made me aware of what’s behind a video production. As a viewer, we take the process behind the experience for granted, but clearly there’s a great deal of thought, planning and adjusting before committing to the shot.
Back to David, and “fluctuating circumstances” such as weather, one evening he was preparing to shoot at a drive in, and had rented all kinds of vintage cars. But it unexpectedly started to rain! (Doesn’t happen often in LA). Getting the cars for another day was going to be a problem. So, he simply re-wrote the story line in real-time and rolled the cameras.
Not everything works out as planned…
Joshua Richardson ·
I really love storyboarding on index cards specifically for the option to easily add, remove, reorder shots. It’s invaluable to the way I shoot.
Samson Stages ·
Considering a film studio for your next project? When it comes to execution, a professional film studio rental becomes a game-changer. Thanks for providing a comprehensive and insightful guide on the importance of storyboarding in the filmmaking process.