By now a lot of you have tried your hand at shooting a little video on one of the new HD video enabled SLR camera, and a lot more of you are thinking about it. Many of you who tried a little video shooting probably came to the same realization that I did—its pretty fun, the video quality is sometimes amazingly good and sometimes amazingly awful. As a still photographer I quickly came to realize video was an entirely different world and I knew little about it. Luckily we had Mike Henry, who has a lot of video experience, interning at Lensrentals this summer and he’s been teaching me some video equipment basics. What I found out, very quickly, was there is a reason the video guys carry around a lot more equipment than photographers do—because they need it. And with Mike’s help I’ve found that a few accessories make a huge difference in the quality of video I can get.
We certainly can’t tell people much about video techniques in a little blurb like this, and can’t even begin to discuss postprocessing. What we can do, though, is run through some of the basic equipment and accessories that will let you at least get decent footage with your video-enabled dSLR. Because if you haven’t realized it yet, getting anything better than 30 seconds of silent film footage is going to take a few extra tools.
Supporting the Camera
Unlike taking a still photograph, its almost impossible to obtain good video footage while hand-holding an SLR. Even image stabilization doesn’t prevent the little jerks that can rapidly make an audience seasick (the Blair Witch Project effect), and forget trying to zoom in with one hand while holding the camera with the other. You can use your tripod and ballhead to keep the camera fairly still while you zoom in and out but that’s still fairly limiting. Depending on the type of shooting you want to do, there are several different types of stabilization systems for shooting video.
Tripod and Fluid Head
The difference a tripod and fluid head make is enormous. A fluid head (which can mount to a standard SLR tripod) looks like a photography pan-tilt head, but internally is filled with a viscous oil that dampens and smooths movements. Compared to a ballhead, a fluid head allows for for smooth, controlled movements, making pan and tilts steady and never jerky. With a fluid head you can pan side-to-side, tilt up-and-down, and zoom in and out without making the audience seasick. Fluid heads are a bit bigger and heavier than a ballhead, but if you do much video work, bigger and heavier are terms you’ll take for granted. Another term you’ll take for granted is ‘more expensive’.
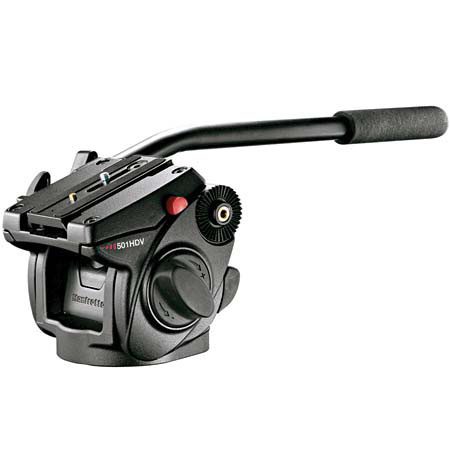
Above: Manfrotto Fluid Head
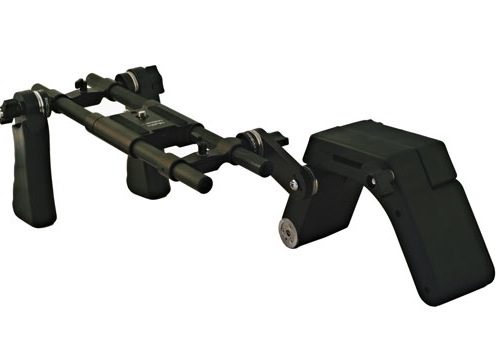
Shoulder Mounts
Sometimes you want to be more mobile then a tripod and fluid head will allow. The simplest and least expensive option to move the camera around while shooting video is a shoulder mount. A shoulder mount puts the camera on a set of rails with a shoulder rest at one end and a pair of handles at the other. (Rails, for those who aren’t familiar, are one of the coolest things about video gear. You’ll have instant flashbacks to childhood Tinkertoys and Erector sets as you assemble various systems on rails.) With the camera on a shoulder mount you can walk around and pause to shoot video without setting up a tripod. If you shoot while walking it will still be a bit bouncy though, unless you practice the skill a lot.
Standard video shoulder mounts, like the Redrock shoulder mount are really made for video cameras with the viewfinder mounted to the side. It can be hard to see the LCD screen on the back of an SLR camera because the camera is a bit too far to the side. We’ve found a really good solution: a shoulder mount from Cavision that offsets the rails closer to center, perfect for seeing the LCD screen on an SLR. It really makes shooting video with a SLR much more flexible.

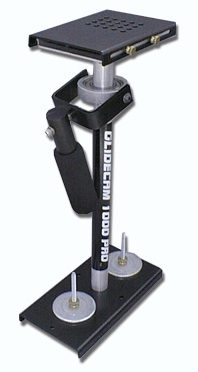
Glidecams
A Glidecam is another support option, and easily the best option if you want to shoot video while moving around. This (or much more expensive professional systems) is what allows that video footage which remains steady while the cameraman is running along a path or walking down a flight of stairs. The Glidecam uses counterweights to balance the camera on a full gimble head built into the handle. It takes a few minutes to set up and balance and we’ve posted some tutorials on how to do that (video links below). Once its set up and balanced you can literally walk around and maintain very steady video.
Glidecam Setup Glidecam Balancing
Audio for Video
Even if you get good video footage, the audio capabilities of SLRs are really limited. Most give you an audio track that’s about as clear as the discussions of the neighbors in the next apartment—you can hear it if you’re really interested and concentrate hard. Getting decent audio isn’t too difficult on even a very limited budget (although getting high quality audio can be more complex and expensive than getting the video footage itself).
External Microphones
Your SLR has a audio input, in the form of a mini-headphone (3.5mm) jack. A microphone like the Rode Video Mic Pro mounts on your SLR’s hotshoe and captures much better audio than the camera’s built-in microphone ever could. This will be enough for home movies and basic camera work. But if you’re doing interviews or trying to capture audio at a significant distance, you’ll need something more, and things get a little more complex.
Audio for interviews can be done with a wireless microphone like the Sennheiser Evolution G3 100 or a wired microphone like the Shure SM58. With off-camera microphones, however, there’s a minor compatibility problem — the SLR’s audio input is a mini-headphone jack and most microphone systems work via XLR connections, so an adapter is needed. The Sennheiser microphones come in a kit with a hotshoe mounted adapter/receiver. For other off-camera microphone systems you can use a Beachtek Audio Adapter or similar device to convert the XLR connection to mini-headphone for your SLR. The BeachTek Adapter will actually let you combine two audio sources into a single input to the camera (an interviewer and subject, for example, or one hand-held audio microphone and an off camera microphone to pick up background sound).
Capturing good audio at a distance is a challenge. You need a high-quality shotgun microphone like the Rode NTG-2, and may want to mount it on an extendable boom-pole to get it closer to the audio source. You could even pair a NTG-2 shotgun mic and a Sennheiser Evolution G2 100 Kit and use both to record audio for an interview (That’s how we recorded audio for the Comparing Olympus and Sony Supertelephoto Lenses video).
Audio Recorders and Mixers
The Canon 5DMkII, like most video capable SLRs, has automatic gain control (AGC) for audio, which means that it automatically adjusts the base volume of the audio level for you. Sounds like a good idea, right? But what happens isn’t always appealing. If you’re recording an interview, and there is a break in conversation, the camera’s AGC will begin searching for audio, and will record the room’s air conditioner (or similar sound) nice and loud. Really, really, really, annoying to deal with in post-processing.
So if you’re trying to seriously record audio, it’s time to consider an off-camera option. You use the same microphones described above (well, not the Rode Stereo Video Mic because you’d need to convert the mini-headphone to XLR) and record using an audio recorder like the Zoom H4n. This captures audio to an SD card. You then download the audio track and just need to sync the camera video and the off-camera audio in post. Oh, and you’re going to want a good pair of headphones to monitor the audio as it’s being recorded to make sure the levels are good, etc… we recommend the Sony MDR-7506
Now, say you’re really getting into this, and need a setup with more then two microphones. Well, you could use 2 field recorders and sync all three items up in post (not a lot of fun), or you could use a field mixer like the DV PRoX3 This would pair very nicely with the Fostex field recorder to record up to 4 channels of audio. The FP33 has three inputs and two outputs, so you could record three different microphones (say an interview with two lavalier mics like the Shure SM93 and a shotgun mic for ambient or crowd noise) by running them through the FP33 into the Fostex field recorder. (Yeah, OK, we went a step too far here. Never mind. I guess you can tell I’m really starting to get into this.)
Lighting for video
Digital SLRs generally do a very good job at capturing in ambient light, but the ambient light isn’t always going to be great for what you’re shooting. And indoors is still indoors. As photographers, we’’re used to using studio strobes or on-camera flash which is obviously useless for video. There are lots of different options for video lighting, everything from your friend holding a flashlight (not really recommended), to a full continuous lighting rig like the Lowel DV Creator Kit. As an aside, I’ll mention that after learning a bit about video lighting, I’m so impressed that I’m starting to use video lights for photography, too. Its one of those ‘WOW’ moments, the lighting options on the video side are just that impressive.
Shoe mounted lights
One of the easiest options is replacing your shoe mounted flash with a shoe mounted continuous light. These are LED lights, which have a low power draw and don’t get hot. We carry the Litepanels Micro which can be powered by 4 AA batteries or (with an adapter ) by Sony L-series batteries. They’re not nearly as powerful as a shoe mounted strobe, more like the light given by an on-camera flash, but they can run for hours on batteries. Pretty cool actually.
Continuous lighting kits
Just like with photography, when the shoe-mounted light isn’t enough light for you situation, you’re looking for either a larger light or a kit. There are lots of options, everything from the LED-based Litepanels 1×1 or Arri T1 to kits like the Lowel Omni-light lit If you’re looking for a softbox, the Lowel Rifa eX 55 is available.
Your choice of light depends on a lot of factors. If you’re shooting indoors, you probably want Tungsten based lighting, which operates at 3200K. The Lowel lights and the Arri T1 are examples of powerful Tungsten lighting. Again, you can’t really compare continuous lights to strobes, but these kits put out enough light to take bright photographs at normal ISO 10 to 15 feet away. Just like with strobes, they can be modified with reflectors, snoots, grids, etc.
If you’re shooting outdoors, or are working with lots of other ambient light, you probably want lighting balanced at 5600K. Our Litepanels LED’s and our RPS 5500 are examples of daylight balanced lighting. The Litepanels are particularly impressive (and expensive) putting out 500 watts (equivalent) of light with no heat. We’ve run them for hours and they remain cool to the touch.
Summary
I usually go to great lengths in this articles to avoid ‘pimping the equipment’. As most of you know, we don’t really need to do that. But as a photographer with no video experience I found when I tried to educate myself online about the equipment available to help me shoot video with an SLR I was just overwhelmed. I didn’t have any idea what half of the things discussed even did, or why they were necessary. I had the luxury of Mike’s on-site instruction to help me learn the basics I needed to dip my toe into video and begin to see what the various accessories were for. The learning experience has been incredibly fun—I haven’t been this pumped up about equipment since I bought my first SLR. I hope for those of you out there in the same boat, who don’t have a “Mike” handy to show you the ropes, this will give you a starting place for trying out some video accessories.
Roger Cicala and Mike Henry
Lensrentals.com
More Lensrentals Articles
