D7000 Dissection
Everyone seemed to enjoy my destruction of an NEX camera a couple of weeks ago. I made the statement in that post that it was amazing how simple and clean the camera was compared to even a small SLR. So, of course, a number of people then wanted me to open up an SLR so they could see the difference. Having matured only marginally since 3rd grade, I had no choice except to rise to the challenge once someone said “bet you won’t take an SLR apart like that”.
So, yesterday a D7000 got a nasty scratch on the sensor. It was already an older camera and Nikon has upped prices on sensor replacements to the point it wasn’t economically worthwhile to replace it. So it was time to go get some useful parts. Why? Because with the Nikon parts shortage we can sell the parts for more than the camera. (Anybody besides me seeing the coincidence of “Nikon will no longer sell parts to independent repair shops” and Nikon repair prices going up? Just me? OK, well I’ll up my medication again.)
The Usual Disclaimer Stuff
Like I mentioned in the last article, there’s a curse against people who take their cameras apart. This time it’s more than just a warning that you might screw things up. Inside an SLR with built-in flash like this one is a very powerful flash capacitor that has a very strong electric charge. If you don’t know where it is, and you don’t know how to discharge it, then when working on the camera you may well get a nasty shock. Big shock. Makes-putting-your-finger-in-the-120-volt socket-seem-pretty-fun kind of shock. So don’t do this. And, no, I’m not going to show you where it is and how to do it, because then you’d blame me for whatever damage you did to yourself. I’m married. I get all the blame I need at home, thank you.
Now Let’s Take Stuff Apart!
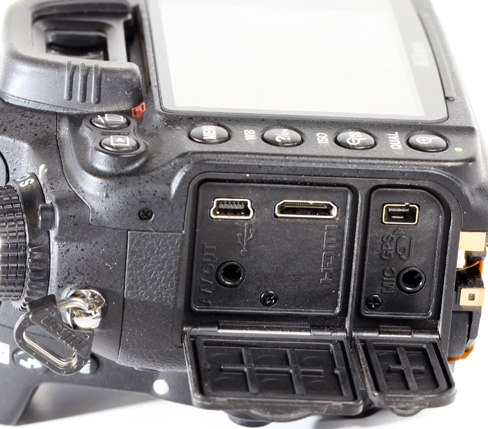
There’s some pretty obvious screws on the bottom of the camera and that makes the bottom plate pretty easy to remove:


There’s a few more obvious screws on the side of the camera. You’re thinking they’ll let us take off the side, right? Nope. They don’t let us do nothing, at least not yet. But they have to go.
Kind of like a Nikon dissection club secret handshake: We have to remove the eyepiece and a bit of grip to find a few more screws that are asking to be removed. It still doesn’t let us take off the side, but the back assembly and LCD are now loose.
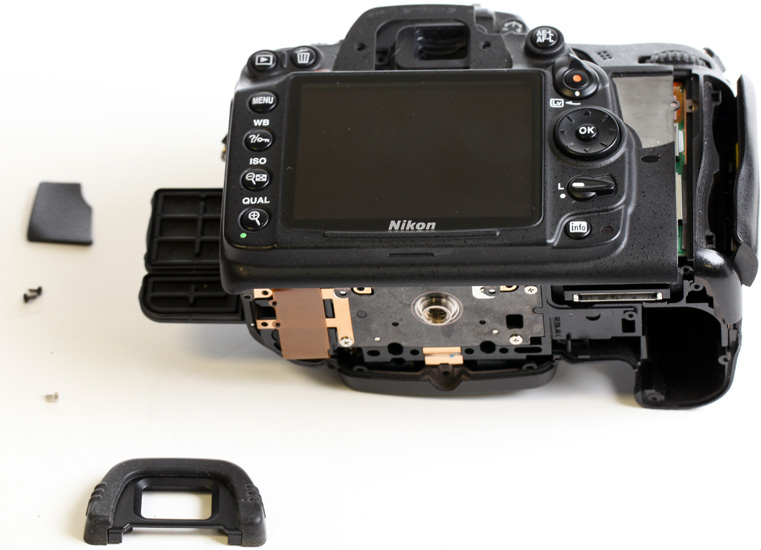
Lifting the back assembly just a bit reveals the flex cables attaching it to the main board. Rule number one for disassembling cameras: when something comes loose just peak under there before yanking it off. Actually that’s rule #2. Rule #1 is keep the screws separated and labeled. Nothing inspires less confidence than having 3 screws left over when you finish putting one of these back together. If it happens, though, I recommend saying something like “I found the problem: there were extra screws inside shorting out some circuits”.


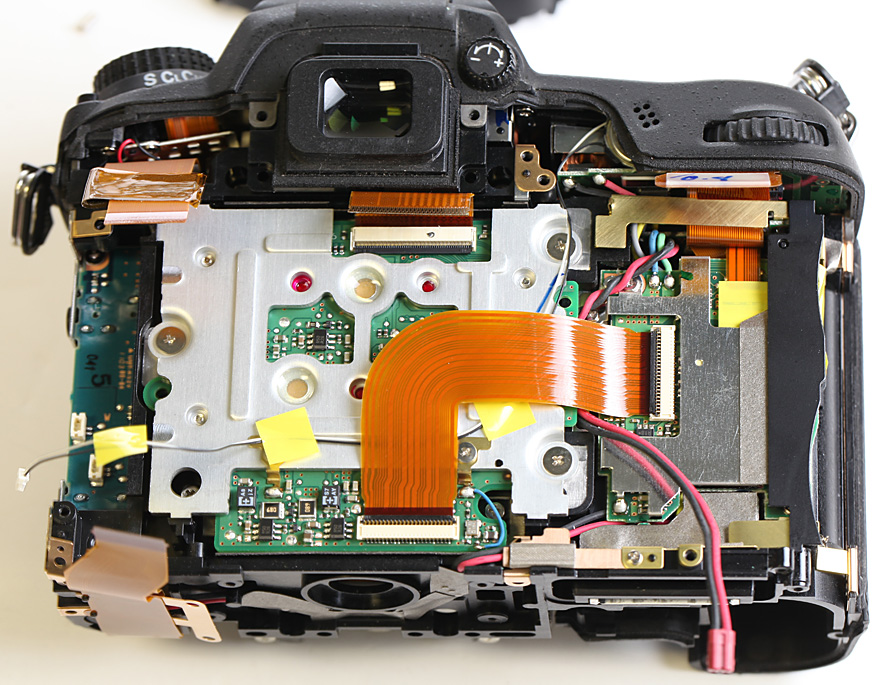
And here’s a look at the rest of the camera, which now has the main circuit board and it’s shielding uncovered.
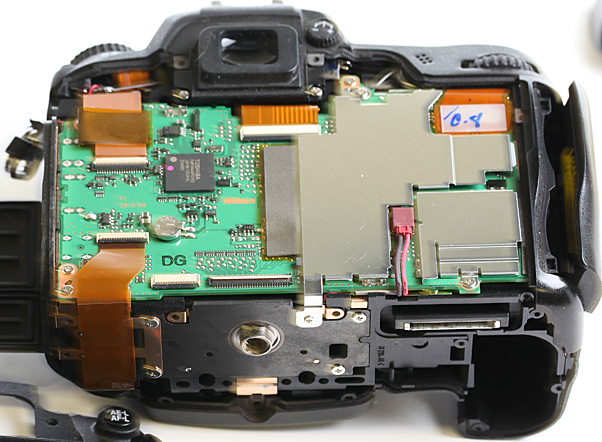
Remove the shields, undo the half-dozen other flex connections, take out a couple of screws and the board is ready to remove Notice the Expeed processor there in the center. There are also two Nanya DRAM chips, a Spansion flash memory chip, and a Toshiba Control chip. Plus some little chips that I have no idea about.

When you remove the board, flip it over, and remove some taped-on shields, we see that the two SD card slots are conveniently soldered to the main board. Which is why if you mess up a card slot (not very common with SD, but happens all the time with CF) the repair can be quite expensive.

We could have done this before, but with the main circuit board out of the way, we’ll remove the tripod plate from the bottom.
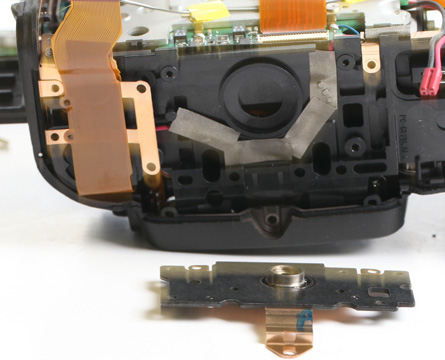
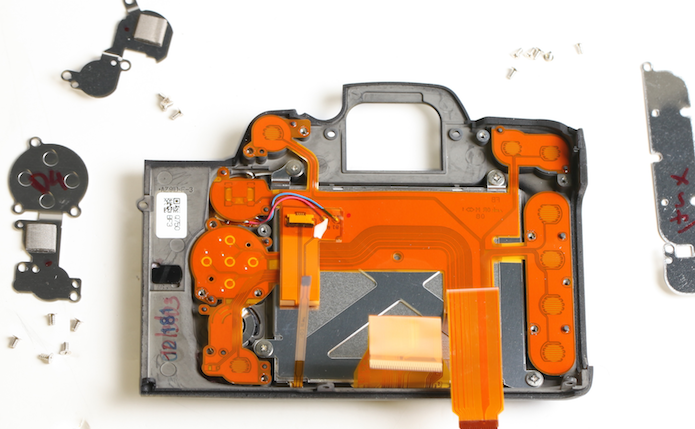
Returning to the back of the camera, there’s still lots of flex cables and circuit boards that were under the main board.
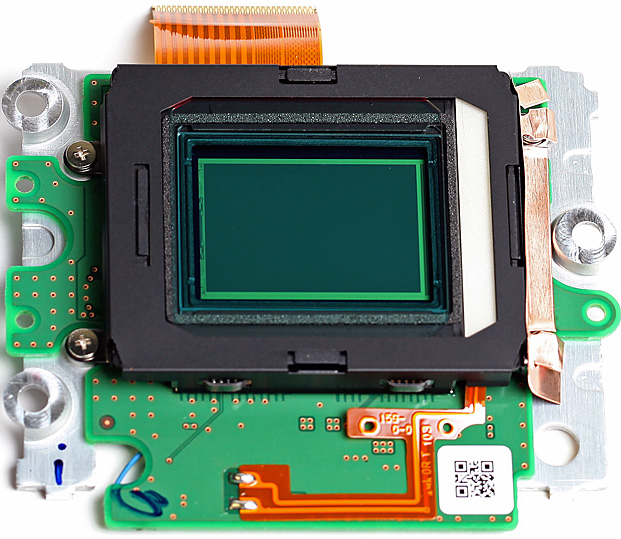
Underneath that large right-angled flex and the aluminum shielding you see above, you can see a deeper circuit board. That is actually the back side of the camera’s sensor unit. A few screws and flex disconnects and that’s out too. Now you can see the shutter from the back side, with it’s lovely grayscale gradient on the 4 sections of the curtain.
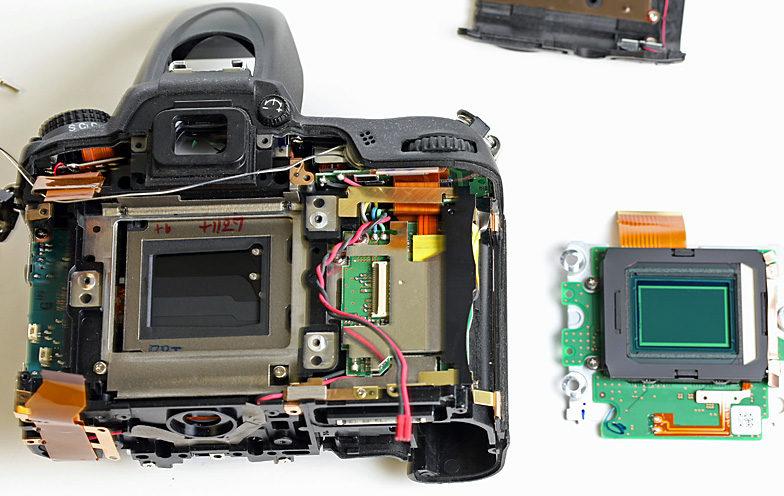
If you look carefully at the sensor closeup below, you might see the divot in the upper right corner that led to this little adventure. Doesn’t look like $500 worth of repair, does it? Then again, after spending all of this time getting here, I’d charge a bit, too, if I was the repair technician.
Now it’s time to go back to the front of the camera (Getting bored yet? I told you SLRs were way more complex than mirrorless.) to remove the front cover …

… and the right-hand grip. Did you ever want to know why D7000 grips never peel off like some others we won’t mention? Because isn’t a thin piece of leatherette just glued over the body covering access screws. The screws holding the grip on are located inside the battery compartment, so the grip can be permanently bonded to the plastic underneath, not just attached with some double sided tape.
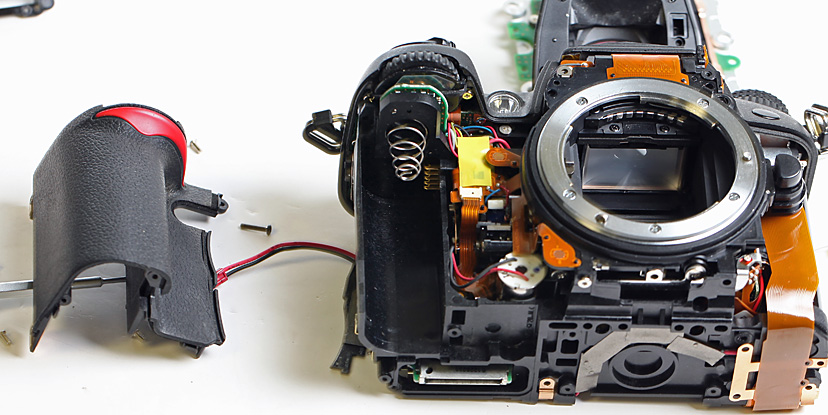
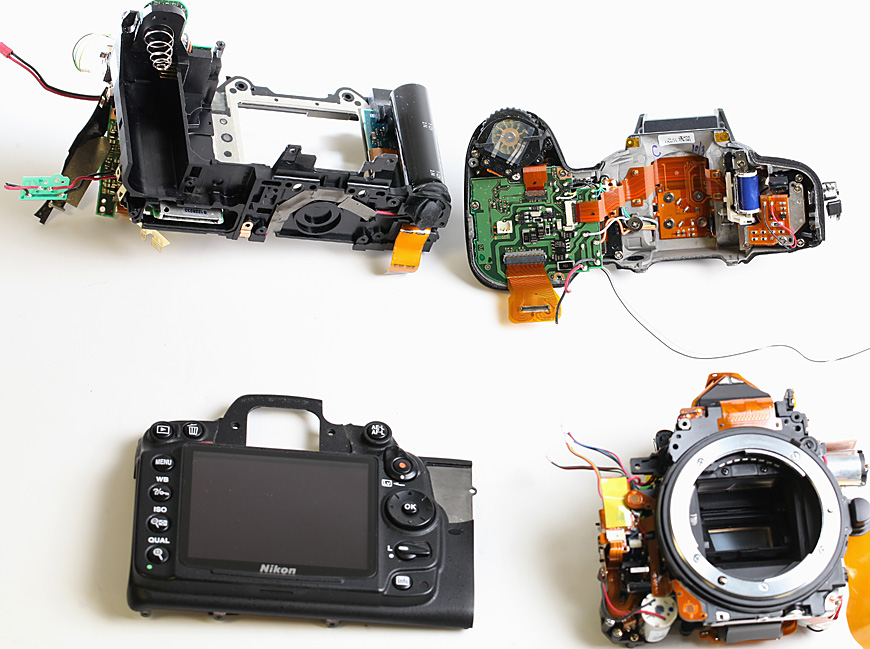
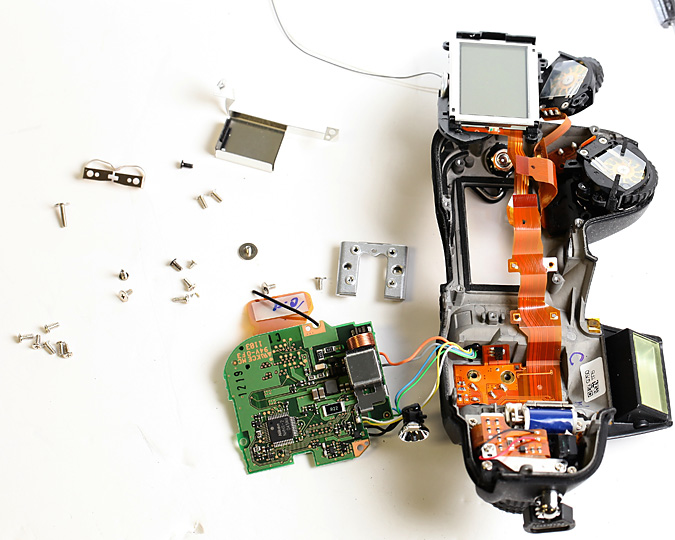
Finally (for phase 1, at least) we now have access to all the screws holding the top assembly in place and can remove that and separate the mirror box from the battery holder /chassis assembly. The mirrorbox (left) and top assembly (right) are shown below.
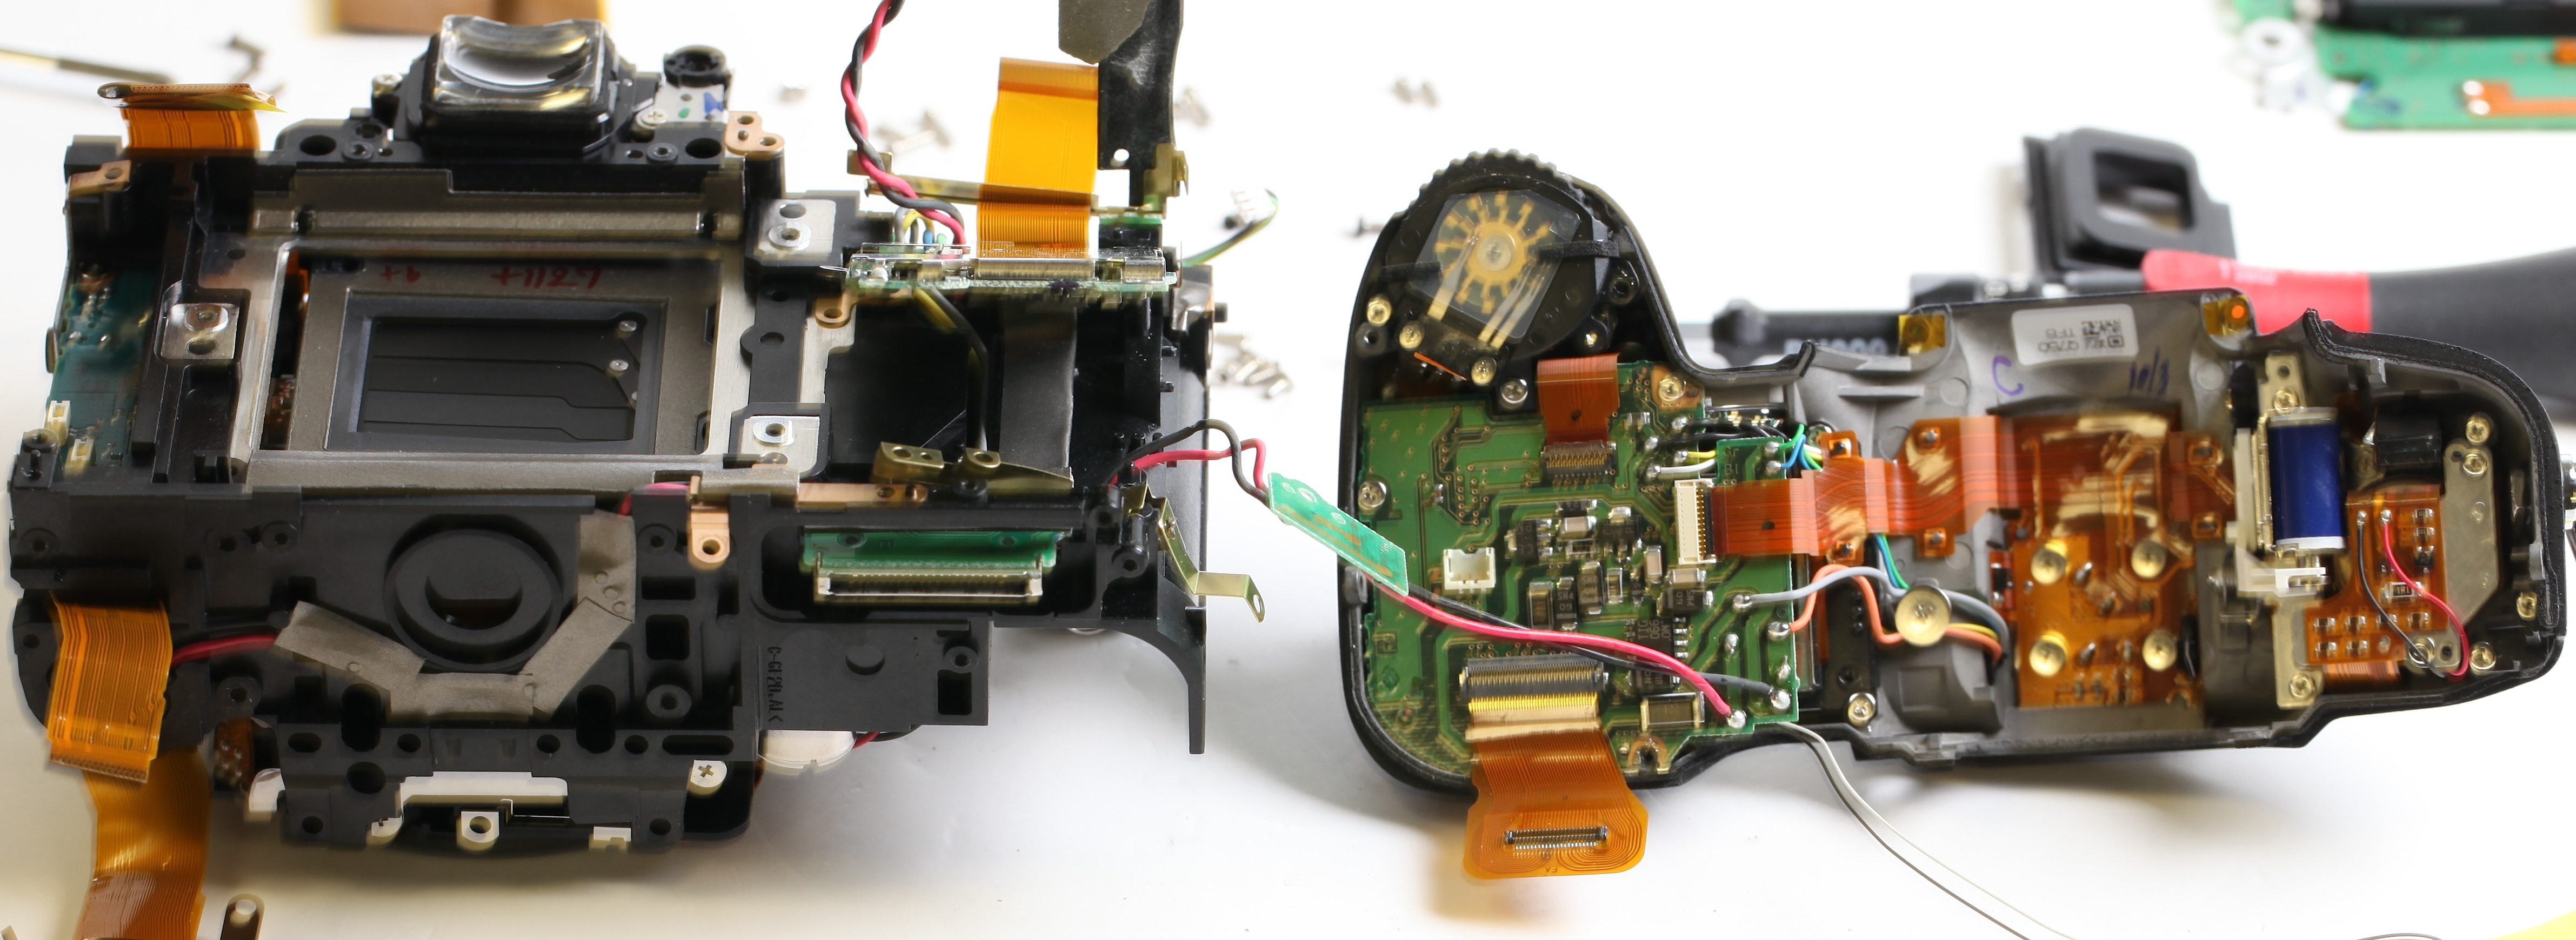
Let’s take a break and summarize what we’ve done, in case you’ve gotten confused (and that’s easy to do). We’ve now separated the camera into four main components. Going clockwise from upper right they are: 1) the top assembly with flash, 2) the mirror box assembly (central portion of the camera), 3) the rear/LCD assembly, and 4) the battery box / chassis. All except the battery box are going to be disassembled further. The battery box could be disassembled a bit more, but there’s not much point in it unless you needed to replace one of the small circuit boards or a wire.
Oh, yeah, we’ve already removed 63 screws with, I believe, 11 different sizes / thread pitches. That’s way more than the NEX camera had in it’s entirety, and we still have another 50 or so to go. It’s not too shocking that a loose screw rattling around (and shorting electric circuits) in an SLR body isn’t unheard of.

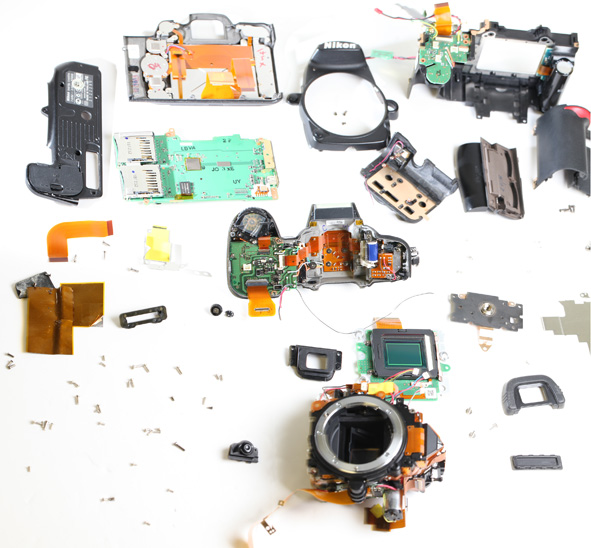
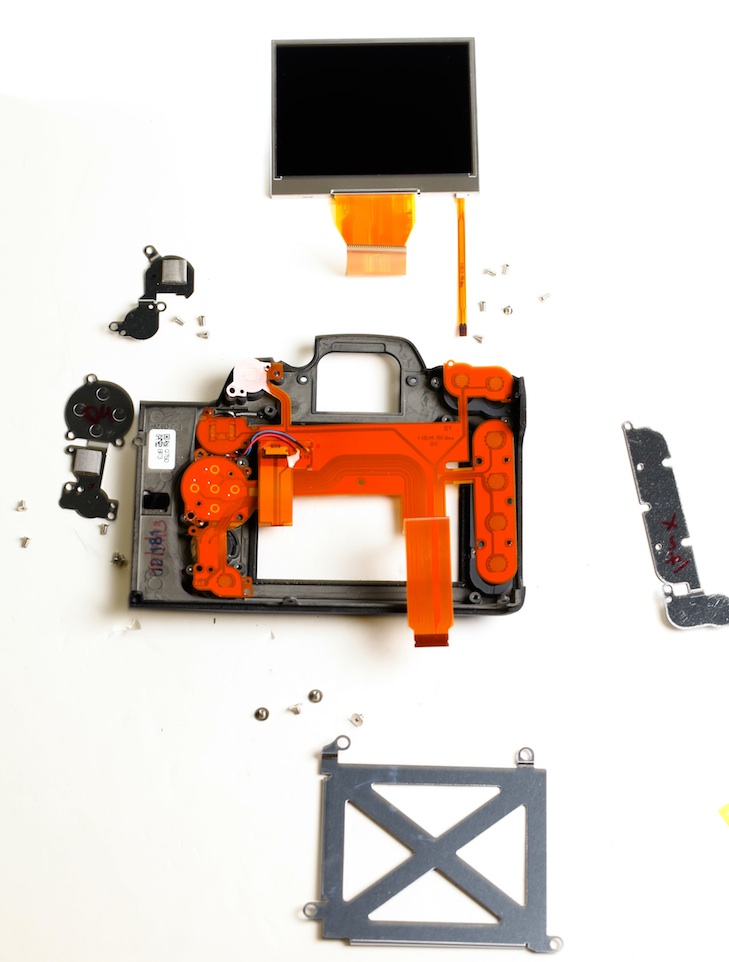
We’ve also removed various and assorted other parts and circuits. Here’s a look at things as they are now.
Secondary Disassemblies
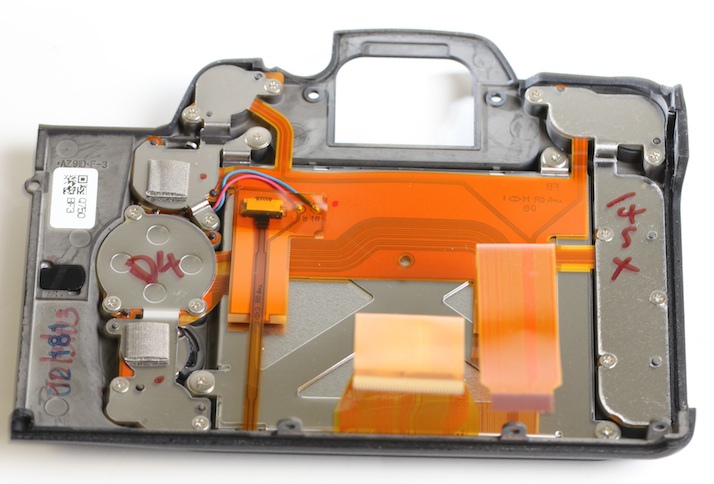
Back Assembly
First we’ll take apart the back assembly, which is one of the nicest (from an engineering point) parts of the camera, very well done and very logically laid out, without some of the “where are we going to shove this in?” feel that some of the tortuous flexes and long, winding wire runs bring to mind in the main camera body.
The button arrangement is especially elegant: There are stiff metal backs that are tightly screwed down.
Once those are removed you can see that the flexes contain small electronic microswitches that were under the metal plates …
and if you peel the flexes up, the rubber buttons you actually push on the outside of the camera are underneath the electronic switches. No mechanical parts to wear out, get dirt in them, or break. Very nice.

And while we have the flex lifted up, we can go ahead and remove the LCD. Oh, since I’m keeping count, there were another 19 screws in the back assembly.
Top Assembly
The top assembly is often sold as, and replaced as, a unit, although it can get taken apart for replacing the upper LCD or flash components.
Another 16 screws and the LCD, flash circuit board, and switches are accessible, but most of these flexes are soldered in place so we’ll leave them be. This is as disassembled (except for the flash unit) as I can get the top assembly to be without making some useful parts useless. If you’re disoriented, the front right hand dial switch is in it’s normal place, the LCD is removed and folded up over where the rear dial switch would normally be, and the rear dial switch is removed and hanging by it’s flex between the LCD and front switch.
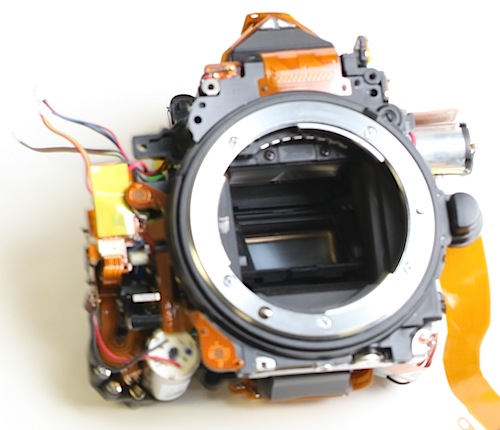
The Mirror Box Assembly
This single piece probably has more parts than any other section of the camera. Unfortunately, a lot of it is difficult to see and to access. There are a couple of subsections, though, that are interesting and large enough to see. The first is the prism at the top of the mirror box and the second the autofocus assembly (covered by a piece of gray tape) at the bottom.
Seen from below, the size of the flex cable gives you an idea of how much electronic signaling is going back and forth between the AF sensor and the main PCB board (a lot). The AF sensor is very precisely aligned to the mirro box so once we touch it nothing short of a service center realignment would let this camera focus properly again.

So, of course we touch it. When the autofocus sensor is removed, you can see how the front reflects the shape of the Nikon D7000 sensor array. (That’s just some dust on the front, which BTW was present when removed. It could have gotten there during the disassembly process, but it could also have been there all along. That much dust on an imaging sensor would certainly affect the images. I wonder if this would affect the autofocus sensor?
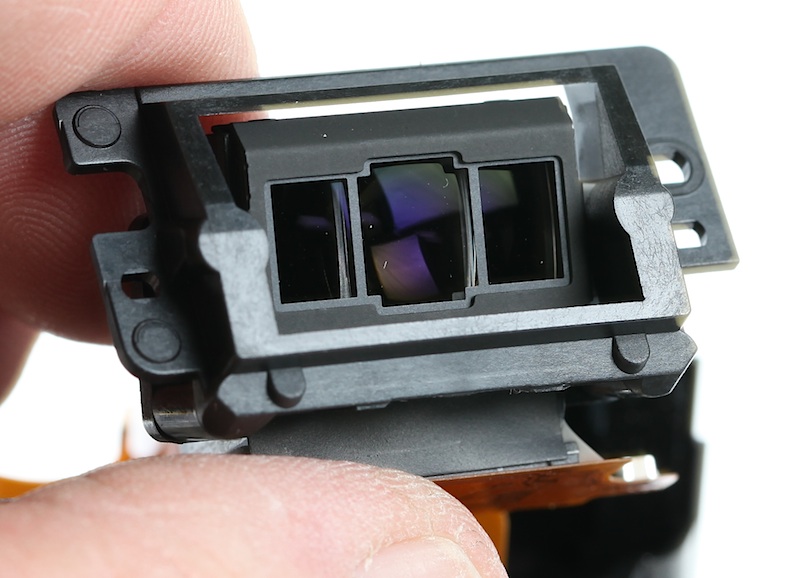
A couple of more screws and the pentaprism / focusing screen assembly comes right off of the top of the mirrorbox. Again, this could be disassembled further, but at this point it becomes just lots of screws, shims, and tiny parts. Nothing to see here. And this post has gone on for far too long, but I think we’ve done enough to demonstrate how complex an SLR is compared to a mirrorless camera.

The Bottom Line
By itself, this little post doesn’t do anything but give all of us adolescents the opportunity to see some camera guts. But if you compare the disassembly of the D7000 to that of the Sony NEX we did a couple of weeks ago, it’s readily apparent just how much more complex the inside of the SLR camera is. It would have to be: the mirrorless doesn’t need a pentaprism and viewfinder, mirror assembly, or autofocus assembly, nor does it have a built-in flash. But even considering that, this is obviously a much more complex camera.
The difference in complexity is especially striking when you consider that I didn’t take all of the SLR assemblies down to individual parts like I did for the NEX. Scroll back up to the disassembly picture above with all the pieces laid out. Then consider that there are more individual pieces left to disassemble in just the mirrorbox than there were pieces in the entire NEX camera.
I think the disassembly makes it very clear why a D7000 costs $1,200 and an NEX-5n costs $700. But my second thought, because I’ve been thinking a lot lately about where the camera industry is going in the next few years, is which camera is more profitable for it’s manufacturer: the $1200 camera or the $700 camera? I’m guessing the latter, basing my guess on the number of parts, the complexity of assembling the system, and assuming there’s a higher failure rate in quality control from the more complex assembly. I’m pretty comfortable saying there’s at least as much profit in the $700 mirrorless as in the $1200 SLR, probably more.
Just food for thought, but we know the mirrorless market is growing faster than the SLR market. If my assumption is correct, and mirrorless cameras are also more profitable than at least low end SLRs, it makes me curious about which camera manufacturers may be doing well in 3 or 5 years.
And fanboys: before you state the obvious, yes we all know the money is in the lenses and the high-end SLRs are much more expensive than the intro level systems. But high-end SLRs are a tiny, tiny, fraction of the camera market. And mirrorless manufacturers will be selling lenses too. Assuming, of course, they start making some decent ones. But right now, high quality native mirrorless lenses include about four or five for m4/3 and a couple for Sony E mount. Given some recent releases, though, I suspect that is going to change soon.
Roger Cicala
Lensrentals.com
April, 2012
59 Comments
Adam ·
That’ll buff right out.
Wow, that’s a lot of screws. The biggest question I have is where do you find all the right screwdrivers for them?
cs hauser ·
Was there any evidence of weather sealing on the D7000? I kind of thought there would be some rubber gaskets lining the buttons, dials, and/or seams of the camera.
Roger Cicala ·
There were rubber gaskets that are integral parts of the back buttons, but that’s the only thing I saw.
Silvio ·
Ouch, it hurts a bit to see such a nice Nikon getting torn apart. And I can barely make out the scratch on the sensor, looks a bit like a speck of white dust.
KyleSTL ·
Would have been a perfect candidate for IR conversion. I have probably disassembled and repaired a dozen DSLRs in the past year, but I would never reassemble someone else’s teardown. Next time you have a camera that is economically infeasible to repair throw it on eBay whole a for-parts/for-repair and sell it whole. You would be impressed how much non-functional cameras go for to guys like me.
Roger Cicala ·
Totally true, Kyle, even moreso recently. But then I don’t get to do teardown pics 🙂
And honestly even the simple parts we can reuse make the economics a wash to do it this way. If we carried IR D7000s we’d have done that instead (as we do with D700s) but we don’t.
nony ·
Would the reference to the leatherette not peeling off a reference to the leatherette or vulcanite found on a certain cameras that may or may not have special viewfinders with framelines and look retro? 🙂
Roger Cicala ·
Nope. It refers to certain bodies made by the two largest Japanese SLR manufacturers that are fairly famous for having grips peel off on the ‘handle’ side. Currently the Canon 60D and Nikon D700 seem to have the problem fairly frequently (the 60D the worst). Other cameras in the past have had it, too.
Chad McClarnon ·
What info is stored in all the little QR code stickers? Tried to scan one from the pictures but it wouldn’t take.
Roger Cicala ·
Hey Chad – which one(s)? I’m assuming the Nikon one on the main circuit board and I’ve attached a larger image below. Let me know what you figure out. The small round one on the bottom cover is our inventory control sticker, and there’s an anti-theft tag we put on the inside that I can’t share about obviously.
Peter Leong ·
I see the flash capacitor! Wow! That’s a big sucker; twice as big as I thought it would be. It might have been a good idea to show where its’ exposed contacts/wires are just in case someone decides to do what you did and get themselves zapped by inadvertently touching something they should’t have touched! LOL
ShooterMcGavin ·
What 4/3 lenses would you say are “high quality” at this point?
Very cool tear down. I totally agree with your points on profitability for the camera market. The other side effect is that given that a less complex assembly is less money to produce, it also allows further enhancements to the sensor, ASICs, and buffers while maintaining competitive price points. For example, 10 fps out of a 24mp Nex 7.
Roger Cicala ·
Shooter,
I definitely think the Panasonic 7-14mm f/4; Panasonic-Leica 24mm f/1.4 and 45mm f/2.8; and Panasonic 8mm fisheye are excellent lenses, and I think the Olympus 12mm f/2.0 is really good too.
ShooterMcGavin ·
Very cool. I’ve been contemplating a mirrorless to supplement my DSLR kit, but haven’t really started researching the various systems. I appreciate your willingness to share your opinion, and will take a look at the Panasonic to see how it fits my needs. Thanks!
Anthony ·
I agree with the warning about the flash’s capacitor; I once melted (fried? cooked?) a hole in my thumb taking apart an old Canon Rebel 2000. If decently-old low-end SLR can do that with a partially-charged capacitor…
CarVac ·
Roger, Canon seems to have revised the 60D grip. After my copy’s grip peeled, I sent it in to get it fixed and it was replaced with a slightly harder rubber that doesn’t seem to absorb moisture the way the original grip did. It also seems to have less wear; my first one was wearing smooth after 9 months of use while this one has zero wear after another 9 months.
Roger Cicala ·
That’s true about the grips. We have replaced the grips on a dozen or so and the new grip is much less prone to loosening. I think the combination of adhering with only tape and using a ‘stretchy’ rubber is the major problem.
A ·
As a matter of interest, how many screws were there in total anyway?
My guess is that AF-sensor dust probably doesn’t make that much difference. The AF-sensor will usually be in use when the lens is wide open, so as with the main sensor the dust will only make a major difference when focussing stopped down.
That said, I do sometimes wonder whether my 5D2 has dust on the AF sensor, as I’m sure it doesn’t AF as well now as it did when I first bought it…
If you have a camera with working AF but don’t otherwise rate, you could always place some crud on the AF sensor and keep adding more until it gives you a noticeable AF performance loss.
Cost wise. My question is, how much of the overall cost is in the sensor? If the sensor is the significant cost, and it’s a large cost, then the margins will be a lot smaller on the cheaper camera. All depends on that sensor cost though.
Cost reduced designs do usually have fewer parts, but I don’t know why people don’t apply cost reduction normally? I guess part of it may be down to how well the individual unit design teams communicate with each other.
Roger Cicala ·
Adrian,
I wrote it down but threw the paper away. I think it ended up being just under 120 that we removed, but there are still a couple left deep in the mirror box. The short answer on sensor cost is, of course, I don’t know. But we could certainly assume that APS-C sized sensors of about the same Mpix should cost about the same. Since Sony may make at least some of Nikon’s sensors I think it’s a fair assumption to call sensor cost even. The cost of buying a replacement sensor is interesting, though: you can buy a current APS-C, 16 or so Mpix replacement sensor that will vary in price from $220 to $440 depending on which manufacturer it is. I doubt that has much to do with the actual cost a manufacturer pays for the sensor, more about how much markup they want to charge the repair market.
Rusty ·
I have said for at least two years now that the DSLR as we know it is a dying breed. The mirrorless body will replace it most likely in the next 5 years or so for a large percentage of mid-range cameras. Some of the pro versions probably will follow fairly shortly. There are so many advantages to a mirrorless system. One of the biggest advantages for some will be how quiet the camera can run not needing to slap up a mirror to take a photo.
Great post. I love reading your blog. I learn so much!!
Mandeno Moments ·
Interesting article, thanks. I would have thought that reducing the variety of screws would have reduced the assembly costs.
What happened to the sensor? What was the effect on photos?
Your point about margins in SLRs and mirrorless is interesting? Do you know why m4/3 lenses are so expensive? I wonder if they’re charging what the market will tolerate.
I think that the arrival of m4/3 was one of the most significant points in the history of photography. There’s a lot to like about m4/3, but being next to useless with moving subjects is a huge limitation and I wonder if technological advances will overcome this (is the Nikon V1 heading the right way with mirrorless AF?). Also, EVFs give a detachment from the subject that I find unhelpful so I prefer optical in this regard. SLRs are big heavy, and conspicuous, but hard to beat for versatility (I use compacts, m4/3, and SLRs).
Jerry Russell ·
I see you’re charging $230 per week to rent a Nikon D800, and only $200 per week for the Canon 5Diii, even though the MSRP of the Canon is higher. Is that entirely because of the difference in service costs and parts availability between the brands?
Roger Cicala ·
Jerry,
That’s partly it. Nikon cameras do cost us more to maintain in service and our pricing model has to reflect that. Repairs are a bit more expensive and take longer (which has to be priced in – time out of service is $ to us). Parts availability (we can do very few repairs on Nikon in-house, even simple things, because of lack of parts) has made that worse lately.
In this specific case, though, it also includes the fact that D800s aren’t really available for list, so we’re actually paying about as much for them as for 5D III. In a few months, assuming we can start getting enough at list price, the D800 prices should drop a bit.
Wayne ·
I had a customer back in the mid 80’s drive off with an original Minolta Maxxum 7000 on top of his car. Needless to say, it didn’t survive the trip. Since he know it probably wouldn’t be repaired under warranty, he decided to take it apart, completely apart. After dis-assembly, he decided to bring the bag of parts to us to see if we had any use for them. I was amazed to see how complicated a camera it was. I’m sure they’re tenfold more complex now.
bill ·
Do you plan on putting this back together?
Eric ·
A very interesting article! – What do you think, how sensitive would a Nikon D7000 be to vibration damage during transportation? Would screws come off after a certain number of hours on the road? What kind of other damage would probably happen? Do you see this kind of damage often? Seeing the complex inside structure of the camera makes me feel I have to keep the camera on my lap to protect it while traveling because continuous vibration is common for example during bus travel… Maybe lenses are not as sensitive as the camera bodies?
Roger Cicala ·
Eric,
I don’t think they are all that sensitive: we ship them all over the country (and everyone knows that means boxes being tossed everywhere at hubs, dropped here and there in the trucks, and of course being rental cameras people are not as careful with them as their own camera. And even then most of them spend 18 months with us and never break.
Joe Z ·
Looks like Nikon is using three screws to hold the pentaprism assembly (vs. four on most of their DSLRS). Strange way of using three screws only when critical alignment is necessary to center the viewfinder relative to the imaging sensor (three pressure points vs. four).
Eric ·
Under “The mirror box assembly” the article states:
“The AF sensor is very precisely aligned to the mirror box so once we touch it nothing short of a service center realignment would let this camera focus properly again.”
Maybe the need for the focus microadjustment of the D7000 can be found here? As far as I know, nearly every D7000 comes out of the factory with that need. Perhaps time and money were saved and only a quick & rough adjustment of the focus was done at the factory. We benefit by getting a very good camera body for a good price. But we have to take care of the final focus adjustment by ourselves. Could it be like this? What do you think, Roger?
Scott ·
I thought the D7000 had a mostly magnesium allow frame. I don’t see any sign of it in the photos above. I am assuming each plate you removed had an allow backing?
Excellent article. Thank you for posting!
Scott ·
Okay, I did some more reading. The magnesium allow frame consists of the plates you removed to each piece. Very interesting reading. Thank you again for posting. 🙂
Craig ·
Question for Roger: How much would the sensor replacement have cost you? I’m in the dark on the prices for sensors, and I’ve always wondered how much they cost. For instance – did the D3x really have a sensor that cost $5000 more than the D3’s?
I’m also curious about your statement that the Nikons cost more to keep in service than the Canons.
Craig
Roger Cicala ·
HI Craig,
The sensor replacement was going to be about $500 or a bit less. Being a business, rather than a person, we have to look at it as investing that much in a camera that we’d be selling in 2-3 months for $750 or so, and that we could get about $500 worth of parts out of.
Nikons don’t break more frequently than Canons, but repairs take longer (3 weeks average compared to 10 days, which means increased lost revenue) and the repair itself costs about 20% more. So our cost to keep in service is higher.
Tom L ·
My camera strap attaches to the 7000 tripod plate.
Is the tripod plate held on securely?
Roger Cicala ·
ABsolutely held on securely. I wouldn’t worry about the tripod plate at all.
Tom ·
I once dropped a Nikon D200 and badly cracked the built in flash housing which in the process disconnected one of the connecting wires. In opening up the camera to do what I thought would be a simple re-attaching of said wire, I shocked myself. After I recovered from the surprise I promptly closed up the camera and glued the cracked pieces of the flash in place, sealing the thing up and vowing never to touch it again. I can tell you with 100% certainty you definitely don’t want to mess with that. Camera works great still. No flash though…
Fraucha ·
Great article! Nicely done!
A little concerned that there is no room for the film.
It really didn’t look all that well in the weather sealing department, but you would know better as you got a much better perspective on that.
shadowfoto ·
Roger, is that a bulb or just a warm LED that used to be AF Assist light?
Markus ·
Hi, how difficult would it be to remove the AA filter from the D7000 sensor? Is it doable?
Thanks
M
Roger Cicala ·
Markus,
Doable if you really know your way around the camera, but you have to replace the AA filter with a clear optical glass filter to maintain focus, and you may have to adjust the sensor afterwards.
Anon ·
Is the flash capacitor that blue thing right next to the flash itself?
If you write a technicle article like this you should expect that the public that is going to read it is going to be very technical as well. In my case I demand to know where the capacitor is for my own good mental health. I swear if I hadn’t found it I would have had to take mine apart too, and I would have blamed you if I received a shock for subliminally inciting people’s curiosity into shocking themselves.
Just kidding =)
G.Yang ·
The blue thing is too small to be a flash capacitor. I believe it’ the black cylinder under the left hand shoulder, shown in the picture of ” the battery box / chassis”( at the rigt side of the picture). The blue thing should be the electric switch(what’s the right word?) for automatically popping up the flash. Just my guess.
Daryl ·
I wonder why this camera was chosen to be stripped? Was it end of life and wearing out?
Was the camera reassembled and reused?
Is this an extension of a maintenance/repair of the camera or was the camera thrown away in pieces?
Isaac ·
The camera was taken apart because of the little divot on the sensor.
The QR codes inside are for assembly line ID. DENSO invented the QR code for their auto parts assembly lines, it let’s factories track all the parts as they are coming together.
Ed ·
I did it. New D7000 refurb from Hunts direct sun exposed in Live View for no more than 2 seconds, but enough to create damage to the sensor. My first solar eclipse gone really bad–oh well. So, I have a newer D7000 with than 500 clicks–should I sell it for parts or send it to Nikon ($500??) I do have a wedding coming up June 5th and it was to be my second camera. Sorry to ramble, but my emotions are running high.
Roger Cicala ·
Ed, that’s a close call money-wise. Repairing vs selling and buying new is probably leaning a bit towards getting a new camera. But you know you have a good camera in-hand once it’s repaired so I might lean that way rather than buying another refurb.
Ed ·
Thanks Roger, I’m leaning towards selling as it would allow me to make sure I meet my wedding date. Do you think there’s any hope of Nikon covering this? There could be a new run on sensor parts with the eclipse. I’ll post what the outcome is.
Steve ·
Can you tell from your teardown whether the spacing/alignment between he lensmount and the sensor mounting flange is enforced through complete metal to metal contact, or do plastic parts intervene between the lensmount and the sensor?
J R Compton ·
I scrutinized all the D7000 dissasembly pix. My d7k jumped off a desk with a 300 2.8 a week ago. When they separated, the bayonet mount detached from the camera, and a local technician delicately removed it from the lens, which works and does not rattle. I wanted to see how the mount was attached to the camera, but you didn’t take it off. Fun look anyway. I was curious. Not sure how I came upon this site, but I’ll be back.
Brian ·
Do you sell those parts? I want to buy the Focusing Screen Assembly…. 🙂
Kirk ·
Hi Roger,
Thanks for posting this disassembly. Knowing about the screw behind the grip was a big help.
I am replacing the top cover assembly and the last thing I need to remove is the diopter adjustment knob and I’m home free. Is this just a friction fit which can be popped off or is there a screw holding it on?
Thanks much.
Koertis ·
Hi Roger,
i made a big mistake today. In a hurry i switcht my D7000 with a wrong polarity on(+9V and GND). So for now my battery works, but when i attack my EP-5B the low Battery symbol lights and it doesn’t work…
I am electro engineer, can i fix it to my own or should i rather buy the service to fix this?
Thanks, Koertis
Koertis ·
Hi today i made a big mistake in a hurry. I connectet my EP-5B with wrong polarity (+9V), so for now it is not working any more, the symbol with low Battery lights up when i connect it. But when i inserd the Battery it still works as usuall.
Should i open my D7000 and make it to my own (I am studying electro engineer) or should i rather buy the service for that? Have you some advices for me?
Thank you, Koertis
Mike ·
Hi,
I have a broken Nikon D7000 for sale for spares – after being dropped a foot the board with the Fn buttons no longer works and its locked at 200s without the ability to change any settings (although it still takes pictures) and it was going to cost over £400 to repair. So my insurance has covered it for a new camera. Do you know where I can sell this either in the UK or US? Happy to post for the right price.
Also, do you have any idea what value it would be given the issues?
Thanks
Mike
Roger Cicala ·
Mike, there’s a strong trade on eBay for broken cameras sold for parts. I’d definitely look there and you should be able to get a very good idea what it’s worth from other listings. That would be an awesome parts camera and I think you’d get 60-70% of what a good used one sells for.
Roger
Scott Eriugenus ·
I was taking the lens off my D7000 and what appeared to be a wide v-shaped spring fell out of the mirror box. It has two small black plastic tabs at the ends. It seems like it was designed to fit into the mirror box opening, but if I place it where it seems to go, then I can’t mount the lens. Have you run across anything like this in your disassembly? This has me puzzled. BTW, prior to this discovery, I was having problems with the shutter release.
Roger Cicala ·
Scott there are a couple of springs like that inside, one part of the mirror assembly, another with the shutter. Not something that I’d try to replace, myself.
Roger
Mark ·
Thank you for a perfect disassembly review!
David ·
Hi Roger. I have to replace the LCD status screen on my D7000. Am I able to disassemble the top part, alone, to do this? Or do I have to pull the lower body down, as well?
Cheers
David