OK, I’ve done a couple of posts about critical focus for testing, and setting up an optical testing station. This post will provide some demonstrations about actually using it.
I’m going to use lenses that we optically adjusted back into proper alignment as examples. I’m doing this because it’s a great opportunity to show you the difference between an optically misaligned and a properly aligned lens.
I’m not giving a tutorial on optically adjusting your lenses. Optical adjustment is very different for every lens, very time consuming and requires at least partial lens disassembly. Most people who try optical adjustment at home convert a below average lens into a totally useless lens.
For a couple of the examples, I’ll show some Imatest MTF charts of the lenses so you can see some correlation with how our home test looks compared to the MTF numbers of the lens.
One last point. I’m using mostly Canon lenses for these demonstrations. The main reason is very simple; we stock more Canon lenses than all other lenses combined. So we see more Canon lenses with optical problems, and we’re more practiced at fixing those. I can show you decentered pictures of some other lenses, but not ‘after’ pictures of them all better. Because we can’t make them better.
Finally, if you haven’t read the last article, there’s not too much reason to read this. You probably won’t understand what you’re seeing.
High Quality Zoom: Canon 70-200 f/2.8 IS II
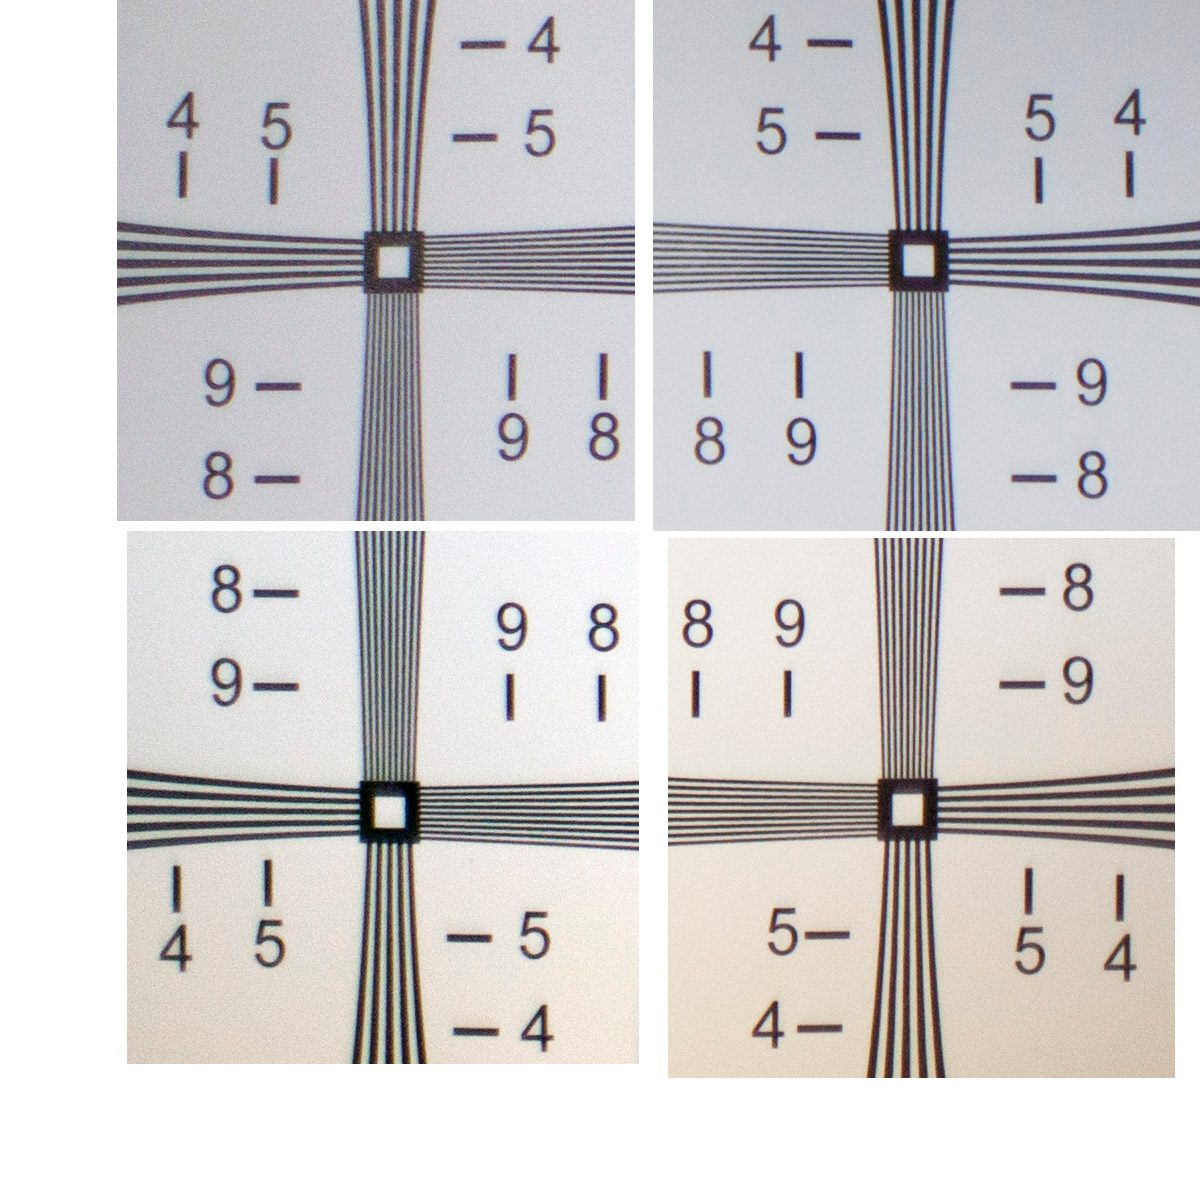
This lens was caught on routine screening after a rental. The tech who tested it wide open saw that the four corners looked like this and sent it straight back to the repair department. You don’t need a good working knowledge of how sharp the corners should be to tell something is wrong.
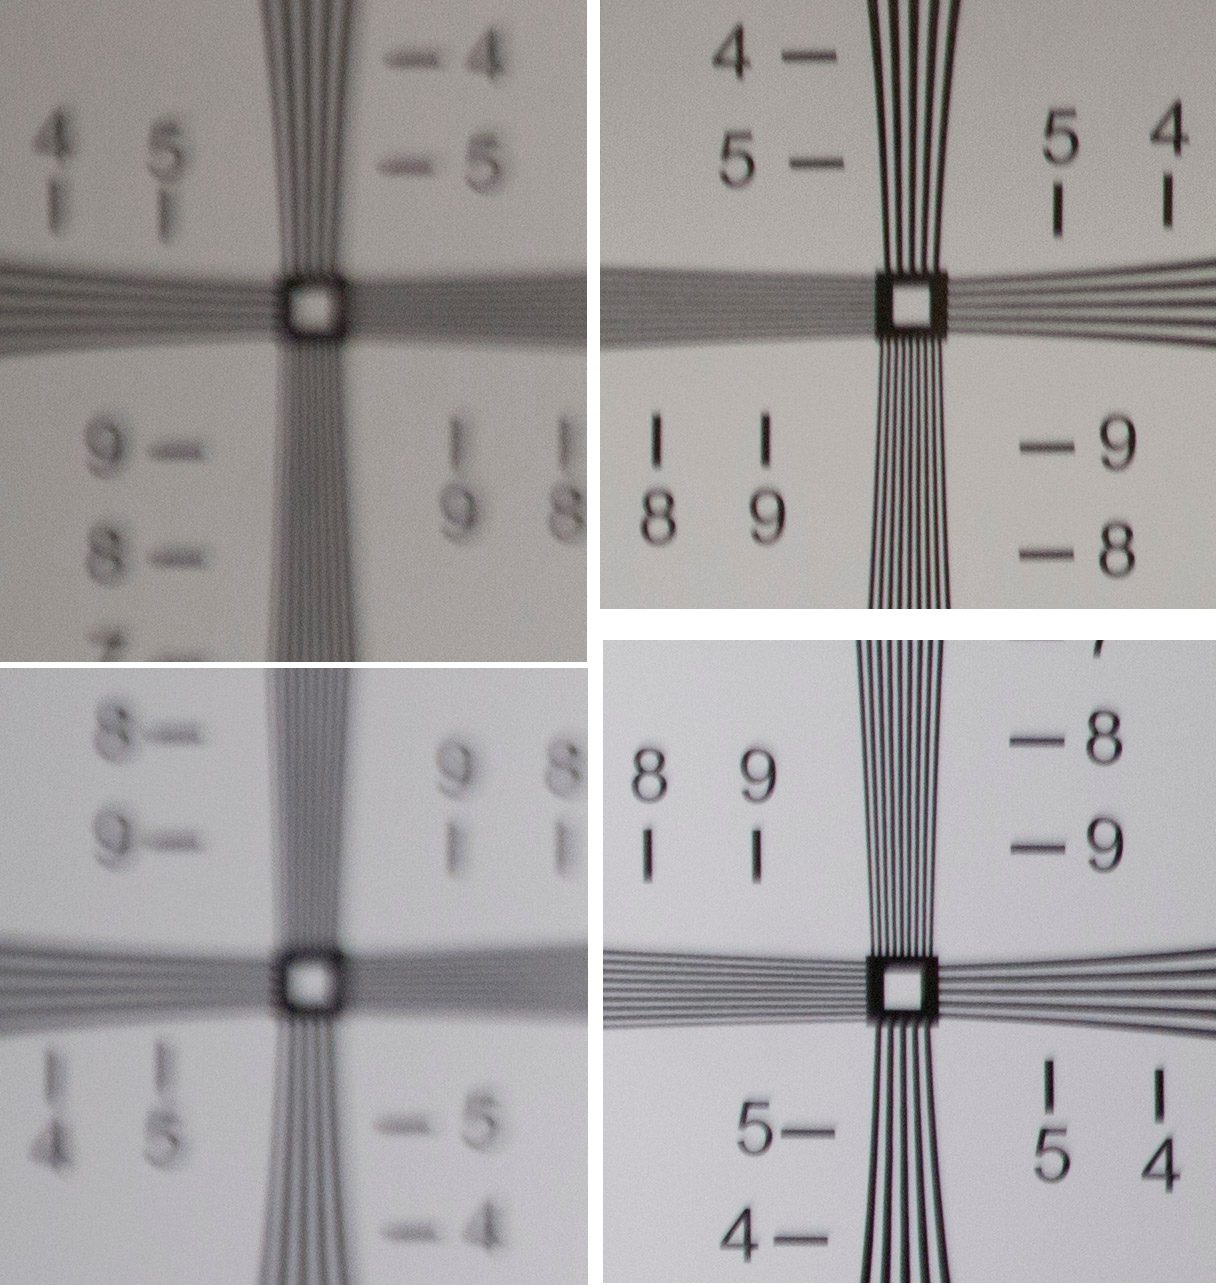
First, let me make a point about why we only test with the lens at widest aperture. The image above was at f/2.8. I stopped down to f/5.6 and repeated the test to make the point that even bad lenses look reasonably good with the aperture closed down 2 stops.
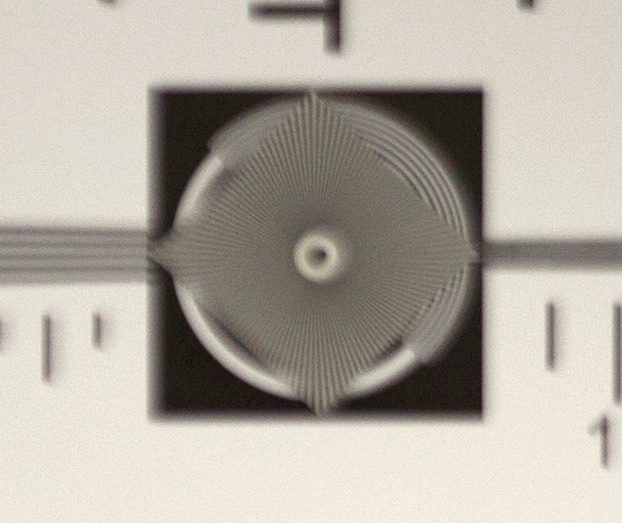
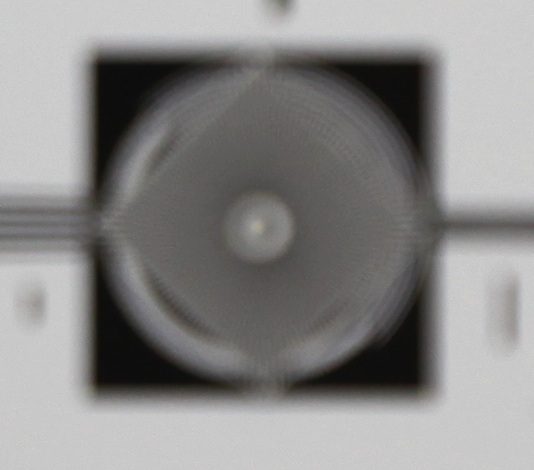
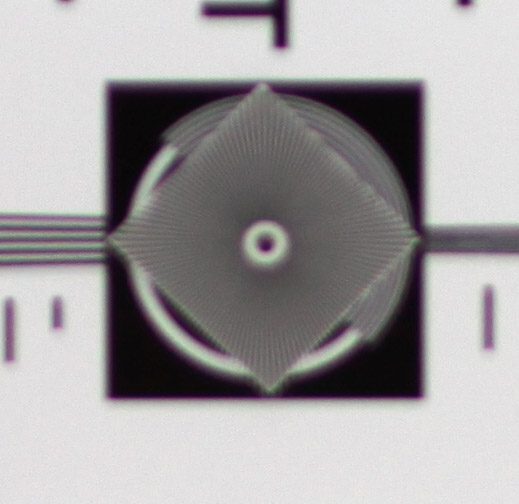
The center looked fine and reasonably sharp when in focus, but just out of focus it exhibited a flare or halo pointing up toward 2 o’clock. (If you don’t make it out at first, look at the center black circle and see how the white ring has smeared over most of it, leaving a little black dot at 2 o’clock.)
We examined the lens and immediately discovered one of the concentric adjustment collars under the focus ring was very loose.
In fact, when we removed it for a closer look, we found it was broken in two pieces.
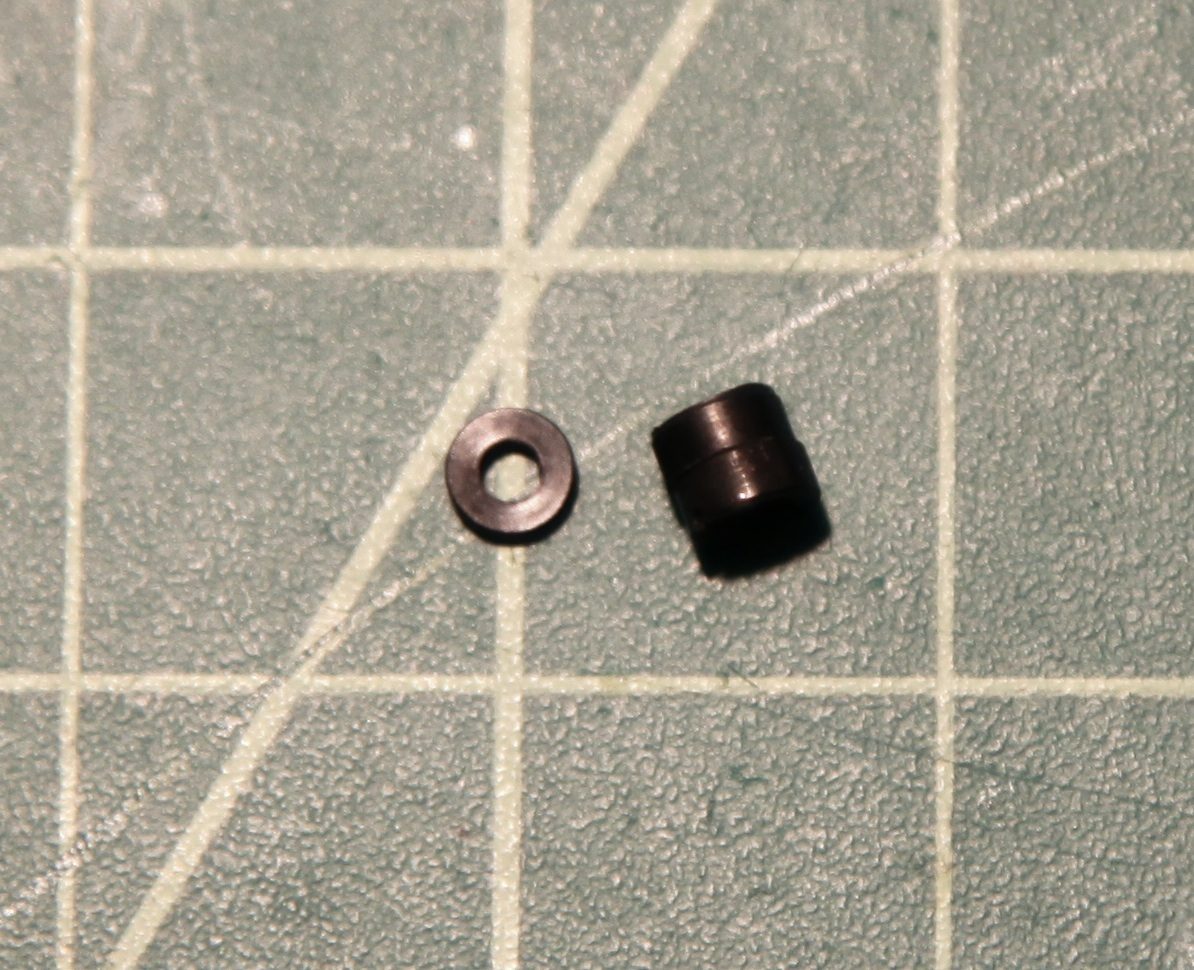
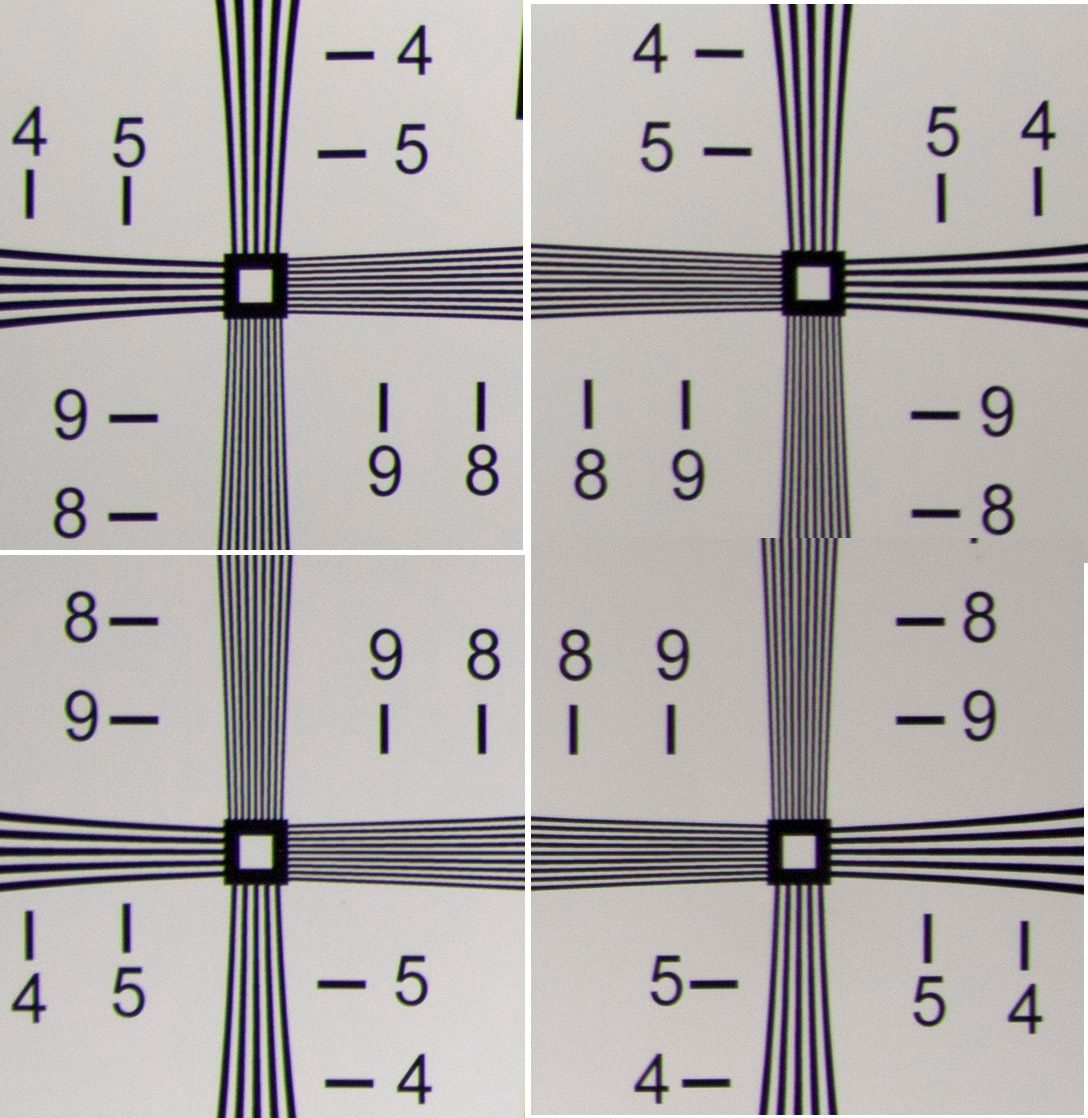
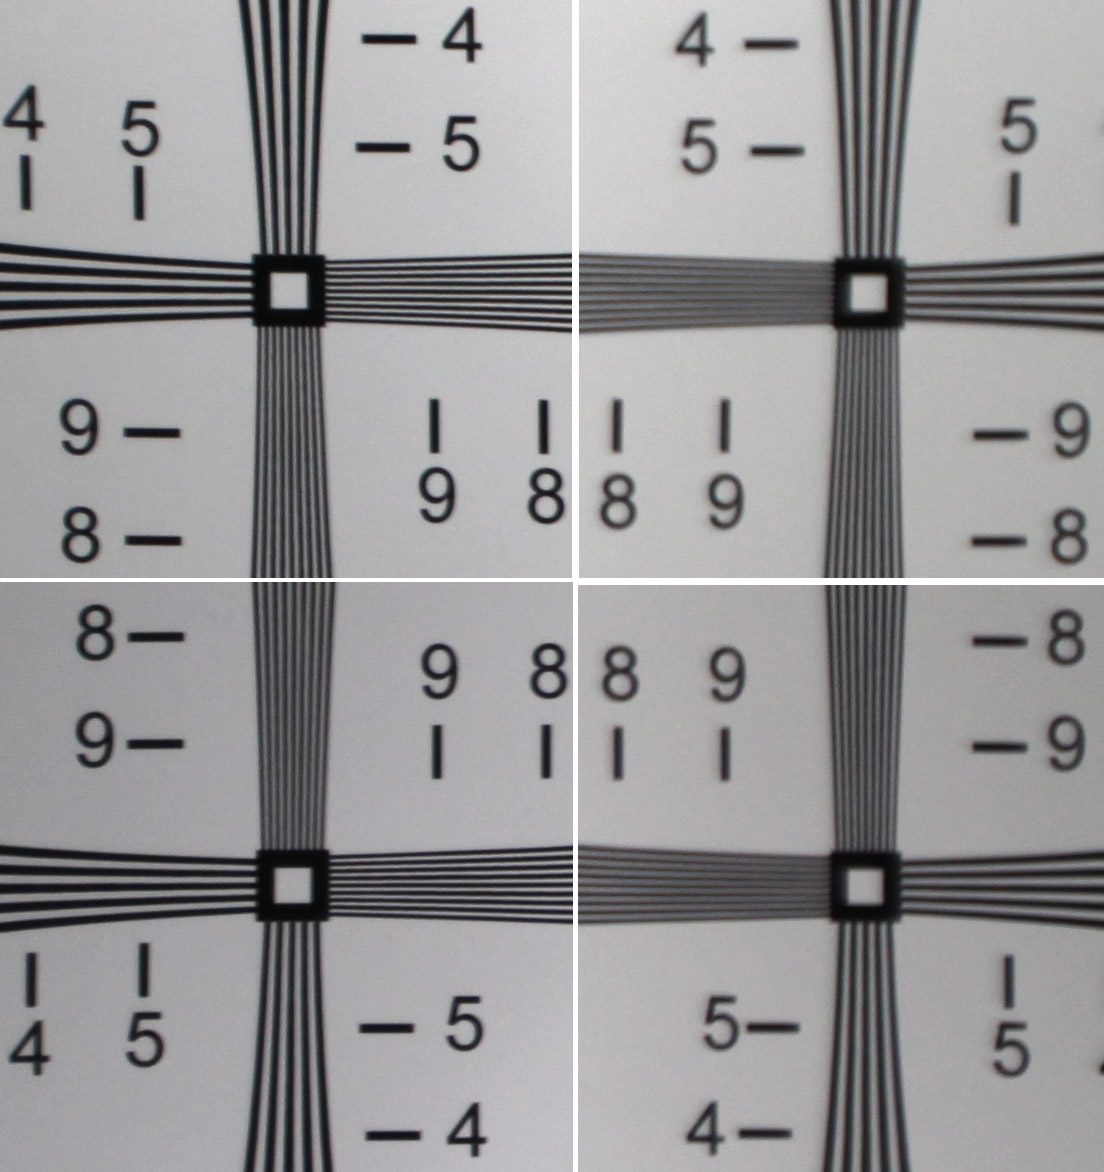
We replaced the adjustment collar and repeated our test. The corners wide open now look like this and there was no center flare.
It’s not quite perfect. You can see the left upper corner is still a bit softer than the others, especially the vertical lines. With this particular lens we do expect near perfection in all 4 corners, but for most zoom lenses, getting the 4 corners like this is the best you can get. If you took pictures with this lens right now I think you’d find it just fine, but we’ll see if we can’t get it a little sharper in the corners.
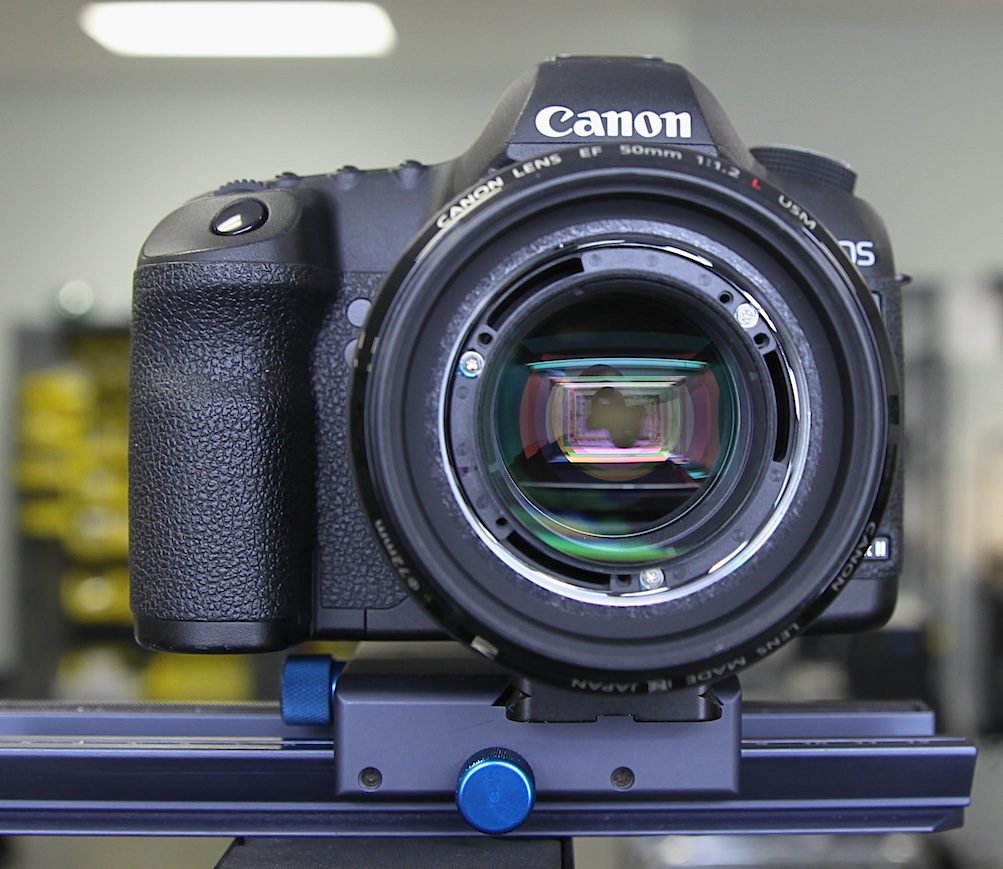
Wide Aperture Prime: Canon 50mm f/1.2
This particular copy came back from rental and the customer told us he’d dropped it but it seemed OK and he had continued to use it for the rest of the rental period. It did seem OK when we first examined it and in all the images the center was fine. For those of you who have never shot this lens, trying to assess anything other than the center at f/1.2 is challenging — you never know whether the field curvature, the very narrow depth of field, or an actual problem with the lens is causing off-center softness.
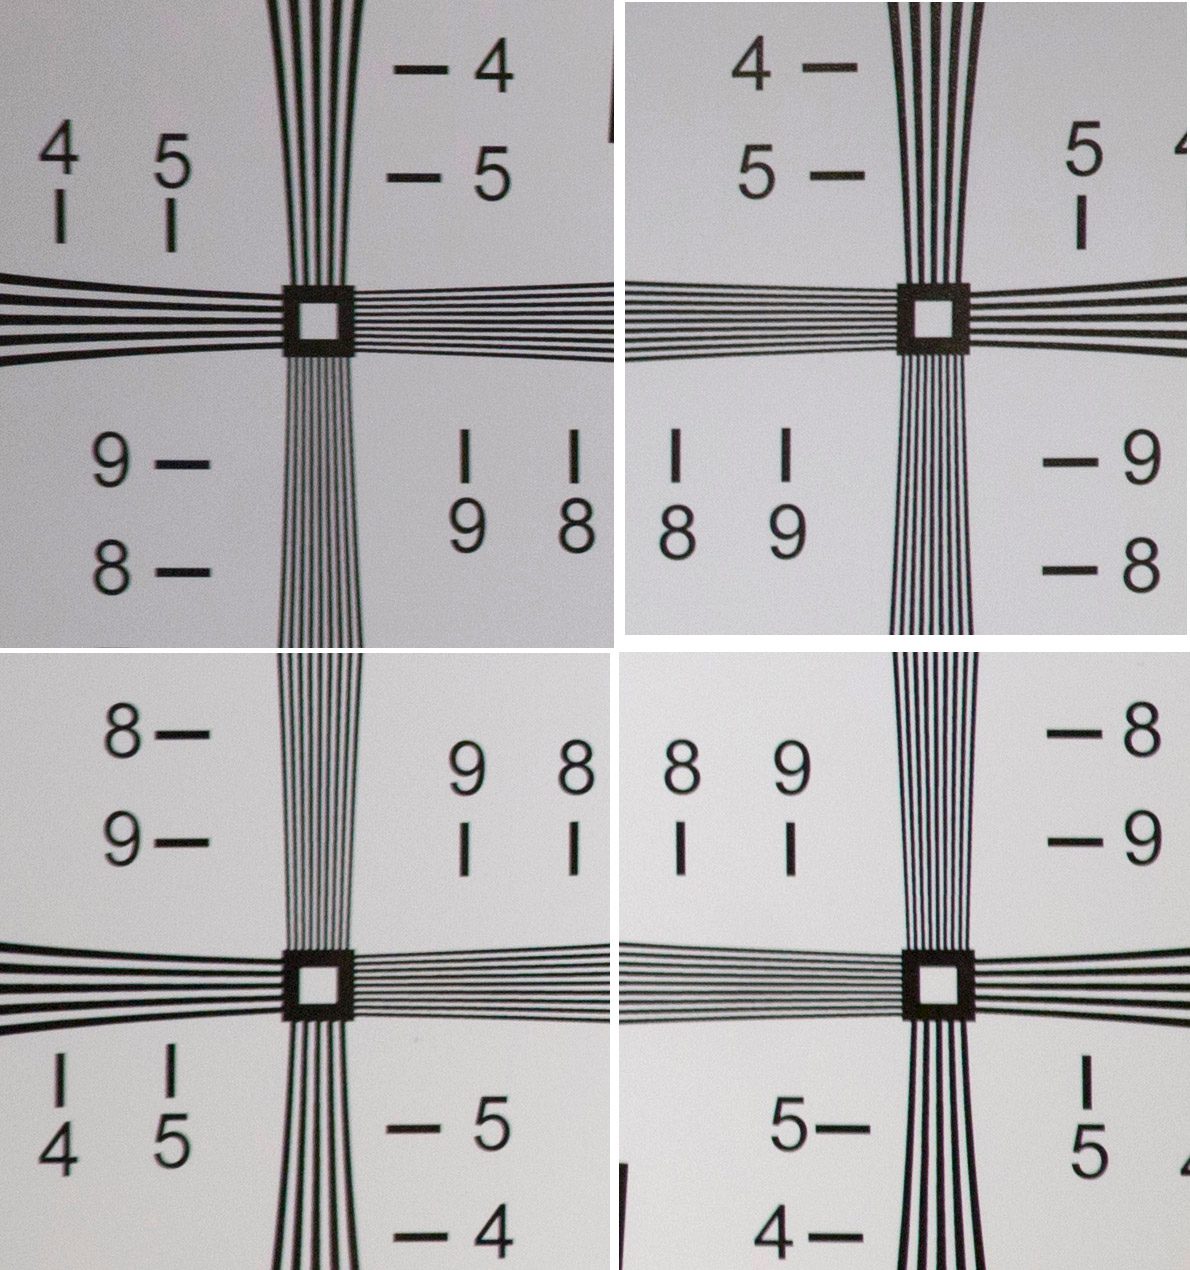
When we tested it, however, the corners looked like this (focus was on a corner for this view, not the center). The upper two corners, especially the left upper, aren’t quite right. This is a great example of why careful alignment is so important. If someone took this shot hand-held, I would just assume they weren’t quite lined up with the chart properly. We also watched on the video monitor while we manually focused from near, to in-focus, to far. The top never sharpened up.
One of the nice things about the 50mm f/1.2 is the front element is a centering element; just pop off the front ring, loosen three screws and you can slide the front element around to recenter it. In this case, we recentered while watching the image in live view on the monitor. That got us pretty close, then we made a few final tweaks with photos of each.
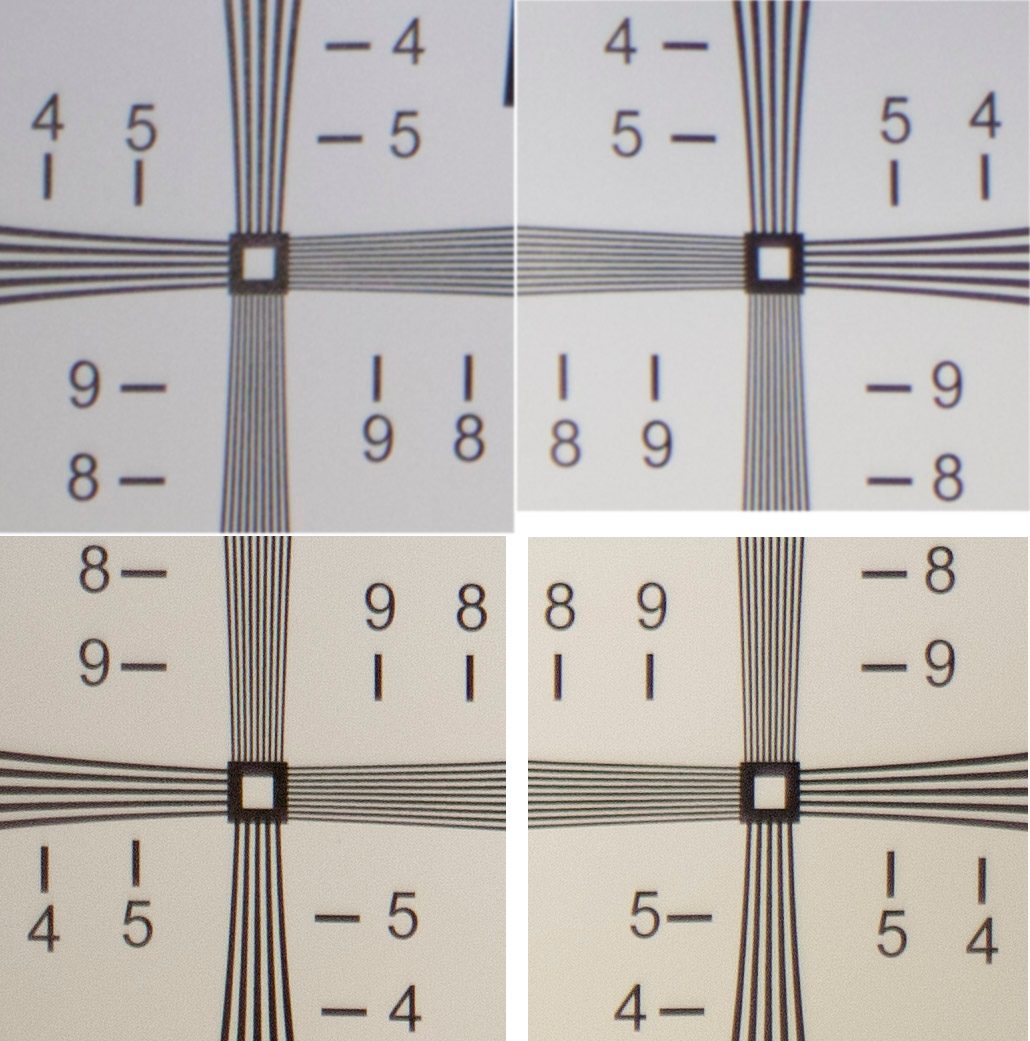
Let me emphasize, though, that an optically bad lens doesn’t necessarily mean a simple optical adjustment is all that is needed. Decentering occurs with all sorts of damage to the lens. It just happened that this lens simply needed an optical adjustment. We ended up moving the front element about 0.5mm upwards and a smidge to the left, after which the test chart looked like this.
Two things to note with this lens. First, I didn’t show centers because the 50mm f/1.2 is one of the rare lenses that always has just a bit of flare in the center. Not a large flare like 70-200mm lens above had, but always just a bit. So center flare is only helpful when the lens is way off.
Another point is you can notice the left upper corner is still just a bit softer, particularly in the verticals, than the other corners. This is the best adjustment we could obtain (more movement could sharpen up the these verticals, but only at the expense of another area). With really wide aperture prime lenses, and many zooms, this is not unusual. If we test a bunch of brand new copies, most will have this degree of difference in one corner or another. Could you notice it in a photograph? I seriously doubt it, even knowing it’s there.
Finally, you might notice the color difference in the top and bottom images. These were taken with only our ambient, industrial frequency fluorescent lights. The color difference is from the fluorescent lights, not the lens.
Wide Angle Zoom: 16-35mm f/2.8 Mk II
Wide angle zooms, being retrofocus designs, seem to have a lot of alignment problems. They’re also very difficult to test with pictures because there’s just so much stuff in the frame of a 3-D picture and the wide angle makes lining the image up square to the sensor very critical.
The 16-35 is a lens we commonly end up doing in-house because it’s one the service center seems to struggle with. This one had two trips to the service center and came back just fine at 16mm but unacceptable to us at 35mm. The center had a large amount of flare just off focus at 35mm. As with primes, wide-angle zooms often have a bit of flare when they’re perfect, but this is way off base.
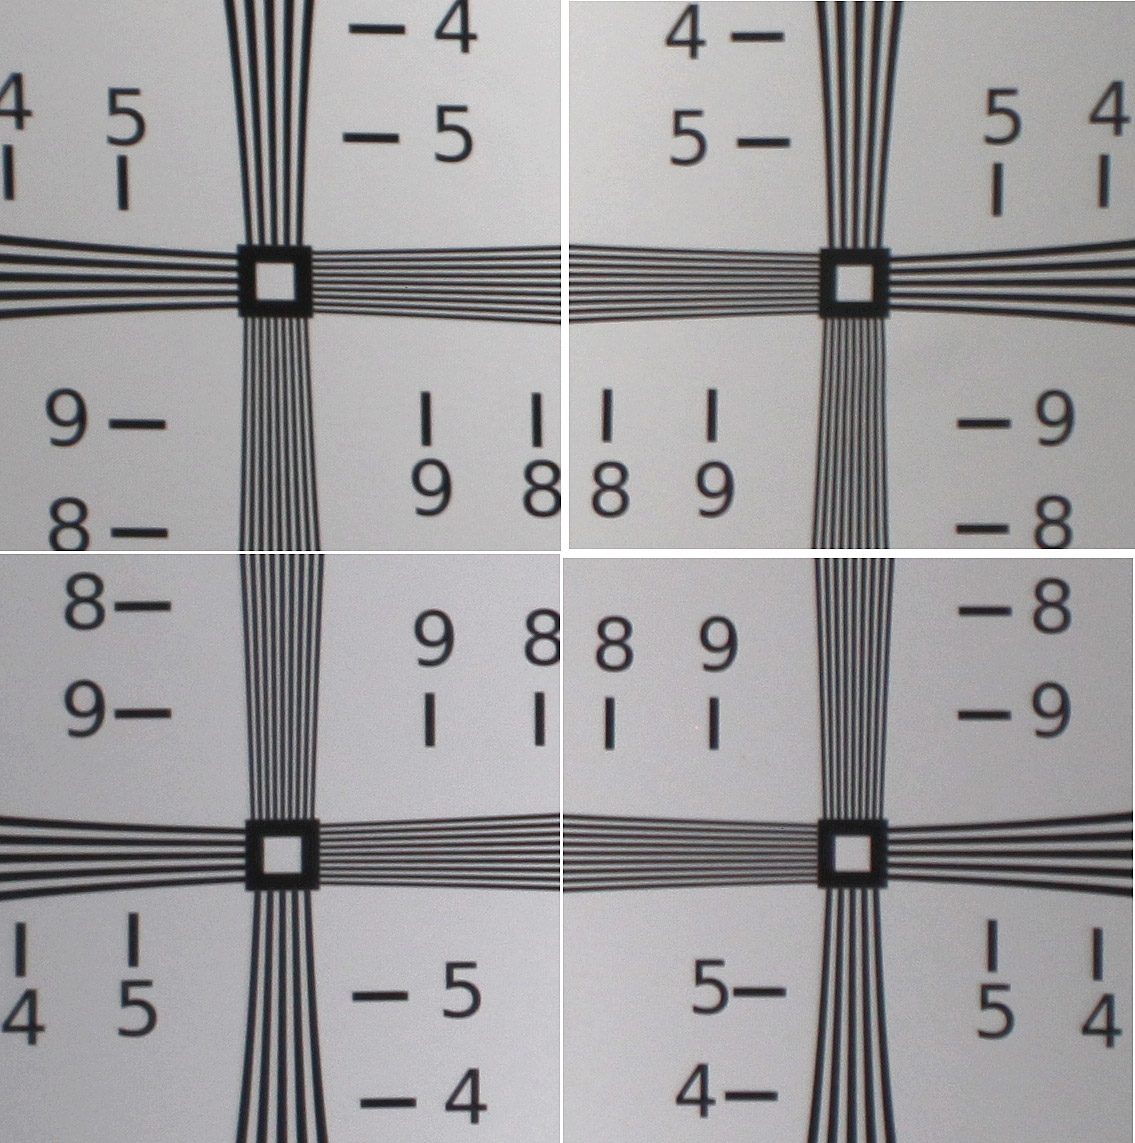
And the 4 corners looked like this at 35mm. The most obvious thing is the right side corners are softer than the left. Also the left verticals are a bit blurrier than the horizontals, while on the right side the horizontals are a bit worse than the verticals.
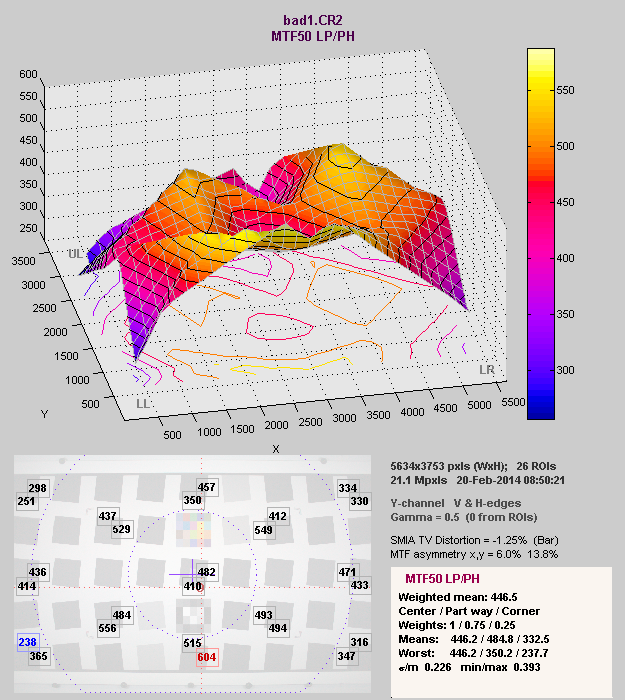
Still, this doesn’t look as awful as the 70-200 f/2.8 we showed first, so I ran the lens run Imatest. Imatest makes the issue more obvious, but the simple test we did above certainly was enough to show the lens was out of optical alignment.

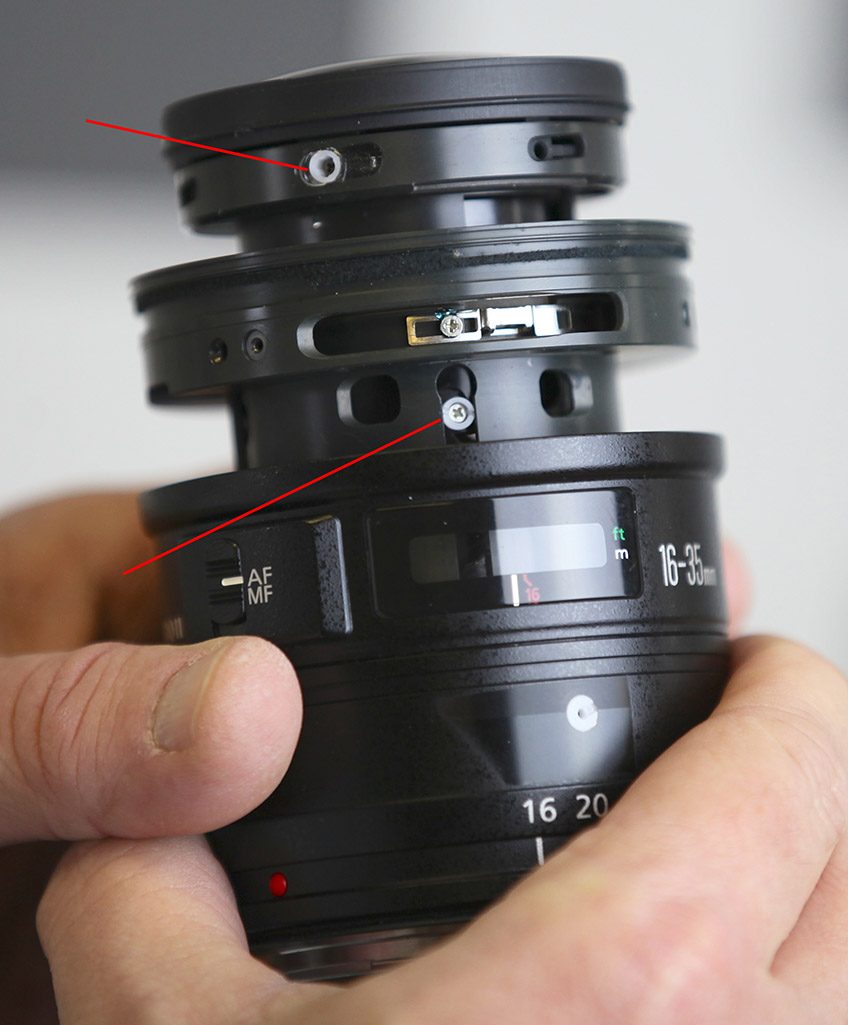
I’ll also use this lens as an example of why you don’t want to do optical adjustments at home. In order to reach the compensating elements for this lens you have to disassemble it, then partially reassemble it so you can remount it, but with pieces of the barrel and the main PCB left off.
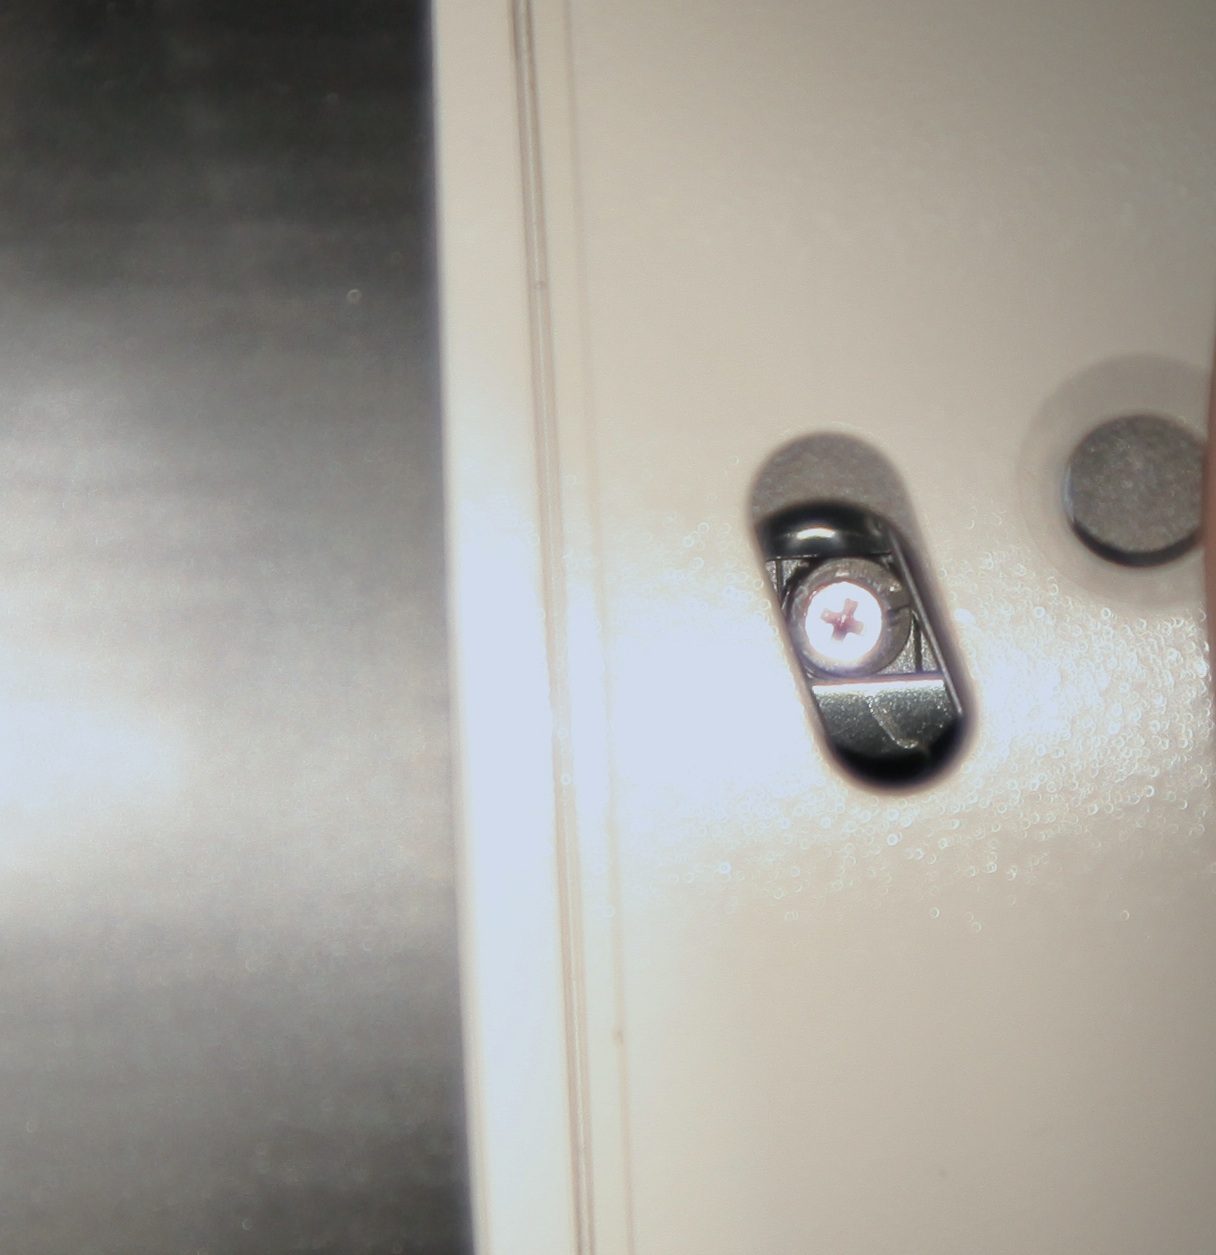
You leave the PCB off so you can reach the rear centering group. (The three screws hold down a plate. Loosening the plate lets you slide the rear element around to center.)
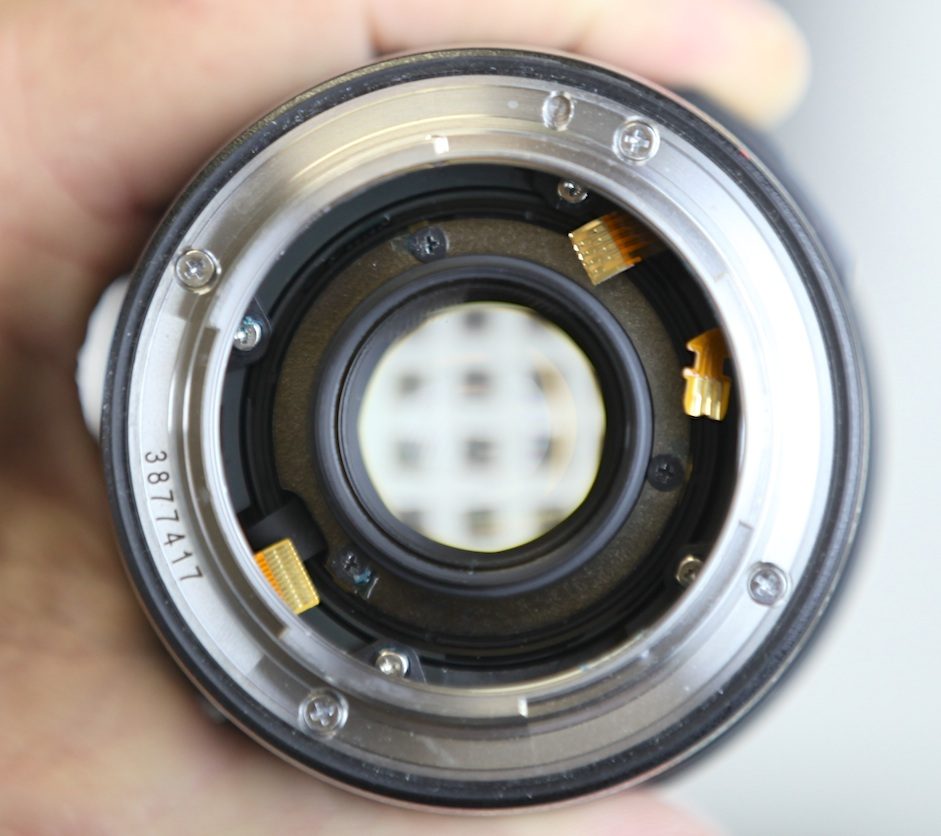
You leave the front barrel and focusing ring off so you can reach the adjustment collars for the three groups of compensating elements inside the lens (two are shown, the third only shows at certain zoom ranges). For those of you with enquiring minds, you focus by using a small screwdriver to move the zoom key, the piece of metal in the slot between the two adjustment elements.
I won’t bore you to tears with a blow-by-blow account of adjusting the lens at 35mm, which then threw off the optics at the wide end. Then adjusting the wide end and going back to readjust at 35mm because the wide end adjustments affected 35mm, finally making a minor compromise at the wide end to get things right in the middle of the zoom range, etc.
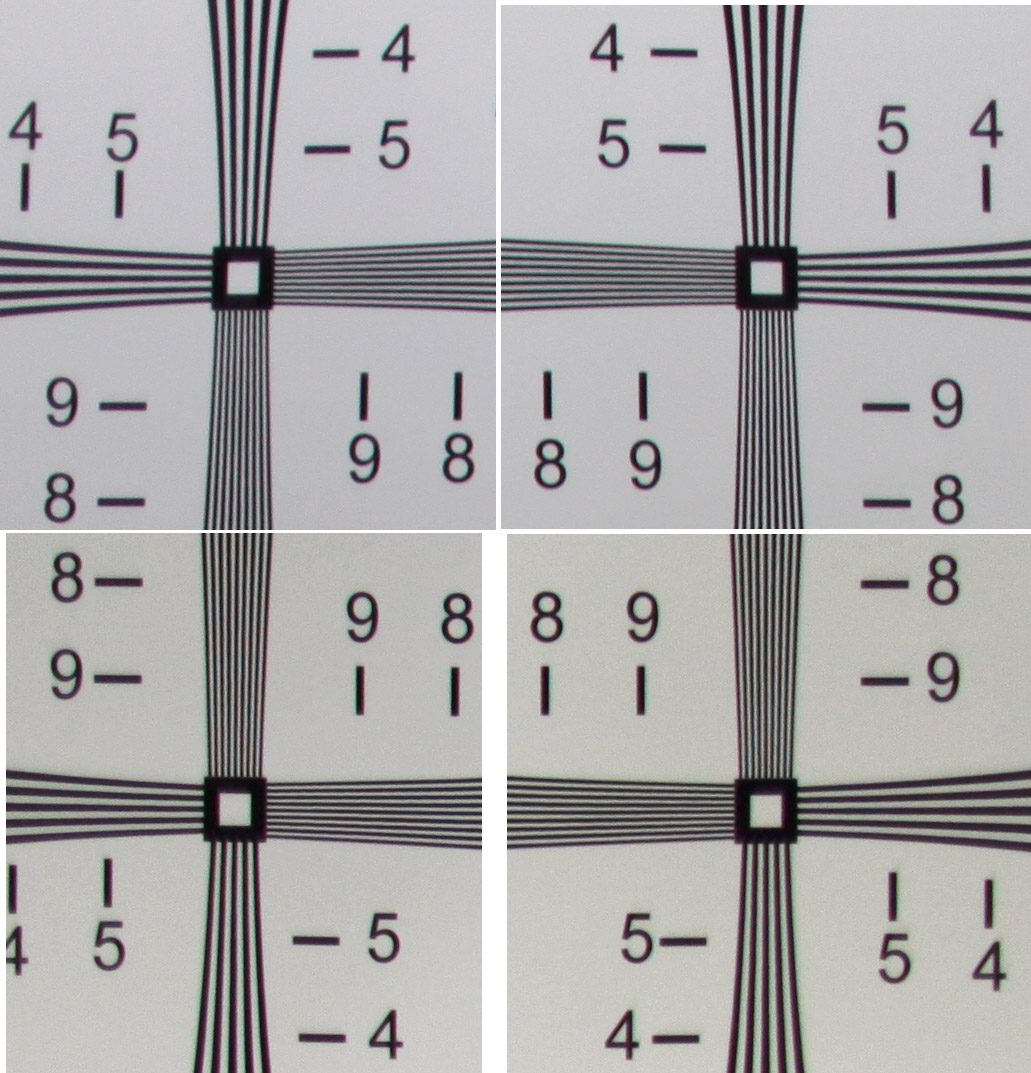
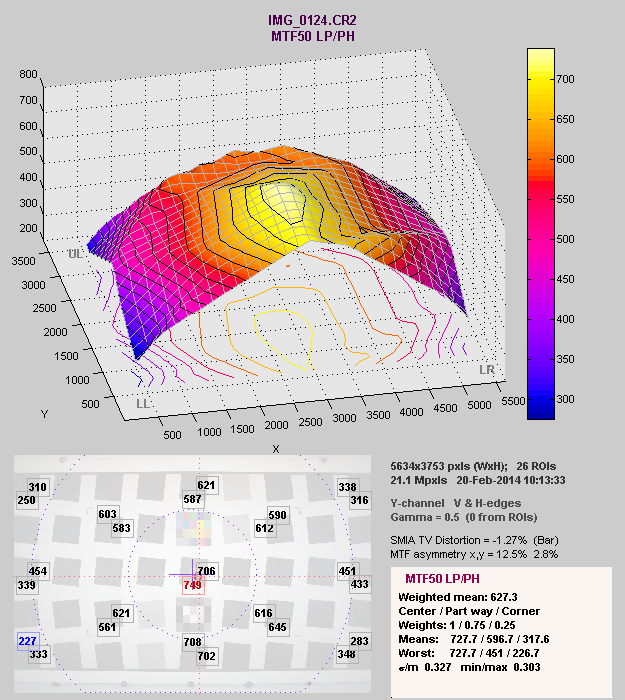
My point is simply that we did most of that adjusting using this chart and testing screen, with a very occasional Imatest image for confirmation of what we were doing. At the end of all that adjusting (about 3 hours total), this is what the corners looked like at 35mm (and throughout the rest of the zoom range, but those were fine when we started).
And here is the Imatest graph repeated after the final adjustment.
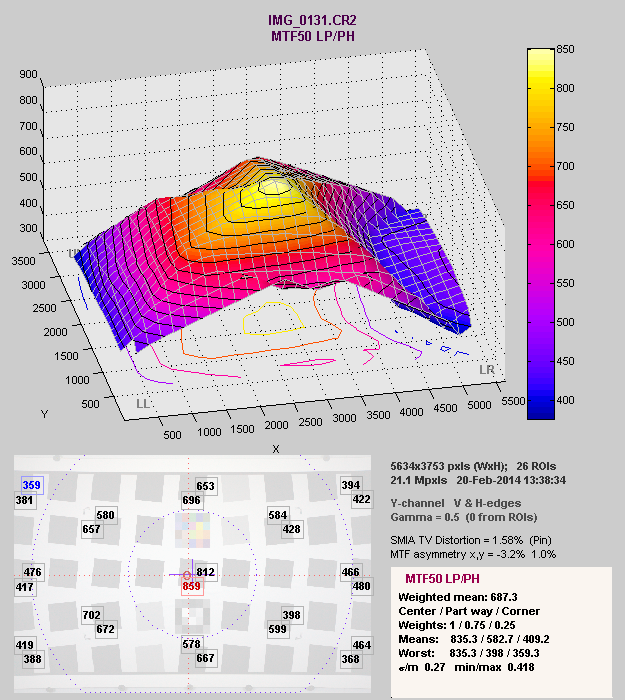
As before, Imatest certainly clarifies things and gives us a nice set of numbers that our database tells us is what we expect from a good copy of this lens, but the simple chart test clearly shows the difference between a good and bad copy.
This Home Test Isn’t Perfect
I mentioned earlier that this test is very accurate in detecting bad lenses: when a lens looks bad on this test, it almost always has an optical problem. Very occasionally a lens looks OK on this test but does have a minor problem. It’s rare, and the lenses are not awful, but it can happen.
I thought I’d show you an example of the kind of lens it might miss. This is a Canon 35mm f/1.4. In retrospect we probably should have caught it, but it’s pretty subtle and I’m not surprised we missed it.
The four corners look acceptable, fairly evenly matched and all resolving well. The horizontal bars on the upper corners are a bit softer than the verticals, but I would consider them acceptable on a wide aperture prime.
However, there is a fair amount of flare in the center when the lens is just off focus. We probably should have caught this, but it’s certainly not as bad as the examples above, and you do sometimes see a bit of flare on an optically good lens. I have the advantage of looking at this retrospectively, I certainly wouldn’t give a tech a hard time for missing this one.
The strongest hint the lens wasn’t OK was that the best focus on the center of the lens wasn’t very sharp. I constantly say the center of the lens is the least sensitive indicator of an optical problem, but here is the exception to the rule. (We see 50-60 decentered lenses a month, and most months we don’t see any lenses like this.)
Imatest shows the problem, but mostly because I know what MTF50 numbers are acceptable for this lens. The center should resolve better than this, and well, the highest resolution should be in the center, not at the bottom of the image. Even with Imatest my first thought was we’d had a technical problem or missed focus despite focus bracketing. But repeated attempts gave the same result.
Here are the Imatest results of this lens post adjustment.
I thought adding this last one was worthwhile, particularly because it should give you an idea of what a lens looks like right on the borderline of acceptable. This one did need some adjustment, but most lenses that look about like this one on our optical charts are perfectly fine.
Conclusion
Hopefully, for those of you interested in this kind of thing, these examples will give you a good starting place to do a little optical testing yourself. I strongly encourage you to set this up with some friends or a camera club. Looking at a few copies of a given lens this way will really help you see what is normal and what isn’t.
If any of you are interested and will be at WPPI next week, we’ll have a similar set up in our booth and would be happy to look at your lens with you.
Roger Cicala and Aaron Closz
Lensrentals.com
February, 2014
Addendum:
If you read this post and thought, “Yeah, I know that,” Midwest Camera Repair is looking for an experienced Lens and D-SLR tech, mainly to service Nikon Lenses; knowledge of Canon lens would be helpful but not required. Someone who has experience servicing high-end lens would be best. Most of our repairs are middle to high-end equipment to Professional customers. We will train on use of Nikon & Canon test and adjustment equipment. Our Nikon lens volume has more then doubled in the last year. Knowledge of D-SLR repair would also be helpful.
Midwest is a Nikon Authorized Service Center and one of only four authorized, trained and equipped to service the VR-Series lens. They are also authorized on Canon IS-Series lenses.
Send confidential resume to repairs@midwestcamera.com
Again, this is a posting for Midwest Camera Repair, because they’re good guys and do a good job. It’s NOT a lensrentals job posting.

21 Comments
alek ·
As always, a great writeup – thanks Roger (and Aaron).
BTW, an idea for a future article. Compare the numbers between the Canon “Series II” lens and the original. I.e. you have the 70-200/2.8V2 above … how would those images (and Imatest numbers) compare to the original. Am basically asking how much better are the Series II lens? And would older technology bodies be able to resolve that difference?
alek
P.S. I also appreciate the humor you include in just about every post – loved this comment – “Most people who try optical adjustment at home convert a below average lens into a totally useless lens.”
Roger Cicala ·
Alek,
Unfortunately we don’t have the V1 anymore. I did some testing when the VII first came out and it was clearly better, but back in those days we were still developing our Imatest techniques and I didn’t trust results at 200mm.
Pete Myers ·
Hi Roger and Aaron:
It is quite scary to think that you see 50-60 decentered lenses per month! What is a consumer suppose to do to make sure their new lens is not ailing right out of the box? I certainly see the potential for a service here from LensRentals.
Zeiss seems to be very concerned about quality assurance out of the factory—does that verify with your testing when a new lens arrives?
Pete
Roger Cicala ·
Pete, remember that’s not 50-60 new lenses a month decentered, that’s from our rental stock and they’ve been shipped, dropped, and heavily used. Also remember we’re checking hundreds of lenses a day from that stock to find 50-60 a month that are decentered.
New lenses have problems at a rate of 2% or so and not all of those are decentered.
Pete Myers ·
That truly is an amazing volume of testing per day, and from that it makes sense that you would see a pile per month. I marvel at how much your business depends on being able to make cost effective repairs, get it fixed and out the door again.
50 to 1 odds on getting a good lens out of the box is pretty good. I will relax! 🙂
Thanks for letting us into your world—it is fascinating.
Pete
Richard S ·
Reading this fills me with feelings of hopelessness and despair because if one doesn’t obtain a good copy of a lens from the git-go, it sounds like the manufacturers don’t have the equipment or inclination to make it work right. For instance, my copy of the Nikon 24-70 has never been as magically sharp as the one I rented from you guys, and that’s after two trips to El Segundo. I would be happy to send my lenses to Japan if I thought it would make a difference.
We live in the greatest country in the world; there has to be at least one repair company that cares as much about image quality as Roger? Doesn’t there? Or should I just forget photography and take up stamp collecting.
Someone ·
“…there has to be at least one repair company that cares as much about image quality as Roger?”
Well said.
Ron ·
I found the 16-35 section very interesting as this is the Canon lens with which I’ve had the most trouble, resulting in several trips to Canon (Canada), yet never quite ‘resolving’ to my satisfaction due to quite poor edge/corner performance at the wider end. How do I know it should be better? The loaner copies I had from Canon during those repairs were all noticeably sharper. If you guys were to offer lens servicing, I’d seriously consider sending it.
The experience wasn’t all bad – it gave me an incentive to explore other options and systems, and an excuse to spend even more money on gear… Never seems to end!
Jon H ·
Using a bad lens (eg. the 16-35II in your example) as an example it would be interesting to see identically-framed before-and-after “real world” shots to see the effect on resultant image quality.
I am thinking of buying a 16-35 II when i get my 5d mark III and testing one before buying is gong to be a challenge.
Christer Almqvist ·
Roger,
when you test using the ISO 12233 test chart, what is the distance test chart to sensor?
Do you have a fixed distance in meters/feet for all focal lengths, or do you shoot at a distance that is a fixed number multiplied by the focal length of the lens tested. (A note for the not technically experiencer reader: The latter method will give the same size image on the sensor irrespective of focal length, a quite useful benefit for comparison purposes.)
I have downloaded the ISO 12233 test chart from the source mentioned in the previous post and have it printed 50×75 cm (approx 20 by 30 inches). For meaningful test I need four of those charts glued to the wall; then the 4x test chart approximates the size of the chart one can see in the photographs of your workshop in a previous posting.
It seems to me that a test target of 6×9 ft is quite good, that makes for a reasonable shooting distance; not too close and not too far.
—
Many thanks for letting us share your insights; your web site is source of true knowledge.
Christer
Roger Cicala ·
Christer,
Since we only have charts in a few sizes (40, 60, 78 inches diameter) shooting distance varies with focal length. I recommend upsizing the printed test chart and cleaning up the edges or buying a larger preprinted chart. 6 X 9 feet would be superb but I haven’t got one that large.
Roger
Richard S ·
The economics of this is interesting….The rental income that these guys make from each lens obviously pays for such meticulous ongoing maintenance. But I bet that between salaries, buying expensive testing equipment, depreciation, office space, coffee, and training it costs them $100 an hour (or more?) to work on lenses.
If someone performed this service for customers they’d have to charge at least double; that means I would have to fork over $200 an hour just to get my lenses where they ought to be. It almost makes sense to buy all new lenses.
Roger Cicala ·
Richard, couldn’t have said it better myself. One of the reasons I’m so interested in new equipment is to see if we can get this done faster and more accurately. I can’t see getting costs under $100 an hour, but if we can do a lens in an hour instead of 4, that makes a huge difference.
Paul B ·
Roger–you may have mentioned this before–you indicated in the post that you “had more Canon lens than all other combined”–is that because of –demand? quality? physical robustness? etc? You may have answered this before, and I missed it. Not wanting to begin a fanboy war, just curious–thank you! Excellent info on the tests, BTW…
Paul
Roger Cicala ·
Hi Paul,
It’s simply demand. We order as rental volume dictates. I was referring only to photo lenses, though. Video demand is quite different.
Dan Euritt ·
Thanks Roger, for another xlnt article. The resolution testing that I’ve done with Imatest has proven to be very complicated. Getting repeatable results with it is difficult, so I’m wondering if vignetting testing can reveal any defects in camera lenses.
Tom ·
Hi Roger, interesting article cause i have a “problematic 16-35-II” The are 4 options for this lens to adjust? Backside lens for centering- bur for what are the other possibilities? First is near group 3, in front of the aperture; next like shown in the middle and last one at the usual big end. My sample has a issue (tested to a plain chart, 1m difference with 5D-II, Liveview) – center sharp, all 4 edges blurred. Set the edges sharp (all 4 are equal), center blurred.
May sound normal cause it´s wide, but there´s no significant change from 2.8-7.1 and 16->35. Exactly the same test with a version I with better results all over the test.
But where will be set up such a lens for sharpness from center to the edges? Or will this only work together with a alignment of all 3 possibiliies?
Thanks from Munich an a happy xmas!
Tom
Roger Cicala ·
Hi Tom,
It’s a complex adjustment, except for those where rear centering is the only issue. The very front group Canon cements in place and suggests not adjusting it, although we’ve had to on occasion. There are two inner tilt / spacing adjustments that often are opposed – one may make things better at 35, the other at 16, and there’s often a back-and-forth to adjusting those.
l_d_allan ·
In the article, I’m unclear about the following:
> The same lens as above, but stopped down to f/5.6 rather than the f/2.8 used for the first pictures.
> The center looked fine and reasonably sharp when in focus, but just out of focus it exhibited a flare or halo pointing up toward 2 o’clock. (If you don’t make it out at first, look at the center black circle and see how the white ring has smeared over most of it, leaving a little black dot at 2 o’clock.)
Is this with a small part of a “Siemens Star” taped to part of the test chart?
Hunter45 ·
Yes. Roger described that in the previous post, February 17, 2014. They cut a 2″ circle out of the middle of the Siemens Star and paste it in the middle of the ISO 12233 chart, in place of the original strange blob.
45Hunter ·
Yes. Roger described that in the previous post, February 17, 2014. They cut a 2" circle out of the middle of the Siemens Star and paste it in the middle of the ISO 12233 chart, in place of the original strange blob.