Over the past couple years, video has become a major player in the photography world. Just a few years ago, the two markets were separated, where cameras largely either shoot video or stills, but rarely both. Since the announcement of the Canon 5d Mark II and the Nikon D90, video has become a standard feature for many of the latest DSLRs. In fact, since those announcements, video has become a standard feature on DSLRs across the board. Let this be a guide for those who are looking to use the video functions on the DSLRs, and are slowly making the transition from stills, into more video.
The first thing to note when shooting video on a DSLR, is that it’s not perfect. While video has become a standard feature in many of the most popular DSLRs on the market, the cameras are still first and foremost for stills photography. For example, high-megapixel sensors, while great for stills, tends to degrade the quality of video on DSLRs. Many would agree, that if you’re looking to shoot specifically video, there other options which will provide greater quality than what is currently attainable with most DSLRs.
Sensor Size

Perhaps the biggest thing to note when shooting video is that a large sensor is not nearly as important as when shooting stills. For many photographers, full-frame sensors are ideal when shooting stills, as it provides a nice shallow depth of field, especially when compared to crop-sensor cameras. When shooting video however, a full-frame sensor can be a hindrance more than a feature.
When shooting video, it is not always advantageous to have a razor thin depth of field, which is achieved when using fast lenses on large sensor cameras. This is especially inconvenient when your subject is moving; a super shallow depth of field can make it nearly impossible to keep that subject in focus. Since most DSLRs do not have the capability of continuous autofocus during video recording, tracking a subject can be incredibly challenging when shooting at f/2.8 or faster. A smaller sensor will provide a deeper depth of field, which is much more manageable when shooting video. For reference, the standard sensor size for video cameras is Super 35mm, which is a 1.5x crop when compared to full-frame.
Camera Recommendations: Full Frame: Canon 5d Mark III, Nikon D750, Sony A7sII | Crop Sensor (Super 35): Canon 7d Mark II, Nikon D7200, Canon C100 | Micro 4/3rds: Panasonic Lumix GH4, Olympus OM-D | Super 16mm: BlackMagic Cinema
Audio
When it comes to DSLR video, many mistake people make is neglecting the importance of capturing quality audio. While most DSLRs have onboard mics, the quality is generally only good enough for scratch audio. In order to have basic usable production audio, you will need to use a supplementary audio system. There are many different solutions, including shotgun mics and lavalier mics.
Shotgun Mics
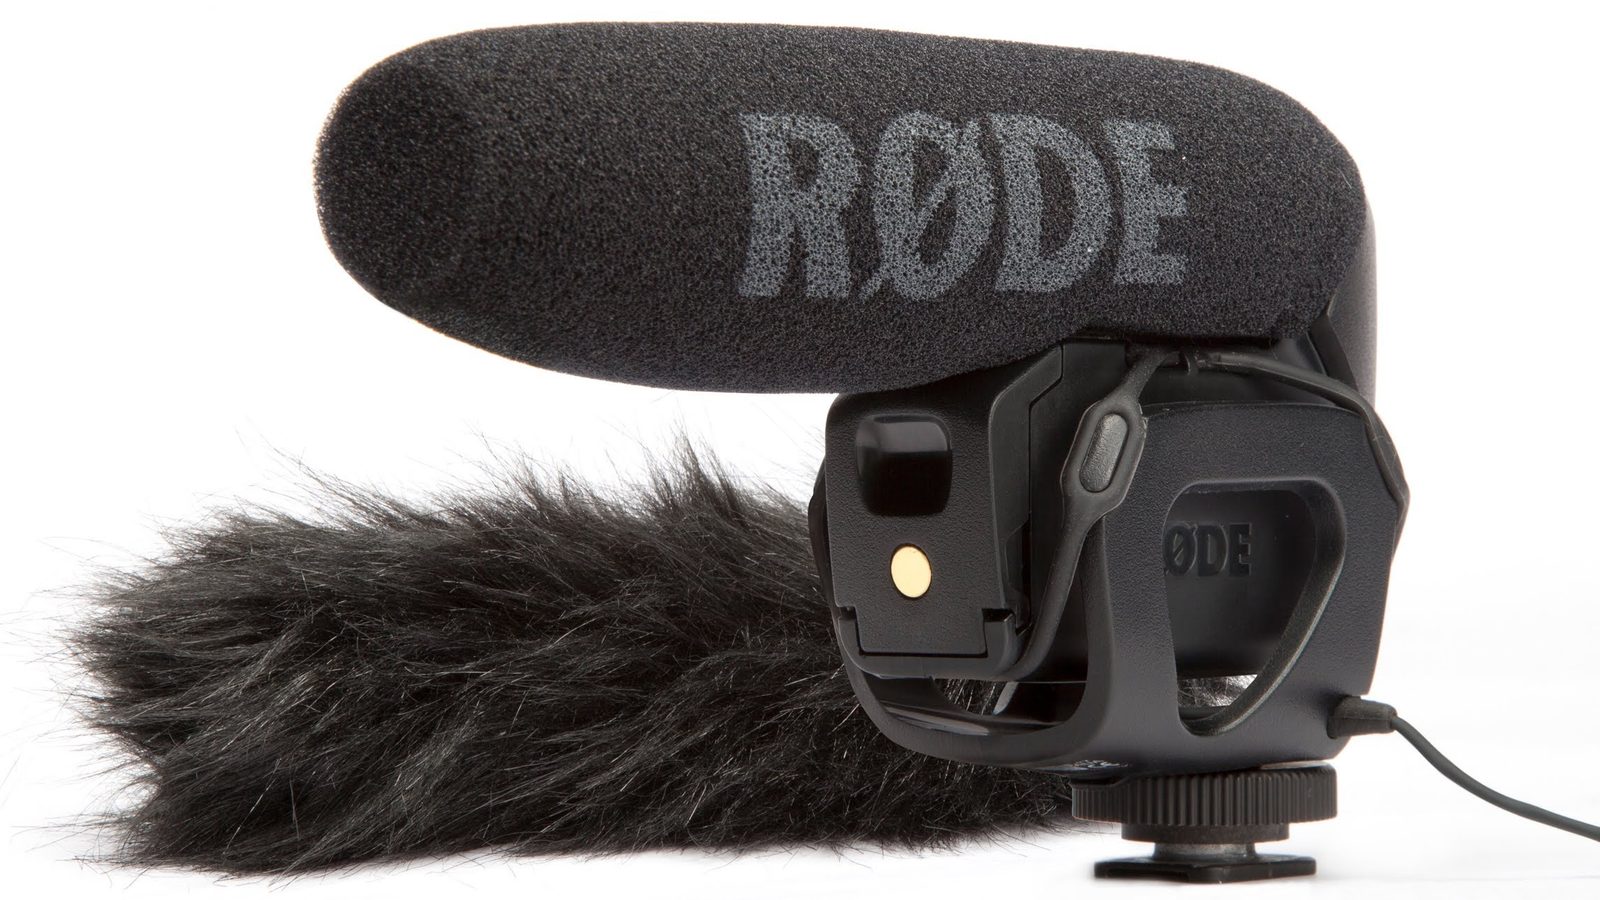
Shotgun mics are very sensitive, directional microphones with off-axis rejection. This basically means that whatever the mic is pointed at will be louder than, or isolated from, what is not directly in front of the mic. There are many types of shotgun mics, all with various features. Some are super directional and allow almost no off-axis sound, which is great for interview situations. Others are a bit more forgiving and allow more off-axis sounds, which might be good for run-and-gun/documentary style audio. Some shotgun mics are easily mounted to the hot shoe of your camera or they can be attached to a boom pole to get close to a subject and achieve even cleaner audio. Keep in mind that some shotgun mics will require power to work, Some are powered by a battery, but most will require phantom power which DSLRs do not supply. So when using a shotgun mic with a DSLR, be sure find one that is powered internally with a battery (AA or 9V).
Shotgun Mic Recommendations: Rode NTG-2 Shotgun, Sennheiser Compact Shotgun
Lavalier Microphones
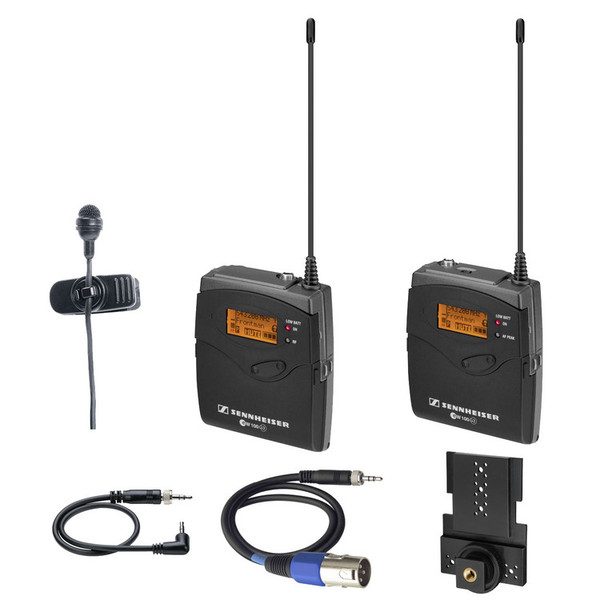
Another common audio solution is using a lavalier microphone. These are small, typically omni-directional, microphones that are easily affixed directly onto a subject. These mics do great when you are capturing audio from only one subject. A lavalier mic can be wired directly to the camera or used with a wireless transmitter and receiver.
Lavalier Mic Recommendations: Sennheiser G3 Wireless Mic Kit
Stabilization
Perhaps one of the most commonly overlooked tools needed for video is stabilization. When shooting stills, you’re freezing one fraction of a second in time. This allows you to handhold the camera and produce sharp images. When shooting video it is necessary to have some accessory to eliminate camera shake when shooting.
Video Tripods
Tripods are the most basic forms of stabilization, not only are they ideal for achieving a locked down shot but they can also be used to incorporate motion to a shot. It is very important to keep in mind that video tripods are different than tripods used for still photography. Video tripods feature a fluid head which make panning and tilting silky smooth. High end tripods also include features such as drag control, counter-balance, and other additions which assist in achieving perfect stability and fluidity.
Tripod Recommendations: Kessler Hercules 2.0 Head & K-Pod Tripod Kit, Manfrotto 504HD Head w/ 546B 2-Stage Tripod
Shoulder Mount Systems
A common option for stabilizing a camera in order to achieve a run-and-gun style is a shoulder rig. They are typically compact and are low in profile which allows you to be more flexible with where you are able to shoot.
Shoulder Mount Recommendations: Redrock Eyespy Deluxe Kit
3 Axis Gimbal Systems
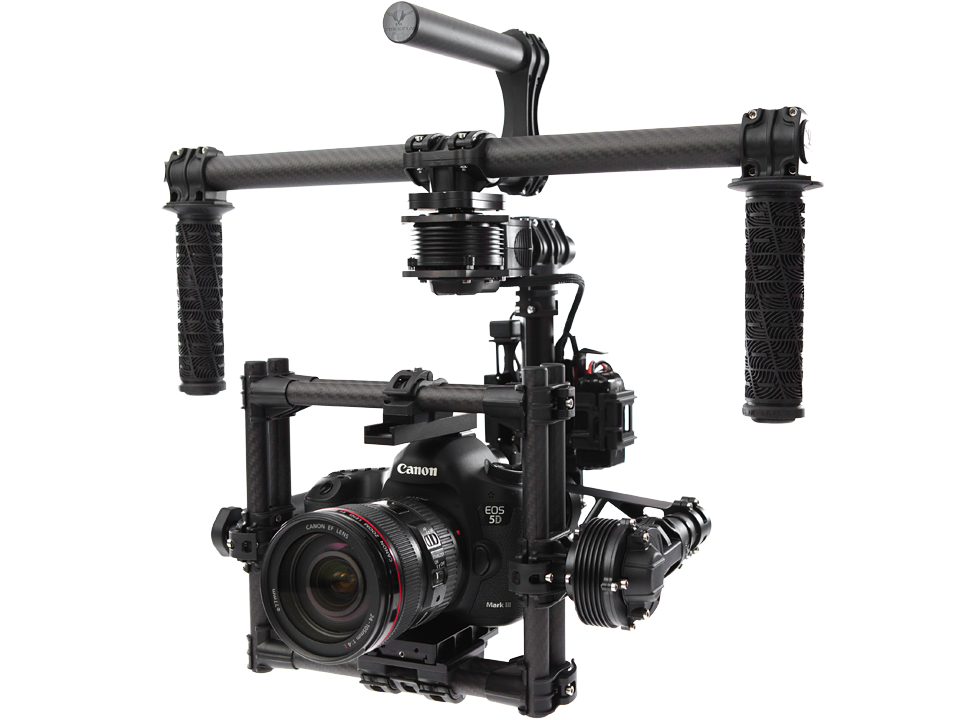
Among the most advanced in stabilization technology comes in the form of 3-axis gimbal systems, like the Freefly Movi M5 or the DJI Ronin. These products use brushless motors to balance and stabilize the camera. These devices allow you to get incredibly smooth video footage while still shooting handheld.
Gimbal System Recommendations: Freefly Movi M5, DJI Ronin
Neutral Density Filters
Neutral Density (ND) filters are a very popular tool used when shooting video. If you’ve used professional level video cameras, such as the Canon C300 or a Sony FS7, you’ll find that ND filters are actually built into the body of the cameras. DSLRs, however, do not have this feature since the body size is too small to accommodate built-in NDs and because ND filters are not necessarily as important in photos as with video. Let’s break down why we need ND filters when shooting video.
If you’re shooting stills on a sunny day at f/5.6, it’s not uncommon for your shutter speed to be upwards of over 1/1000th of a second. When shooting photos, a faster shutter speed is almost always preferable because it eliminates camera shake and motion blur in a still image. When shooting video, however, motion blur is actually desired to achieve a certain cinematic quality. This quality is attained by setting the shutter speed to twice the frame rate. For example, when shooting at 24 frames per second, the shutter speed should be 1/48th of a second (or 1/50th of a second when using a DSLR, since they are unable to set the shutter speed at 1/48 exactly). Since the shutter speed should never change in video, the exposure should only be set using aperture or ISO. If you are trying to achieve a shallow depth of field and want your lens to be wide open or close to it, you’ll need to put an ND filter on your lens to control the amount of light coming through the lens.
Neutral Density Recommendations: Tiffen ND Filters (Various Sizes)
As you further transition into video production, you’ll run into other unique challenges specifically for working with video. However, this guide should help get you started on the tools needed to properly get started in video. If you have any other suggestions for gear needed during video work, feel free to leave your comments below.
Zach Sutton & Justin Kelly
LensRentals Editor & Video Tech

4 Comments
Sean Setters ·
You might also add a section for post-production, as that can be another huge part of transitioning to video.
Shane ·
Many years ago I participated in some 16mm film projects at college. We used blimped cameras and Nagra tape recorders, and yes, shooting outdoors in the sun we often needed to use ND filters, as the cameras only had one or maybe two settings for shutter speed and we didn’t always want the lenses stopped down to the max. We spent way more time in the “lab” as we called it, doing voiceover, post-sync, and editing – lots and lots of editing. In those days, the only stabilization we had was a tripod, usually with a fluid head but sometimes not. Handheld shots looked like amateur crap. (IMO they still do. I yell at the TV screen on some shows “Use your damn tripod!”) The cinematographer’s handbook was our bible, the Sekonic lightmeter our talisman, and we never went anywhere without them.
Kai Harrekilde-Petersen ·
I’m surprised that you link to Tiffen for ND filters. I have found that they give a really bad color cast, which Bryan Carnathan’s article on ND filters confirms. His verdict on their ND 3.0 filter is:
“This is the least expensive filter in this review, but … it has dreadful color shift and poor contrast. Tiffen makes some good products, but I’m not at all happy with this one. Cross this option off of your list.”
Here’s a link to Bryan’s article: http://www.the-digital-picture.com/Reviews/10-Stop-Neutral-Density-Filter.aspx
PVC ·
I’m surprised at all the recommendations, especially the cameras. It doesn’t make sense. Don’t do full frame or 4k and use the worst dynamic range solutions available is what I hear.