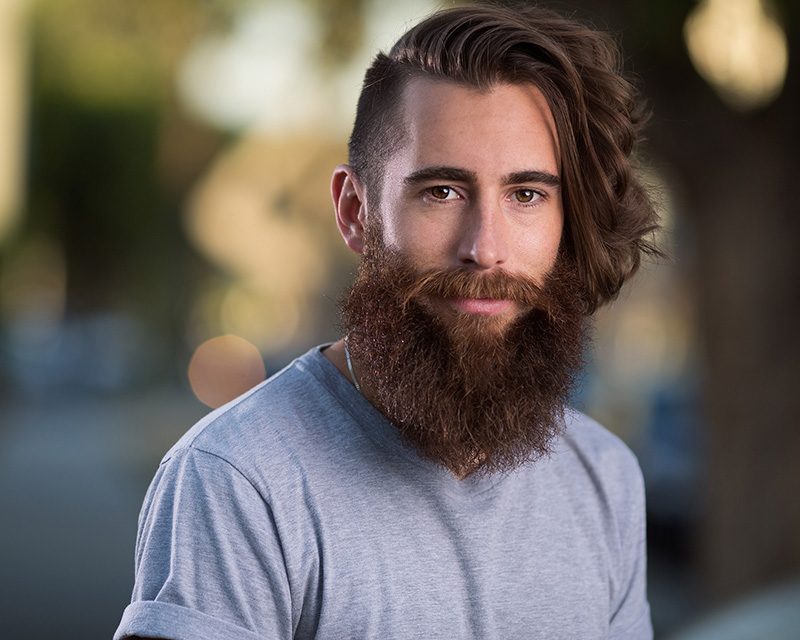
Creating a headshot is as simple as pointing your camera to a face and shooting. But creating an effective headshot is a much more complicated process. Lighting, expression, location and a million other variables come into play, and can drastically change the feeling of the image. And for many, such as actors, lawyers, real estate agents, authors, and others, a headshot is their calling card to generate business. How often have you contacted a business person because they looked nice and friendly in their headshot? Creating an effective and interesting headshot is in incredibly important tool in photography, so I’m going to share one way I help achieve those with my headshots.
Cinematic Headshots
Over the last few years, there has been a surge in what’s commonly called the “cinematic headshot”, and became popular from some of the work by Dylan Patrick and a few others. In short, this is a headshot shot on location, typically using multiple lights to create a more commercial and three-dimensional look to the images. This is often shot using either 2 or 3 lights, and today we’re going to talk about how to effectively do this using only two lights.
Gear
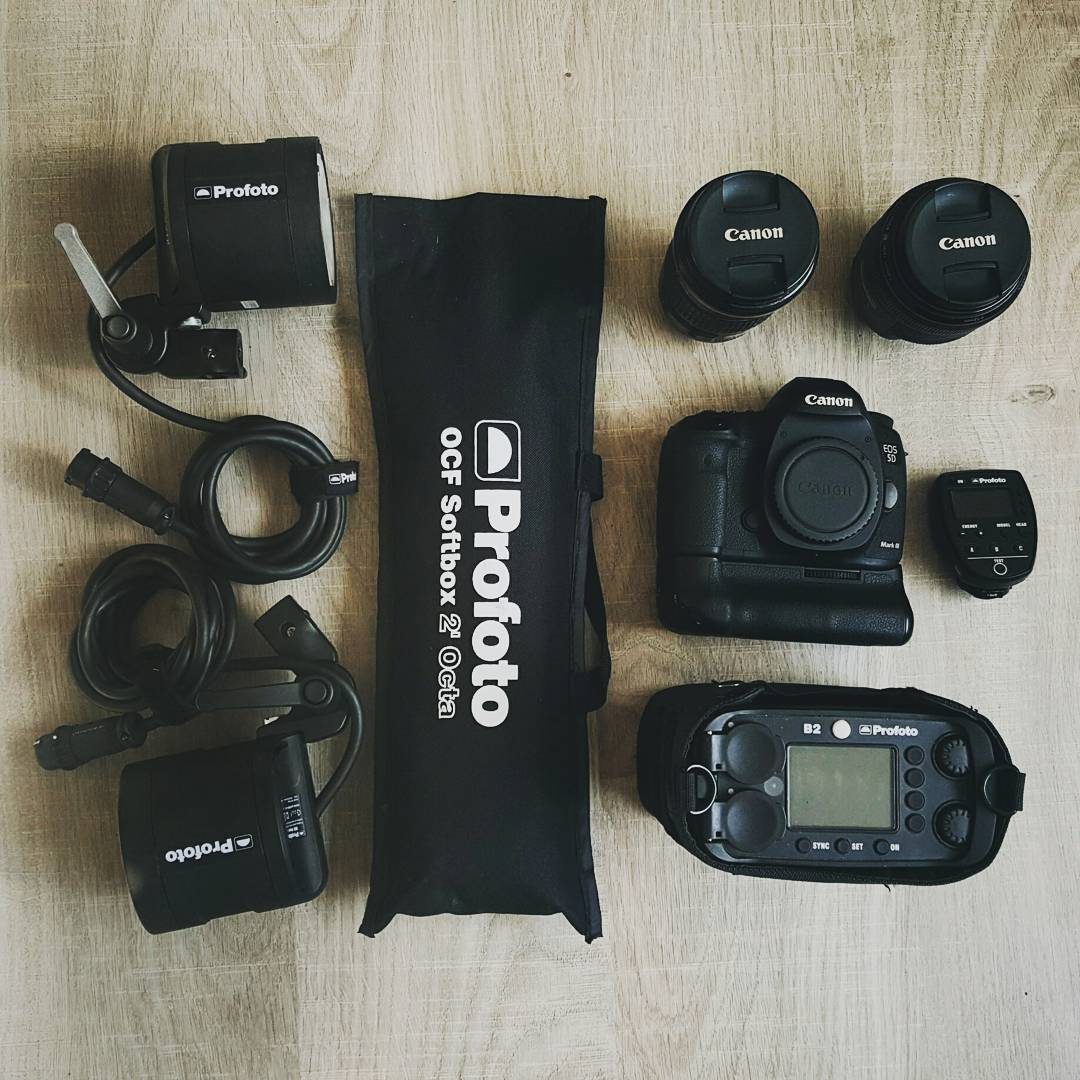
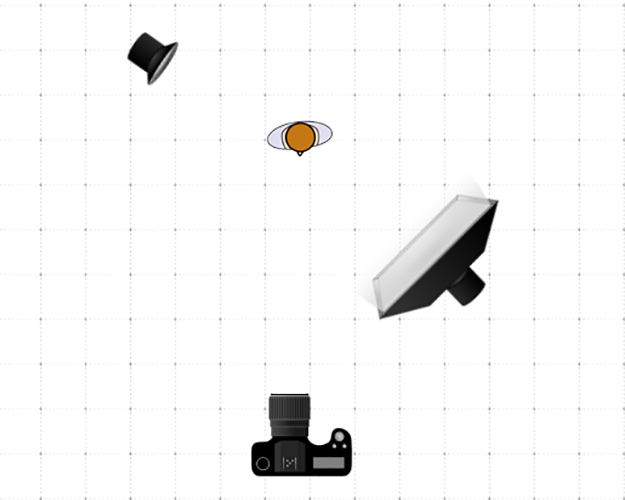
Ordinarily, when creating a cinematic headshot, you want to have a couple lights, one as the main light, and one as a rim light, to be able to effectively create a three-dimensional look to your image. For me, I prefer using the Profoto B2 system to create this look and prefer it for a couple reasons.
High-Speed Sync
The biggest reason I prefer the Profoto B2 Two Head Kit is for it’s high-speed sync capabilities paired with its power. When using off-camera flash, traditionally, you’re limited to 1/200 of a second shutter speed, because your shutter is unable to stay open for the entire duration of the flash (I’ve explained it further here). High-Speed Sync allows you to fire multiple bursts, allowing you to shoot on location up to 1/8000th of a second using strobes. The Profoto B2s (and Profoto B1s) are among a few very select strobes that allow you to do this. Simply, this allows you to stop down the sunlight on-location while maintaining a nice shallow depth of field. Whereas without High-Speed sync, or the use of an ND filter, you’d be able to shoot on location with lights, but be forced to shoot at f/8 and above under normal sunny conditions. To learn more about High-Speed sync and how it works, be sure to check out my previous articles on the topic.
Size
Another reason for my preference of the Profoto B2s is their size to power comparison. Broadly speaking, the Profoto B2s are 3-5 times more powerful than a traditional speed light, and the physical size of them is not much larger (though it’s worth noting, they do have an inverter to deal with). In terms of modifiers, I generally prefer using a single medium sized modifier, though I don’t have a preference with a softbox or an umbrella. I usually use whatever I have available to me at the time.
Light Theory While Working With Subjects
A lot of technical mumbo jumbo comes into play when lighting on location, which can make the experience very difficult for those who have never played with it before. Light relation to your subject changes drastically with distance, so finding that sweet spot can make all of the difference when using artificial lighting on location. But there are two properties that work alongside each other that are important to remember – Relative Light Size, and Inverse Square Law.
Inverse-Square Law
If you’ve gone to school or taken a workshop on lighting, you’ve likely heard this law thrown around a considerable amount. Mathematically, it’s complex, but there are some really important, simple to follow aspects that you want to take from it. But first, let’s bore you with the math behind it all.
Inverse-square law states that the intensity of light is inversely proportionally to the square of the distance from the source, or –
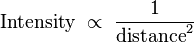
Judging by most of our readers ability to read Roger’s incredible techy rambling about optics, I have no doubt that many of you are still following without confusion, but to put it in layman’s terms, each time you double the distance between the light and your subject, you lose 75% of the light’s power. So as you can imagine, as the distance increases, you lose less and less overall light. For example 500Ws at 3ft is only 125w at 6ft, and only 31.5w at 12ft. But remember, when shooting on location, you’re lighting more than just a subject – you’re also lighting your scenery.
And since the falloff of light is inversely proportional, you know that the falloff is drastic near the light, but much more gradual as the distance from the light to subject extends. So if you want to light a subject, and have little effect on the background; you bring the light incredibly close to your subject. This also means you need less power in your light.
Relative Light Size
The other core principle comes in what I personally call the Relative Light Size principle. Light has five basic principles – brightness, size, shape, color temp, and softness. Two of these, size and softness have drastic effects on each other, and can change immensely based on distance. Generally, when lighting people, softer light is preferred, as it’s able to hide any harsh details, such as skin blemishes. The softness of light is determined purely by the size and distance of the light modifier you’re using. What is important to remember is the closer the light is to your subject, the softer the light will be (Because softness is determined by the size of the modifier, relative to your subject, and things closer to you, appear larger in size by perspective). Want a small umbrella to give nice soft light? Place it really close to your subject at a lower power. Want a small umbrella to have harsher shadows and harder light? Place it further away from your subject, at higher power. These two principles can be summarized in these couple of bullet points.
- The closer the light is to the subject, the less effect it has on the background
- Relative distance is everything, a close light is a soft light
Shooting
Now that we’ve got our gear and technical aspects figured out, let’s get into the shooting aspects of this style. Alongside all of the gear mentioned above, I also will typically bring a stool with me, but this is only to compact the size of my set up a bit and to keep the light stands closer to the ground, to avoid problems with the wind. Also, in terms of location, I try to set up in a small patch of shade, allowing me to completely light my subject, but also allowing for natural light to handle the colors in the background.
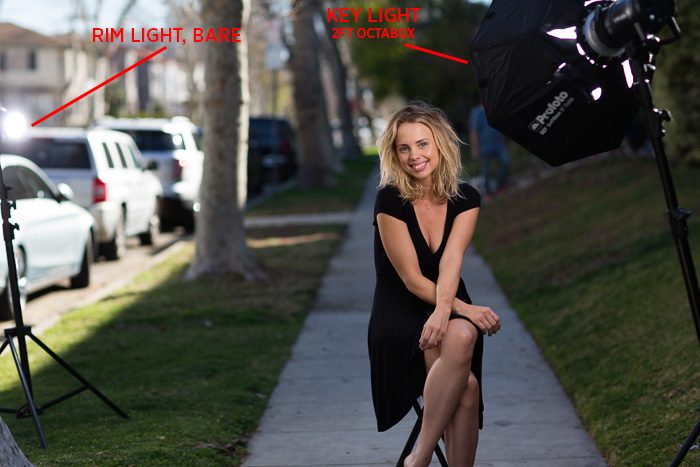
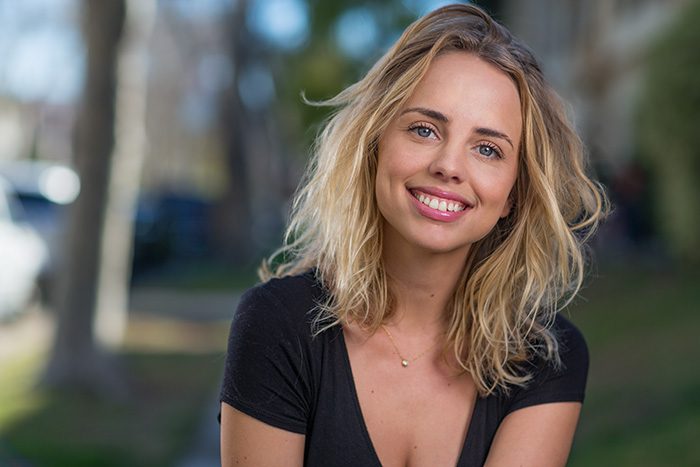
And I can’t stress how plain the backgrounds of these shots can really be. I often shoot these headshots in my own block, with limited trees or anything considered traditionally interesting. I’ve also shot similar shots in public parks, city alleyways with terrible graffiti in the background, and a ton of other different places. Often, people are quick to say “Wow, that must have been an incredible location to get that shot” and more often than not, that’s not the case. I look at colors over details, and when I find some nice interesting color, I’ll shoot there. The viewer doesn’t need to know what that interesting blue blob in the background is…and more often than not, it’s a dumpster.
To avoid problems with the inverse square law, I make sure to keep any background items at least 3 times further away from the light than the subject is. This will ensure that the tree, bush, or whatever the item may be is out of focus, as well as making sure the light isn’t having an effect on the background elements. This is the easiest way to make a photo lit with studio strobes to look natural in an outdoor environment.
I also choose a longer focal length, to have a more aesthetically pleasing background. As you probably know, the longer the focal length, the more the objects in the background are stretched and manipulated by perspective. This changes to the background items will have a habit of almost blending, making the edges far less hard, and more aesthetically pleasing. Remember the most important part of these photos is the face and expression, so I want the background to have nice colors, but without being too distracting. I also choose a longer focal length because of barrel distortion. When shooting portraits, it’s important to not stretch their features, so anything 85mm and above will give you the best results to a natural look.

These are just my techniques on how to achieve this look while shooting on location, I obviously encourage you all to give it your own spin, and see what you come up with. This technique is also explained in great detail, in the fantastic tutorial series put together by my friend Dylan Patrick, which I encourage you to look into if you’re wanted to learn considerably more about this topic. If you’d like to rent the Cinematic Headshot Lighting Package, you can do so by clicking here.
LensRentals.com Editor

18 Comments
Thinkinginpictures ·
Can you suggest a product that doesn’t cost over 2K for the lighting kit!
Zach Sutton Photography ·
Sadly, there isn;t many options available in terms of battery powered strobes that support HSS. That said, you can use speedlights, but you might run into problems with flash power. The other option would be to get a Alien Bee kit, and use an ND filter to stop down the ambient light.
Mike Fitzgerald ·
Adorama sells a Flashpoint Rovelight (Bowens or Flashpoint mount) that can do it. 2 of those total ~$800 so there you go. .
Carleton Foxx ·
First: Beautiful shots. Second: How much does the ambient light contribute to the exposure of the subject? Third: Do you have a rule of thumb for how much you underexpose the background? Fourth: Amazing shots.
Zach Sutton Photography ·
Thanks for the kind words, Carleton!
Ambient light typically doesn’t affect the subject at all, since they’re usually placed in the shade. I *might* be able to find a shot where the lights didn’t fire, and use that as an example.
No specific rule in terms of underexposing, I just try to make sure there aren’t any blown highlights that would distract the eye. I use the backgrounds as a source of color and to bring the eyes onto the subject, so I try to match the exposure so it just has nice even colors and tones.
Carleton Foxx ·
That is great info. Just saying “no blown highlights” makes a lot of sense. But sadly, since I live in Iowa and the temp is 10°F and it’s snow as far as the eye can see, I’m going to have to wait a few months to try this out.
misquamacus ·
Devil’s advocate here, great article and really good shots, but why expend so much effort to make images that look like a fake background was shopped in? Serious question. http://i.imgur.com/LKnt4xg.gif
Zach Sutton Photography ·
What effort? The set up for these shots takes 5 minutes total…and if my lighting looks so good, that it looks photoshopped straight out of the camera, then I think I’m doing pretty good as a photographer.
marina ·
You’re such a moppet! What fake?? That is a real nicely done background,
your mind is fake. Art is the interpretation of the reality and it is
up to the artist, and that is called depth of field and it was really
nicely done. Go and do something else, give up photography Mr
misquamacus!!
David Alexander ·
I think you’re adding some confusion.
> Light has five basic principles – brightness, size, shape, color temp, and softness.
Softness isn’t a principle. It’s determined solely by the size of the light relative to the subject. A frosted incandescent isn’t intrinsically softer than a clear one; it’s merely a larger effective light source relative to the exposed filament of the other bulb.
> Want a small umbrella to give nice soft light? Place it really close to your subject at a lower power.
Power has nothing to do with softness. It only determines the relative emphasis of that light in your scene.
Zach Sutton Photography ·
> Softness isn’t a principle. It’s determined solely by the size of the light relative to the subject. A frosted incandescent isn’t intrinsically softer than a clear one; it’s merely a larger effective light source relative to the exposed filament of the other bulb.
I explain the softness of the light and how it functions immediately after that sentence, explain how softness really interacts based on relative size. I included softness in the piece, as harshness and softness are often discussed properties of lights. It wasn’t meant to be confusing or misleading…the opposite really.
> Power has nothing to do with softness. It only determines the relative emphasis of that light in your scene.
Turning down the light is so you’re not blinding your subject with a 250Ws bulb flashing a foot from their face 🙂
Thanks for reading!
David Alexander ·
All fair points. Still, it’s important to separate theory and practice. Blurring them can mislead people who don’t know enough to tell that you have. It took me more time than it could have to learn lighting for precisely this reason.
Consider your audience. If people want “diffused” light, they search Amazon for that word and end up buying a Stofen. Then they aim it at their subject outdoors and wonder why nothing changes. You told them light can be intrinsically diffused, so why shouldn’t this work?
Same with brightness. If I crank the power and I’m not careful with the exposure, that light will look “harsher”. People use harsh and hard interchangeably. Therefore I must have made it harder. And here, someone confirms as much by tying together power and softness. Suddenly we seem to have added another factor that complicates scene setup by an order of magnitude.
Better to fix the imprecision than to defend it, IMO.
KG ·
Still too things being discussed as one here. Specullarity or “snap” and diffuse or “spread” of light. Both contribute to “softness”.
Stephen ·
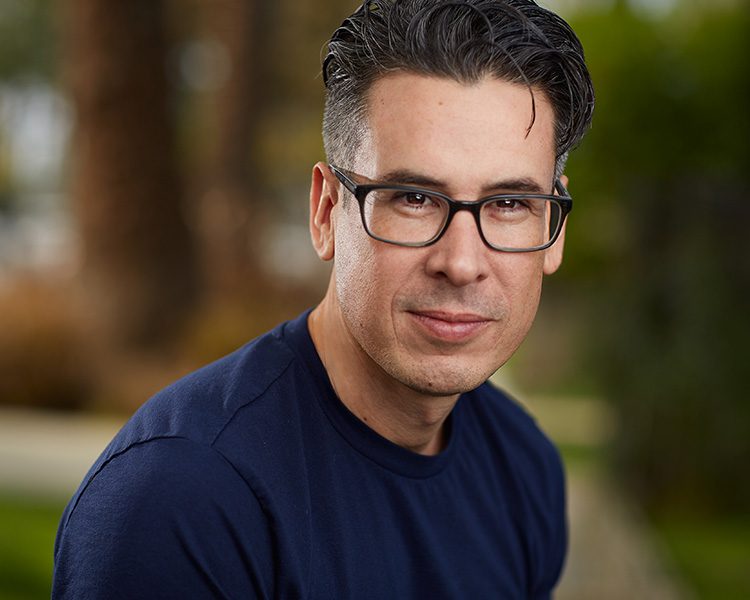
How do you deal with glare on glasses? For example in the last photo.
Zach Sutton Photography ·
Typically, I turn the modeling light on, and then make sure to position the light to reduce the glare. Fortunately, I didn’t have much of a problem with his glasses. It’s just a lot of trial and error though
Scott ·
Canon’s new RT series of flashes (as well as the Yonguo copies) offer off-camera wireless high speed sync up to 1/8000. Nice article, this is very similar to how I setup outdoors, and being able to use Speedlites only makes it easier.
Cheers.
http://scottsmith.photos
Ian Goss ·
The inverse square law only applies with point sources—as soon as light sources become larger, the falloff is less.
Sergey ·
Hi Zach, thank you for sharing your work and how-to behind it. It looks like you don’t use reflectors but still have soft shadows, do you use an ambient as a fill? If so, doesn’t it limit you to certain ambient light levels?