You probably shouldn’t read this article unless you’ve at least skimmed through Part 1. To summarize, we had a Sony FE 70-200mm f/2.8 GM OSS lens that had been dropped and no longer would focus. We tore it down both to see if we could repair it and to see what-all was up inside there. In the first part, we did the initial disassembly of the major components and a complete disassembly of the back (mount) half of the lens. We found a few surprises and some different ways of doing things. But we didn’t find the problem with the lens.
The Rest of the Teardown
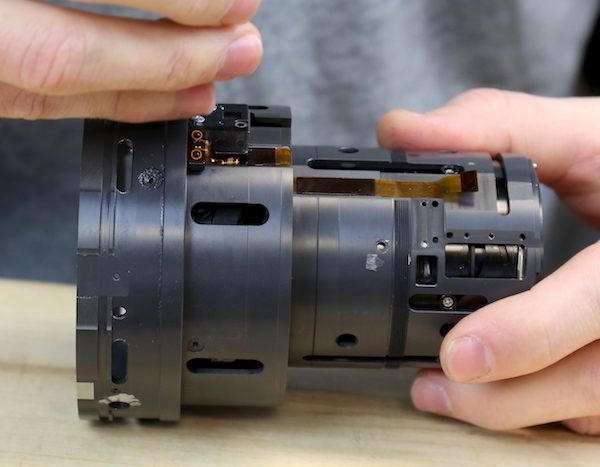
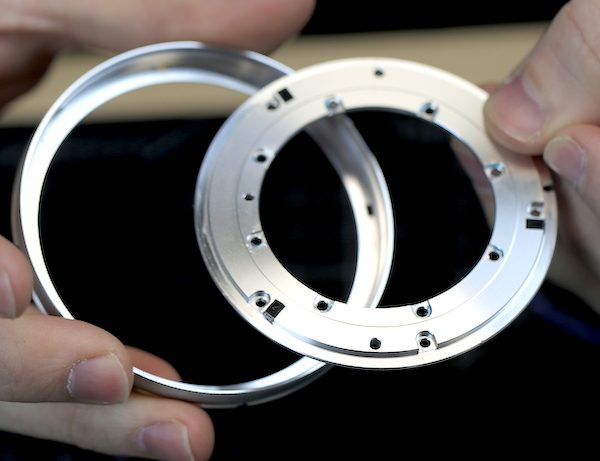
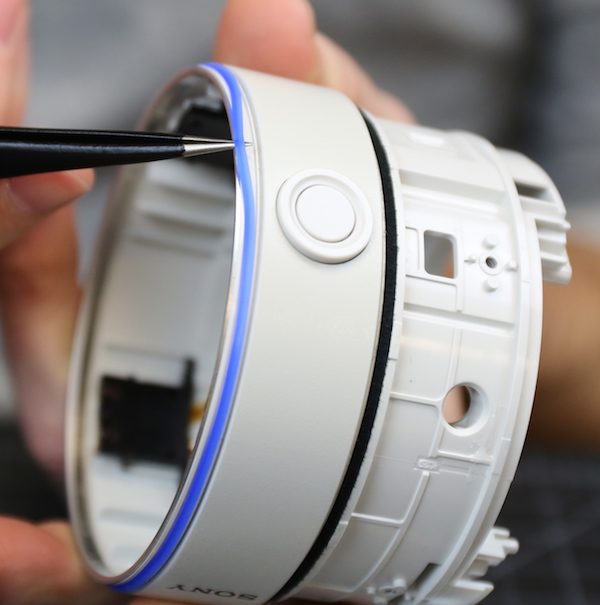
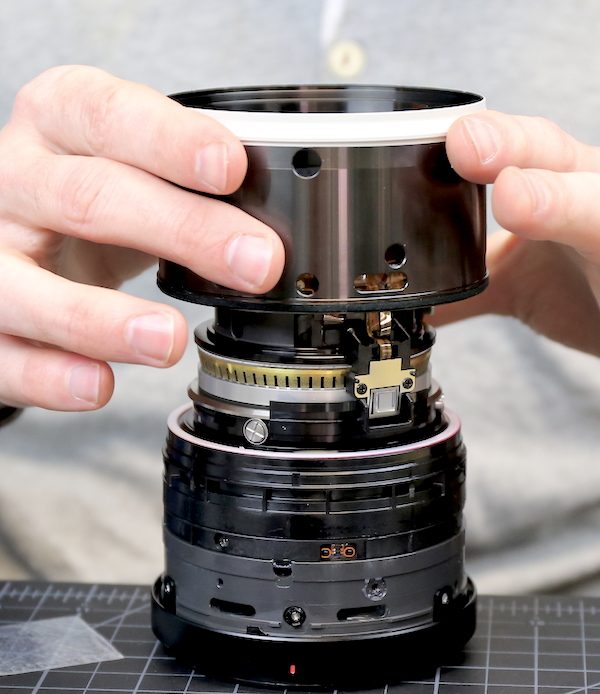
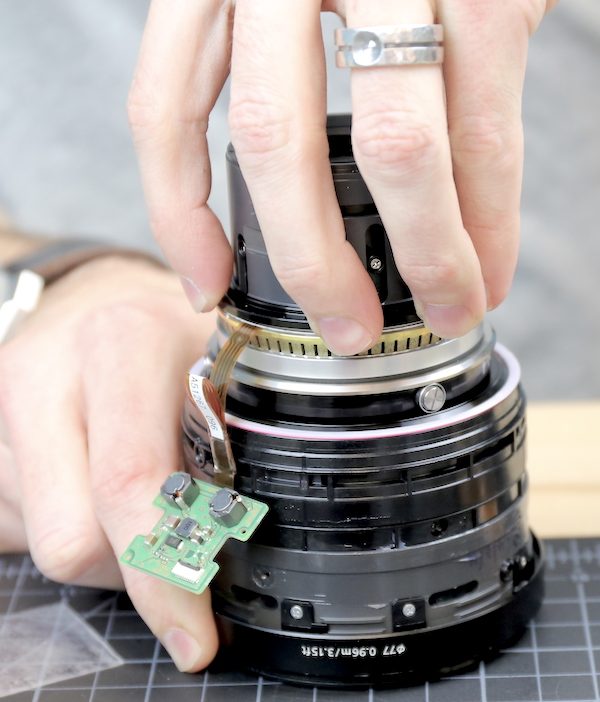
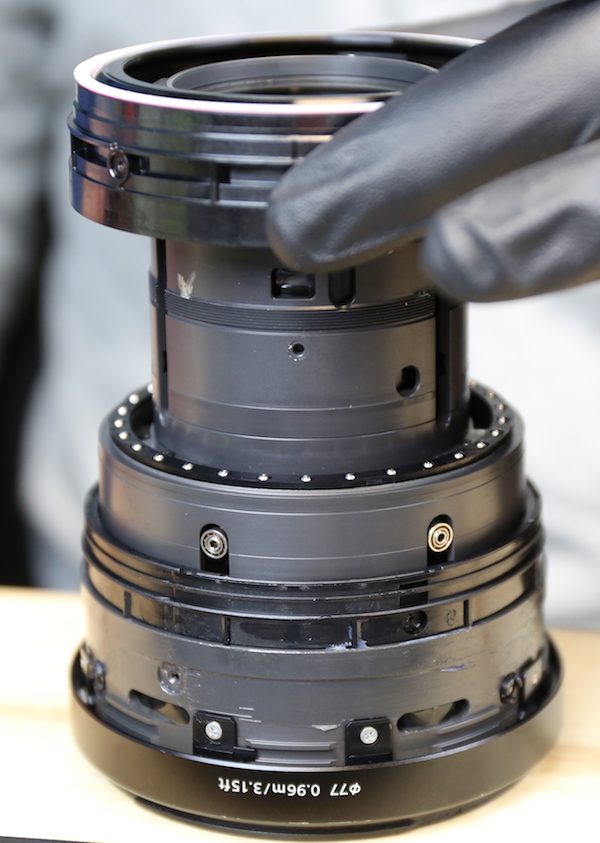
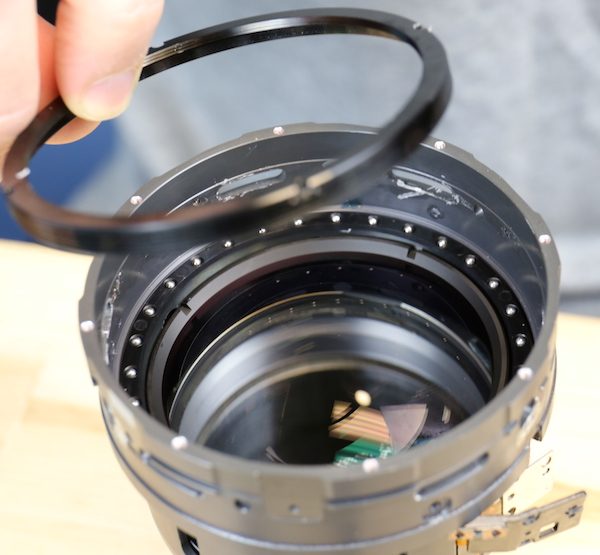
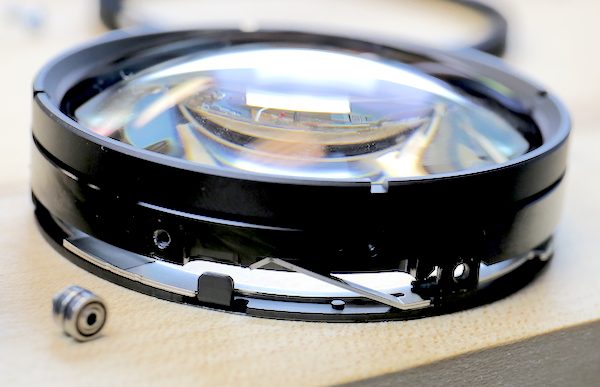
So after a snack break and some more caffeine, we tackled dissecting the front half of the lens. You can see the Southern Fairy Tale ring on top, with the black plastic zoom-link ring right underneath it (you can see a metal zoom key peaking out above it on the side away from Aaron’s hand).
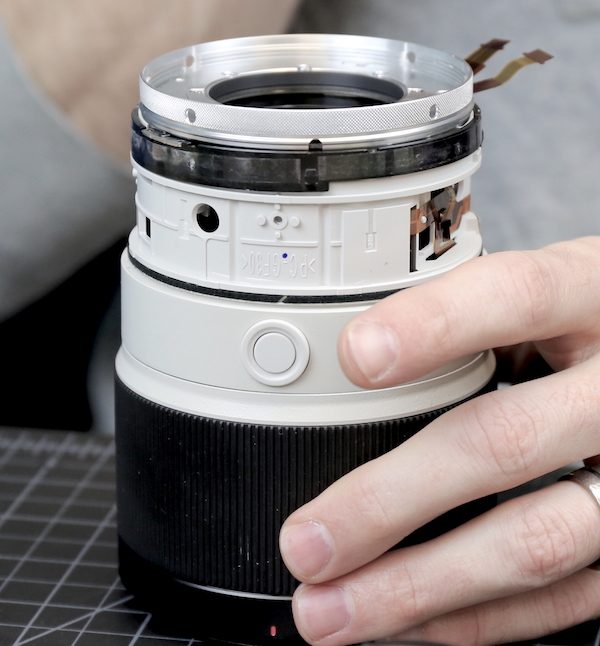
We start by removing the lock-on ring that connects the front half to the back half of the lens. You can see the ring of 8 screws holding the ring assembly to the front of the lens. There are 4 additional screws in the little notches, two of which are by Aaron’s forefingers.
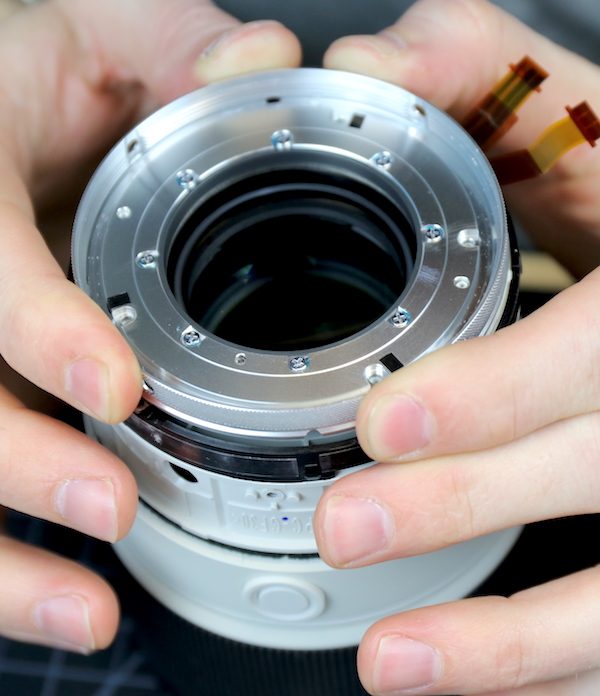
Taking all of those out let us remove the lock ring from the front half of the lens.
As you might expect, only the plate is fixed to the front of the lens, the locking ring spins freely behind the plate, threading onto the rear half of the lens to attach it.
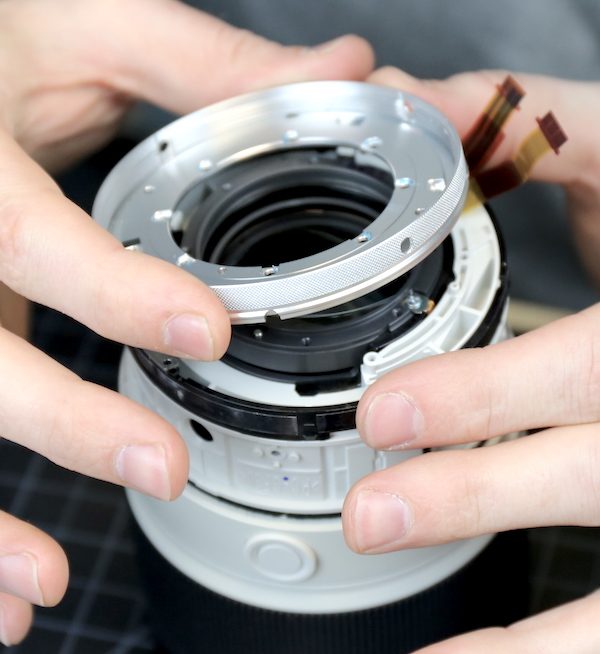
There’s also a shim under the plate. This would be a spacing shim either for backfocus adjustment or for optical spacing (probably the latter).
Here’s where we found our first problem with the lens. It didn’t prevent focusing; but it may well have caused an optical issue. Remember, this lens had been dropped. We were told the drop was only about 2 feet, and there was no external evidence of damage (no scuffs, dents, etc.)
When we looked at the attachment plate above more carefully, it became apparent that two of the screw holes on one side of the lens were bent downward slightly.
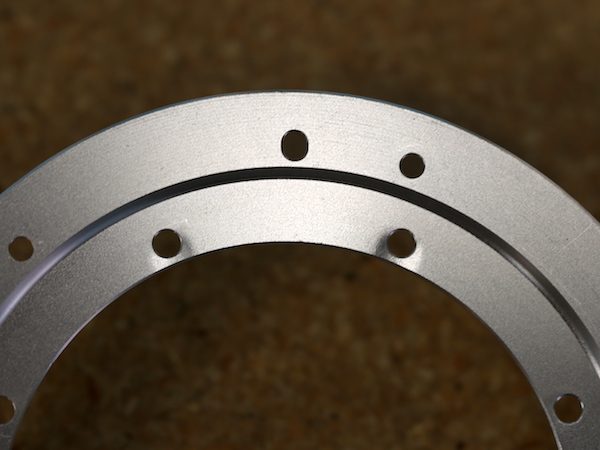
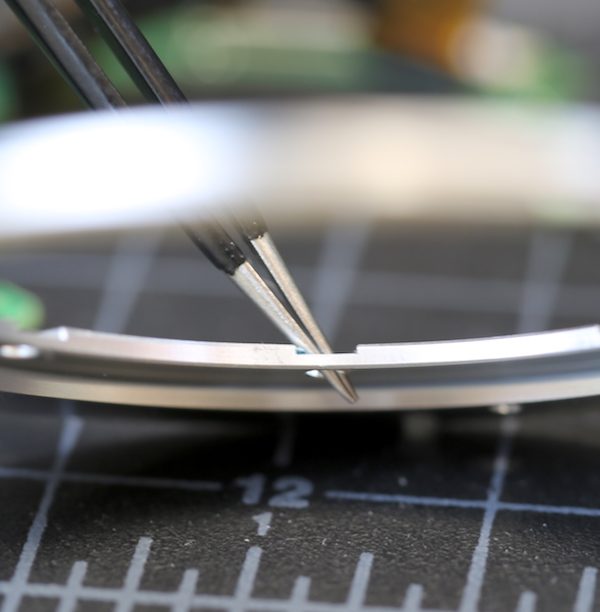
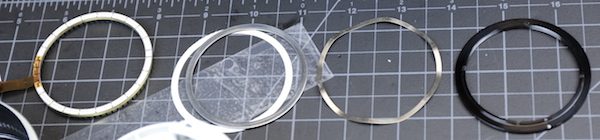
Two holes on the opposite side were bent upward slightly. This plate is attaching two heavy lens-halves, and it’s fairly thin aluminum (or aluminium, if you have a non-U. S. plate). The picture below shows the thickness of the plate through one of the screw holes; we measured it as 1.2mm. That might be thick enough if it was stainless steel or titanium (I’m no materials engineer) but this is aluminum; we could bend it with our hands. If the screw holes were bent, we had to assume the rim of the plate was also.
Some engineer with way more math than me obviously calculated that this plate was thick enough to hold the mass of the two lens-halves together. But I’m damn sure he didn’t consider the part about force and velocity squared and all, because this plate, the one I can bend in my hands, is not going to resist much force. At all.
While the plate did hold the lens together just fine despite these bends, we’re obviously concerned that the bent plate could affect the lens optically. There are strong elements on either side of that connection and a tilt of a few microns could cause some significant optical disturbance.
Anyway, while we aren’t happy about the plate, it certainly wasn’t preventing the lens from focusing, so we continued on with our disassembly after getting the parts department to order a replacement plate.
With the connecting ring out of the way, we can access the keys to remove the inner ring linking the zoom barrel you turn to the zoom mechanism inside the lens.
Removing those keys lets us take off the connecting ring and then remove the front outer fixed barrel. Like the other outer barrels, it has weather resistant rubber strips; the blue one is a seal, the black fuzzy felt one further back goes under the rotating barrel.
Looking inside the outer barrel, you can see the focus-hold button mechanisms and the flexes that connect them.
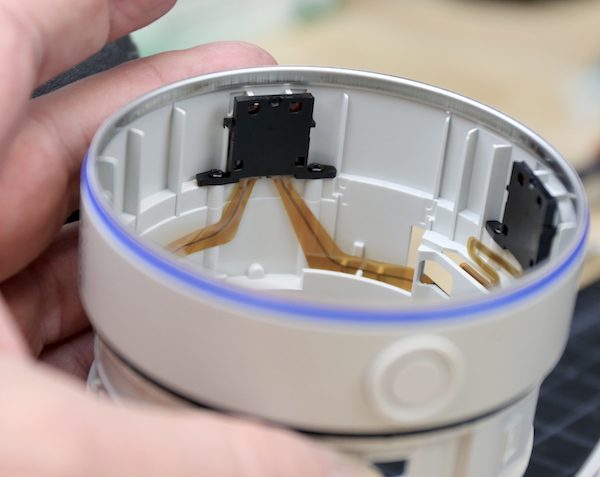
Underneath we start to see the inner workings of the zooming groups and front focus motor. You might think ‘look at all the cool stuff in there’. We thought, ‘oh, crap, this is going to take forever’. If you look you can see a position sensor over on the left side, the big GMR unit hanging over the ring USM motor on the right side, and flexes criss-crossing every damn where. More and more, this lens looks like it’s got a lot of Nikon heritage.
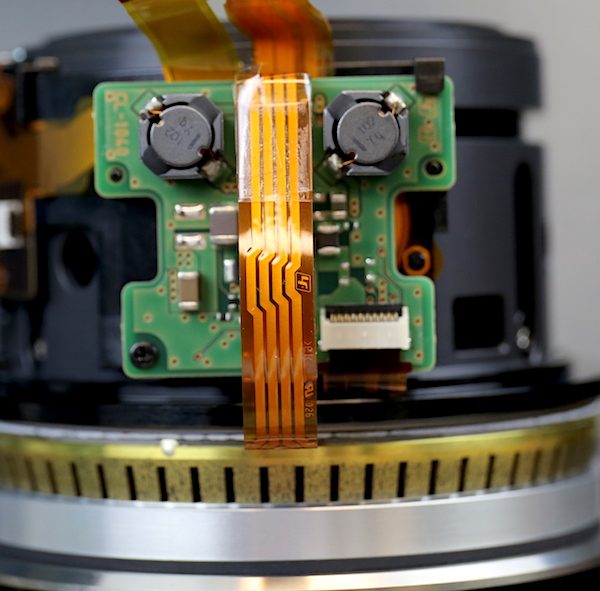
Rotating around to the other side, there’s another PCB, presumably doing some position processing since it’s connected to all those position sensors.
The focusing ring was the next obvious removal and with the rubber taken off there was easy access to the screws and collars holding it in place, after which it slips off of the lens.
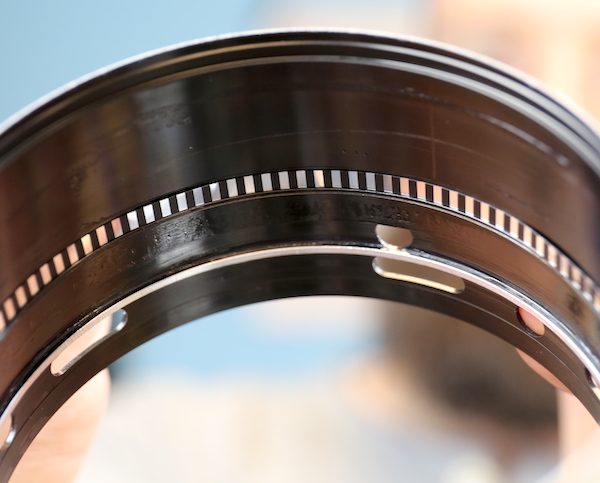
This is at least partially a fly-by-wire-focusing lens so inside the focus ring is a magnetic strip. When you turn the ring a sensor reads the strip and sends a signal to move the rear focusing elements accordingly. The front focusing elements can be controlled mechanically by the ring or through the ring USM.
And now we’re getting down to the inner workings of the front half of the lens. We were pleased to see an optical adjustment collar up here, too.
I’m going to compress about an hours worth of work now, trying to keep this post a reasonable length. But that set of flexes and sensors you saw 5 pictures ago was removed.
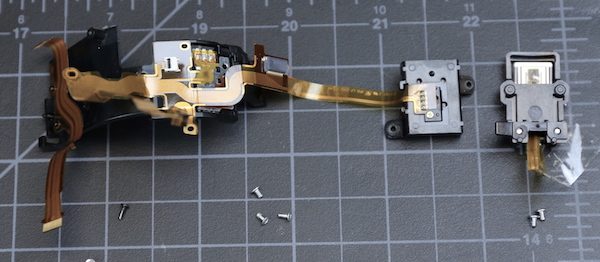
After that we spent 4 or 5 minutes colorfully discussing the parentage of the lens’ mechanical designer who saw fit to make the stacking of the ring USM an integral part of the disassembly. In a nice lens, designed with the thought that someone might actually repair it some day, you take out a couple of screws and take off the ring motor assembly. In this lens we (I’m using the Royal “We” here; Aaron does all the hard stuff) have to take the USM apart piece by piece to get further into the lens.
So after carefully marking the alignment, Aaron started counting turns to remove the pressure plate (because it has to go back to exactly the same point).
After which we unstacked all of the rings and the USM motor was off.
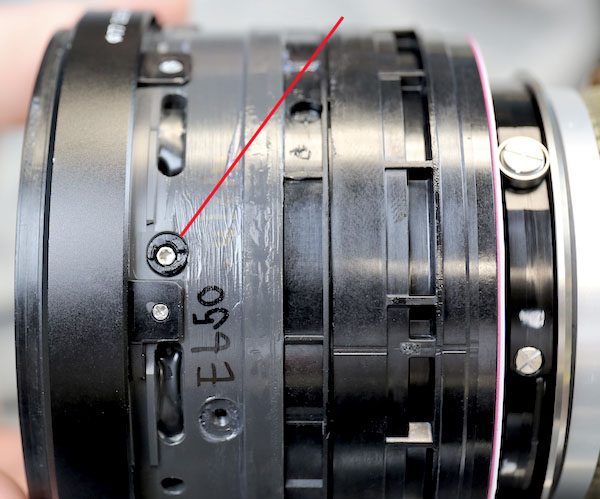
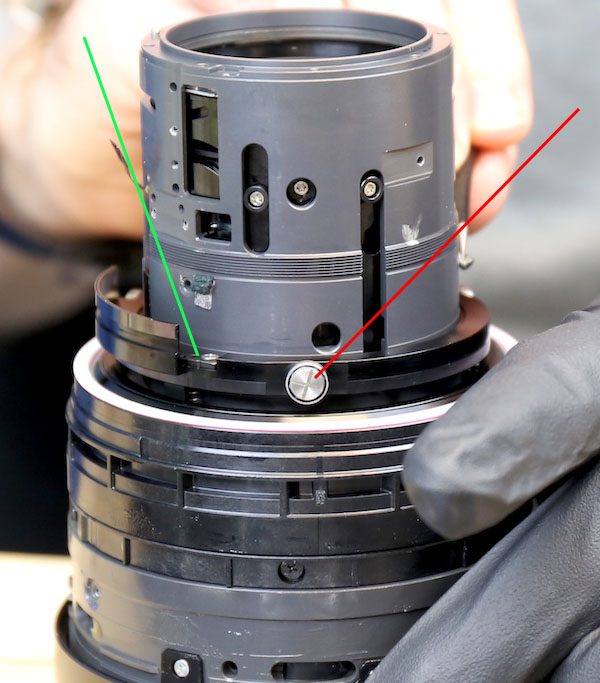
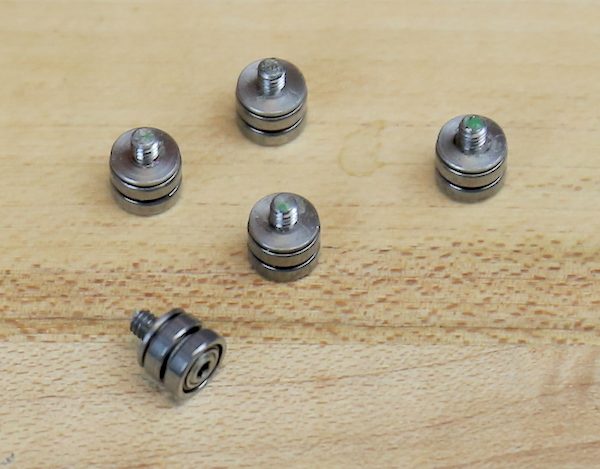
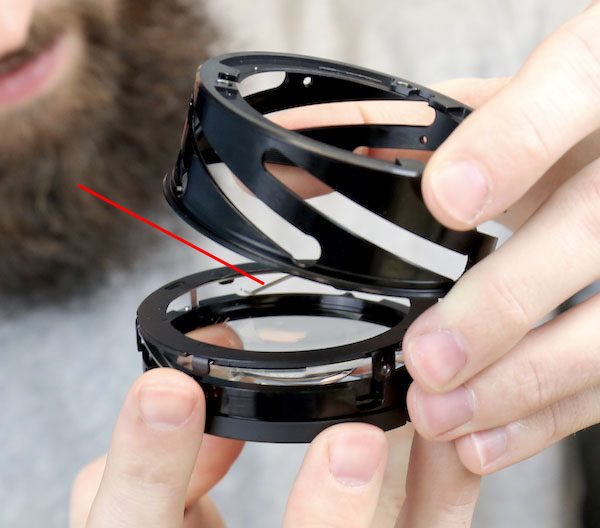
With the motor off, the next ring is a clutch or transfer ring that translates focusing movement to the focusing elements. Well they would, if they worked. We were now able to see the front focusing group didn’t want to move very well since we could turn this ring by hand now. You can see the ring rolls on very robust bearings (red line) and moves the focusing keys connected to the internal group (green line).
Once we took the keys and one locking pin out, this ring came right off. We were grateful the tensioning springs underneath it came right off with it. Sometimes those spring out like a jack-in-the-box and we have to spend 15 minutes on hands and knees searching for them.
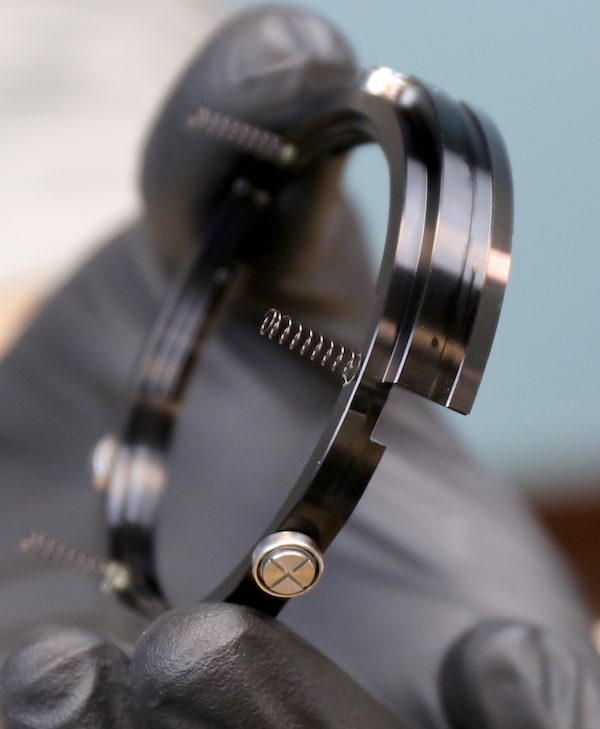
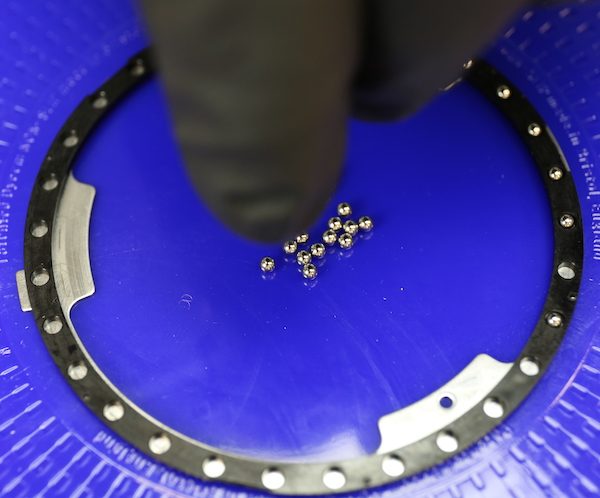
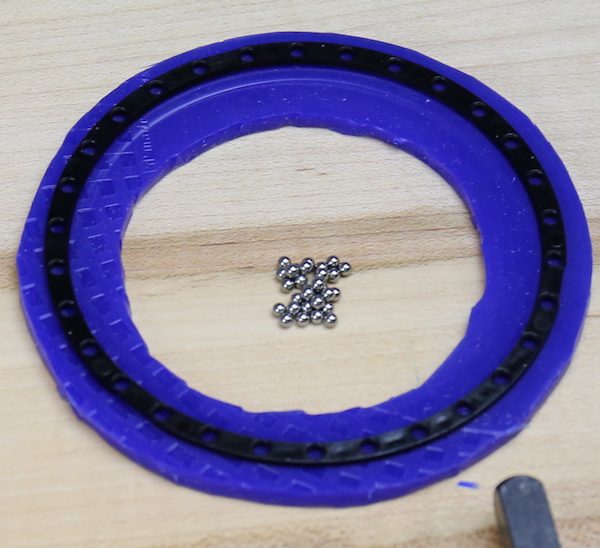
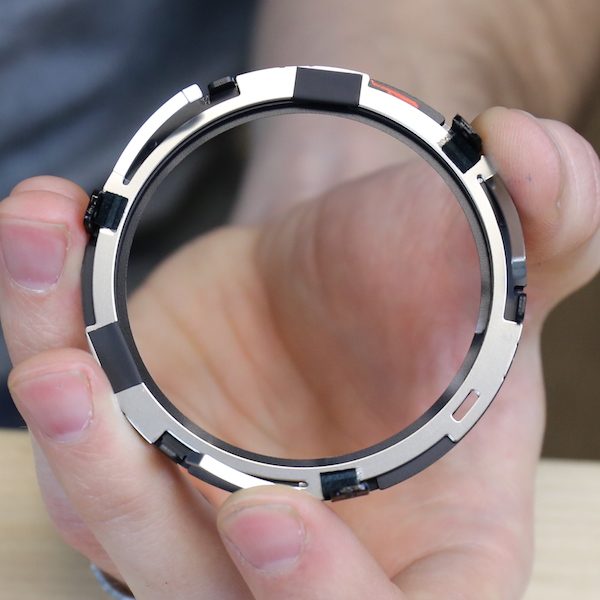
The next ring down comes right off, too. It rotates on a beautifully made bed of 30 ball bearings, which is one of the reasons this focus ring is so nice and smooth. We both did another prayer of thanks, because none of the ball bearings escaped the disassembly table and made a mad dash for freedom. Ball bearings are the escape artists of the lens prison system.
Just in case any of you want to know how we keep the ball bearings from running away during disassembly, they are corralled on a Dycem non-slip pad. Dycem is one of the great accomplishments of humanity, ranking slightly below the invention of fire and the wheel, but well above the printing press in my pantheon of most important advancements.
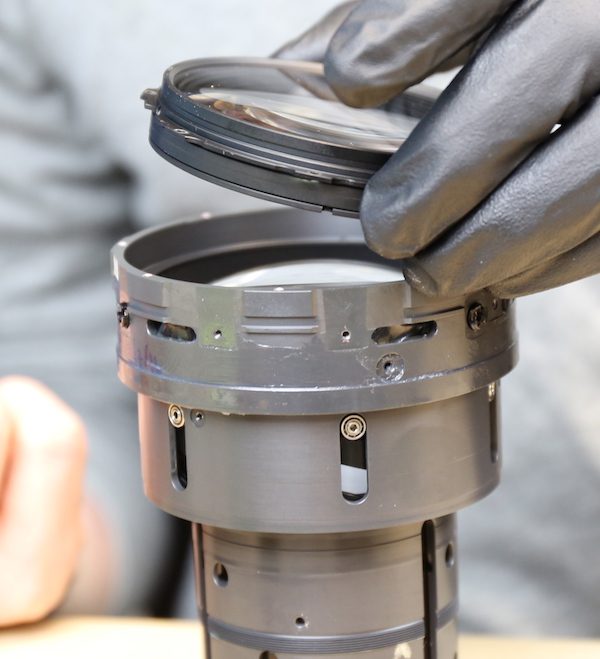
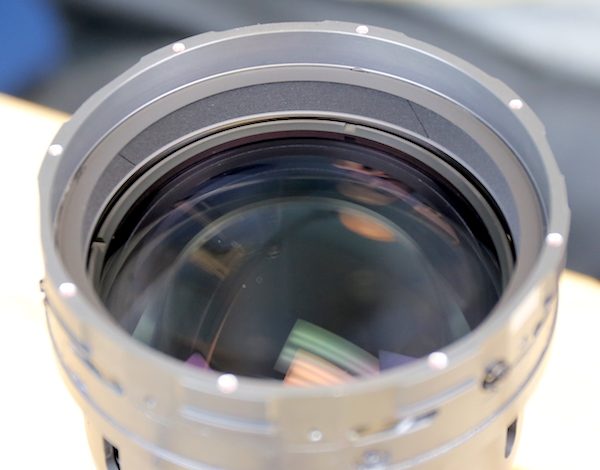
Next, we took off the front (filter) ring, which like all other joints in this lens has a nice rubber seal. Right below the top ring you can see 3 of the 6 heavy rollers that the front focusing element slides up and down on.
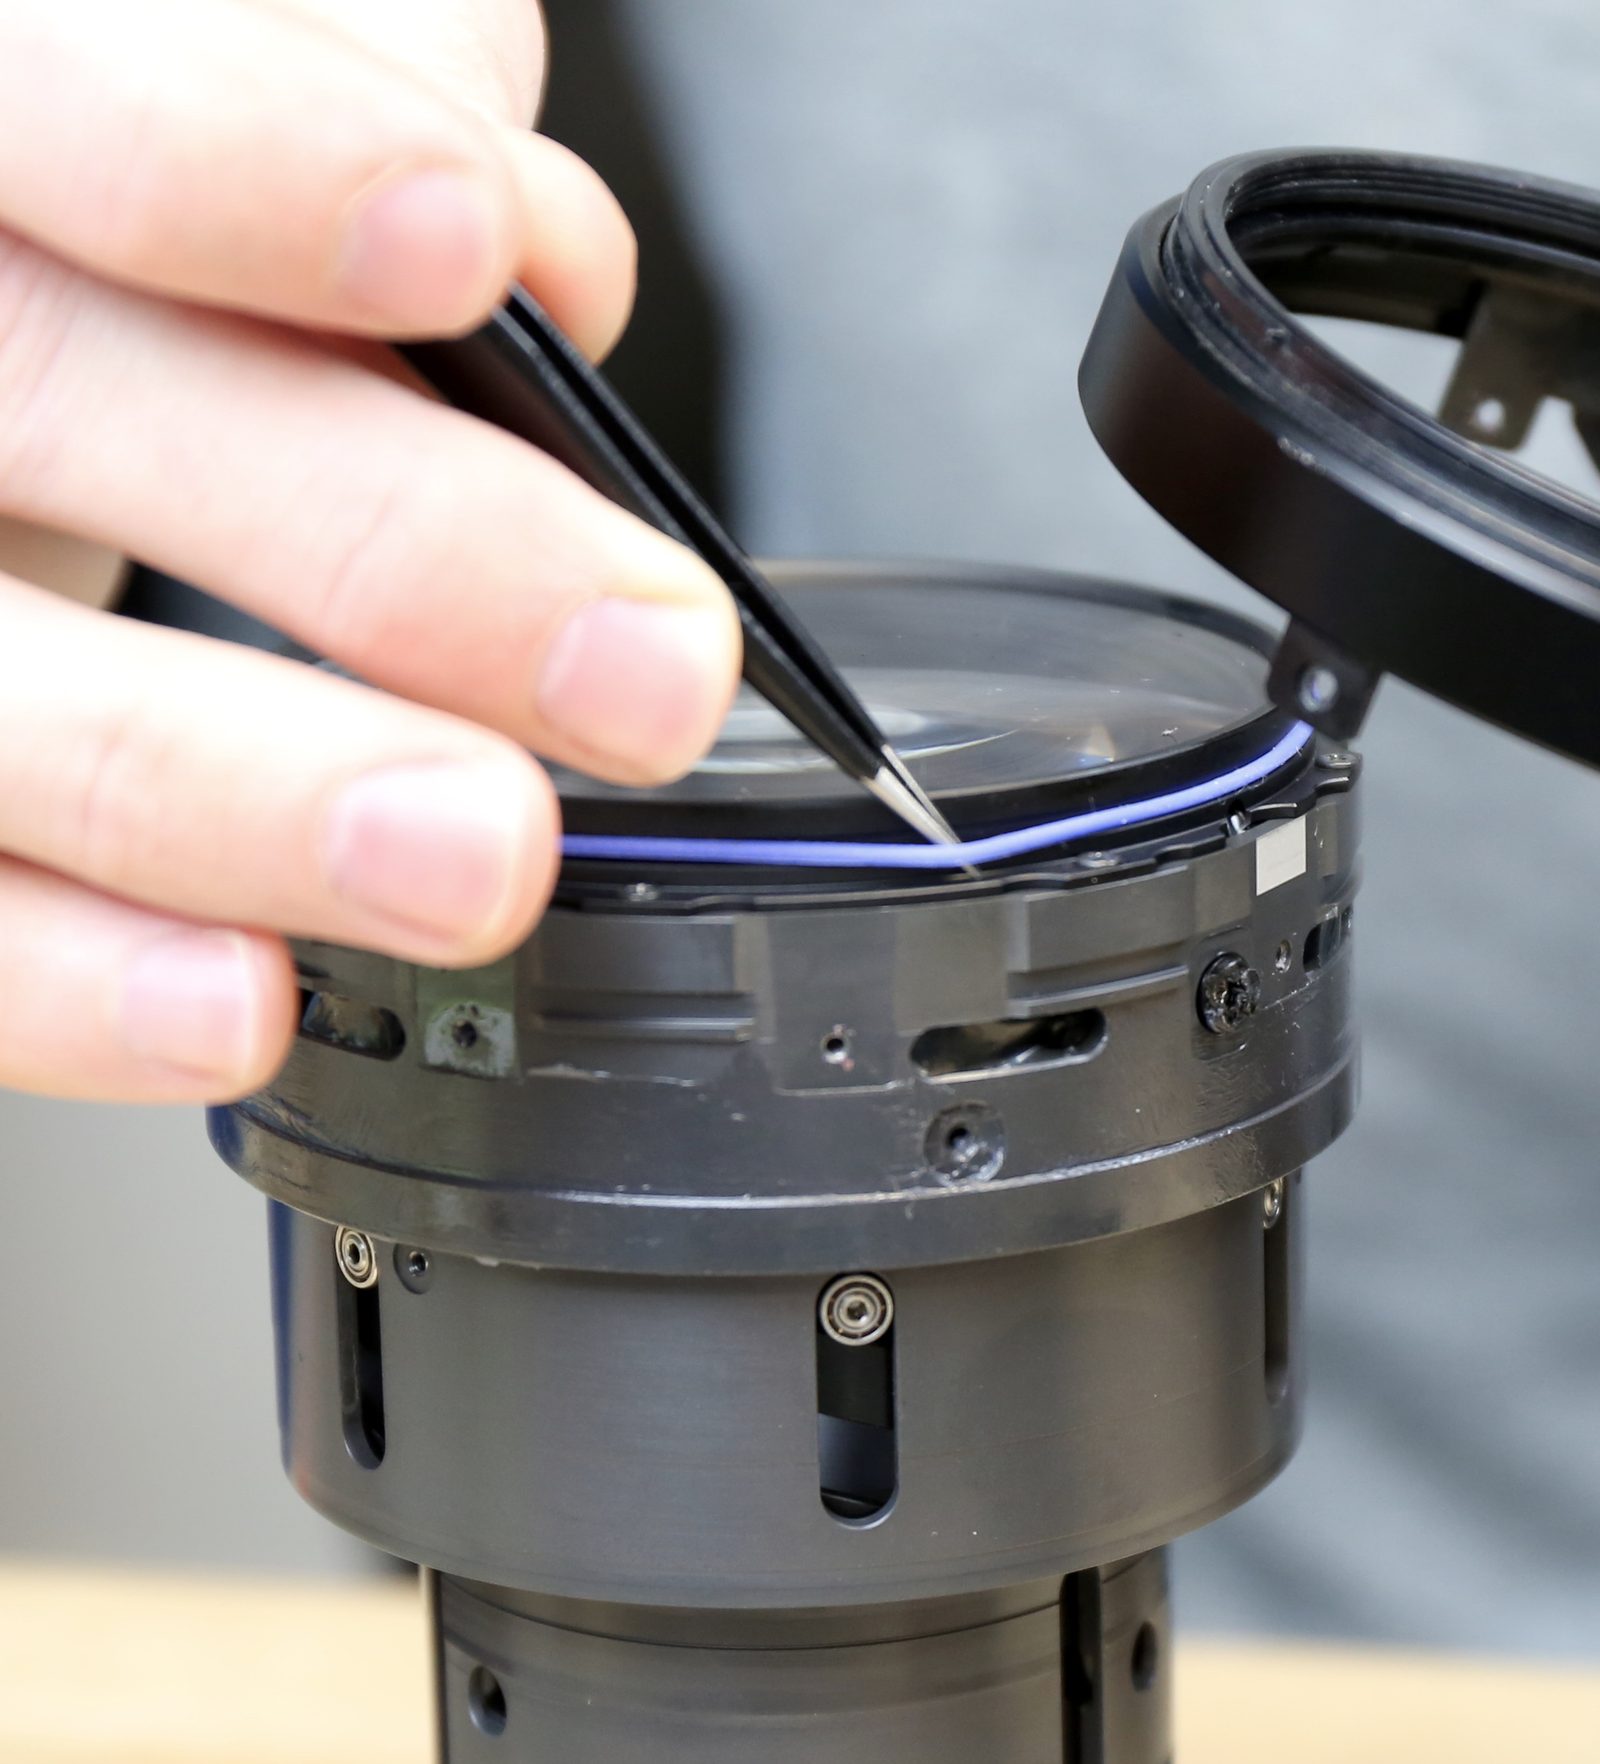
Then we removed the front group, which is two cemented elements. This, of course, could have been done at any time during the teardown, but we were doing most of our work with the lens face down, so it seemed best to leave it until near the end.
Oh, Yeah. About that Focusing Problem
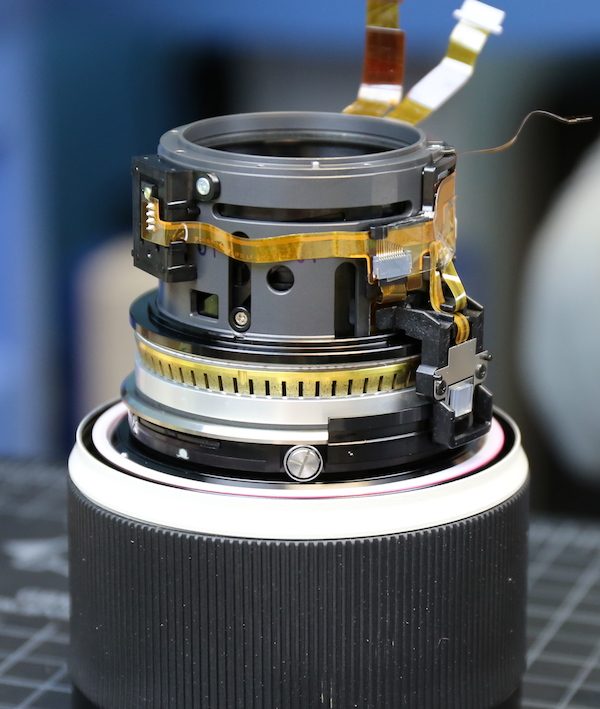
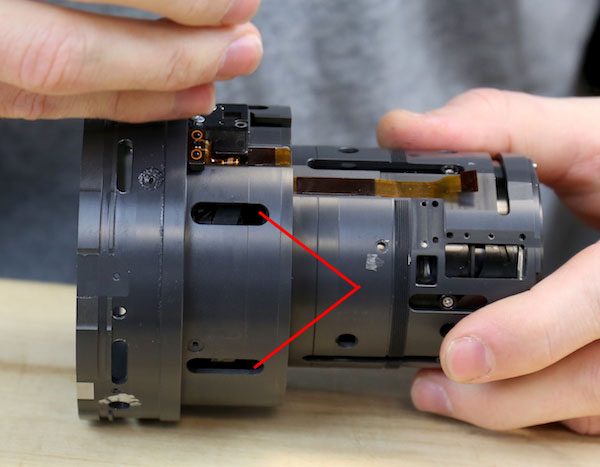
At this point we we had one piece left – the front group barrel assembly you can see in the picture above. This contained some zoom elements in the smaller part of the barrel, and the front focusing group in the larger part. Reaching through the slots with forceps we could tell that the focusing group was still grinding when we moved it up and down, with a lot of resistance. We could also see it was slightly tilted. This usually means a roller or cam was broken or bent.
We removed all 6 rollers, which by the way are some really robust, ball bearing containing, pieces of engineering. They were all working fine and even with them out of place the focusing groups was still scraping when we tried to move it.
Looking through the slots where the rollers had been, we could tell there was some form of spring loaded plate system with the focusing element; three of the rollers above went into the actual focusing element, three into the plate below the spring. But we couldn’t find a way to open things up further.
We decided to put the lens back together, bite the bullet and see if the service center could repair it. But being a suspicious person by nature I did some checking first and found out, in typical Sony fashion, this entire assembly was considered a single part. So if we sent it in they would replace this entire assembly at a repair cost of slightly more than half the price of a new lens. Needless to say, we switched into nothing-to-lose mode and went back to looking for a way into this assembly.
We could have removed the zoom groups from the small end, but that wasn’t going to give us access to the larger focusing area. The only way in appeared to be by removing the second group, which was held in place with both a spanner ring and also with adjustable collars through the side of the lens.
Oh, and lots and lots of silicone glue. So we (royal “We” again – Aaron did this while I made more coffee) position-marked and removed the collars and chipped out lots and lots of glue.
Finally we got the element out and could actually look down onto the top of the focusing element. (And yes, we realize there’s more glue to clean up before reassembly. Don’t be snarky. You’re tired just from reading about it, so you can understand we were really sick of doing it.)

There’s another spanner ring down over the focusing element, so we took that out and then just about lost our minds. Because there’s another ring of beautiful ball bearings under it. We’ve never seen anything like this before and at this point really had no idea what we were seeing.
Despite multiple cups of coffee and the resultant tremor, Aaron managed to get the focusing assembly out without spilling any ball bearings. (Notice how I use ‘we’ when I know everything’s going fine, and switch to ‘Aaron’ when there are 30 ball bearings that might spill onto the floor.)

So we made our second ball-bearing corral. We kept them separate on principle, but they’re the same ball bearings as the other set. What size you ask? Oh, 2mm, which is just a bit thicker than that connecting plate I’m obviously not happy about.
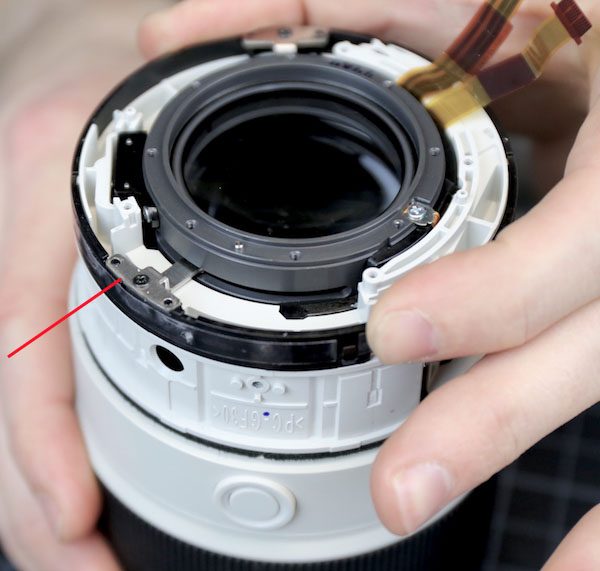
We looked at the internal focusing assembly and saw there was a pressure spring at the bottom (red arrow), pressing up against the focusing element in a cage-like arrangement. It appeared to be out of position, creating a bit of a tilt of the element that was scraping the inner barrel when the focusing group moved.
We (yeah, I’m back to taking credit now) reassembled it with the spring properly positioned back under it’s little latches like it should be.
I won’t bore you with reassembly, except to add that we discovered that the spanner ring over the ball-bearings is like that for a good reason. Tightening the spanner compresses this bottom spring and you can ‘dial in’ the proper amount of tension for the focusing element. Too loose and it rattles around a bit. Too tight and it gets a little resistance to sliding up and down. It’s an interesting arrangement.
But if this spring comes out of position with any regularity the repair is going to be a royal PIA. This is just one dropped lens so let’s not run screaming about what may or may not happen again. We may never see this again. Or we might. Only time, and a few more dropped lenses, will tell.
Usually I end these posts by saying we’ve got the lens reassembled and it’s back in stock now. In this case we’ll wait for a new connecting plate, and then optically test and adjust the lens after final assembly, and really, really carefully check it before putting it back in stock. But we did reassemble it with the old connection plate to make sure the autofocus system worked properly.
So What Did We Learn Today?
Well, first and foremost, that lens repair is a miserable way to make a living. And lens repair on this lens will be miserabler than most.
Second, we learned that dropping your lens is bad, so don’t do that.
Third, 1mm thick aluminum plates maybe shouldn’t be used to hold two halves of a heavy lens together. And yes, Fanboy, I know the Sony engineers are smarter than I am. They designed 962 really great parts that I couldn’t have designed. But it doesn’t take massive engineering knowledge to figure out that the thinnest piece of soft metal shouldn’t hold the two biggest pieces together.
And finally, we learned there’s some really elegant and complex engineering in the Sony FE 70-200 f/2.8 GM OSS lens. There’s also some engineering that just seems complex. It may be far more awesome than I realize and I’m just missing the point. Or not.
I’ll repeat what I say all the time: Sony is trying a lot of new things; that’s how you advance. I completely admire the risk taking and efforts to try new things when most manufacturers are just fine-tuning what already is. Some of these new things turn out to be awesome, some don’t. It’s just as important to identify which new things are not better, or not even adequate, as it is to identify when the new thing is a dramatic improvement.
Roger Cicala and Aaron Closz
Lensrentals.com
March, 2017

131 Comments
Adam Sanford ·
With deep, deep respect for all that you do for the photographic community, Uncle Rog, please consider revising the title of this article. A difficult lens to tear down and service does not in the slightest compare to *that* level of human suffering. Surely there are other words you could use.
Roger Cicala ·
Adam, you are correct and that was inappropriate of me. Removing that now.
Munchma Quchi ·
We still have 3 years and 11 months of unknown suffering to endure. No getting ahead of the curve.
Jay Dee ·
I’ll suggest “who knew Sony repair could be so complicated?” Too easy?
curby.net ·
Thanks for continuing to be awesome. For being able to repair the unrepairable (or at least the not intended to ever be repaired), and for sharing your findings with the world.
Two possible typos:
“mechanical designer who saw fit to make the stacking of the ring USM” (unstacking?)
“creating a bit of a tilt of the element that was scarping the inner barrel” (scraping?)
Re: 2mm ball bearings, you said that they’re uncommon, but have you ever seen bearings used like that in any other lenses? Thanks!
Roger Cicala ·
We see ball bearings every so often, around USM motors, but I don’t recall seeing anything like this many and don’t think I’ve ever seen them around a lens element.
Munchma Quchi ·
Oh so easy Roger – you keep setting em up… I’ll keep hitting them out of the park.
https://www.youtube.com/watch?v=pbWWxGmbS9s
Mike Aubrey ·
Old Canon FDn lenses are filled to the brim with ball bearings!
Benz Oberst ·
Yes, many classic lens mounts are filled with bearing balls, but 2mm balls are huge and off the top of my head I can think of only a couple of places I’ve seen anything of that size. Most of the balls you find in lenses like FD are in 1-1.5mm range and I keep piles of them just so that I don’t have to look when another detent ball escapes on me. Of course FD is different in that it uses cylindrical rollers for a detent 🙂
Tribune Rickettus ·
Yes, many classic lens mounts are filled with bearing balls, but 2mm balls are huge and off the top of my head I can think of only a couple of places I've seen anything of that size. Most of the balls you find in lenses like FD are in 1-1.5mm range and I keep piles of them just so that I don't have to look when another detent ball escapes on me. Of course FD is different in that it uses cylindrical rollers for a detent :)
Panacea ·
Roger, is there a possibility that the weak connecting plate was intended to function as a destructible, consumable item to take the brunt of minor drops that might otherwise damage other, harder-to-service components?
(Not that it mattered in this case. Maybe they need to make that plate thinner? ;))
Roger Cicala ·
Possible, I guess. I considered that, but then thought how you had to largely disassemble the lens to get to the ‘crumple zone’ was an awful lot of work. But it’s certainly possible.
Zaphod ·
It may be Sony’s explanation for it now if it wasn’t before. 🙂
David Bo Hansen Cartagena ·
Definetly no.
Maxim Podtopelny ·
Wow, definitely it’s the most complex and superheroic teardown I’ve ever seen in this blog. Thanks for letting me discover the meaning of PIA abbreviation.
Guido ·
As always: interesting, informative and entertaining. Thank you so much!
lemonjam ·
Thanks so much for all this work Roger and Aaron. Really interesting ~ What a lens !
Patrick Chase ·
Tried to post earlier but I think comments were disabled:
In a former life (before detours through image-processing, imaging systems architecture, and software) I was a mechanical engineer. This design strikes me as “unbalanced”, by which I mean that it’s extremely robust in some respects but not in others. Ironically the fact that the halves are heavily built with thick metal barrels increases the vulnerability of that joint.
I also wonder how much shock and vibration testing this design saw. The middle joint looks like a shock vulnerability even at the low accelerations that are typically used for product testing, and those springs look like they wouldn’t last very long on the shake table.
Patrick Chase ·
I feel obligated to say: I never would have believed that s*** (Southern Fairy Tale).
Seriously. If I’d read that on a random forum somewhere I would have discounted it as another “85/1.4 metal shavings” incident.
mtnman1984 ·
In my full time job, I work at a company that builds test chambers. We build pneumatic and electrodynamic shakers that integrate into environmental chambers. I’m not an engineer, but I’m imagining a fall from no more than shoulder height, likely waist high slipping out of the renter’s hands while switching lenses. With no visible external damage, probably onto a carpeted surface or similar. I don’t know if I want to invest in a lens that may bend if dropped from waist high and become unusable. It reminds me pictures I’ve seen of the 70-200 F4 split in half after a drop. This is coming from a guy that has an a7rii with adapted Canon glass and really wants to dive into the E-mount system, but reliability is huge for me. I don’t want to carry a $2,600 lens and worry that a short fall would kill it.
Frank Kolwicz ·
The thing that I find most disconcerting is that, if the focus hadn’t failed, any other owner would not know that this lens was bent and that image quality is bound to have suffered.
Roger Cicala ·
That is a very good point. I didn’t mention it in the article, but well worth considering.
Patrick Chase ·
I’m in a similar position. I have a 1Dx II and a bunch of Canon glass. I’ve been eyeing the a7R II as a “high-res” body for a while, and have rented it a couple times. The sensor is terrific at lower ISO (though Canon has hugely reduced their read noise deficit in the 1DxII and 5Div, so the Sony isn’t as compelling as it was a year ago) and IBIS works beautifully even with adapted glass. It’s a slow camera even with native glass and slower still when adapted, but that’s what I have the 1Dx II for.
The thing that keeps me from going with the Sony is that I’m reluctant to invest that kind of money on a purely adapted solution, and I don’t think that Sony’s glass represents good value. The last few teardowns haven’t done much to change my opinion, and the 70-200/2.8’s design is a complete misfire IMO.
If only there were a financially distressed camera-maker with terrific glass, that already uses Sony’s sensors and might be an attractive acquisition target. OTOH Sony already acquired one of those and the “lens design transplant” didn’t take.
JJ ·
Just buy A99II?
Patrick Chase ·
I think you’ve missed the point. I already said that Sony’s bodies are fantastic, but their lens lineup is deeply problematic. Switching to a different body doesn’t help with that. In fact making the specific change you suggested would only make the situation worse because the A99 II:
1. Can only be used with Sony’s *old* A-mount lens lineup that they’re not aggressively developing any more, thus eliminating hope that things will get better in the future.
2. Can’t be used with adapted lenses the way E-mount bodies can
Also I like super-telephotos. The biggest lens I own is a 300/2.8, but I rent 200-400/4, 400/2.8, 500/4, 600/4 etc. lenses when needed. Sony’s A-mount telephoto lineup is an obsolete joke. They have old unstabilized 300/2.8 and 500/4 lenses that they inherited from Minolta, but nothing else.
I also think that the a99 II is a step in the direction of a true sports camera, but isn’t there yet..
JJ ·
These “old” A-Mount lenses are my point. They should be very robust, these are the designs everybody is asking for? And there are plenty of Minolta lenses out there wich are still working fine for a good price.
But if someone needs pixel level sharpnes on a 50MP sports body build like a truck … I bet we still have to wait a few years more, the industry is not quite there.
Louis Sherwin ·
Yes this seems to be the same problem in the FE 70-200 F4 except the pictures that I saw the connecting ring is plastic and seems to shatter under certain circumstances. The example that I found most troubling was the lens that was found broken in two in the shipping box. Maybe the delivery driver was playing soccer with the box while on break…
Even so I have purchased the Sony after I saw really terrible flair problems using my EF70-200F4 with a Photodiox adaptor. It is best, as Roger says, to not drop your equipment. I am clearly going to be extra careful with this Sony lens.
-louie
Paul M ·
Years ago I bought my wife a Canon Ixus 700 or something. I fumbled it and dropped it all of four inches onto a table; the lens mechanism jammed and the camera simply said E18. It turned out to be a common problem with many Canon compacts at the time. I read a guide how to hold the lens feeling for the misalignment and pull it and sort of bend it, and it clicked into place.
Anyway, my point is that some lenses are vulnerable in ways they really shouldn’t be.
KM ·
Well, four years later and I haven’t heard anything about these lenses breaking in half. If it’s happened, it’s not common.
Roger Cicala ·
Thanks, Patrick, that’s a better description of my thinking than what I wrote in the blog.
hugh crawford ·
Perhaps that piece is a sacrificial weak point designed to break rather than transferring force to something harder to fix deep within the lens assembly? A mechanical fuse if you will?
Reminds me of those idiots that replace the plastic foot that keeps breaking on their flash with a piece of milled aluminum and then tear the top plate off of their camera.
David Bo Hansen Cartagena ·
I work with Mechanical construction i SolidWorks and also have education as an machinist and completely agree. Some parts are made very sturdy and almost overconstructed while other parts are underconstructed and too fragile. That aluminium (Yes I am from that part of the world) ring is clearly not made properly and thats obvious just by looking at it.
My mantra is simple Mechanical design is better. This design looks like the designers did everything to make it as complex as possible.
Thanks for showing us this design. I am now certain that I will never buy this lens since it will cost a fortune to repair should it ever need some.
HomoSapienSapiens ·
I can’t help but wonder if the lens was designed with that attachment plate meant to be titanium or stainless steel; but then, at the last minute, for some unknown reason but probably to meet a target cost for the lens, aluminum was used instead? In other words, maybe the fault doesn’t lie with the designer(s).
mtnman1984 ·
Thanks for the teardown Roger. It’s funny that you prevented the replacement of a major component by simply moving a piece back into position, after tearing into one of the most complex lenses in production. With the damage to the aluminum ring and the lock pin hole wear on the bayonet, would you consider this lens more fragile than the Canon 70-200 2.8 L II? Do you see similar damage/wear problems with the Canon? I’ve been wanting to switch to Sony from Canon, but this teardown really gave me pause. I realize that this is only one lens, but the weaknesses still exist in every example. Are you going to stock bayonet plates and those aluminum rings for repairs?
Roger Cicala ·
We won’t rush into judgement on one sample. I did consider stocking more replacement plates, but I think we’ll wait and see if this is a recurrent problem. One other thing we have to consider is how much better we’ll get at tearing them down. Obviously we’ll get faster as we get used to the lens, but we can’t afford even a 2 hour teardown just to check and see if the plate is OK. This is the first broken 70-200 GM we’ve had. If we start to see patterns, then we’ll get more aggressive about stocking parts.
Patrick Chase ·
Could you afford 2 hrs if you had a lens that was obviously “out” optically?
As you’ve pointed out many times, it’s not a good idea to try to fix stuff that isn’t clearly broken. Presumably you’d only go to the trouble of checking the plate if you had good reason to suspect a problem. This specific case was unique in that you couldn’t check the optics due to the jammed focus.
If the alternative is a Sony-sized repair bill then it seems to me that the economics might work, depending on the salvage rate (percentage of the time that the plate is the sole cause of the problem and said 2 hrs’ labor actually results in a fixed lens).
Roger Cicala ·
Patrick, absolutely. 4 hours would still be a good time/price point. If we see a lens go out of sorts optically that will be one of the first things we check. But it also will matter how long the optical adjustment will take. So if it’s 4 hours of disassmbley/reassembly and 4 hours of optical adjustment, it could get close to economically unfeasible. Our economics are different, though, because that lens is also a lot of valuable parts so we have a point where ‘parts’ makes better economic sense than ‘fix’.
Dragon ·
I have quite a few cameras and also a lot of Caterpillar equipment. Cat makes a lot of assemblies that have the same sort of precision as lenses (think fuel injection systems and rotating hydraulic manifolds on excavators). I do my own Cat repair and have never encountered silicone glue. If corrosion resistance is called for, then the part is either plated accordingly or made of a corrosion resistant material. If sealing is called for, then O-rings (some quite exotic) are used in profusion, but silicone glue is avoided even on engine gaskets. I suspect this is because Cat is a very service oriented company and they expect that their people are going to have to repair these things at some point (similar to Canon). Silicone glue is great stuff to seal something up that you don’t expect to ever take apart (at least in a precision kind of way). House siding is a good example. Seal it with silicone and if you ever have to take it apart get out the sledge hammer and the wrecking bar.
Enough said.
Munchma Quchi ·
Well, Sony lenses have never been used to bulldoze innocent girls so while strictly a Nikon fanboy, I credit Sony and Nikon for that much…. http://www.motherjones.com/politics/2003/09/death-rachel-corrie
Nathan Wright ·
Ever wondered where the next must-inject-politics-into-everything person would strike?
In an article about tearing down broken lenses, that’s where.
Thanks Munchy, loads of help.
Patrick Chase ·
Don’t feed the trolls.
Munchma Quchi ·
No problem whatsoever. https://www.cnbc.com/2017/03/07/caterpillar-is-accused-in-report-to-federal-investigators-of-tax-fraud.html
Jase1125 ·
Always have to be the village….. well you know… in the thread.
Patrick Chase ·
I think that one key difference is that people who buy serious construction equipment tend to be much more knowledgeable about what they’re getting than photographers, and they hold the manufacturers to account. Also those folks are very cognizant of service costs and turnaround times, and factor those into their purchase decisions much more than we do.
LR is an interesting case, because their business model has forced them to develop expertise on par with that of a large construction equipment operator. They’ve also recognized that it’s mutually beneficial [*] to share what they’ve found with the rest of us, which is IMO a good step towards holding the manufacturers’ feet to the fire.
[*] It’s beneficial for LR for two reasons: In the short term these blog posts drive eyeballs and rentals. In the longer term the actions we readers take presumably amplify their message to the manufacturers, and increase the likelihood of change.
disqust101 ·
“I think that one key difference is that people who buy serious construction equipment tend to be much more knowledgeable about what they’re getting than photographers”
Hahahaha. Just snorted coffee thru my nose. Most construction types have no idea and abuse their equipment until if fails. I know, I ran a cstr biz for 20+ years. The good news is good equipment is built with that sort of ignorance in mind – so companies (like CAT) tend to overdesign things. In the good old days, Terex (owned by GM at the time) used to produce the lamest junk you’d ever see. It would “look” like a CAT, but run like and last like it was a Yugo.
hugh crawford ·
I grew up on a farm and in the 60s we had a pair of government surplus Cat D6s bought in the 1950s. We would only shut them off to change the oil because they were such a pain to start. Start the pony engine with a rope then use that to start the D6, hate those pony engines. You could rebuild them in the field, in a tent on a tarp of course. Totally unkillable tractors, we kept using them until 2000 or so when we sold them with the farm. On the other hand just Google Caterpillar C13 and C15 to see how far the mighty have fallen. Mercedes Benz in the 1960s and 1970s was the same way, We drove ours for 700,000 miles until a tree fell on it. Now they realize that making things to last forever is bad business. If you want machinery that will just keep running until, well whatever wipes humanity from the face of the earth, the old two cylinder John Deers are what you want. If someone made cameras like that, well back then lots of companies made cameras like that notably Leica, Nikon, Linhoff, and Graflex before that sewing machine company bought them. Zeiss notably epoxied their cameras together to prevent them from being serviced.
Dragon ·
I had Cats back in the day and I still have a bunch. The new stuff still holds up very well and it does a lot more work than the old machines. I think their truck engine problems were aggravated by rapid changes in emissions regulations and that division somehow didn’t have its act together and Cat exited that market. The equipment division and the power generation division are doing fine. Often there is a penalty to being too big.
denneboom ·
“Well, first and foremost, that lens repair is a miserable way to make a
living. ”
I learnt that when i had to take apart a nikon 105 f2.8D, i had to remove a pcb for distance feedback that was glued to a barrel in order to disassemble the lens.
i messed up, bending one of the contact pin , so that the distance feedback was broken. and during reassembly i could get the diagraph lever functioning again, it got stuck when focusing.
Although i am glad that it was my own lens, and i dont repair lenses for a living.
That nikon 105 still works on my sony a7. Well…kinda.
Volker Bartheld ·
Haha. That kind of makes us brothers in arms. I lost an AF Micro Nikkor 105mm 1:28 D that was plagued by fungus exactly the same way. Heck. It could have worked though…
Benz Oberst ·
Yep, that’s what my first thought was when I saw the photo of a flex snaking around the assembly – “it’s looks like typical Nikon crap”.
Mehdi Torabi ·
Thanks, I really enjoy your posts. First thing I do before starting to work each dat is to look at your blog for a geeky post. I take excellent care of my equipments but my Canon EF 8-15mm f/4L USM Fisheye lens has been very jumpy, I had to open it up and repair it three times, reading your posts helped a lot doing it well. I have to say it’s modular construction makes openning and closing it very easy. First time it jumped out of my bag and landed on the asphalt, a nylon round thing (roller or cam) had broke in half which made the large front element jerk which I glued, second time I fell down a 3m wall and the lens was in mu pocket… again the same roller broke and I glued it. The last time I was photographing birds and sunset I was walking on the caspian sea my legs where 50cm in the water and this lens in my pocket I bended then I heard a splash sound and then I thought ohhh! the lens fell in the water and went down in the sand. well it wass all wet I cleaned it and put it in silica gel to maybe dry it the next day it was dry but the camera didnt recognize it and no auto focus and diaphragm… I opened it up and reconstructed it again, its amazing there was no sign of salt, water or sand inside and after closing it up it worked and it is as sharper as it was when new.
Ilya Snopchenko ·
A story not for the faint of heart. 🙂
Ilya Snopchenko ·
A story not for the faint of heart. :)
Oye ·
I don’t want to go all conspirational here, but both that thin aluminium ring, as well as that pressure spring that was the eventual culprit seem like rather obvious weak points compared to how robust almost everything else is. Especially when the former looks indeed so weak and the latter is a small part of a single assembly which costs so much to replace.
I’m always amazed when things are designed in a smart way (e.g. to be easily repairable) so it ticks me off even more when they have such weak points, makes me wonder if some of that isn’t on purpose.
Do you have that feeling when taking apart other higher-end lenses? (With the cheaper ones I can understand they may not be worth fixing.) And how would this factor compare to lenses from say, 20 years ago?
Patrick Chase ·
Never assume conspiracy where mere incompetence will suffice.
Seriously, I’ve seen results like that from highly silo-ed design teams, i.e. ones where different groups are responsible for the various components and they don’t communicate well or have consistent objectives. This sort of outcome also tends to reflect deficiencies in the systems architecture/engineering role, though that can itself be a symptom of a silo-based organization (the individual silos tend to hoard responsibility, and that prevents the overall architect from effectively riding herd on the whole mess)
Oye ·
Also true. With the amount of overergineering the current technology has, the limited budgets and the huge teams that work on every little bit of equipment, mistakes happen or problems tend to be dismissed as ‘known shippable’.
But sometimes the weak points are still quite jarring. And overall it’s a shame that so much of the current technology is pretty much deemed as single-use throwaway.
Roger Cicala ·
That’s a good point. The center plate made me think “front half design team, rear half design team, and tell the intern to figure out how to put them together.” Which I totally know isn’t true, but I certainly think several teams and weak seams between them is likely.
One other thing that is very true in optomechanics – parts designs tend to be reused over and over. This is a lot of why we see a certain ‘look’ in a manufacturer’s lens. I had an interesting conversation a couple of years ago with a very respected optomechanical engineer. I asked why he kept using a particular part, in numerous designs for years, even though it broke all the time. He looked shocked and told me no one in the company had ever told him that broke frequently. Isolation of teams is very strong.
keen ·
heh. reminds me of my mom’s old job back when we had a textile industry – she’d talk to the sewing machine operators and find out that they’d just cut 4″ off every left leg or whatever for years because the patterns were wrong – but no one would tell the pattern makers until she did.
pipe2null ·
I work in government business. So like to tell you that what’s worse than non-communicating engineer teams is non-communicating governmental bodies.
Each department works according to the predefined protocols (rules, regulations, laws) which some were written since 1920!
Almost in every countries, US included ?
AStarbucks ·
Highly informative, thank you! Was waiting for this Part II…
I CLEARLY remember that quite a number of years ago, there was talk that Canikon lenses (can’t remember which) of this type (typically 70-200mm f2.8 cos there are so many out there) tended to break right in the middle during heavy drops.
It cannot be coincidence that Sony engineered both halves so robustly but forgot/neglected the middle joint. It seems like a deliberate decision to ensure a clean break at the middle while having the 2 halves escape any serious damage.
Can you enlighten us on the breakage characteristics over the years when Canikon/Sigma/Tamron lenses of this type are dropped? Do they break in the middle?
AStarbucks ·
Highly informative, thank you! Was waiting for this Part II…
I CLEARLY remember that quite a number of years ago, there was talk that Canikon lenses (can’t remember which) of this type (typically 70-200mm f2.8 cos there are so many out there) tended to break right in the middle during heavy drops.
It would also make sense that companies would re-use proven designs. I’m sure Sony did so from the Minolta heritage which in turn probably shared designs with all other makers.
Therefore it cannot be coincidence that Sony engineered both halves so robustly but forgot/neglected the middle joint. It seems like a deliberate decision to ensure a clean break at the middle in order to have the 2 halves escape any serious damage. Just that a 2-foot drop is one of those neither-here-nor-there kind of impacts.
Can you enlighten us on the breakage characteristics over the years when Canikon/Sigma/Tamron lenses of this type are dropped? Do they tend to break cleanly in the middle?
Roger Cicala ·
We’ve seen some supertelephotos break (somewhat) cleanly in the middle, but I don’t remember ever seeing a 70-200 f/2.8 break in the middle like that. Near the mount or in the rear barrel occasionally. Much more commonly they break internally and either won’t zoom or focus, or are optically out of whack.
David Bo Hansen Cartagena ·
It dosen’t make sense to design a lens to break at a certain point since it’s not a ie. Safety component designed to break at a certain point. And with all those screws on the aluminium ring and the big outer thread it’s certain they didn’t think of it as a place designed to break should the lens be dropped.
AStarbucks ·
Didn’t what you say just made it the only sensible thing to break in the middle?
Given how heavy such telephoto lenses are, you prefer the body’s mount joint to break from the camera body?
The whole point is that in the field, you break the telephoto lens (so stuff it in your bag), but you can still carry on shooting with other (shorter) lenses instead of having a huge hole in your camera body. Lens Rental has already confirmed that this seems to be the case with the larger telephoto lenses.
AE-1Burnham ·
“Ball bearings are the escape artists of the lens prison system.” -Roger Cicala
Hah! I love it (see above). Thanks guys (and commentors) for this always enlightening and entertaining view into the rarely seen microbiome of the modern objective.
Sean Mclennan ·
Great write up, as always. Just curious, as a large rental house that services your own lenses, do you ever reach out to the manufacturers and speak with engineers about any potential issues you find?
Roger Cicala ·
Sean, it varies a great deal by manufacturer. Some don’t want to hear about it and just say ‘well rental gear gets abused’. Others come visit us regularly and want every report we can give.
Florent ·
Another excellent article Roger, thank you.
About “Others come visit us regularly and want every report we can give”. Very interesting facts. I suppose you can’t give any names?
Roger Cicala ·
Not much, no. When we’re actually working for someone there are nondisclosures in effect. Even when it’s just friendly visits and exchange of information, nondisclosure is pretty much taken for granted. It makes writing a blog and commenting on forums sort of like walking on stepping stones.
curby.net ·
I’m sure confidentiality also improves the relationships between Lensrentals and the manufacturers!
Roger Cicala ·
I’m not sure about that. It does limit what I can write about, though.
theclod ·
Wow, you folks sometimes do work for some of the manufacturers? Interesting, what kinds of things? Testing?
Roger Cicala ·
Olaf does some optical testing, for some and consults about testing methods a bit. For others Lensrentals provides a good field test with a large sample size about what breaks. Some just want our opinion about what customers like, don’t like, or want.
curby.net ·
“… about what customers … want.”
Sweet, so you’ve told them to make the optically-perfect 10-600 f/1.8 that fits in your palm, weighs 1 lb, and costs under $1000. Thanks for looking out for us! 🙂
Aelwyn ·
Seriously. It’s 2017. Why doesn’t this exist yet?!?!? 😉
H.G.Schmitt ·
I really couldn’t tell what I admire most: Designing that lens or tearing it down and putting it together again.
Roger Cicala ·
I really thought the ball-bearing corral was a high point.
pl capeli ·
i thoroughly enjoyed pt 1 …. eagerly awaited pt 2 …. and enjoyed that too
great humor and technical insight
phill luckhurst ·
I also wondered whether that ring was sacrificial, but as you say it looks so hard to replace that would seem pointless. Another thought that sprung to mind was at Sony planning a series of lenses that all use the same rear half to cut down on costs, maybe just with slightly different lenses in that section.
Douglas Watt ·
Amazing! Thanks for posting this Roger. It really underscores how much lens design has evolved in the past 20-30 years. Old Minolta beercans you could take apart with just a decent+ level of mechanical skills. This thing is a beast and challenges you guys with all your experience and skills. That’s what happens in any technological area where there is heavy demand driving continuous technical refinement. More and more layers of additional complexity.
Reinforces that I am not going to ever attempt to fix any of my lenses!
Chas Herren ·
Fantastic report and an example why Lensrentals blog is indispensable for the technical photographer. Now we see why the lens costs so much. Sony reinvented the wheel. Instead of understanding the state of the art and improving on it, they seem to have built from the ground up and now have an Apollo level failure on their hands. It’s the same mindset behind their 1.9mm filter stack over the coverglass. “We know better” Minolta, where are you now?
What is a shame, is that half the time Sony does know better. That 42mp BSI sensor is a marvel, and the latest thin filter mods show it can outperform M240 with steep ray angle lenses like the notorious ZM21/4.5. Such greatness and such hubris, which is only human, like our fearless duo above 🙂
I hope for more optical tests to come, and with the success of the M10, more RF lens testing as you did in the epic 50mm shootout. But did I hear you had sold the optical bench or gotten rid of it?
Brandon Dube ·
Shit, if the MTF bench is sold I’m out of a job!
Roger Cicala ·
What he said!
Klaus Pforte ·
Thank you very much for this great work of art. Very well written and imaged!
Other people only write 140 characters to make the world crazy. You write some thousand characters more and make many readers happy.
I will come back when you disassemble the Space Shuttle next time.
Best regards, Klaus
Roger Cicala ·
We’d try it if they’d let us. But that would probably have to be in at least 3 parts.
Pete No Surname ·
Would it help you if we turned our screens to portrait mode?…..
Klaus ·
Thank you very much for this great work of art. Very well written and imaged!
Other people only write 140 characters to make the world crazy. You write some thousand characters more and make many readers happy.
I will come back when you disassemble the Space Shuttle next time.
Best regards, Klaus
GregoryH ·
I lack faith that Nikon would do as good or careful a job as you folks. Do you do general repairs for privately owned Nikon gear?
Roger Cicala ·
We do not do repairs for others, I’m afraid. We can’t even keep up with our own repairs.
xslavic ·
I could say from what i saw in the dissassembly pictures that this lens is designed by Sigma.
Roger Cicala ·
Really? I didn’t get that impression at all. What made you think that?
FreedomCostsPlenty ·
I wonder if that weak plate joining the halves would even experience displacement during shipping? That much mass being thrown around by UPS?
Roger Cicala ·
I wouldn’t think so if it was packed decently, that kind of shock should be distributed throughout the lens. I think it would take more of a blow on one end or the other to transmit force through that plate. But that’s just me thinking, which doesn’t always work out well.
Patrick Chase ·
I think that’s right – My recollection from when I did this professionally is that with good packaging a vulnerability like that would be a nonissue. I think that in this specific case the concern should be around operating shock.
To put this in perspective, people ship glassware through the mail with reasonable success, provided the packaging is well designed. Nobody expects glassware to withstand the sort of handling that a lens will see, though.
Tord55 ·
I once dropped a Sigma 150-500 straight down on its rear end (my Pentax K-5 was attached, so it took the brunt of the brutal crash into the gravel). Say from 2 feet height, and the only thing that happened was a scratched LCD protector, and the mount lost contact with the OS in the lens, that’s all! And all covered by my insurance — nice!
Wilson Laidlaw ·
Roger,
Do you have to check the optical properties of the two halves of the lens before reassembly for things like adjustable element spacing, adjustable collars, etc, which are only accessible with the lens disassembled? If so did you have to get from Sony what the optical properties of the two sections should be, prior to re-joining them and do you have to power up each half of the lens to do the check? I like your little sucker for lens element lifting. When I took my rather large Leica Visoflex/Televit Telyt 560mm/f5.6 head apart, a small sucker similar to that did nothing to remove the single cemented group from the barrel for cleaning. I had to use the large windscreen sucker off my auto GPS to get enough suction to pull the group out, which I suspect had not been moved since new, in the 1960’s.
Roger Cicala ·
Wilson, we don’t have access to that information, it’s proprietary, although we’ll eventually figure it out. Many hints make me think subassemblies are optically adjusted prior to assembly, but that’s not an option we’ll have either.
However, the lens can usually be reassembled without most of the outer barrels, then adjusted, then fully reassembled.
Zaphod ·
Roger, there are some products out there that screw onto the filter thread of a lens and add a rubber ‘bumper’ to it. Have you trialled these products, and do they work to reduce impact damage? (DeluxGear/easyCover/etc)
Roger Cicala ·
We have not tried any of those.
Ralph Wallace ·
Roger and Aaron – It was impressive as heck to follow along (as much as any ignorant layperson ever could) while you disassembled, evaluated and re-assembled this extremely complex piece of machinery. My assembly experience consists of plastic model building (primarily Revell) military ships and planes and, later, HO guage buildings and rolling stock with careful painting, decorating (decals) and aging by hand. What you did here is another whole dimension and I was properly awed (if not shocked). Thank you for inviting us to accompany you on the journey. Hopefully your success was rewarded with copious quantities of Johnny Black (or better yet, Blue) to calm your frazzled nerves. Bravo!
Jay Philip Williams ·
Cool!
Don Farra ·
Roger, thank you once again for guiding us through another adventure into the unknown. I have question for you, is it harder to take apart a lens or reassembling it?
Roger Cicala ·
The first time, definitely taking apart. You don’t know where you’re going and are working on just general principles and common sense. After you’ve disassembled a given lens a few times it’s much easier.
Patrick Chase ·
It’s also easier to take anything apart if you don’t care about reassembly.
That’s how engineers avoid wasting too much time when doing “competitive analysis” 🙂
Ralph Hightower ·
It seems that lens repair was simpler in the manual focus days. But just image what lens from the 70’s & 80’s could have been with the optic materials and computer power of today.
Astro Landscapes ·
Just noticed in his bio that Roger likes shooting the Pentax K-1. Considering Roger’s engineering mind, to me that says a lot. I’ve been wanting to get my hands on a K-1 for a long while now… We’ll see how it goes…
Marc P. ·
I am no lens specialist, but a 1.2mm ring made out of aluminium seems to be a design error – and/or Sony have had missed the material stress into here, in terms of a 2ft drop. Stainless steel would have been also being cheaper perhaps then alu, i’d guess. It’ll be better for Sony to design this part out of steel then. Again, thanks a lot for this way interesting Lens Tear-down, Roger.
For instance, i’ve dropped last december my (way old) EOS 20D, whileas taking pictures. The attached Lens was thankfully a cheap one, and got a stuck, defective zoom mechanism, but still took pictures, as a fixed “prime” now being stuck at around 35mm setting. Whileas the Canon Body only had a small scratch at the left corner, barely noticeable, it wasn’t a drop from 2 ft, but when i was standing and taking pictures at the lake here, i’ve slipped onto the mud, and felt backwards, whileas having the DSLR touching the ground with the bottom and not that heavy, the DSLR and lens came horizontal to the ground with my arm, and the 20D still shoots very well. But something into the Lens then prevented the Zoom mechanism from functioning, and when i slightly shake the setup, something is rattling inside the Lens…this is the 1st ever lens i’ve broken since 1987 for real, whileas being physical from apperance intact.
Laurent Fournier ·
I am curious…how much would it take for you guys to do that same repair again? surely you learned quite a bit from the experience and the second time would be less painfull, right?
Roger Cicala ·
It will definitely be better the second time. But we still haven’t looked into how long the optical adjustment would take. I think it’s reasonable to think we could do the disassmbly/reassembly in 3-4 hours pretty easily. But the optical adjustment could be 30 minutes, could be another 4 hours. So too early to tell.
But if you’re speaking how much would we charge in $$ – I’m pretty comfortable too much to be worth anyone’s while.
Mansoor Guuwa ·
Can someone please explain exactly how the damage to the aluminium plate was caused.
“When we looked at the attachment plate above more carefully, it became apparent that two of the screw holes on one side of the lens were bent downward slightly.”
Actually the bending you showed in the photo was upward ie towards the screw heads. I know it’s mentioned that on the the holes opposite the bending is in the opposite direction, I am aware that the lens has been reassembled but i would’ve like to see the other holes to understand the forces involved.
The aluminium plate was screwed flash against the lens with a shim between the two surface. In the assembled state the forces that bent the plate would have had to go through the shim. Also any forces, due to the front part of the lens being knocked against something, would be taken up by to 4 outer screws and not the inner 8 screws.
Roger Cicala ·
I’m not understanding your “go through the shim” comment. That’s an 0.01mm flexible shim. Are you trying to say it would tear if there was stress or should be a shock absorber? Neither would be the case.
As to the screw bending there was no sign in the outer set of screws, but the bending of the inner set made us concerned that the entire plate could be warped slightly, especially after we found could bend the metal with finger pressure.
But we don’t know for certain, of course.
LAB 2.35:1 ·
Roger – with this sort of of finding (the aluminum ring)… what do you think are the chances that Sony’s team might consider a parts change and swap out the ring for something more robust in the future production runs? Given your close relationship with their engineers, I would suspect that they take your feedback more seriously?
This reminds me of the infamous issue with the plastic lens mount on the first A7xx bodies, which were obviously replaced with a proper metal ones on the Mk2.
Roger Cicala ·
I think that’s about it — it will probably be different on the Mk 2.
DONOTUNPLUG ·
Roger - with this sort of of finding (the aluminum ring)... what do you think are the chances that Sony's team might consider a parts change and swap out the ring for something more robust in the future production runs? Given your close relationship with their engineers, I would suspect that they take your feedback more seriously?
This reminds me of the infamous issue with the plastic lens mount on the first A7xx bodies, which were obviously replaced with a proper metal ones on the Mk2.
Konstantinos ·
It is funny reading all comments below that people is expecting for a lens being made mainly from glass and ligthweigth materials to be working normally after a drop of 2-3 feet… When lenses are heavy (Zeiss, new Sigma 85mm Art) everyone is complaining about the size, weigth and bla, bla, bla… when manufacturers use ligther metals (eg: Aluminum) people complains about it bending under pressure. Hum…
Again, lenses are not meant to be dropped. If they do, things will brake. I am a Nikon user but I believe Sony´s engineers weren`t using a “crash test” approach when designing this lens.
Pete No Surname ·
“And lens repair on this lens will be miserabler than most.”
Hi Roger, are there many that are worserer?
And do you, once finding a lens/e that is worserer, banish it/them from your hallowed turf?….
Roger Cicala ·
Some are nearly this bad, but I can’t think of any worse off of the top of my head. There are certainly some lenses that we just won’t work on because it’s not worth the time involved. We’ll still carry it, but not try to repair it in house.
Terry ·
Thanks for the detail story and sharing! Always happy to read and learn from you guys!
Prefer Anonymous ·
the deformed aluminum piece may have been a ‘sacrifice’ design, to prevent other parts from impact failure.
it may have been a specification error, as aluminum alloys comes in varying types as well, some softer, some a tad more rigid, even brittle.
all that silicone?, seems like a curing process was used as most silicone takes a good day or so to become fixed, maybe some cute new light curing stuff that polymerizes in a few seconds?
as for the little springy thing that came out of place? shame shame shame on sony!
know any good shops that do mirror refurbishing? ive got a few cat’s that have seen too much moisture over the years.
Matthias Welwarsky ·
Well, Sony are not alone to not consider heavy mechanical shock in lens design. I had my Tamron 24-70/2.8 break right through in the middle after taking a fall of around 2.5m inside the photo bag, mounted to the camera. And I think they’re right. As a lens maker you can rightfully assume that photographic equipment is well cared for and protected from mechanical harm. And you’ll admit that the little aluminium ring is a good indicator for a repair mechanic about what has happened to a lens. I’ll even venture saying that little piece is the “canary bird” of this lens. Had it been any sturdier, the lens would have been broken just as good with much less indication as to what has happened.
VTC Media ·
So just what happens, customer wise, when they return a lens bent like a flamingo leg?
Ayoh ·
Roger you seem to have quite high confidence in the claim of customer that he dropped this lens from a height of only two feet..
This leads you to a criticism of sony engineers that the the lens is not robustly designed against general rough handling that it might see in practice. Yet is there any evidence that the customer was being honest about how the damage was sustained? Is it less likely that the team of engineers who successfully design this complex mechanical assembly did not think of a seemingly obvious parameter when specifying the plate thickness?
Who would you give the benefit of doubt in this scenario – a random customer who damaged the lens or a team of specialised engineers responsible for complex design scenarios? You seem to think the engineers made some obvious oversights based on the word of this customer.
To me as mechanical engineer the internal assembly looks like it is possibly intentionally designed to localise plastic deformation upon overloading to that aluminium plate. If you overload the lens assembly sufficiently (such as due to large load on account of a fall) some material will eventually plastically deform and result in permanent deformation; if the lens assembly is uniformly stiff it will be difficult to localise that deformation to a predictable location (where a deformed part of the assembly could be easily replaced). However, If a section of the assembly in the load path is markedly less stiff, then the deformation will be predictably localised to that location..i.e. in a replaceable component. The fact that a lot of glue is also used to seal lens elements also suggest robustness against possibly decentering.
Whether this a concentrated failure point design is the best approach for such a telephoto zoom lens I am not sure. But it seems somewhat arrogant of you to imply the engineers do not know what they are doing and did not think of this detail. To me it seems they did think of it when specifying the design.
If the plate is in fact the aluminium plate is not stiff enough to avoid deformation under general rough handling, replacing it with stainless steel with the same geometry would make it about 3 times stiffer so is an easy design correction.
EvilTed ·
I dropped my 70-200 F2.8, mounted to my A9 from hip-height onto a grass playing field.
I missed the holster as I swapped between 70-200 and 24-70.
The lens mount on the 70-200 bent enough that it would not attach to my A7r III very easily.
On closer inspection, the mount was clearly deformed at two of the mount screws.
The cost to repair?
$700!
Sorry, but a Canon or Nikon 70-200 F2.8 is a professional grade lens. The Sony is not.
The lens mount is 1.2mm aluminum as Roger found and this could be bent by hand pressure.
Rainbow Dash ·
I own this lens and have the filter thread damaged.
As far as I can see the replacement of the front filter ring is quite easy: remove the focus ring rubber and the clear tape underneath. Then I can unscrew and replace the filter ring.
I do need only a new filter ring and a need strip of that clear tape.
No optical recalibration needed.
Am I missing something?
Roger Cicala ·
Rainbow Dash, no that’s it. That part is well designed for repair.
Kovács Tibor ·
I dropped it too :(
can you see what could be wrong? Can you help ? https://drive.google.com/fo....
Roger Cicala ·
Sounds like one one of the AF motors is broken.
Harry Dennis ·
Thanks for a great read!
Stratis Papadopoulos ·
So, five years later I find this article which gave me the answer to my question; why is my lens wobbling!! Is there any way to order for this connecting plate? I am pretty sure Sony does not provide spares like that, but I was wondering if anyone has an idea…. Thank you for the great article!!
Torben Lysholm ·
Excellent work and a good read. I just bought a broken copy of this lens. The zoom is broken. Not in the usual way, where it doesn’t zoom even if you turn the zoom ring – here the zoom ring is stuck, so in order to fix it I needed to get into that mechanism …. and that’s about the only thing not shown here. One other thing is the different sizes shims – it doesn’t show where they go, and when taking the lens apart they just fell out, so I have to just guess.
The broken zoom, I knew about before I bought it, but I wasn’t told about the focus and aperture not working either. I guess I’ll see if I can fix it, and if not, I’ll either sell it again as defective, or take it apart completely and sell it as parts.
Either way, this article was a great help in taking the lens apart down to barrel around the zoom assembly. Thanks for sharing!
Something is broken there on my lens, so that I can’t align the holes with the rollers and their screws, so I’l have to remove a bit of material from that outer barrel in order to be able to remove those screws.
We’ll see what happens.
Felipe ·
Hi Roger, how are you? ask me a question about this lens, when yours had the reported problem, did it keep measuring the diaphragm opening?