The most important thing about RED’s new Ranger is that it’s rental only, not because that’s a first for RED (though it is), and not because we’re the only online rental house carrying it (though we are), but because it’s indicative of the customer it’s designed for. This isn’t a camera for owner-operators. I don’t mean that as a positive or negative judgment. Cameras are just made for different uses. While RED’s other DSMC2 brains might be perfectly capable in a studio environment once built out for that purpose, the RED Ranger is the first camera they’ve released that’s made specifically for demanding studio work at the kinds of budget levels that can support a rental-only model. Companies like Arri and Panavision have similar strategies for their higher-end cameras like the Alexa 65 and DXL2. In fact, RED has worked closely with Panavision in developing their recent digital cinema cameras. The DXL2 uses the same 8K Monstro sensor as the Ranger.
By designing a camera from the beginning as a rental only product, manufacturers allow designers to narrow their focus. Retail cost, while still a concern, isn’t nearly as high on the list of priorities when a camera is only meant to be rented. User interface, too, can be more directly tailored to a particular market. In short, RED knows who will be using this camera, and they’ve made design choices to serve those customers.
Similarities
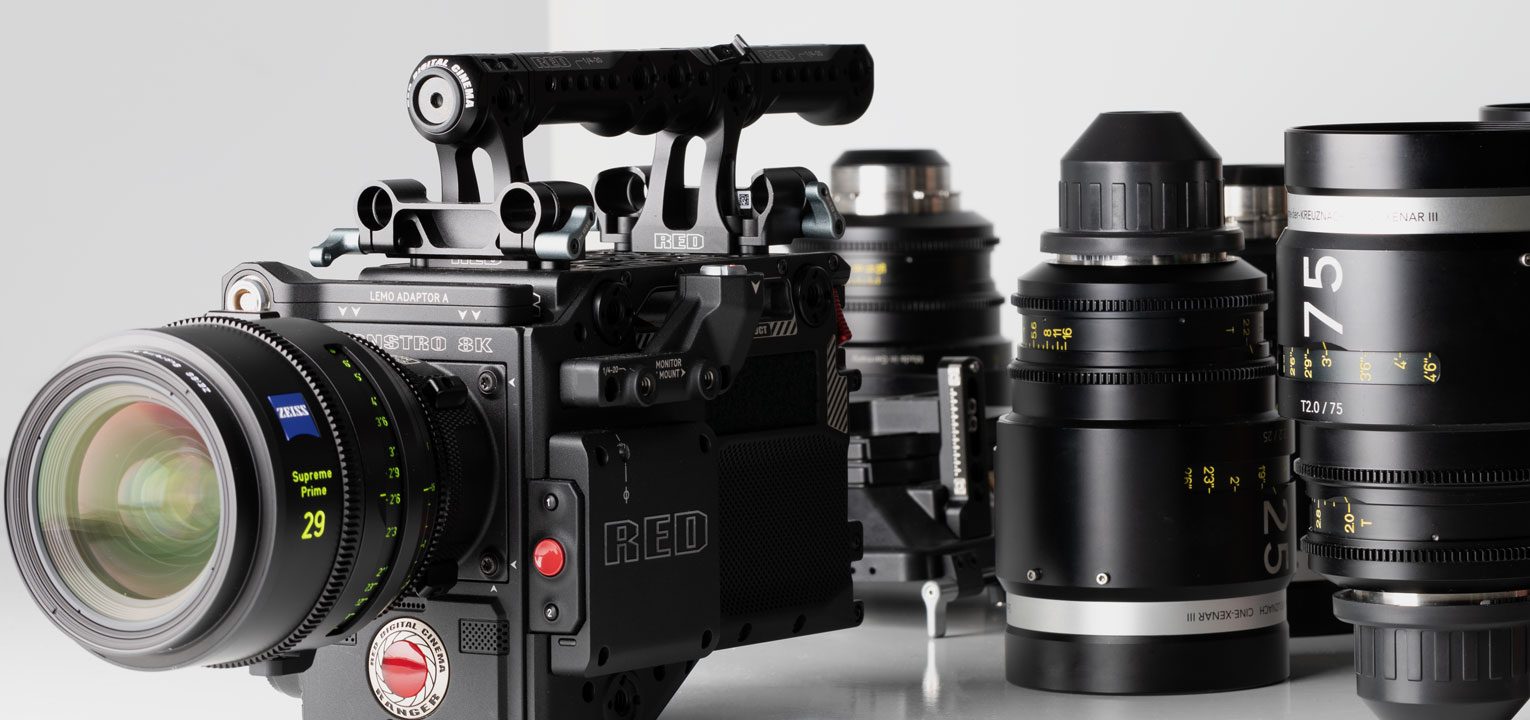
Before we cover what’s specifically new on this camera, let’s go over what’s the same. First, the RED Ranger uses the same 8K Vista Vision sensor as the DSMC2 Monstro. It also features the same internal processing, so most of the imaging-related specs are consistent between the two bodies. You’ll find the same color science, the same codec options (R3D + ProRes), the same maximum resolution (8192 x 3120), and the same maximum frame rate (300fps at 2K 2.4:1). The RED Ranger also uses the same OS as the other DSMC2 brains, so if you’re already familiar with operating any of those, the learning curve shouldn’t be very steep at all.
You’ll also be able to use some of the same accessories, and, most importantly, media. The RED Ranger takes the same high-speed RED Mini-mags as the rest of the DSMC2 line. It will work with the same Pogo-based quick mount RED Touch LCD monitors and LEMO adapters, as well as the swappable DSMC2 OLPFs. None of the existing expander modules will be compatible, but mostly because the feature set of those modules is almost entirely built into the body of the Ranger itself.
This fact, that many of the features and ports previously relegated to expansion modules are built into the camera body, is the root of most of the major differences between the RED Ranger and the rest of the DSMC2 line. RED’s previous focus has been on modularity. DSMC2 brains like the Monstro or Gemini have been relatively small on their own, with the expectation that the user would add task-specific expansion modules to build them out according to their particular requirements. On the Ranger, though, RED has designed the camera to be fully operational on its own.
Differences
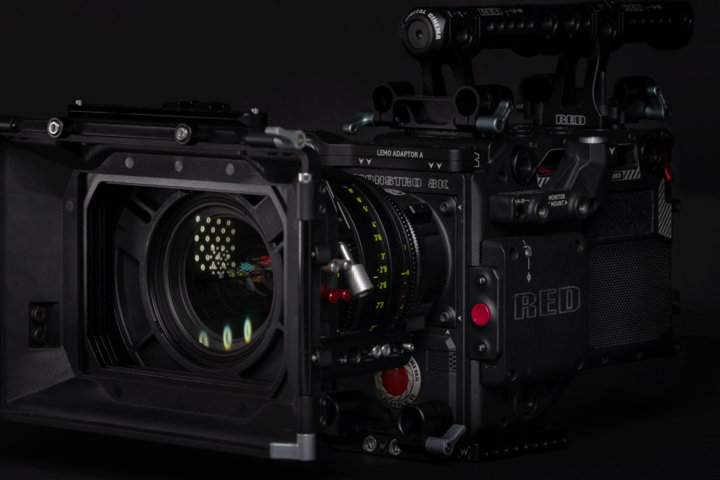
I/O-wise, the RED Ranger is on par with many of the other cinema cameras in its class. For power, it features 2 3-pin 24v LEMO power outputs, 2 2-pin 12v LEMO power outputs, a USB power output, a 3-pin XLR DC input, and a battery plate. Our rental kits are gold mount, but there are v-mount versions available. The USB power output and 3-pin XLR DC input are, I think, especially nice touches. Because the camera has built-in Wi-Fi control, the USB output will come in very handy for Camera Assistants (ACs) who need to power smart devices during breaks. And I think the 3-pin XLR DC input is a great sign that RED thought carefully about the people that are going to be using this camera. RED’s clearly designed the RED Ranger for a studio environment, where large format battery packs like Anton Bauer’s Cine VCLX are common. They know these cameras will be used more often with third-party power solutions, so they designed the input around a standard connection rather than the proprietary LEMO typical of the other DSMC2 brains.
For communication, the RED Ranger features a RED standard CTRL port, 3 SDI ports, a gigabit ethernet port, a timecode port (5-pin LEMO), and a BNC genlock port. For audio, you’ll find a 3.5mm headphone jack, a single 5-pin XLR input, and 2 built-in stereo mics. That single 5-pin XLR can easily be adapted to 2 standard 3-pin XLR inputs with the use of a splitter cable. In addition to providing a line or mic level input, that 5-pin will also be able to provide +48v phantom power if need be. Finally, as I mentioned before, the Ranger features built-in Wifi for controlling the camera over a smart device using apps such as FoolControl. You can see the Wifi antenna on the assistant’s side of the camera, right above the side controls. This control surface is basically the same as RED’s DSMC2 Sidekick, just with the addition of the Wifi antenna and built into the camera body rather than screwed onto the side.
The last major difference between the RED Ranger and the rest of the RED line is the lens mount. It’s a PL, very similar in design to any of the PL mounts you’d use on the other DSMC2 brains, but it’s shimmed internally, whereas the rest of the DSMC2 line uses an internal back-focus adjustment. As such, the Ranger is incompatible with any RED mounts other than the shimmed PL that it ships with. The idea here being that, as very high-end studio-specific cameras, these will only ever be used with PL mount lenses. If you don’t have to design a mount around the idea that it’ll be swapped regularly, why not use a more precise and foolproof internal shimming?
Our Kit and Recommended Accessories
Given that this camera is meant to be a more ‘ready out of the box’ solution than the rest of the DSMC2 line, and since RED would prefer for this rental-only option to be packaged consistently at every authorized house, we carry the RED Ranger one way and one way only. Our standard kit includes the camera itself, built-in gold mount battery plate, shimmed PL mount, two top-mounted lightweight 15mm rail supports, a 7-inch RED Ultra-Brite LCD, arms and cables to connect the LCD, an AC adapter with 3-pin XLR power cable, a manual, and a multitool. This all ships in one case, ready to plug in and start shooting as soon as it gets to you. On one hand, this pre-built kit makes it easier to put together a ready-to-use rental package. On the other hand, though, being locked into a specific package can make it a little tough to build the camera according to your individual needs. While the Ranger is pretty well-appointed in its default configuration, there are still a few accessories I’d consider adding.
First, this kit obviously doesn’t include lenses. To take full advantage of the 8K Monstro sensor, you’ll want something in a PL mount that will cover a full-frame. Given the cost of this camera package, I feel comfortable assuming the budget isn’t a huge concern, so I’ll start by recommending the current cream of our rental crop, the Zeiss Supreme Primes. These lenses render beautifully on that full-frame sensor. They’re tack sharp, don’t breathe at all, and with T1.5 apertures across the whole focal length line, allow you to take full advantage of the gorgeous bokeh you get by shooting on a larger sensor. If the Supreme Primes take you over budget, we have plenty of other PL options that will still cover the sensor, including the Zeiss CP.3s and Tokina Cinema Vistas. If you need a zoom, the full-frame versions of the Angenieux EZ-1 and EZ-2 are both great fits.
You’ll also need some other basics, like media, batteries, and support. I’ll start with the media. Since 8K R3D files can fill up cards pretty quickly, even with RED’s impressive raw compression, you’ll want to have plenty of storage on hand. Our 6-pack and 12-pack mini-mag kits will save you a little money over renting cards individually, ship in a single case, and include a reader. Battery-wise there’s no better choice than our Anton Bauer XT90s, which ship in 4-packs or 8-packs and include a charger, also bundled in a single case. Lastly, support. I can’t say I’m very impressed with the arm RED bundled with the RED Ranger. It’s not the sturdiest and can be kind of a pain to adjust. Instead, I’d recommend adding on a Bright Tangerine Support Arm, which is better in basically every way and shouldn’t add much to the cost of the rental. You’ll likely also need a baseplate that can accommodate 15mm rails. The best tool for this job can kind of vary depending on how everything is being put together but, for most setups, a Wooden DSMC2 baseplate and dovetail should work just fine.
Overall, I think the difference between the RED Ranger and other cameras in the DSMC2 line is a difference of intent. How do you intend to use the product? Are you a budding filmmaker with a modest budget shooting your first serious short? A RED Raven would certainly be a lot cheaper. Are you shooting a low-light run and gun documentary for web release? A slimmed-down RED Gemini setup might be a better fit. Now, are you shooting a feature film with a reasonable budget, mostly in the studio or at least in controlled lighting environments? Then I think the Ranger is a product designed for you. The self-contained body is more reliable, easier to work with, and, in some cases, even cheaper than building out a comparable camera using, say, a Monstro brain. Most importantly, the beauty and versatility of the image are hard to argue with.
If you’re interested in more information about the RED Ranger, we’re including some links to videos we’ve produced about it, including some sample footage for download. As of now, we’re the only RED authorized online rental house carrying this camera, so there’s surprisingly not a ton of information yet available on it. If you have any questions that aren’t covered here, as always, feel free to email us at support@lensrentals.com or give us a call at 901-754-9100, and we’ll be happy to help.