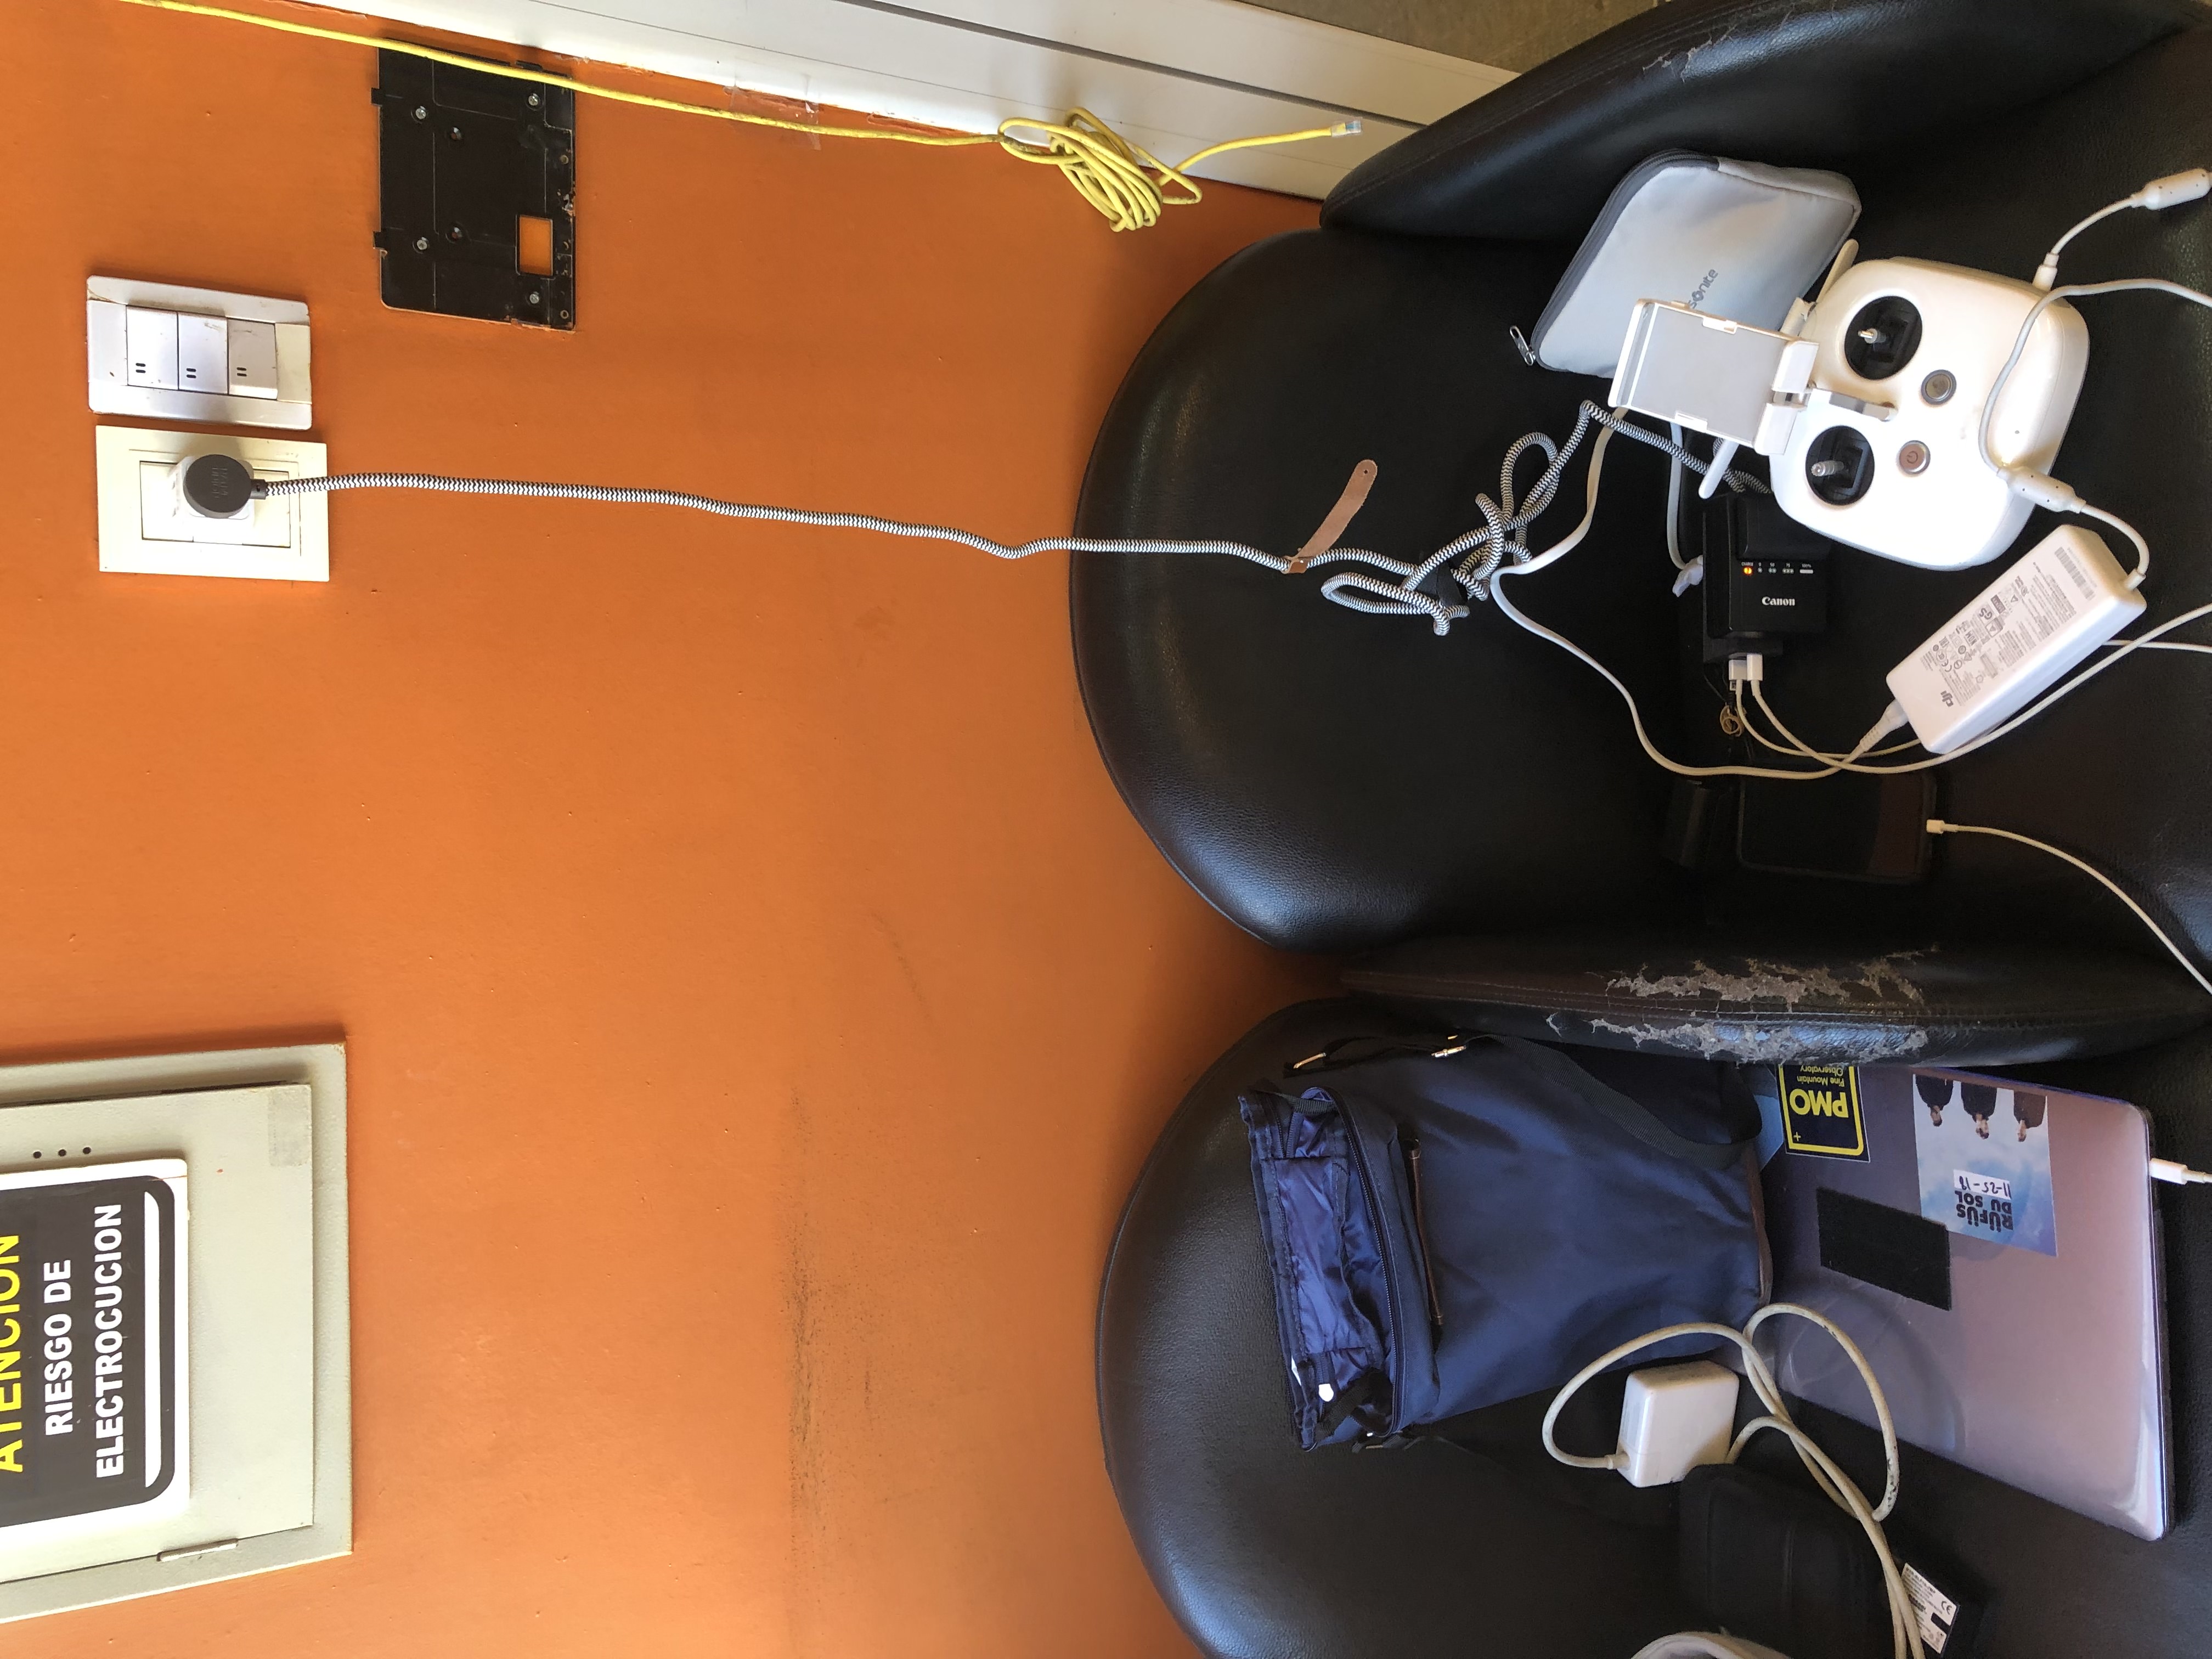
It was the night before totality in Rodeo, Argentina, and all the power was out. I had just returned from shooting all day in Valle de la Luna national park. Most of my batteries were dead or low, and my memory cards needed to be emptied on my also dead laptop. Fortunately, the eclipse took place at 17:41, and before noon the next day, I was fully tethered into an outlet at the tourism center downtown. The following “blackout” would take place in less than six hours.
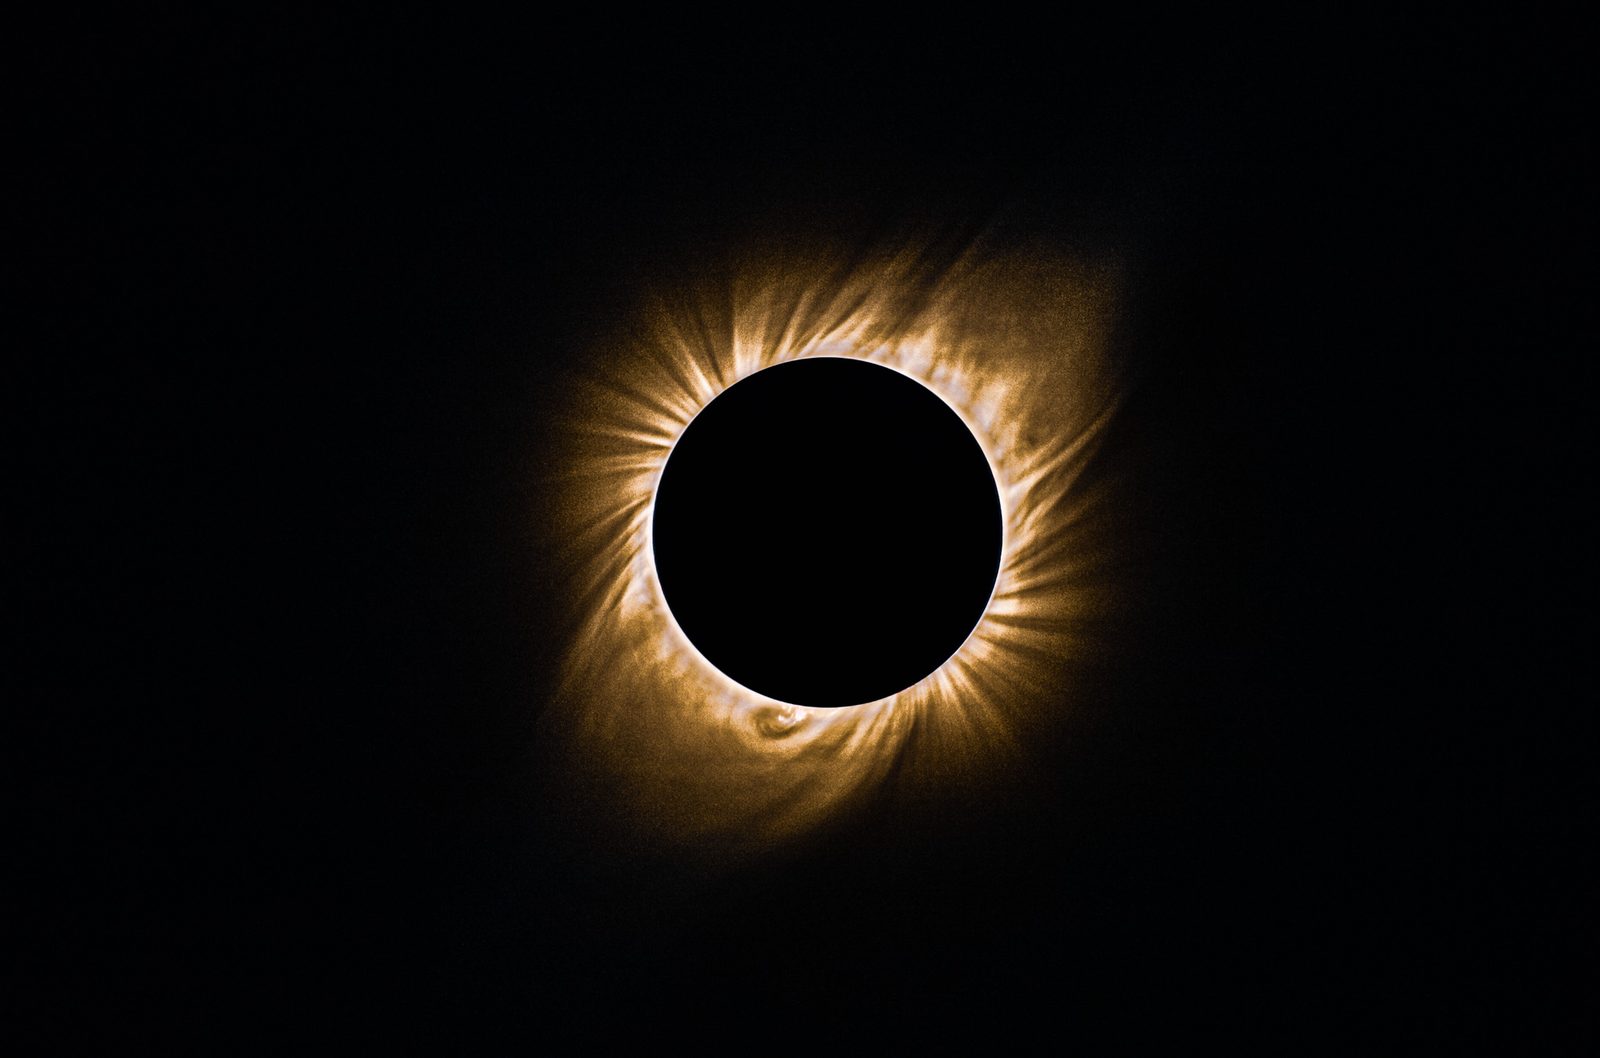
What brought me to Rodeo, Argentina was a sunset solar eclipse, which took place on July 2nd, 2019. A solar eclipse happens when the moon is entirely between the sun and earth. While the sun is around 400 times larger than the moon, it is also roughly 400 times further away, making both celestial bodies equal in size in the sky. For reference, a partial solar eclipse occurs when part of the moon covers the sun, and a total solar is when the moon completely covers the sun. During totality, you can look directly at the sun and see the corona, the outermost part of its atmosphere.
When a total eclipse happens, it’s not everywhere on earth. There’s a path of totality where the moon’s umbra, shadow, moves across Earth from west to east. Totality stretches from the shadow’s top to bottom. The center of the shadow will be in totality the longest.
The 2019 solar eclipse began in the South Pacific Ocean, east of New Zealand, and crossed over land only in Chile and Argentina. The path of totality ended by the time the umbra reached Buenos Aires because the sun was setting below the horizon. On the western coast of Chile, totality lasted 2 minutes and 36 seconds, 17:38:17-17:40:54. The end of totality, just short of the eastern coast of Argentina lasted 2 minutes and 3 seconds, 17:42:35-17:44:39. As the shadow moves east, both the moon and earth continue their respective rotations causing a shorter totality duration.
To get quality images of this cosmic spectacle, you want to be in the path of totality, preferably closer to the center. You won’t see the sun’s corona if you’re just outside of the shadow’s path. 99% of an eclipse will have dramatically darker skies but won’t yield the amazing photos you see during totality; where you are within totality matters just as much. You may want to give up a few seconds of totality to have a better view, whether it is a higher altitude to see the moon’s shadow or in front of mountains or a lake to add to your composition.
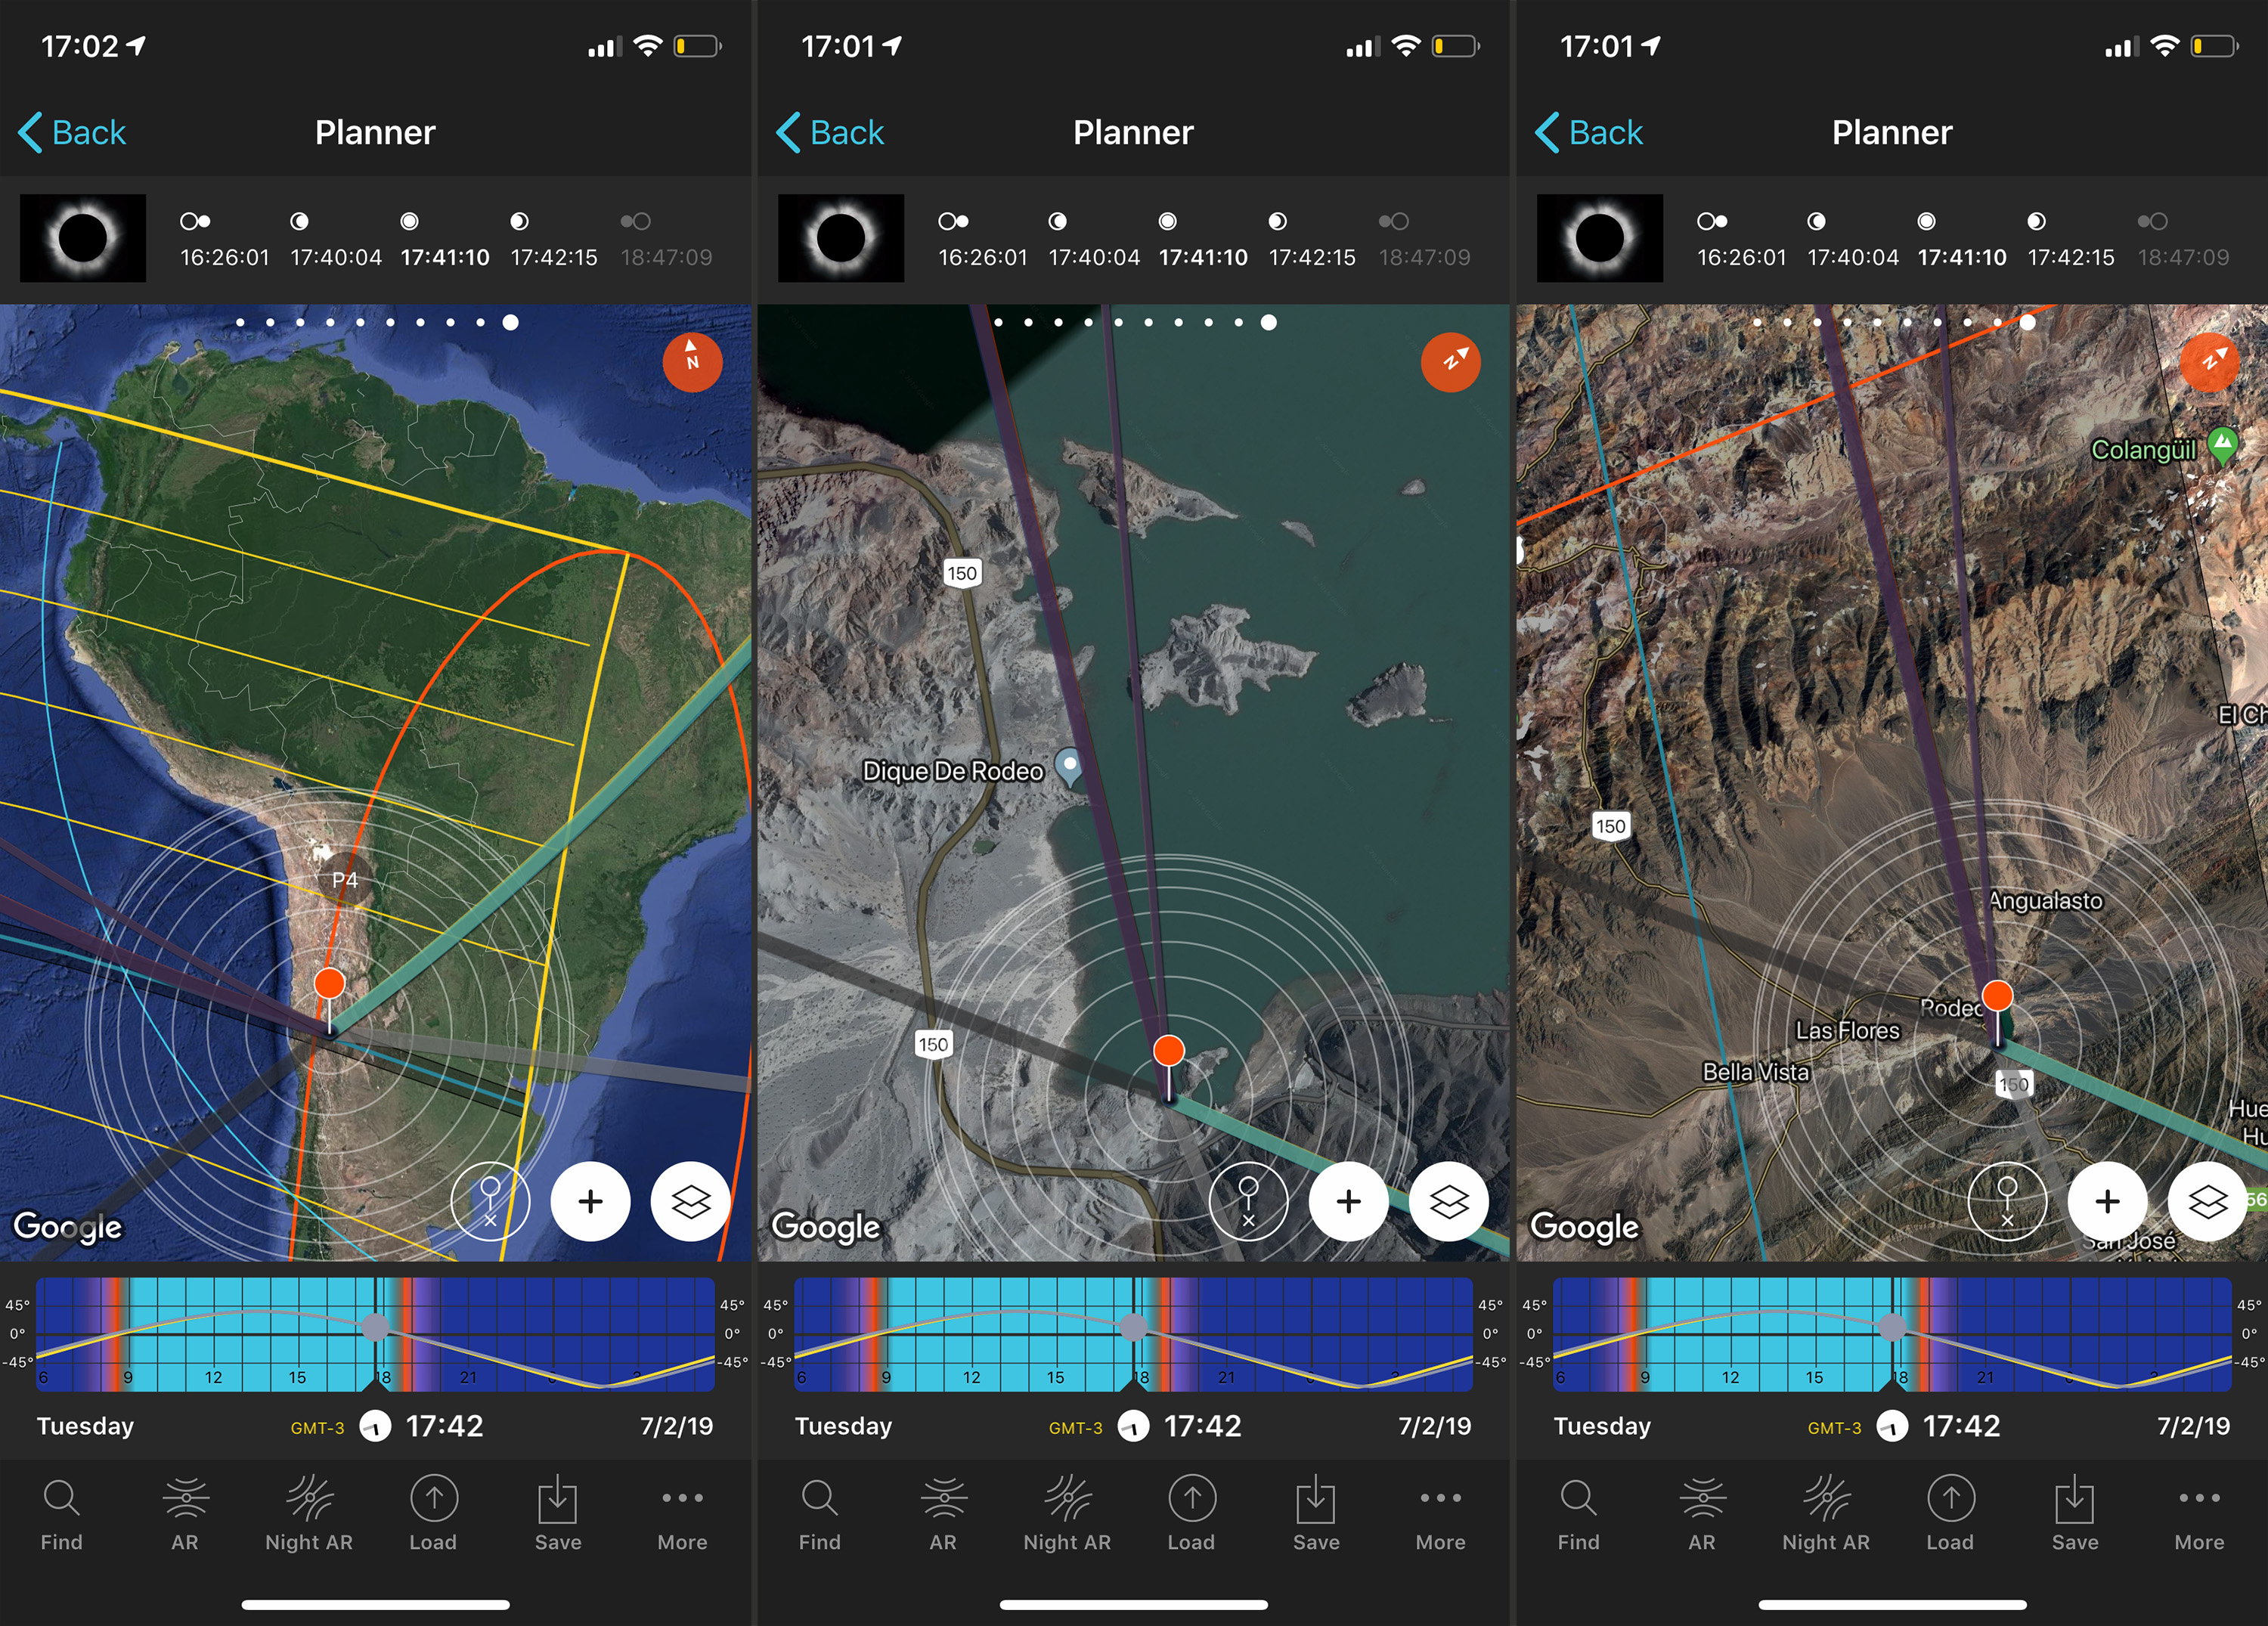
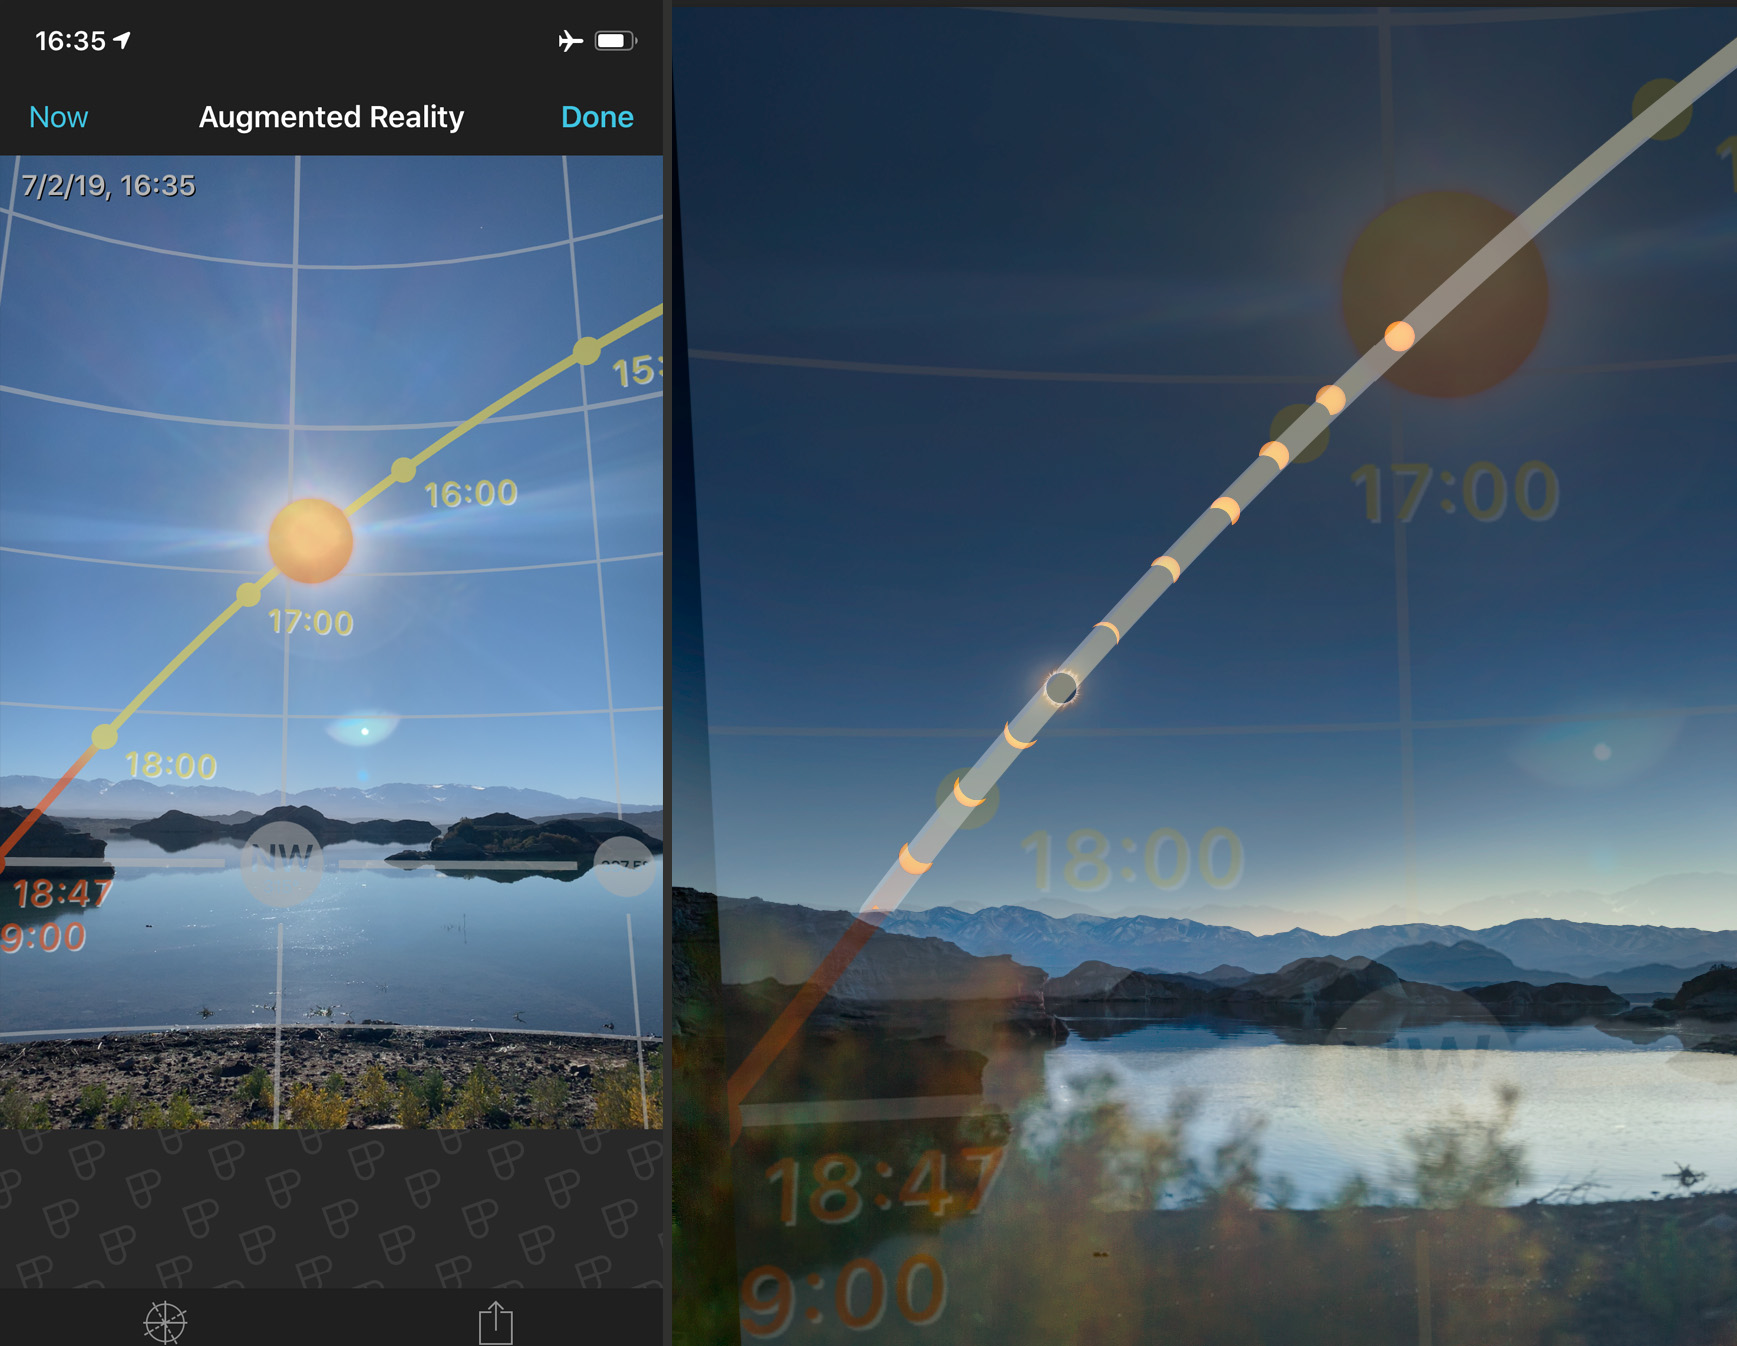
I was in Rodeo in the San Juan province of Argentina on the day of the eclipse. I began planning using the mobile app, Photopills. On this app, I could view the path of totality and move a pin to see when and how long totality would be. All of this information overlays google maps with satellite. Anywhere in this region would have the eclipse over the Andes Mountains range. Closer to the peaks means the mountains appearing higher in the sky. Also, if you are higher in elevation, the mountains will be smaller due to perspective. In Rodeo, the eclipse totality began at 17:40:04 and lasted 2 minutes and 11 seconds, ending at 17:42:15, and shaped up to be the perfect spot for me to capture my photos. The sunset nearly an hour later at 18:47 so I knew the eclipse wouldn’t be too high above the horizon. After searching around the area on Google Earth, I determined a lake northwest of the town would provide a great vantage point.
Photopills provided me with the direction of the eclipse based on the point I picked on the map. I readjusted the point until the path intersected islands on the lake and a gap in the hills to let the Andes through. Now that I knew the time and location, the photo technicalities were next.
My first and only eclipse prior was the 2017 Great American Eclipse. This gave me a great understanding of preparing and shooting the 2019 eclipse. I knew what kind of shots worked last time, and I had visions for new methods. With the help of Lensrentals.com, I was able to have a total of five cameras shooting during totality. The next step was to decide what I wanted each camera to do. I ended up shooting 4K video time-lapses with my iPhone Xs and DJI Phantom 4 Pro, slow motion and 4K video with a rented Panasonic GH5 and stills with my Canon 6D Mark II and a rented 715nm infrared Canon 6D. This was my first time shooting any video during an eclipse, which meant I had plenty to research.

If you’re a frequent reader of this blog, you may recall a few years ago, when they showed some of the damage done to their equipment from the 2017 Great American Eclipse. I didn’t want to be another statistic, so I made sure to equip myself with all the necessary safety tools to assure I wouldn’t burn a hole through my sensor or lens aperture. I attached an oversized Celestron telescope filter to the Sigma’s lens hood with gaffer tape. The lens hood was easy to attach and remove, allowing me to remove it for totality quickly.
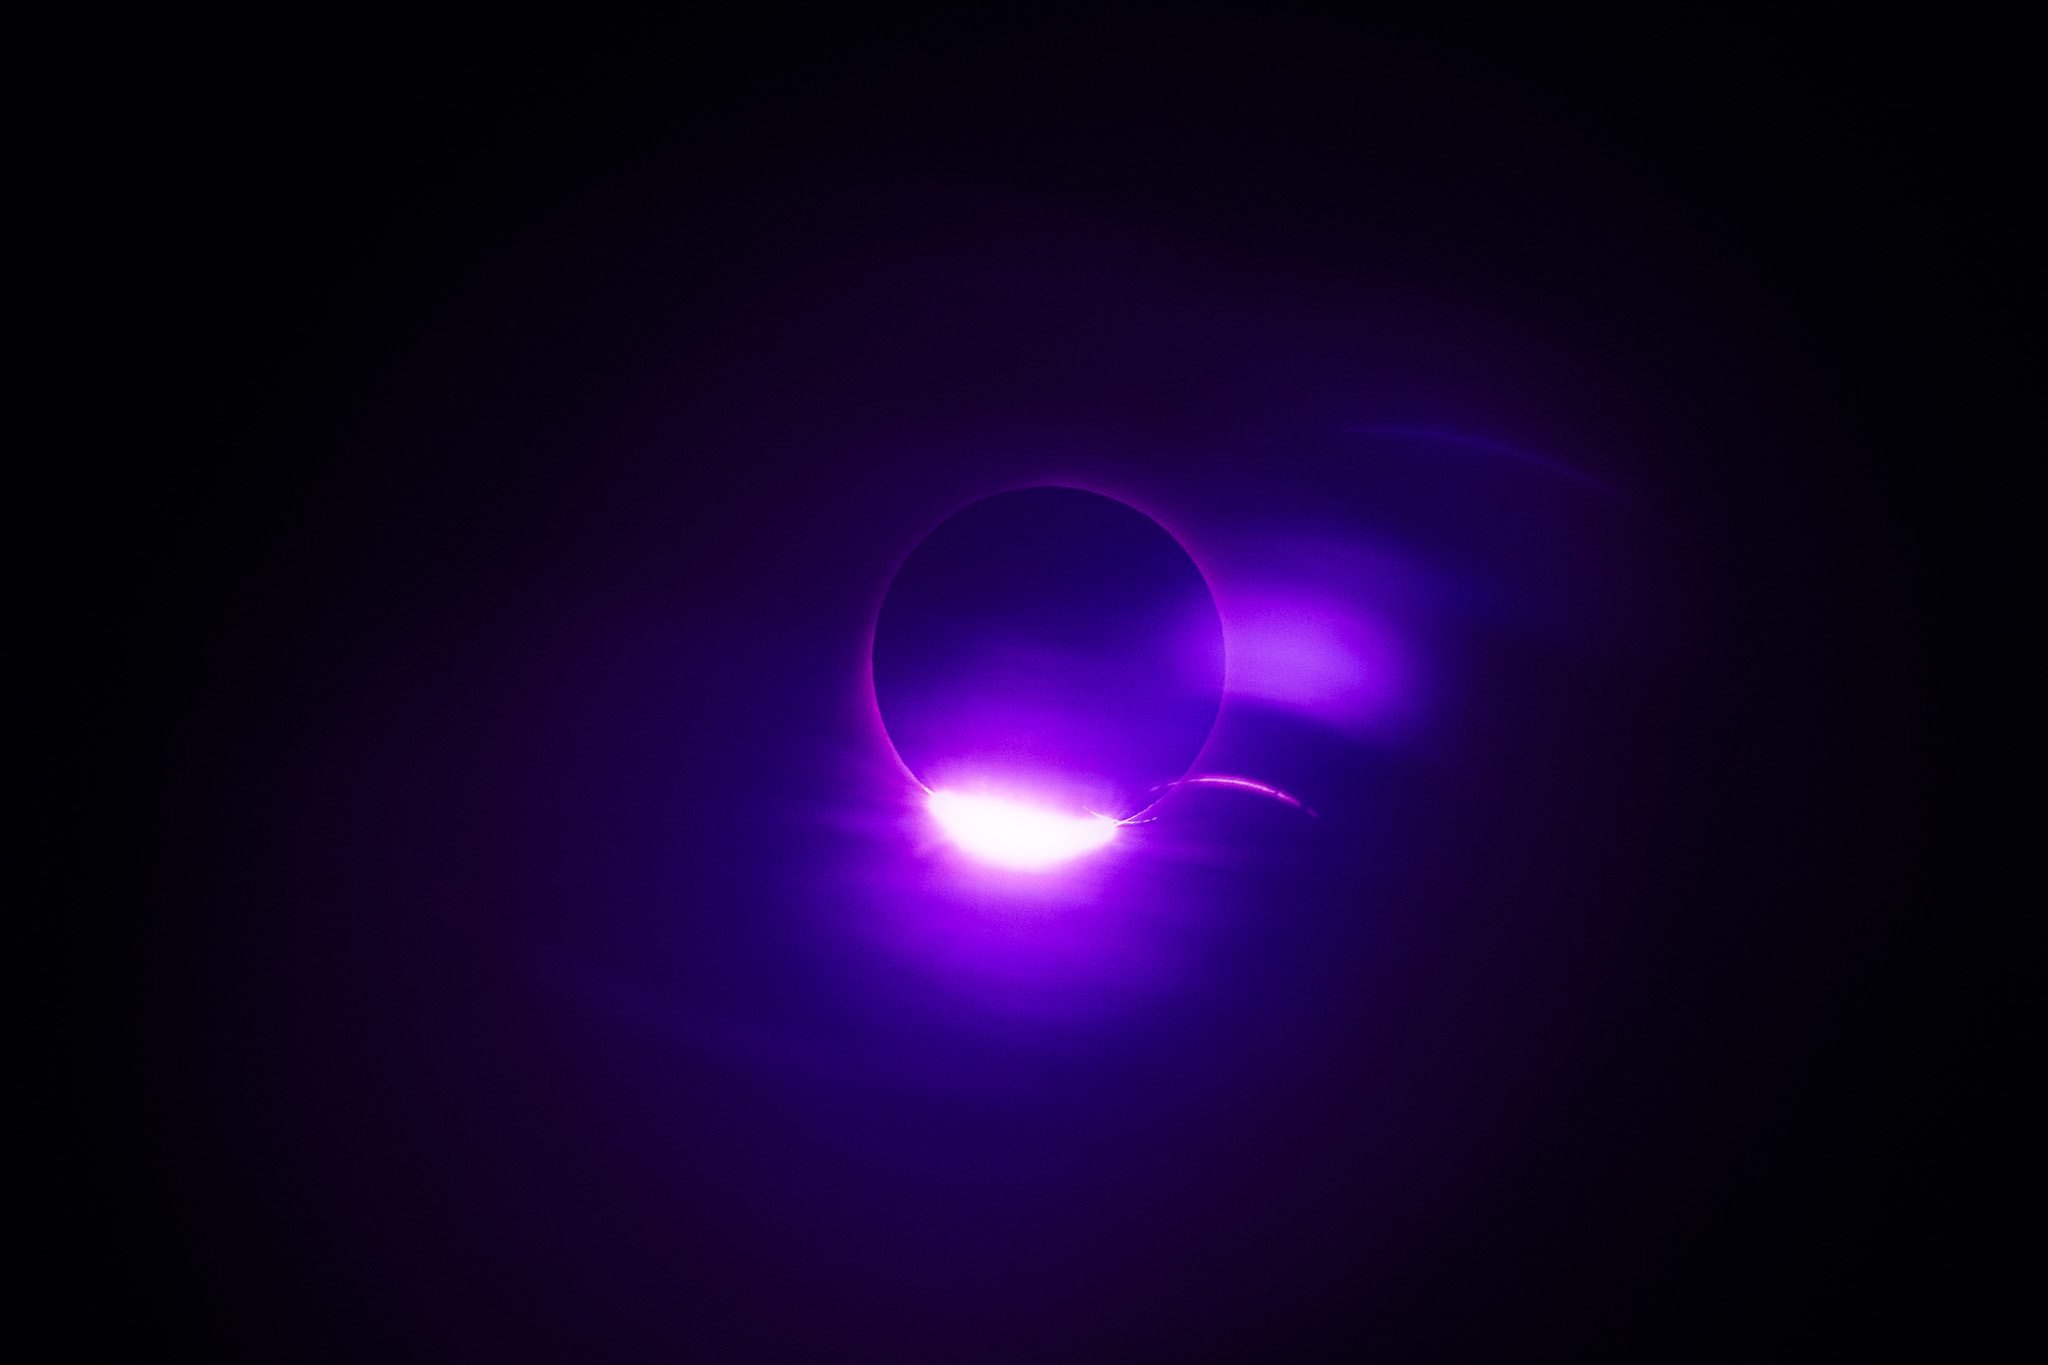
There is plenty of information on shooting and processing all types of photos and videos of solar eclipses online. I found the best resource was the Reddit Astrophotography community. You can search camera models or lenses and find images made with similar setups. The biggest challenge was finding settings that exposed for totality but wouldn’t blow out the approaching eclipse and diamond ring. The diamond ring is the second and third contact of the moon and sun when the eclipse begins and ends. The last bit of direct sunlight causes a flare that looks like a diamond on a ring.
I knew I wanted slow-motion video revealing this transition. The Panasonic GH5 is a micro four-thirds sensor, which is a 2x crop factor on lenses. The rented Sigma 150-600mm f/5-6.3 DG OS HSM Contemporary would become an effective 300-1200mm. Online research recommended shooting at around 500mm to fill the frame with the sun and corona.
The next shot was the 4K video, also on the Panasonic GH5. This was the most effortless switch because all I just had to switch the camera to 4K and adjust the shutter speed. During the video, I shot stills on the Canon 6D Mark II to capture a panorama of the landscape and totality. Afterward, I swapped the Panasonic GH5 body for the Canon 6D Mark II, and created the video below.
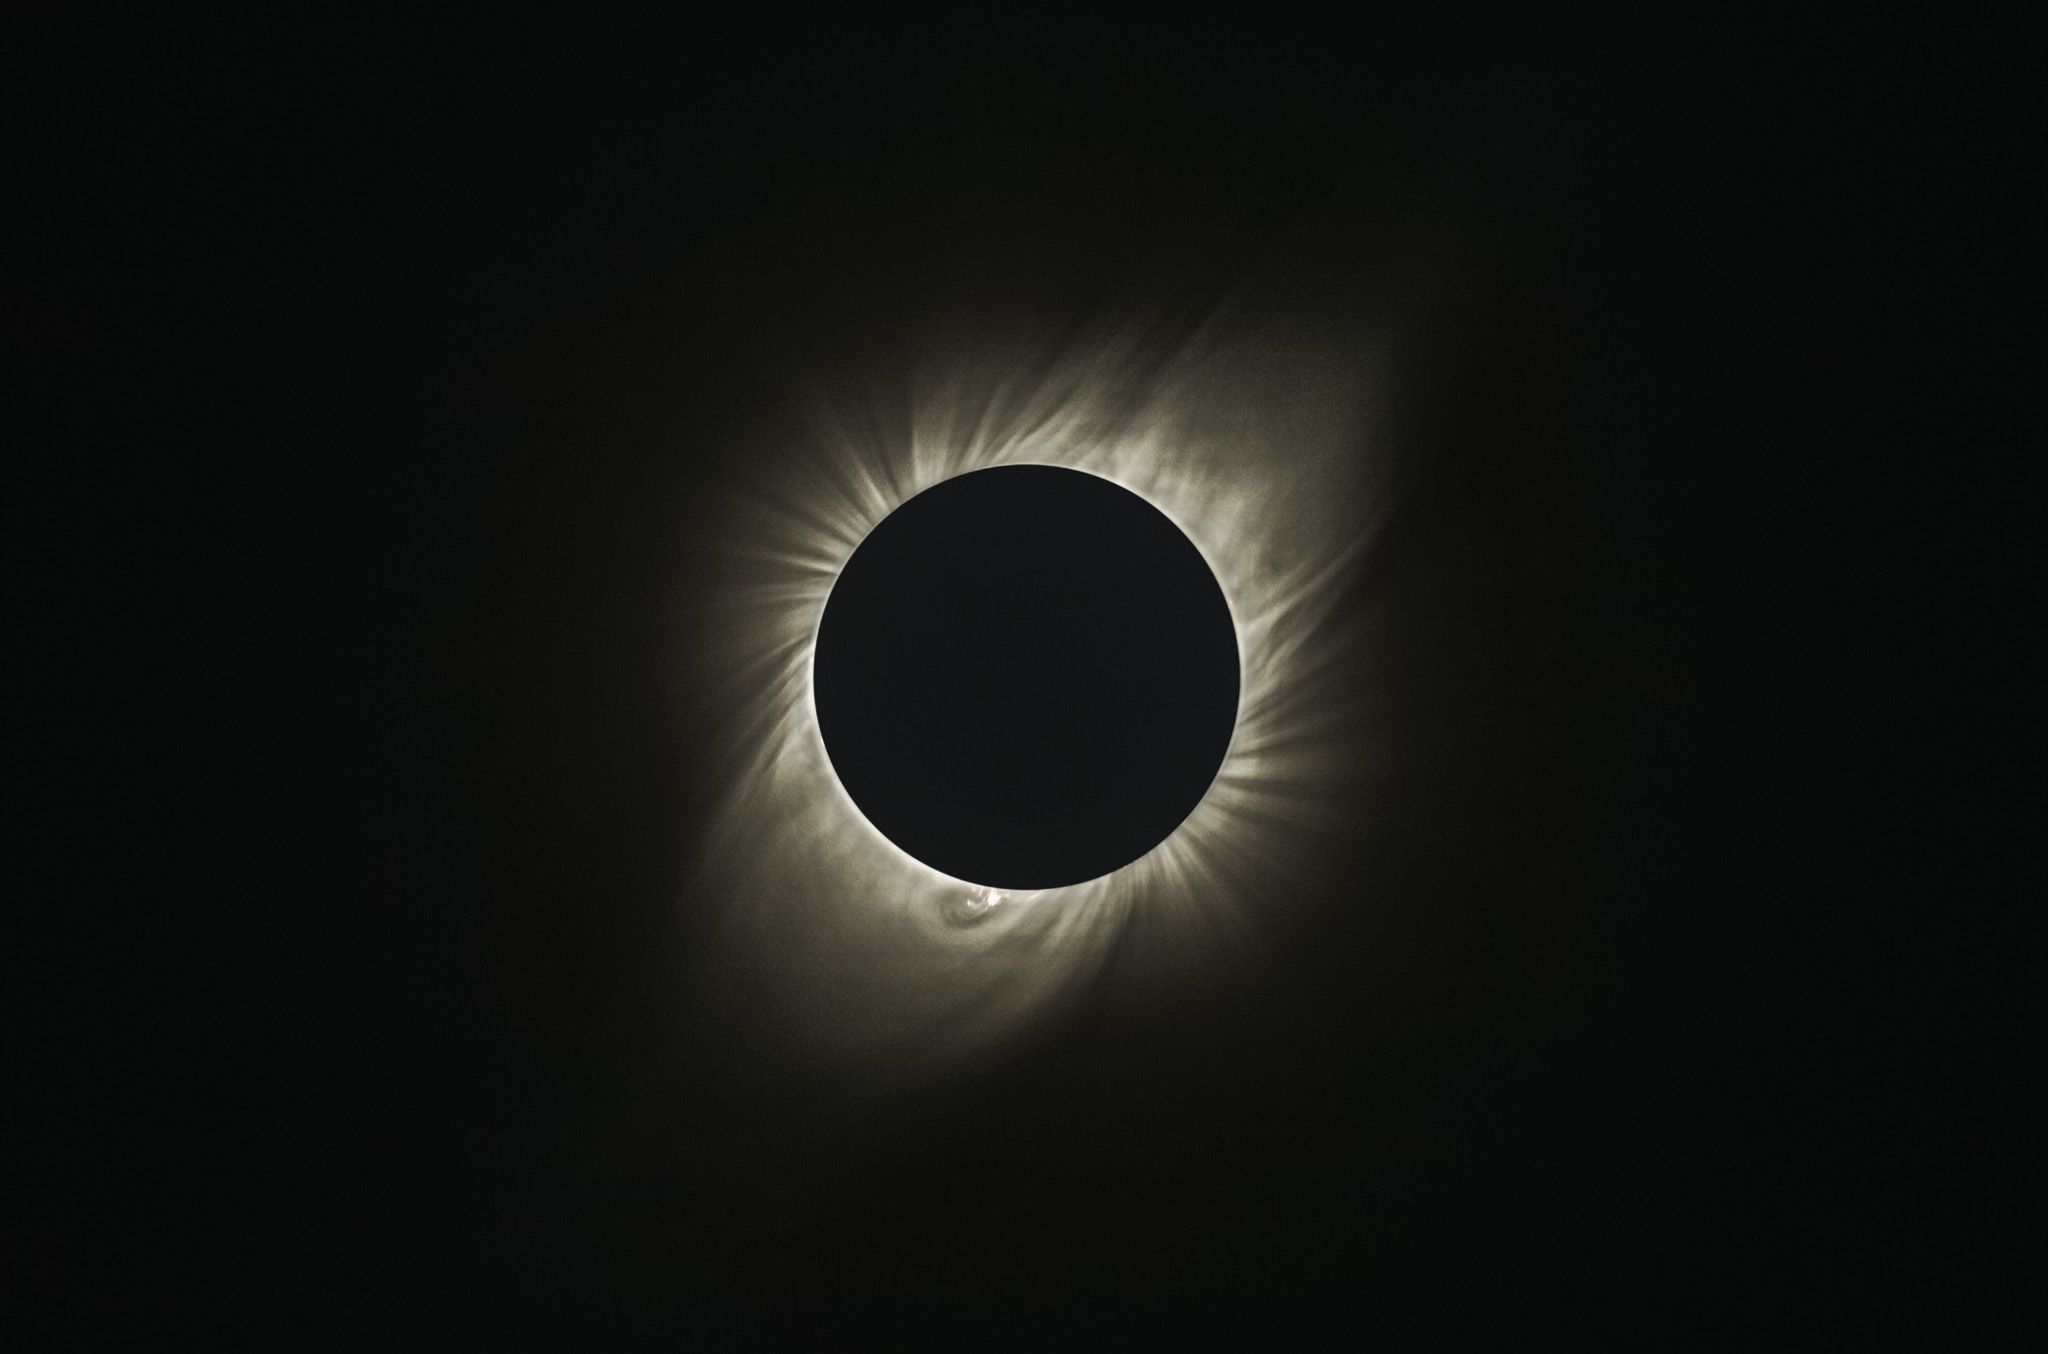
I used the Canon 6d Mark II to capture an HDR of the sun with over ten bracketed exposures. I manually switched the shutter speed from 1/3200” to 1/30” while keeping a constant aperture and ISO. The HDR reveals the massive size and spread of the corona and the solar prominences (flares) emerging from the surface.
Before the third contact, the end of totality, I swapped the Canon 6D Mark II with the infrared Canon 6D. I captured single stills of the last moments of totality and the diamond ring.
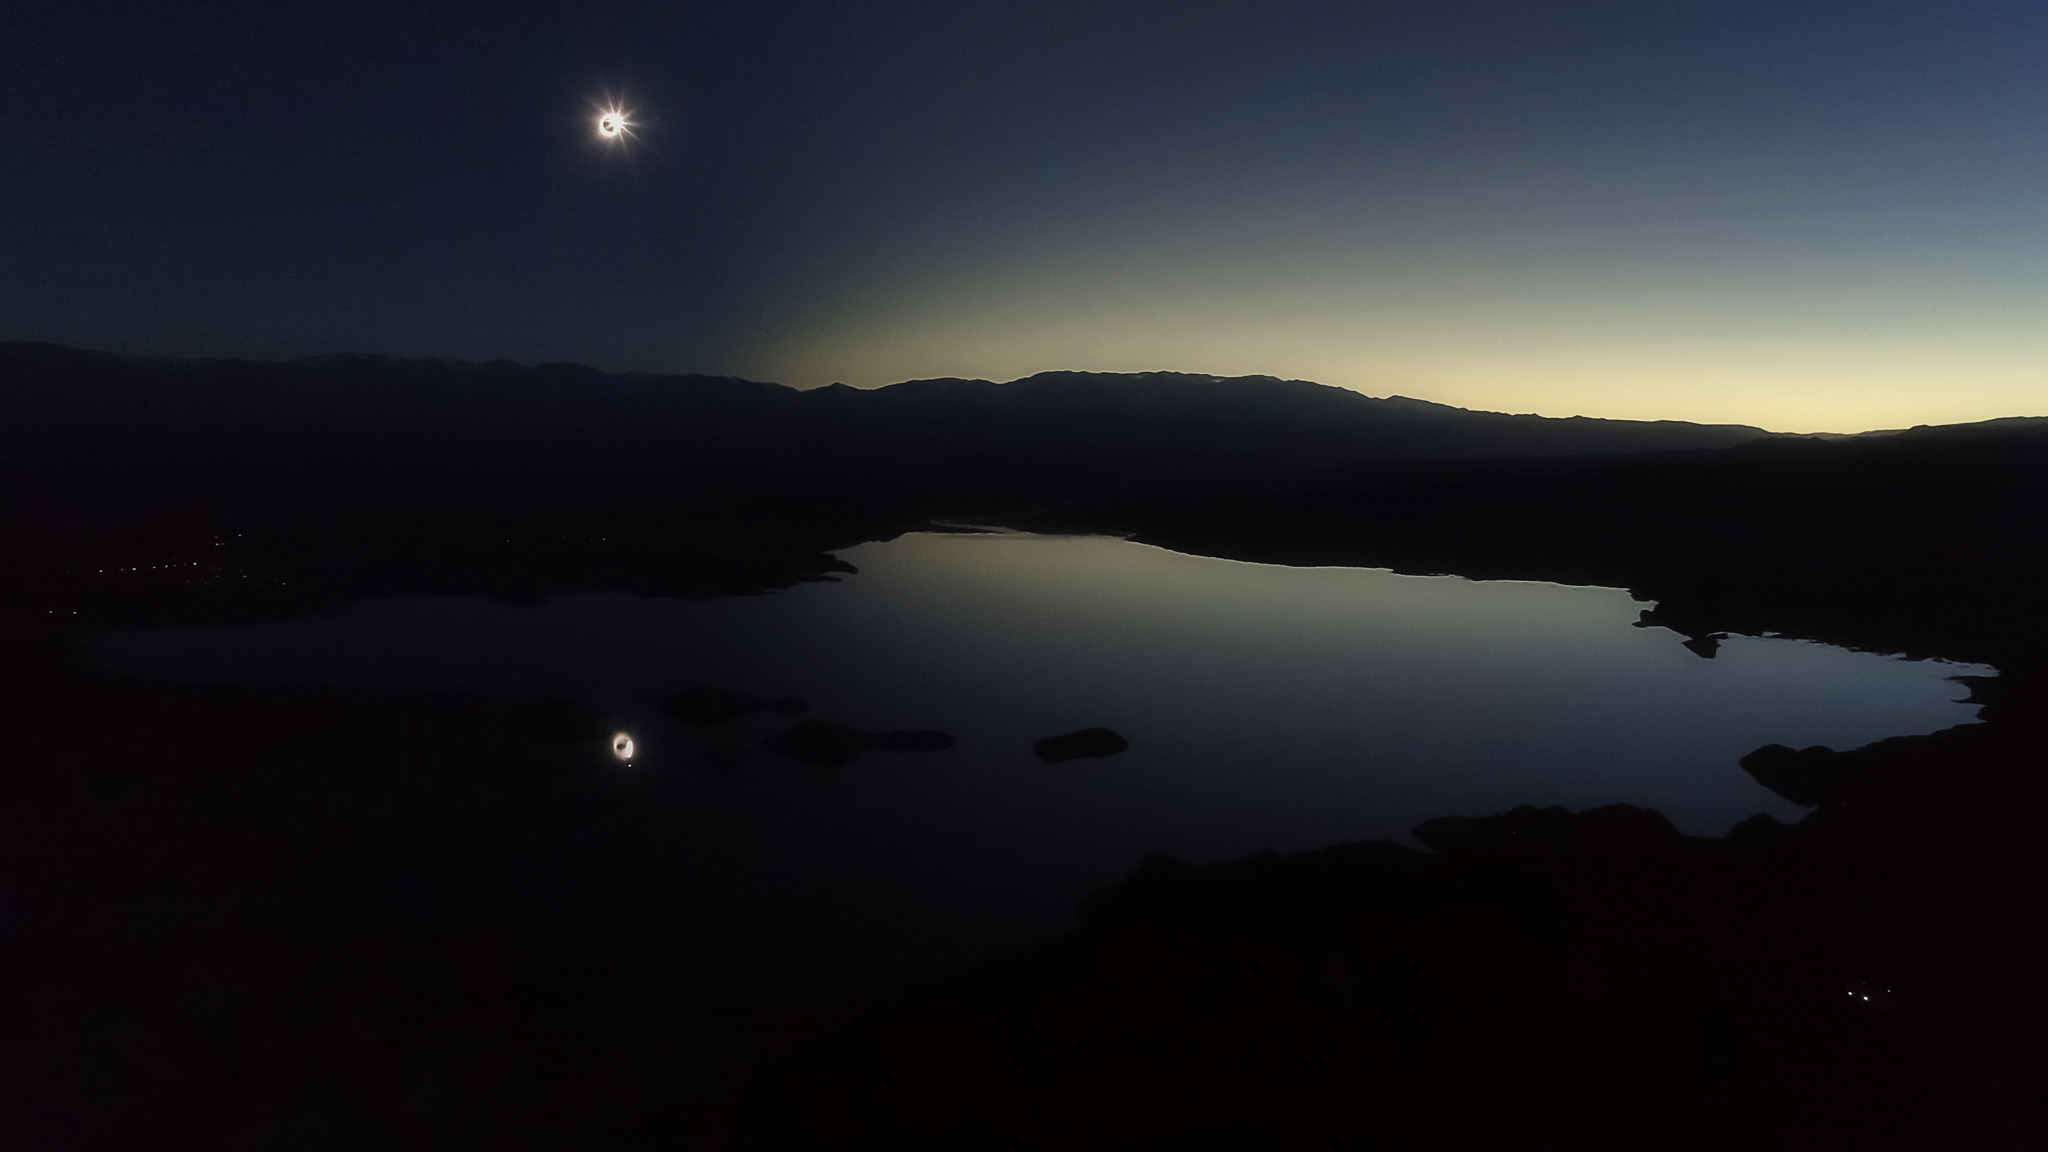
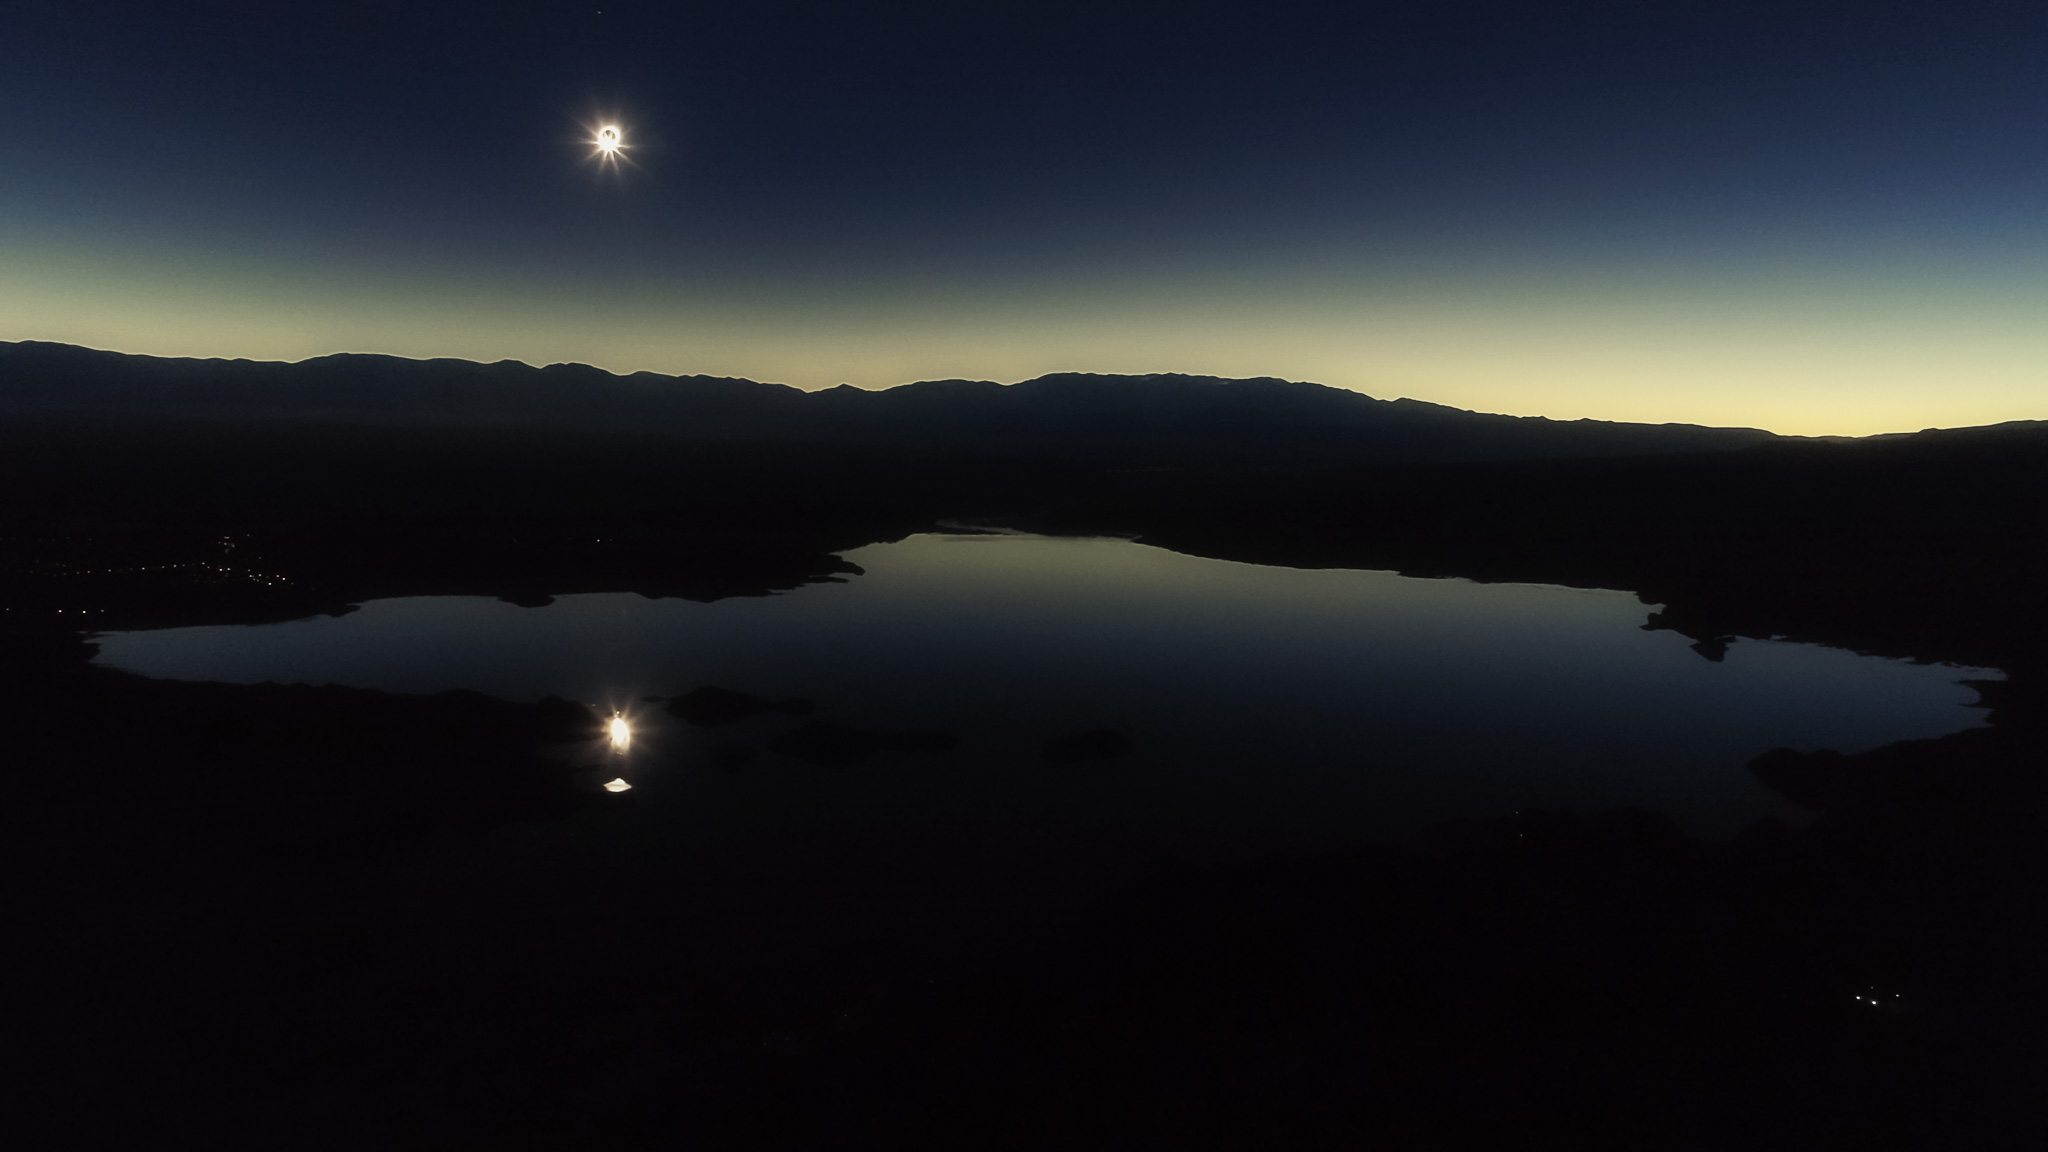
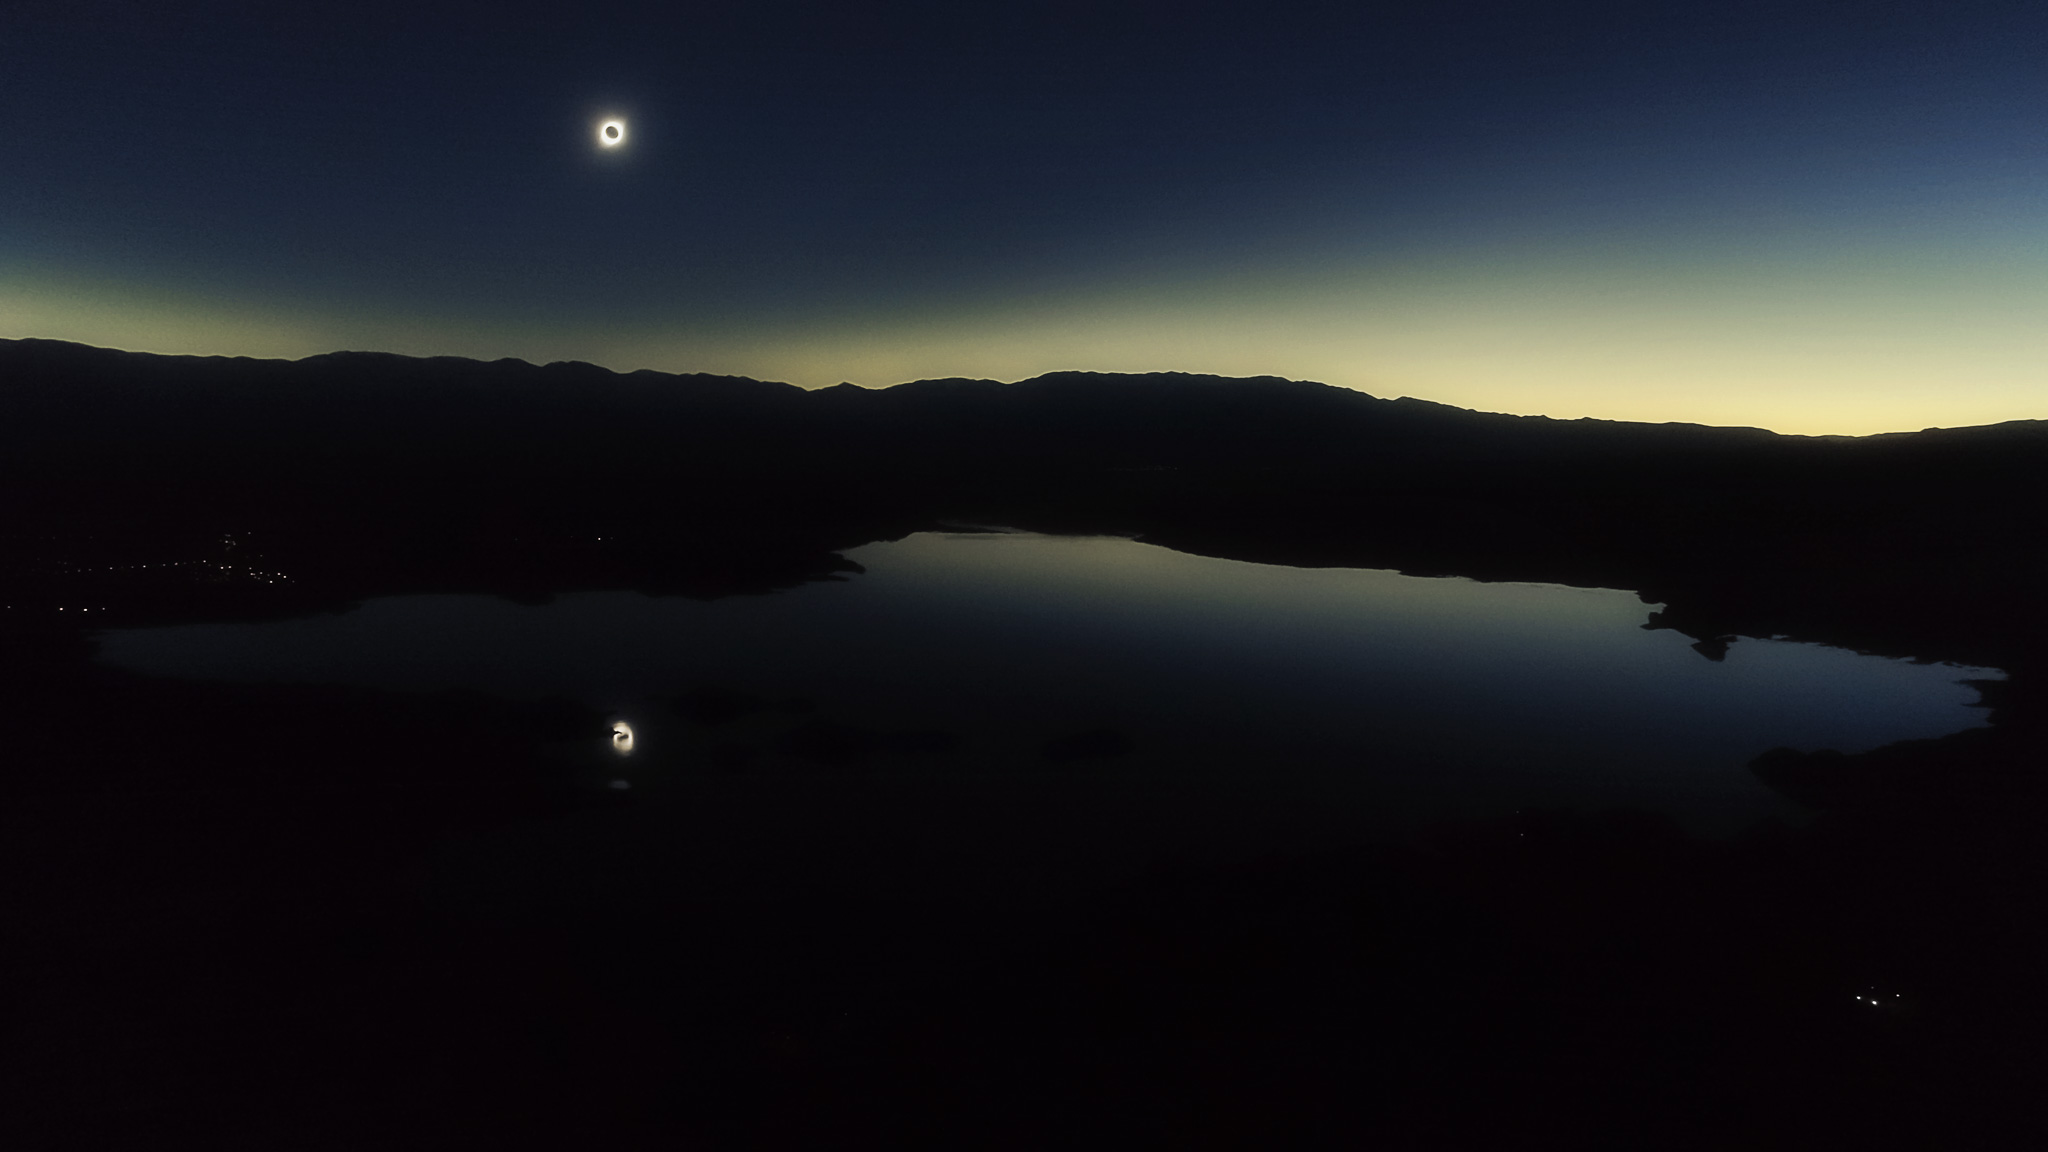
While I manually operated three cameras during totality, I set up both the phone and drone to record automatically. Seven minutes before totality, I began video on my phone, which was propped up between rocks. I locked focus and exposure on a shadowy region of the lake. I wanted to expose for what I anticipated the brightness of totality to be. Five minutes to totality, I sent my drone up and switched it to tripod mode; the drone stays in place and will correct itself if it moves. I had the drone shoot on auto video with a locked aperture at F11. Auto mode meant the drone changed the shutter speed and ISO to be at -1 underexposed constantly.
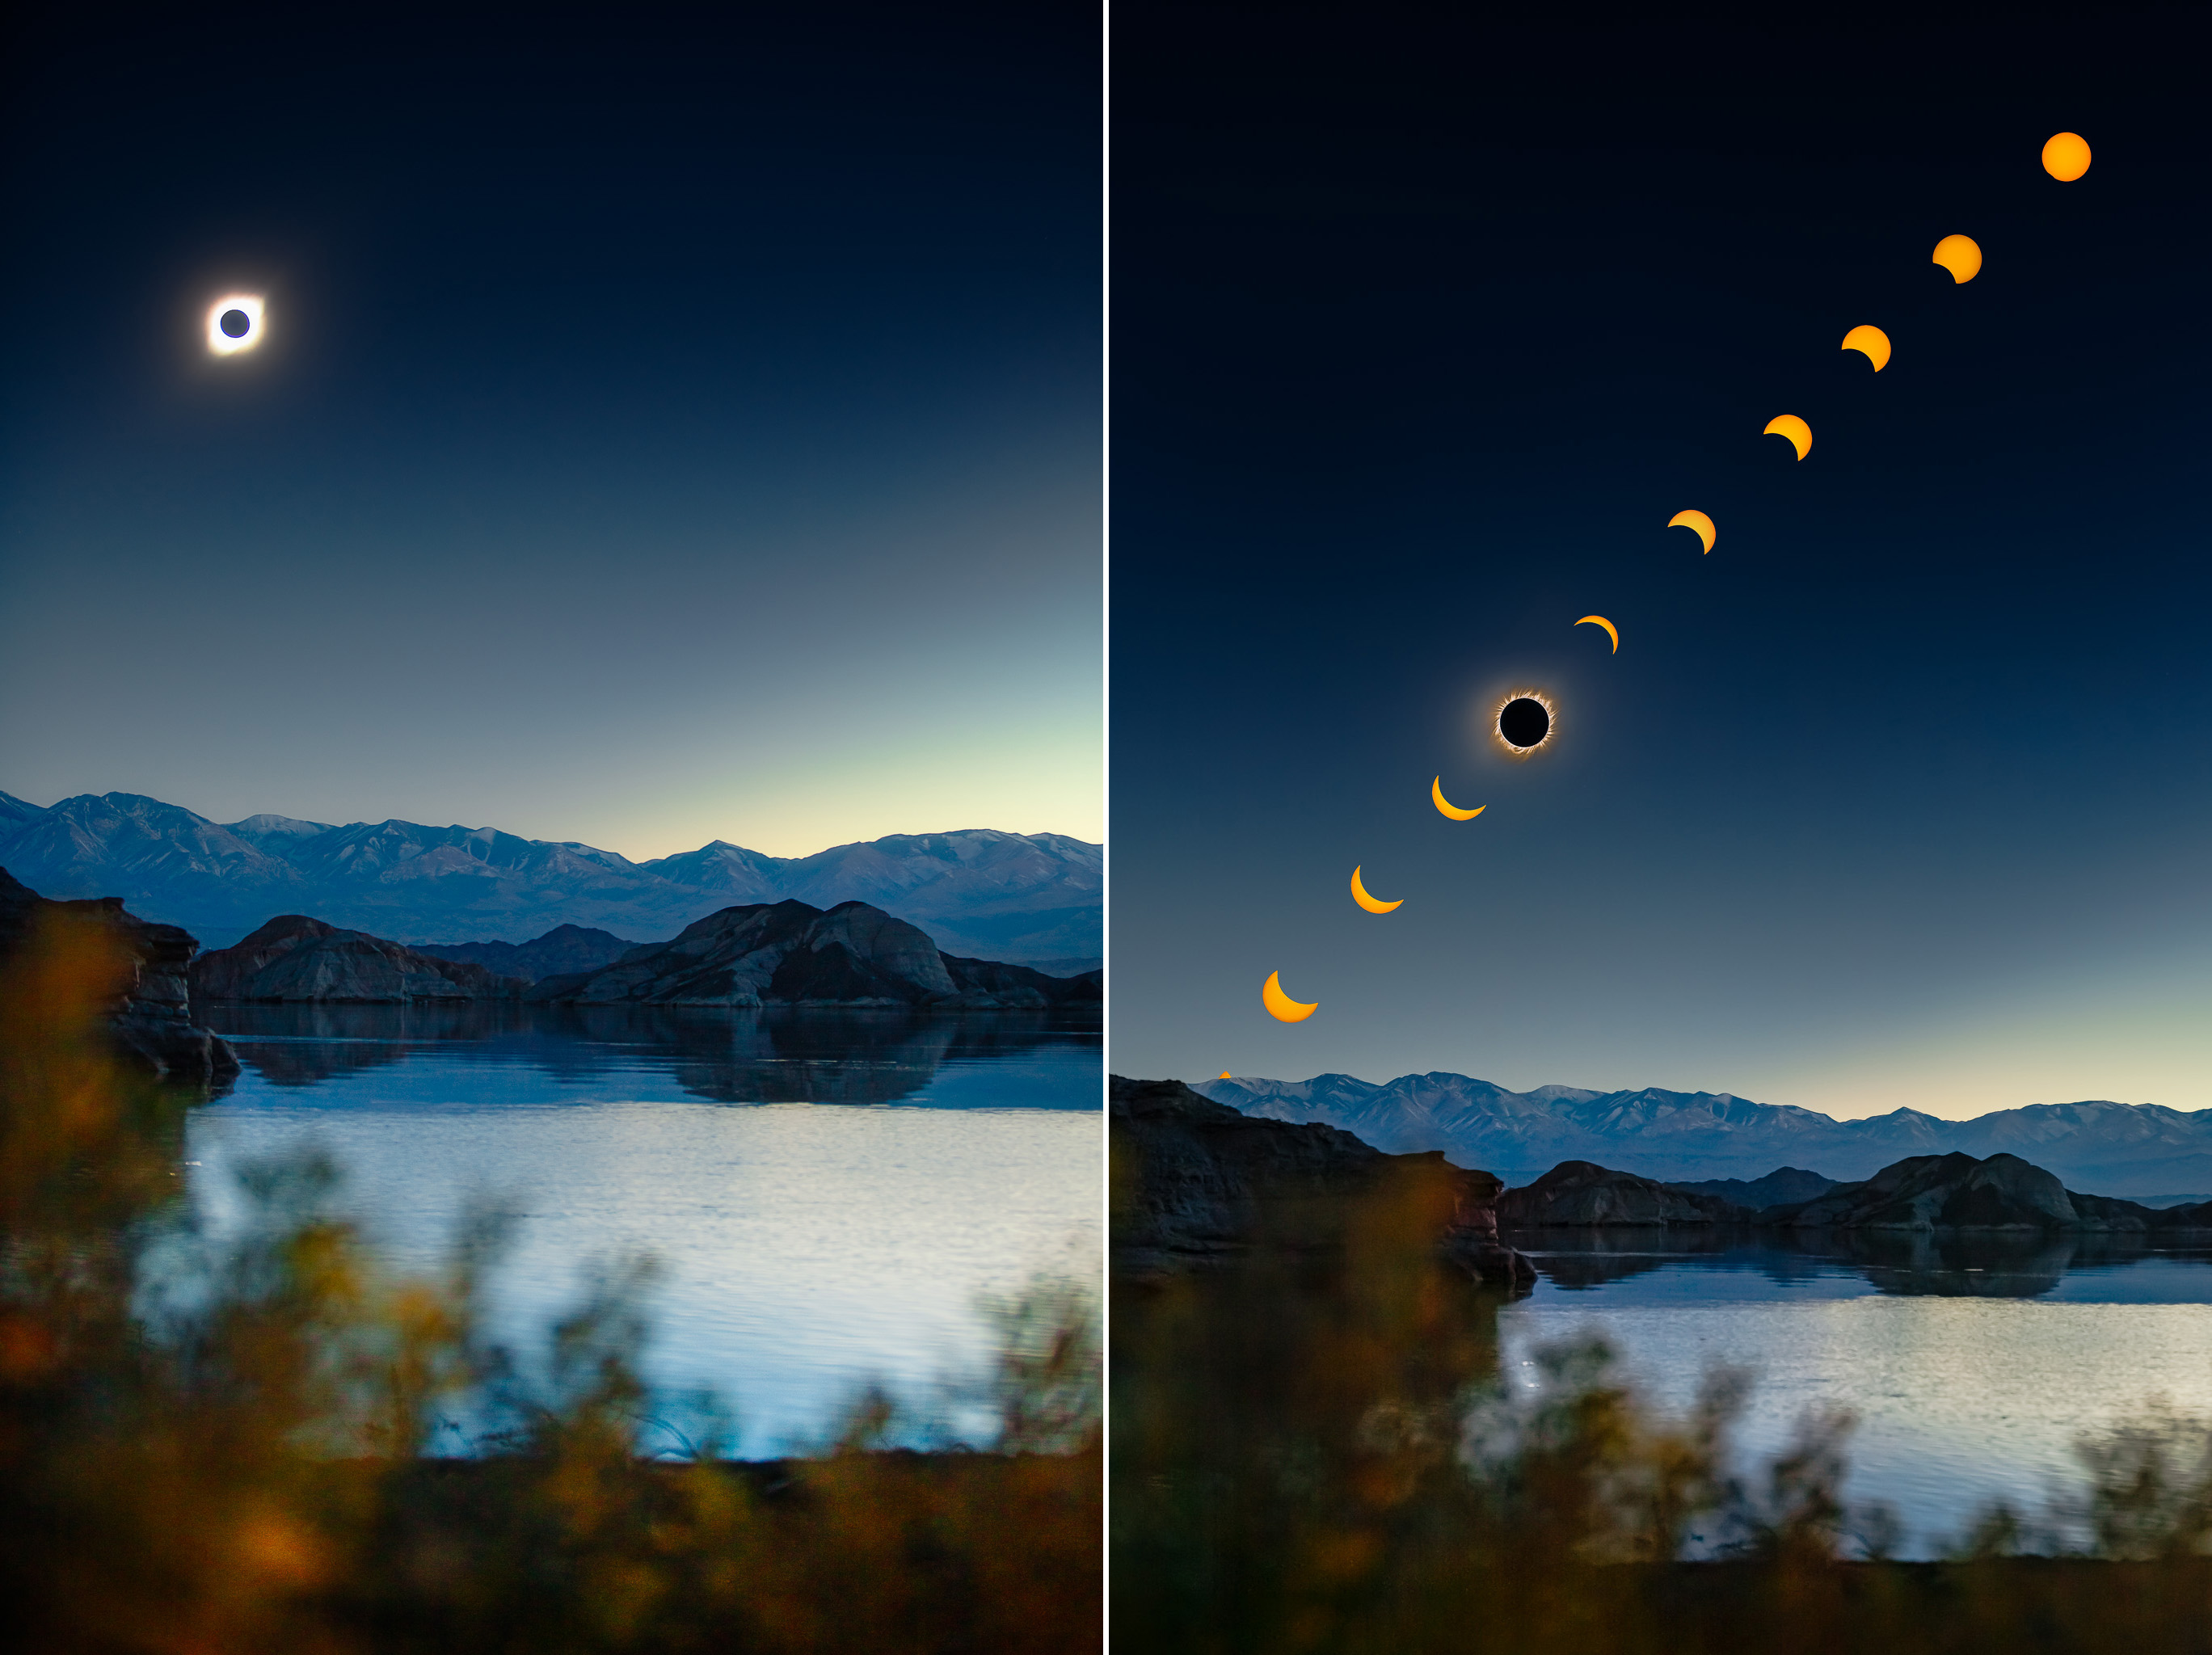
I captured close-ups of the sun from the first contact, when the moon first overlays the sun, until sunset. I planned to create a composite featuring these partial phases and totality over the landscape during totality.
Once the sun set, I had captured all the data I needed for my images and video. After importing the data and backing it up several times (there’s no second attempt on eclipse photography), I began organizing images and video. First was the HDR bracket.
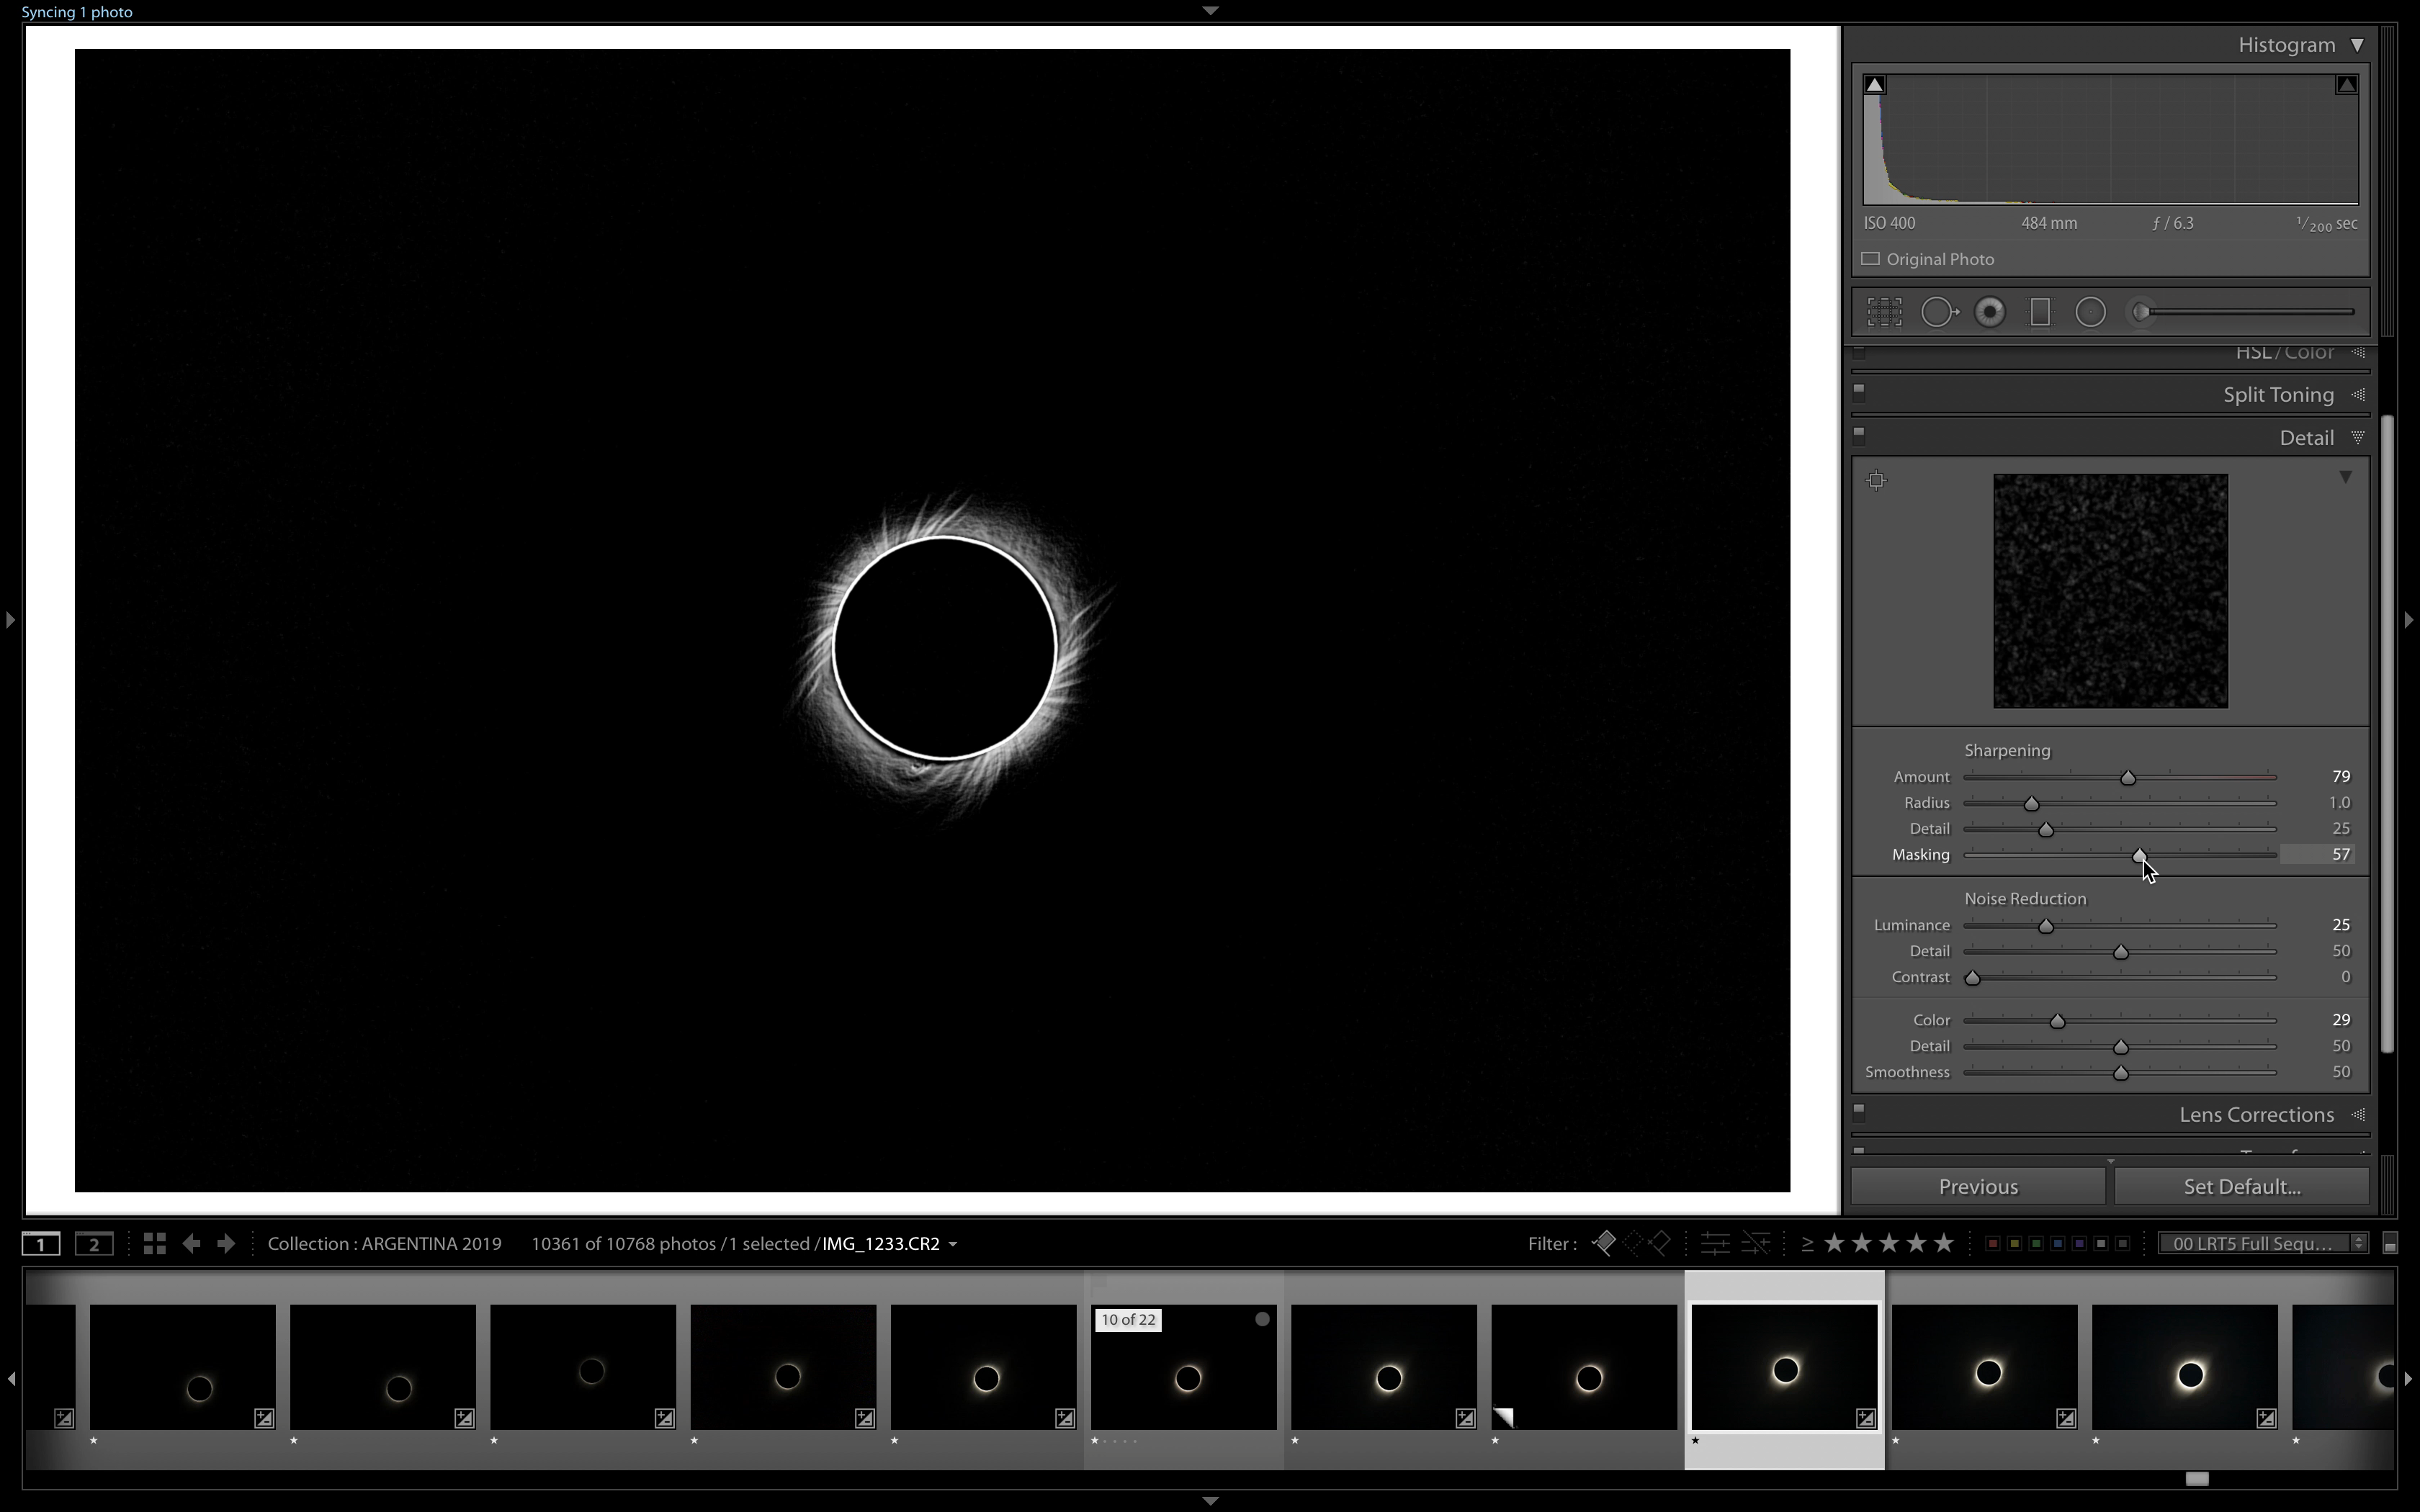
I used Adobe Lightroom, PixInsight, and Adobe Photoshop to correct, process, and edit the image. I exported 16-bit TIFFs from Lightroom with boosted shadows and a sharpen mask only on the corona. I didn’t shoot these with a tracker, so I had to align the images next.
I used PixInsight’s FFTRegistration, which excels in aligning Astro images with large-scale bodies like planets or moons. For other Astro aligning, StarAlignment does a great job using every star in the frame as reference. I saved each aligned frame as a 16-bit TIFF, ready for Adobe Photoshop.

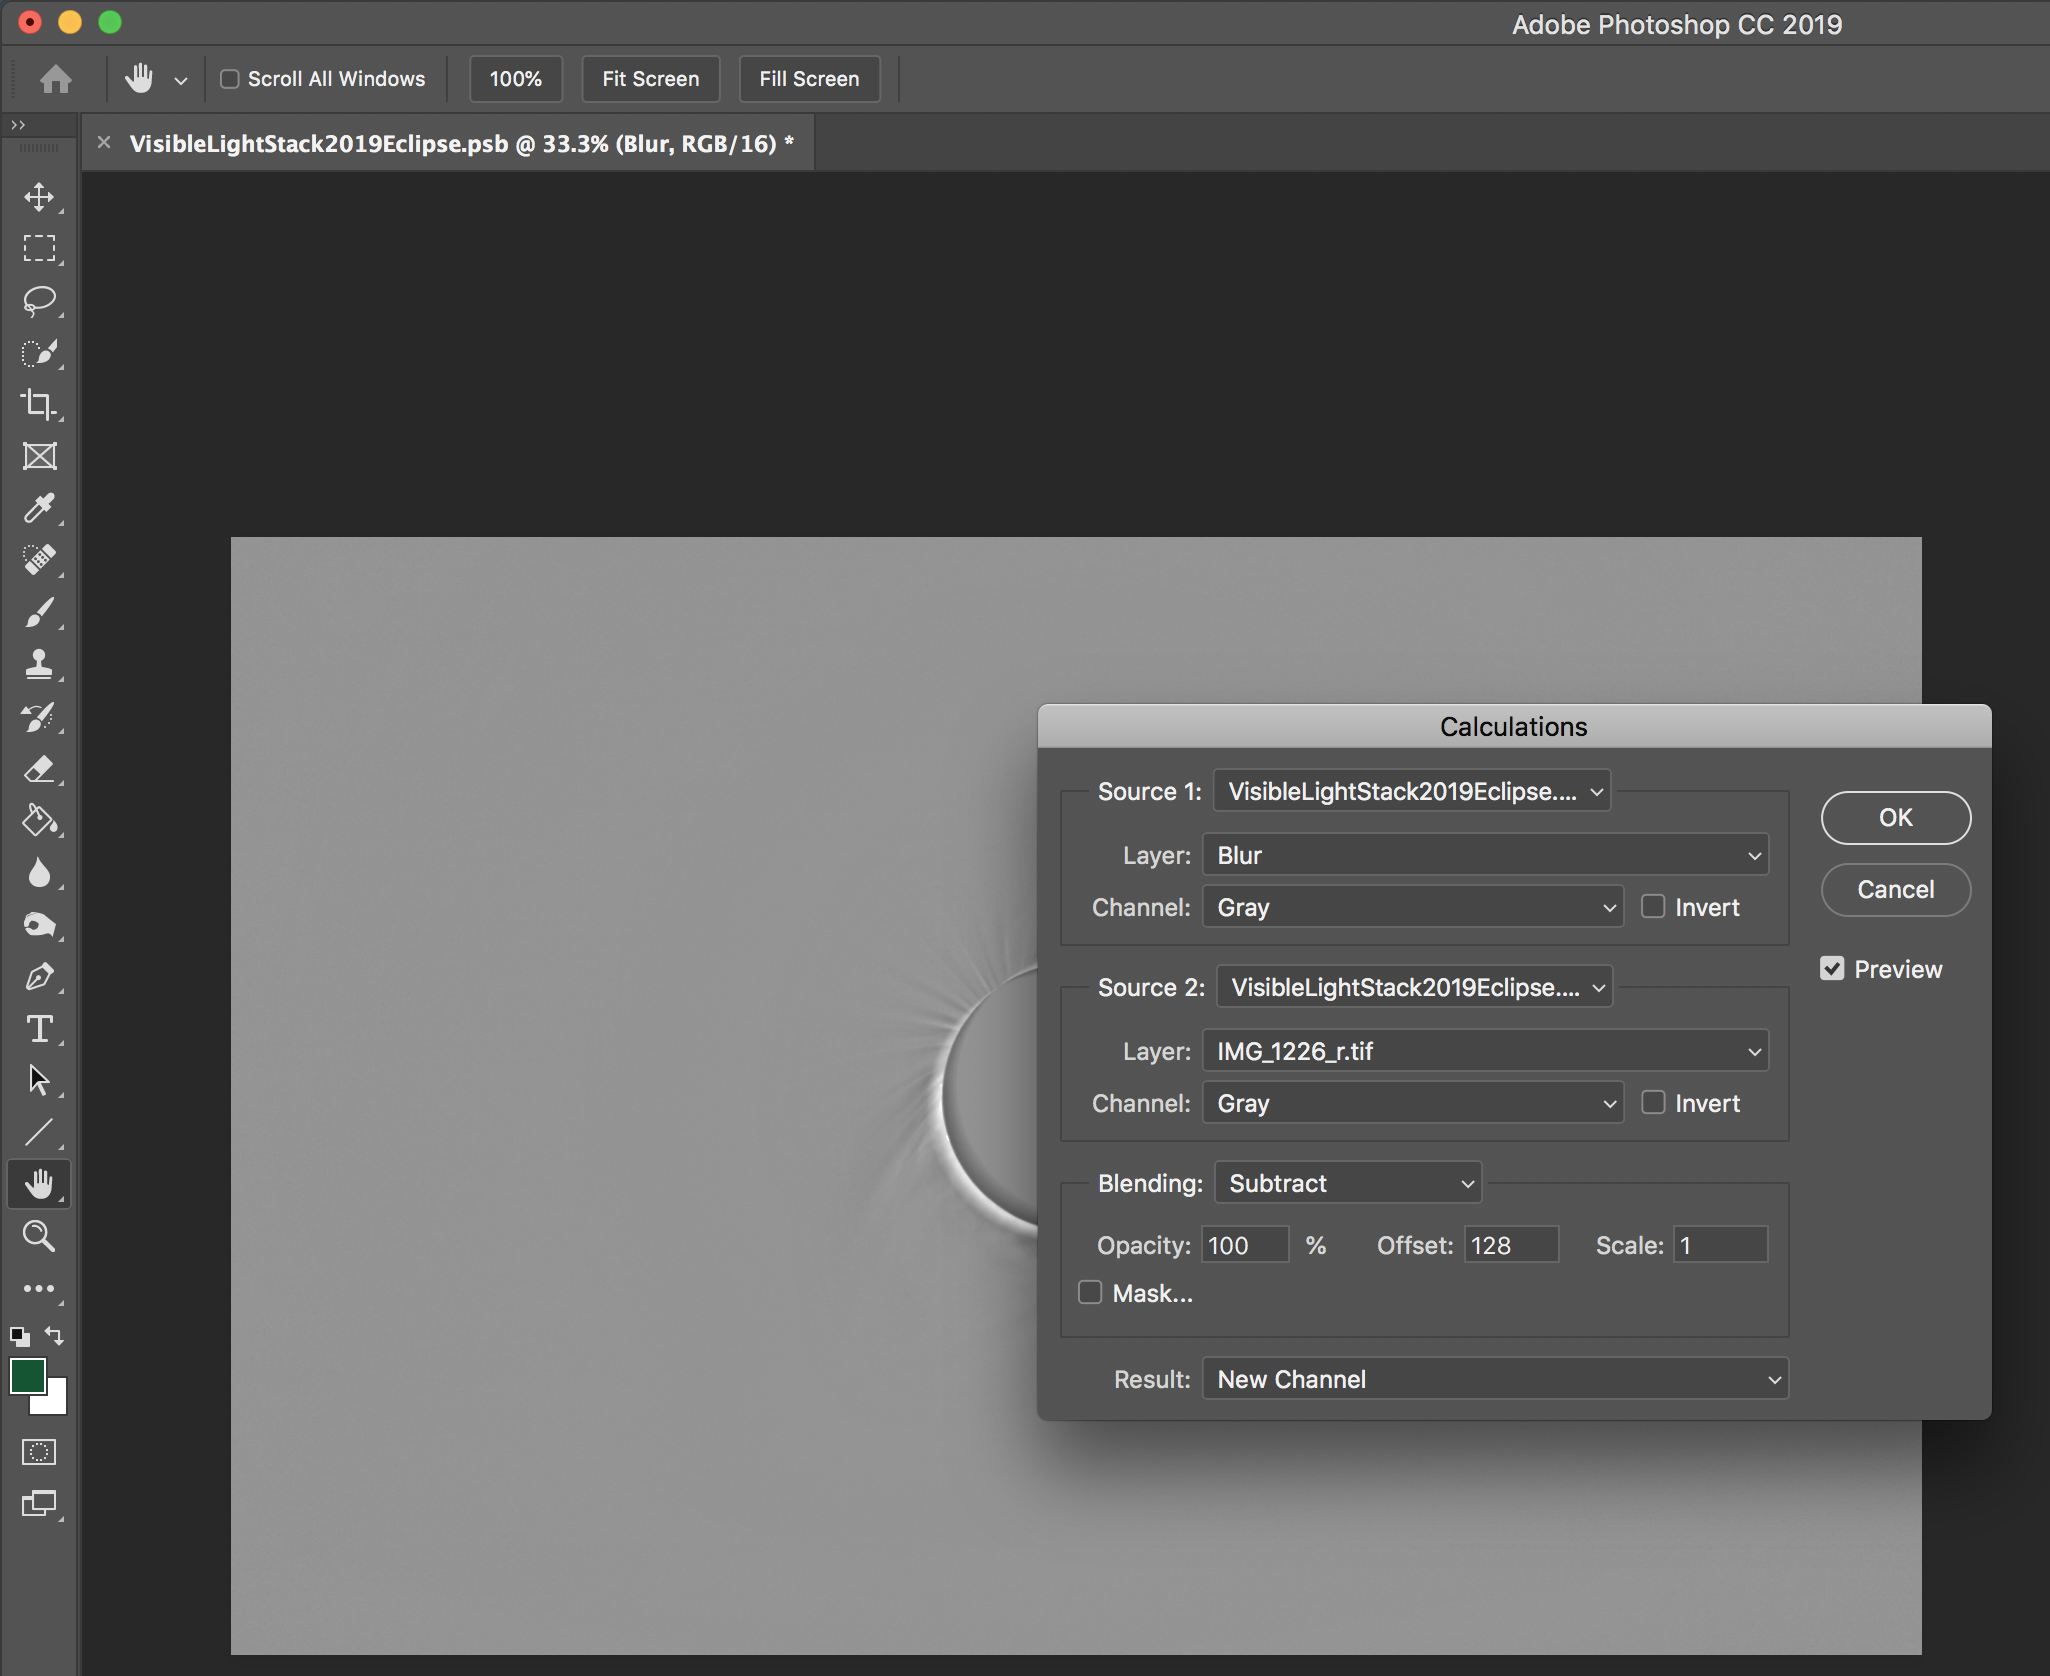
After importing files as layers, I followed Russell Brown’s imaging workflow (part 1 and part 2) for creating the HDR merged image. The main concept is converting the layers into a smart object and taking the mean of the layers to get the full dynamic range. To further reveal detail, I duplicated the smart object, rasterized it, and added a radial blur. Under Image calculations, I added Source 1 Layer: Radial Blur Channel: Gray, Source 2 Layer: Original image, Channel: Gray, Blending: Subtract, 100% opacity, 128 offset, scale 1. I added a new channel as a layer and used the overlay blend mode. I duplicated the layer to increase the effect. I save the document as a .psb due to the size and create a copy without layers as a .psd for Lightroom.
Finally, I finished processing in Lightroom with basic exposure and photo profiles. The landscape photo stack builds off this final HDR image. I applied basic edits to the merged panorama in Lightroom and opened it in Photoshop. I bring the final HDR image and partial eclipse images from Lightroom into the same Photoshop document as the panorama.
During the day of the eclipse, I used Photopills AR mode to view the path of the sun over my phone’s camera. While this helped visualize compositions in the field, it also helped me assemble the stacked image. I aligned the screenshot over the panorama and lowered the opacity to reveal the phases of the sun. I scaled all the sun layers down equally and began placing them accordingly. I further refined the image with localized edits, including dodge and burning and color correcting and grading.
The infrared photos were a much simpler process and involved editing individual frames in Lightroom and spot removal and finishing touches down in Photoshop.
All of the video editing and post-processing was done in Adobe After Effects. The iPhone video was trimmed and added speed ramps. The drone video required more correction because of the ISO ramping. I used a plugin called NeatVideo that does a clean job at removing noise in videos. I even pulled a screenshot from the drone video because of how well it captured the diamond ring and reflection.
Both the slow motion and 4K footage from the Panasonic GH5 was shot in v-log, a flat image profile that provides up to 12 stops of dynamic range. I color graded with Lumetri color, adding an s-curve, local saturation on the corona, and lower brightness locally on the dark region. Finally, I trimmed and added speed ramps to both videos.
Even with all of the images and video I captured, nothing compares to what your own eyes witness during those couple minutes of totality. Not every planet in the universe has a moon that perfectly covers its star. I can’t recommend enough giving yourself time to stare into totality without a viewfinder in the way. These few minutes are arguably the most magnificent view the universe offers earth.

More information on how I shoot other astrophotography and other galleries can be viewed on my website and Instagram.
12 Comments
Henry Winokur ·
WOW! Great stuff…thanks for sharing.
Justin Hartney ·
Glad you liked it Henry! Thanks!
Bruce Gerber ·
Besides being your cousin, I am also a fan! Great work, Justin!
Justin Hartney ·
Thanks Bruce! Glad you enjoyed it.
Athanasius Kirchner ·
You have some great material in there! Thanks for the detailed write-up. I just have a few nits to pick:
– Slow motion isn’t at all necessary to film totality, in my opinion. In the place that I picked to watch the eclipse, totality lasted barely longer than a minute, and even so I found myself speeding the footage up for social media sharing. At normal speed it lasts “just enough” to be impressive and not tiresome. On the other hand, I think it’s likely that many people will find themselves with too short a telephoto lens to record it nicely, and then, 4K recording can save the day (one can crop quite a bit into it).
– You chose an amazing spot for the drone timelapse, and it looks honestly much better than that other one that’s been making the rounds. It’s a shame that the lens flared so much, and that the very narrow aperture impacted sharpness a little :/
– Not nitpicking: The lens hood idea is brilliant. Did you come up with it yourself?
Justin Hartney ·
Thanks Athanasius for reading through. In reflection of shooting, I found the slowmotion to be most effective during transition into totality. The bailey beads and diamond rings fading out came out wonderfully! Totality itself didn’t have much change to film.
I’m sure someone else has done the same for the lens hood. Just some good ol fashioned gaffer tape. 🙂
Zé De Boni ·
Congrats! Nice job!
Amazingly I had the same idea and you are the second guy I’ve found in the internet that planned the eclipse shots by a lake, with a drone… I was going for the same approach with a lower sun (ca. 5 deg) by a lake in the Pampas. However, logistics were not easy, as I made it as a family trip. I owed that to my daughter, who was 4 in the image taken during the 1994 TSE in Sao Paulo, Brazil, where I live. Totality was 600 miles south, we got 85%, reproduced by the multiple projections on the shadow of a tree. Now I would take her and her son, 5 yo, both seen on the other foto. So I chose the nice town of Merlo and set our observing site at 1850 m asl (6000 ft) on the Sierra de los Comechingones. Sun at 7 deg.
I am very glad with what you have acchieved as I know exactly how is the tension building up for one hour and the mix of joy, adrenaline and despair for those two magical minutes. Almost all my results may be considered a failure, but I still brough two images that I can add to my portfolio of uncommon sunsets. I post them here, not willing to spoil your show (you may remove them if you wish).
Be our images the elusive invitation for people to experience such event at least once in a lifetime, no matter what it may cost. https://uploads.disquscdn.com/images/a6907ff807e5c6468aef8fa81cb5e22d73935bde4e4ea153dad4e3ca63e27a43.jpg https://uploads.disquscdn.com/images/6f06cf2fe962fd909d15a47f3d9403663b97e9c69b786132bfc4e6d97aa85c65.jpg
https://uploads.disquscdn.com/images/1969b4137e445ffceb01b887e3d46055e88c9a8f6bd69606290e87951d3f8752.jpg https://uploads.disquscdn.com/images/7978a470938e5a4a0f85408a53e3132ba2becb916cf6e84e05a1647717affece.jpg
Sunil Paul ·
Amazing work – thank you for doing all this and describing it in such detail.
j.a. ·
Many thanks for sharing. Awesome photos and work!
Carl Cottrell ·
Thanks Justin! Seeing a solar eclipse in totality should be on everyone’s bucket list.
Josiah X ·
wOw, that is really tight. You definitely came prepared.
paradiddlesixix ·
i used some of that solar film and attached it to the small filter that fits into the back of my nikkor 500. it immediately melted from the strong magnification haha. could have turned out to be not much of a laughing matter, but luckily i had it in live view at the time, and no damage to my eye, or the camera took place. i guess i should have known, but for anyone that doesnt….. DO NOT TRY THIS!!
luckily, i had enough of the film to quickly fashion one for the front element and no shots were lost.