
Just so you know, my original title was “Lens Disassembly is a Complicated Profession. Don’t You Agree?” The editor said nobody would know what the post was about. But I promise, you’ll see by the end of this; lens disassembly is a complicated profession.
We were interested in this disassembly, and by interested, I mean both excited and nervous. We assumed that things would be very different inside from previous Nikon lenses. But Nikon lenses have always been a bit ‘old fashioned’ and different from other SLR lenses, so we weren’t sure what to expect.
Do not get your lens and screwdriver and follow along at home. Bad things might happen. Bad. Things.
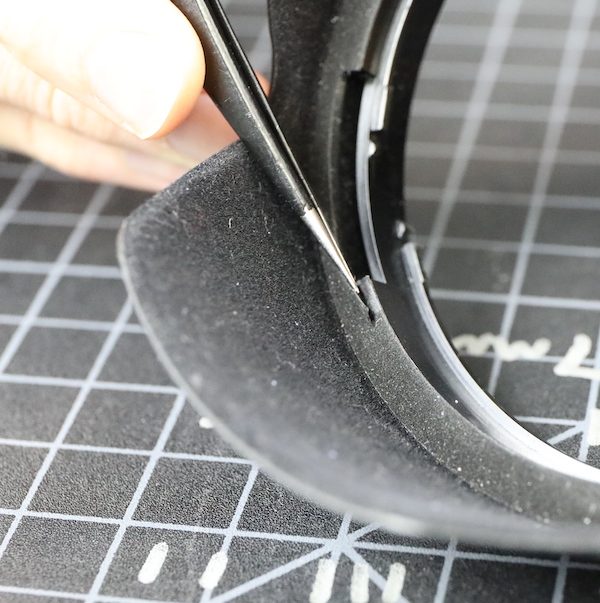
Before we start, a quick break to do some QA bitching. Nikon, do something about the felt you line the lens hoods with. It’s a really minor thing, and yeah, we can super glue it back down, but this is too frequent.
Spoiler alert: we don’t find much else to complain about in this lens.
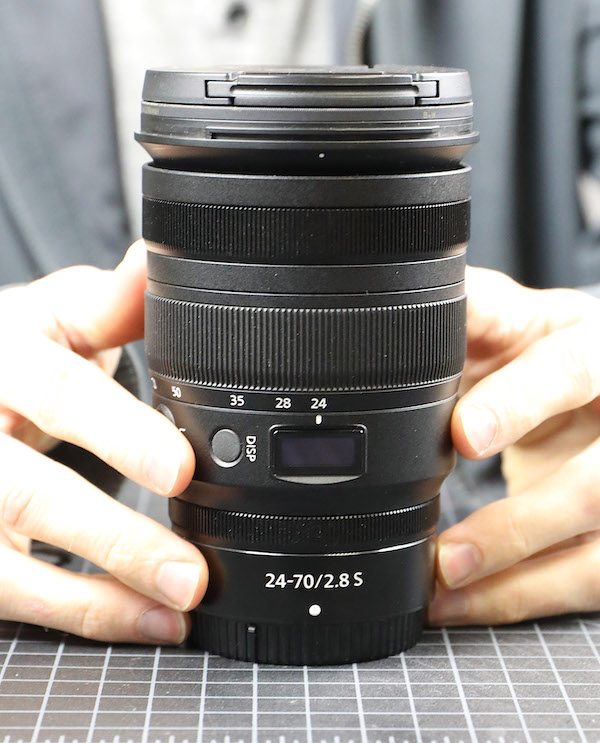
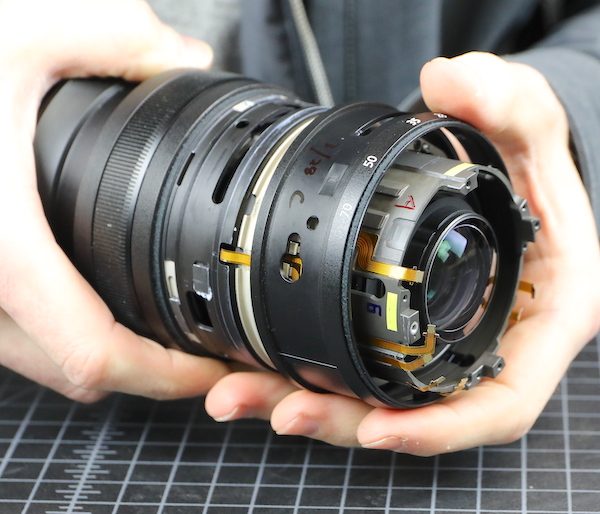
So Let’s Get Inside the Nikon Z 24-70mm f/2.8
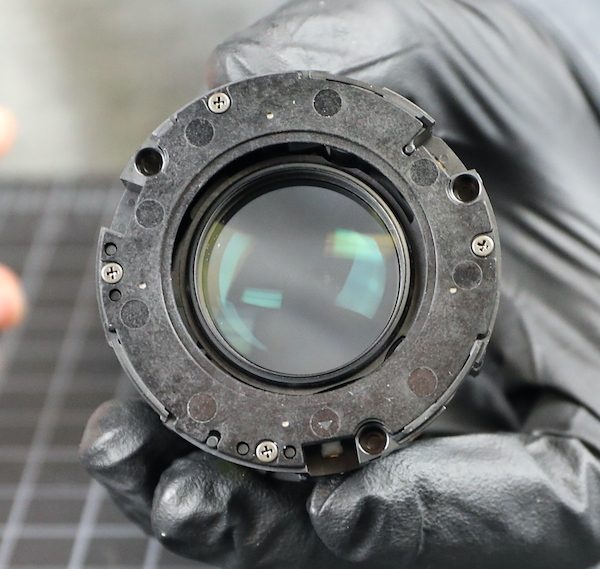
Going in from the back, we start by removing the usual three tiny screws that hold the rear baffle in place.
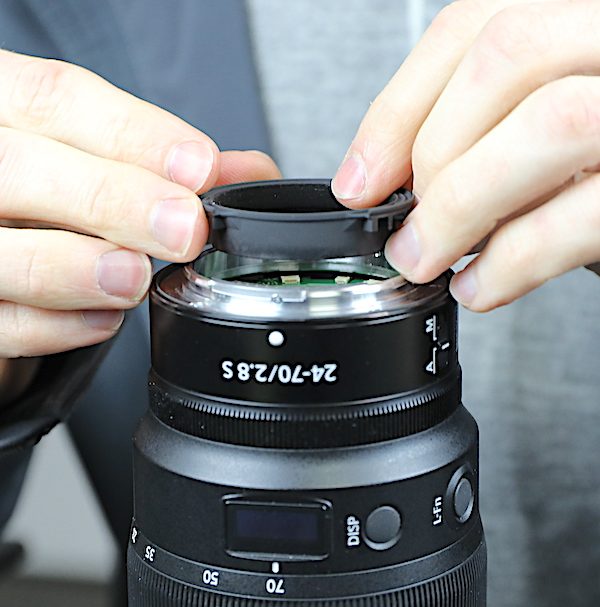
The baffle is felt-lined, whether for absorbing light or dust, or both, we don’t know. But it’s a nice touch.
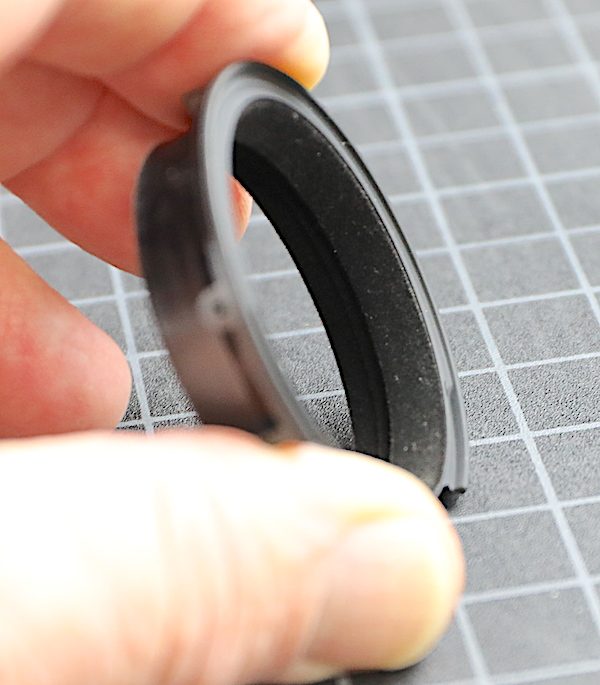
The bayonet is held in place by the usual four screws. Even after removing the screws, it took a little force to pull it off, almost a suction-like effect.

We immediately saw the reason for this; the rear baffle has an inner lip that sits tight against the rear barrel. This might be to keep the bayonet centered, for a dust seal, to provide a little extra strength, or just because it looks cool. But after seeing it (I don’t remember anyone else that has it), it just seems like an all-around good idea. I certainly can’t think of any downside to it.
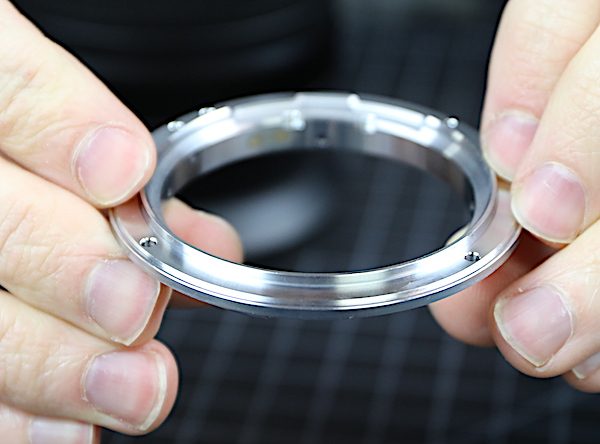
There’s the usual rubber weather sealing ring under the bayonet.
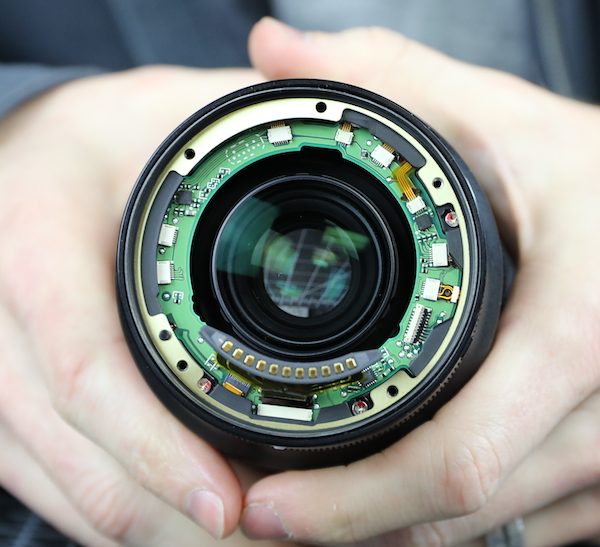
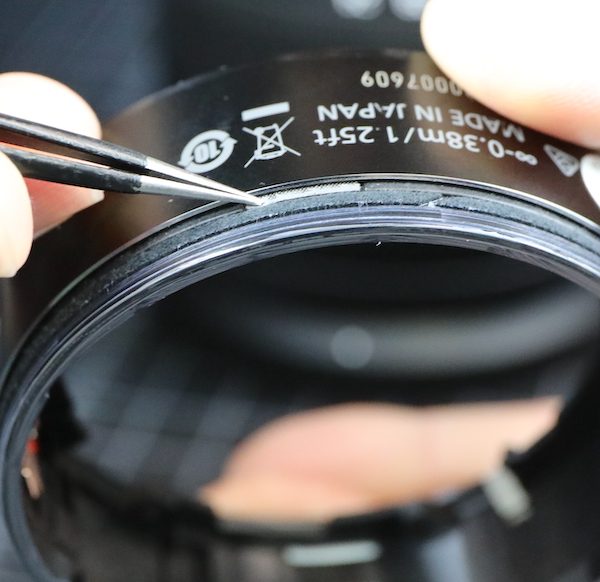
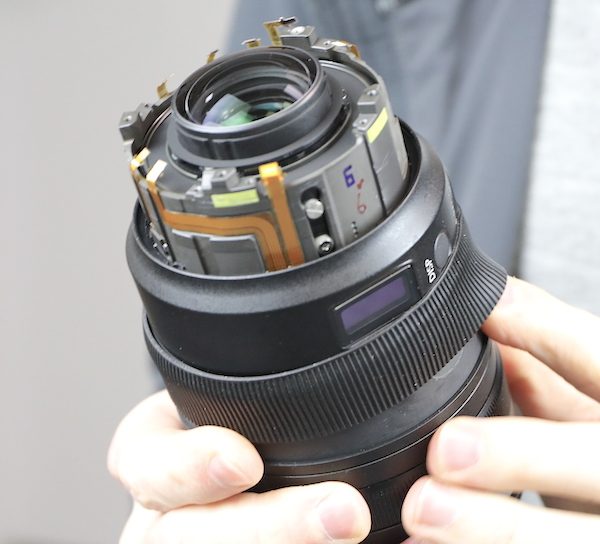
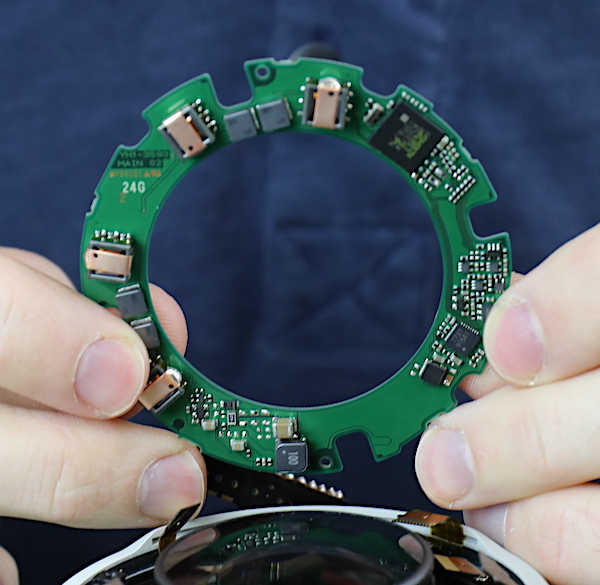
With the bayonet off, we see the PCB, and it’s flex connections.
You may have noticed the spacing shims in the above photograph; there are three different sizes in this copy, so definitely, these are an adjustment, probably for infinity focus.
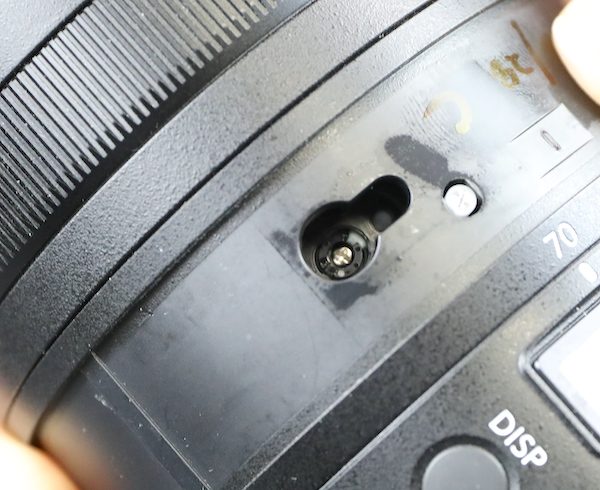
Removing four more screws and one flex lets us remove the rear outer barrel.
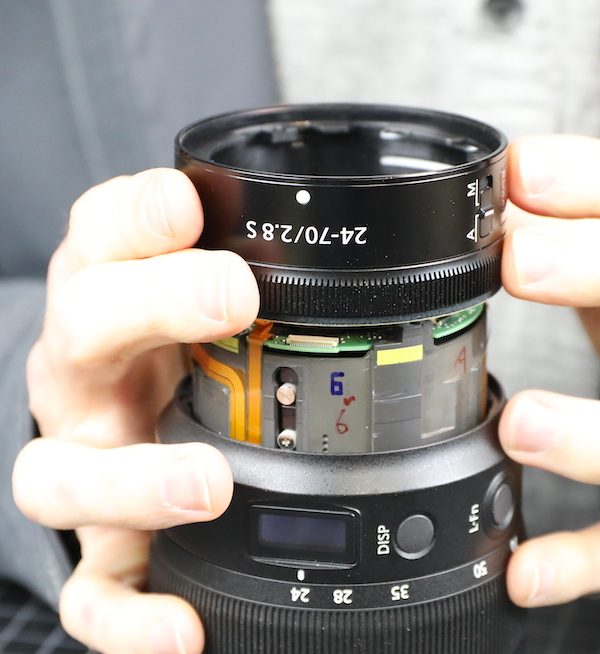
The flex goes to the A/M switch. The lens control ring is simply an optical sensor ring.
Of course, there is a good, foamed weather seal at each barrel joint.
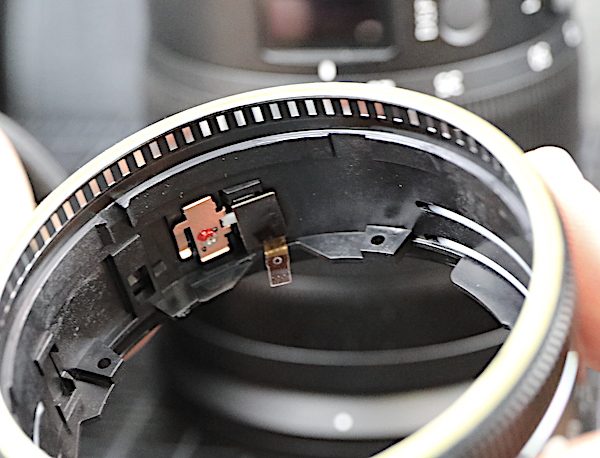
The lens control barrel isn’t attached mechanically, so these two barrels can be separated.
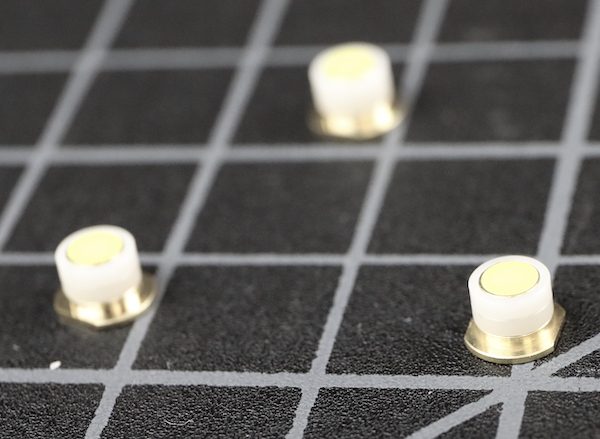
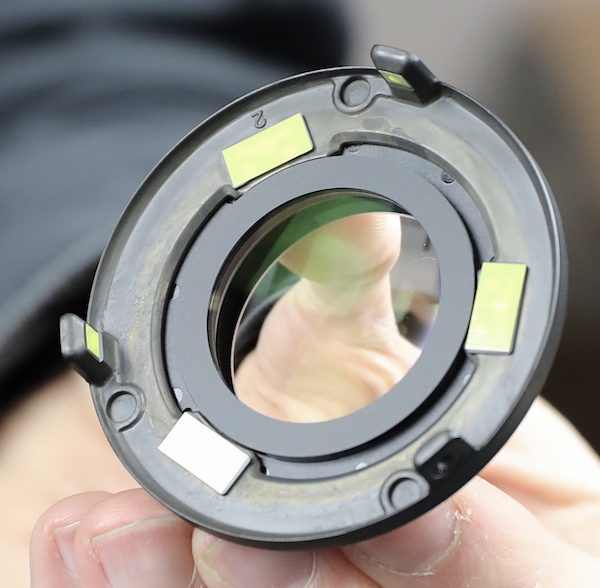
You could see the weather sealing in the above image, but this one also shows the ESD (electrostatic discharge) cushions that are under this ring.
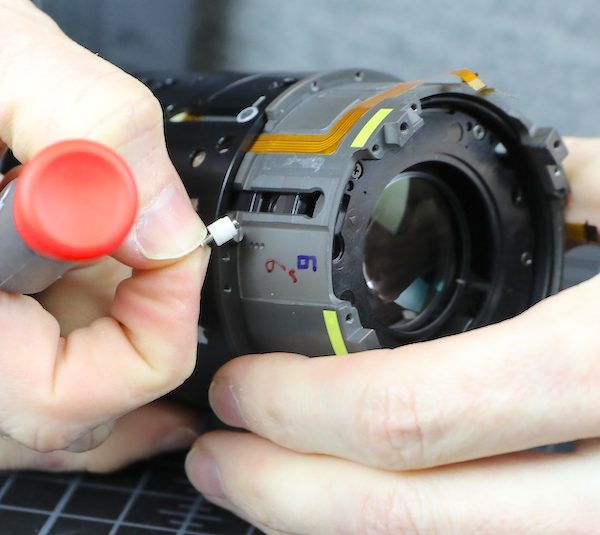
We can also see the optical sensor that is activated when you turn the control ring.

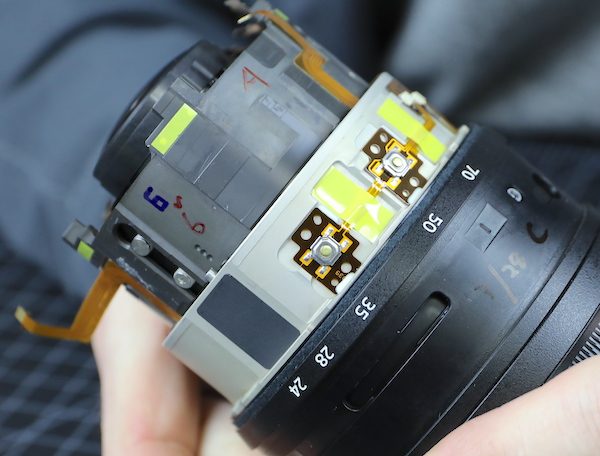
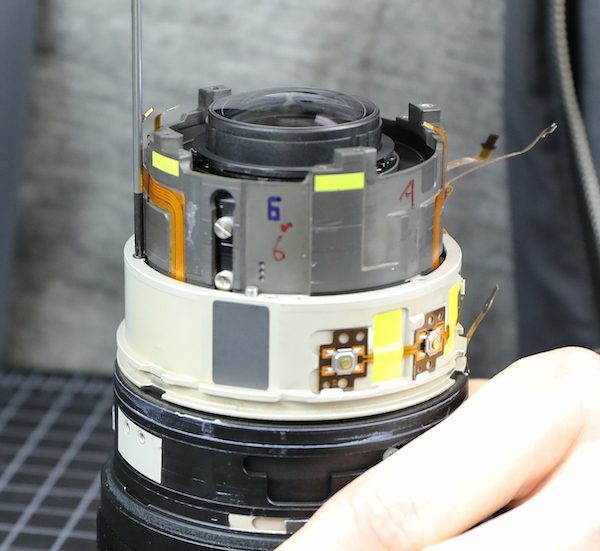
OK, let’s take a moment for me to give some props. Forever, during Nikon tear-downs, I’ve made snarky comments about the old-fashioned look they have inside; soldered wires here and there, flexes wandering aimlessly, random secondary circuit boards, etc. Well, no more. Look at this engineering right here: neat flexes running directly where they’re heading placed in recessed channels in the barrel and thoroughly taped in place. Superb!
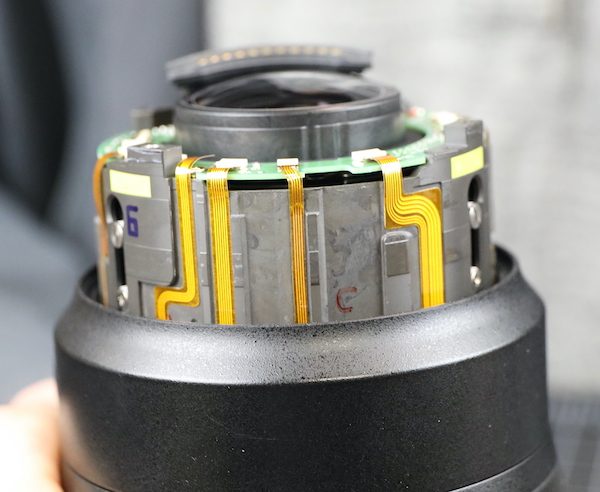
Nikon has clearly modernized and spent time and effort in making a clean, well-engineered layout for the electronics. I’ve been asking for that for years, and Nikon delivered. It would be a shame if, having gotten what I wanted, it ended up biting me in the ax, wouldn’t it? (I read this article about being a better writer, and it said to use foreshadowing. There you go, I foreshadowed the hell out of that, didn’t I?)
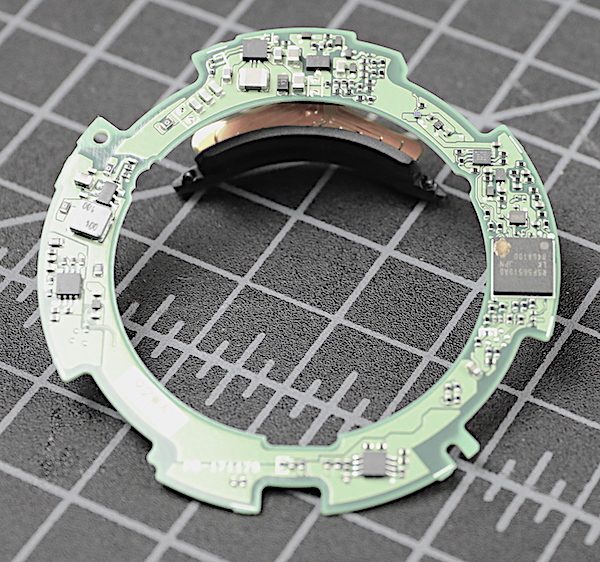
But I digress. The next step is undoing all the flexes and removing the PCB. If you compare this to the PCB in the Canon RF 70-200 f/2.8 you’ll probably notice there’s just less stuff on the Nikon PCB. We’re used to Nikon lenses having secondary circuit boards deeper in the lens and thought that was why. I’ll jump ahead and tell you there wasn’t another board, though, so Nikon probably does more electronic processing in the camera. (This was going to be more foreshadowing, except I ended up not talking about it anymore.)
With the PCB off, we can see there are shims under the rear group (they’re the thin brass line). These are circular, so they’re for proper spacing, not tilt.
There’s another light baffle back here, which is always a good thing.
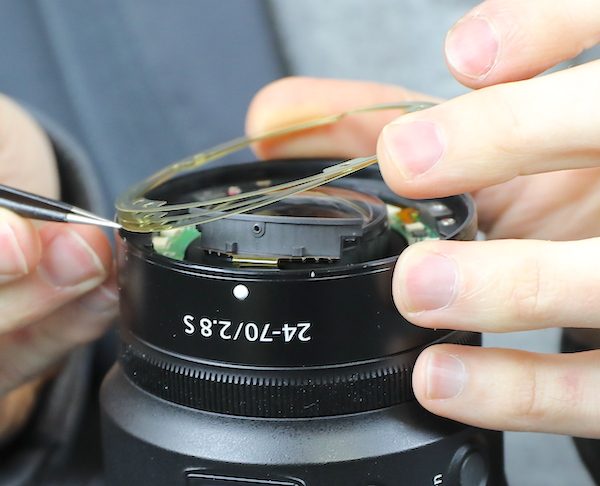
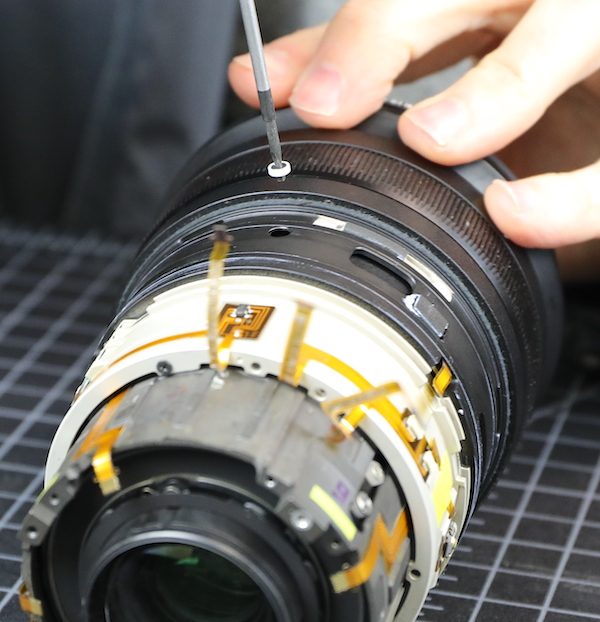
We moved on to taking off the mid barrel, removing the screws that obviously held it in place.
And here, as happens so many times, we ran into the ‘be careful what you wish for; you might get it’ conundrum. As I’ve wished for dozens of times, Nikon has now made a neatly engineered lens with flexes laid out logically. They went even further, building in nice channels for the flexes and thoroughly taping each flex in its proper place.
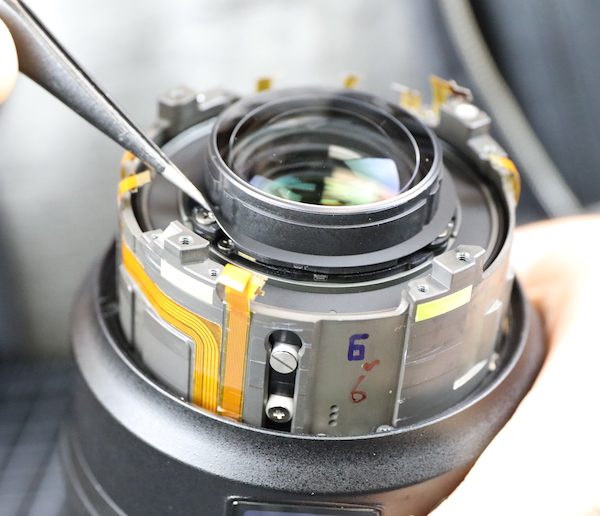
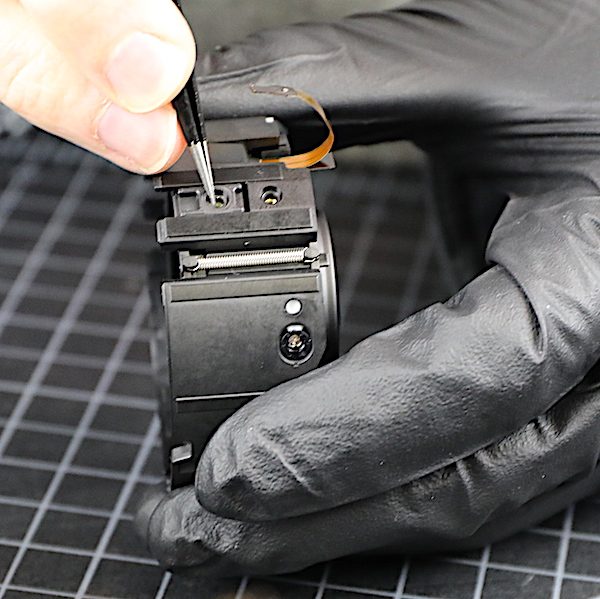
One of those flexes (the one sticking up on the left) runs down to the display unit in this barrel. We untaped it where we could reach it, but it was still taped down somewhere underneath that ring. Aaron could feel the tug when he started to pull up the barrel.
Rule 63 of taking apart lenses is ‘thou shalt not tug a flex’; because tearing a flex is bad. On Nikon lenses, because we can’t buy parts, tearing a flex is very bad.
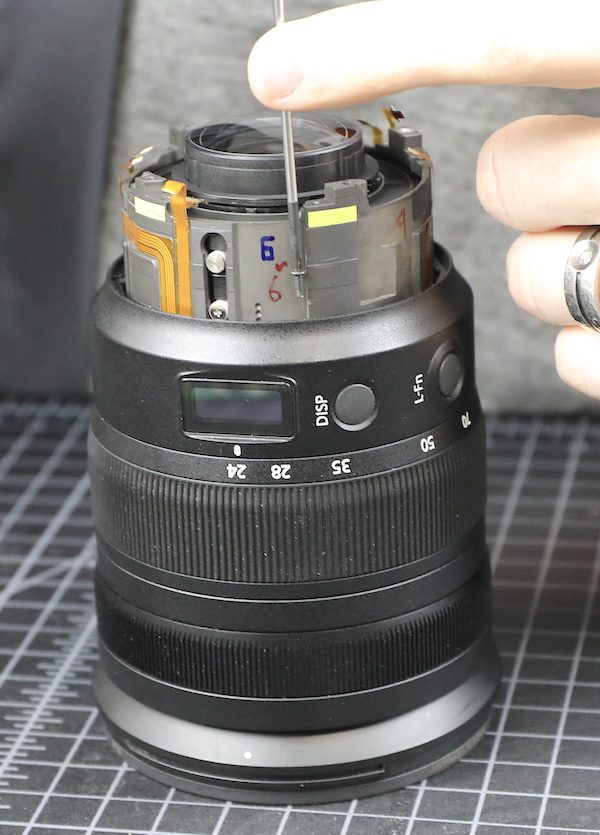
We used every type of flat instrument we had to free the flex up, from spunger to bamboo sliver, but the tug remained the same.
We even removed the rubber and the underlying shield tape to see if we could get a look from the other side.
Tape is probably an inadequate description; that’s a nice piece of 0.5mm heavy-duty plastic. Despite all this, the bottom line is 45 minutes later, we still hadn’t gotten the display barrel off and couldn’t see where the flex was stuck. This is why we don’t do videos of teardowns; they’d be incredibly dull.
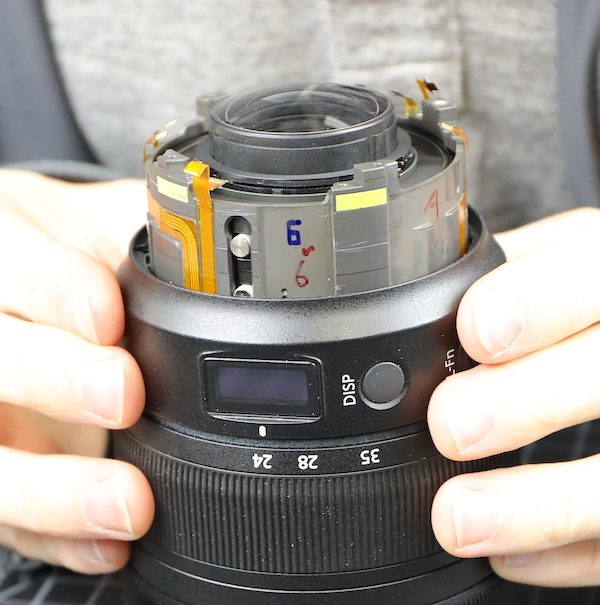
Many of you know my attention span is limited, so I suggested we inject alcohol into that area to loosen the adhesive and then pull the ring off, or let her rip, whichever happened. It’s been years since we damaged a lens during a disassembly. We were concerned that streak was about to end, but it was getting close to lunchtime, and we were hungry.
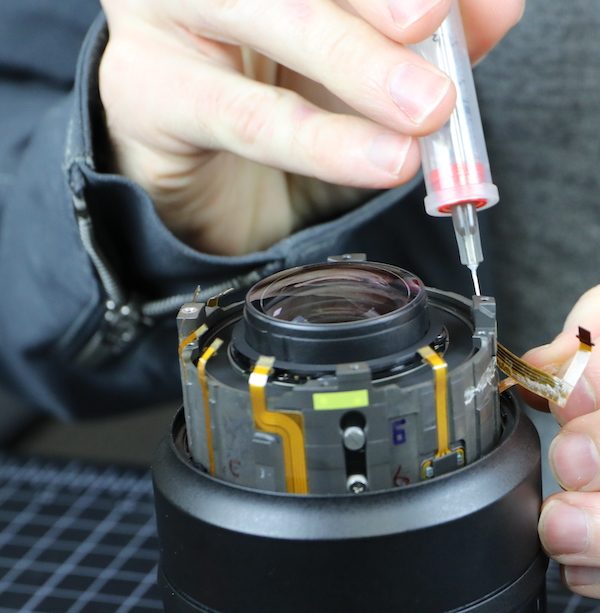
The ring came off with no damage to the flex, and now we could see why it stuck; we could free up the part that went straight down, but after we lost sight of it, the flex had two right-angle turns, both of which were taped down. However, those two bends took all the direct tension off of the flex during removal, so there was actually little danger of tearing it.
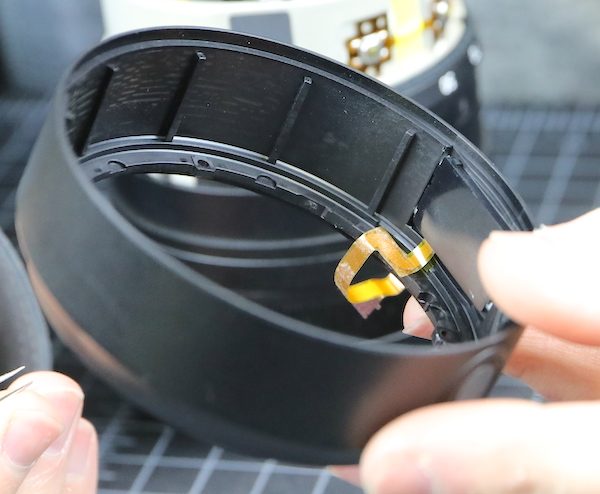
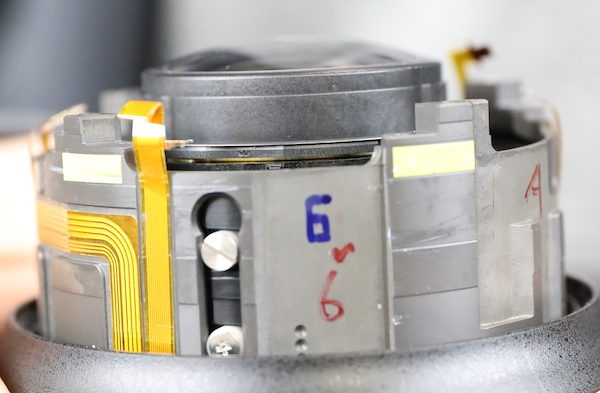
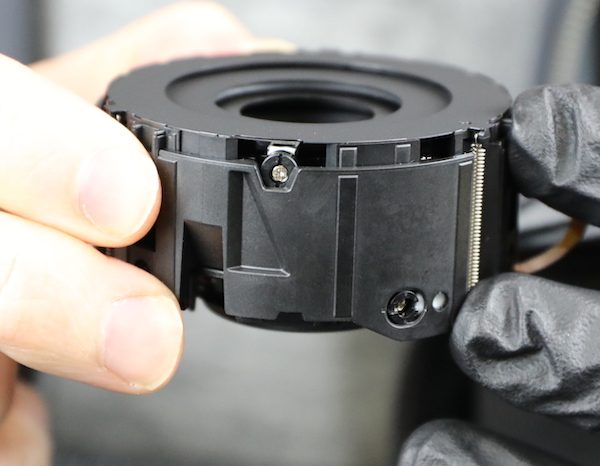
While we were looking around, though, we did see that there was a nice adjustable eccentric collar under the display ring. It has a very nice touch; the zero position is marked on it. You don’t care, I know, but for people working on the lens ‘zero mark at 12 degrees forward’ is a lot more accurate than ‘the fatty part is towards the front a bit’. It makes us sound all professional and such. After that flex fiasco, we need to sound more professional than ‘put some alcohol up in there and give it a tug’.
A look underneath the display ring shows you the button on the ring, just a rubber stopper that pushes the real button underneath, which allows more complete weather sealing. To the left of the buttons, the gray plate is an anti-reflective/antiglare plate that was under the actual display. Finally, you’ll notice there’s a lot of yellow tape. This decorating theme is carried throughout the disassembly and gives the lens a bright, beachy feel (yeah, I been watching HGTV some). As we’ll discuss in a bit, this tape has a really practical purpose.
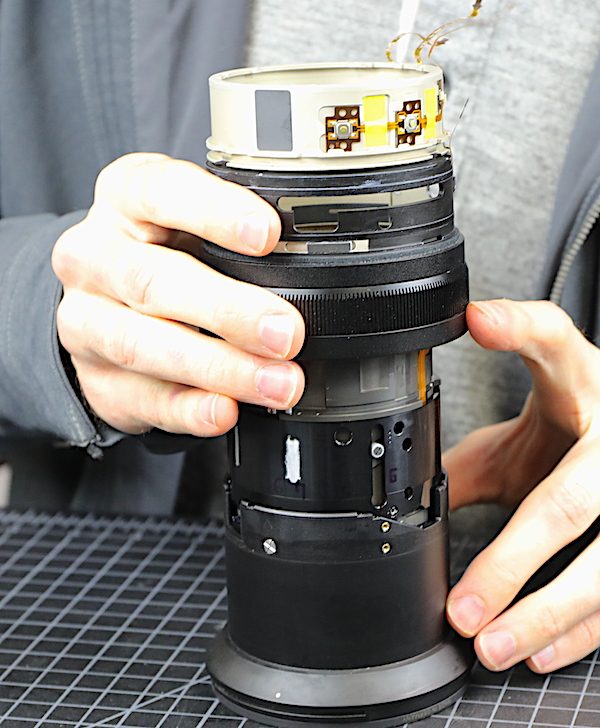
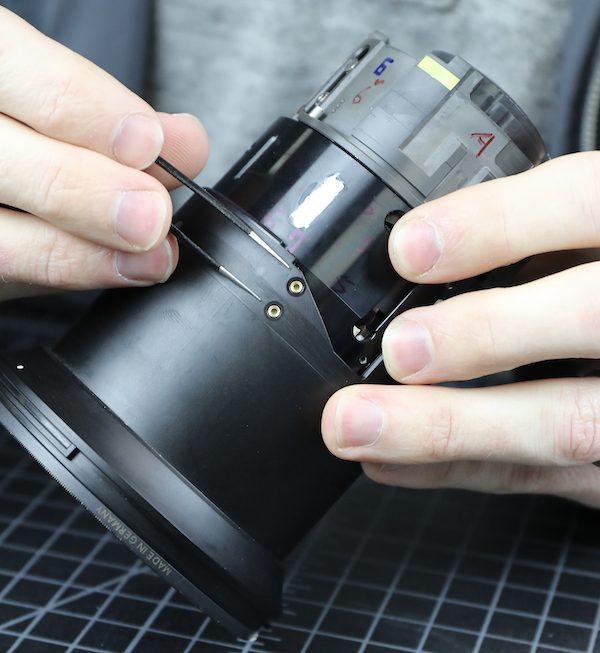
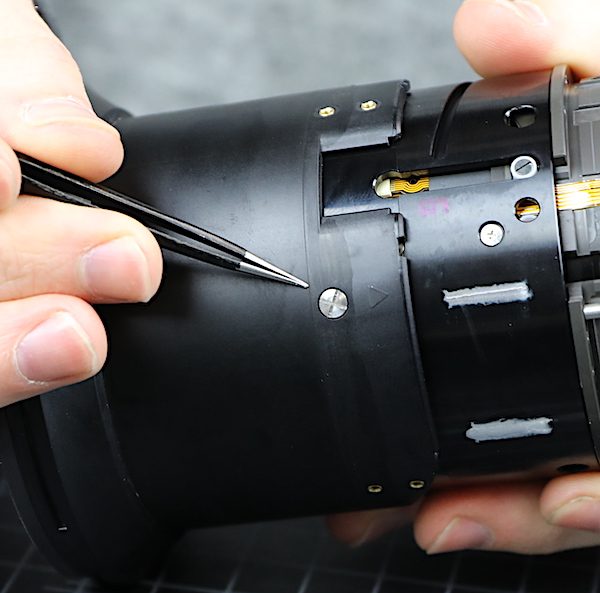
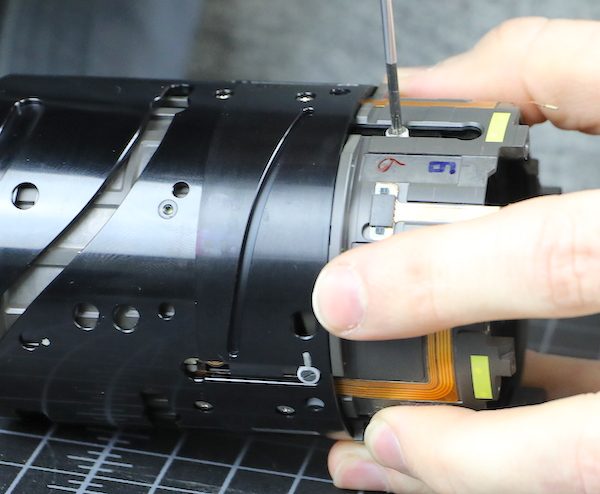
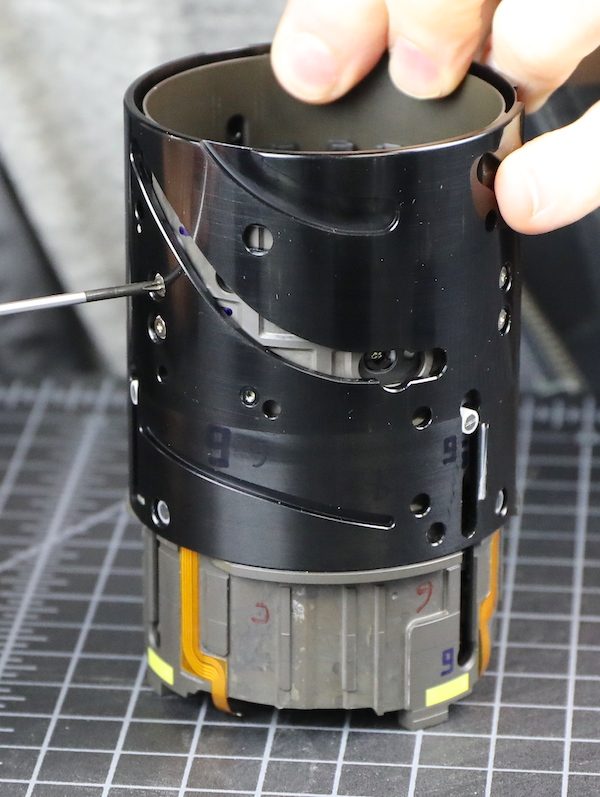
The zoom barrel is next up. There are mechanical zoom stops (the two slotted screws) that are nice and robust, and again, good weather sealing between each outer barrel.
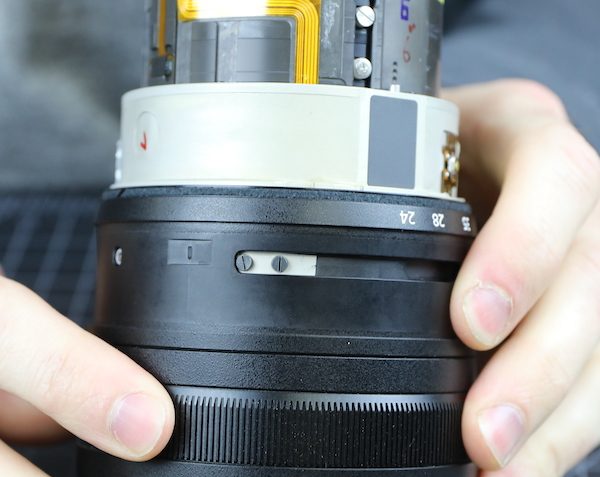
Turning the lens a bit, you can see the zoom position sensor (Nikon has finally moved on from metal brushes) and one of the zoom ring keys (small slotted screw with white nylon collar) that attach the zoom ring to the cam barrel.
All of those things are removed next to take the zoom barrel off. The zoom keys are heavy-duty, as you’d expect. Aaron here exhibits the ‘balance screw-on blade of screwdriver maneuver.’ This is the Geek equivalent of spinning a basketball on your fingertip. We’re like the Harlem Globetrotters of lens disassembly.

With the hardware out, the zoom ring slides right off. We’ll look fondly back on this step, because ‘slides right off’ isn’t going to happen much more.
Underneath the ring is the ESD pads that we got a peak of earlier.
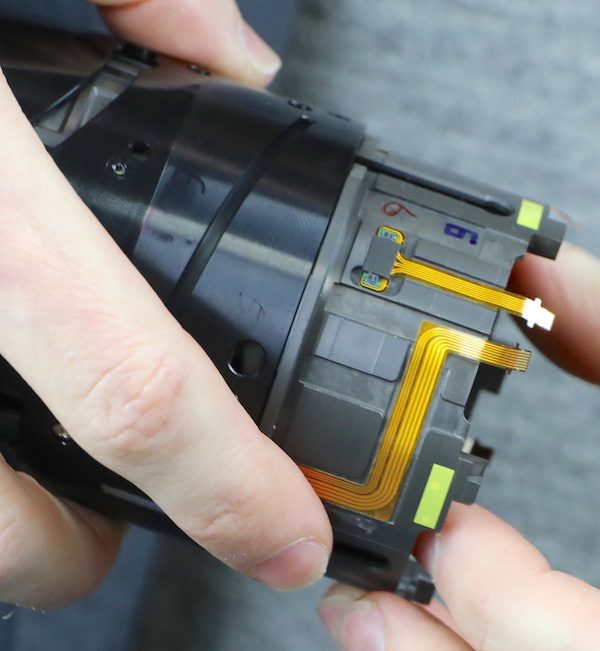
The next step is to unhook the flexes and sensors at this level. As you can see from the image above, Nikon puts actual connectors in the flex runs that can be disconnected; we much prefer that rather than long runs of a single flex that has to be traced and untaped.
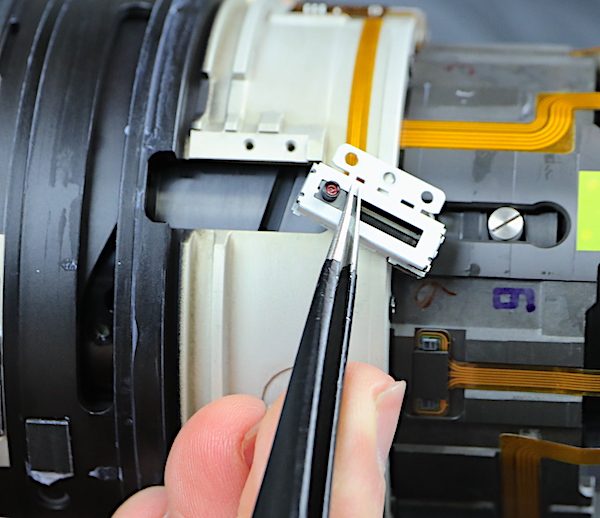
The electronic zoom sensor is held in place by a couple of screws (already removed in this image).
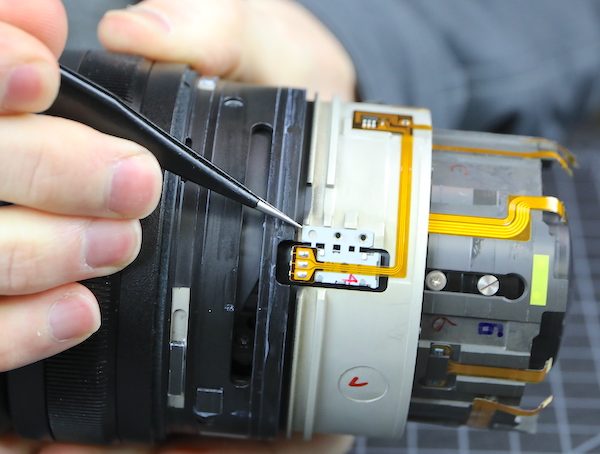
This is a self-contained unit. On the backside is a small cam that inserts into a barrel slot. Rotating the zoom barrel moves the cam up and down, and the sensor reads that position.
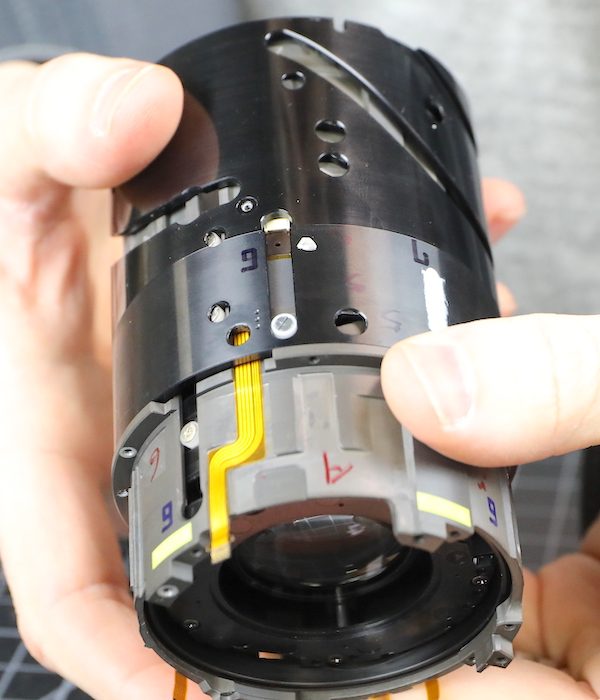
With all of that stuff disconnected, the next step is obviously to remove the inner (white) electronics barrel.
Except, well, it wouldn’t slide off despite Aaron spending 30 minutes doing various zoom and focusing ring position changes. It was like watching a safecracker trying to find the right combination and failing. We just couldn’t remove the rear inner barrel.
As I mentioned earlier, I am not a patient man. My suggestion of ‘get a saw’ was overruled, and instead, we took a lunch break to regroup. To put it in perspective, lunch is usually between disassembly and reassembly. Here it was lunch break, and we weren’t even halfway done with disassembly.
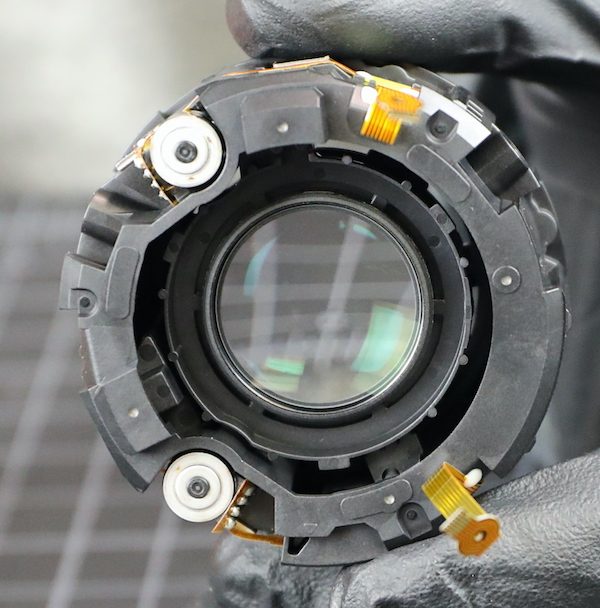
After lunch, we did a reverse and decided to take out the front extending barrel. Like the Canon RF lens, the Nikon uses pairs of rollers, two in each slot. This should prevent any barrel sag in the extended position. The hardware isn’t as robust as Canon’s, but certainly seems adequate for the job.
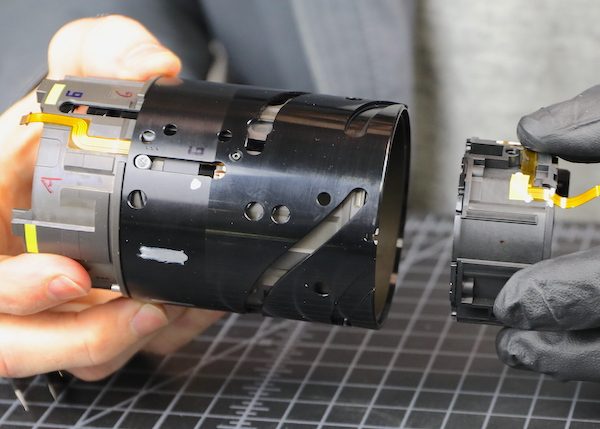
With those removed and a few more things detached, we were able to slide rear inner barrels off as a unit.
So basically, you have to remove most of the front barrel hardware to take off the focus ring and rear barrel. We discussed the various reasons this would be so and concluded, “make Roger and Aaron look foolish during a tear down” was the most logical.
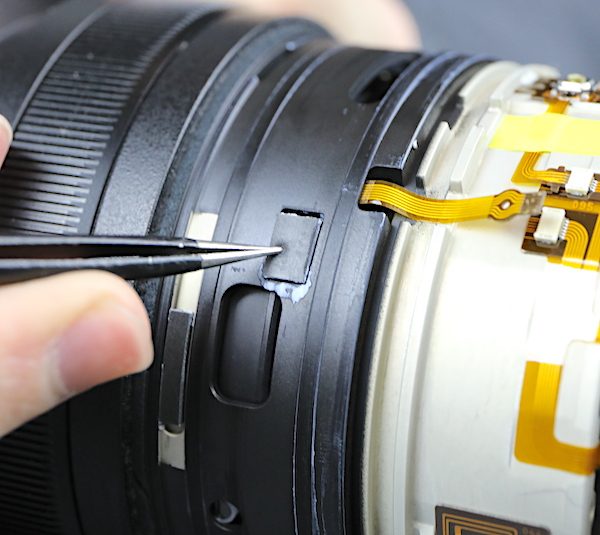
I’ll take a moment to discuss that pretty yellow tape we’ve seen scattered about the lens. It was about now we realized that the tape was placed inside of every screw hole in the lens, and its reason became apparent. It’s for what we refer to as FELD (First Expensive Lens is Dusty) syndrome. That’s where buyers of expensive lenses look inside, see dust, and lose their mind because they think lenses are assembled in NASA clean rooms, and ‘weather-resistant’ means ‘hermetically sealed like a vacuum jar.’
But even I admit they have a point when a brand-new lens gets a huge spec inside. The answer to ‘how did a huge spec get in there’ is generally Loctite. All the screws have Loctite to hold them in place, but extra dried Loctite can break off and become that ‘huge’ chunk of dust in the lens. (Huge usually equals about 0.1mm to 0.2mm; but lenses, as we learned in grade school, make things look bigger.) That yellow tape everywhere prevents any Loctite around the screws from getting down into the optical parts of the lens. Nicely done, Nikon. Very nicely done.
Another nice touch is Nikon has put line-up markings throughout the lens so that during reassembly, you know precisely how round pieces are supposed to line up. (If you haven’t done a reassembly, I should mention that most pieces will fit in any of 3 different rotations. That’s why you see us putting little marks on them during disassembly.)
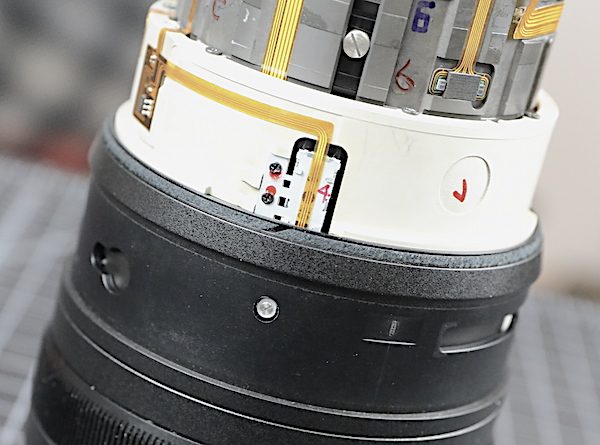
With the barrel off, we can now see those screws and collars we removed insert into nice brass inserts, no screwing into the plastic.
There is also a second set of screws holding the front barrel on to the inner assemblies. The triangle just above the screw is another lineup marker.
Removing these screws let us slide the extending barrel off.
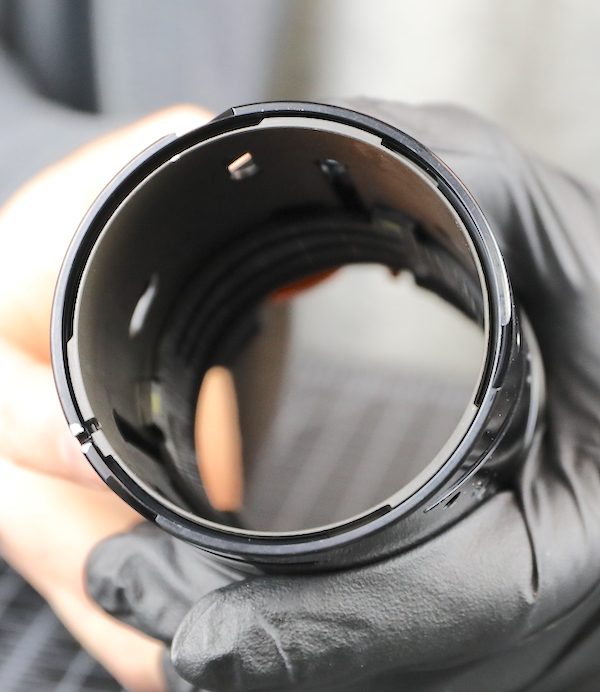
Inside, you can again see that yellow tape covering the internal opening of all the screw holes.
Even the insides of the pressed in brass screw slots are taped.
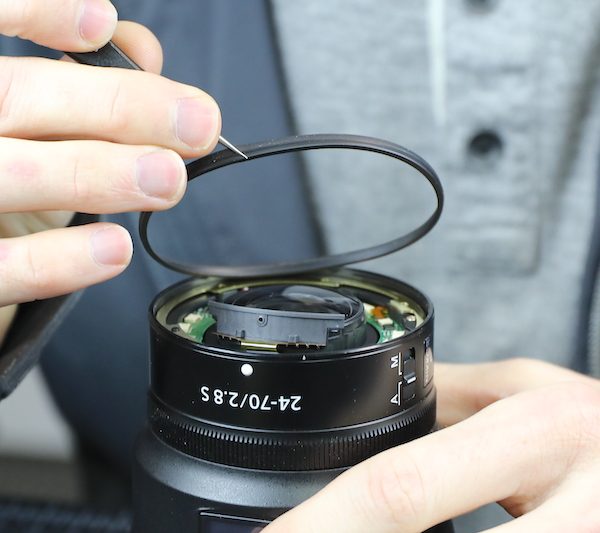
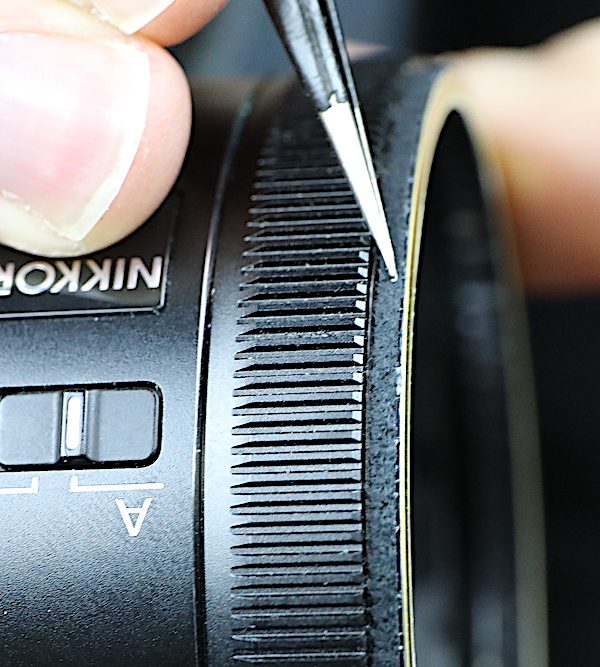
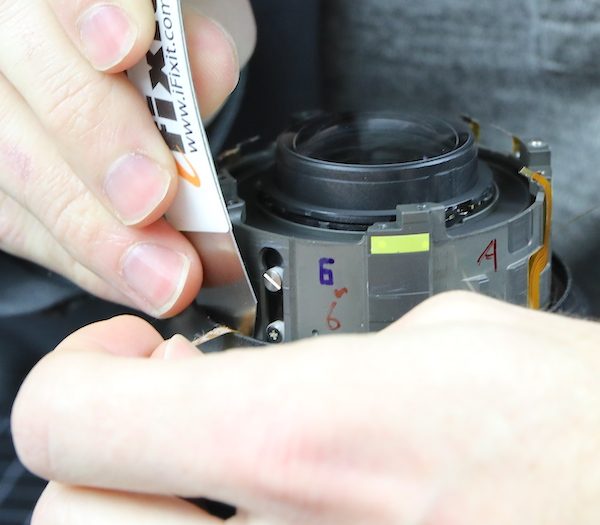
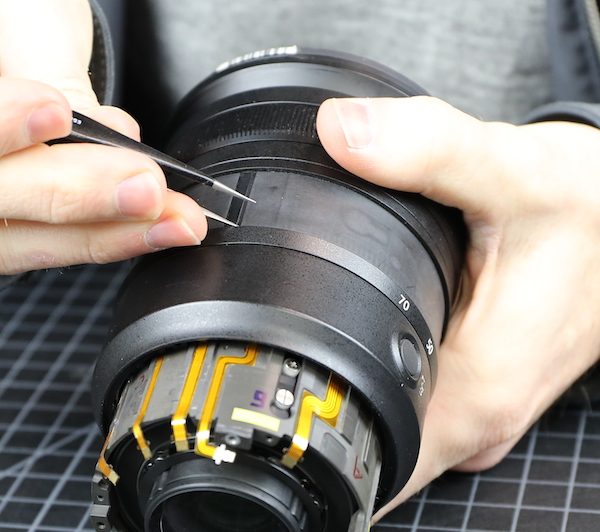
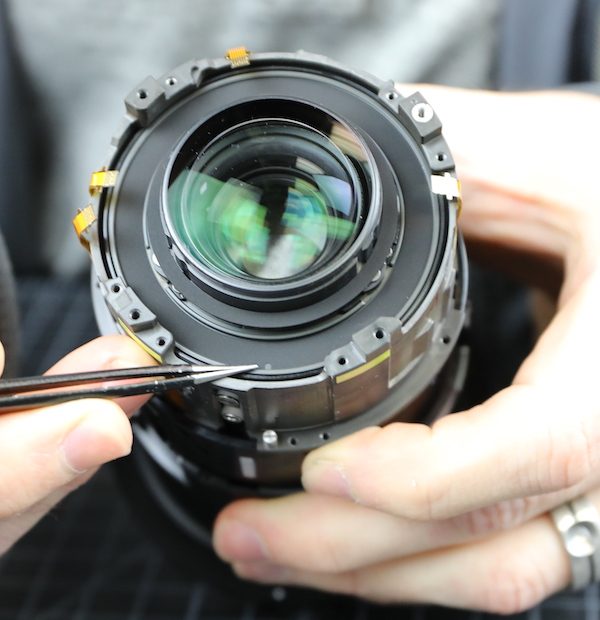
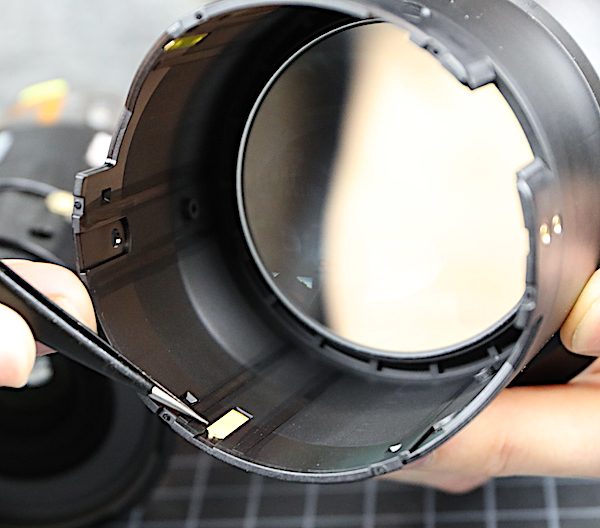
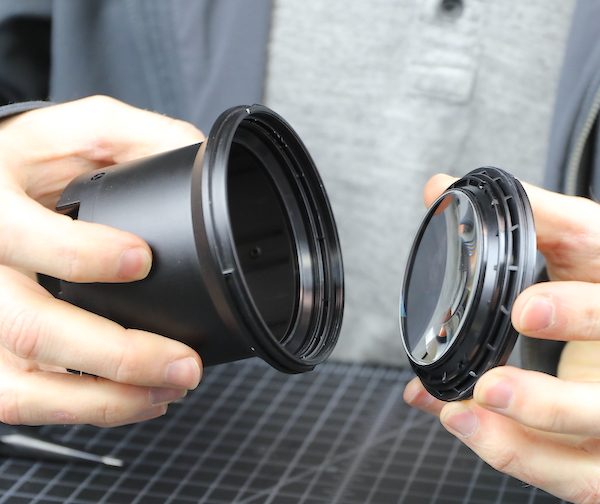
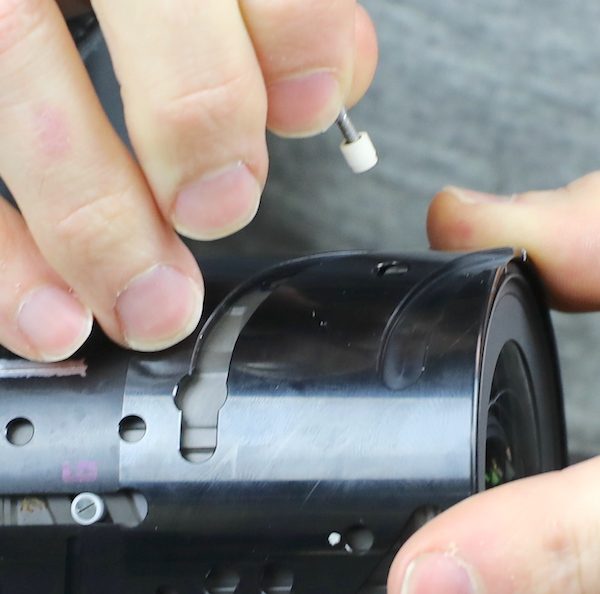
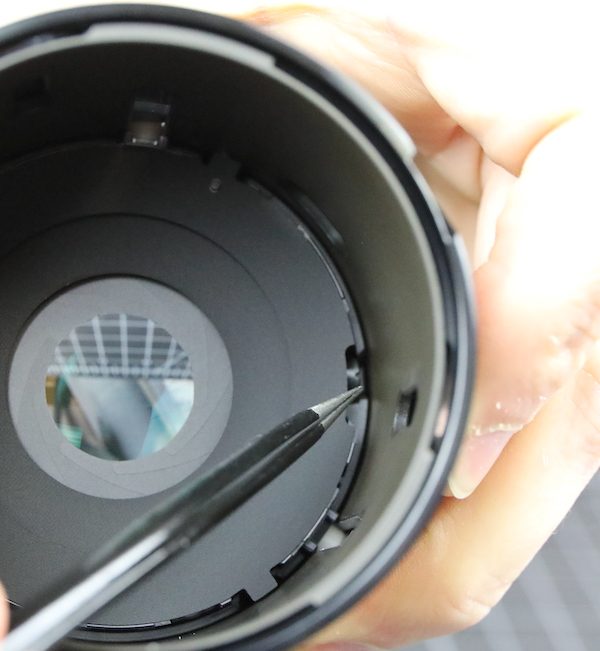
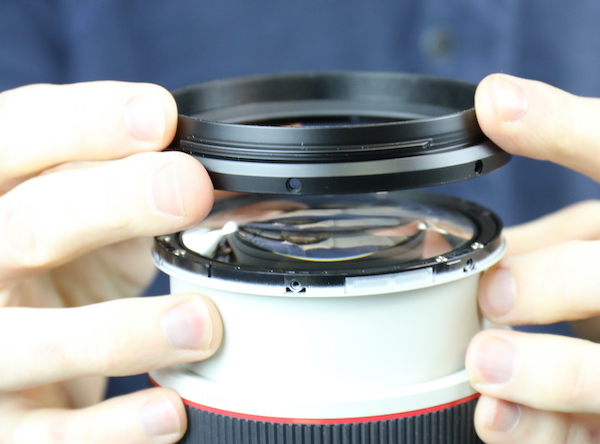
There is already some bad news about the front barrel, but to decide how bad we need to take the front element out. As seems to be the norm for this lens, we spent some time in quiet contemplation. (Quiet Contemplation, of course, means softly muttering unlikely descriptions of the possible parentage of this lens.) We saw no screws; we saw no makeup ring that might cover screws, we just saw nothing.
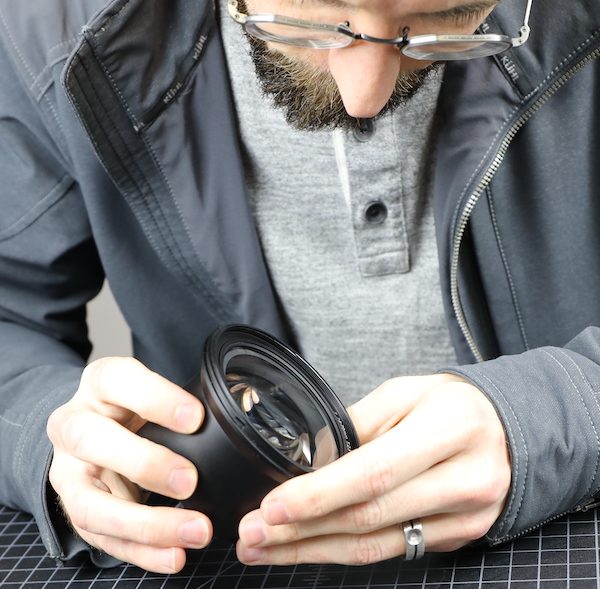
Finally, Aaron found an almost invisible seam that indicated a possible makeup ring and using the rarely required thumbnail tool was able to remove it. That revealed the spanner slots in the front element, so it just unscrews from its seating. Props again, though, because being unable to see the seems is an indication of how precisely even these decorative parts are being made.
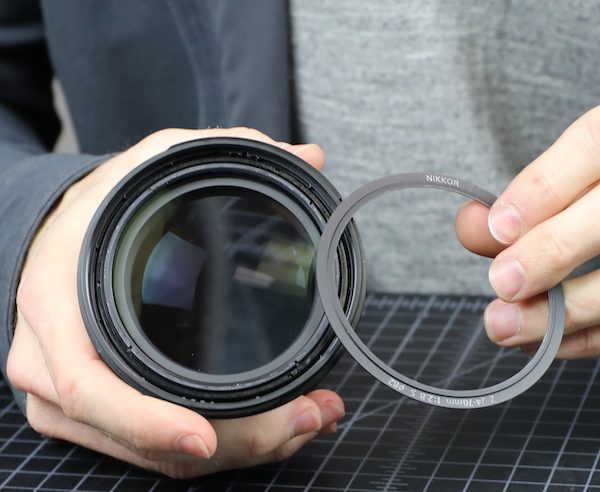
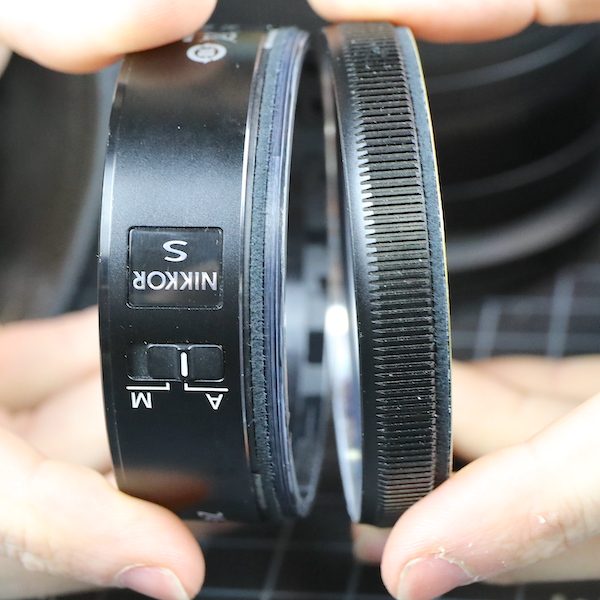
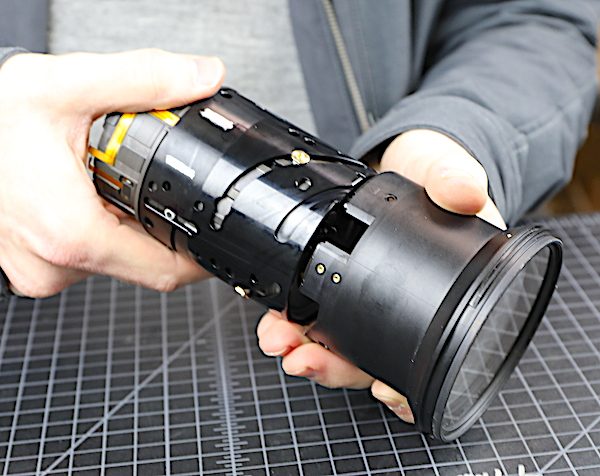
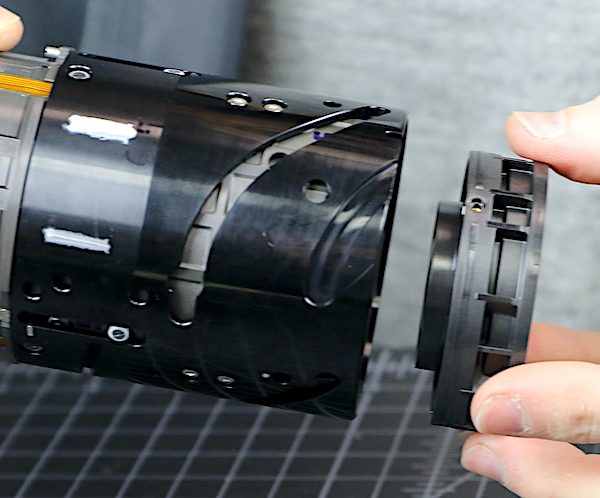
Now, here’s the bad news. If you notice what Aaron is holding in his right hand below, it’s one piece. So if you break off the filter ring or hood slots, this is the disassembly that has to be done to replace it. When a lens is designed to be repairable, the filter/hood ring is a separate part, and you take out three screws and replace it in 10 minutes. For this lens, replacing a broken filter ring means a major disassembly to replace the front barrel. It will not be cheap. It will not be at all cheap.
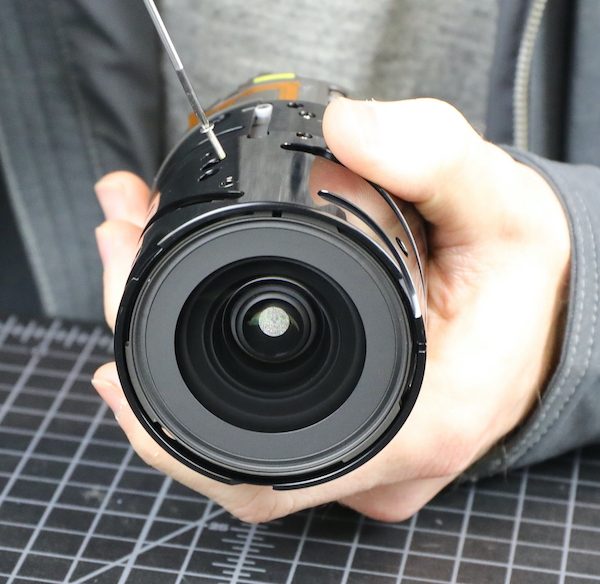
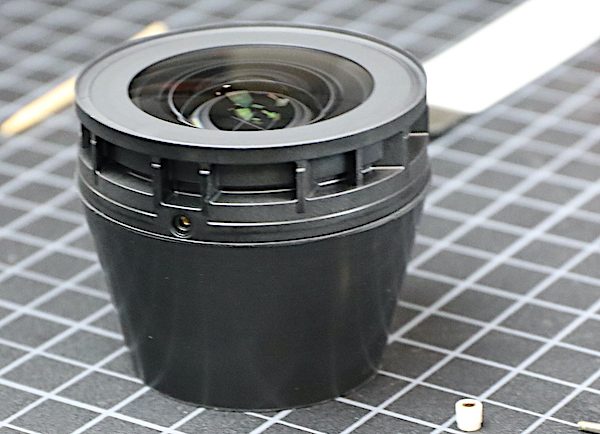
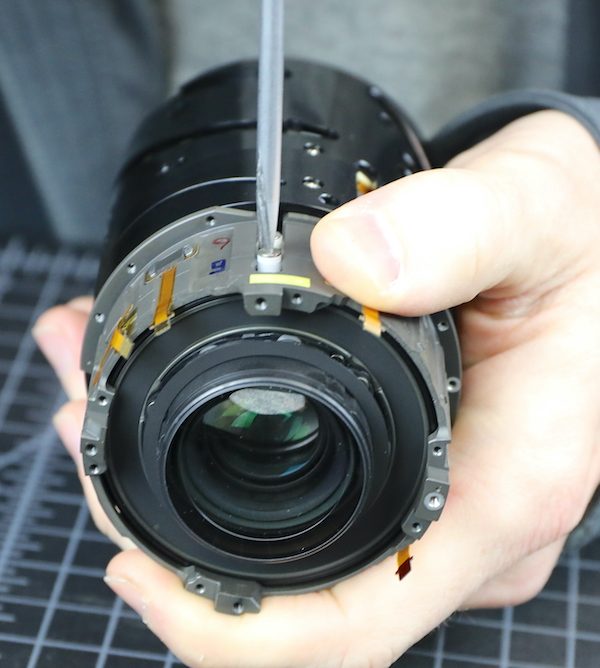
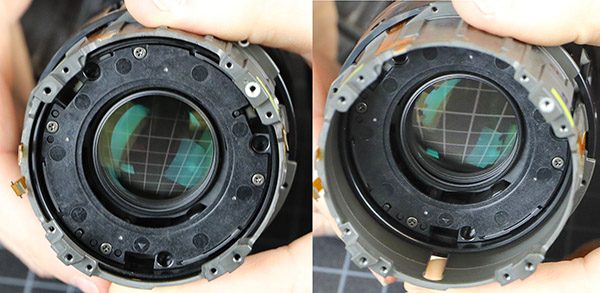
The inner optical barrel is pretty nicely exposed now. This contains all of the optical elements other than the front, the focusing motors, aperture assembly, and of course, the cams and barrels for the zoom elements. You can see one of the eccentric collars showing through one of the zoom slots and a fair number of screws and collars for the inner elements.
Rotating the barrel shows the focusing range. Note the rear element poking out in the image below, and the distance the rear element cam screw has traveled compared to the image above.
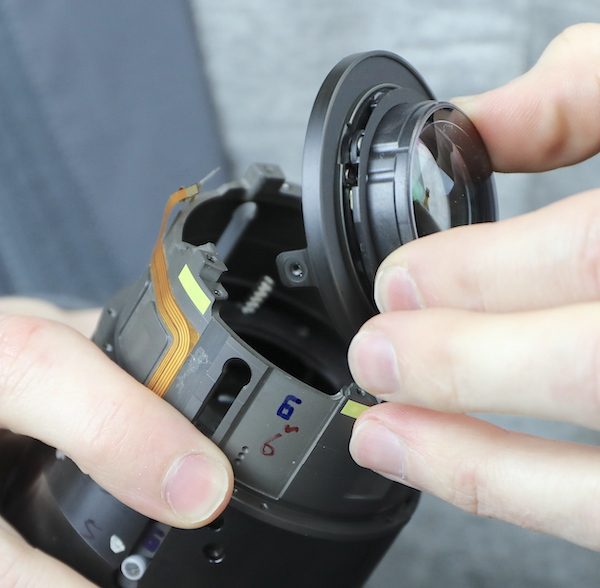
The logical next step is to remove the second group, which is not an adjustable element. Each of three long screws is removed.
Then a puller is used to remove each collar.
After which, the second group slides out of the barrel.
And then gets set in a safe place. Some new coatings are used on these elements, so we’re avoiding touching; some coatings are more delicate than others.
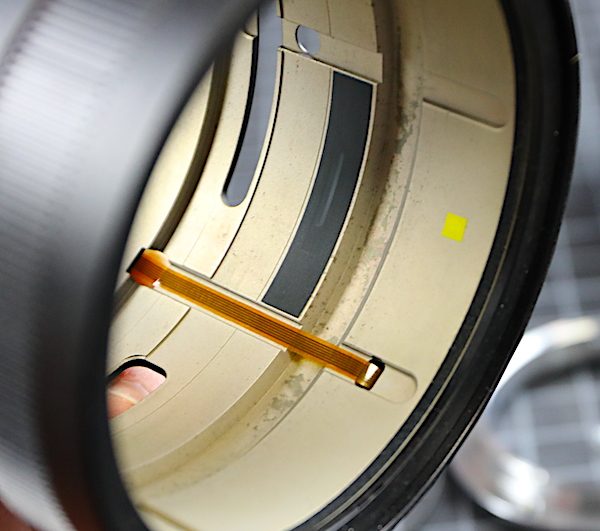
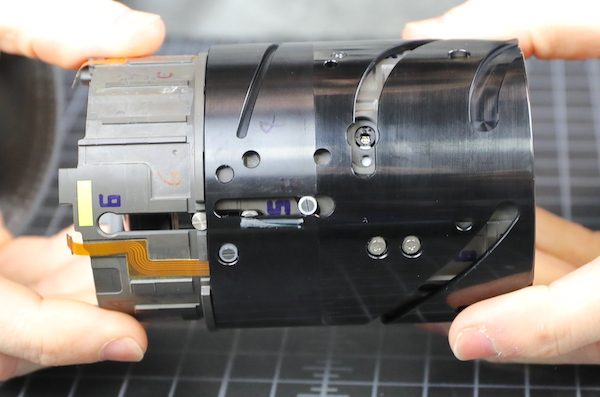
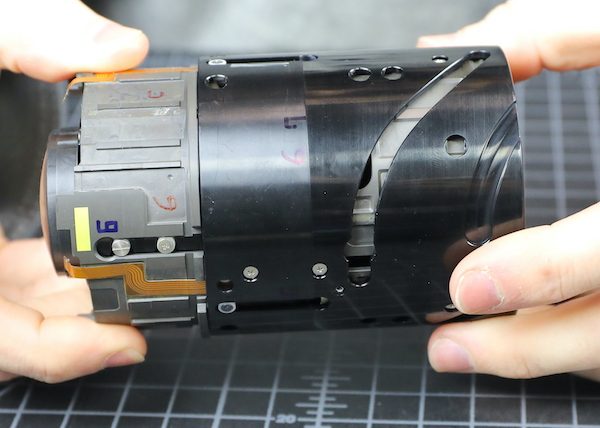
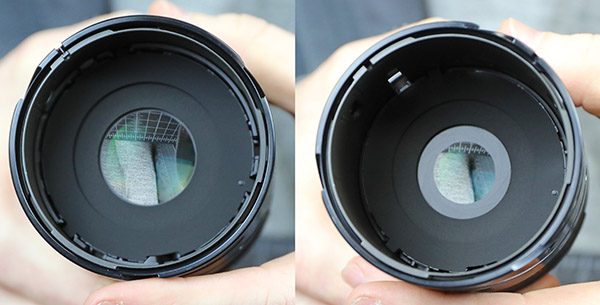
Going back to the optical barrel, we get to see something we don’t see this well very often – the working of a secondary aperture. A fixed aperture zoom has to change the absolute aperture size as the focal length changes. At 70mm f/2.8 requires a 25mm aperture, at 24mm f/2.8 requires an 8.6mm aperture.
The Nikon does this mechanically. As you can see in the images below, as you move the zoom back from 70mm, the secondary aperture closes. (Note: like the rest of this disassembly, we were wrong about this being a secondary aperture, as you’ll see later.)
The mechanism is simple and elegant (although a bit hard to see). There’s a cam that inserts into the zoom barrel, changing the size of this secondary aperture as you zoom. You can’t see it from the image, but the post is eccentric, it would be adjusted during assembly to fine-tune the aperture size accurately.
The next obvious move was to take off the rear element. The posts removed quickly.
After the second one was removed, it became apparent there was some mysterious force pushing the element up. This isn’t Aaron’s first rodeo, and he kept a good grip on the rear element as he removed the final post. You can see the force, at least one of them, inside the barrel in the image below.
There is a set of three springs keeping separation force between the rear element and the main focusing element.
The springs sit about 1/3 of their length in fairly deep wells in the back of the focusing element.

And shallower wells in the rear group. Why springs, you ask? I don’t know. It is the way. Notice again the yellow tape placed beneath every screw hole. Very thorough.
Here’s a look from inside at the travel of the focusing group.
Now we’ll move on to the next episode of “Roger and Aaron make bad choices.” We still have a couple of helicoid barrels, focusing and zoom lens groups, at least one adjustable group, the aperture, and the focusing motors in a fairly compact piece that needs to be disassembled.
The focusing group is right there at the back of the lens, held in place with collars and screws, so that was the obvious choice.
Except we discovered that once it was fully released and free in the back of the barrel, the focusing group won’t fit through the rear of the lens barrel.
Now there will be a 20-minute break while Aaron replaced collars while holding the group, so it didn’t fall forward and bang into stuff. Once that’s done, we went back around to the front. Avoiding the adjustable collar was high on our list of goals, and there seemed to be a set of 6 screws and collars that would let us take something out of the front. (We couldn’t see exactly what was going to come out at this point, but we were comfortable something would. I mean, it got in there somehow, and somehow wasn’t through the back.)
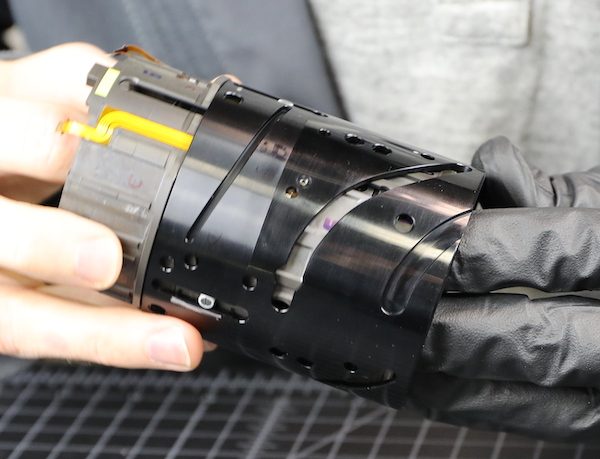
You know shit’s getting real when Aaron puts on gloves. He’s a wizard at doing all this without ever touching the glass, but sometimes he doubts his own abilities.
We had made better choices this time, mostly because we had already exhausted all the bad choices (a metaphor for my life, really). The zoom group came right out, complete with some compression springs and the untouched adjustment collars.

This includes the aperture assembly we’d seen earlier.

Now that it is removed, we can see it’s not a secondary aperture with the electronic aperture behind, as we thought earlier. This is the main aperture and a combination electrical/mechanical device. As we saw earlier from the top, there’s a cam that goes into the zoom ring, mechanically closing the aperture as you zoom to maintain f/2.8.
Here’s a good shot of the adjustable collar for the mechanical aperture function (top center). This would be adjusted using an ‘occulter’ (basically a sized target) so the aperture is the proper diameter. There is also an electronic aperture control inside that makes the aperture even smaller if you stop the lens down — very elegant piece of engineering.
This assembly is basically two parts with three compression springs pulling the aperture assembly (in the front) towards the zoom element (in the rear). Since each of these two parts has it’s own cams (the forceps are in the forward cam hole) we aren’t certain if the spring is there to provide better feel during zooming (unlikely), to provide pull on the mechanical aperture when un-zooming (possible), or for some reason we don’t understand (almost certainly).
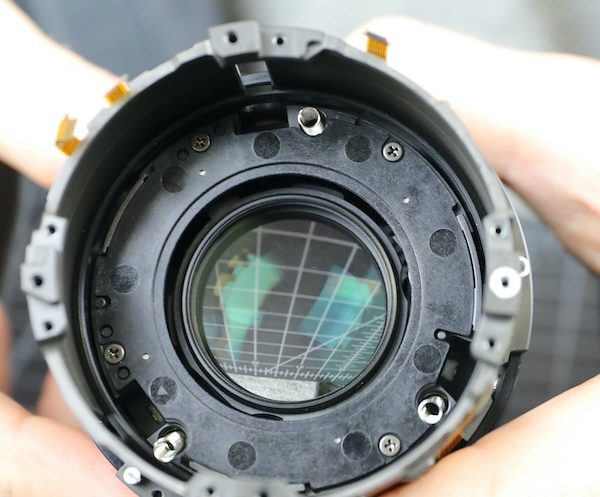
Now we go back, again remove the cams from the focusing group, and take it out through the front of the inner barrel.
The inner barrel is now empty, other than a few cams and the various flexes passing hither and yon.
The focusing group is self-contained. The rear view of the assembly shows just the backplate and the four screws holding it together.
The front view showed the paired stepper motors that move the focusing group, and the two flexes that power them.
Here’s a side view of one of the motors along with a position sensor.
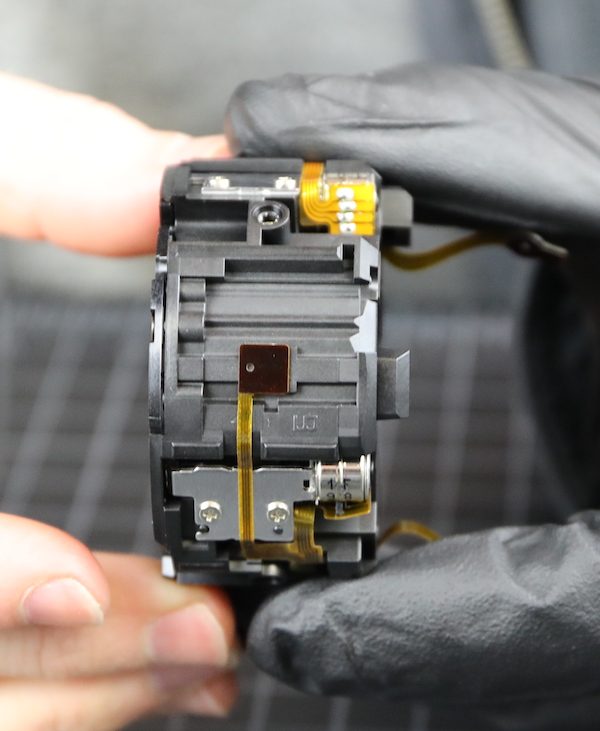
As you can tell from the screws over the motors and on the backplate, this unit can be further disassembled. But we didn’t see what more information we’d obtain, and this disassembly had already been one of the longest ever. Entirely our fault, now that we know the right way in it could be done in a couple of hours, tops. But it had been a long day nonetheless.
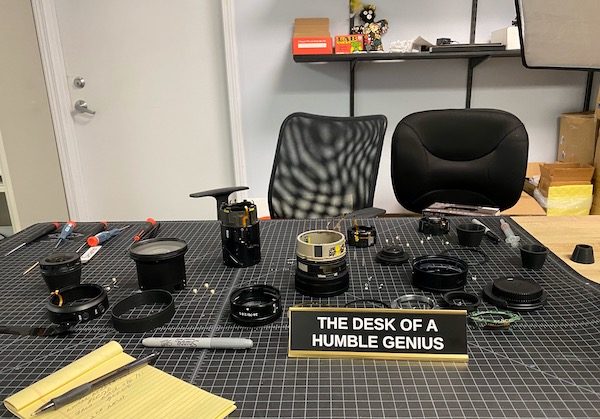
So long, in fact, that Aaron left things out to put back together tomorrow.
Conclusions
As you can probably tell from our struggles doing this disassembly, the Nikon Z lenses are very different than their legacy lenses. They’re also different than what we’ve seen from other manufacturers. That suggests Nikon Z lenses, like Canon R lenses, are a completely new optomechanical design, probably done entirely in-house.
The engineering itself is incredible in most ways. The neatly laid out and solidly adhered flexes reflect the careful design. The taping of every possible point that Loctite or anything else could get in the lens does, too. The design is logical and clean; the difficulties in the tear-down were ours. Now that we know our way around, disassembly won’t be bad at all.
I will complain about the fact that filter-ring or hood-slot damage means an expensive repair. That was not well thought out; those are common repairs, and they’re going to be pricey on this lens. But the lens is well-engineered, and I see no other weak points to make me think it will be anything less than reliable.
I’m sure various internet experts have strong opinions about stepper motors versus electromagnetic motors versus piezo motors for linear focusing. I don’t have enough knowledge to comment other than the vague general understanding that EM is probably the fastest and stepper perhaps more accurate. I would simply caution people that taking engineering reports of how well a given motor does this or that may not be very well reflected in how a lens performs autofocus. Autofocus, like lens disassembly, is a complicated profession.

Roger Cicala and Aaron Closz
Lensrentals.com
January 2020

83 Comments
geekyrocketguy ·
A question I’ve wondered for a while: what would happen if the aperture didn’t stop down as you zoom out? Given the choice between a 24-70 f/2.8 and a 24-70 f/1.something-2.8 lens, I think most people would opt for the latter. Why limit the aperture at the wide end, when optically it could be faster?
barmalini ·
Good question, I was wondering the same. Hope somebody will come up with a reasonable answer
Roger Cicala ·
Reason #1 is the wider aperture would allow a ton of aberrations, vignetting, veiling glare and other awful things to come through. The aperture is really an optical element in the lens, carefully positioned to eliminate ‘bad’ light rays from getting to the sensor.
You’d have this horribly blurry, distorted, no contrast f/1.2 or whatever lens at 24mm.
Poppy ·
I think what he is saying is that typically one end of a constant aperture zoom is going to be better than the other end, so why not allow the aperture to open to say f/2.5 or whatever aperture it may be that the lens will still work well at.
Roger Cicala ·
I guess it’s possible, although I’m not certain. I wonder, though, it people would then consider it ‘nonprofessional’ since variable aperture zooms, even wide ones, are generally classified that way? Just speculating
Poppy ·
Do you guys clean old lenses like Canon FD that have fungus/dust inside them?
Roger Cicala ·
We dust lenses all day every day, but we won’t touch fungus. It’s contagious. 🙂
We just repair our own gear, though, we can’t really keep up with that, so we can’t take on outside repairs.
Urbex Mark ·
That’s my guess. It could be that the lens could technically be a F2.2-2.8 (for example) but the market expects a constant 2.8, so it’s purposely de-rated. Or it could just be to ensure good performance as you say above.
PhilK ·
See my reply to Eamon. In order for the lens to actually perform well at the wide end with the aperture wide open, you’d have to change the optical formula and element/barrel dimensions.
It’s more than just the physical diaphragm opening size.
Akvinat ·
24-70mm f/2.8 should have 70/2.8=25mm pupil size. If it stays the same as you zoom out – that would be 24/0.96=25mm. Lens that doesn’t stop down its aperture at all would be f/0.96 at the wide end. And f/2.0 – f/2.8 24-70mm zoom would be stopped down more than 2 stops at the wide end – perhaps enough, as it was shown by Samsung. Am I making a mistake in this calculation?
PhilK ·
I’m not an optical engineer so I cannot verify the specific numbers.
All I know is that no lens designer is going to over-design a lens that is only required to open up to 2.8 at the wide end in such a way that the optics and barrel would allow acceptable IQ and vignetting characteristics even if the aperture is allowed to open to f0.96 at the wide end. (Or whatever actual wider opening that works out to be)
It would be like putting a 500 bhp motor on a skateboard. Pointlessly expensive, large, heavy, and has no practical positive impact in actual real-world usage.
Michael Clark ·
You’re forgetting the part where the difference in magnification between the physical aperture and the front of the lens affects the size of the entrance pupil. If all of the change in magnification when a lens is zoomed occurs in front of the physical diaphragm, no change in absolute aperture diameter is required. Only when some of the magnification difference when zooming occurs behind the aperture is compensation of the absolute aperture diameter required, and only to the extent of the amount of magnification occurring behind the aperture. It should be fairly obvious in the photos from the teardown that the amount of compensation is much less than the roughly 3:1 ratio between the 25mm entrance pupil needed for f/2.8 at 70mm focal length and the 8.57mm e.p. needed for f/2.8 at 24mm focal length.
Eamon Hickey ·
This question has been debated for as long as I’ve been in and around the industry (1980s). I think in most cases it’s primarily a marketing decision, as you outlined—in the photo dawg community, variable aperture is associated with amateur and constant aperture is associated with professional.
I’ll note that Samsung didn’t buy into this convention with their top-tier mid-range zoom, the NX 16-50mm F2.0-2.8 S ED OIS. And look how well us photo dawgs rewarded them for trying something different!
PhilK ·
The other thing is that it takes more than an aperture opening to make a lens that performs well at a wider opening. Anyone can make an f0.2 lens if they want, but making it good optically and small enough to be practical to use is something else entirely.
This lens was designed as 2.8 constant aperture. If it were designed to float to a wider aperture at the wide end, then in order for the performance to be acceptable wide open at that end of the zoom range, most likely the elements and barrel would all have to be increased in diameter so that all the light rays at the edges weren’t hitting the elements at extreme angles and hitting or bouncing off the barrel walls.
Brandon Dube ·
The lens would be a fundamentally different design if the F/# changed as a function of focal length. You can’t predict at all what would happen to the barrel or anything else.
Athanasius Kirchner ·
I suddenly feel a strong urge to purchase a Voigtländer Zoomar, to see if it also stopped down automatically or not. It was the first of the type, after all.
Roger Cicala ·
I actually have one on the shelf, this made me take it down and look: it has the aperture very close to the rear, so as Brandon pointed out above it maintains a constant aperture that way.
It was interesting, looking from the front you see the entrance pupil vary as you zoom it, from the back, of course, you just see the fixed aperture (it appears from looking the aperture is must in front of the rearmost singlet).
Athanasius Kirchner ·
That was amazing, and very kind of you. You just saved me a chunk of money ?
I’d guess that a lot of older, fully mechanical zooms work the same way, as it sounds cheaper and easier.
Roger Cicala ·
I collect old lenses and get a lot of grief about how useless my hobby is. So it was fun for me to tell everyone “I told you this would come in handy some day.” 🙂
Ben Langlotz ????? ·
Scott Adams would describe that as your having added an element to your “talent stack” which is the essence of different fields of expertise “coming in handy”. (This optics patent attorney is a former childhood amateur telescope maker, etc.)
Andreas Werle ·
Roger it is said, that the cementet rear Lens Group of the Voigtländer Bessamatic Zoomar 36-82/2.8 suffers from separation and one of the rear lens elements will eventually become yellow, because it was made of (radioactive) Thoriumoxide.
Perhaps you have a geiger counter at hand for testing this. :-)
Akvinat ·
Leica stil makes top-tier variable aperture zooms. I suppose they’re not afraid to look different…
Eamon Hickey ·
Ah, yes, good example; I had forgotten about the Leica zooms. And I used the SL 24-90 ƒ/2.8-4 for several months—definitely a very top-tier zoom. Can’t believe I forgot it; the mind fades …
Michael - Visual Pursuit ·
Constant aperture is basically a historic and/or studio strobe thing.
You don’t want your image brightness to change with focal length.
geekyrocketguy ·
Thank you. So basically you’re saying that the manufacturer does their 24mm optical design optimizations stopped down to 2.8, and they give no weight to what the performance would be if the lens was ever wide open to f1.2ish.
Athanasius Kirchner ·
Thank you for answering the age-old question. I’d much rather love it if they let *me* decide where my own threshold for “useless mush” is, and give me the extra speed.
Cryect ·
Likely to limit internal reflections as the imaging circle that would be way too large for what its designed for in mind, which would result in reduced contrast. They could make lenses larger or try to to reduce the reflectiveness and albedo of the barrel sides to address this but one makes it larger/heavier/more expensive and the other I’m guessing doesn’t work that well.
Poppy ·
I think what he is saying is why make it a constant aperture zoom at all? Shouldn’t all zooms be a variable aperture?
Kenneth_Almquist ·
The link below will take you to a simulation of a constant aperture zoom lens described in a Sigma patent.
http://www.photonstophotos.net/GeneralTopics/Lenses/OpticalBench/OpticalBench.htm#Sigma/JP2015-092300/Example01.txt,figureOpacity=0,AxisO,OffAxis
You can use the "Next Senario" and "Previous Scenario" buttons to switch between scenario 1 (52mm focal length) and scenario 3 (145mm focal length). You will notice that what happens after the aperture is pretty much the same in both scenarios. To allow a larger aperture at any focal length, including 52mm, you would have to increase the diameter of these elements. You could increase the aperture at 52mm without increasing the size of the front elements if you didn't mind the amount of vignetting that would result.
In short, an f/2.8-4.0 might have the same size front element as a constant f/4 zoom, but it's likely that other elements will have to be larger on the f/2.8-4.0 zoom, increasing the weight and price of the zoom.
Brandon Dube ·
Unless you have really tight synchronization between the exposure algorithm and the zoom ring, constant aperture is good for maintaining constant exposure when zooming.
It is also less jaron in the lens’ name.
Brandon Dube ·
If all zoom groups are in front of the aperture stop, it is naturally
constant aperture. If constant aperture is the goal and you want more
freedom, you can get a zoom group behind the aperture stop by adjusting
its size as the lens zooms. That’s cheating, but all’s fair in lenses
and war.
Letting the aperture get very wide for the
wide angle side of the design will naturally weight design effort
there. Wide angle = harder, larger aperture = harder, harder^2 will
outweigh easier^2 with narrower FoV and smaller aperture. So you will
end up with a mediocre performance at, say, 24/2, and a mediocre
performance at 70/2.8, instead of exceptional performance at both ends.
Athanasius Kirchner ·
Ahh, I get it now. Thanks a lot for your input, as always.
Dimy ·
It may also be dedicated to videographers who do want everything else to be constant while changing one parameter of a lens. E.g. parfocal, no focus breathing, no aperture focus shift, color matching…
roXplosion ·
The f/number is the relative aperture: the focal length divided by the size of the entrance pupil. The entrance pupil is the size of the physical aperture as seen through the front of the lens. Some zoom lenses are designed so that the zoom operation moves elements in front of the physical aperture. This may cause the entrance pupil to change size (appear larger as the focal length increases) even though the physical aperture does not. Or, with other designs, the entrance pupil remains constant but as the focal length changes the f/number calculation changes. Then there are designs where the physical aperture does, in fact, change size and so does the entrance pupil. It is not a matter of lens designers “cheating” users out of extra aperture or entrance pupil size, it’s just different ways of designing the lenses.
asad137 ·
Minor semantic note: While those springs are holding some things compressed together, they’re actually “extension springs” rather than “compression springs”. Not sure which makes more sense: refer to the component by its design, or refer to the component by its use in the assembly.
Roger Cicala ·
I’m gonna start using the technical term ‘springie things’ from now on.
Ben Langlotz ????? ·
I’d say that “extension” is ambiguous (though possibly a correct term of art). In my work I try to describe the function of the spring: tension vs compression.
asad137 ·
McMaster-Carr calls them extension springs, so that’s as good an authoritative source as exists! https://uploads.disquscdn.com/images/3670644ad4ea81d41a96a46e8404d7b79b01f35a304d1a222d18767fb2642780.png
Andreas Werle ·
Thanks for this nice Teardown, Roger and Aaron. No soldered wires, (is this realy Nikon) perhaps you will miss them. 🙂
BTW you suggested re the yellow tape, that Loctite can cause dust or better some crumbs within the lens. Is there no possibility to hold srews in place without any sort of glue which can cause such trouble?
Roger Cicala ·
I think it’s just a trade off. You don’t have to Loctite screws, but it gives some extra ‘won’t loosen over time’ reassurance.
Brendan ·
Has me wondering if they may have created a bigger problem over the long term as the adhesive on the yellow tape dries out and they fall off throughout the lens. That would make for some really large “dust”. Only time will tell.
Roger Cicala ·
I guess it could happen, but we see Kapon tape inside lenses and cameras maintain its stickiness for years and years.
KeithB ·
I can tell you they use kapton tape inside nuclear weapons. They have to last a long time without being disassembled. 8^)
DrJon ·
Although when people hear Loctite they tend to think Super-Glue and this stuff is Thread-Lock (also quite possibly not by that exact firm), which is designed to break if enough force is applied (meaning when being unscrewed, with a little extra power, but not moving with vibration).
(Okay, strictly there are higher-strength Thread-Locks which need heating before unscrewing, but no-one’s using those in lenses… hopefully…)
DerekL ·
“I would simply caution people that taking engineering reports of how well a given motor does this or that may not be very well reflected in how a lens performs autofocus.”
Real world engineering is all about the trade-offs. Performance on one spec may be sacrificed to gain performance on a different spec. Or to save money. (All too often overdone.) Or because one type may have a shorter lead time than another. Or… Any one of myriad reasons not often taken into account by internet “experts”.
John Matthews ·
A joy to read.
Michael Steinbach ·
Wow. That was incredible to see, I can hope to never work on anything that complicated. Thanks for the article!
Bill Claff ·
Aaron – great work and Roger – great write up as usual.
One pet peeve … you wrote
“A fixed aperture zoom has to change the absolute aperture size as the focal length changes. At 70mm f/2.8 requires a 25mm aperture, at 24mm f/2.8 requires an 8.6mm aperture.”
This wording reinforces a common misconception that these figures are the physical aperture size when they are in fact the size of the entrance pupil.
Roger Cicala ·
Thank you Bill, and an important point I should have emphasized. The images clearly show how much larger the physical opening is than the calculated entrance pupil. I’ll try to reword that.
Bill Claff ·
Yeah, for short focal lengths that tends to be the case.
Here’s a ray tracing from the PhotonsToPhotos Optical Bench that might help people visualize.
This is a Tamron 25-73mm f/2.9 patent.
The black tick marks are the physical aperture which is 19.25mm
The blue line labelled P is the entrance pupil and it’s 8.52mm (24.7mm/2.9)
So in this case the physical aperture is about 2.25x what you might naively think !
https://uploads.disquscdn.com/images/525e962efe2dac2db932d6073492a2aed7955f0b0b74a3af189f911372c2e127.png
geekyrocketguy ·
This diagram is helpful. I do a bit of optical design work, but that’s more for telescopes and nothing as complicated as zoom lenses.
1) Why does this diagram show rays passing outside the entrance pupil P?
2) What does the ray trace (particularly the entrance pupil) look like for off-axis rays? I would guess that the entrance pupil is still the same size, but is shifted?
Bill Claff ·
You may find it fun to play with the Optical Bench yourself. That particular patent is not published to the site yet but there are many others there.
The blue rays are the bundle from infinity and have nothing to do with the entrance pupil except that the maximum diameter matches the diameter of the entrance pupil.
In the diagram I'm attaching to this post the blue rays come from the edge of the aperture, they diverge and the cyan rays trace back to the edge of the virtual image (the entrance pupil).
The heavy almost vertical blue line shows that the pupil is actually curved, not flat.
And the heavy blue line that goes up and to the right shows how the center of the entrance pupil moves as you view it off the optical axis.
When you're at the Optical Bench you may want to follow the Optics Primer button.
https://uploads.disquscdn.c...
Andre Yew ·
Thanks once again for the detailed teardown Roger and Aaron! It’s such a sight for sore eyes to finally see Nikon using circular PCBs! Speaking of which, most of the extra components on the Canon PCB are power supplies (the large square things with the copper strips across them are inductors, which are typically used in switching power supplies), and they might need them because perhaps different electric components (those different AF motors, perhaps?) use different voltages that the mount doesn’t supply. So either Nikon uses fewer different voltages or the Z mount provides a wider range of voltages.
Roger Cicala ·
Thank you, Andre. Good points.
PhilK ·
Still kind of weird to use motors that don’t operate on the native voltages you provide from the camera, especially for a brand-new system like RF where you are in control of all those design parameters.
And even more so because Canon is a top maker of micro-motors, with lots of motor patents. it’s not like they couldn’t make a bespoke item for that application.
boeck hannes ·
I know you want to test it for mtf. I know you want it bad! I want it too!
Athanasius Kirchner ·
If you can cough the $$$ for a new, electronically coupled bayonet mount for their optical bench, I’m sure Roger would be delighted to oblige ?
PS: It’s a LOT of money.
Stefanie Daniella ·
interesting Nikkor Z Series Zoom lens teardown!
waiting till newer generation Canon fast wide aperture RF Zoom lenses show up with:
?the extra “flare reduction” aperture, in addition to main aperture
?as well as two different moving optical focus groups
that teardown hopefully will be straight-forward, even if a more complex zoom lens
bdbender4 ·
Another great teardown! I have no technical insights, but I do have one of these lenses. Best zoom lens I have ever had. Also the most pricey. For my uses it is close enough to just leave it on my Z6 and not worry about accumulating the primes in this focal range. Yeah, I know, Roger, you and the MTF tests will reprove me for this heresy. And I do have the 50mm F/1.8 S if I want to walk around with the nice warm feeling that I am using a lens as good as it gets. But with the zoom I am already walking around feeling that way anyway, so what the heck.
Roger, I am sure you remember Victor Borge. As long as you are foreshadowing you are OK. If you start fiveshadowing we will know you have been doing too much self-improvement. Remember Borge’s line to his significant other: “Dear, you have never looked so twoderful befive.”
Jim Huang ·
I disagree. Lens disassembly is easy. Putting it back together is hard. Haha~
Awesome article as always, Roger 🙂
Michael ·
Well, 2 times I tried to disassemble a lens:
Canon EF-S 60mm 2.8. Stripped my screwdriver head.
Learned about JIS screwdrivers. So I bought a JIS screwdriver set.
Canon EF 85mm 1.2 L II: Stripped the screw completely. 1 of 3 screws were glued on, and the screw felt awfully brittle. I guess I’m keeping this lens for life. I just wanted to blow some dust out of the back element.
Lens disassembly is hard.
Jim Huang ·
*Lens disassemble correctly is hard.????
Tord55 ·
I have solved filter issues by adding a thin step ring on the front of those plastic body lenses I have that I use fliters on, before the lens gets damaged, of course! Cheap way to protect the lens, and cheap to replace should it ever need replacing. Should work on this lens as well!
Lens hoods is a more difficult issue, though.
MyrddinWilt ·
Oh very good, the boss does the lens disassembly because then he has nobody to blame but himself should he bjork the 180-400 f/4.
Was wondering if the Z series teles were worth getting when the F-mount can do double duty. Seems like there may be a reason. This is basically where all the new equipment has been focused on in the factories.
Larry Huck ·
Your ability to perform this lens teardown and reassembly is amazing. Way beyond my abilities!
I am wondering how often you put a complex lens completely back together and it doesn’t work correctly?
Roger Cicala ·
Larry, very occasionally we’ll have an issue and have to repeat disassembly to figure out what we did wrong. Once or twice a year. Usually it’s something simple like a flex wasn’t plugged in properly.
Athanasius Kirchner ·
“We’re like the Harlem Globetrotters of lens disassembly.”
You both underestimate and overestimate yourselves, I think. But I split my sides laughing at that reference!
Ben Langlotz ????? ·
The taping of holes to prevent incursion of loctite crumbs is also a smart way to reduce the need for factory service that would be more complex (and cost-unfriendly if not under warranty). Much like the adoption of LED light in cars substantially reduces warranty bulb-replacement costs.
Michael Clark ·
It’s cost unfriendly to take lenses apart under warranty, too. It’s just unfriendly to the warranter (usually the manufacturer) rather than to the owner of the lens.
Henry Winokur ·
I find this a fascinating article, and I appreciate the work that you and Aaron did in taking the lens apart and putting it back together. I love taking things apart. i just wish I could put them back together again, so that they functioned! 🙂
There is one small error in the spelling, when you are discussing the fact that sometimes people will see flecks of Loctite inside the lens: “But even I admit they have a point when a brand-new lens gets a huge spec inside. The answer to ‘how did a huge spec get in there’ is generally Loctite.” “Spec” is the abbreviation of “specification”. The word you were actually seeking is “speck”. That threw me for a serious loop when I first read it until I came to realize what was meant! 🙁
Keep up the great work. As someone else said: you greatly underestimate your work at both doing the physical labor and writing about it.
Michael Clark ·
While you were at it, you could have also pointed out the misuse of the contraction [it’s] = [it is] where the third person neutral possessive pronoun [its] = [belongs to it] was intended.
Henry Winokur ·
Nope, I’m obligated to only point out 1 error / post. I left it for you to do. So thanks. 🙂
Dennis Linden ·
Dude, you’re breaking my heart. This setup needs a clean room… 🙂
Brandon Dube ·
A cleanroom that isn’t maintained extremely rigorously is not of very much use. ARRI put out a PR video not long ago of the clean room they do lens repair in, and the technicians are not wearing covers for their beards. This renders the cleanroom an expensive waste of time, as the largest source of contamination is not mitigated.
For consumer camera lenses, a clean room is really not very necessary, and it’s easy to blow $10k/mo maintaining one properly.
Roger Cicala ·
Someone’s been watching too many videos where the techs where those white cotton gloves 🙂
I’ve been to a few dozen factory and authorized repair centers. I’ve seen all kinds of things I can’t talk about. But you know what I’ve never seen? A clean room. They have one at JPL, but that’s different.
Oh, and speaking of those white cotton glove videos? Nobody wears those in real life either. Cotton = massive source of fibers. But they do look all professional, don’t they?
Aaron, BTW, has the highest factory training certification you can get from various (including German) lensmakers. He’s never seen a clean room either.
Dennis Linden ·
Roger, I am no expert, and I’m not trying to suggest I am. My comment was more in jest than an actual suggestion. I was just seeing visible dust on the lens and thinking to myself, gosh, wouldn’t that affect the images? I have seen many videos on sensor cleaning, but of course suspect few people do more than give them a passing blow. I love listening to your insights.
Roger Cicala ·
Sorry for my grumpy fit. I get beat with ‘dust in the lens’ all day, every day. It’s like poking an open wound 🙂
We clean them pretty meticulously during the re-assembly. But there’s dust in them when they arrive from the factory, there’s more dust once you use them. There is no lens without dust, and unless it’s massive it doesn’t affect the images at all. You could theoretically reassemble in a clean room and they’d be nearly dust free. For a couple of days.
Gene O'Shea ·
Very informative and you’re a damn good writer too!
Rogério Peccioli ·
Fantastic lens. Nikon congratulations.
Pablo Yanez ·
Great article… but for me it is close but no ceee-gar. I was searching to see how expensive it is likely to be to replace the front element of a 24-70mm f4 Z…. while this article has a fantastic amount of detail, I’m pretty sure that not much of the design of the f2.8 applies to the f4 Z lens. Is that correct?
Mira Studio ·
Wov! Did you assemble if back after that?
clicksbysatish ·
how can i remove front or top glass in my nikon z lens. because my nikon 24-70f2.8 z mount lens got some fungus on front or top glass. please help me.
Agnieszka MT ·
Hi, do you have a tear down of Nikon Z 24-200 by any chance?
If not will you be doing one anytime soon?