So today is “Every Dark Cloud Has a Silver Lining Day.” The dark cloud involves a Fujinon GFX100 medium format camera that went out on rental, got used in a dive housing, and ‘suddenly died for no reason.’ Except on further investigation, well, maybe it got a little wet, but just a bit, but it was working for a while after it got wet. Alas (our editor said my writing’s too casual, so I thought throwing an ‘alas’ in would class things up a bit), Fuji Service said ‘repair not possible’, insurance claims were paid, it got sent over to repair to see if there were any salvageable parts.
There were several silver linings. Aaron and I were still kind of sore from our disastrous Canon 600mm f/11 IS teardown, so we were eager to tear apart something we couldn’t break. Plus, medium format cameras are big, and big things come apart easily. Plus, since we’ve started becoming aware of fractures in IBIS units, we wanted to start comparing IBIS among the various cameras, and we figured medium format sensors, being large, would maybe have robust IBIS units. Plus, well, I get to add an MF format sensor to my ‘sensors: collect the whole set’ collection.
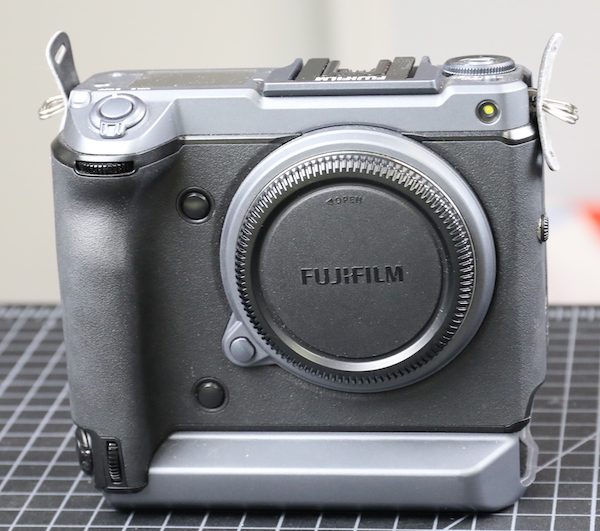
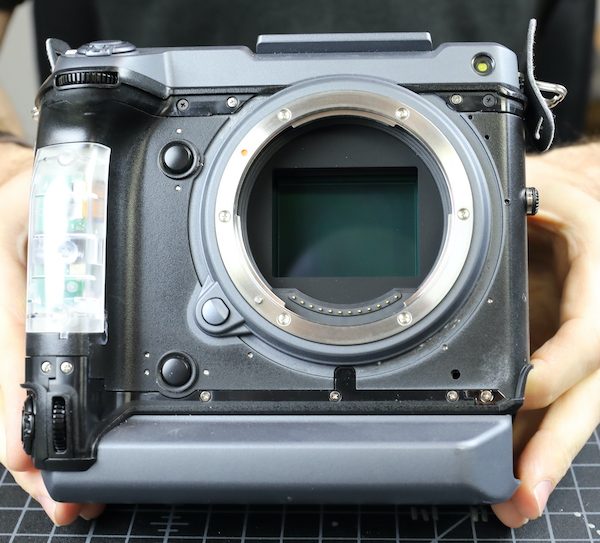
The other silver lining is this should be a great example of what even a little saltwater does inside a camera. Seriously, everything we know about the incident indicates there was just a tiny bit of saltwater that got the camera wet. It wasn’t immersed or anything. The camera worked for a couple of hours after that before going belly up. In the image above, you can see the camera had no external signs of water exposure.
Routine Water Check
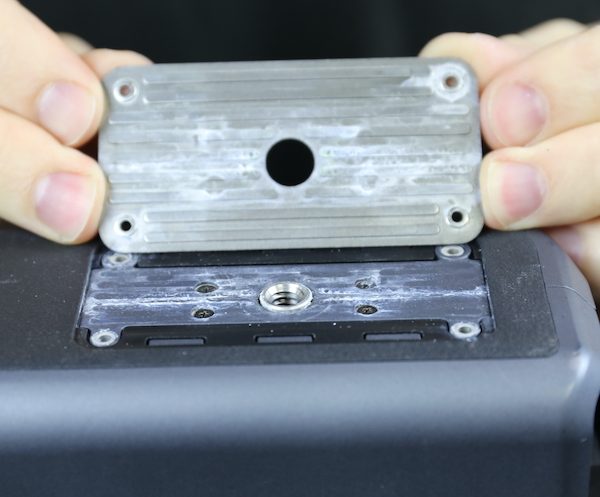
First, I’ll show you why it only takes about 10 seconds to say, “Yes, it was exposed to saltwater.” Removing 4-8 screws in most cameras lets you take off the tripod plate. If there has been water, you’ll almost always see corrosion under it; water tends to wick up along metal, often traveling a good ways from where it originally entered.
Peeling off the grip material shows salt deposits along the crack where the shell halves join. This is pretty mild exposure, which matches the story we were told very well. Heavy exposure would have caked a lot more salt and corroded the screw holes much more than this.
This is all a repair person really needs to see to be 90% sure the camera is a write-off. Usually, you open the camera enough to see some internal corrosion. Often, you don’t even need to do that; just looking around the I/O ports is enough. Once you’ve seen that it’s considered not repairable for very good reason – replace the corroded stuff you see, and something that looks OK fails in another month or so.
Back To Tearing Stuff Down
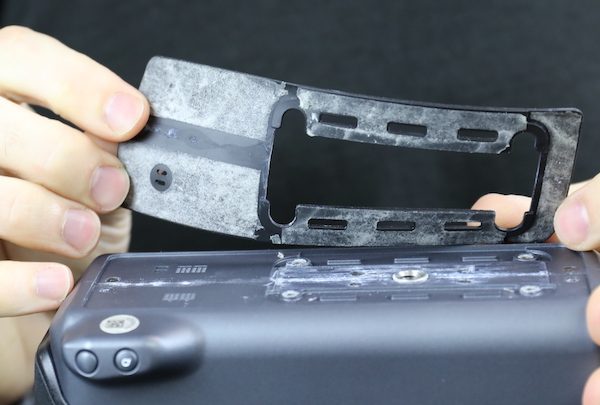
The first step is always to peel off all the grips so we can see where the screws are.
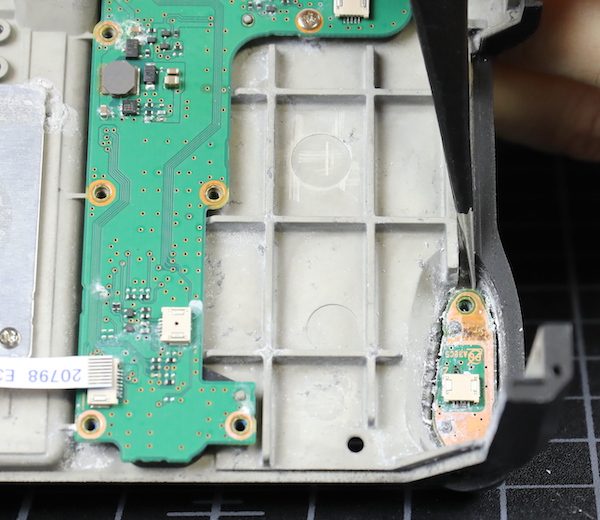
Something we hadn’t seen before is a clear plastic window on the grip.
The Wifi chip and antenna are underneath that. Obviously, the plastic passes signal better than the body material.
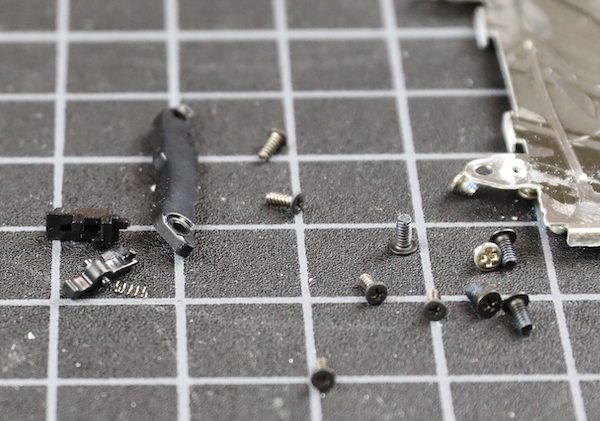
Once all the grips are off, the numerous screws holding things together are visible, except for the screws that aren’t visible. There’s always some of those.
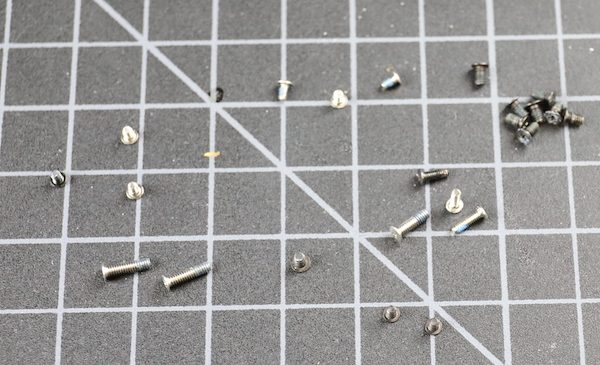
Rather than show you a bunch of pictures of a screwdriver removing screws, I’ll show the removed screws all at once. These are the obviously-visible body screws.
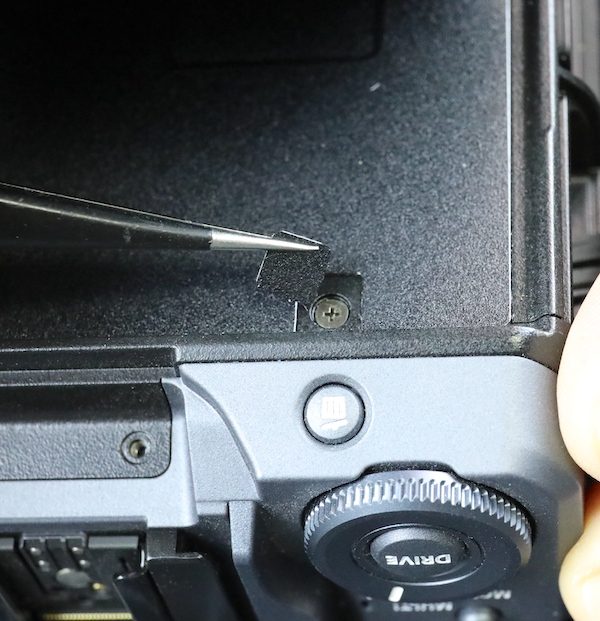
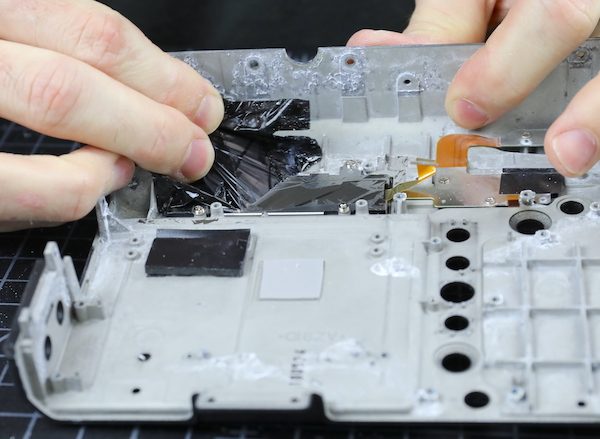
Then you try to separate the parts that look like they should come apart now that the screws are out, see where they are stuck, and look for the hidden screws in that area. I’m not sure why they hide the screws other than to keep people like us out of there.
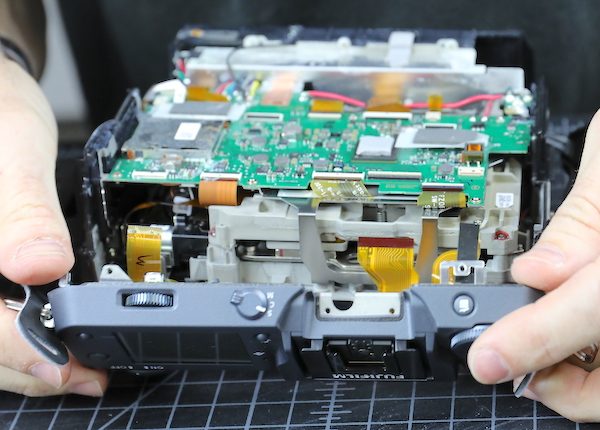
After that, we can take the back assembly off.
Looking at the back assembly, it’s obvious we aren’t going to salvage much because we could see apparent corrosion in several places.
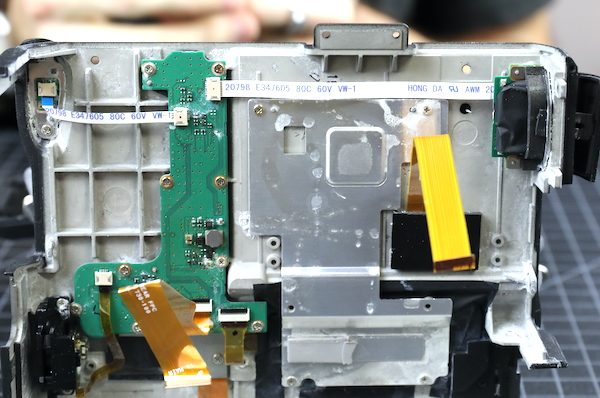
It’s clearly worse along the bottom.
But even at the top, circuit traces and connectors are damaged.
There was much more corrosion inside the bottom plate than outside it. Probably both because the renter wiped the outside down, but also since water wicks along nooks and crannies because of surface tension / capillary action. That’s the general rule of water damage, “it’s always worse on the inside.” Still, since this is a non-electric part, it can be cleaned and re-used if it’s not pitted.
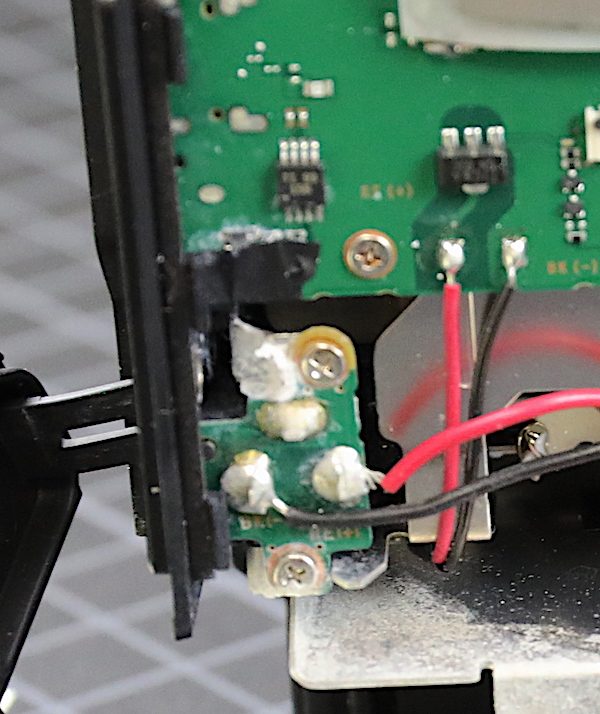
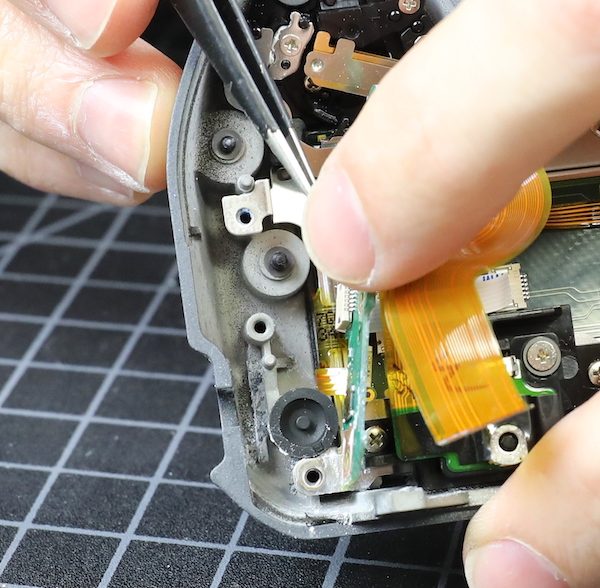
Despite my missing focus in this picture, you can see just above that area; there’s bad corrosion on the external power input wires. So nothing to salvage from the I/O ports or mainboard, but we didn’t expect to have any luck there.
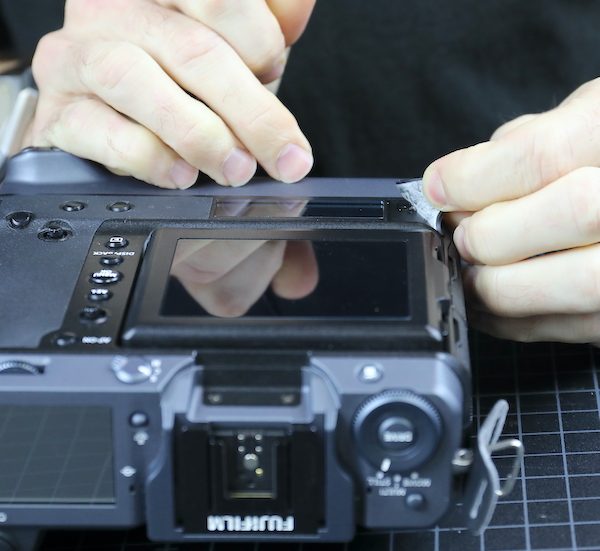
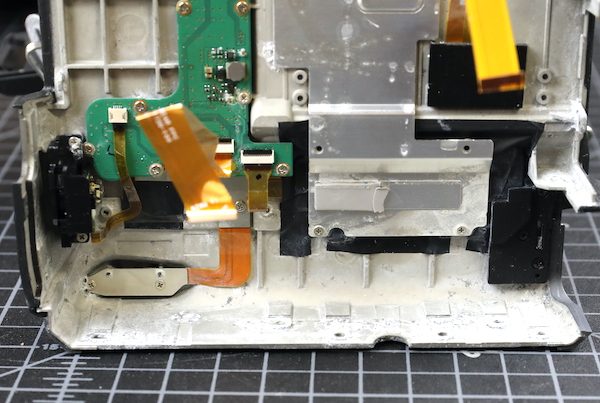
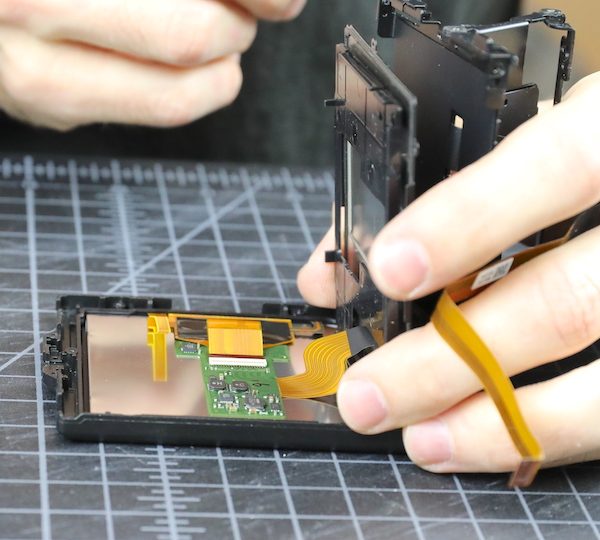
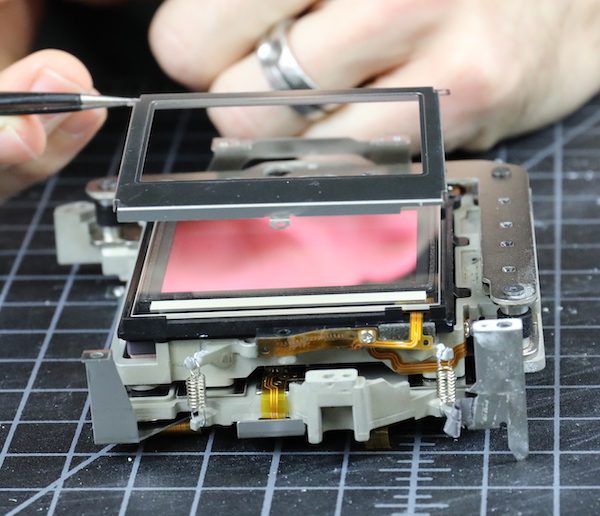
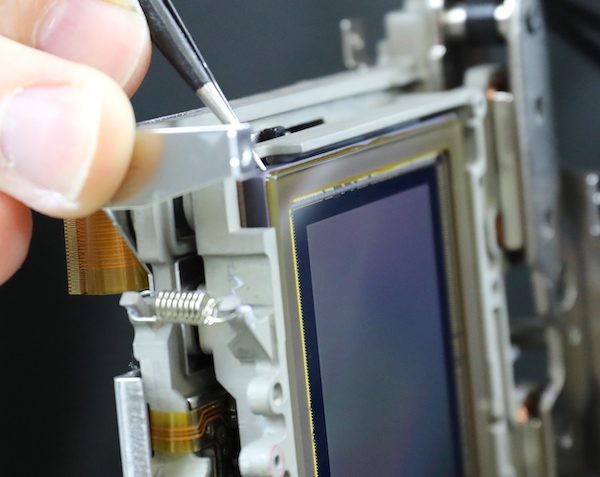
We disassembled the back assembly next because we had a little hope the LCD screen might be salvageable.

The inner surface PCBs and connectors were all pretty fried, though.
Cleaning out the back was necessary so we could detach the LCD flex. The information display is thoroughly covered by an adhesive light shade, which Aaron’s removing in this pic. That protected the LCD very well, but the flex has some corrosion.
The main LCD assembly looked pristine on the outside and had adhesive covers on the entrance ports.
The hinges were impressive; they aren’t just some friction springs and screws; each hinge had several different parts and was rather complicated.
There were a ton of screws holding the LCD case together. This is most, but not all, of them, along with one hinge assembly.
When we finally got everything apart, the inside of the LCD case was dry and pristine. We’ll at least see if that LCD is working, it seems to have escaped the saltiness.
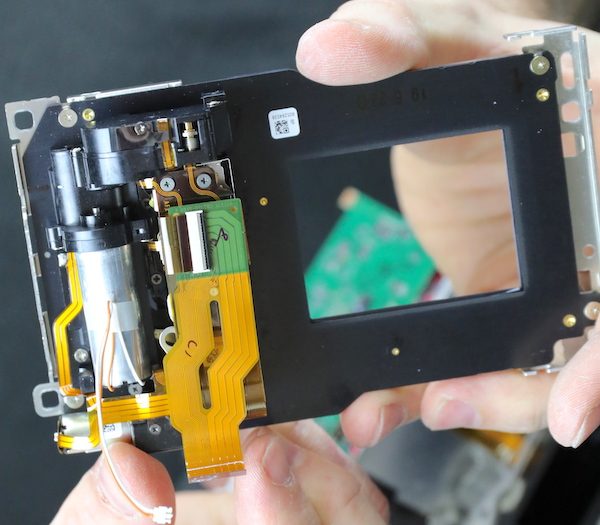
Back to the Camera
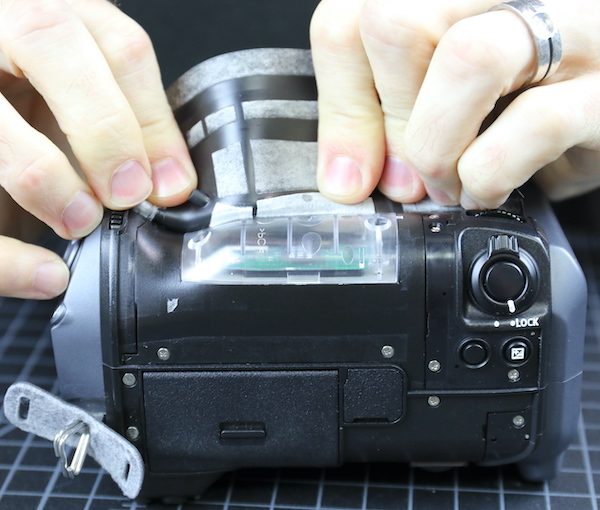
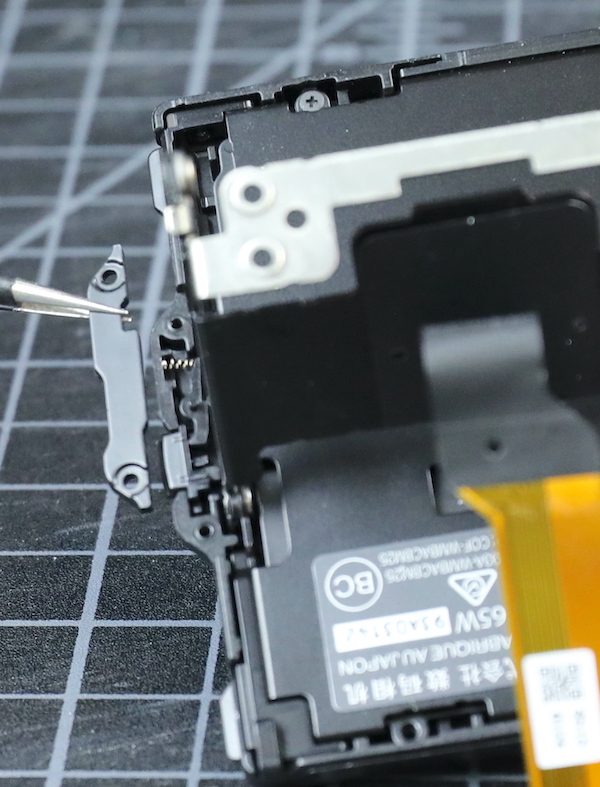
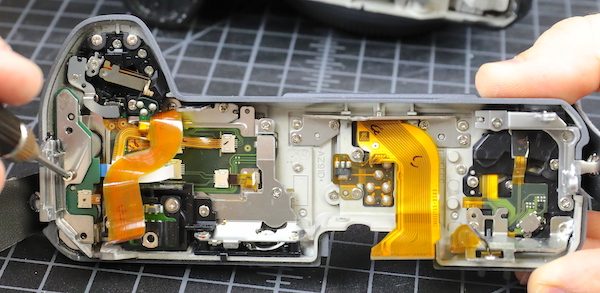
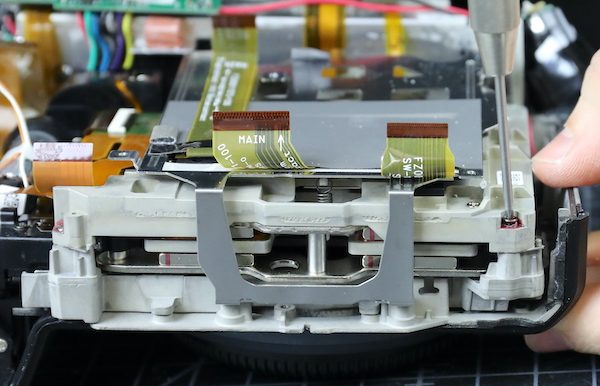
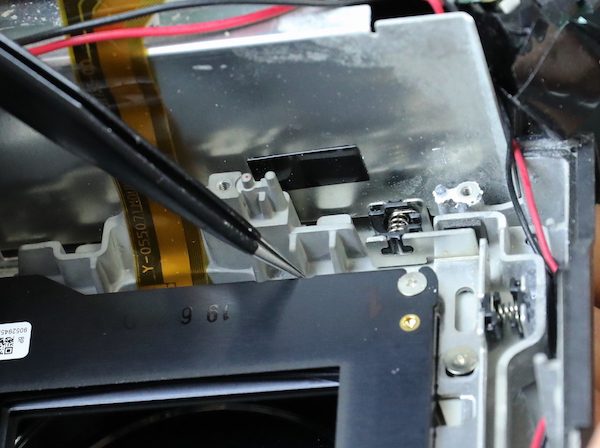
Removing the top assembly was next on our agenda. As is traditional for most mirrorless cameras, there’s a hidden screw inside the viewfinder box.
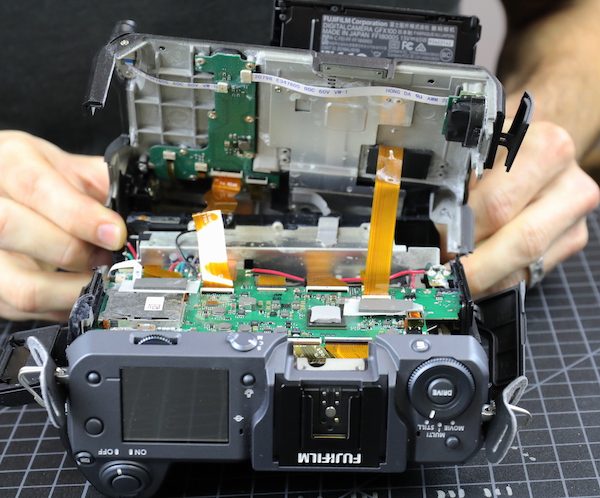
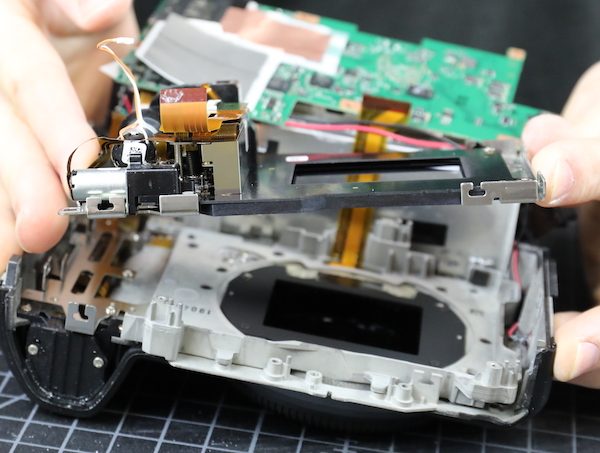
After disconnecting a bunch of flexes, the top assembly came right off.
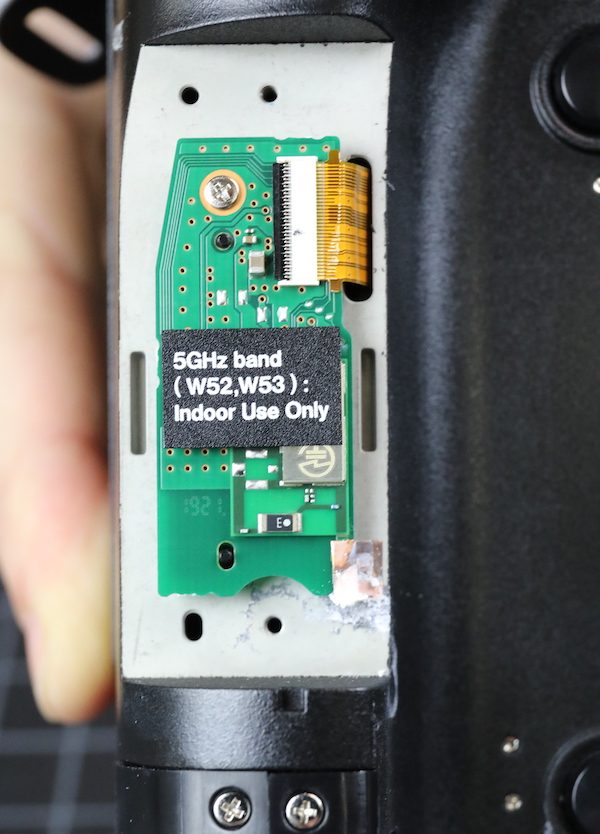
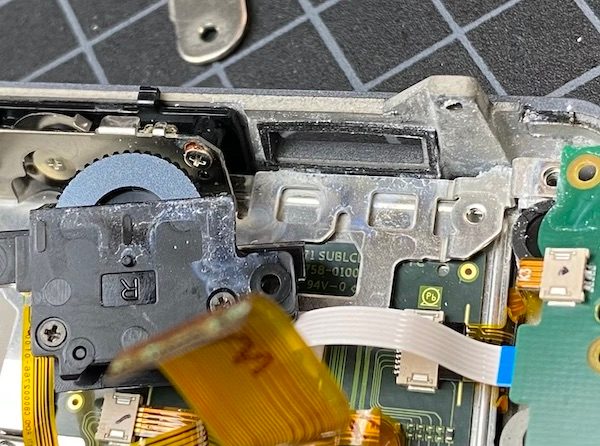
It looks a lot like every camera’s top assembly, tons of electrical communication from the switches and displays. It also looks pretty clean. It seems likely the camera sat in a saltwater puddle, rather than getting exposed from all directions; the bottom area is way more corroded than the top.
Looking back into the camera, we get a glimpse of that big sensor assembly / IBIS unit. The metal bars with red lines on them are some of the IBIS magnets.
The seals between the various plastic shell pieces aren’t what I call robust weather sealing. I’m aware that several people have called it a great weather resistance camera. I am not joining those several people in claiming that. The top assembly looks quite resistant to water falling on it from above, that’s about it.
I won’t bore you with the top assembly disassembly. Some parts of it looked fine, but there were a couple of areas of corrosion even up here. We were able to salvage the hot shoe and a couple of other pieces. However, we found leakage around every command dial.
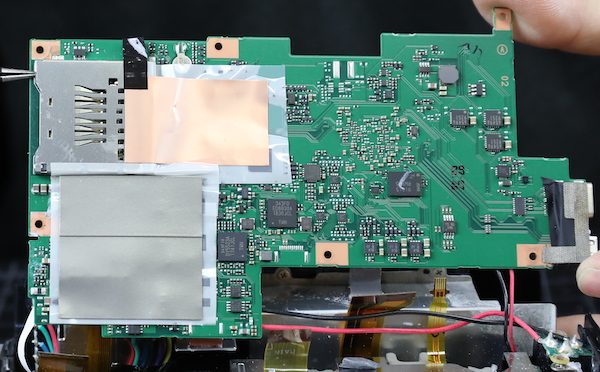
The main PCB comes off next, just a matter of taking out a couple of screws and unhooking flexes.
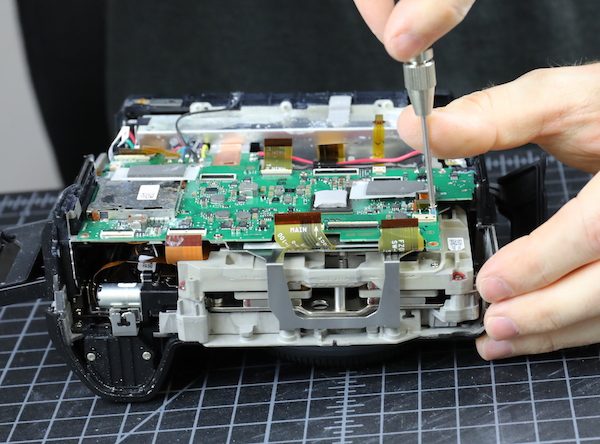
The mainboard is toast, with corrosion showing in several places on the upper side.
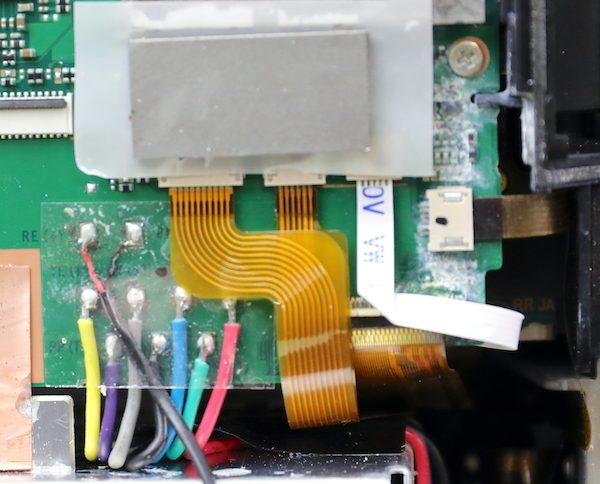
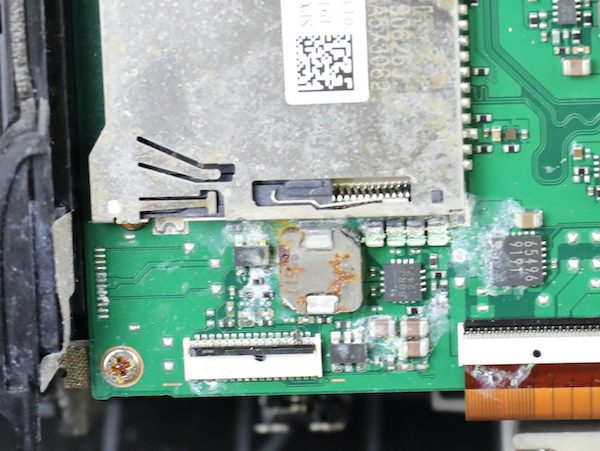
The underneath side still looks pristine. It’s worth noting that both card slots and the I/O ports are all soldered to the board, so breaking one of these probably means a mainboard replacement.
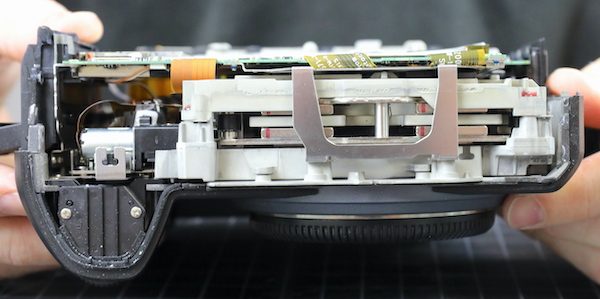
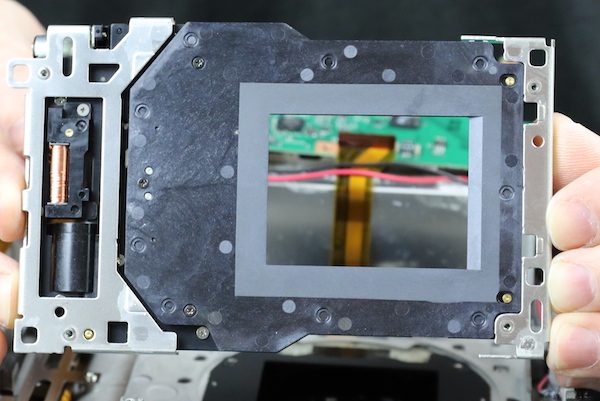
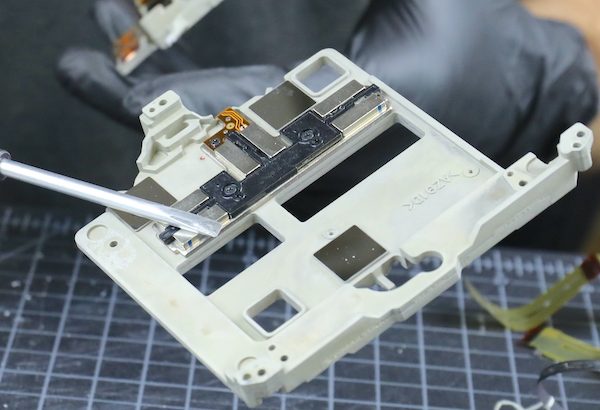
Looking back into the camera, we get a nice look at the back of the sensor/IBIS assembly and to the left the shutter motor and electronics. You can’t really tell in the picture, but the entire shutter assembly is suspended on springs, not attached directly to the chassis.
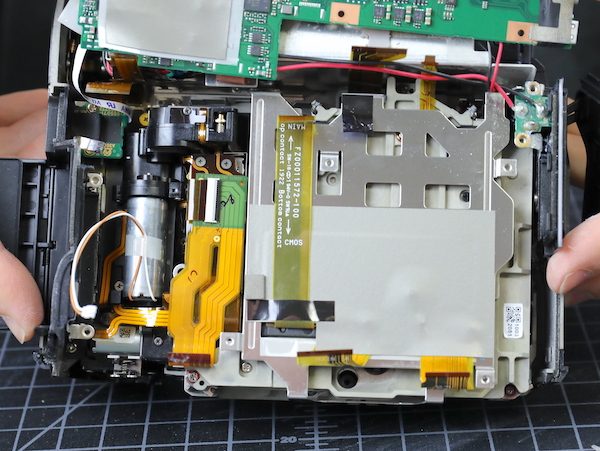
All of the plastic side panels come off now.
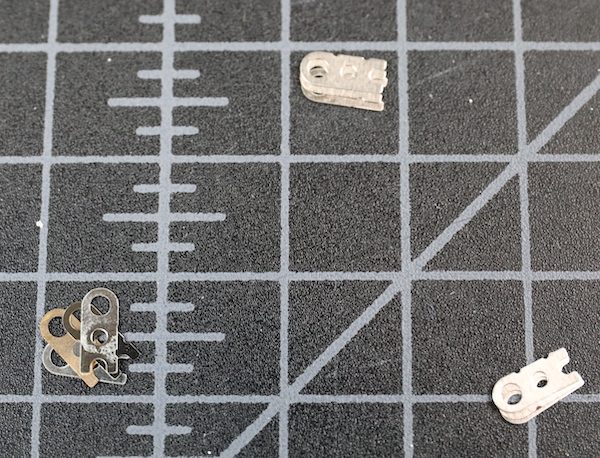
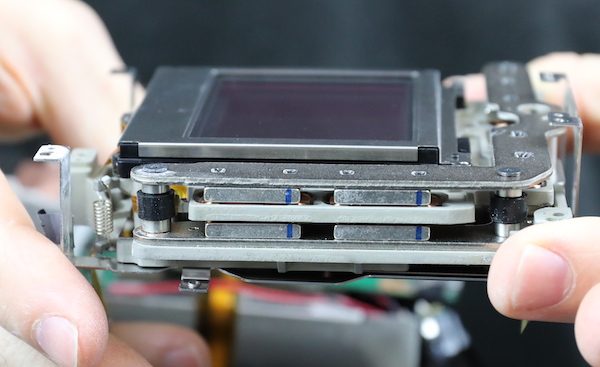
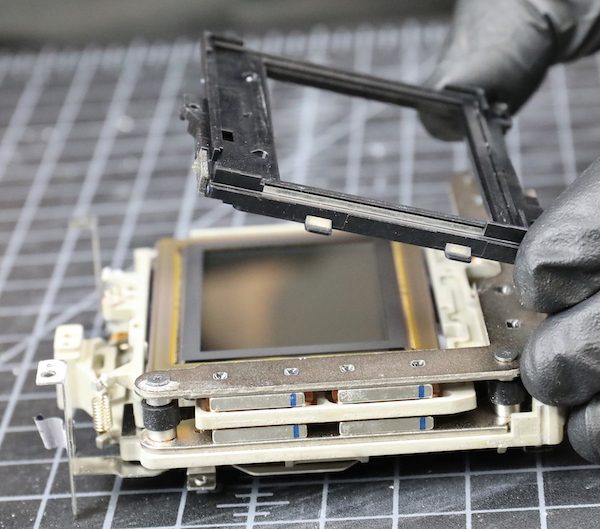
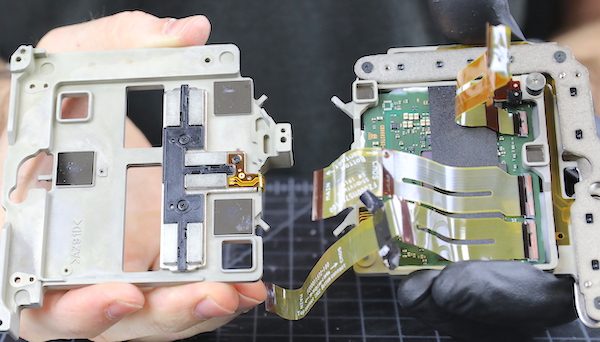
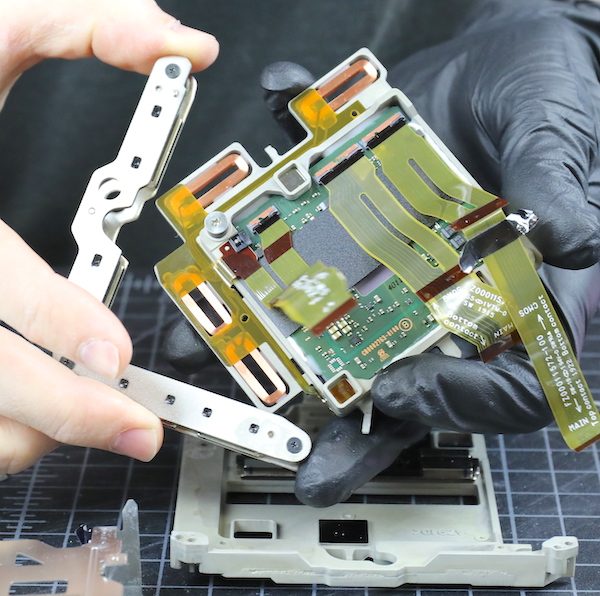
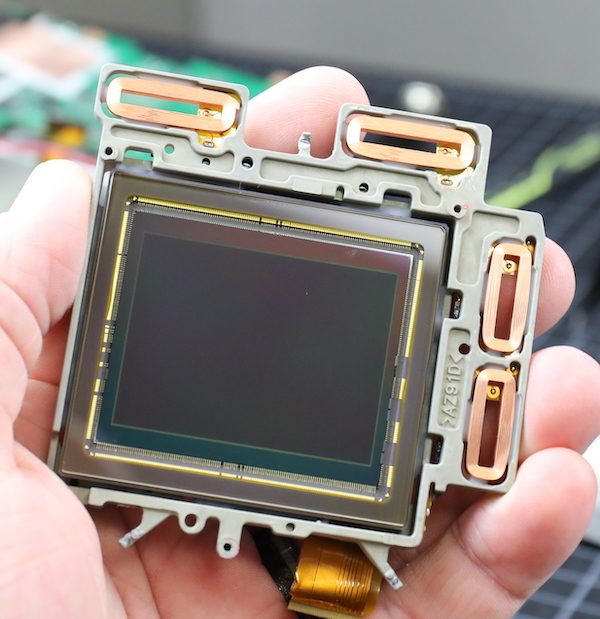
Now we have room to start evaluating the sensor/IBIS assembly. The sensor frame is two pieces. The front is mounted to the camera chassis. The sensor is mounted to the back, which is attached to the front. In between, the two pieces are shims at three places that level the sensor, so it is parallel to the lens mount. You can see the shims between the sensor assembly and mount, right under the screw Aaron is removing.
OK, so you couldn’t really see them. Here’s a closeup.

You can start quite the fracas claiming shims are better than tension spring – screw adjustments. (Isn’t fracas a great word? It’s not the kind of word you find in an article written too casually.) Tension spring adjustments can be more accurate, but shims stay the same thickness for years, while spring adjustments might not (or might, we don’t know). But for guys who disassemble cameras, shims are easier. You just make sure you keep the same shims in the same location when you reassemble. We also measure them and take notes, of course. Here they were 0.45, 0.45, and 0.47 thicknesses at the three locations.
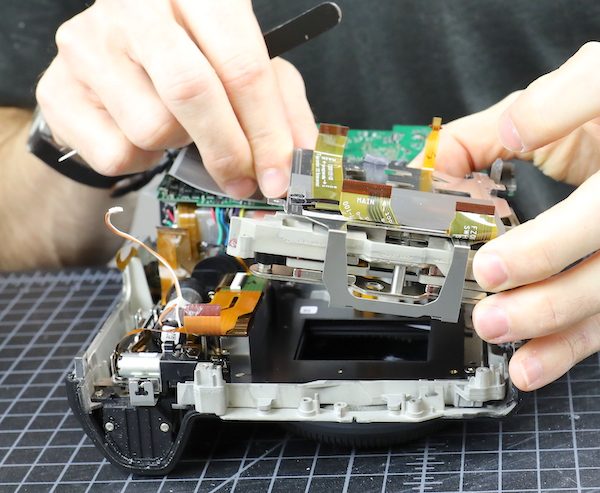
Now we can lift the sensor / IBIS assembly off and have a good look at it.
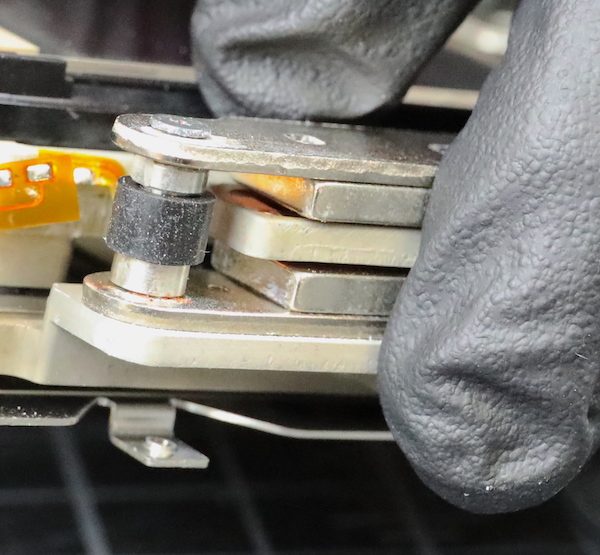
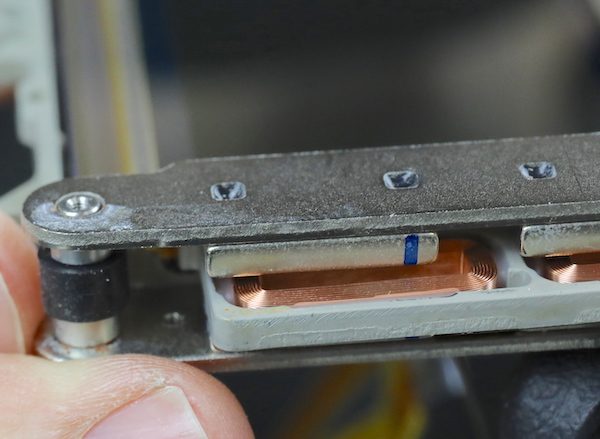
Here’s another look at the magnets we saw above, and this time a good look at the big posts and bumpers that connect the two halves of the IBIS unit.
Before we take the sensor apart, let’s take a look at the shutter assembly, which I found very cool. A medium format camera has a big-ass shutter and shutter slap happens. Fuji has advertised a shock-absorbing shutter, but I hadn’t realized they mounted the entire shutter assembly on springs, it’s not mechanically attached to the body at all.
Taking the shutter springs out, we see a bit more corrosion down in this bottom corner.

Remove the springs and disconnect flexes, and the shutter assembly comes right out.
Taking Apart the Sensor / IBIS Assembly
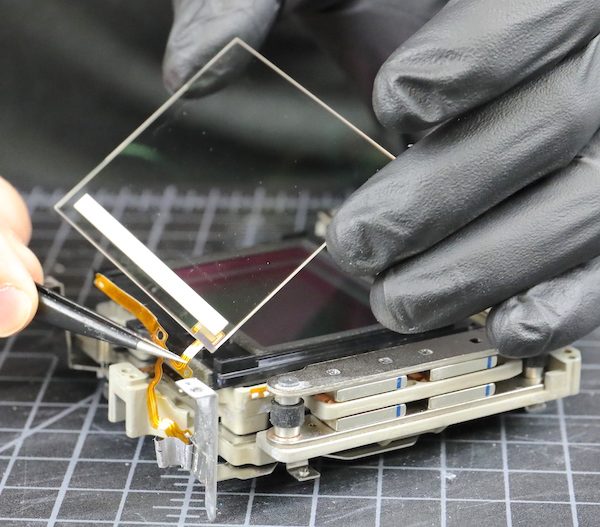
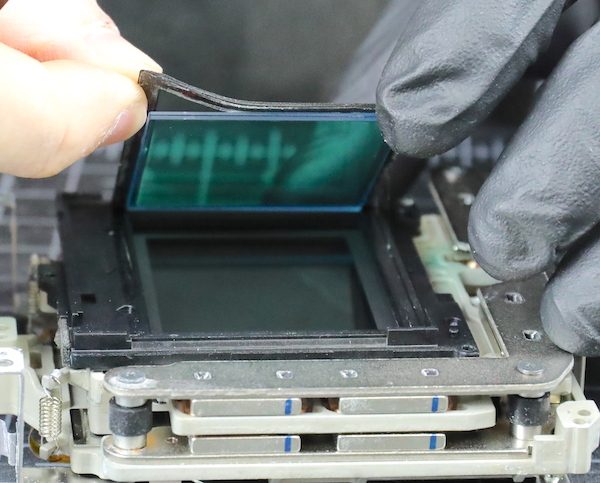
This is what I came for! First, we wanted to get the sensor glass off so we could measure thickness, not that many people are adapting lenses to the GFX, but some are. Plus, we’re just curious. First, let me show you the other side view of the assembly, which has some of the springs that compress the two halves of the IBIS unit (one side attaches to the body, the other mounts the sensor).

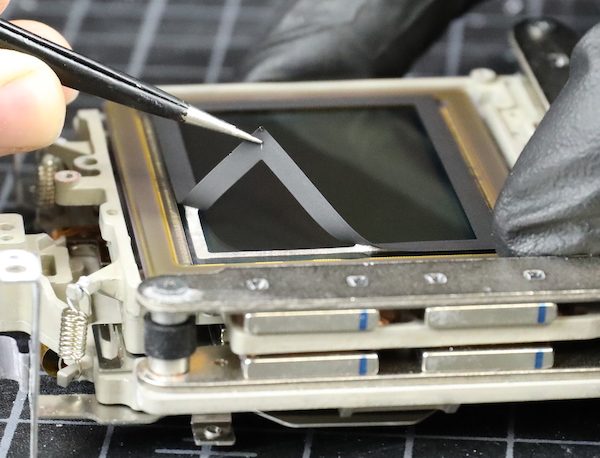
The little metal shield over the sensor stack gets removed next.
Before you ask, Aaron’s wearing a glove for the next part, not to protect the camera, but to protect Aaron. We’ve been known to break some glass plates taking apart the sensor stack. Anyway, the first layer peels off from the adhesive below pretty easily. This layer has an electrical connection; I think it’s just to generate a negative charge, but most of what I know about electronics comes from readers leaving comments telling me what stuff really is.
The adhesive rubber below gave a bit of air gap between that top plate and the second plate. You can see the tip of the syringe in the top left, applying some alcohol to loosen the adhesive.
Once the adhesive softened, the adhesive rubber and the second plate came off pretty easily. The second plate, you can probably tell, is actually two glass plates cemented together.
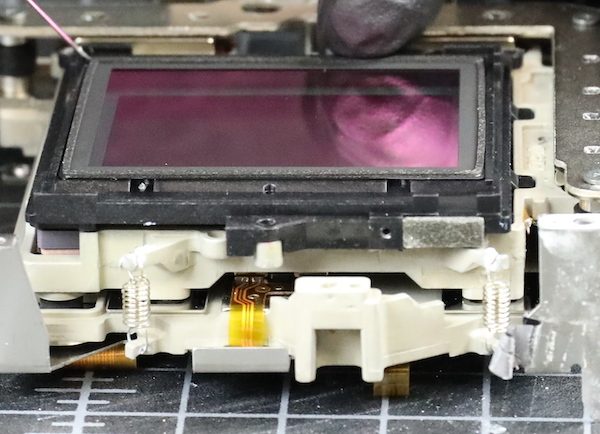
We have two plates out now, the uppermost electrically charged plate, and the glass sandwich, which I assume is IR filter. The GFX-100 doesn’t have a low-pass filter, but sometimes that actually means two low pass filters set opposite each other, cancelling out. I don’t know which is the case here.
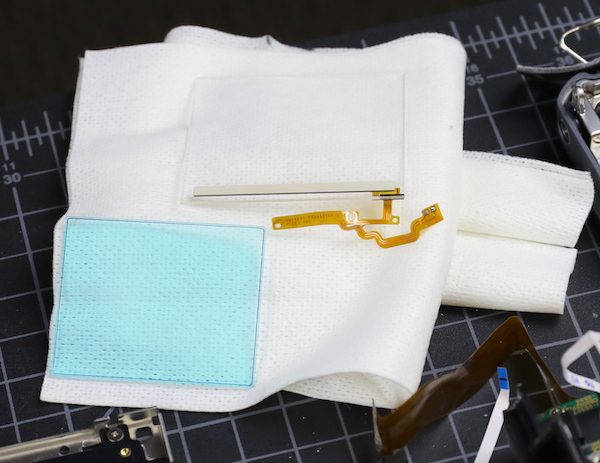
Next, we can take out the plastic frame that held up those two pieces of glass.
Then the light baffle under that.
Which exposes the last piece of glass in the stack. These are usually tightly glued to the sensor, we often break them trying to get them off, and we could measure it in place, so we left it. The sensor stack had three pieces of glass measured at 0.9mm for the top, 1.34mm total for the second sandwich, and 1mm glued to the sensor. That’s 3.24mm of total glass thickness for those of you interested, not counting the two air gaps between the glass plates.
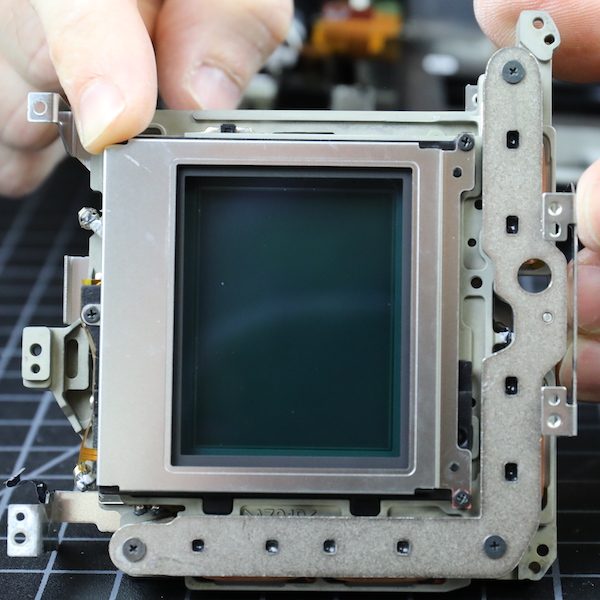
Now let’s take a look at the stabilizer. The IBIS unit is a stack. There’s a large plate containing the sensor with electromagnets around the edges. Below and above it is L-shaped metal brackets containing permanent magnets. The brackets are kept in place by large posts with rubber bumpers and bearings. The sensor is held to the bottom post with spring tension, which I assume allows for some up-and-down movement during stabilization, since this a 5-axis stabilizer.
I like the robust construction; I like that the sensor is attached on a complete plate, not just by some tabs, etc. etc. But this is a big sensor in a big body. Fuji had plenty of room to do it right. To their credit, they did.
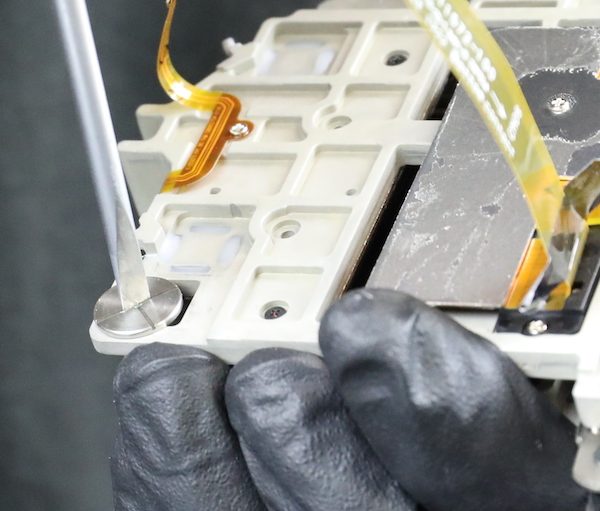
As long as I’m going all fanboy over the heavy-duty engineering, the base of the posts is so large I got to tell Aaron, “I think we’re gonna need a bigger screwdriver” because we did. Not often you get to use a screwdriver from your car’s tool kit on a camera disassembly.
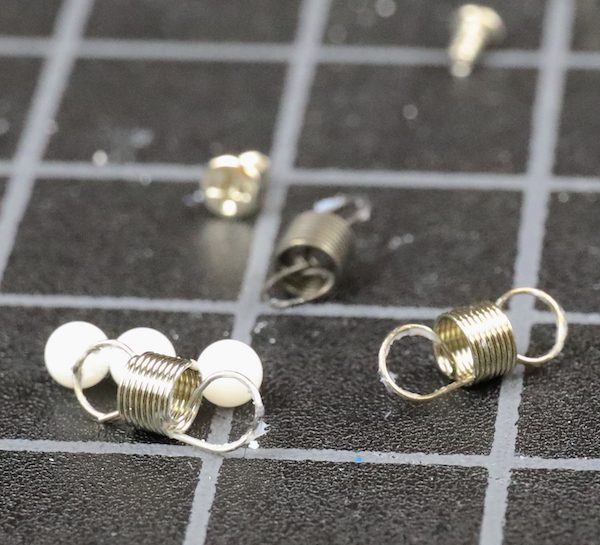
Anyway, with those posts unscrewed and springs removed, we can separate the two halves of the IBIS sandwich. If you look on the left side of the image, you see three flat mirror-looking thingies. Matching them on the other half are two boxes (the third is hidden under the flex) with smooth mirror-like bottoms.
What you missed were the three large, white ball bearings that were in each of the three boxes. Why did you miss them? Because they fell out on the floor when we separated the plates and we had to go find them. But here they are, along with some of the springs that gave tension to the two halves. So kind of a cool roller bearing system; the springs tension the two halves together, the boxes and bearings let them move easily.
Here’s another overview of the sensor plate, metal L bracket, and the base. You can see the electromagnets on the two sides of the sensor plate.
In this image, how the electromagnets sit between the permanent magnets on the L bracket.
Those permanent magnets, BTW, are damned strong. We had fun picking up various parts by touching a screwdriver to the magnets, any one of which was plenty strong to pick up the entire IBIS assembly. It took a bit of force to get out screwdriver away from them, though.
I should probably take a moment to explain in more detail how IBIS works. You see, you put the magnets and electromagnets together, program stuff and connect it to some sensors, add a little electricity, and then magic happens, and your picture is better. I’ve tried to visualize just how fast all these parts move, but my brain won’t wrap around it, so I keep coming back to ‘and then there is magic.’ Kind of like ‘so if you put a colored coating on a lens, more light goes through.’ There’s magic everywhere if your physics knowledge game is weak enough.
What my skillset involves is basically ‘look at the mechanical stuff and see does it look like it will break if it moves in all directions faster than you can imagine for years.’ In this case, despite that huge sensor, I’m comfortable it won’t break. This is as well made as you could hope.
Anyway, the real point of all this was that I got to walk away with the very impressive, extremely pretty medium format sensor I wanted to add to my collection. Nice silver lining, isn’t it?
So What Did We Learn Today?
Well, we learned that salt and water are bad for cameras. Really bad. Even if it’s just a little bit.
And we learned if you invest $10k in a GFX100, you should probably keep it dry. I’ve seen a lot of claims that the GFX100 does well in the rain, and it may, because it has a big overriding top and rainwater is freshwater. But did you notice all those weather resisting barriers and gaskets in the teardown? Yeah, me neither. I did notice some wide-open areas around the command dials you could shine a light through, and pour water in if water happened to be around.
But hey, it’s your camera, do as you like. Be aware, though, that your camera, just like this one, will get the ‘warranty void because of water damage’ response when you send it for repair.
Other than that, though, everything in here was as well supported and robust as you could ever hope. The IBIS unit looks like it could stabilize a small child, and certainly is strong enough to support this big sensor. I got a nice sensor to put on my desk, and our repair department got some grips and structural parts, and probably an LCD to hopefully fix some future copies that get damaged.
Roger Cicala and Aaron Closz
Lensrentals.com
August, 2020

119 Comments
Henry Winokur ·
I gotta say Roger, your editor is wrong. When you have a casual discussion with someone it is more direct and I feel like you’re talking to me, not the hoi palloi (like that? 🙂 ) who read the article. Tell him/her to get their spell checker working and to actually edit the article (yes, they missed something), but not to tell you how to communicate w/ your readers.
Roger Cicala ·
On the other hand, I really liked ‘fracas’. I’m gonna use that again. 🙂
Henry Winokur ·
“Fracas” is definitely a good one. Keep up the casualness! 🙂
Nobody Knows ·
Another great read Roger thanks , as a Scotsman may I put forward “stramash ” as an alternate to fracas .
Roger Cicala ·
Had to look that one up. Both ‘fracas’ and ‘stamrash’ just have a nice ring to them, almost onomatopoeic. Is there a severity scale? Like fracas < stamrash < riot?
Nobody Knows ·
Going by the way it is used by say sport commentators stramash is a step up on the more gentle fracas 🙂
macdisq ·
Since Scotland was mentioned, perhaps row < fracas < stamrash < riot? Or maybe fracas < row; I really don't know.
asad137 ·
You mean “hoi polloi”? 😉
Henry Winokur ·
Yep, that’s exactly what I meant. Thanks for the correction. I sound stuff out, and since I started spelling, I almost inevitably do it wrong, which is why I really appreciate spell checkers. But sometimes they don’t work and I end up still spelling it wrong. 🙁 I’ll try to remember the correction…
Athanasius Kirchner ·
First of all, I’d kindly suggest that your editor can go take a walk in a dense, distant forest. Without a map, GPS, or anything related to orientation. Your writing style is great!
Second, those ceramic bearings are just like the ones shown by an Olympus engineer in a video by Dave Etchells, from Imaging Resource (which I recommend, nay, urge anyone who enjoys this geeky blog to watch if they haven’t already). I smell a licensing agreement here.
RNG ·
Fujifilm marketed this design as new way for IBIS during X-H1 launch in 2018. The Olympus video shows em-5 mk3 design that was launched in 2019.
Of course, one would need to go see how earlier Olympus IBISes were done to get definite answer who was first, and it definitely does not remove the possibility for either collaboration or licensing.
GNGGGG ·
Fujifilm marketed this design as new way for IBIS during X-H1 launch in 2018. The Olympus video shows em-5 mk3 design that was launched in 2019.
Of course, one would need to go see how earlier Olympus IBISes were done to get definite answer who was first, and it definitely does not remove the possibility for either collaboration or licensing.
EDIT: I see the video shows also EM-1 mk2 design that's was released in 2017, I believe, and it has the same ball bearing approach as the newer one.
El Aura ·
Should this make me afraid of handling cameras while I’m dripping sweat?
Roger Cicala ·
Well, I’d try not to drip on the camera if possible.
Olandese Volante ·
Ha! I’ve been a club photographer for quite a while, and a night wasn’t really groovy if the sweat didn’t run right through your brows and into your eyes 😉
Most of the shooting was done with a Canon Rebel series camera, it really needed a wipe down with IPA after every night. No trouble except for a few buttons that got a bit flaky, nothing that a quick disassembly and a bit of contact cleaner couldn’t fix. The Rebel is still alive and well.
Frank Kolwicz ·
That’s abuse of a fine malt beverage! India Pale Ale should only be applied internally in humans.
Henry Winokur ·
Not unless the camera is upside down! 🙂
Andre Yew ·
Roger, it looks like in this construction, the sensor can’t be locked down? I’m curious if you’ve seen other IBIS units that have a physical lock mechanism, or do they all float all the time? Now I’m wondering that even those that claim to lock down, like Nikon, are just using spring tension or something to hold the sensor in place when the magnets are powered off.
I ask for two reasons:
1. The Internet story that cleaning an IBIS sensor can damage it, but if the sensor is locked down, it’s more OK to clean it. But if the sensor is never locked, then this is probably a myth to the extent that touching (or maybe even giving a mean look) at a suspended sensor will damage it.
2. When IBIS is off, if the sensor is just held by springs, then you could have unwanted bounce in video footage, which I’ve seen with my Z6. It’s been said that the GH5S was designed with a static sensor because people were putting them on cars and the IBIS system couldn’t deal with it, on or off.
Do you have any thoughts on this?
Roger Cicala ·
I can’t say I’m filled with knowledge, so take this as some informed guessing.
You can damage an IBIS sensor cleaning it, we’ve seen it more than a couple of times, but it’s not common. I think that has more to do with the strength engineered into the unit, we see a lot of variation in how strong the various ones are. I don’t know if locked versus suspended is superior.
I think with camera on and IBIS off, the electromagnets are supposed to hold things rigid, preventing any bounce. I can’t imagine why it wouldn’t.
RNG ·
I believe it is quite hard to achieve a physical locking system that would allow the sensor to be aligned precisely. The electromagnets and the hall sensor feedback loop will allow “locking” it precisely where the engineers want it to be.
The IBIS cleaning is a tough one. All these IBIS cameras do have a manufacturer decided mode in which the sensor cleaning should be done.
The thing is that if the IBIS is not powered, it will float, and in some constructions applying too much force on the sensor then could exceed the mechanical strength of the construction.
But also, when the IBIS is powered, and too much force is applied, one at least in theory could maybe fry the electronics, as I assume they will try to resists the force by driving more current in the coils. Also, when something is powered on, the higher the risk of excessive cleaning fluid causing some damage. They do evaporate quickly and have really low conductivity, but you never know when mixing liquids with electronics, as the liquids can have contaminates that can make them better conductors than they as liquid are (as is with water that as pure doesn’t really conduct much at all, but it quickly gets contaminated with ions and minerals etc that will boost it up).
So it is best to rely on what manufacturer suggest.
GNGGGG ·
I believe it is quite hard to achieve a physical locking system that would allow the sensor to be aligned precisely. The electromagnets and the hall sensor feedback loop will allow "locking" it precisely where the engineers want it to be.
The IBIS cleaning is a tough one. All these IBIS cameras do have a manufacturer decided mode in which the sensor cleaning should be done.
The thing is that if the IBIS is not powered, it will float, and in some constructions applying too much force on the sensor then could exceed the mechanical strength of the construction.
But also, when the IBIS is powered, and too much force is applied, one at least in theory could maybe fry the electronics, as I assume they will try to resists the force by driving more current in the coils. Also, when something is powered on, the higher the risk of excessive cleaning fluid causing some damage. They do evaporate quickly and have really low conductivity, but you never know when mixing liquids with electronics, as the liquids can have contaminates that can make them better conductors than they as liquid are (as is with water that as pure doesn't really conduct much at all, but it quickly gets contaminated with ions and minerals etc that will boost it up).
So it is best to rely on what manufacturer suggest.
Andreas Werle ·
Wonderful teardown, Roger and Aaron!
How the hell can anything work in camera full of electronics and moving metal parts if you place several strong magnets in it? 🙂
Greetings – Andreas
Roger Cicala ·
See the section above on how IBIS works. 🙂
I think the only moving metal parts are the IBIS unit itself. The shutter is all non metallic moving parts. I assume some of the electrical shielding is for the electronic fields generated by the magnets, but the sensor is right in the middle of it; not sure if they have to do anything to counter that or not.
RNG ·
Magnets don’t have electronic fields, electromagnets do :). But any metal moved in a magnetic field will get some electronic fields generated inside it.
The CMOS sensor will most certainly have a solid’ish ground layer in it that protects the sensor from most of the outside interference. I’d assume that in 14/16bit modes they cut the power to the coils during the readout to reduce the emission, as the stabilization is not needed during readout. Overall, it will depend greatly on the frequencies they drive those coils and what sort of Henrys they are.
The sensor readout is usually through differential signaling lines, which will effectively eliminate most of the noise from the transmission lines. I have no idea how they move them through ribbon cables though.
My assumption is that the coils are driven such low frequencies in comparison to what the sensor readout works at that it won’t likely mess things up. Usually the higher the frequency more easily it will mess digital electronics. But I am not expert in these matters, just work with them.
GNGGGG ·
Magnets don't have electronic fields, electromagnets do :). But any metal moved in a magnetic field will get some electronic fields generated inside it.
The CMOS sensor will most certainly have a solid'ish ground layer in it that protects the sensor from most of the outside interference. I'd assume that in 14/16bit modes they cut the power to the coils during the readout to reduce the emission, as the stabilization is not needed during readout. Overall, it will depend greatly on the frequencies they drive those coils and what sort of Henrys they are.
The sensor readout is usually through differential signaling lines, which will effectively eliminate most of the noise from the transmission lines. I have no idea how they move them through ribbon cables though.
My assumption is that the coils are driven such low frequencies in comparison to what the sensor readout works at that it won't likely mess things up. Usually the higher the frequency more easily it will mess digital electronics. But I am not expert in these matters, just work with them.
Nikooles ·
Why would the magnets stop other things from working? This makes no sense.
KeithB ·
You mean like a compass?
Nikooles ·
Does the camera have a compass? No it doesn’t, so how the hell is that relevant? And by the way, mobile phones have magnets in the form of their speakers, and their compasses still work fine. You really thought you had a “gotcha!” on me there didn’t you….
Michael Clark ·
Because certain forms of energy, like electricity flowing through conductors and magnetic fields, generate energy fields in the “electro-magnetic” spectrum and the electromagnetic energy they generate affects the energy flowing through other nearby (relatively speaking with regard to the intensity of the EMR) electrical conductors.
Zak McKracken ·
Static magnetic fields (from those permanent magnets) don’t really do much to electronics, but changing magnetic fields, (from the electromagnets, or from moving the permanent ones), might induce some current in a wire.
However: The permanent magnets are between thick metal brackets, and right on top of the magnetic coils, which in turn are facing them. This means: When the coils generate a field, that probably stays inside the metal bracket for the most part, plus there are some more metal plates for shielding. Plus: The strength of any induced current depends not just on the amplitude but also the frequency of the magnetic field (i.e. how quickly that field changes).
Most mechanical hard drives also have pretty strong magnets in their motors, which are running at 7200r/min (120Hz), and still not managing to destroy the data on the hard drive.
So: You probably should not try to route a cable through that IBIS bracket, or put a sensitive IC directly next to it, but the problematic effects should be limited to the space pretty close to the magnets. You can also see that the magnets do have *some* distance from the image sensor. I bet they could be a lot closer from a mechanical point of view, but might need some safety distance to avoid funny colours in the adjacent pixels 🙂
Dave Jones ·
Just for morbid curiosity, if I do rent on of these beasts to take on a dive, does Lens Rentals sell insurance?
Roger Cicala ·
We have insurance, but not for salt-water damage. You can buy personal insurance for salt water, but a rental company can’t.
John Dillworth ·
This is a tragedy but I just love those Lens Rental destroyed equipment teardowns (bet you guys don’t miss Burning Man this year?). One of my favorites from the blog was when you used to publish the occasional rankings of reliability of rented equipment. Do tell me the renter took out insurance on this one.
Roger Cicala ·
They had their own insurance.
GNGGGG ·
Umm. I can see clear weather seal foam around the place where the command dial is pressed on here?
https://www.lensrentals.com...
Can we get pics of those that doesn't have such?
RNG ·
About the weather sealing. I see that most of the body seams are covered by the “leather”, which will effectively act as a seal.
The dial picture given, has a rectangular seal around the top plate, which it presses against. The dial unit itself seems quite sealed as it is, I assume it is optical, so it can to some degree withstand some water inside it. I’d like to see those pictures where you can shine the light through.
Top plate has some sealing, but I think that could be better. Hard to say on these images. Capillary action has its limits in gaps, but I assume the top plate is not that tight fitting that it would not be possible.
But I agree it could be improved, but the “leather” seems to take care of most of the sealing of the body seams in this camera.
The most concerning part for me in these images is the external power
leads, of which the read one has probably more broken strands than
attached ones. Maybe it happened while tearing down the corroded lead,
but if not, then that should not have left factory like that. Otherwise
the electronics seem really well thought out.
Having the SD-cards and some other signals like USB/HDMI on the motherboard is actually better design electronics wise than sending the signals over ribbon cables between separate boards. But sure, if one fails, new MB it is.
I wonder does the increase in pressure inside the dive housing due to leak cause more damage. The pressure should even out quite quickly between inside and outiside of the camera, but I guess there can be small moment where the new water pressing into the housing increases the pressure on the water already in the gaps and pushing them further inside.
Jim A. ·
While I applaud your effort to defend Fuji’s weather sealing, I encourage you to learn about capillary action. Any two surfaces that aren’t completely impervious to moisture and in conformable, compression contact, will pull liquid in like you wouldn’t believe.At atmospheric pressure. Quickly. Where I work, we fill cells with liquid crystal that have a 10 micron gap between the two surfaces, and they fill lickety split – to use the technical jargon. Stranded wires on my saltwater fishing boat have a particular affinity for capillary action if I don’t seal every single connection like my life depended on it, and even then, I get surprised sometimes. If it gets wet, water will find a way in. You can count on it.
RNG ·
I am well aware about the capillary action and the seals in this camera are there exactly for that. I am not sure what sort of else seals one would need to make camera weather resistant. After all, you are not suppose to leave your camera in a puddle or let water puddle up on it.
You can find a picure of the seal placementss in Fujifilm’s webpage and looking at these images the seals are there to stop all capillary action. So hence this will be “weather resistant” camera, but it won’t be “withstands water pressure”.
I am not defending Fuji, I am more about the facts.
RNG ·
What I mean that the picture of the seal thickness is enough to stop capillary action, especially when in tightly fitting seam. In normal use, it won’t wear out either, only when the camera is disassembled.
My take is that Fuji service will replace those thin seals when they reassemble the camera after service, and lensrentals would rather have re-usable seals. Hence they do not consider them robust, although those seals will do just fine to stop the capillary action.
But I personally would not rely on re-usable seals, even if they are thicker or beefier. They work well, when 1st time crusher between two mating surfaces. But take them apart, and some of the natural cushion of the seal is already lost, and there is danger that the seal won’t, well, seal as well at it did in the 1st time.
RNG ·
In fact there is a video from GFX100 assembly by Lok Cheung in YT and we can see there as they apply those weather sealing strips on top cover that this article tries to hint that “are not there”.
GNGGGG ·
I am well aware about the capillary action and the seals in this camera are there exactly for that. I am not sure what sort of else seals one would need to make camera weather resistant. After all, you are not suppose to leave your camera in a puddle or let water puddle up on it.
You can find a picure of the seal placementss in Fujifilm's webpage and looking at these images the seals are there to stop all capillary action. So hence this will be "weather resistant" camera, but it won't be "withstands water pressure".
I am not defending Fuji, I am more about the facts.
GNGGGG ·
What I mean that the picture of the seal thickness is enough to stop capillary action, especially when in tightly fitting seam. In normal use, it won't wear out either, only when the camera is disassembled.
My take is that Fuji service will replace those thin seals when they reassemble the camera after service, and lensrentals would rather have re-usable seals. Hence they do not consider them robust, although those seals will do just fine to stop the capillary action.
But I personally would not rely on re-usable seals, even if they are thicker or beefier. They work well, when 1st time crusher between two mating surfaces. But take them apart, and some of the natural cushion of the seal is already lost, and there is danger that the seal won't, well, seal as well at it did in the 1st time.
GNGGGG ·
About the weather sealing. I see that most of the body seams are covered by the "leather", which will effectively act as a seal.
The dial picture given, has a rectangular seal around the top plate, which it presses against. The dial unit itself seems quite sealed as it is, I assume it is optical, so it can to some degree withstand some water inside it. I'd like to see those pictures where you can shine the light through.
Top plate has some sealing, but I think that could be better. Hard to say on these images. Capillary action has its limits in gaps, but I assume the top plate is not that tight fitting that it would not be possible.
But I agree it could be improved, but the "leather" seems to take care of most of the sealing of the body seams in this camera.
The most concerning part for me in these images is the external power leads, of which the red one has probably more broken strands than attached ones. Maybe it happened while tearing down the corroded lead, but if not, then that should not have left factory like that. Otherwise the electronics seem really well thought out.
Having the SD-cards and some other signals like USB/HDMI on the motherboard is actually better design electronics wise than sending the signals over ribbon cables between separate boards. But sure, if one fails, new MB it is.
I wonder does the increase in pressure inside the dive housing due to leak cause more damage. The pressure should even out quite quickly between inside and outiside of the camera, but I guess there can be small moment where the new water pressing into the housing increases the pressure on the water already in the gaps and pushing them further inside.
obican ·
First use I’ve seen of the word fracas since Jeremy Clarkson arrived in his hotel on empty stomach on one particular evening.
Tuolumne ·
That’s one of the most disheartening article titles I’ve seen in a long time. My first thought was “NOOOOHHH… not one of those!!!” The teardown itself didn’t ease the pain of seeing this amazing and expensive piece of high-performance electronics get fatally injured by salt water.
Still, very informative and thanks for sharing.
CA Geographer (near Roseville) ·
That's one of the most disheartening article titles I've seen in a long time. My first thought was "NOOOOHHH... not one of those!!!" The teardown itself didn't ease the pain of seeing this amazing and expensive piece of high-performance electronics get fatally injured by salt water.
Still, very informative and thanks for sharing.
Mike Earussi ·
I don’t understand how a professional water housing leaked. Were the seals bad or did water get in when it was opened?
RNG ·
Maybe they exceeded the depth rating? Or these were those who develope dive housings and had already destroyed their own, and hence rented one out, just to find out that even more design work needs to be done :).
Otara ·
User error is the most common reason, or when the housing was new and it turns out there was an assembly issue and the person didnt test it before using it. It is a lot rarer now because of vacuum pumps, but we are creative beasts. Given this was a rental, its possible the person didnt have much experience with it, maybe didnt even use the vacuum system etc, or it needed maintenance.
geekyrocketguy ·
The most common error is that you get sand on the o-rings when closing up the housing, and then the o-rings don’t seal.
Cdave ·
All it takes is a hair across an o-ring, or a twist or crimp. And with many penetrations for controls, there’re lots of places where a too dry or overgreased seal can give. Much care is required. In thousands of dives with cameras, I’ve flooded two, a Nikonos V (probably a twisted o-ring in the back plate) and a D70 (perhaps an actual housing failure through the flash conection, and *maybe* not my fault). The old, mostly mechanical Nikonos was repaired for a couple hundred bucks. The D70 was trashed.
David ·
Virtually all new housing designs have a vacuum pump to test the seals. Massive piece of mind! I setup my rig the night before and check the pressure before I head out 🙂
Astro Landscapes ·
“There’s magic everywhere if your physics knowledge game is weak enough.”
Roger, is there enough money in the world to get you to do a Netflix show where you debate flat-earthers? I think I would die laughing every minute of every episode.
Roger Cicala ·
That would be fun! Or anti-vaxxers!
But tune in next week when I try very, very hard not to debate Canon heat conspiracists.
Olandese Volante ·
Yay!
Thanks for the heads-up. I’m going to make sure I’ll have ample supply of popcorn at hand.
Astro Landscapes ·
Indeed, we should have all invested in a monthly popcorn subscription biz startup at the beginning of this pandemic…
Andreas Werle ·
Does this mean, that Aaron you will crack open a R5?
Baconator ·
I’ve heard there is a pizza parlor on outskirts of DC where Canon fanboys are abusing little Fuji cameras by soaking them in salt water….
Roger Cicala ·
They’ll get theirs tomorrow 🙂
Baconator ·
That was a "pizzagate" qanon joke :) https://en.wikipedia.org/wi...
Btw if you think of qanon... it spells almost like Canon. Oh noooooooo...
Andre Yew ·
imma leave this right here ....
https://www.christiansagainstdinosaurs.com/video-debunking-dinosaurs-aerodynamics/
ausidog ·
If anyone from Netflix is reading, I would legit watch a series that was 50% interesting stuff going on and engineering projects at Lensrentals, and 50% teardowns and gear reviews.
Roger Cicala ·
“How it’s Made” and “Mythbusters” were my favs
geekyrocketguy ·
So was this a more or less expensive error than the 600mm f/4L that ended up at the bottom of an alligator-infested swamp? (Side note: I can’t find that post now. Did it get deleted?)
geekyrocketguy ·
Ah, that was borrowlenses, not lensrentals. I'm mixing up my blog posts from 12 years ago. The original post seems to have disappeared, but I found this:
https://borrowlenses.smugmu...
https://photography-on-the....
https://uploads.disquscdn.c...
geekyrocketguy ·
I found the post and linked to it. Mods, please “approve” my update.
Astro Landscapes ·
Also, I am left wondering if an Olympus or Pentax, notorious for being just as good as or allegedly (according their fanboys) better than Nikon or Canon weather sealing, would have survived “a little salt water” while being in a housing…
TLDR, “weather sealing” is NOT created equally, folks.
Trey Mortensen ·
I feel like all weather sealing is less capable than what the internet or fans would say…
Here’s my little equation:
Actual sealing = (fan claims / lensrental teardown) x safety factor percentage
Basically, if there’s moisture or dust, a rain baggy with some gaff tape is coming out 😉
m k (Overexposed) ·
Hi Roger,
i heard there are two fans inside the GFX100, when i take pictures i hear a sound.
could you find any fans?
cheers
mirko
Roger Cicala ·
No fans
RNG ·
It’s the shutter mech winding up most likely. It is a big shutter mech, so you get more sound than normally.
Bob Barbieri ·
The sound may be the IBIS mechanism. I have a Fuji 55-200mm zoom lens and I hear a similar noise. I called Fuji (yes, an actual repair tech answered) and they said it is the electronics of the IBIS mechanism.
Gigidagigi ·
Hi Roger,
i heard there are two fans inside the GFX100, when i take pictures i hear a sound.
could you find any fans?
cheers
mirko
Paul Fan ·
Looks like the camera drive in without a housing.
Gordon Lewis ·
What this stripdown confirmed for me is that marketing terms such as “weather-sealed” should be taken with a grain of (dare I say it?) salt.
RNG ·
Not really. One would need to make tests to conduct the result if something is enough or not. There’s plenty of seal strips in this camera. They will stop capillary action and in most cases that can be called “weather resistant”. They may not look convincing when removed, but if they block the miniscule air gap between parts, they are enough.
There’s no such thing as “weather sealed”. That would mean something like IP65 classification, and there’s no ILC that are that, as you pretty much cannot make the bayonett enough tight to withstand the pressurized water spray.
Tony Arnerich ·
Nikonos. Have fun cleaning and relubricating the o-rings before loading each and every roll of film.
I believe that any claim for weather sealing can be 100% correct as long as the weather in question is a dry sunny day with no wind and no air pollution. Kind of like what you get on the moon.
Tord55 ·
The Nikon 1 AW1 was definitely that if treated they way Nikon told you to! One guy used it in Death Valley as it of course was dustproof as well. Worked great!
GNGGGG ·
Not really. One would need to make tests to conduct the result if something is enough or not. There's plenty of seal strips in this camera. They will stop capillary action and in most cases that can be called "weather resistant". They may not look convincing when removed, but if they block the miniscule air gap between parts, they are enough.
There's no such thing as "weather sealed". That would mean something like IP65 classification, and there's no ILC that are that, as you pretty much cannot make the bayonett enough tight to withstand the pressurized water spray.
Michael Clark ·
Very few to none of the ILC manufacturers ever actually claim their products are “weather sealed”. Instead, they refer to certain design features as being there for the purpose of “better weather sealing”, which isn’t quite the same thing as “weather sealed”. One implies that the item in question is impervious to any weather intrusion, the other implies that it is weather resistant, to one degree or another. They hope that when we read that model XXx has “more weather sealing” what we will take away from reading that is us thinking that it is “weather sealed”.
Calaverasgrande ·
Fuji says ‘weather resistant’ and ‘dust resistant’.
Even the G and X series lenses are labeled WR if they have the requisite seals.
bertwong ·
Thanks again for the article Roger. I could imagine both of you chearing with joy as you got closer to the IBIS and MF sensor.
The corrosion caused by just a little bit saltwater is impressive, specially if you consider this camera was used inside a dive housing. I myself have taken my cameras to the beach and taken close up shots of some shallow waves. BOth have taken some water, the LCD of the 60D went blank for a couple of minutes but so far both cameras (Canon 60D and 6D MK II) work well and they’re not even among Canon’s top water tight cameras.
I was wondering, though, if spraying alcohol could also lead to any damage to a camera’s internal workings. In this downtime of event photography I rarely use my cameras, and even then I will spray 70% alcohol on them as soon as I get home (and yes, i do know the appropriate method would be just to rub isopropyl onto the camera’s exterior with a cleenex).
In you experience, have you ever seen any cameras presenting damage from using alcohol?
Roger Cicala ·
Never that I’m aware of. Since alcohol is non-ionic it should be easier on cameras than even fresh water, but I don’t have first-hand experience. That I know of. 🙂
disqus_XN9vf0ShQK ·
Roger, no dropped rentals at wedding parties returning to you? 🙂
Strong isopropyl alcohol can strip many old-school lens paintings and painted logos right off. If you want an all-black stealth Leica without any logos, it’s easy (don’t ask me how I found out) 😀
It can also damage some types of soft rubber. Up to the point that some no-slip rubbers become all gooey and sticky. But it should be perfectly safe for the electronics, for the reason Roger states. To be safe, just wipe it, not spray it, like in the Lensrentals article on how they disinfect their returns. Don’t dip the camera in it 😉
That said, apart from the Leica paint and a disintegrating no-slip coating (computer mouse), I never had any other problems with it, even way before Covid (shooting a report inside an active sewer system waist deep in s**t makes for some pretty thorough camera and personal disinfection afterwards!)
DataMatrix ·
The dial serves as an umbrella, not a wetsuit, since it rarely rains sideways on this planet. The camera is weather resistant, not waterproof. Pretty much like a “water resistant” wristwatch that will survive on your wrist while you’re washing hands but will die if you take it swimming.
PS: From my experience, the same applies to Canon and Nikon “weather resistant” gear.
AtRandom ·
I take it you have never visited the west coast of Scotland 🙂 (Hello, Nobody.)
Tord55 ·
Aye, I have, many times, and I can wouch for such sideways rain on Skye and here on the West Coast of Sweden!
When it is blowing 80 knots or more rain is more or less horizontal, wherever you are!
Kenneth_Almquist ·
Roger Cicala reports that, “we found leakage around every command dial.” Since the camera was not submerged, it obviously takes less than submersion for water to come in around the dials.
DataMatrix ·
The camera was in a leaky underwater housing, remember? It was likely tossed in a bag while inside said housing, and as a result got exposed to water from all directions.
Olandese Volante ·
Puah. Loudspeaker designers have been at this game for decades – admittedly on a single axis but maintaining very precise alignment on the other two. There’s a reason why those electromagnets are colloquially known as “voice coils”, even when there’s no speaking or singing involved.
Roger Cicala ·
Yeah, but that paragraph was way, way easier than trying to write 2500 words on IBIS that nobody wanted to read. I have no pride, I’ll happily claim ignorance to avoid a discussion. 🙂
Chik Sum ·
This looks like only modest weather resistance camera and personally is a bit disappointed at this price range. as pros using this should quite often taking pictures in real/ artificial rain, or seaside with waves. We all know that salt water is a big killer to electronics and I don’t think even canon/nikon top models can survive sitting slightly in a salt water puddle but I do hope fuji did better in ports or dial sealing, how hard can it be to use seals in all joints in a camera this price range?
As a side note, I genuinely believe this camera dies because the customer thinks putting the camera on a wet seashore rock with a small “layer” of water is ok for either selfie or taking the dive housing out to put it in.
Roger Cicala ·
I totally agree. “I just set it down on some moisture”, “It maybe got a little splashed on it” are things I hear a lot and really believe was the case. It doesn’t take much.
YS ·
This looks like only modest weather resistance camera and personally is a bit disappointed at this price range. as pros using this should quite often taking pictures in real/ artificial rain, or seaside with waves. We all know that salt water is a big killer to electronics and I don't think even canon/nikon top models can survive sitting slightly in a salt water puddle but I do hope fuji did better in ports or dial sealing, how hard can it be to use seals in all joints in a camera this price range?
As a side note, I genuinely believe this camera dies because the customer thinks putting the camera on a wet seashore rock with a small "layer" of water is ok for either selfie or taking the dive housing out to put it in.
thesun ·
I accidentally killed my first Canon 5D Mark IV with salt water. Just a little leaked into the enclosure. I realized what was happening while underwater and went to exit as soon as possible. The camera was still working as I exited the water. And then it wasn’t. I sent it to Canon, unrepairable due to corrosion. RIP! Forgot to tighten a seal before entering, biggest mistake in awhile!
Clayton Taylor ·
In addition to ratcheting-up the literary content with “alas” and “fracas”, Roger has also introduced “foreshadowing” with this line in the Comments – “ But tune in next week when I try very, very hard not to debate Canon heat conspiracists”. Ooohhhh…..I eagerly await that one.
By the way, HOW much salt can a fluid ounce of seawater deposit upon evaporation? Looking at all of the places where the camera has salt deposits and the extent of corrosion, I am thinking that the amount of water that entered the camera body was actually pretty significant. Sitting in a puddle, indeed. Given that the renter was using it in an underwater housing that leaked, how much time passed between initially discovering the leak, getting OUT of the water, and opening up the housing to rescue the camera? Yipes!
Roger Cicala ·
I’m dreading it, actually, the Canon one.
There’s 35 grams grams of salt per liter of seawater; if my math is right that’s about a gram in 2 tablespoons. I would guess there were a couple of grams of salt in this camera, tops, maybe less than that. I suspect there was more than a few tablespoons of salt water that got in there, but that’s just a guess. Certainly it didn’t get saturated, there were too many dry areas for that to have occurred.
We did a Sony teardown a while back where the camera got ‘pretty wet’ and things were way worse inside, wiring completely dissolved, etc.
Brandon Dube ·
Okay but most importantly, if I lick the camera clean what percent daily value of sodium have I consumed??? 😉
Roger Cicala ·
Trick question because only organic non-GMO Himalayan salt should be used for calculating MDR.
Brandon Dube ·
I should have known, neither Mt Olympus nor Mt Fuji are good enough for dietary intake!
Clayton Taylor ·
Understood. I’m thinking that since the entire hypothetical two tablespoons of salt water was NOT allowed to completely dehydrate inside the camera, the amount of salt that WAS left there seems to indicate a pretty thorough soaking before the water was drained out and the exterior was cleaned up.
Many, many moons ago I was canoeing in salt water and a wave washed over my trusty Nikon Ftn Photomic. I hustled it straight to a local repair guy that was able to get it dried out and cleaned before anything bad happened. He lectured me the entire time as he checked it over. Ah, fully-mechanical systems….
Achim Schäfer ·
well you are right – fully-mechanical systems are not as prone to corrosion from salty water because remember your school lessons in chemistry what salty water and electricity do together….
Doesn’t even have to be salty it is sufficient to be dirty – had my own experience with my ancient car phone (Siemens P1) located in the luggage compartment. A very hefty rain and a faulty lid and the mainboard of the phone was corroded after a day…
Michael Clark ·
The nice thing about those mechanical cameras is the lubricants used on most of the wear surfaces also helped protect those surfaces from liquids.
AE-1Burnham ·
N.b. Windshield, yup, definitely a negatively charged windshield.
…thanks guys!
j fortunato ·
So the “almost medium format GFX” is almost weather resistant, good thing lensrentals has “LENSCAP and LENSCAP+”
Alban Cousinié ·
So much technical genius, so many complex and finely adjusted parts, and no proper joints arount to protect those. Proper weather sealing should be standard nowadays. At least, this should be an area of progress for the years to come, it has more interest for me than having an 8K sensor.
Tord55 ·
The problem is that weather-sealing also locks the water in, if a minute amount has got inside. I had a Leatherman (very stainless) in my waterproof emergency survival bag in my kayak and after some time took it out, and to my surprise and disgust it had rusted a lot!
But the bag had been exposed to a lot of sunshine, so was very hot for hours each day we paddled, and something else in it had probably been slightly humid or water had somehow penetrated the US-made bag, and then had stayed inside, turning the bag into a sauna.
I never got an answer from Leatherman, but before that I had been carrying a tiny Konica compact (definitely not weather-resistant) in a cloth bag (home-made of corduroy) hanging around my neck while paddling around Skye, and the camera often got wet from salt spray, but the bag soaked the drops off and the camera lived many years after that and never failed!
Michael Clark ·
“Any sufficiently advanced technology is indistinguishable from magic.” – ArthurC. Clarke
Hunter45 ·
I was wondering when someone would bring up that quote. Thank you!
fmMD ·
I’m a little confused by what you’re calling “corrosion”. It looks to be dried salt.
In the old days of film cameras, it was recommended you dunk the camera in fresh water and hope for the best. I wonder if something similar applies here that after you take apart the optics, cleaning the circuit boards with fresh water and then 90% isopropyl alcohol would seem to be able to clean the “corrosion” off.
Bolton Peck ·
I saved a neighbor’s laptop once by doing this after she spilled wine into it. Thankfully, she turned it off and removed the battery quickly, so the electrochemical magic didn’t have time to fry things.. but the PCB had a fair amount of corrosion looking fuzzies around where it got wet. I cleaned it all off with water and then alcohol and then let it dry for a couple days. Put it back together and it worked. It did cack out for real a few weeks later-but at least she was able to safely remove all her data before the crash we knew was coming.
Calaverasgrande ·
Still trying to find a use case scenario to justify owning one of these. I know I can always rent, but I just want it.
bluesb ·
Salt water is indeed bad. True story about the first Nikonos IV prototype released into the wild. I worked for the company that published Popular Photography, and the equipment editor there, Michelle Fox, was the first to get the first of anything new. Including the groundbreaking Nikonos IV underwater camera from Nikon. Instead of a can with rubber seals and guts that came out the top to change the film, this had a clamshell back (like a conventional SLR) built-in light meter, auto exposure and more. So Michelle gets this thing from Nikon, decides to take it with her on vacation to the Caribbean. Goes snorkeling (NOT diving, just snorkeling). Camera immediately stops working and she opens it to find (a) couple of tablespoons of seawater inside and (b) the electronics fried. Mind you, this was the replacement for the world’s best (at that time) underwater camera. The Nikonos III — based on the original Jacques Cousteau design — was good down to 200 feet. Maybe more. On her next trip to the factory in Japan, Michelle took the drowned N-IV with her. She recounted the sequence of events for the engineers. They looked unfazed, and turning to her assistant — he was a guy, and Japanese engineers didn’t talk to women, even if they were the most powerful product test editors in the world — said, “Not supposed to get water in camera.” Well, sure, we knew that. I had a look at it before she went to Japan and apparently the clamshell back was causing the rubber gasket that kept the water out to roll in its channel, opening up a tiny crack. I also couldn’t figure out why they didn’t pot the small circuit board in epoxy. Just in case. After some re-engineering, the Nikonos IV-A (assume the “a” stood for “aha! not supposed to get water in camera!”) became a very successful underwater camera. Footnote … after this experience I stuck to Leicas and Canons.
Evensteven2000 ·
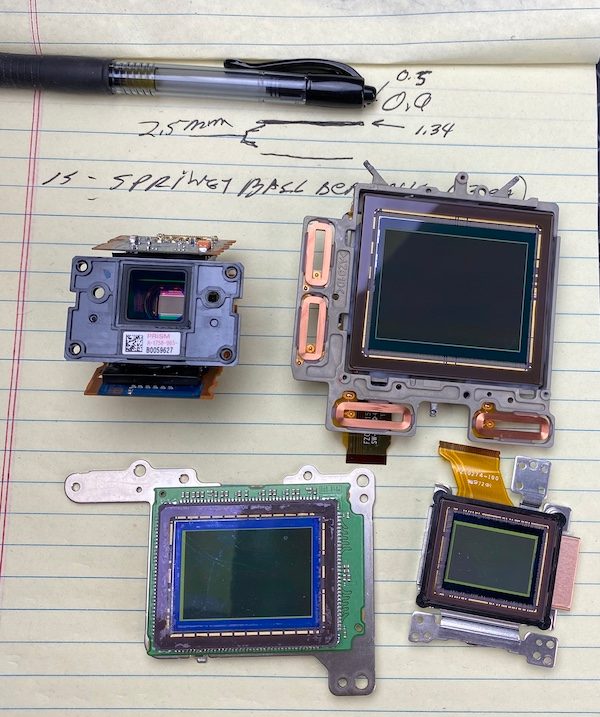
Roger – thank you for the comprehensive article. Hope the camera manufacturers take note. Could you tell us the sensor sizes in the figure of the four sensors placed on a yellow legal pad (third image from the top)?
donald alice ·
Is this for real about the genital herpes cure with the herbalist??? I have been suffering from this pain in the ass virus for the past 10 years and I have been constantly hoping, praying and researching for a cure and I have gotten to a point where Ive lost more hope as the years went by without any medical breakthroughs .I was infected when I starting dating a woman I met while on vacation in the summer of 2009 which quickly became my girlfriend and she never told me she had genital herpes..I never found out if she contracted the virus before we met which is what I personally believe happened or did she contract from someone else while we were dating, which at that point it really didn’t matter because it wasn’t going to change the fact that I now had the virus.. I definitely know that it wasn’t me because I didn’t cheat on her and I was also tested and was negative for everything not long before we met, but all I know is that we were intimate for 8 months without any problems until one day in the spring of 2010 while sitting in class I started experiencing severe symptoms out of nowhere..I obviously went directly to my doctor and got tested and within 2 weeks I received the positive results which really affected me in a way I couldn’t even put in words but it was part of the reason I started abusing substances for some time back then. I was even in denial before and after I received the results trying to convince myself that maybe there was a mistake with the testing.her reaction to the entire thing is what made me believe that she knew she had it and just didn’t tell me..regardless We stayed together until 2012 even though I never forgave her and always carried resentment for what she did. since then she moved onto more victims which I despise her for not learning from her actions..I have avoided dating and sexual contact because I just couldn’t do what she did and give someone an incurable virus. So I’m 36 now and I gave up on romance, marriage, and having kids. Honestly I have kept my diagnosis a secret from everyone for the past 10 years except obviously the woman who gave it to me so excuse me that I told you the entire story but this is the first time I mention it to anyone and it’s a relief to get this off my chest.I have tried looking up and signing up for clinical trials hoping that whatever drug was being tested could be the one to cure this virus but it just didn’t work out..so at this point I’m up for trying an alternative method of treatment for this virus that basically ruined my life..please reply to me if there is anything more I may need to know..if your recommendation helps me get my old life back I will be forever indebted to you..thank you and sorry for rambling on.. Dr Joe I contact him through drjoehome@gmail.com and use his natural medicine to get rid of this virus contact his WhatsApp +2348155730398 .
Dimy ·
IME – if the „electrolyte“ (e.g. salt water, coffee, tee…) has not dried internally you can save any delicate electronic component in a vacuum chamber.
A vacuum of 10 to the power of -4 is enough.
What you do is „boil“ off the fluid quickly at a lower temperature, which is not harmful for any other components.
You hereby prevent the electrolyte liquid from doing it’s „magic“ of corroding the metals with lower
electrochemical potential.
Then you can take your time to open the casing and remove the residue.
In this manner I have saved all delicate electronic devices that were brought to me in due time!
Zak McKracken ·
1e-4 (atmospheres? Pa? Poise?!, PSI? mm mercury?) sounds like something most people won’t be able to achieve with household equipment, though, and I’m not sure how many people would be able to have one sufficiently close while taking pictures on the beach or on a boat.
Dimy ·
1013,2 mbar x 10^-4 in a small volume chamber with a positive displacement pump is feasable.
Dan ·
I don’t suppose you can share the dimensions of the IR filter sandwich? I know Z is 1.34mm (thank you) but would love to know X and Y.