This post is of interest to any user of a mirrorless interchangeable lens camera (MILC). I’ve illustrated it with images from the Fujifilm GFX 100.
Here’s the Cliff Notes version:
- Use as much magnification as you can subject to 2, below
- Use a low peaking sensitivity to produce visible peaking at the chosen magnification.
- The tie-breaker: if you can’t see any peaking at maximum sensitivity at maximum magnification, back the magnification off a step and try again.
Some of you have been around the MILC block a few times, have figured all this out, and understand the import of, and agree with, the above interdependent prescriptions. Congratulations. You can stop reading right now. Enjoy the rest of your day.
There are undoubtedly others who are using their first MILC, for whom the above sentences either make no sense or seem wildly at odds with how you think your camera works. Read on.
There are some with more experience, who get the gist of what I’m saying, but want to know more about the fine points. There will be interesting things for those in this article.
Before I get to the nuts and bolts, I want to give you all some background. You can skip it and scroll down to the pictures, but I can tell from some Internet discussions that misconceptions about focusing abound, and that those misconceptions can keep some people from understanding how to focus better, and, perhaps worse, cause people to think they know things about focusing which are in fact untrue.
Grab a cup of coffee and get comfortable. Here goes.
It’s either in-focus or out-of-focus, right?
Wrong. With a perfect lens and no diffraction, the sharpest plane in the object field (that’s in front of the lens) is infinitely thin. The depth of field is zip. Similarly, in the image field (behind the lens), the depth of focus is zilch. Even with diffraction and real-world aberrations, there still is only one plane where everything is as sharp as it gets.
When we talk about things being in focus or out of same, in order to have our discussion rise above a strictly intellectual exercise, we need to think in terms of good enough, not perfect. Traditionally, defocus blur is measured by the diameter of the circle of confusion (CoC). Depth of focus is the shift in the image plane for a subject at a given distance between those planes that produce CoCs within preset limits. It works similarly in the object field, too. Depth of field is the distance between the two planes in front of the lens that causes the amount of defocus blur specified by the CoC.
People talk about depth of field without specifying the CoC, but that’s a mistake unless both the speaker and the listener understand some implied CoC. In the film days, 30 micrometers (um) was the CoC upon which depth of field tables for 35mm cameras were based. In today’s world, a 30 um CoC on a full-frame camera is pretty darned blurry, so old-fashioned DOF tables are usually unrealistically optimistic.
Another thing you should know about defocus blur is that, in real lenses projecting images on real sensors, aberrations, diffraction, and sensor pixel aperture all combine to flatten the top of a sharpness vs distance curve. Consider this example:
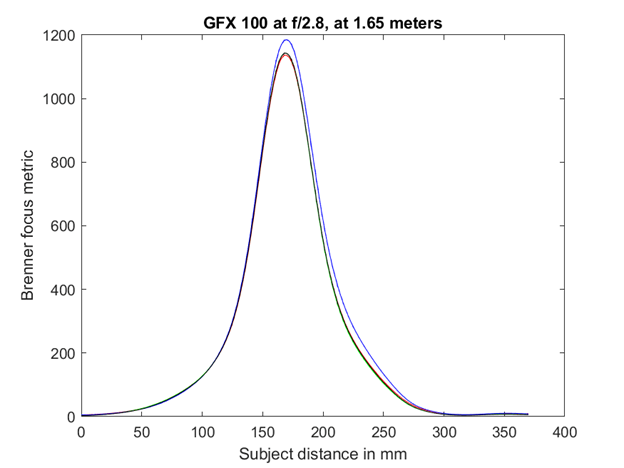
The vertical axis here is a common focusing metric invented by a guy named Brenner, but I could plot MTF50 and the curves would look pretty much the same. The horizontal axis is the relative distance from the camera to the subject, with the peak occurring at an absolute distance of 1.65 meters.
The main thing I want you to notice about this curve is that it flattens out near the correct plane of focus. That’s a good thing; it means you have a little wiggle room to miss the perfect focal distance and still get a sharp shot. But there is still one plane that is the sharpest. In the real world, people don’t “nail the focus” in terms of getting it perfect; but they can get the lens focused so that the defocus error is acceptable. Many of the arguments about whether a shot is well-focused or not are really arguments about what’s an acceptable amount of focus blur.
A Short History of Focusing Aids
In the beginning, there was ground glass, viewed with the unaided eye, or with some kind of magnifier. An interesting thing about plain ground glass is that there’s a kind of Heisenberg uncertainty principle about knowing whether the image is in focus if you’re picky about focus blur. You can’t just eyeball the ground glass and tell if the image is as sharp as it can get. You must move the focusing ring or gear back and forth to tell. Thus, you can’t tell if an image is as sharp as it can be without potentially making it less sharp than it was before you touched the focusing ring.
Bummer.
Also, focusing by tweaking the focal plane while looking at the ground glass is a skill. Almost anyone can get good at it if they work at it long enough, and, like heel-and-toeing and double clutching a manual transmission car without synchromesh, it’s a source of pride to those who have the skill. Also, like driving, it’s one that I suspect many people think they’re better at than they really are.
Double bummer.
For at least the last 100 years, there have been focusing aids developed, with the aim of making the focusing process more accurate, faster, and less demanding of hand-eye skills.
We’ve had all kinds of aids. One of my favorites for long lens work is a clear spot in the center of the ground glass with a black cross etched into it. You focus by parallax. If the focal plane is right where the cross is, the image won’t move relative to the cross when you move your eye. The image moves one way if you’re focused too close, and the other way if you’re focused too far away. You make a guess, move your head, and see which way you must tweak the focus ring. When you are focused correctly, it is completely unambiguous, and it takes no skill at all to tell if you have achieved good focus.
There’s an analog to this that doesn’t work nearly as well: the green or gray “meatball” with arrows to the right and left of it that Nikon and some other manufacturers use. The problem is that the meatball can light up when the image is not very sharp.
Leica and other cameras have long used split-image rangefinders to get fast focusing. There are all kinds of problems with those (only on-axis focusing, low magnification, reliance on fragile cam mechanisms, dependence on precise control of the body and lens flanges’ relationship to the focal plane, etc.) but, if you can see it well enough, the merging of the two images in a split-image rangefinder is unambiguous, and it takes no particular skill to look through the camera and tell if it’s focused at least fairly well.
Some single-lens reflex cameras used to have split-image rangefinders or micro prisms in the central part of the ground glass. Matching the images in the top and bottom, or top-right and bottom-left in some cameras, got you an unambiguous, but sometimes wrong estimate of your focusing.
When live view came along, first in DSLRs and then in MILCs, where it’s on all the time, things got more accurate, since you could easily get more magnification than was convenient optically, and you didn’t have to worry about misalignment of the image plane with respect to the ground glass. Then MILC’s upped the bar with focus peaking, which had roots in video. It is also related to a focusing technique used in the Betterlight scanning backs.
Nikon says peaking is an indication of whether something is in focus or not:
Is that right?
It most certainly is not, at least most of the time for most of the settings. At low magnification, with contrasty subjects, and short lenses, peaking can flag areas that are not remotely in focus if you consider a CoC of <10 um or so to define what’s in focus. On the other hand, with high magnification, flat subjects, and long lenses, peaking can fail to indicate areas that are well-focused.
Peaking is different in different cameras, isn’t it?
I don’t know about all cameras, but I can tell you that focus peaking in the Sony a7, a7II, a7III, a7R, a7RII, a7RIII, all the APS-C alpha cameras I’ve used, and the a9 works about like focus peaking in the Nikon Z6, Z7, Z8, and Z9, and that the focus peaking in the GFX 50S, GFX 50R, GFX 100, GFX 100S, GFX 100 II, and GFX 100S II works pretty much the same as in the other cameras, with one little twist that I’ll get to later. The sensitivities may be different, the colors may be different, the controls may be in different menus and buttons, but if you read the next paragraph, you’ll find it covers all those cameras.
How Peaking Works
What peaking does is look for changes in the luminance of horizontal rows of pixels the EVF or LCD display that are over a certain threshold (if you’re mathematically inclined, it takes something close to the first derivative of the “scan line”, and flags pixels for which the derivative is over a threshold). The photographer can vary that threshold with the sensitivity control. Higher sensitivity means a lower threshold, and more pixels flagged. Lower sensitivity means a higher threshold, and fewer pixels flagged. Here‘s a look at peaking’s insensitivity to vertical contrast.
Setting the sensitivity too high makes my focusing less accurate. Isn’t that backward?
It depends on how you think about it. The sensitivity that you are adjusting is the sensitivity of the peaking detection. High sensitivity means lots of peaking. Low sensitivity means less. It is not how sensitive the peaking in the image is to changes in the focus ring.
Focusing Stopped Down
Many lenses have enough spherical aberration that the focal plane shifts as you stop the lens down. It generally shifts fastest at the widest f-stops. With those lenses, you should focus at the taking aperture until the shifting becomes negligible (usually by f/5.6). It’s beyond the scope of this post to tell you how to stop down every MILC and every lens during focusing, but it’s something you should consider. I will say that if you have a Nikon Z6, Z7, Z8, or Z9, it takes care of that for you.
If you use peaking, you don’t have to use magnification at the same time, do you?
Wrong. With the settings available on all the MILCs I’ve used, with the magnification turned off, with almost any lens and almost any subject, the screen is awash in the peaking color. There’s so much peaking that it seems like everything anywhere near the focal plane is lighting up, and that means that you can’t tell what’s really in focus. When you increase the magnification less and less lights up, and that makes it easier to make fine judgments.
More peaking is good, right?
Sort of. With a given lens, subject, and magnification, you want the most of the peaking color you can get at the places in the scene you want sharp. But you want to crank up the magnification so that the camera is parsimonious with the peaking indication. Ideally, when the focus ring is set perfectly, there is only one place the focus ring can be that shows peaking where you want it.
Show me how all this works, please.
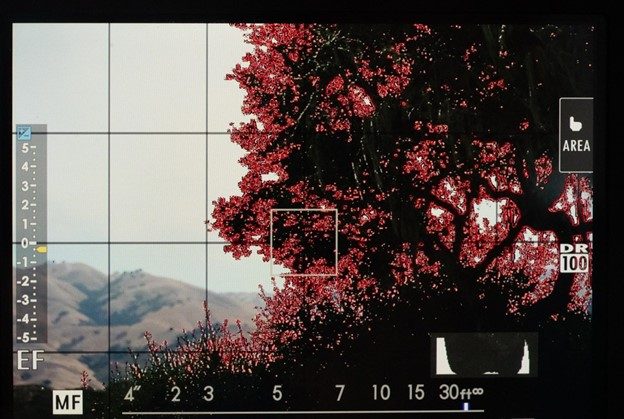
I’m going to show you some screenshots that I made using a handheld Sony a9 and the Sony 90 mm f/2.8 macro. These are meant to show the presence, absence, and amount of peaking in various circumstances. Because the a9 is handheld, it is not perfectly square to the LCD screen on the GFX 100. Don’t try to judge how well-focused the camera is by how sharp the image is.
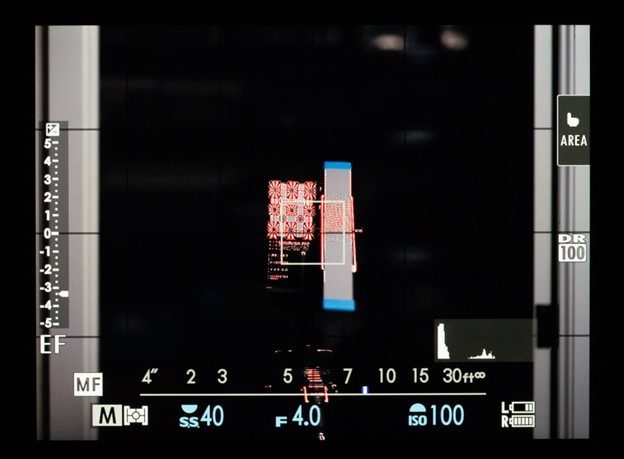
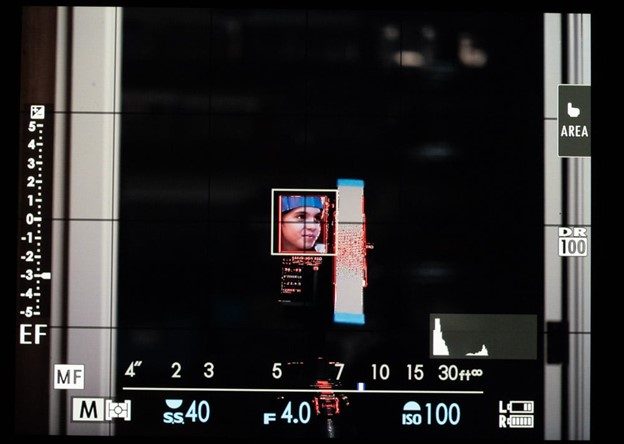
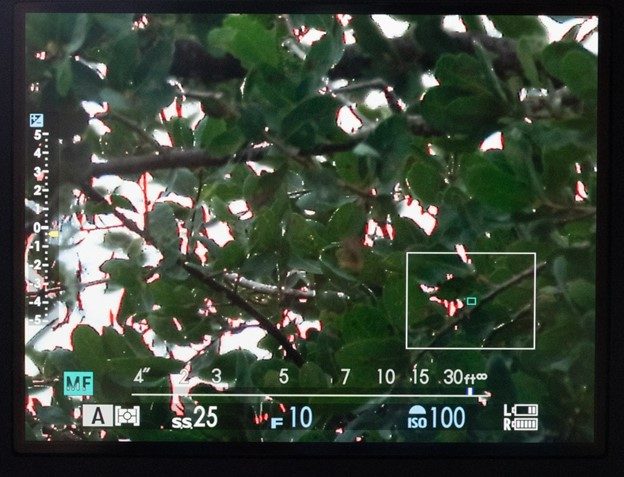
Here is what the LCD screen looks like on the GFX 100 with a 110 mm f/2 lens aimed at a focusing ramp with no magnification at high sensitivity:
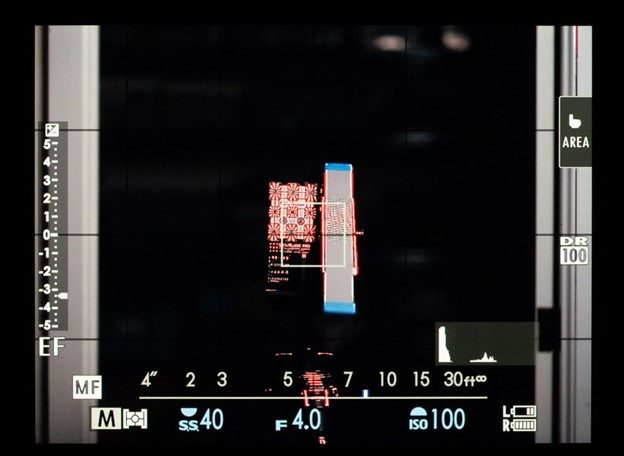
Note that almost the entire length of the edge of the ramp is lit up in the red peaking color. You can tell even with no magnification that it is not all in focus. Note also that the horizontal edges have no peaking; peaking only works on vertical edges when the camera is in landscape orientation.
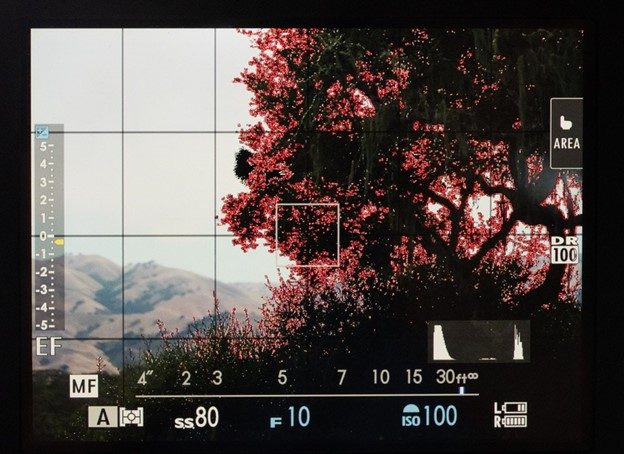
Turning down the sensitivity makes little difference:
Boosting the magnification helps. There are four levels of magnification available in the GFX 100. Here’s the lowest:
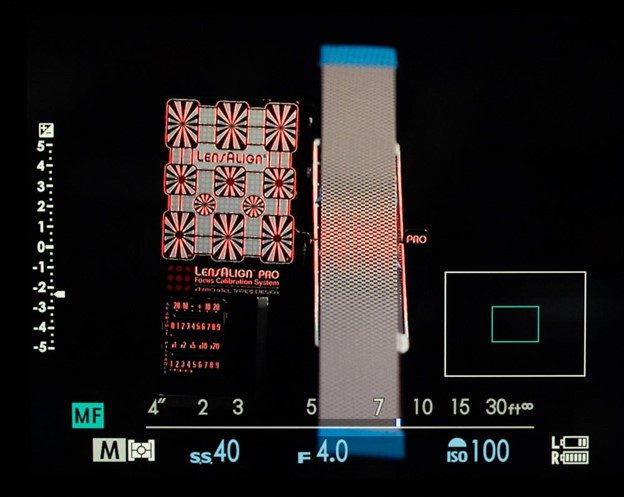
We could actually focus fairly accurately on the ramp using the above display since we know it’s a ramp. But the real world is not usually so regular. In the absence of the ramp, we could not focus accurately on the LensAlign focusing plate. We’d need more magnification.
Here’s the next level up in magnification, with the sensitivity still set to low:

The band in the middle of the ramp that is lit up by the peaking color is narrower.
One more step in magnification:
The band continues to narrow.
At the highest magnification:
The lit-up band is confined to four or five squares. That’s better, but, for a high-contrast target and a sharp lens like the 110/2, we’d like less peaking.
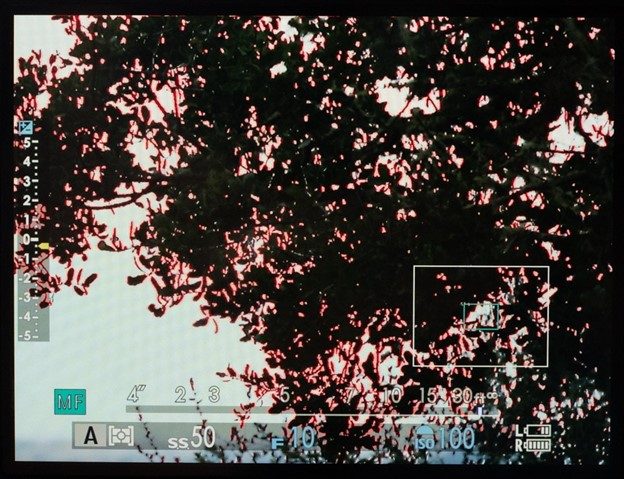
Let’s look at a lower-contrast situation:
In this case, we can zoom in one level and get useful peaking:
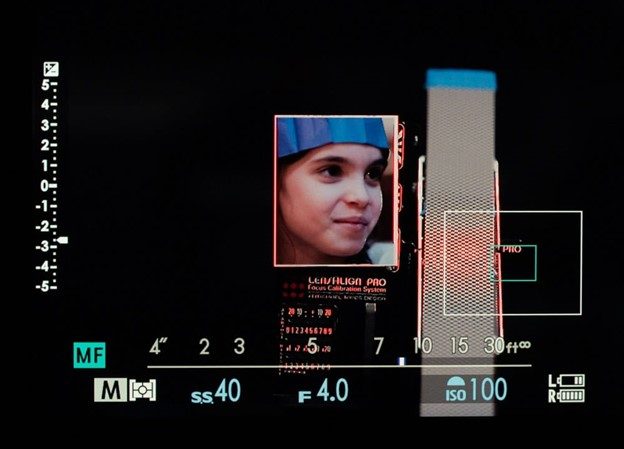
There is a little red, but the GFX cameras all have an undocumented feature (Or is it a bug? In any event, it is useful.) See the white dots along the far camera-right of the girl’s cheek? They work just like the peaking. They disappear when this setup is slightly misfocused.
Zooming in a bit more, there is only one place in the image that lights up when the subject is well-focused:
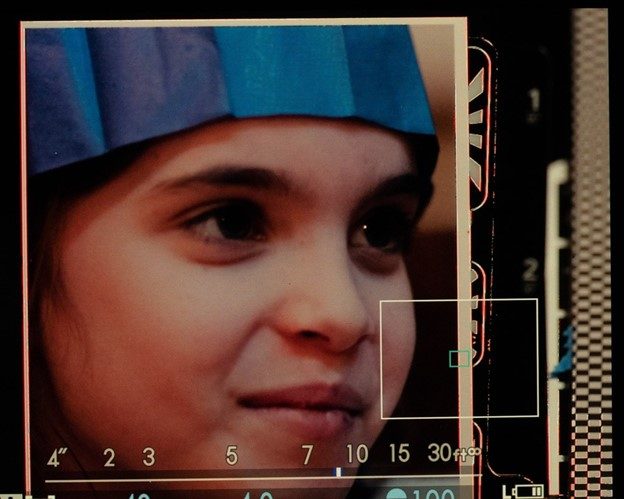
It’s hard to see, but the red tinge to the specular highlight in the camera-right eye is the tip-off that the focus is right.
If we zoom in further, we need high sensitivity to get any visible peaking:
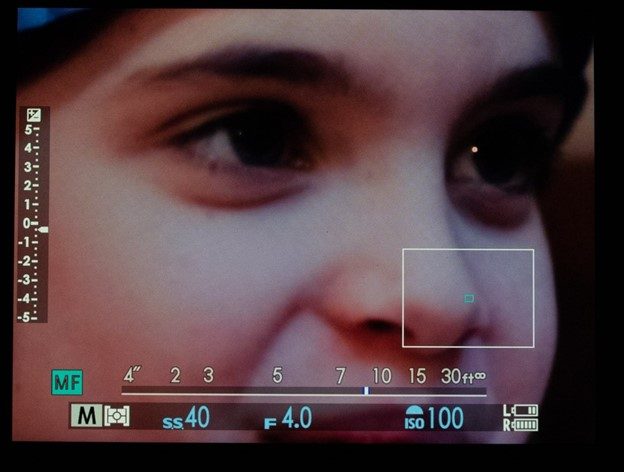
Again, it’s hard to see, but there’s a red tinge to the specular highlight that disappears if you breathe on the focusing ring.
That’s pretty contrived. How about a real-world example?
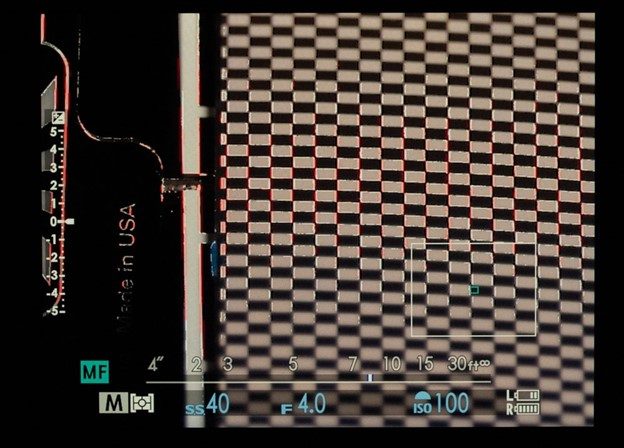
Here’s an unmagnified LCD screenshot of the GFX 100 and the 110/2 with focus peaking set to high sensitivity. It looks like somebody bled all over it and is useless for focusing precisely.
Turning the sensitivity down to low doesn’t help much:
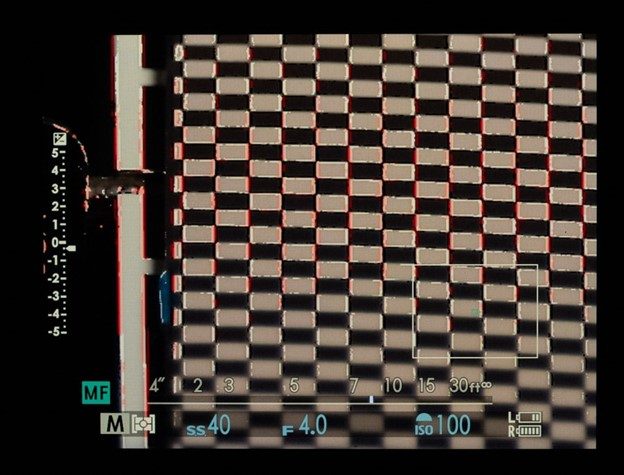
With the sensitivity set to low, zooming in a bit reduces the visible peaking, but there’s still too much for accurate focusing:
Boosting the magnification helps, but there is still more peaking than I’d like at high sensitivity:
At low sensitivity, there’s still more peaking than I’d like, but this is as good as it’s going to get:
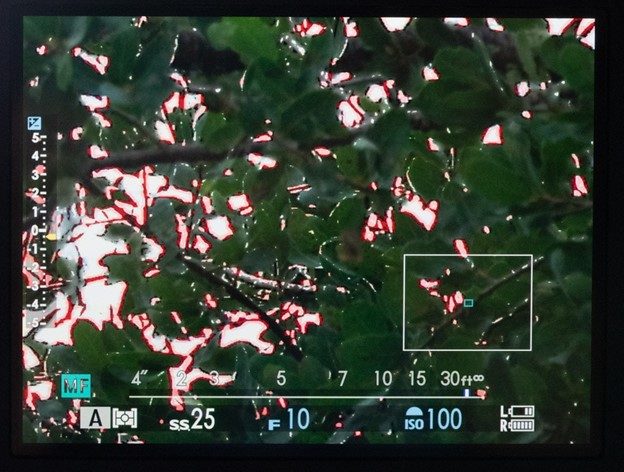
Here’s another example of that GFX-specific trick to getting the most out of this view. It works with the Fuji GFX 100 and the other GFX 50x cameras. See those tiny white dots along some of the higher-contrast leaf and branch edges? You can get the equivalent of lower sensitivity by just looking at those. Twist the focusing ring to maximize the number of those dots near what you want to be in focus.

6 Comments
Frank Kolwicz ·
I'm confused. When you use peaking aren't you using the camera's autofocus detection system to find what it thinks is best focus and then manually changing the apparent focus plane? If the autofocus detection system is flawed (offset, erratic, stopped down shifted or whatever) then you aren't "manually" focussing, only manually changing the *apparent* focus plane with all those potential errors.
To me, manually focussing means using your hand to rotate the focus ring and your eye to judge best focus, just like in the "good" old days. Of course, the language has probably moved on from what I remember about manual focussing and the term now means what you say, instead.
BTW, it would have helped if you put up pointers on the test images to show what detail you're talking about, on my screen I can't make out what you're referring to.
Harry Gill ·
No, focus peaking doesn't involve the camera's AF systems at all, which is why it works on Canon mirrorless cameras when using dumb lenses that don't activate their AF systems or their match-triangles focus aids. As Jim said, it works on the brightness difference between adjacent rows of sensels. My gripe with Canon's focus peaking is that they stopped it from showing in magnified view; my M100 is the most recent camera I have that still has that possibility.
Frank Kolwicz ·
I was hoping that somebody else would chime-in about the absurdity of saying that using the CD part of CDAF "doesn't involve the camera's AF systems at all".
Harry Gill ·
I can’t speak about other cameras, but Canon’s AF architecture requires the camera to know that a lens is fitted in order to activate its DPAF autofocus or the focus sensors at the bottom of the mirror box. With their DSLRs that allows the points in the viewfinder to light up when in focus, or to control the lens focussing motor. The focus points just won’t light up if you use a non-AF lens on a dumb adapter, which is why they’re are a lot of chipped mount adapters to EF mount. Focus peaking however is just a measure of the contrast between adjacent rows of pixels and is not dependent on the camera knowing that a lens is fitted and the camera does not use it for any form of control. It’s an indirect and very loose form of focus confirmation that is ignored by the camera’s operating system.
Carleton Foxx ·
There's no wonder that peaking isn't as helpful on larger-sensor cameras—it is an import from broadcast video cameras with their 2/3-inch sensors and more generous apparent depth of field. It's also the reason large-sensor cinema cameras all come with tape-measure hooks even though they have focus-peaking too.
Supreme Dalek ·
I'm pedantic enough to point out that "Leica and other [rangefinder] cameras" almost always use coincident-image focusing, NOT split-image focusing (unless you have an Ektra or a Leningrad, in which cases may God have mercy on your soul.) Coincident-image means there are two semi-transparent images visible in the focusing patch, and you adjust the lens' focusing ring until they coincide. It's true that most modern rangefinder cameras (Leica M, Cosina/Voigtlander Bessa and derivatives, Minolta CL and CLE, Konica Hexar, and Pixii) have a sharp-edged focusing patch that allows use of the edge of the patch in a sort-of-split-image way, and this does increase focusing accuracy as long as there are hard-edged vertical lines running through the edge of the patch, but it's not quite the same animal.