24-70mm f/2.8 Lens Teardown Comparison
Warning: This is strictly a Geek article. If you don’t like looking at lenses’ insides, there’s absolutely nothing of interest for you here.
We’ve been doing a lot of teardowns lately and I’ve made comments like “well thought out” or “carefully engineered.” Several people have asked me to show them some comparisons so they can see what I’m talking about. Given that we have fairly modern releases of 24-70mm f/2.8 lenses from several manufacturers, we thought it would make sense to compare what the insides look like.
We’ll compare the Canon 24-70 f/2.8 Mk II, the Nikon 24-70 f/2.8 AF-S, and the Tamron 24-70 f/2.8 Di VC.


This will largely examine the electro-mechanical mechanisms in the lenses. But just for completeness here are the optical diagrams for all 3. The Canon is the most optically complex, containing 18 elements in 13 groups. The Tamron has 17 elements in 12 groups, while the Nikon has 15 elements in 11 groups.

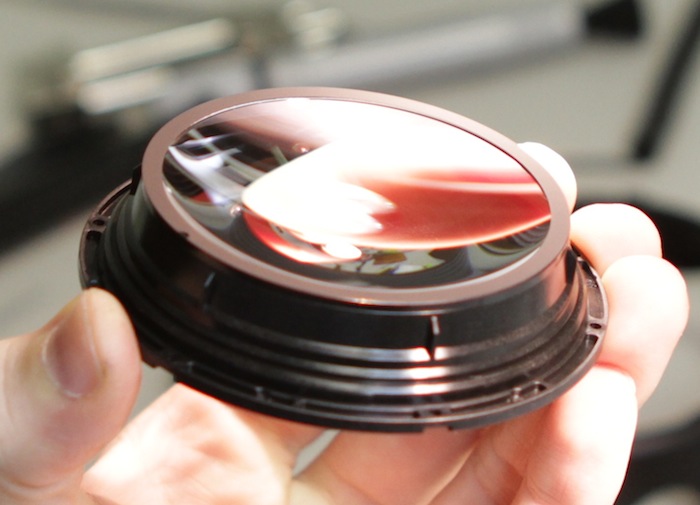
The Front Group
One thing that all 3 of these lenses have in common is a large front group at the end of an extending barrel. They all disassemble the same way – a makeup ring is removed exposing the screws that let us remove the front group from the lens. The Canon front group is pictured below but they’re all very similar — 2 or 3 glass elements permanently set in a plastic case.
I will include an image of the Tamron front group below to show the variable thickness shims used to obtain proper spacing (two on the element, one lying beside it). Both the Tamron and Nikon lenses use shims to space the front element. The Canon does not.

I also want to show one close-up of the Tamron front group because the back element of the first group (element #2) was the one we had reported coming loose in a couple of early copies. This copy (which is more recent) shows a very hard plastic seal rather than the softer glue we had seen in those early ones. We may have gotten a couple with defective seals in those early copies, or Tamron may have changed things. Either way, we haven’t seen that problem in a long time now.

Opening up the Back
Since we’re doing this to show internal differences, I should start with some generalizations. The Canon 24-70 f/2.8 II is typical of most newer (last 5-6 years) Canon designs. The Nikon 24-70 is quite typical of a Nikon lens, which haven’t changed very much in the last decade. Sony lenses tend to be very much like Nikon lenses. Sigma and Tamron lenses used to be much like Nikons, too, but recently are morphing and taking on some of the characteristics of Canon lenses.
Nikon Preliminaries
For all 3 lenses, opening up the back involves removing the screws that hold the bayonet mount and electrical connections in place. For the Nikon there is an additional step: the rear element of this lens is attached directly to the inside of the bayonet mount and is removed first. This is a bit unusual but it is convenient if you need to clean the inside of the rear element.

The Nikon lens also has electronic position-sensing brushes under the zoom and focus rings that have to removed before any disassembly takes place.

The focus brush is smaller and deeper, so it’s difficult to show you until it’s removed.

Under the Bayonet Mount
OK, once we’ve got the Nikon de-accessorized, the rear bayonet mount of all three lenses is removed the same way. (You’re also beginning to see why it takes a little more time to work on a Nikon lens.)
Nikon
The bayonet mount contains the long lever that actuates the mechanical aperture mechanism.

There’s a spring in the mount that returns the aperture lever to neutral position if the camera isn’t actively moving it. Some Nikon lenses have two springs, some just one.

Underneath the bayonet mount are more shims. For most lenses shim thickness at the bayonet mount adjusts proper infinity focus. If you change a bayonet mount, you’ll generally need to alter the shim thickness, etc.
Canon
There’s not much to show with the Canon bayonet mount. There are no shims. Canon bayonet mounts come in various thicknesses, so rather than shimming they simply choose the correct thickness mount when they assemble the lens.
There are no aperture control levers and springs because the aperture is controlled electronically. Springs and levers bend and break, but electronics burn out. If there’s any reliability difference between electronic and mechanical aperture control I’ve never noticed it.
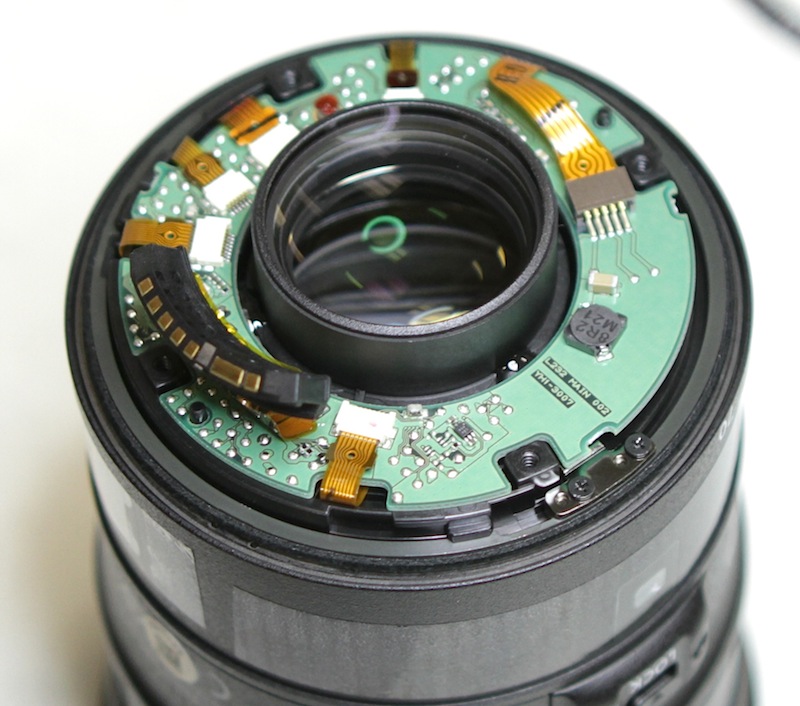
With the bayonet mount and rear barrel mount removed from the Canon lens we’re looking straight at the PCB (printed circuit board) where all the electrical connections live – typical for Canon lenses. If you scroll back up, you’ll notice the Nikon lens doesn’t have a PCB.
Tamron
We dissected a Canon-mount Tamron, so it doesn’t have a mechanical aperture lever. Had we done a Nikon-mount version then the bayonet mount would have had an aperture control lever, like the Nikon. Like Nikon, however, the Tamron (and most third-party lenses) use shims under the bayonet mount to achieve proper spacing.

Under the shim, however, the Tamron has a PCB like the Canon. Older third-party lenses generally didn’t have PCBs, but in recent years most are using them. I particularly like Tamron’s because they are a very cool black color. I assume the plug with green marks on it is a computer connection for factory adjustments.

The black PCB also makes for lovely bokeh from the electronic components if we take a through-the-lens shot of my workbench.

Removing the Rear Zoom Components
Canon
With this one I’ll start with the Canon lens, since it’s the most straightforward. After the PCB is off we remove several screws …

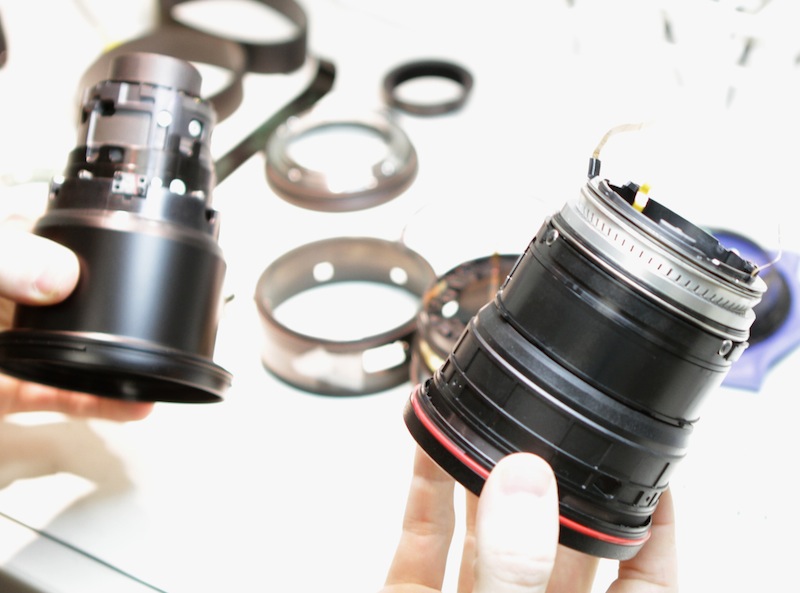
… and the entire rear barrel assembly comes off as a unit. This contains zoom mechanism and keys, the zoom brush assembly, and the lens switches.

The optical elements and ultrasonic motor (silver thingie with slots near the top) remain behind.
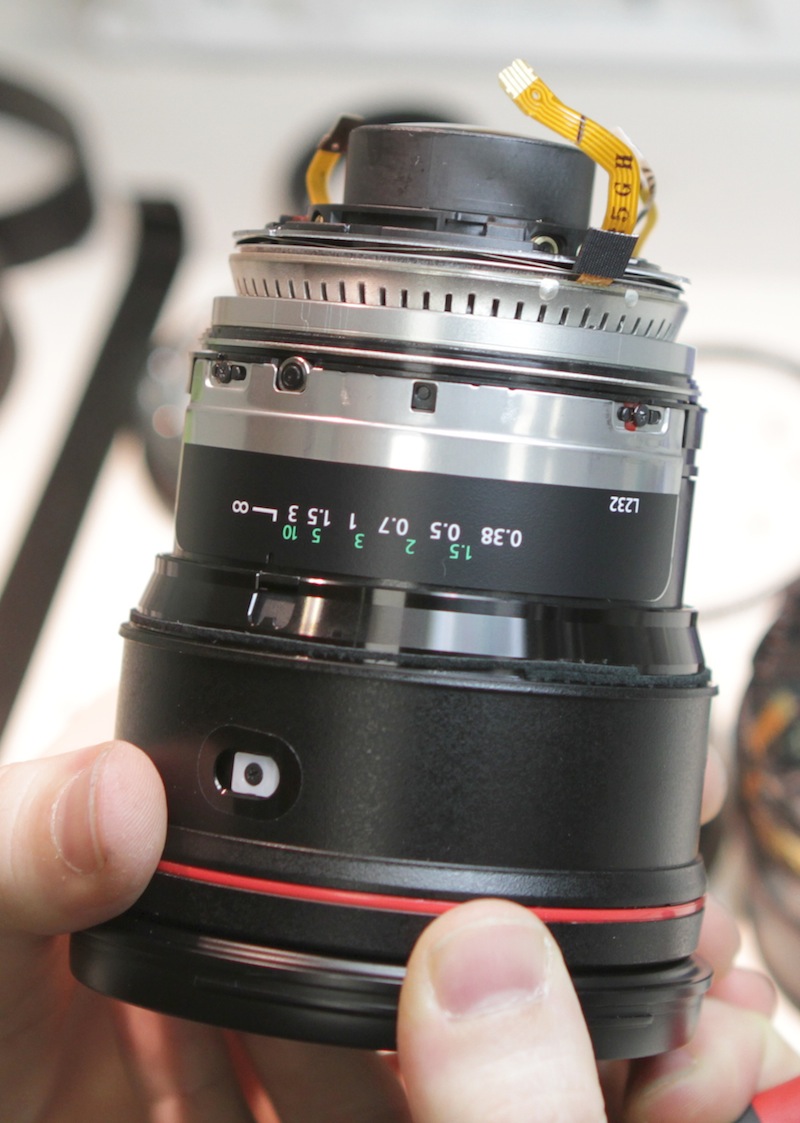
Removing one more set of screws removes the ultrasonic autofocus motor section from the optical portion of the lens. Simple, sweet, and logical. It’s a dream to disassemble. Most recent Canon lenses have this type of modular assembly.
The Nikon 24-70 f/2.8 AF-S comes apart a bit differently. The zoom key is removed first.

Then the zoom ring is removed simply by lining everything up properly and lifting.

Then we can remove the screws holding the mid barrel in place and slide it off.

With the mid barrel removed we now see why the Nikon lens doesn’t have a PCB at the back. Nikon uses several small circuit boards connected by flex cables and even some soldered wires, wrapping them around the inner barrel. It doesn’t look quite as elegant but it works just fine. This is how lenses have been made for years.

On the other side of the lens we can also see the GMR (Giant MagnetoResistor) unit — the slivery piece held on by two screws at the left of the image below. The GMR is the position sensor Nikon and many third-party lenses use. In the spirit of ‘don’t do what I did, do what I say’, I’ll tell you don’t ever touch that with a finger. If you do the lens no longer works and the unit has to be replaced by Nikon and Aaron will give you that look he gives when you’ve done something really stupid.

Newer Canon lenses use a smaller optical sensing unit tucked inside the barrel of the focusing unit we removed above. Even though this is the Nikon section, I’ll show it below for comparison. The limited research I’ve done found that both types of units are available in a wide variety of accuracies, so I don’t know that one type is better than another. The optical units are a lot smaller and out of the way if you open up a lens, but I doubt many of you care about that.

The Nikon ultrasonic motor is the next disassembly step. Unlike the Canon lens it doesn’t come off as a unit — it has to be disassembled piece by piece. Underneath it there is a soldered wiring harness so complete disassembly involves desoldering some wiring, too. That’s a time consuming process that we’re not going to go through for a demo.

Tamron
Once it’s PCB is removed, the Tamron shows some traits similar to both the Nikon and the Canon lenses. It doesn’t come apart modularly like a Canon, but it is a bit more organized inside than the Nikon. The aperture key (screwdriver is removing it’s screw) need to be removed, along with 4 mounting screws, then the mid barrel comes off.

The mid-barrel contains the Tamron’s GMR unit.

With the mid barrel removed we can see the Tamrons ultrasonic motor, which is very similar to the Nikon and Canon motors.


The Tamron isn’t quite as modular as the Canon, but the USM assembly does come off easily as a unit.
Optical Element Adjustments
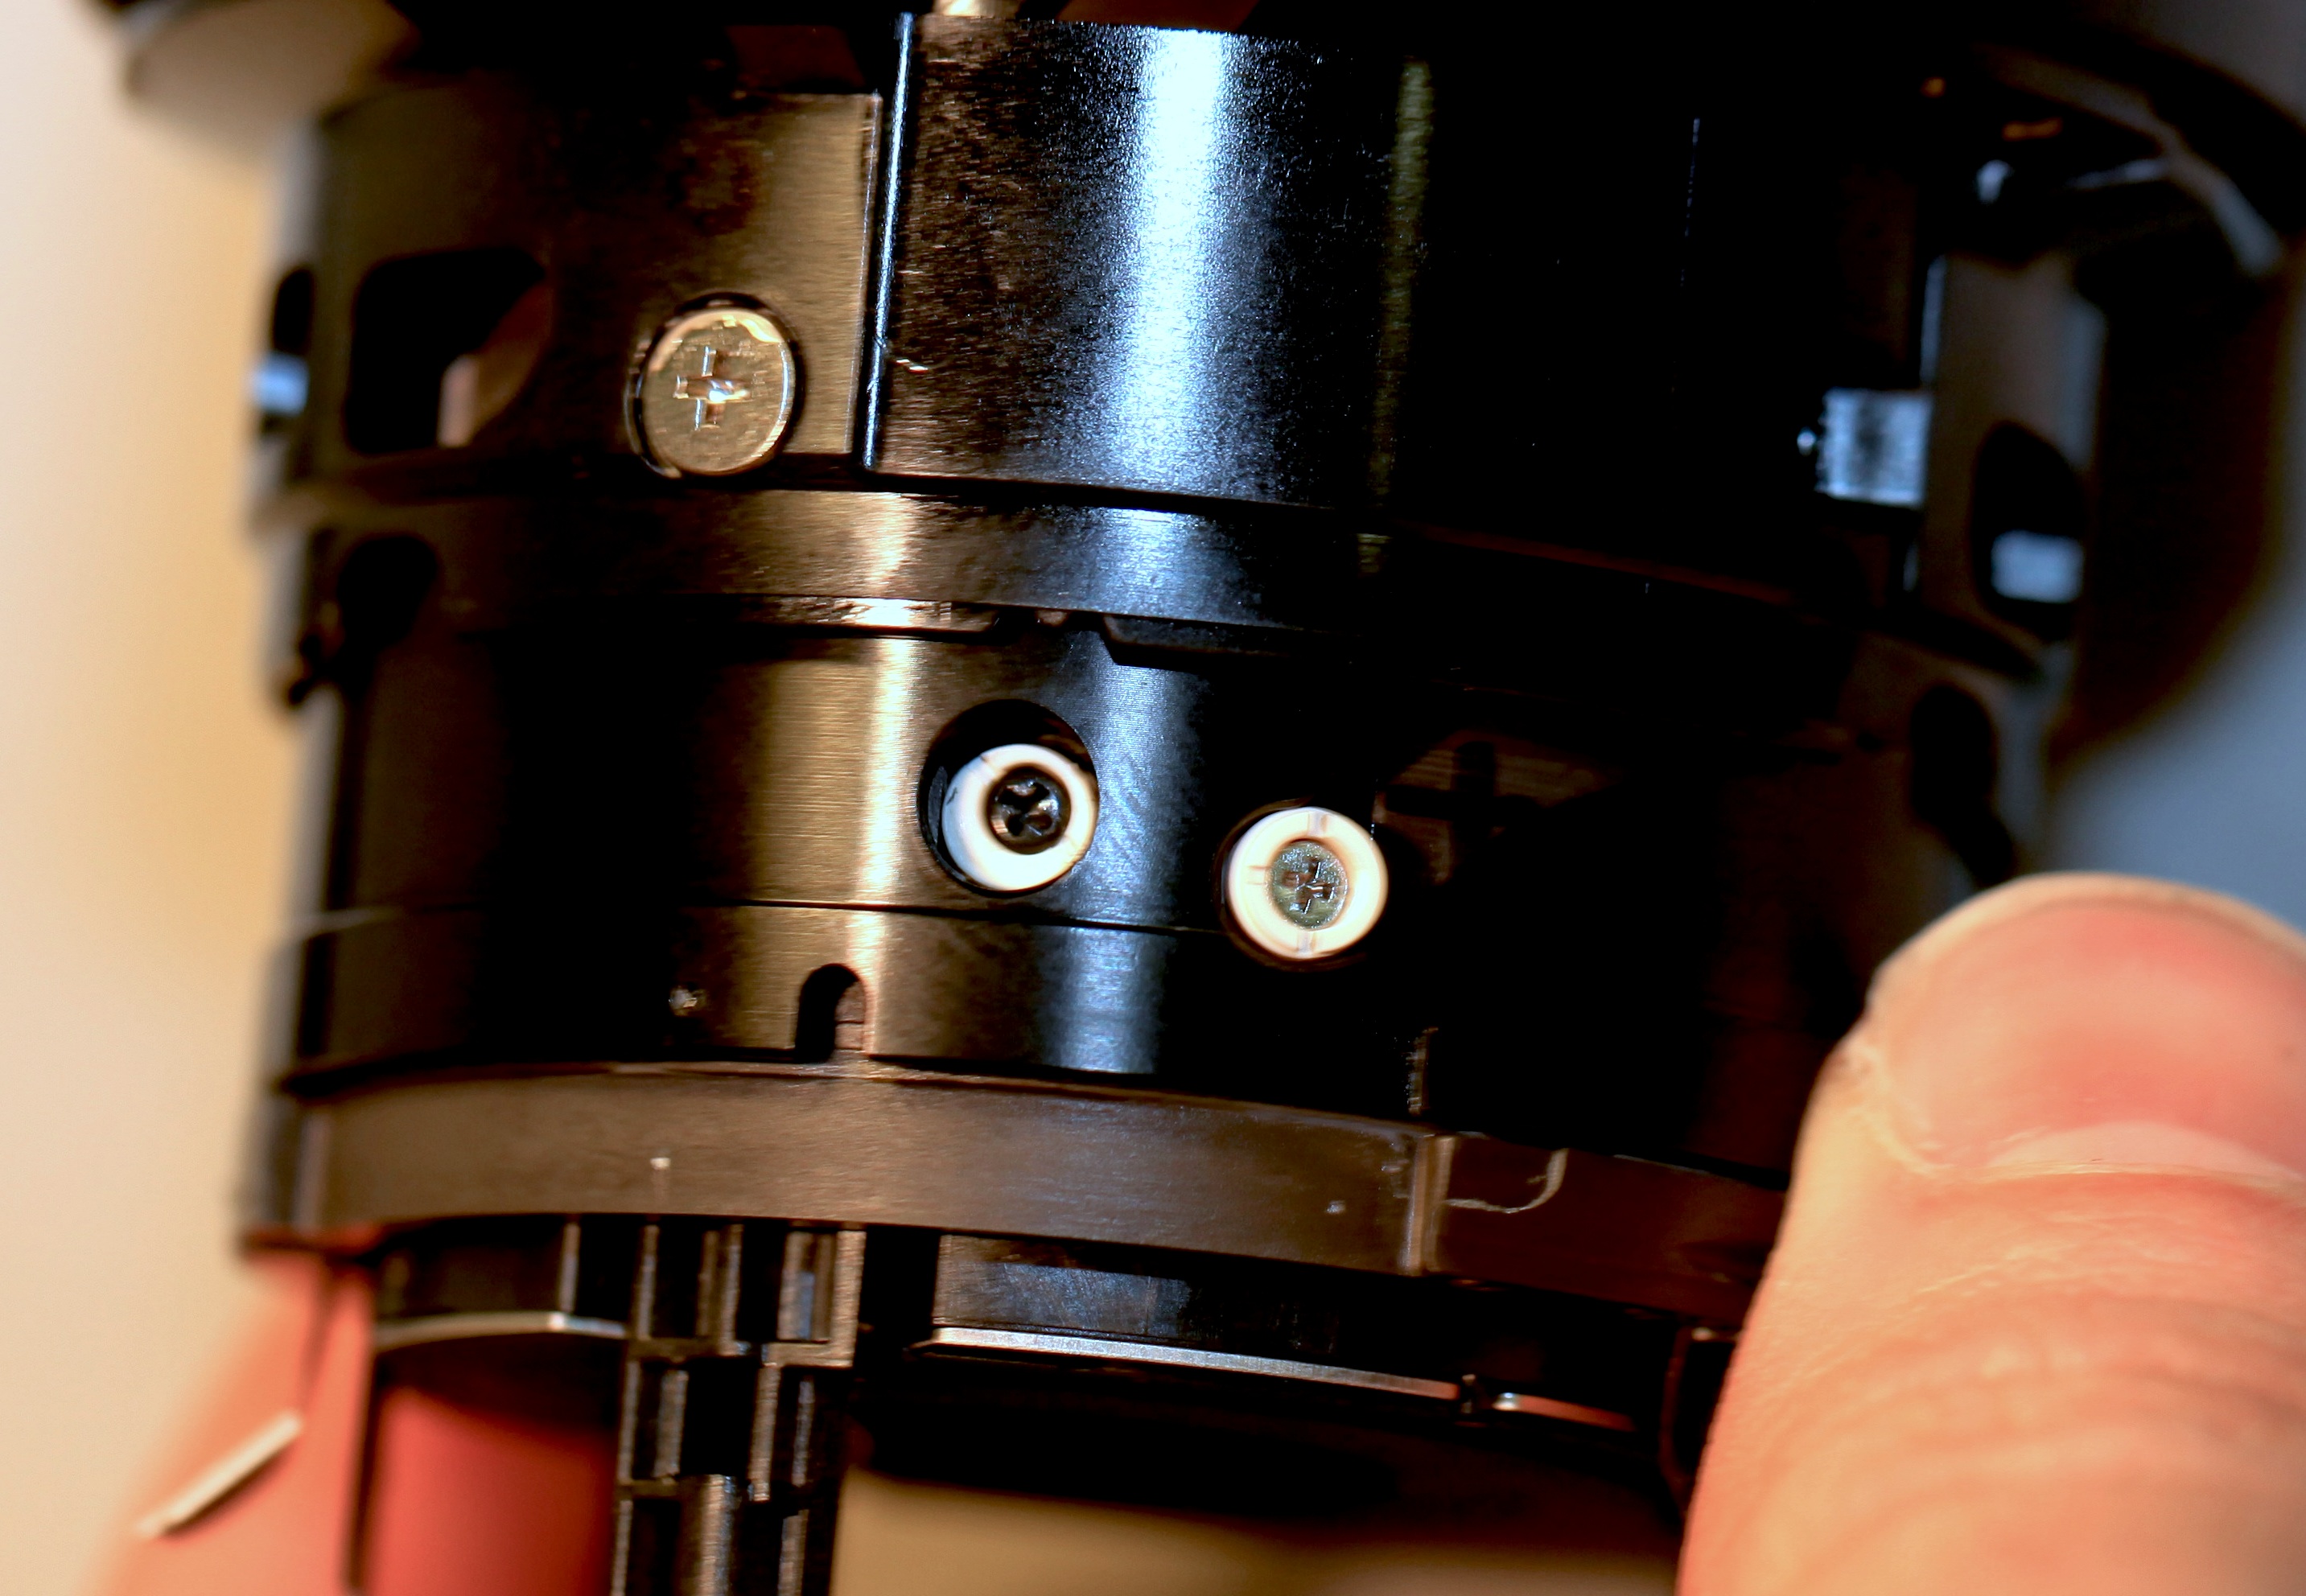
While we’re not getting into the optical elements too much in this teardown, I will take a minute here to demonstrate one of the main differences between the lenses. Notice the rear part of the Tamron optical assembly two images above (the picture with the forceps) and you’ll see several screws holding the rearmost group onto the optical assembly. If we take those screws out we remove the rear group.
As shown in the image below, under each screw is a set of shims – different thicknesses of the three shims could both space and correct tilt of the rear element. Notice also there are three more screws holding the next element in place (each of these screws is just to the left of the rear element screw posts with the brass shims still in place).
Removing these screws lets us remove the next element, which shows a set of spacing shims. Changing shims here would adjust the spacing between elements, but not the element’s tilt.
Most lenses (including most Nikon and Sigma) use shimming to adjust most of the optical elements. Canon lenses tend, instead, to have helical collars on the lens elements. Rotating the collars tilts the element forward or backwards.
Conclusion
Well, if you’ve gotten this far, you have earned the Geek Scout Merit Badge for lens teardown. You may (or may not) have also gained some appreciation for why it costs so much to do a ‘simple’ repair on some lenses.
There are certainly differences in how the various manufacturers design the non-optical portions of their lenses. Third-party lenses used to be very similar to Nikons but recently are starting to, uhm, borrow some of the designs Canon has used.
From an photographer’s standpoint, one design isn’t better or worse. They all make lenses that work just fine.
But a number of you have asked us to demonstrate why we call some designs ‘cleaner’ or more organized than others. Hopefully this demonstrated that, at least to some extent.
Roger Cicala and Aaron Closz
Lensrentals.com
January, 2013
61 Comments
Feng Chun ·
Great comparison! Nice job Roger and Aaron!
Aaron ·
Wow, awesome writeup. More than I ever thought I might want to know about disassemble of a lens, and the differences in physical & mechanical design, vs optical design.
Can I get my Junior Photo Geek Merit Badge now please?
tianle ·
nikon assembly looks like a real pain
Nqina Dlamini ·
Yeash! I was counting the replacement cost of the teared down lens and thinking how much a mistake will set you back. Thanks for this, although I’ll be too scared to open mine. Great write-up.
desmondism ·
thanks for the very informative article! i agree, seeing a teardown/comparison like this can increase one’s awareness and appreciation of the skill needed to service modern lenses. when a consumer-level zoom lens is dropped, which of the internals usually gets damaged most often/easily? also, could you maybe do similar comparisons between primes, such as 50/1.8 models? 🙂 i’m also curious to see how similar lens designs (optically) differ internally when the lens does not feature autofocus… basically to see how much bulk AF adds to a lens. and for that matter, IS/VR/OS/VC as well… 🙂 again, thanks!
Dr Croubie ·
Do I get an extra Geek Merit Badge if i’m contemplating doing my own teardown on a vintage lens so we can see what ‘well-made’ used to be? (well, i’m gonna pull them apart to clean anyway, may as well take photos).
But I’d much prefer a Roger-brand on some nice new ‘well-made’ MF primes, say like a Zeiss ZE, or even a Leica (R/M)? (just anything but not the samyang 35, i’ve pulled mine apart too many times already, it’s boring in there).
Here’s a thought: If Canons are so nice to disassemble, re-assemble, and service, that probably goes a long way as to why Canon’s service centre is reportedly streets ahead of Nikon’s. I’ve done a lot of ‘design-for-build’ and ‘design-for-service’ of other electronics in my day job, a few extra minutes in prototyping saves crudloads later on. Canon took the jagged pill in breaking compatibility from FD->EF and bringing in the electronic aperture, I suppose Nikon are now paying the price for not doing the same?
CarVac ·
In case people don’t know, the GMR effect is what lets us pack trillions of bits into a few square inches on hard disks.
CarVac ·
In case people don’t know, the GMR effect is what lets us pack trillions of bits into a few square inches on hard disks.
Also, Dr. Croubie, when taking it apart did you notice anything weak inside the Samyang 35 supporting the rear focusing group? I dropped mine a foot onto a padded chair and that broke…
Jonathan ·
Great write-up! I’m always jealous of your “opportunities” to disassemble your equipment, and look forward to your teardowns! 🙂
BTW, during your teardowns, did you see what the weather-sealing quality was for the three lenses? Would you recommend any of them for use with a weather-sealed body in adverse conditions?
Roger Cicala ·
Jonathan, weather sealing is rarely more than a rubber gasket at the lens mount and tape over any holes in the lens barrel under the rubber. At least as far as we can tell.
Stephen ·
Awesome teardown!
I’ve been very geeky for a long time. I finally got my badge!
Phil ·
This is all good stuff which is always appreciated but could you please post any test’s or insights you may have on the Sigma 50-150mm f/2.8 DC HSM OS as it seems to be a lens which not many people are talking about or testing.
Chris Wordsman ·
I love reading your posts! I check and read them every morning while eating my cereal. Some of the longer posts have led to soggy frosted flakes…
Chester ·
Maybe I missed it, but did you manage to find the stabilization (VC) mechanism in the Tamron? I’m curious about how much extra complexity or weight stabilization capability adds to a lens, since the Tamron’s size/weight doesn’t seem noticeably different from other non-stabilized 24-70/2.8 lenses.
Thanks!
Roger Cicala ·
Chester, we didn’t show it, but it’s a very small piece of the lens – basically a single element set in a plastic holder with some small electromagnets around the edge. It couldn’t add more than a few grams.
Joe ·
Love the tear downs if for no other reason to know what fixes you are able to do in house. I did a repair on a Canon 17-85 EF-S due to zoom lockup, it’s amazing how well ‘stacked’ the Canon lenses are. Hopefully you never turn any of these into a parts donor.
Spencer ·
I dropped my Nikon 24-70 on a concrete floor this summer and Nikon charged me $690 to replace some parts (including the front element and the lens barrel); at the time I thought it was highway robbery. After seeing the incredible complication of these lenses, I still think the amount they charged was obscenely high, but it doesn’t rise to the level of a criminal offense.
Ken ·
Being a mechanical engineer, I found your lens disassembly fascintating. But I’m curious to know why one company uses more elements and more groups versus another company? Is it cost driven? It would seem to me that the more elements, the f/setting would be higher also.
Roger Cicala ·
Hi Ken,
Each element allows the designer two more ‘degrees of freedom’ to bend light, allowing them to correct various aberrations, etc. In the old days, more elements meant markedly decreased light transmission, but no lens coatings pass 99.9% of light and the problem is not critical anymore.
Ben Bernier ·
Wow! thanks for taking the time to show us in details.
Unhappy ·
Ah, that is why it cost $750 to repair my Nikkor 28-70 lens, and a F5 AND F6 body. The lens developed a high voltage short that fried the AF module in both bodies.
Lots of weeping and gnashing of teeth. I love these photos of people allowing their gear to get wet. If they only knew…
Martin Dittmann ·
Absolutely great a valueable article, something you really cannot find on any other “commercial” review sites. Roger and Aaron – my utmost thanks and respect for doing something like this and spending the time for the sake of public article. I´ve got to admit I´m returning to your web mostly because of these insights, observations and conclusions drawn using real, pragmatic approach, real data and facts and common sense. Bravo, guys, once again! 🙂
Martin Dittmann ·
Guys, can a have a short question regarding Nikon 24-70? Having done the profound teardown, please can you show us the (possible) reason of the infamous Nikon zoom gringing/stiffness? I mean if you at least sense which way the wind was blowing…. Thank you in advance.
Roger Cicala ·
Martin,
The most common cause (it’s not shown in the teardown) is because the inner barrel travels along 3 metal ‘keys’ or rods and they’ve gotten loose. You can tell if that’s the problem by a simple test: the grinding is present when you zoom in and out, but if you turn the lens upside down and zoom in and out it’s gone or at least much reduced. That’s the key problem and can be fixed by realigning or replacing the keys. Often, though, the plastic barrel has gotten scratched or scored by that point and has to be replaced, too.
As with any zoom, it’s also possible for one of the collars in the lens to have broken or come off, but this is much less common and often causes a complete jam.
Roger
Martin Dittmann ·
Roger, thank you for your fast reply. So there is “plastic barrel” in the $2000 pro lens..? Hmm, great indeed.
Klaus ·
Roger, can you comment on any differences in design and construction regarding weather/dust sealing by various manufacturers. With the exception of a few waterproof cameras, there are no IPX ratings for DSLR lenses or camera bodies. Canon claims “water-and dust-proof construction” on some of their higher end lenses and bodies, as does Nikon for their bodies. Yet, Nikon is completely silent on the matter of whether or not their lenses are sealed. Do Nikon’s high end lenses have less weather sealing than Canon lenses, or is Nikon simply avoiding any liability for warranty coverage from moisture damage? Having obviously dismantled your share of lenses from various manufacturers, you may be in a unique position to comment on this.
Thanks for the fantastic blog.
Roger Cicala ·
Klaus,
I’ve never been very impressed by anyone’s weather sealing. A rubber gasket at the lens mount, waterproof tape over the holes under the rubber, that’s about it. I can see that it would tend to keep water droplets from working their way inside the lens but I can’t imagine them surviving a steady rain – watersealed or not. I haven’t noted any difference in Canon, Nikon, or Olympus high end lenses.
Klaus ·
Thanks Roger. I guess it’s time to stop my habit of trusting Canon’s “water and dust proof” construction in the rain. Seems that Nikon is actually a bit more honest in their silence.
Brian ·
Roger, will the modular construction of Canon’s lenses have any influence on your choice of camera system?
Roger Cicala ·
HI Brian,
Not directly, but Canon’s better ‘repairability’ will be something I consider. It won’t be among the first few things I think about, but if there were two close systems in my evaluation, I’d certainly lean toward the one with better service or that I had an ability to repair myself (i.e. parts access).
I realize I consider that way more than most people except for those running corporate photography companies (the ones that outfit dozens of photographers to do event and sports shoots, for example), so I’ll try to be very clear where that weighs in my decision process.
Cinto ·
One advantage of the Nikon design of multiple small PCB’s is that it will be cheaper to replace one of the circuit boards and a few chips if it fails, with the Canon you will have to replace the whole PCB with all the chips.
Cinto ·
Although it looks like it might be power and relays on one PCB and the chip on the other wich might be pretty a good design, replacement wise, too
William Kazak ·
Awesome report and thanks for sharing.
chan ·
Hi
I want to tear my EF 24-70 f/2.8 L apart as it has broke down. The aperture remains stopped down till it is hard to see in the viewfinder and the AF is also not working. It gives error 01.
I heard that the common cause is a cable that is broken (aperture cable i think).
my question is, if i replace the cable myself after buying it from ebay etc, will the act of disassembling the lens affect the optical quality of the lens?
tks a million!
Roger Cicala ·
chan,
For most lenses the electronic aperture and ribbon cable are together – you can’t just buy the cable separately, it’s microsoldered into the aperture assembly. But you can disassemble the lens rear end and electronics without affecting image quality in the EF 24-70.
Mark ·
Extremely interesting review, thank you!
Mehdi ·
Your teardowns are my favorite posts. Last night I made my first lens fix. My Canon EF 8-15mm dropped from my back pack on asphalt bounced few times. Surprisingly no dent but I noticed the front element is tilting, so I opened it up. Probably you know how it is inside it anyway. It is modular so I managed to take out the optical part in one piece the only thing is the front element is sticking to the body with a foamy goooi thing to weather seal it and you have to pull the module toward out until it tears. I found that one plastic collar from a zoom groove was broken, I don’t know where to buy one so I used super glue and assembled the lens. It fine and works. Reading your teardown posts helped a lot!
Richild ·
Hello to all of you can anyone please help me how can I separate the two glass element in the front glass of tamron 24-70 like the picture posted above please please please help me my lens has fungus in the middle of the first and second element in the front glass element please help.
Roger Cicala ·
Richild, you can’t separate the elements in the front group – at least not without breaking the plastic mounts – by any method we know of.
Tevian ·
I have the Tamron 24-70 f2.8 and I also have what looks like fungus beneath the first glass element. Its in the form of little spots covering the entire face of the second element that is sandwiched with the first. Is this a common problem with this lens? What’s the best way to fix it?
Roger Cicala ·
Tevian, you’ll have to replace the first group, I believe.
dave kelly ·
Re fungus on the lens;a few years ago i read a post(may have been in dpreview)that suggested dissolving penicillin in distilled water and applying the solution to the fungus!!!
Gamo ·
Got Canon EF 24-70L 1st GEN. The electronic aperture broke on me.
Have it fix at Canon Service Center and realized that the electronic diaphragm is one of the weak part of the L series lens.
hairelbe ·
Hello
How to correct tilt on the rear element with the shims on the Tamron?
My model is very bad .
Thanks …
Roger Cicala ·
The rear element is a centering element, not a tilting element I believe.
hairelbe ·
Thanks for the answer but i don’t anderstand, i read in ‘optical adjustment elements’ : “As shown in the image below, under each screw is a set of shims – different thicknesses of the three shims could both space and correct tilt of the rear element.”
Roger Cicala ·
You could adjust tilt by changing the shims, but there is also a centering adjustment to the rear element that is more likely to be useful than changing shims. There are some other optical adjustments within the lens. Do you have access to and optical bench or other method to do adjustments, like a pinhole collimator? This is a complex lens to do optical adjustments on, and honestly unless you’ve got lots and lots of time and some good optical testing equipment, adjusting it is going to be really difficult and incredibly time consuming.
hairelbe ·
I have no optical testing equipment, only crop 100% !!
Just a latest question ; at the beginning of the article you say “I also want to show one close-up of the Tamron front group because the back element of the first group (element #2) was the one we had reported coming loose in a couple of early copies. This copy (which is more recent) shows a very hard plastic seal rather than the softer glue we had seen in those early ones.”
Do you remember if this problem with the early copies affect the quality of the image ?
thanks
Roger Cicala ·
It did not unless the group had fallen out, which it did a few times early on.
hairelbe ·
Thanks for the answer but i don't anderstand, i read in 'optical adjustment elements' : "As shown in the image below, under each screw is a set of shims – different thicknesses of the three shims could both space and correct tilt of the rear element."
Roger Cicala ·
You could adjust tilt by changing the shims, but there is also a centering adjustment to the rear element that is more likely to be useful than changing shims. There are some other optical adjustments within the lens. Do you have access to and optical bench or other method to do adjustments, like a pinhole collimator? This is a complex lens to do optical adjustments on, and honestly unless you've got lots and lots of time and some good optical testing equipment, adjusting it is going to be really difficult and incredibly time consuming.
hairelbe ·
I have no optical testing equipment, only crop 100% !!
Just a latest question ; at the beginning of the article you say "I also want to show one close-up of the Tamron front group because the back element of the first group (element #2) was the one we had reported coming loose in a couple of early copies. This copy (which is more recent) shows a very hard plastic seal rather than the softer glue we had seen in those early ones."
Do you remember if this problem with the early copies affect the quality of the image ?
thanks
hairelbe ·
Hello
How to correct tilt on the rear element with the shims on the Tamron?
My model is very bad .
Thanks ...
Kimmo Varjonen ·
Hello
I have Nikkor 28-70/2,8, which has front element loose or there some wobble sideaways. Is this “normal” or should it be fixed someway?
Thank You
Kimmo Varjonen ·
Hello
I have Nikkor 28-70/2,8, which has front element loose or there some wobble sideaways. Is this "normal" or should it be fixed someway?
Thank You
Max Lindner ·
If you were to oil the surface of the usm motor, would it still work?
Max Lindner ·
It would absolutely not. It would completely stop working, even with a small amount of contamination. The surfaces must be free of dust and fats.
John Mork ·
Interesting, about the Tamron above, my copy -I just bought used, shows some wobble when achieving focus. Maybe 1/2 a second or less, is this normal? When I shake the lens I don’t hear anything, and other than the wobble, it works great.advice please:-)
John Mork ·
Interesting, about the Tamron above, my copy -I just bought used, shows some wobble when achieving focus. Maybe 1/2 a second or less, is this normal? When I shake the lens I don't hear anything, and other than the wobble, it works great.advice please:-)
Larry Wilkes ·
Thanks for this, but my problem is the rear focussing ring simply not engaging, it just spins. Needless to say nothing is happening when I focus the camera. Any advice please? This is a 24-70 Tamron.
Larry Wilkes ·
Thanks for this, but my problem is the rear focussing ring simply not engaging, it just spins. Needless to say nothing is happening when I focus the Nikon camera. Any advice please? This is a 24-70 Tamron.