Lenses and Optics
Setting Up an Optical Testing Station
There are a lot of right ways to do optical testing. The gold standard is to put the lens on a $150,000 optical bench or run it through a well-equipped Imatest lab. But unless you have an optical bench or Imatest lab handy, that’s not practical.
We have to optically test around 400 lenses a day, which is more than our Imatest lab can possibly handle. So over the years we’ve learned a lot about practical ways to test lenses. We’ve constantly double-checked our methods using Imatest and an optical bench, refining our optical testing.
We’ve developed a simple set up that is about 98% accurate in identifying lenses that are decentered or optically misaligned. A lot of people could do this at home themselves. Certainly any camera club could make an identical setup.
Judging from the emails I get, a lot of people want to be able to test their lenses optically and few know how to do it, so this should be useful for them.
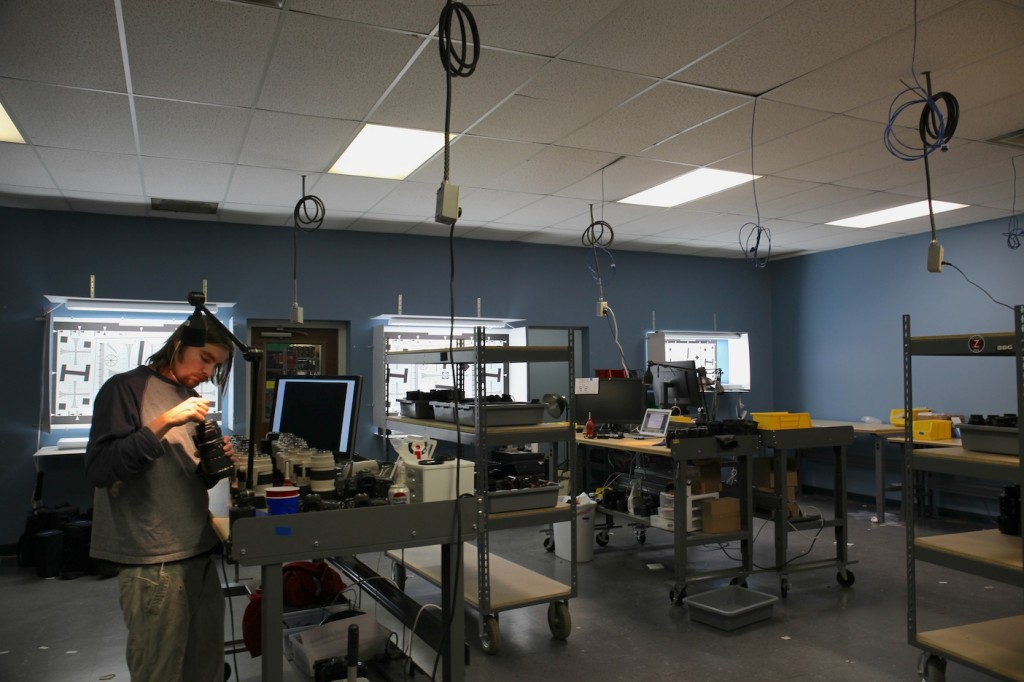
- Post-rental testing bays at Lensrentals
But let me be clear about this is not, so I don’t waste your time if you wanted something else. This is not going to let you test 6 copies of a lens and determine which is the absolute sharpest copy on your camera. It’s doesn’t let you compare two different lens models and decide which is sharper. For that you do need Imatest, a bench, or just a lot of photographs.
But if you have a lens that isn’t performing like you think it should this will let you determine if the lens is optically aligned and centered properly. It can be helpful to know if the problem is with the optics of that copy, rather than the focus system, technique, or simply that the lens isn’t designed to perform any better than that.
Nobody needs to do optical testing, of course. You can just take pictures and if you don’t like the lens send it back. But that’s not always convenient or possible. Testing is a lot faster than trying out 4 copies before you decide a lens just isn’t for you.
A Few Things Before We Start
You will need a tripod.
Some of my most experienced techs can test hand held. It usually takes about 6 months of testing 75 lenses a day before they can, though. So I recommend testing your first 9,000 lenses on a tripod. After that you can try it hand-held if you like, although you will lose accuracy.
Being Perfectly Square to the Test Chart is Required
This is the main reason a tripod is needed, although not the only reason. If you are tilted at a slight angle to the chart, you’ll get a lot of the same results you would get if the lens were decentered.
Center Sharpness is the Least Sensitive Test of a Lens
Most lenses can be pretty badly decentered before center sharpness is affected very much. Eight out of every 10 lenses we fail as ‘optically decentered’ would pass fine if center resolution was the only thing we checked. Those that do fail in the center always also fail off center.
You Can Learn a Lot About a Lens by Observing it Slightly Out of Focus
Of course, they’re blurry when slightly out of focus, but the way that they blur can be quite revealing.
Equipment You’ll Need
Here’s all you have to have:
- Tripod
- Test chart
- Camera output to a computer monitor
I don’t think I need to say anything about tripods, but I’ll go into a bit more detail on the other two requirements.
Test Chart
We’ve tried basically every type of optical testing chart that exists and by far the most useful is the ISO 12233 chart. A lot of people use AF1951 charts stuck in multiple places for testing. These aren’t completely useless, but they are very insensitive. Some fairly bad lenses look fine when you just use a bunch of AF 1951 charts to test them. Remember, they were designed to test things back in 1951. Hopefully our standards are a bit higher today.
(As an aside, I know of several service centers that use only a modified version of AF 1951 bars to test lenses optically. Which explains why they send lenses like this back, saying they are optically fine.)
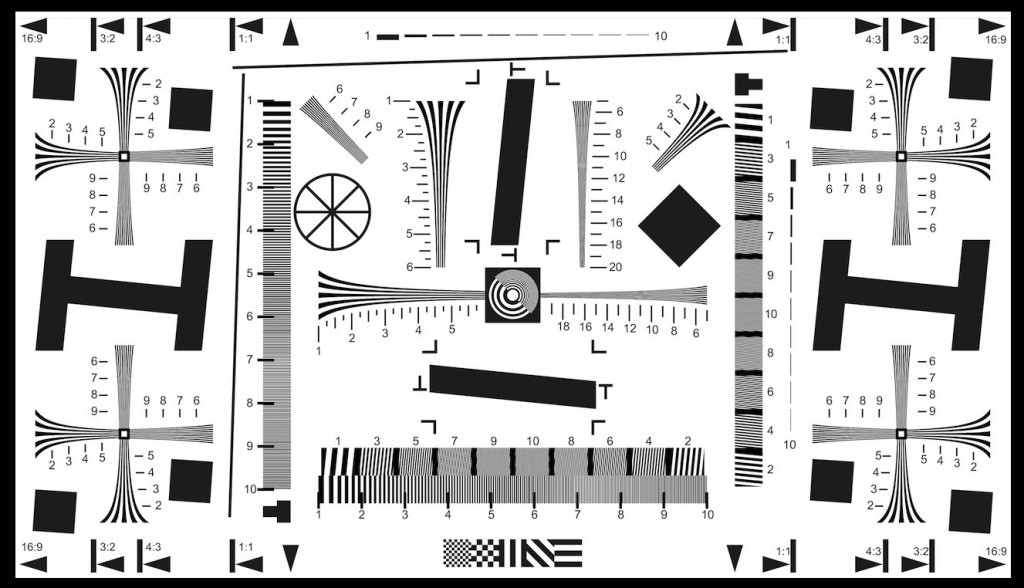
- ISO 12233 test chart
The variable targets in each corner provide great corner-to-corner comparison, which is the most sensitive indicator of an optically decentered lens. The long gradual change in line spacing shows a lot more than the short bars of an AF 1951 chart. It also provides identical horizontal and vertical test areas in each corner. While not a true test of astigmatism, differences in the horizontal and vertical targets strongly correlate with astigmatism and other aberrations. The thick, slant-edge boxes and bars show chromatic aberration and blurring in a way an AF1951 chart doesn’t do.
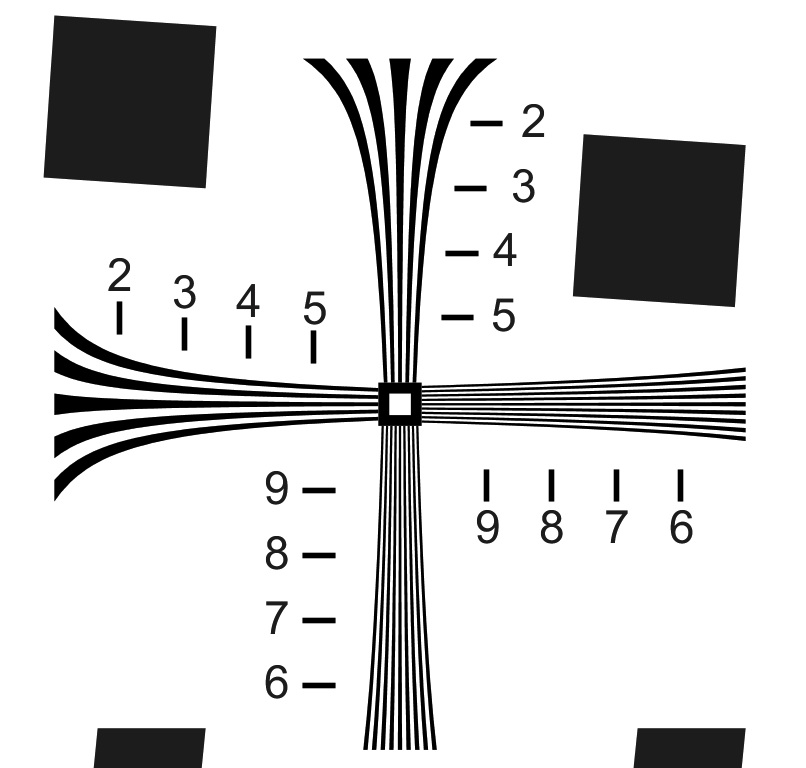
High-quality ISO 12233 charts can be pricey. A good quality, 40″ wide ISO 12233 chart costs about $250. A top quality (photo paper) 60″ chart like we use in our test lab is about $700. But you can download a free version of the chart courtesy of Stephen Westin, enlarge it, clean it up in Photoshop, and print it yourself. It isn’t quite as sensitive as a professional quality chart, but it is good enough.
One thing you will want, though, is a thick black border, perfectly square, around the edge of the test chart. I’ll show you why later. If you’re printing your own, just add a rectangular border in Photoshop. If you’re buying one, it will almost certainly come with a border.
You’ll also want the biggest chart you can get. You need the chart to fill the photo frame completely when testing, so using a small chart to test a wide angle lens gets too close to minimum focusing distance for accuracy. I recommend testing at least twice the minimum focusing distance, and further away is even better.
There is one other test chart we find exceedingly useful, the Zeiss version of Siemens Star Chart, which you can buy for under $30. (Or download and print courtesy of John Williams, who has posted a pdf on Wikipedia Commons.) We only use the very center part: the black dot, surrounding white circle, and a bit of the surrounding star.

In order to keep things simple, we cut the center 2″ out of the Star chart and glue it over the existing center of an ISO 12233 chart. Sometimes we’ll add stars in the corner, too, just outside the vertical/horizontal line cross.
Lighting
Lighting isn’t critical for this kind of testing; you simply want to light the chart with reasonably bright continuous light. It doesn’t have to be extremely bright. Too much light can actually be a problem. We do a lot of this testing in live view mode and too much light will cause the camera to close down the aperture. Try your ambient room lighting before you set anything else up; it will probably be fine.
Industrial quality fluorescent fixtures will cause the usual banding problems and should be avoided if possible. If your testing area has standard fluorescent fixtures (like ours does) then you’ll need some additional lights to overwhelm the room lighting. In this case a couple of incandescent or photo-quality fluorescent softboxes are inexpensive and perfectly adequate.
A Monitor
The goal here is simply to be able to see the camera’s live view output on a decent sized, good quality monitor. For most cameras we simply run an HDMI cable from the camera’s HDMI out port to a freestanding monitor. No computer necessary. We prefer a large monitor for the comfortable working distance, but that’s just a preference, not a necessity. You could use a laptop or tablet with a high-resolution monitor, or a video monitor if you have those handy.
The HDMI output isn’t going to have resolution as high as an actual photographic image, but it’s good enough for this testing. We always confirm with an actual photographic image, of course, just to be certain. But it’s really rare that the photo shows something we missed in live view.
If your camera doesn’t have video output, or you don’t have a monitor around, there are lots of workarounds. Any tethered shooting setup will give you the same capabilities and can be run to a laptop or tablet. Built-in camera Wi-Fi or a Wi-Fi card may do the same thing, as long as it gives you live-view focusing capabilities. If your camera just isn’t capable of putting out live view to a monitor, you can try doing this using a series of photographs, but you lose a lot of information and it’s much, much slower.
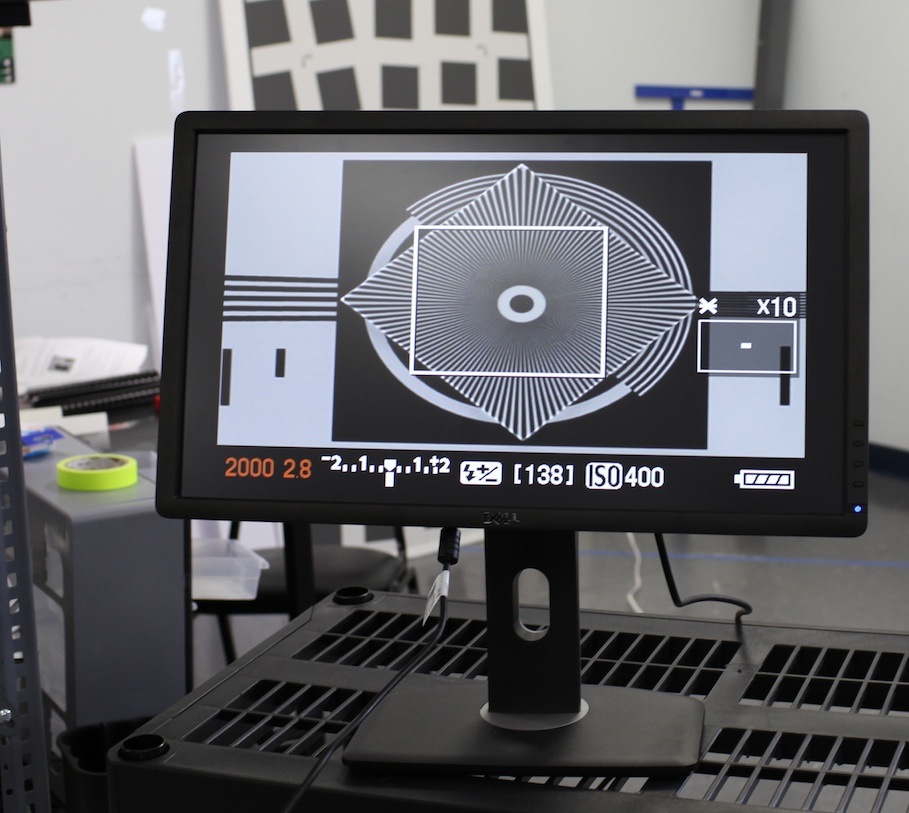
Here’s a picture of one of our ‘portable’ setups, like the one I’ll bring to WPPI. (The chart is mounted in a non-portable light housing that we use for multiple purposes. We need the lighting to wash out the industrial fluorescent lighting in our building, but you probably won’t). Chart, camera on tripod, and HDMI monitor are all that is necessary.
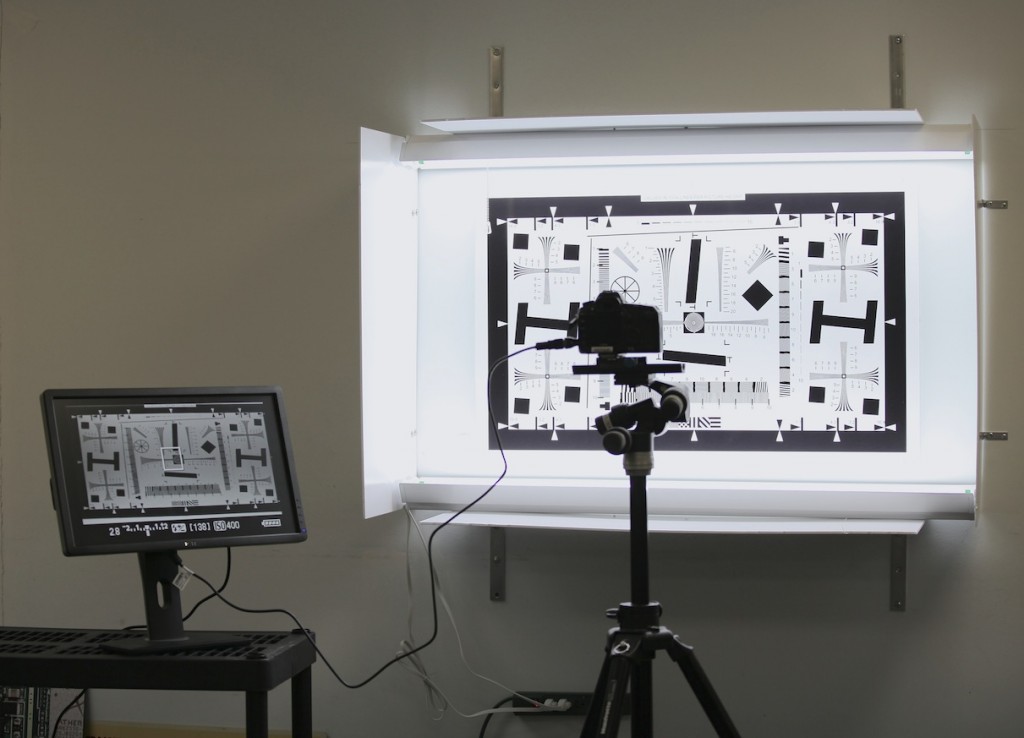
Someone will ask if they can do this simply using the camera’s LCD. Yes, you can. But it will take a lot more time, be more prone to error, and you’ll go blind after a while.
Setting Up
Setting up square to the monitor is the final step, and it’s actually pretty quick to do. The first step is centering the camera.
1. Place the tripod and camera close to the test target, raise the camera so it’s the exact height as the center of the target and lock the column (or legs) in place.
2. Gaffer tape or draw a line on the floor at right angles from the center of the test target. Now as long as your tripod is centered over your line, your lens will be centered on the test target.
The second step is eliminating any tilt and rotation of the camera, which is also simple.
1. Center the tripod over the line you made at right angles to the test chart, at the spot where the test target fills the image on the monitor. (You should just see the black edges around the chart.)
2. Tilt the camera right or left, up or down so that the rectangle is squared. If the camera is tilted the rectangle will look like a trapezoid. (Obviously if the lens has pincushion or barrel distortion it won’t quite be a rectangle, but you get the idea).
3. Rotate the camera clockwise or counterclockwise so the top and bottom lines are perfectly horizontal
If you want to double check your final setup take a picture, download it in Photoshop and measure the length of opposite lines (they’ll be equal if the image is square) and their angle. A degree or two of tilt and rotation is fine for this work (unlike Imatest, where 0.5 degrees is critical).
If you look back at the image above you can clearly see from the picture on the monitor that we haven’t squared things yet (look at the white band outside the top and bottom of the test chart’s black box). The camera will need a couple of degrees of clockwise rotation and a bit of turning. We’re using a geared head here, but a ballhead or pan-tilt head works just fine.
Basic Testing
I’ll give a lot more examples of testing in the third part of this series, but the basics are quite simple. The first point is that we test with the aperture wide open. Even a badly decentered lens may look reasonably good when stopped down.
For this reason you don’t want too much light on the target when testing in live-view mode: the camera will stop the lens down and override your aperture setting, making the lens look better than it really is when looking at it live. Then when you take a photograph of your test image, you’ll wonder why it looks so much worse. (If you have a question if this is happening, just walk around to the front of your setup and look into the lens barrel. You’ll be able to see if the aperture is stopping down.)
Focusing and the Center Star Chart
The star chart in the center of the test target makes it very easy to focus in live view, but first examine the pattern of the chart just out of focus at maximum magnification. On a well aligned lens the star should blur into a fuzzy oval like three of the images below do. A badly decentered lens will blur with a flare going in one direction or another, like the image on the lower left below.
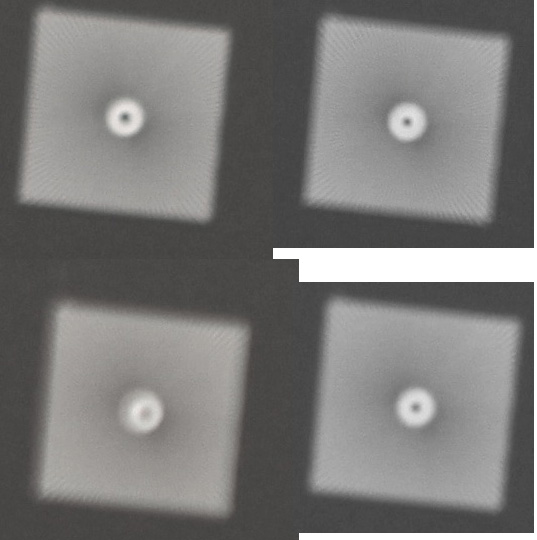
If you look carefully, you’ll notice the image on the upper left has just a bit of flare going upward, toward 12 o’clock. This amount of flare can occur on some normal lenses, but the amount on the lower left is never normal.
When you get the star sharply focused, the pattern should be circular, like the image below. In some decentered lenses the gray circle, where the individual star lines blur together will be oval. In other types of decentering, you may notice the more vertical stars are much sharper than the horizontal stars, or vice-versa.
I suggest taking a photograph with the center both in and slightly out of focus. Once in a while, examining the photograph will show an abnormality of the star pattern or a flare that wasn’t obvious in live view.
Checking the Corners
Once the lens is perfectly focused in the center, it’s time to examine the corners. If you have a really good, large monitor and a camera that outputs good live view images you can get a pretty good idea about the corners looking at the entire image in unmagnified view. Most of the time, though, you’ll be much happier doing this at 5X magnification and moving the cursor around the screen to look at the corners individually.
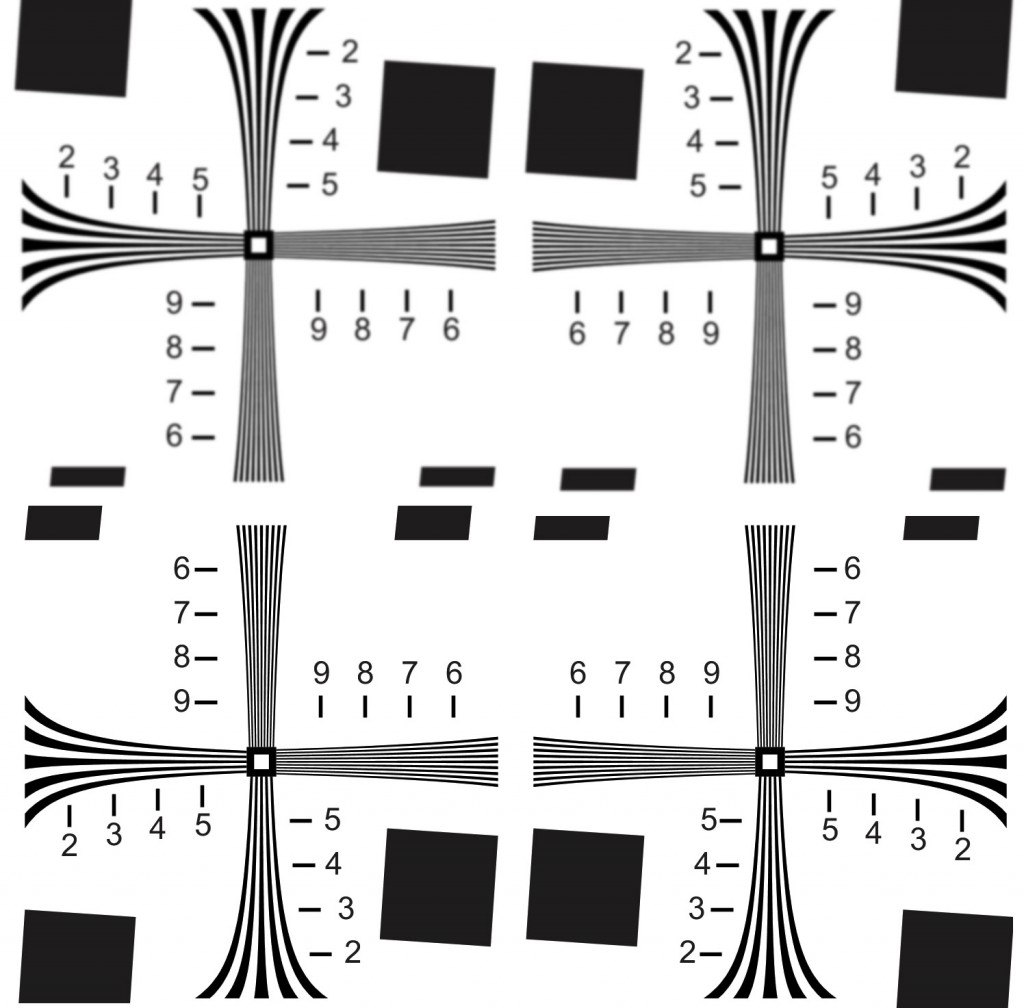
The idea is NOT trying to measure how well the lines resolve, especially in live view. It’s whether the lines all appear equally sharp in each corner. If all four corners look like the close-up of the ISO chart I posted above, you’ve got a great lens. No further testing is needed, go take pictures. It probably won’t, though. So let’s talk a bit about what you’re more likely to see.
Normal Field Curvature
Most lenses have some field curvature, so the corners aren’t at their sharpest when the center is in best focus. When you examine them, the corners all look a bit soft, but equally so. The second step is to zoom in on one corner and manually focus the lens to bring the corner into best focus. If you look at how far you have to turn the focus ring to get the corner in best sharpness you’ve learned something about the lenses field curvature: was the corner in best focus closer than the center, or further away? And by how much? That can be useful to know when you’re out taking pictures later.
Once any corner is in sharpest focus, move the cursor around to check the other three corners and see if they are all equally sharp again. Field curvature, which is a normal part of lens design, means the corners will have a different focus point than the center. But since our alignment is square and centered to the chart, the 4 corners should all focus at the same point. As long as they do, this part of the test is normal.
Abnormal Field Curvature (Tilt)
If some corners have sharpest focus at a different place than others, that’s not field curvature, it’s tilt. Until now I’ve been using the generic term ‘decentered’ for any lens that is optically out of sorts. In reality, there are three types of misalignment: decentering, tilt, and spacing errors. If you’re interested in the difference, I describe them here. A badly aligned lens often has more than one problem and the symptoms overlap somewhat, but we can make some generalizations.
A mildly tilted element often causes two corners to be different than the other two corners. (It can be side-to-side, top-to-bottom, or opposite corners.)
- A lens with mild tilt. Even at 25% of actual size, the top corners are obviously softer than the bottom. In some cases, changing focus slightly you could make the top sharp, but the bottom soft. Most of the time that is not the case; even at best focus the top remains softer. Either case is abnormal. The center of the lens usually remains quite sharp in this situation.
How do we tell this is simply tilt, rather than another form of decentering? With tilt, changing focus often makes the top two corners sharp, but the bottom corners will get fuzzy (or left and right, etc). With other problems, the top two corners usually never get sharp, they always remain softer than the bottom corners. But that’s a generalization that isn’t always true and really doesn’t matter unless you’re optically adjusting lenses.
More Fun with Corners
A mildly decentered lens may only have one bad corner rather than two like the example above. In that case center resolution is always still excellent, although on an optical bench or in an Imatest lab you might notice the sharpest point of the lens has moved slightly off center, away from the bad corner.
In other cases the problem affects only the horizontal or vertical line pairs, like the image below. It is subtler than the example above, but it’s still significant enough to cause a loss of sharpness on that side of a photograph.
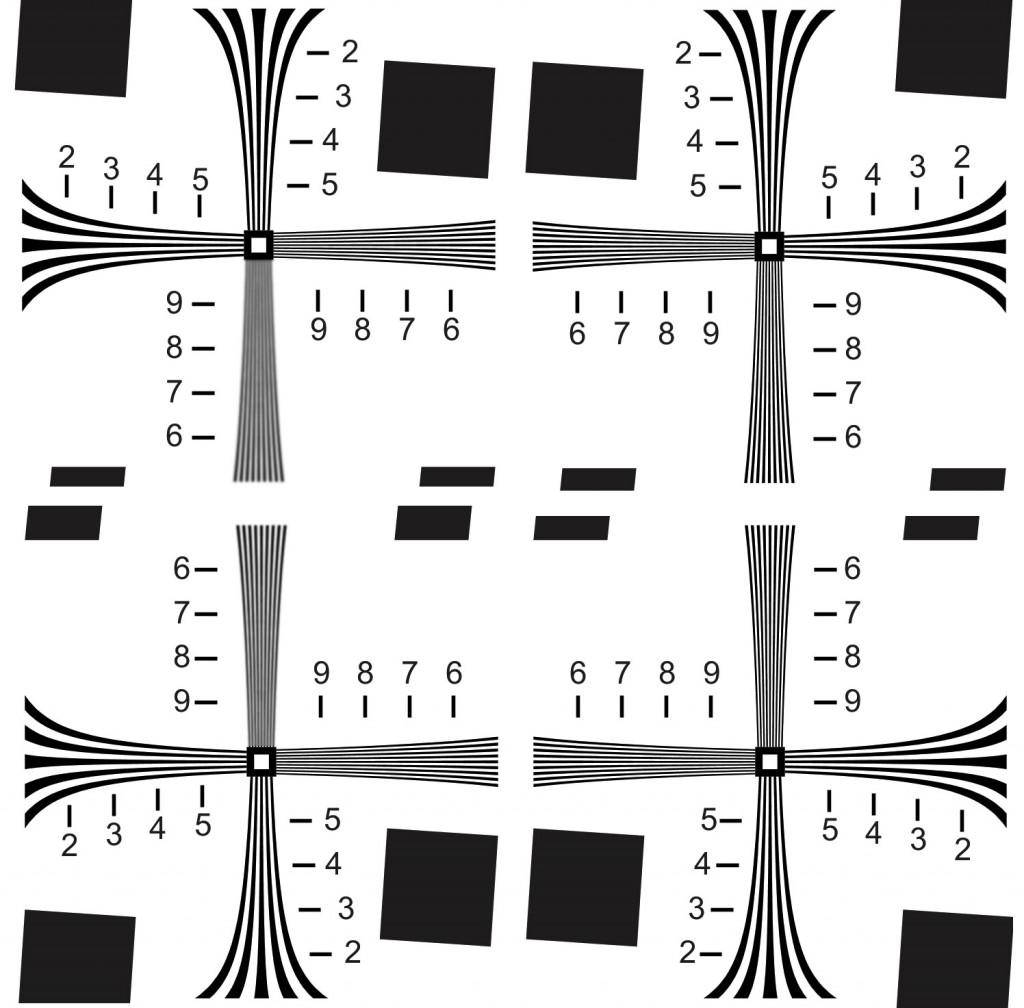
- A less severe problem may only affect either horizontal or vertical bars. In this image the left side vertical lines are softer than the right, but the horizontal lines are equal in all 4 corners. This lens would not be as bad as the one above, but you’d notice the difference in some images.
One other interesting finding that we sometimes see in this situation: by slightly changing focus you may be able to make either the horizontal or vertical lines sharp, but not both at the same time in the affected area. There are some lenses that will show this astigmatism-like behavior in all 4 corners. That’s just the way that particular lens is designed. But if only 1 or 2 corners show it, the lens has issues.
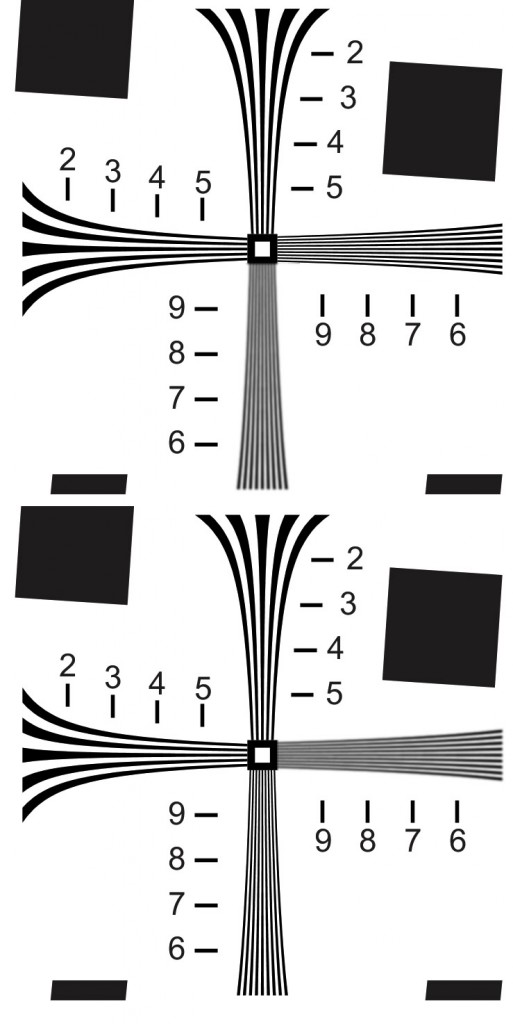
- Changing focus slightly may change the blur from the vertical to the horizontal lines.
When All 4 Corners Look Bad
A badly tilted element, especially if near the rear of the lens, can make the entire image soft, even in the center. Spacing errors, and significant decentering of an element can have the same effect. Sometimes a decentered element leaves the center of the lens quite sharp, but all 4 corners very soft.
The question becomes how do you tell if a lens has a significant optical abnormality, or it’s just a bad design that is soft no matter what copy you have? Usually when this happens, the lens is so bad you don’t need any kind of testing to see the problem. There are halos, you can’t identify anything in the image, the camera won’t even autofocus with the lens, etc.
It’s rare, but there are cases where all 4 corners are bad, or the entire lens is somewhat softer than it should be, but not so bad as to be immediately obvious. A little common sense helps in this situation. You should expect 10X consumer grade zoom to be rather soft at the long end. An f/1.2 lens is probably going to have slightly soft corners at widest aperture. Even good telephoto zooms often have soft corners at the extreme telephoto end.
There are several things that help identify the ‘optically bad copy’ from ‘badly designed lens’ in this situation. First and foremost is the center star target. A lens decentered this badly will almost always have a significant flare, like we demonstrated above, when just slightly off focus. Some will even show flare at their best focus. If you examine the corners carefully they may all be soft, but one is usually quite a bit better than the others, and one quite a bit worse. Examining the thick black boxes will often show chromatic aberration at the edges and it will be of odd pattern: It might be away from center on one side and toward center at the other, etc.
If you’re still not certain, retest the lens with the aperture closed down 1 stop. Obviously all lenses will be a bit sharper stopped down. But with an optically decentered lens you’ll usually see some corners get much sharper stopped down than others, and the pattern will look like the ones we’ve described above.
I want to emphasize that this ‘all over’ or ‘all corners’ softer decentering is really rare. Out of every 100 decentered lenses, we find 2 or 3 of them have this kind of pattern.
Limitations
Zoom lenses have to be checked at 2 or 3 spots. Most optically challenged zooms are bad throughout the range, but there are definitely some that only have a problem at the long or short end. Obviously you have to move the tripod to reframe the image at a different zoom range and realign the camera, but that shouldn’t take more than a few minutes.
Because of the limitations of chart size, testing at a given focal length is only done at one focusing distance. There are lenses, although they are rare, that have problems at certain focusing distances but not others and this test might miss that problem. But optical benches and Imatest have the same limitation; they only test at certain distances. You can overcome that to some degree by making charts of different sizes, but that’s a lot of trouble to go to for something you’ll probably never see.
One thing I should note: this test may over read a bit, particularly on wide-angle zoom lenses and large aperture, wide-angle prime lenses. Most of these have a little bit of flare in the center even when perfectly adjusted and all 4 corners will rarely be completely identical, although they should be close. If you look carefully enough, for example, you’ll see slightly softer horizontal or vertical lines in almost every copy of a 16-35 f/2.8 zoom or a 35mm f/1.4 prime shot wide open.
That’s one reason I suggest this testing setup for a camera club. If a friend brings another copy of the lens, you’ll feel a lot better comparing yours to his when you have a question, and you should be able to do that in 10 minutes.
Summary
A lens that’s optically awful, bad enough to affect sharpness everywhere, will generally show a lot of flare of the Siemens Star in the center when slightly defocused. All four corners may be blurry, but some corners will be worse than others, or the horizontal and vertical resolution will be different.
Less severely decentered lenses may look fine in the center and may, or may not, exhibit center flare. They will show differences in the corners that are readily apparent, however. If a lens has no flare in the center and the corners of the ISO 12233 chart all look identical, it’s optically fine.
We’ve been testing exactly this way for several years, identifying 60 to 70 lenses a month as decentered. We retest all of those on an optical bench and rarely find one that was actually OK. In other words, the test is nearly 100% specific. If it says a lens is decentered, it’s almost certainly decentered.
We also run QA checks using Imatest or the optical bench on lenses that have passed this optical testing. When we recheck these lenses, we do find that about 0.5% of are actually decentered. However, if we repeat this optical chart test on those same lenses, they almost always fail the repeat test. In other words human error, not the test itself, let the bad lenses pass.
There are lots of other ways to test lenses, of course. But we’ve tried most of them and this is by far the most accurate in our experience, short of setting up an Imatest lab. And testing 8,000 to 9,000 lenses a month, experience is one thing we have a lot of.
The next article will be a few days in the making, but we’ll have a lot more examples of problem lenses, and will probably do a simple optical adjustment using nothing but this test system.
Roger Cicala
Lensrentals.com
February, 2012
Addendum:
If you read this post and thought, “Yeah, I know that,” Midwest Camera Repair is looking for an experienced Lens and D-SLR tech, mainly to service Nikon Lenses; knowledge of Canon lens would be helpful but not required. Someone who has experience servicing high-end lens would be best. Most of our repairs are middle to high-end equipment to Professional customers. We will train on use of Nikon & Canon test and adjustment equipment. Our Nikon lens volume has more then doubled in the last year. Knowledge of D-SLR repair would also be helpful.
Midwest is a Nikon Authorized Service Center and one of only four authorized, trained and equipped to service the VR-Series lens. They are also authorized on Canon IS-Series lenses.
Send confidential resume to repairs@midwestcamera.com
Author: Roger Cicala
I’m Roger and I am the founder of Lensrentals.com. Hailed as one of the optic nerds here, I enjoy shooting collimated light through 30X microscope objectives in my spare time. When I do take real pictures I like using something different: a Medium format, or Pentax K1, or a Sony RX1R.
-
Sean
-
David S. Pyle
-
Max
-
John Leslie
-
Peter Figen
