I’m a lighting guy. Ask any of the higher-ups here at Lensrentals.com, and they can confirm that I’m always pressuring them to get more lighting options available for rent (with varying degrees of success). For me, I was taught that photography translates to the capturing of light on film (or in modern cases, a digital sensor). So while your camera’s capabilities, your lens options, and what grip gear you have available will all be components of the images you capture, nothing matters more than the light you see.
So being light obsessed, it makes sense that I use strobes in most of the work I do. Don’t get me wrong; I love natural light; after all, a strobes goal, beyond anything else, is to mimic the qualities from the sun. But using natural light, you don’t get the control you can with strobes, so I’m often using strobes in a studio, as well as using them outdoors to supplement the light from the sun.
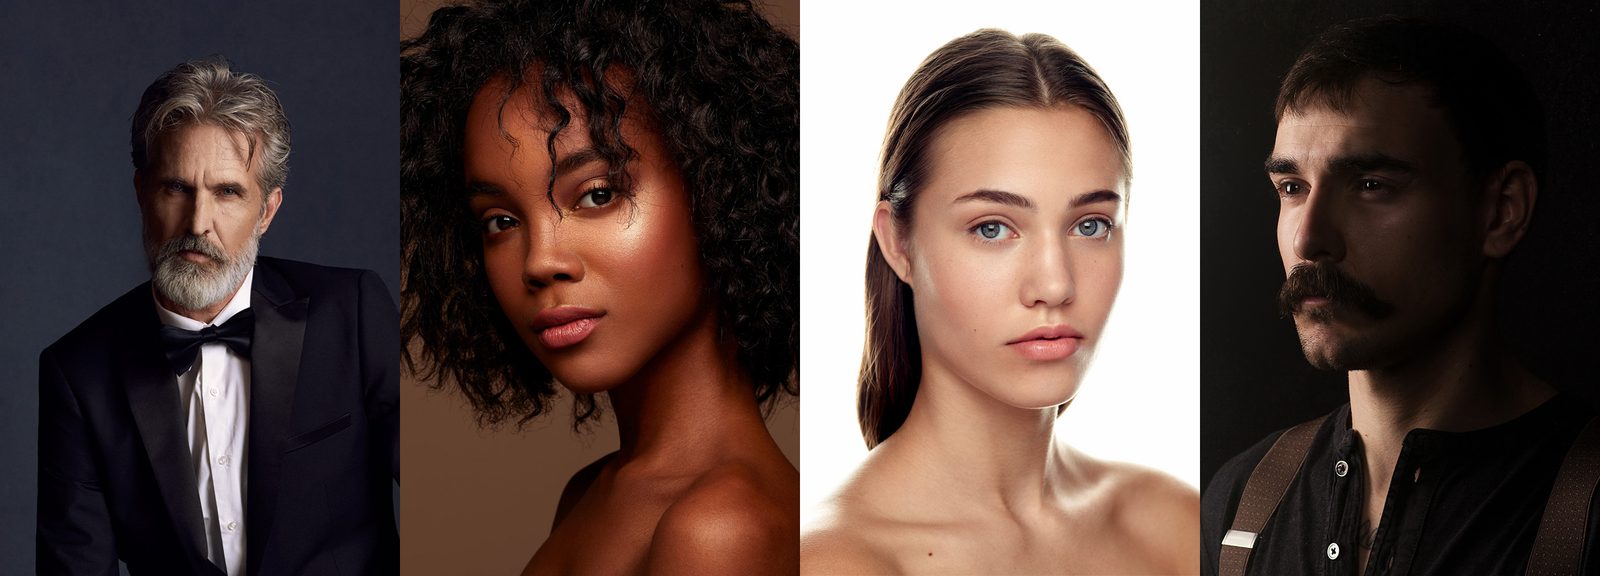
And while not every lighting technique works for every subject, I have found a few looks in my arsenal that tend to work well with many different subjects. And for those who are looking to get a jump start into lighting, I figured I’d put together a post highlighting some of the lighting techniques I’ve found to work well over the years and share them with you. So with that said, let’s look at these four lighting techniques to try on your next portrait session.
The Flood of Soft Light
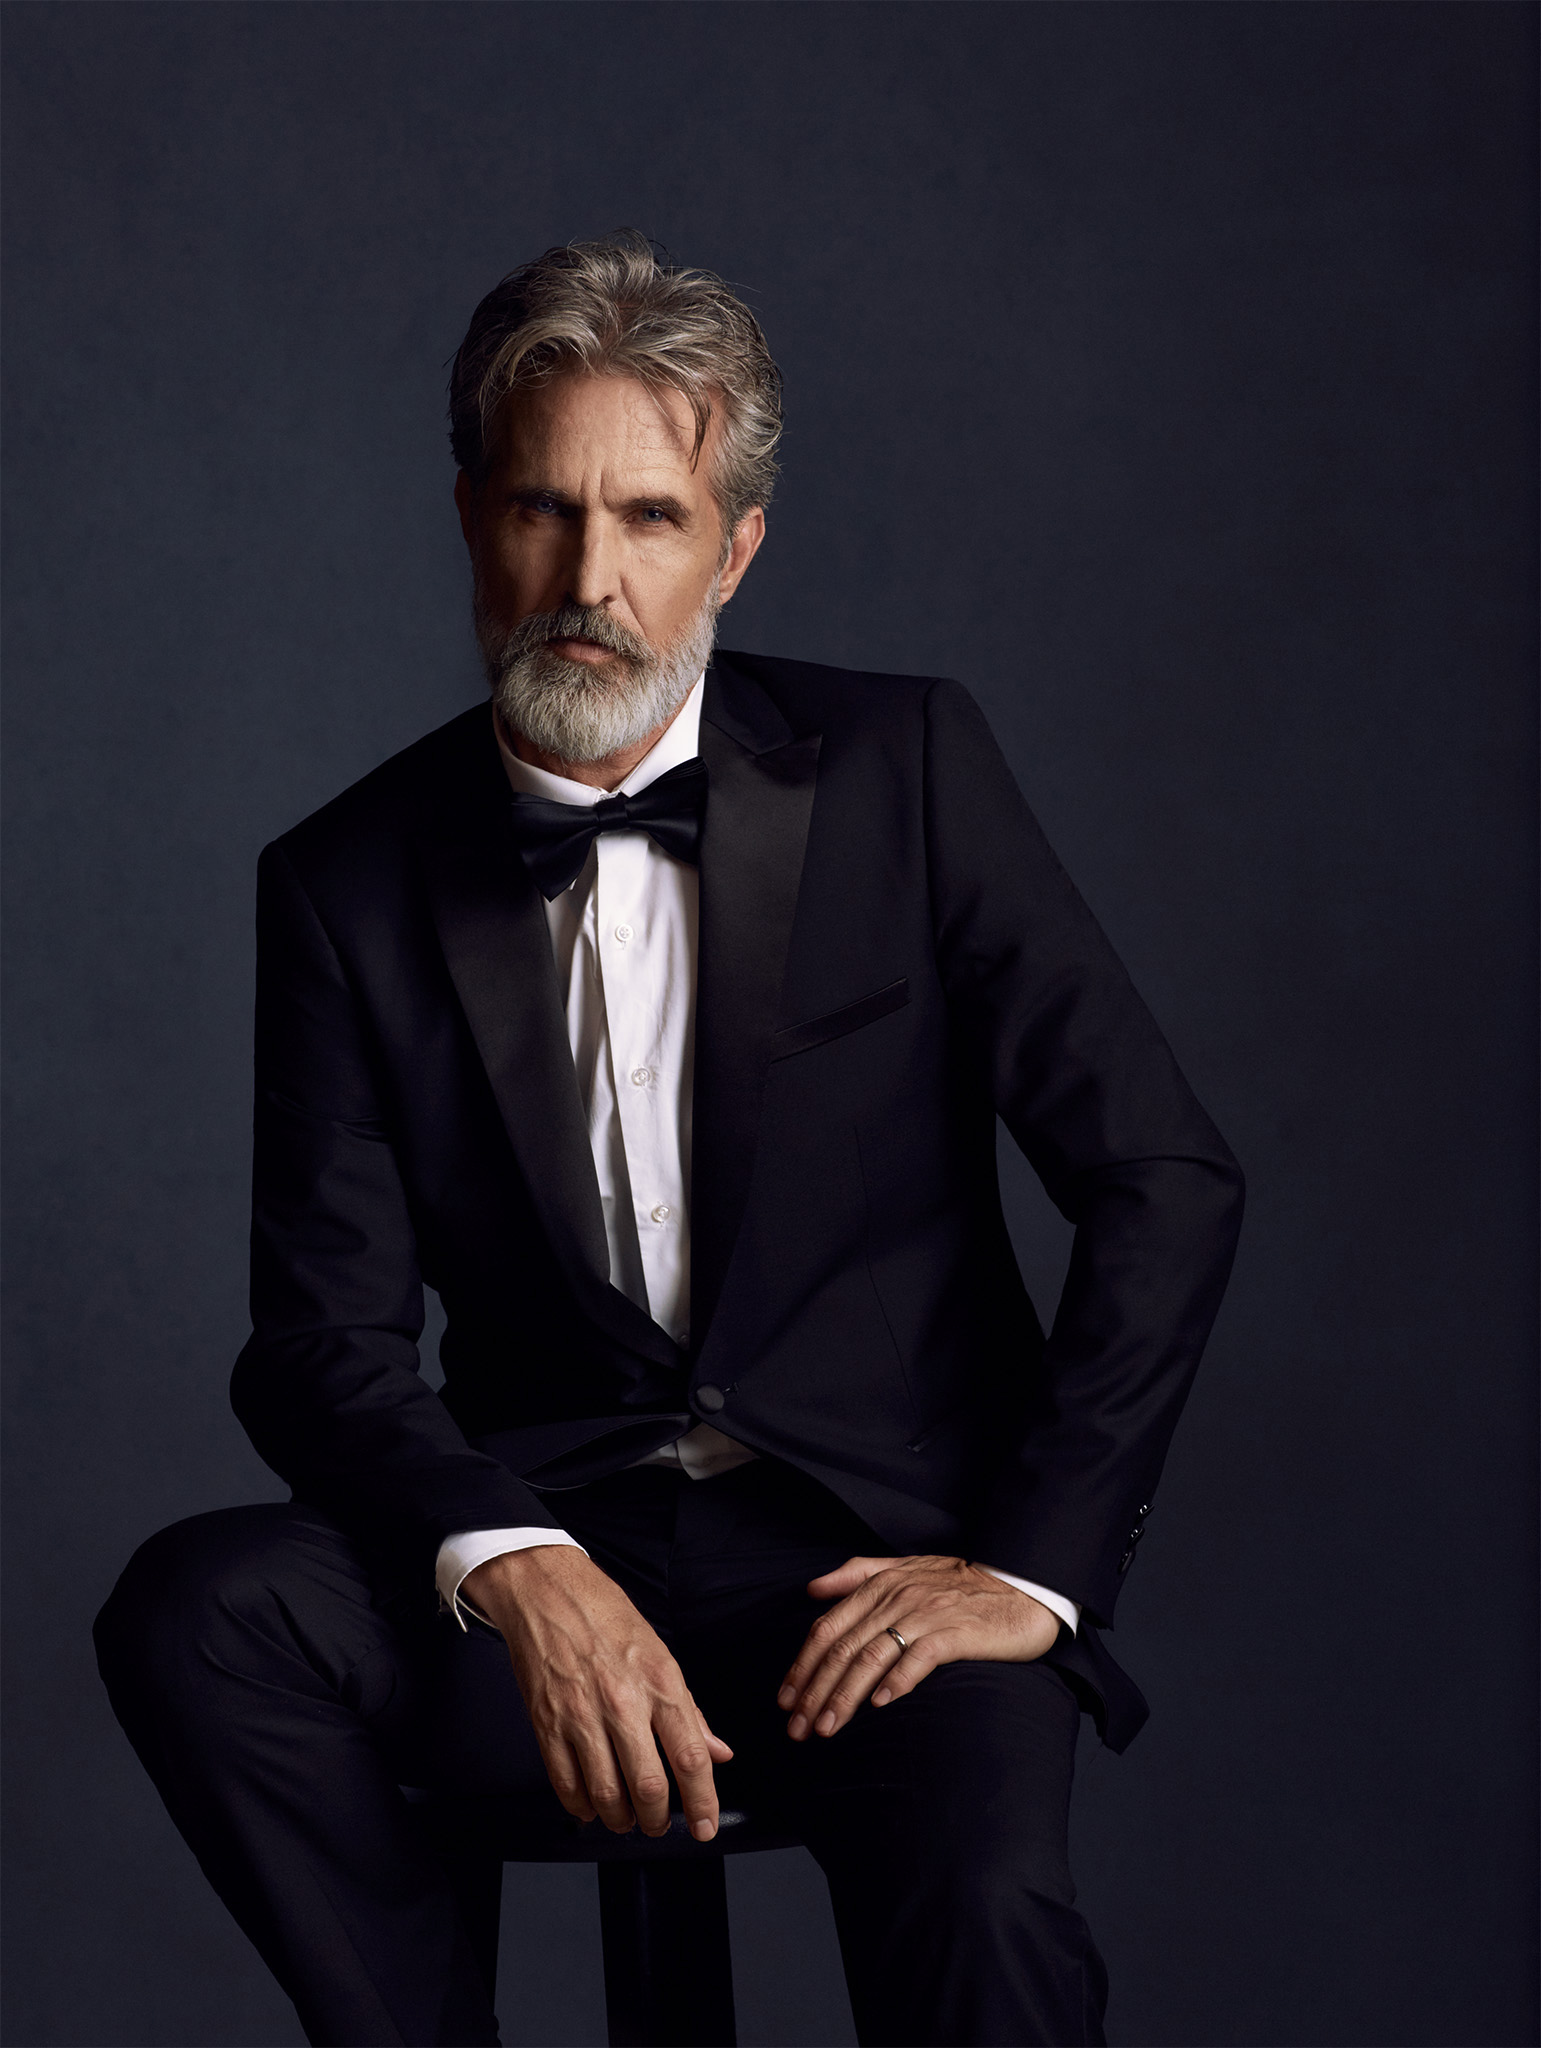
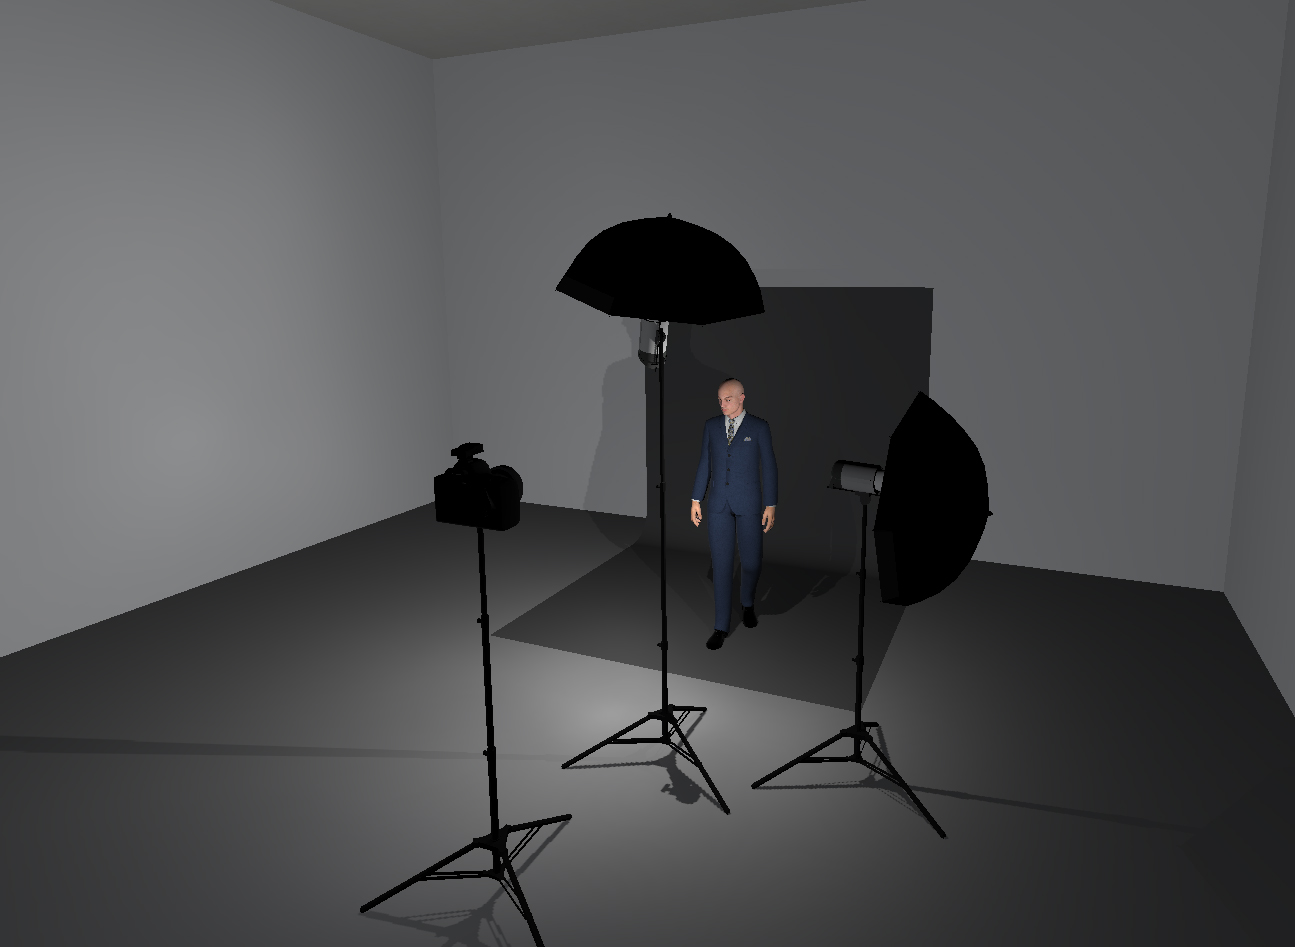
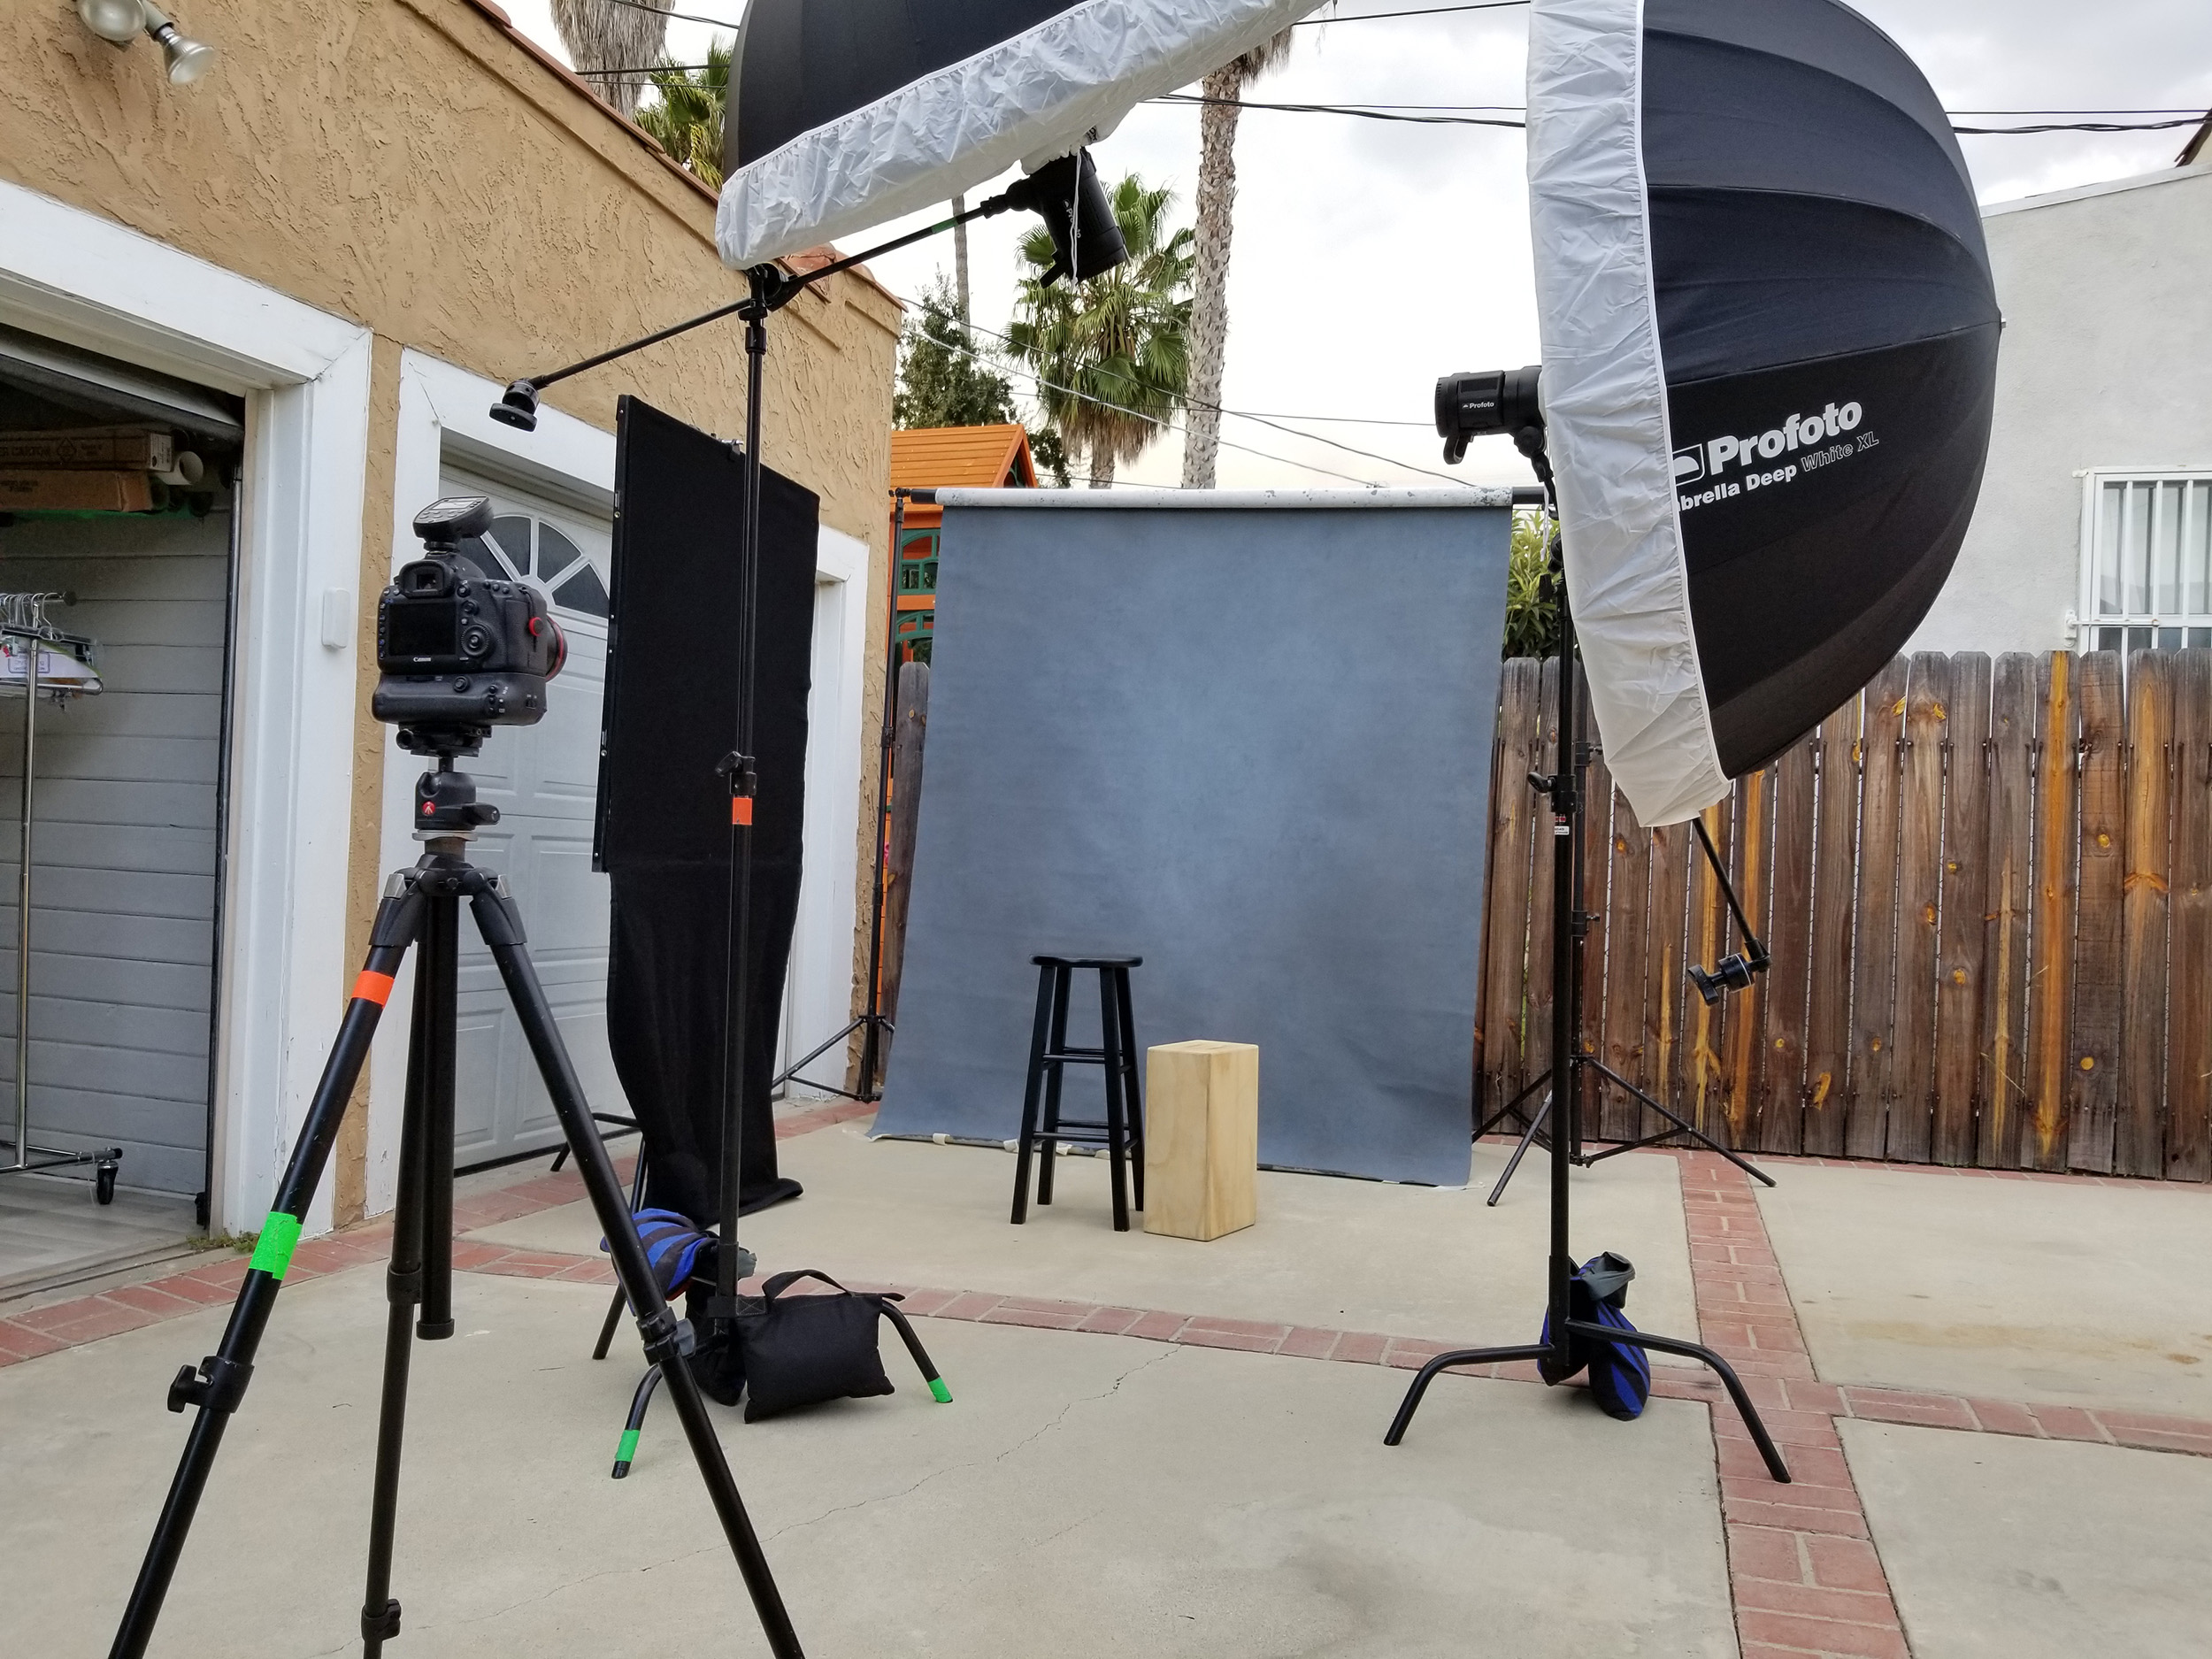
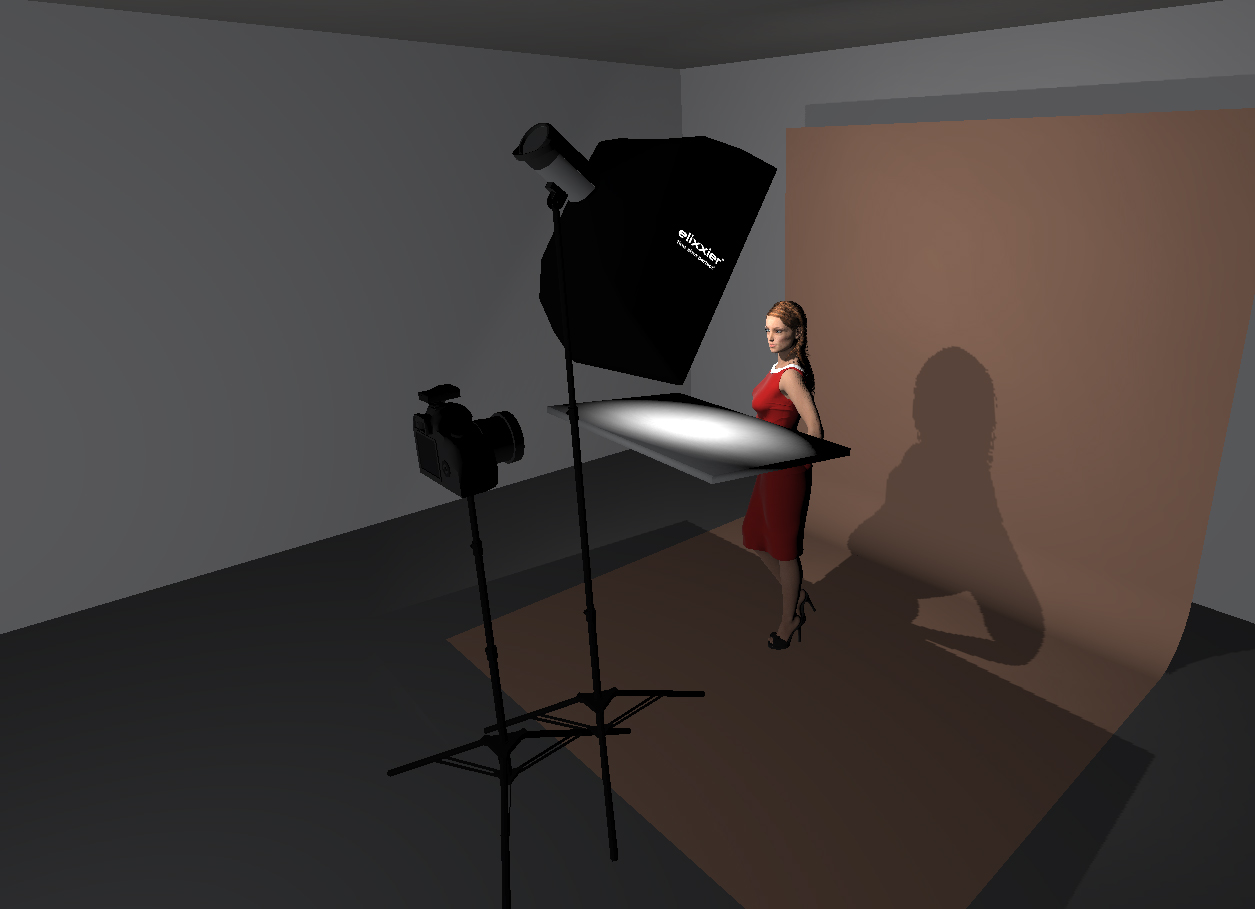
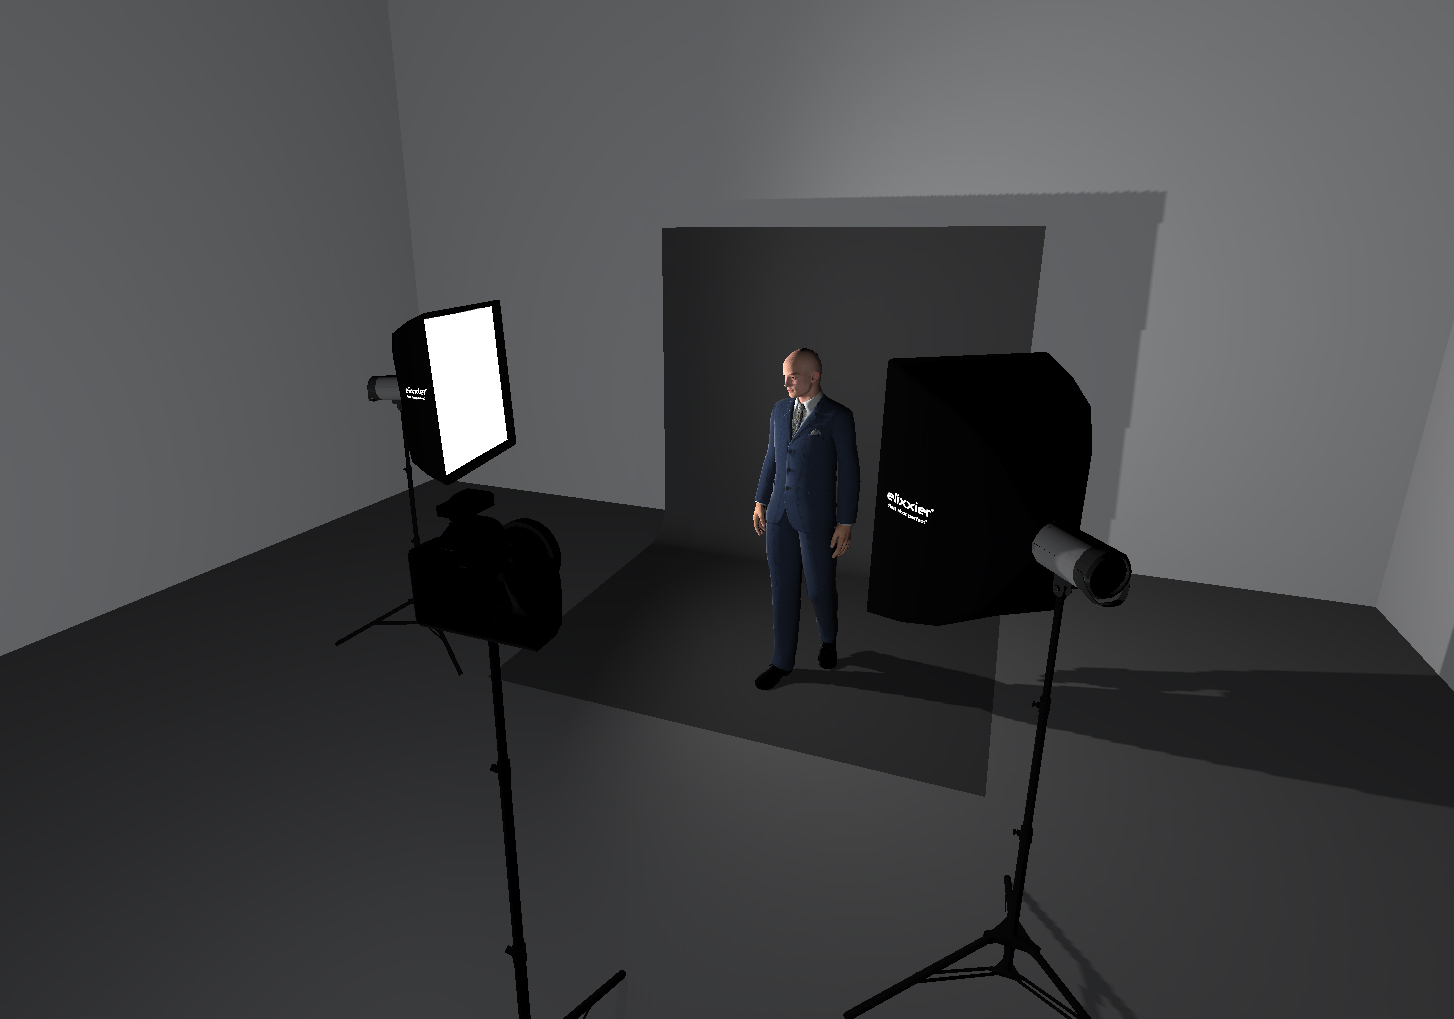
I’ll start with what I like to call “The Flood of Soft Light” because not only does it look incredible for both male and female subjects, but it’s one of the most cost-effective ways of lighting someone. However, though cost-effective, it does have its own set of complications when it comes to space. The setup is simple, and just involved finding two of the largest lighting modifiers you can – I usually opt for large umbrellas, because they’re cheap. From there, I often set up the lights, so they’re at least a foot in front of the subject, and so that you’re using the edge of the light to better feather it on your subject (I’ll have a piece all about feathering light in another lesson, but think of it as just using the edge of the light to get more control and softer light). And when it comes to feathering, I don’t usually have the light pointing at my subject, but off-axis with them, so they’re only getting the edge of the lighting. A lighting diagram is below, along with a BTS shot from a recent shoot I did with a friend of mine.
By using the falloff edges of the lighting modifiers, I’m able to get incredibly soft lighting, while still getting a subtle gradient of light on my subjects. The result is a nice lighting style that works for a broad range of subjects, and really mimics the “Annie Leibowitz” style that is found in magazines with high production value.
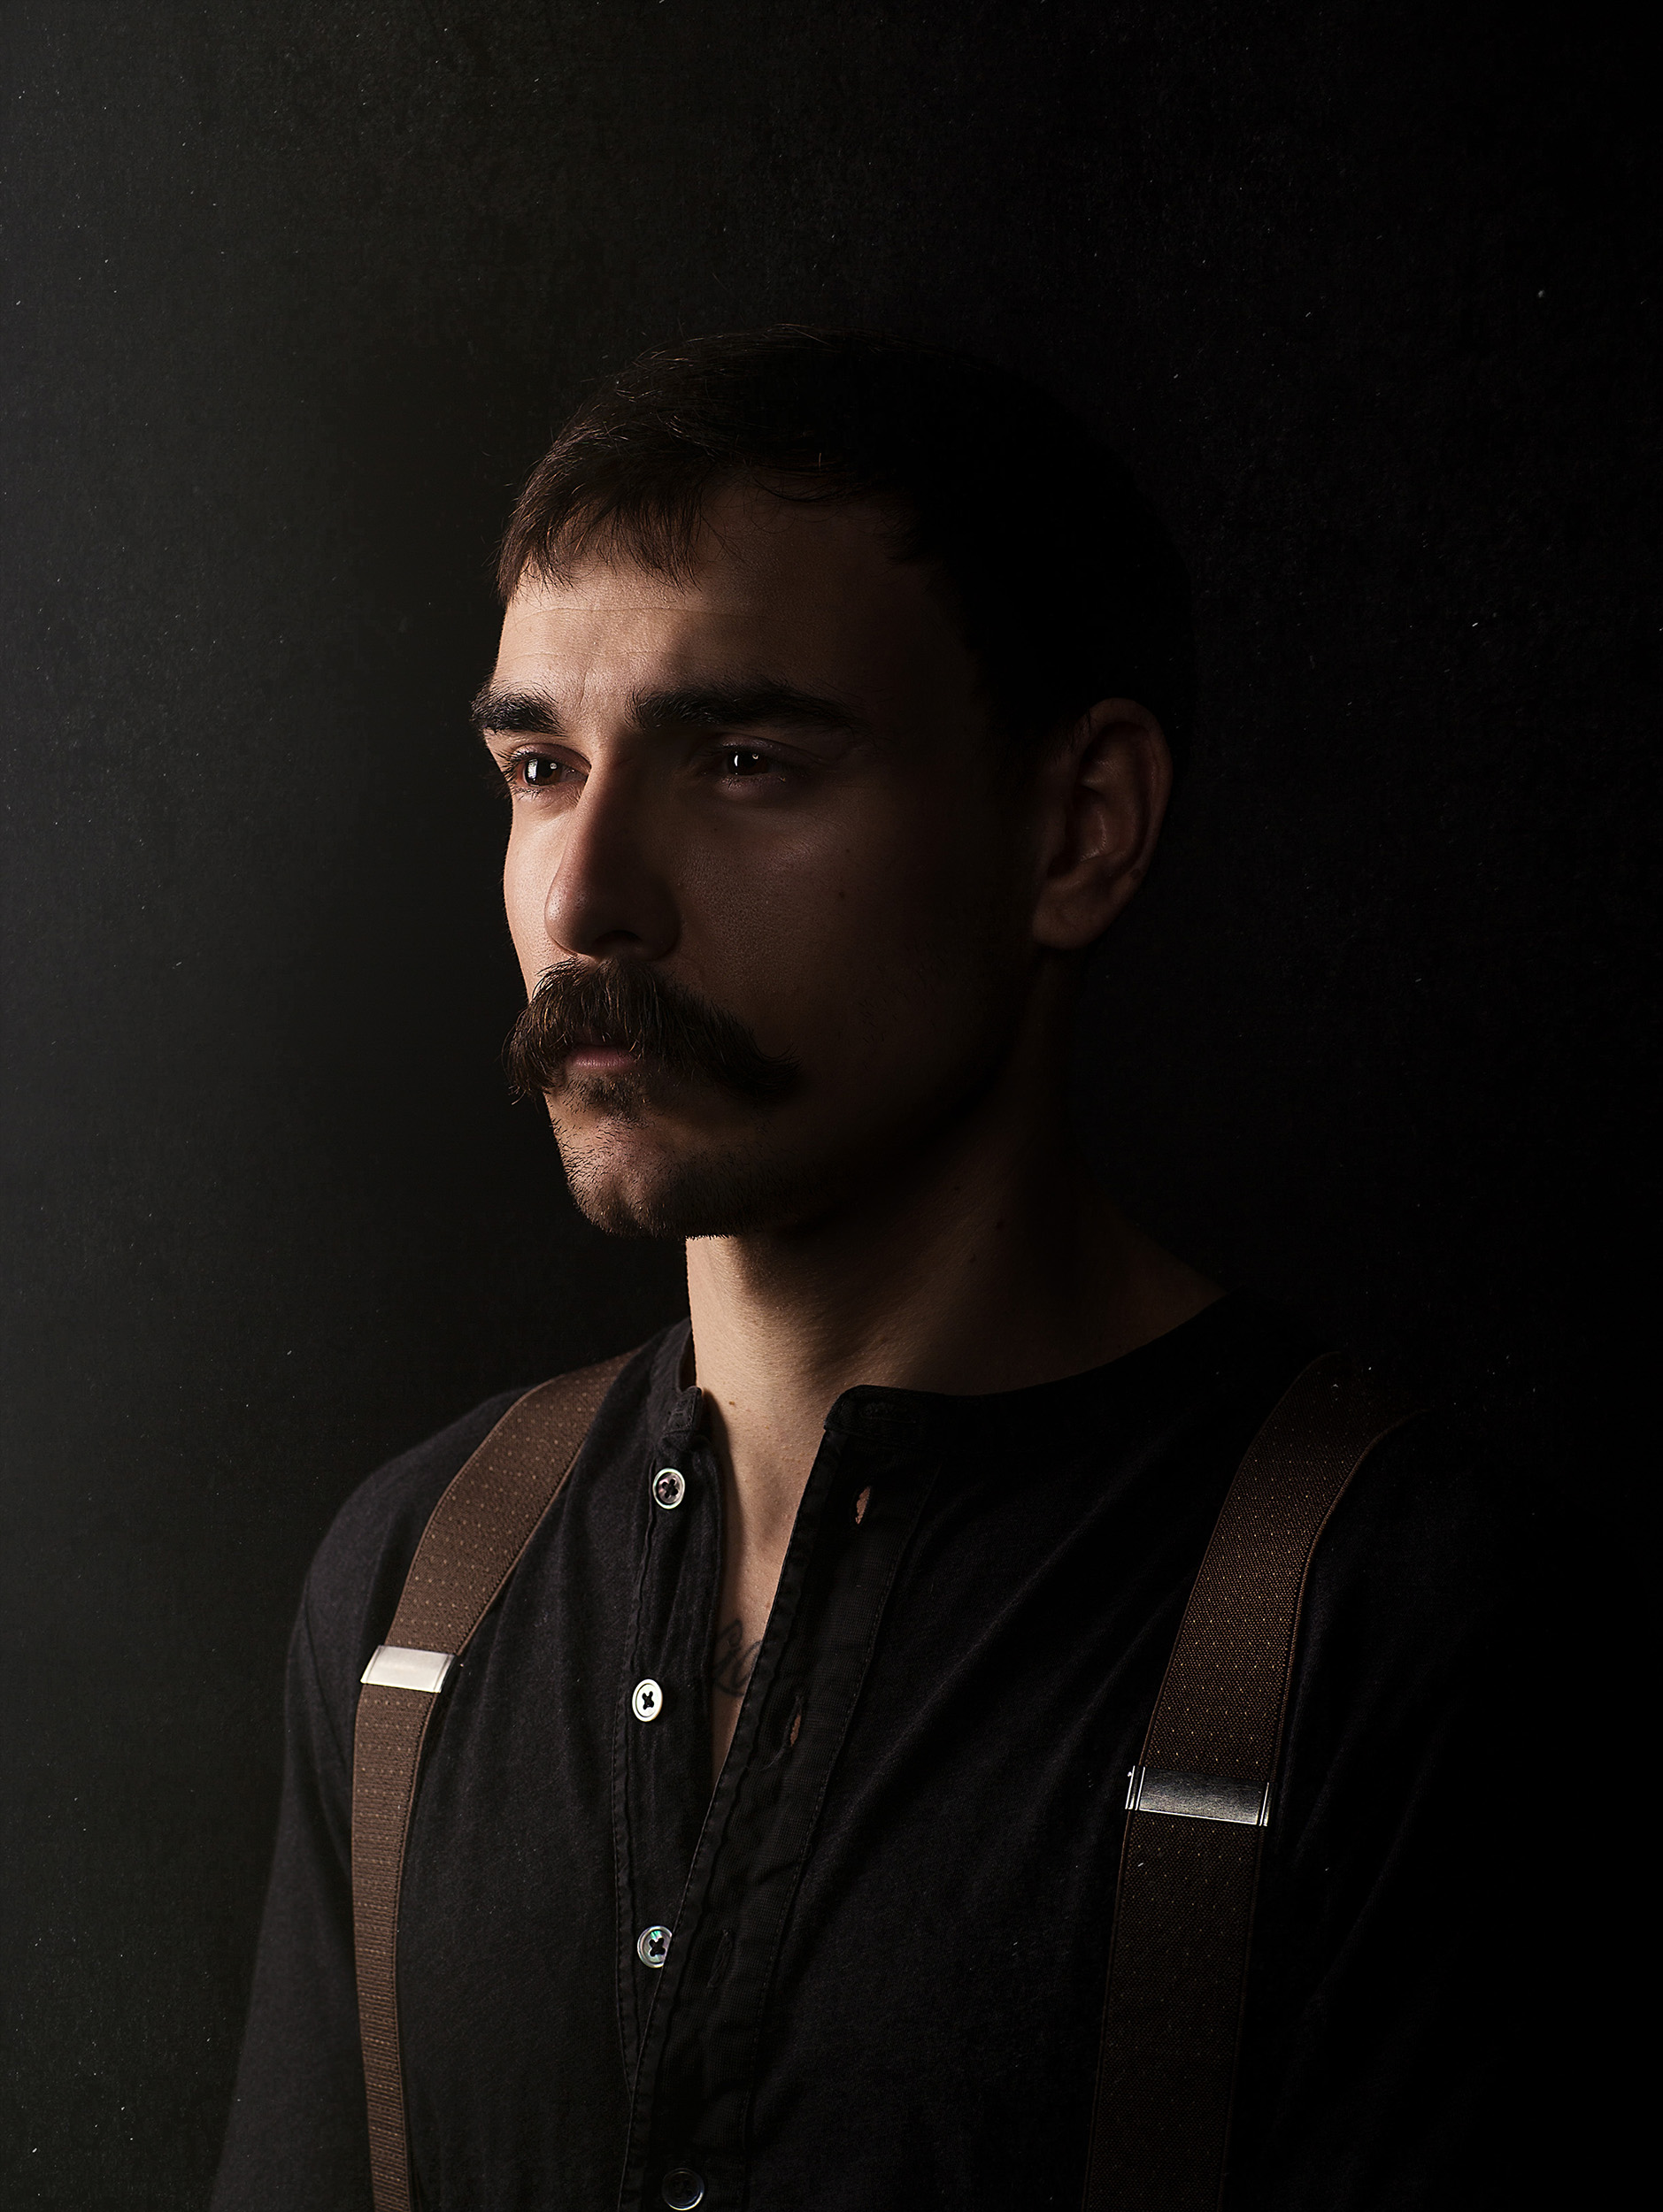
Your Standard (and Under Appreciated) Butterfly Lighting
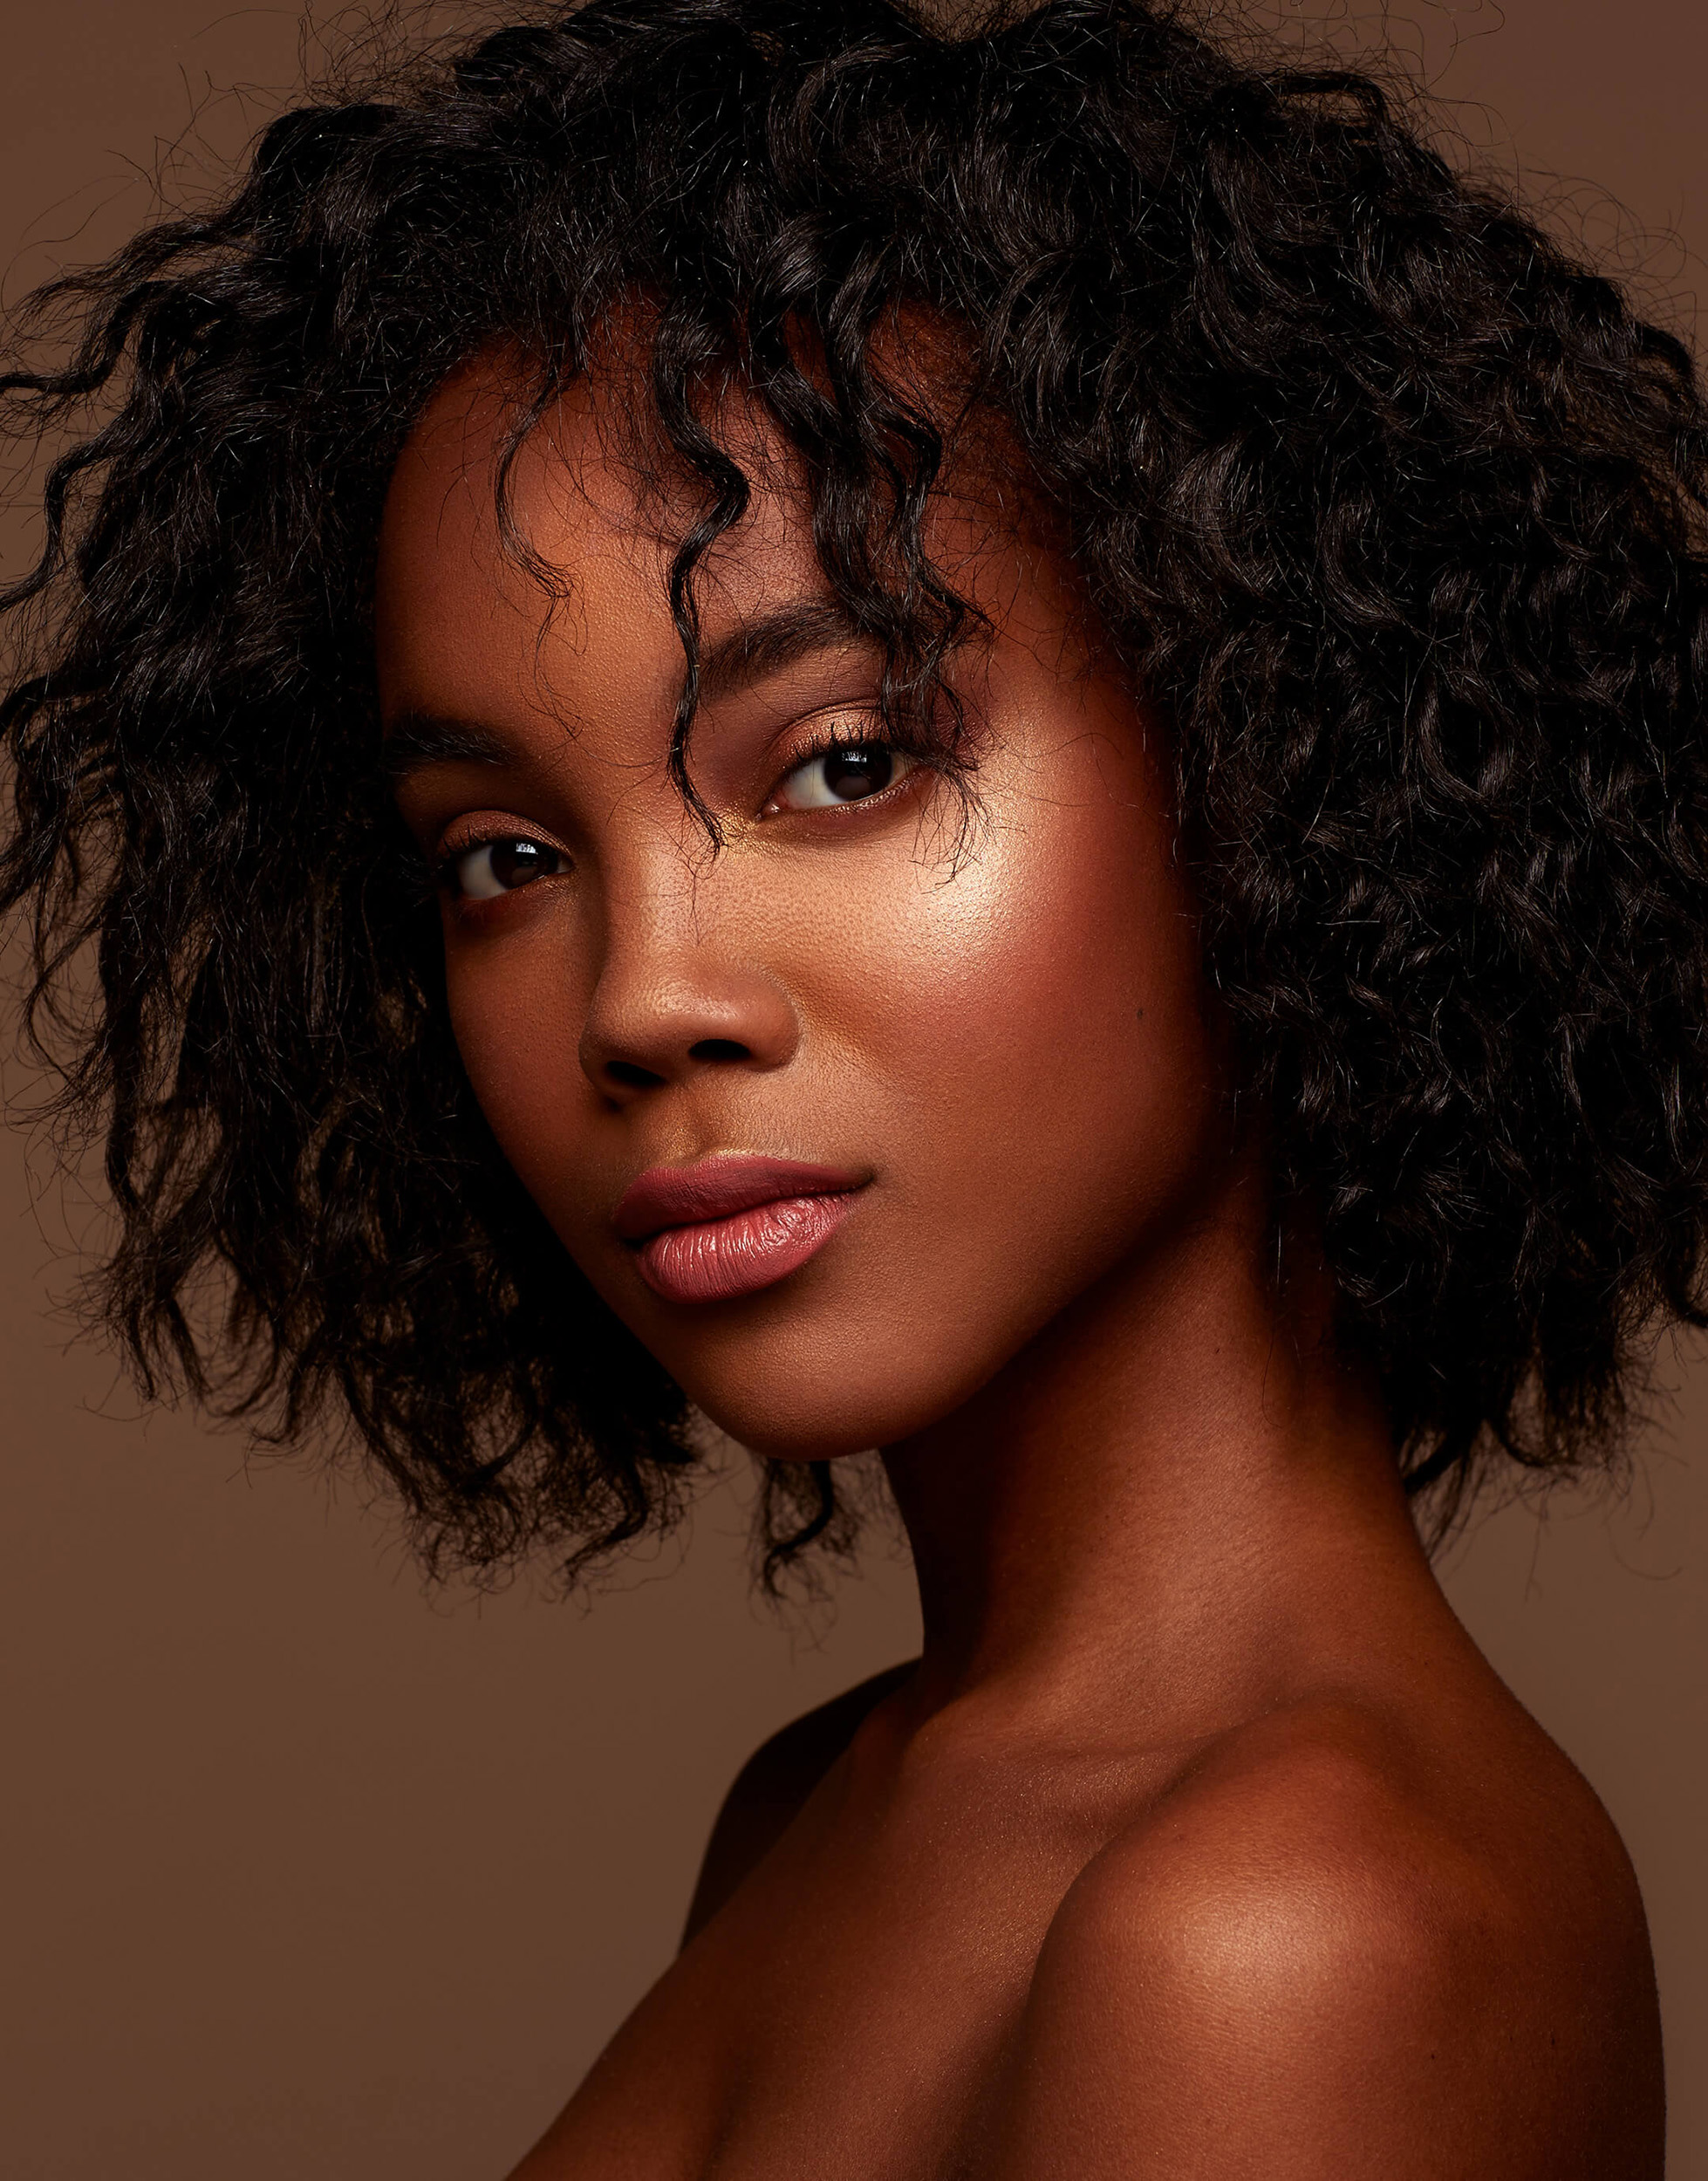
Because I’ve been shooting a lot of beauty work in recent months, I’ve become a huge fan of butterfly lighting. The technique is pretty simple and considered one of the four staples to lighting, but it’s probably my favorite because of how it makes the most fundamental sense. People are lit from above in 99% of situations. Walk outdoors, and the sun is above you, walk into a building, and the light comes from the ceiling. Butterfly lighting takes advantage of what is more normal in everyday life and gives you the option to tweak it as needed. The technique is equally simple and works well for both men and women, especially when you’re looking to get them a beautiful headshot without too many distractions. It can also be done with a broad range of modifiers and light shaping tools. For me though, my favorite is the most simple – a 2’x3’ Medium Softbox from above, and a reflector from below. To say that this is a popular lighting technique for beauty photography would be a bit of an understatement. Not only do I use it for 90% of my beauty work, but it’s probably the most common lighting technique for all beauty photographers because it produces really soft, and elegant light, that is pretty much guaranteed to make your subject look good. As like before, a lighting diagram is attached below, along with some examples of the output.

Backdrop Wrap Lighting
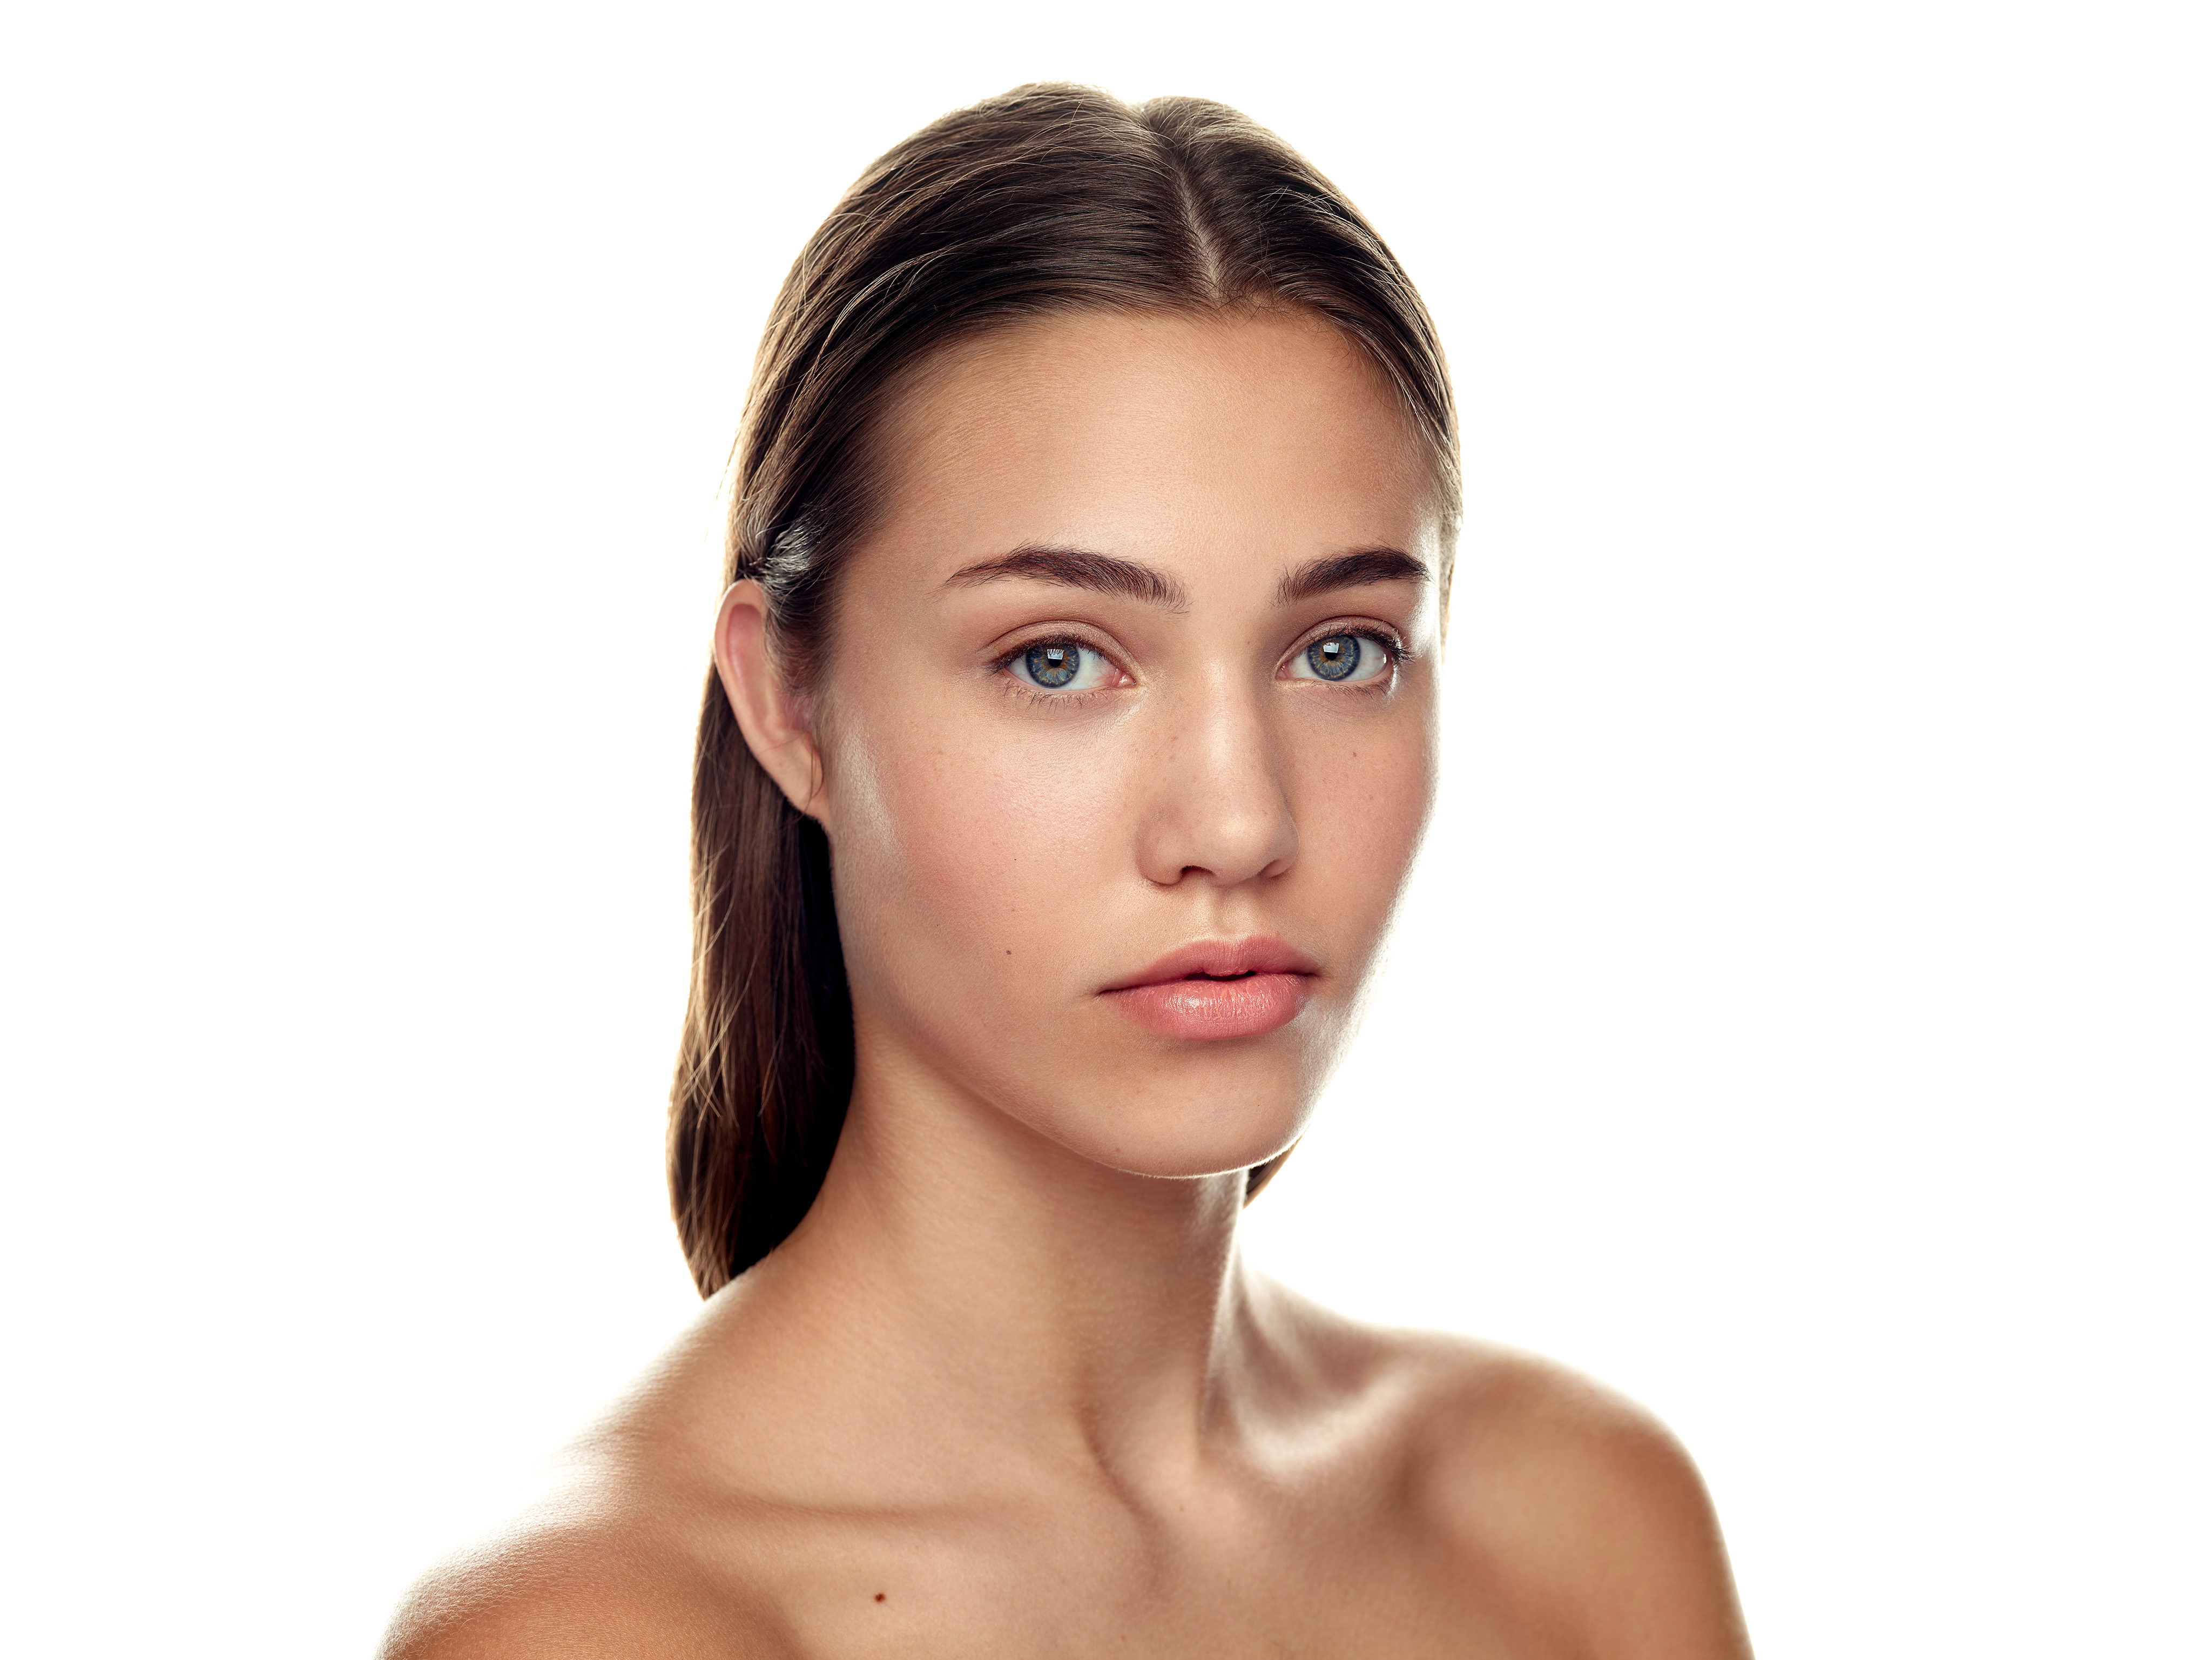
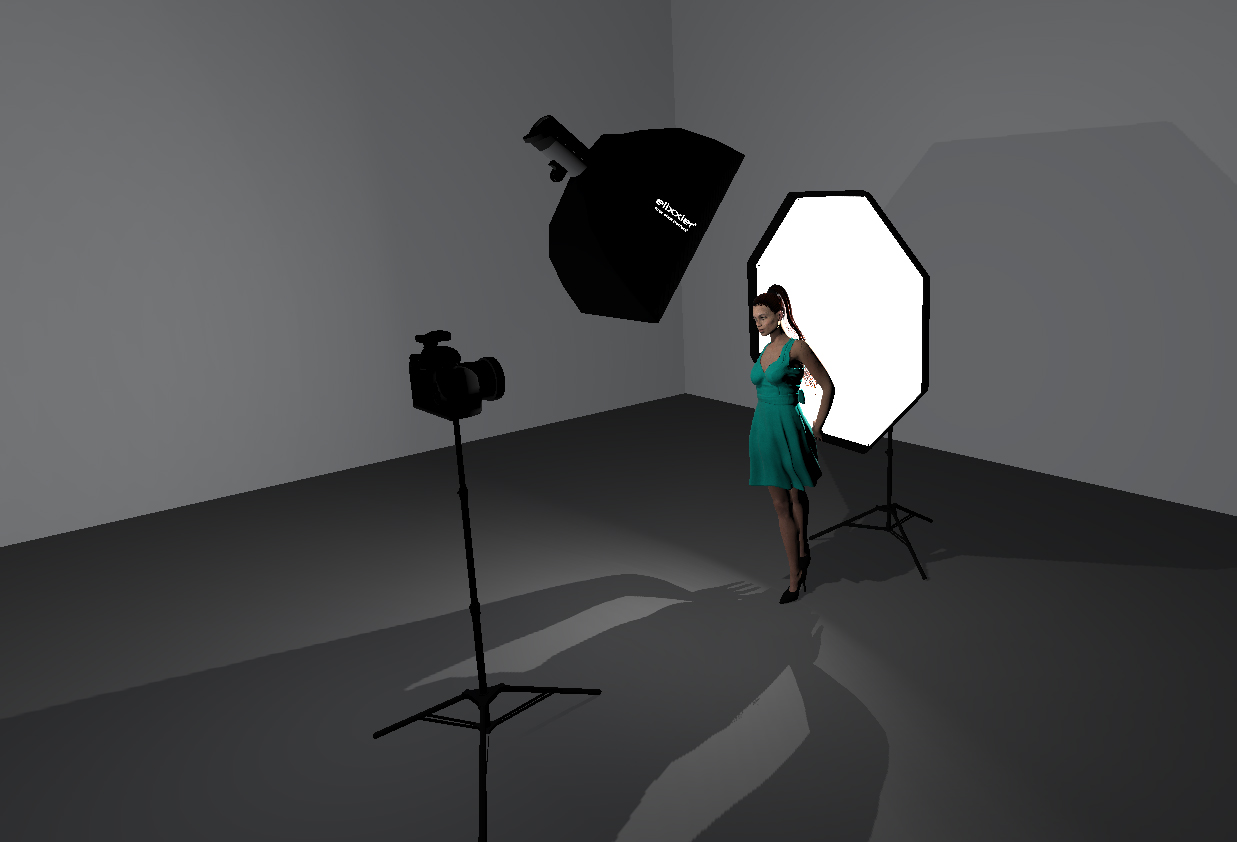
Another favorite technique I like to do uses a white backdrop as a rim or wrap light. While this presents it’s own problems (flaring for example), the result gives an elegant and angelic feel. To pull this look off, I usually use a large light modifier as the backdrop, instead of trying to opt for light bouncing off a white roll of seamless paper. The reason for this is control and conversation of power. As I mentioned in a previous article about lighting techniques, light has an interesting falloff with the inverse square law. By using a light modifier close to your subject, you’re able to get that beautiful light wrap, with less worry about it overexposing the rest of the image. The technique for this lighting look is pretty easy and involves just sandwiching someone in-between two light modifiers, with the background light being a stop or two above your main light. This technique more than anything can take some tinkering, as you not only have to worry about flaring and haze but also making sure you get your exposures correct so it doesn’t end up looking like an amateur attempt to make a background pure white. Diagram of this technique is below.
Strong Short Lighting
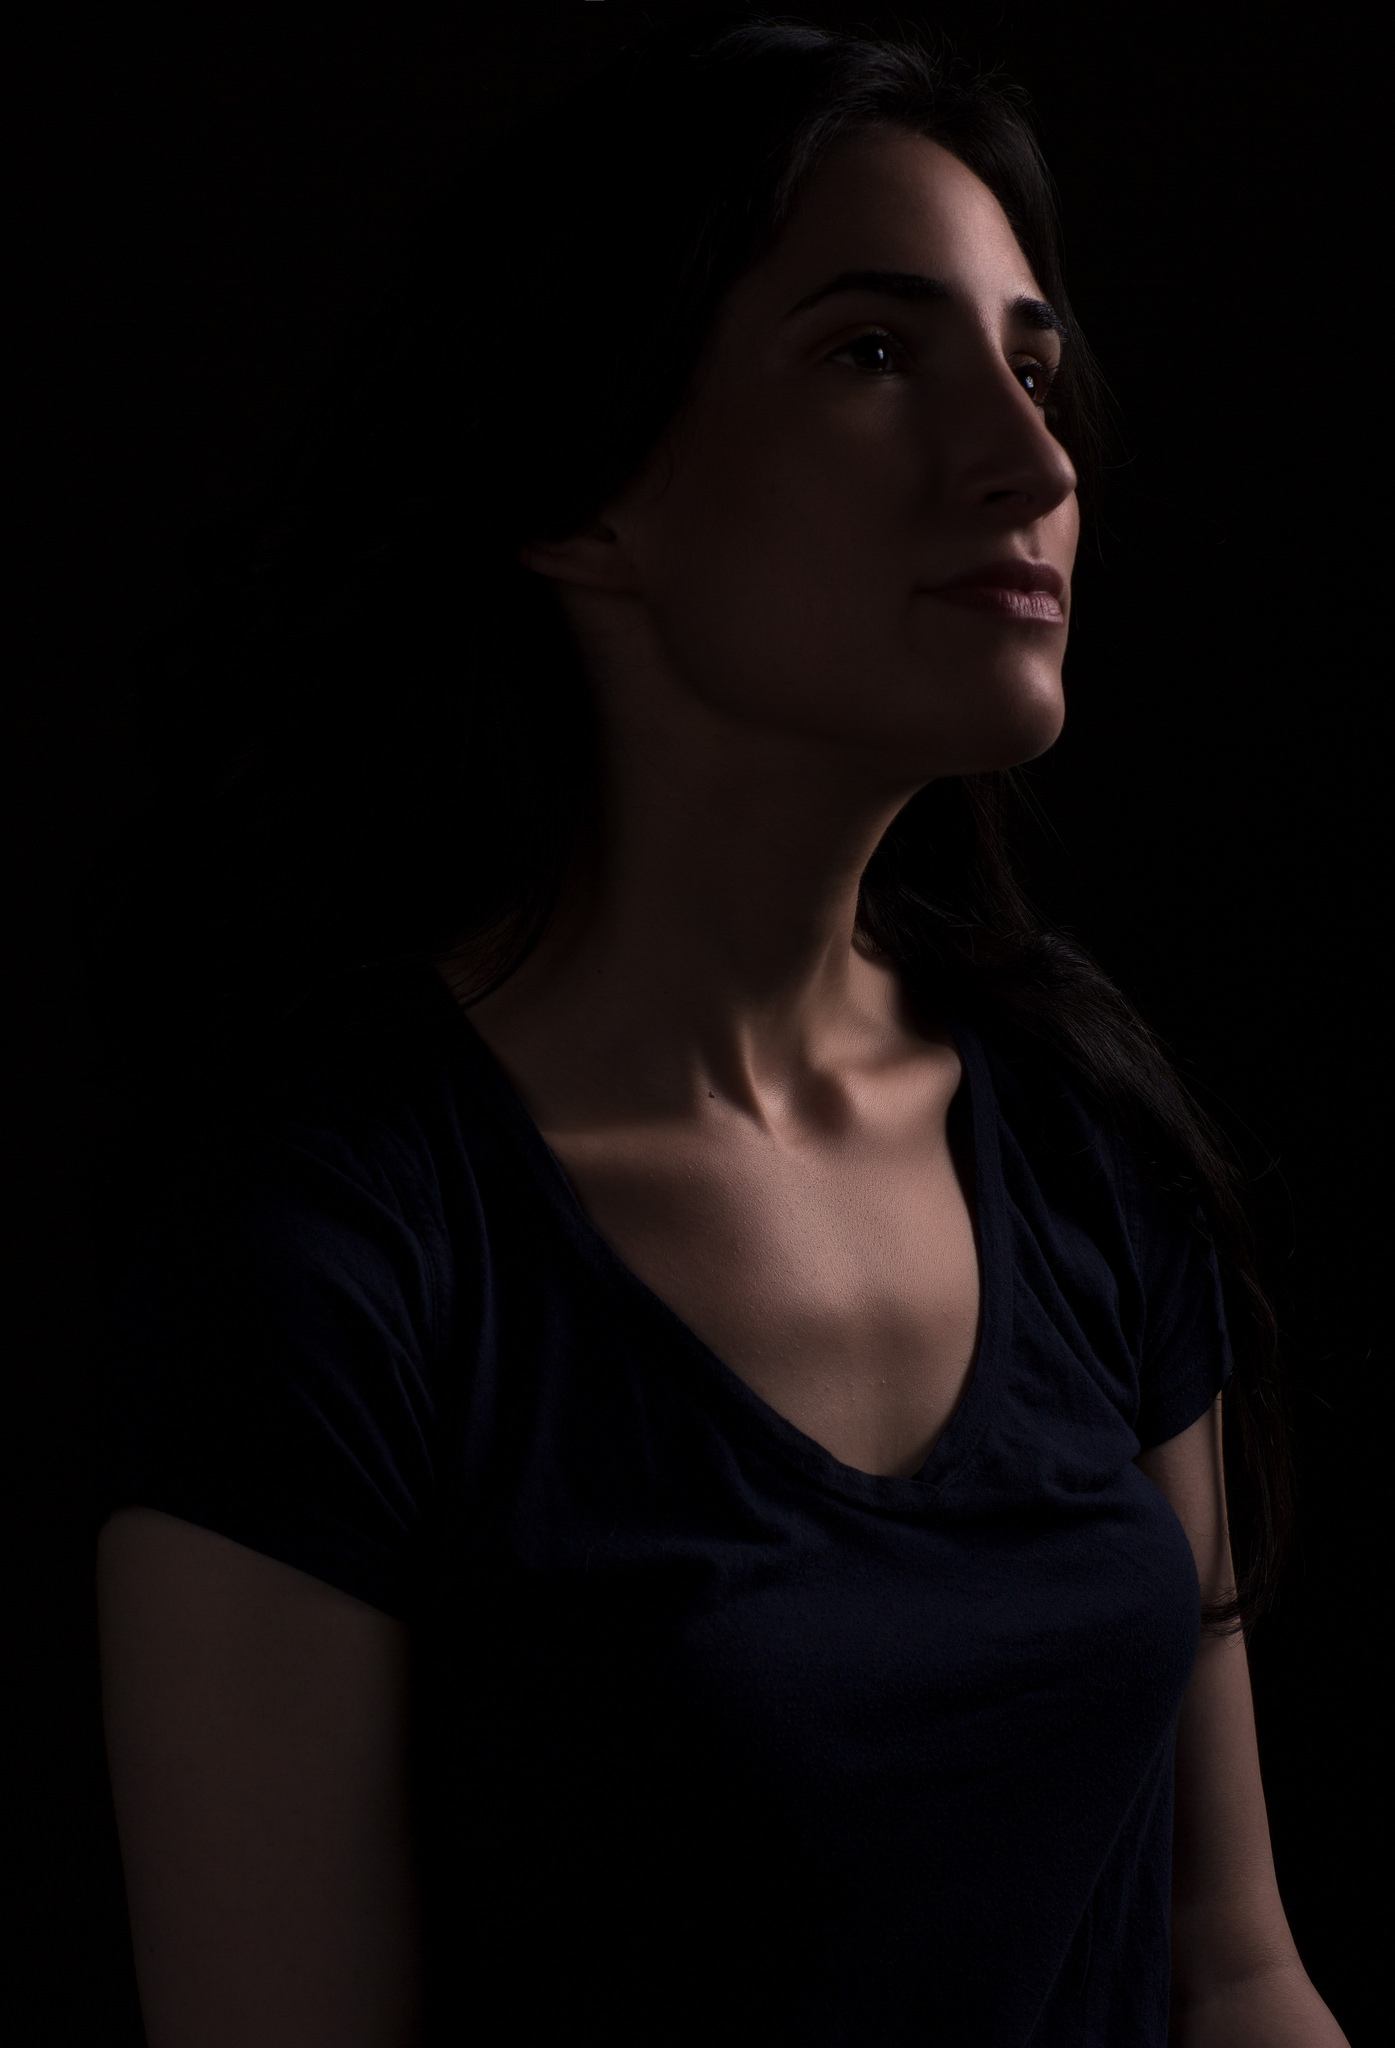
Short lighting is a conventional technique used to add drama to a photo. However, it’s usually neglected in photography just because it feels so unnatural to photographers. Short lighting is the process of lighting your subject, so that shadow side of their face is closest to the camera. It produces far more interesting images as a result, but usually, involves having your main light behind your subject in some fashion. Additionally, short lighting is incredibly common in movies and TV, as it works best when the subject is looking off camera (which they almost always are in TV/film). Though, when I’m short lighting my subjects, I also add a fill light, because while I do want the focus of the light to be on the short side of their face, I do not want the shadow side to fall entirely to black. So to implement this technique, I often shoot with two lights, one short lighting the subject and about two stops more powerful than my fill light, which is just filling in the shadows to reduce some of the contrast. The result is a moody and dramatic image that has a unique style to most portrait photography. As always, diagrams and examples are below.
Do you have lighting techniques that you use as tried and true performers? Feel free to share your knowledge and insight in the comments below!

8 Comments
Oleg ·
Great article, thank you Zach. Really useful. It’s quite sad it won’t generate as much comments as a chart comparison though…
Nqina Dlamini ·
Thank You. This was an informative article.
Juan P. Bialade ·
Thanks Zach, I really enjoyed it
YuichiBaxter ·
Good article. Thanks.
vasile ·
nice way of summarising . thanks.
bob buckley ·
what camera gear did you use for these shots ?
Jim Quinn ·
Regarding your use of a second light as a shadow-side fill when you’re using short lighting, I’m wondering whether you ever consider using on-axis fill. David Hobby has promoted that technique on his Strobist site over the years, using ring lights and other sources in line with the lens. An advantage is that your weaker fill wouldn’t introduce a separate set of shadows to complicate the image, which might happen with a shadow-side light. I shot portraits in a studio for years but never thought to use a fill light on axis until reading his columns about the idea.
DeeGee ·
Hi Zach, an interesting article, but I’m a bit surprised that with the butterfly lighting example you didn’t seem to get much of a “butterfly” shadow under the nose? Maybe the fill was too close? Your “Strong short lighting” looks a bit too strong for me – especially for a woman and IMO needs more fill. Just my 2 pence worth from the UK. Cheers.