Weather resistant – A term that consumers falsely define as ‘weatherproof’ and camera companies accurately define as ‘the warranty doesn’t cover water damage’. The Cynic’s Photography Dictionary
The Sony A7R III has been out for quite a while. Generally, it’s a superbly popular camera with excellent reviews. We were busy moving to a bigger office, and then catching up from moving when it was released, so doing a teardown wasn’t high on our list of things that needed doing. And the good folks at Kolarivision did an excellent teardown, so we didn’t feel any need to rush.
We’ve dealt with a number of water damaged A7 cameras in the past and have a bit more knowledge of where the leaks have occurred, so we wanted to look for ourselves. Plus, we wanted just see all the complicated goodness inside. Now that things have slowed down we decided to take a look.
This will end up being a useful post for those of you who need to venture out into the elements with your camera. Sony has, as they said, markedly improved the weather resistance on this camera. They also left a screaming ‘leak here’ gap in the sealing that you can probably address yourself.
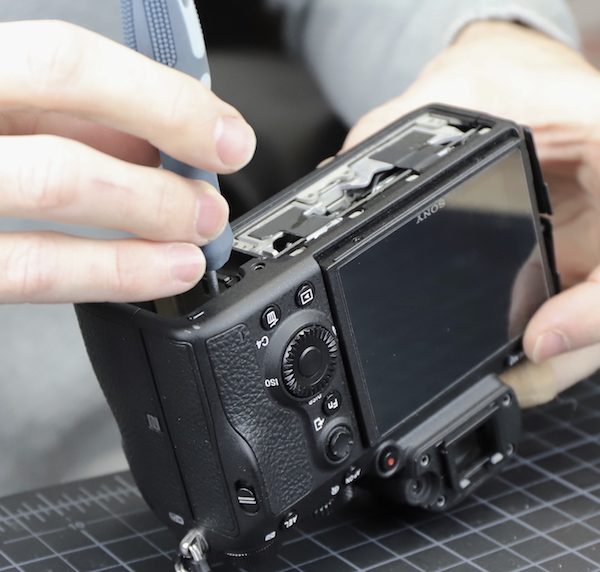
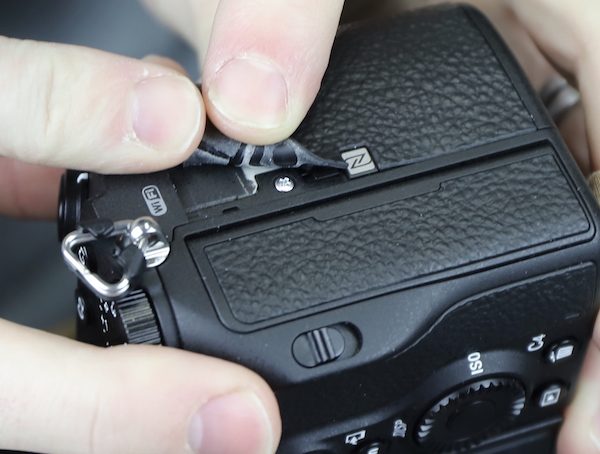
Before we start, let’s look at the obvious openings. First is one of the things we’re enthusiastic about; the memory card door. Yeah, I know, we have no life. But the new design incorporates a latch which is a very good thing. The old design had you pushing on the leatherette over the door to open it which both stressed the hinges and wore out the leatherette.
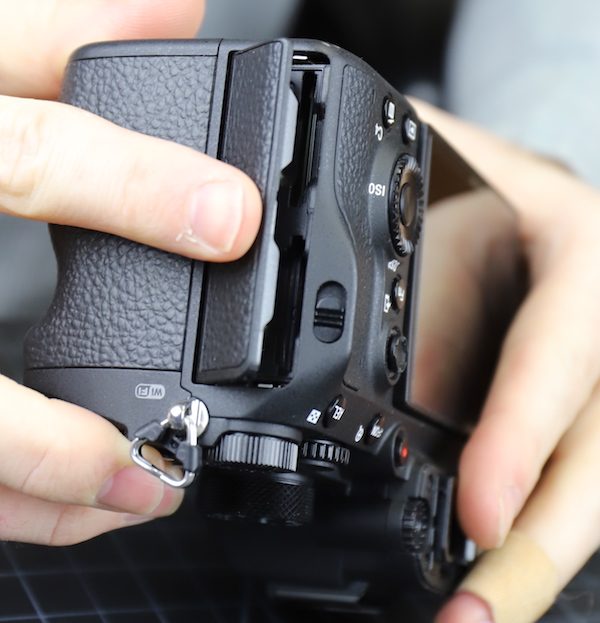
There’s also nice, thick weather sealing all around the inside of the door.
I won’t show you the port doors; when they’re closed, they provide a tight seal. When they’re open, they don’t – because ports. You don’t need a tear down to see that.
The battery door is remodeled and seems to have a bit of extra support which is a good thing. It has nice thick weather sealing (red line) everywhere but the latch and hinge area.

The battery door is an area where we’ve seen leaks on the A7sII. And yes, we double checked, and there’s no seal on the camera side of the door. So significant improvements on the memory card door, but not on the battery door.
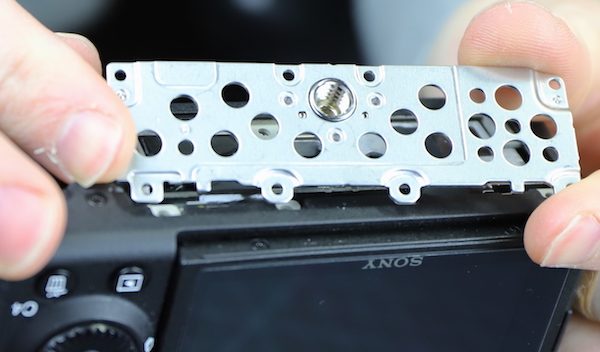
Let’s start with the bad part and get it out of the way, because other than that they’ve done a superb job sealing up this camera. We took out the screws holding the bottom makeup plate.
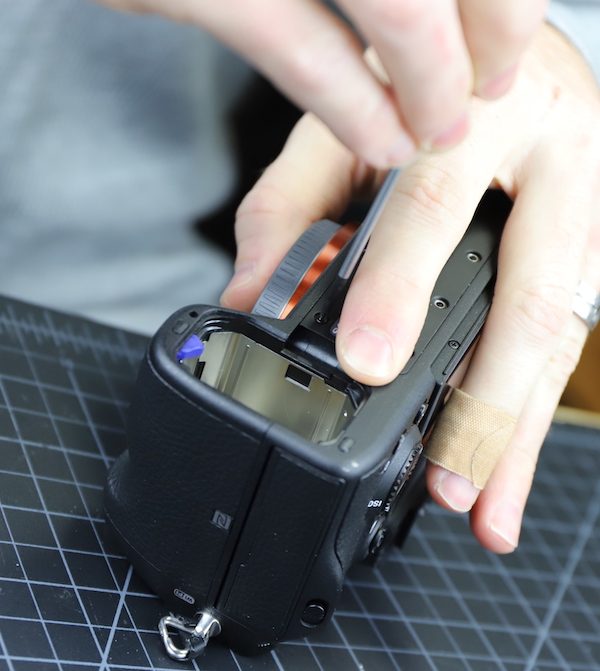
This is another area where we’ve seen leaking, so we expected some good weather sealing added around here. But, as is so often the case, our expectations were a down payment on disappointment. Alas, just plastic edges like the previous cameras. While plastic edges, tightly overlapping, can provide some water resistance, past experience assures us that the A7R series don’t. (That makes sense, they are neither tightly fitted nor do they have a large overlap.)
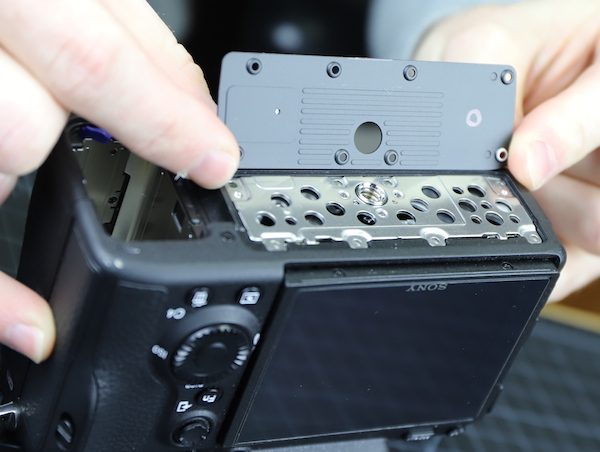
The metal tripod mounting plate lifts up next, it’s nice and sturdy with cheese-plate holes to keep it light and let the water flow unimpeded into the camera.
The actual tripod socket has good news and bad news. The good news: it’s a separate piece and therefore easy (and in theory inexpensive) to replace if needed. The bad news is the top is a thin pressed plate, and if your tripod has a slightly too-long screw, it will pop the top right off. Then the top rattles around inside the camera causing shorts and such. (Yes, we’ve seen it, and it’s not limited to Sony by any means. A lot of tripod sockets are made this way.)
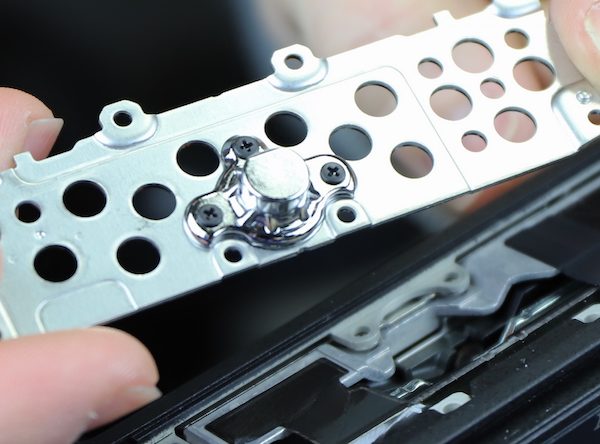
Never had this happen? Lucky you. If it ever does, I’d suggest following our simple steps to this point and shaking the piece out of the camera. No good can ever come of having a piece of metal rolling around in an electronic device. No good at all.
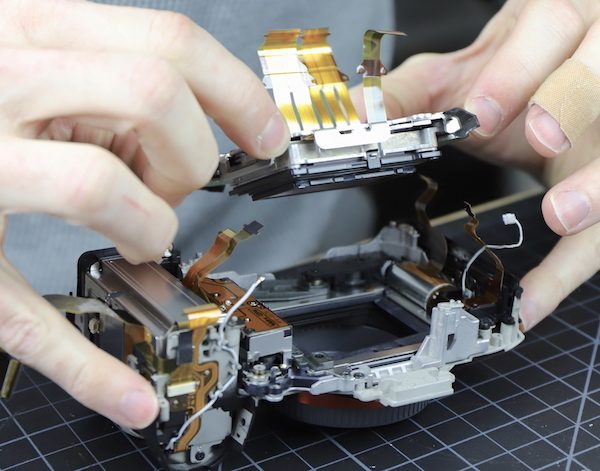
Speaking of where that metal piece could go let’s look at what’s under that metal plate.
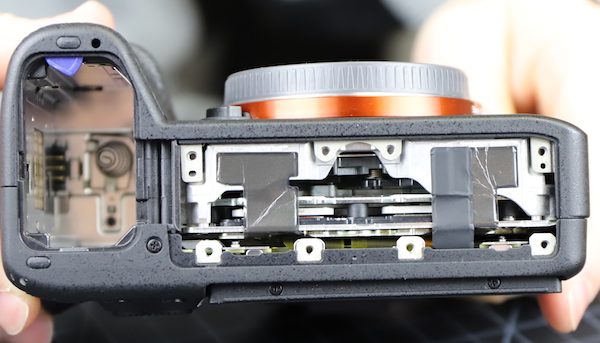
There are two black pieces of heat transfer tape. In between those you can see the flat plates of the sensor / IBIS assembly. The black above those is the imaging chamber and shutter assembly. So if that metal top gets popped off, or water comes in, this is The Highway to Hell, straight into the heart of the camera.
In case you can’t tell, I’m pretty unhappy with the bottom design of the Sony A7rIII. There’s absolutely no protection or improvement over the Sony A7rII. Now the case designers (and most of you) are probably aware that rain falls down from the sky onto the top of the camera. The repair people (like us) are aware that people set cameras down and puddles occur; also splashes go up, and sometimes cameras are held in portrait mode. In other words, a liquid will find your weakest point.
There’s good news coming, though, the rest of the disassembly shows careful and thorough water resistant measures. The A7R III bottom plate engineering team apparently didn’t get the memo, but I bet the A7s III will have some sealing down here.
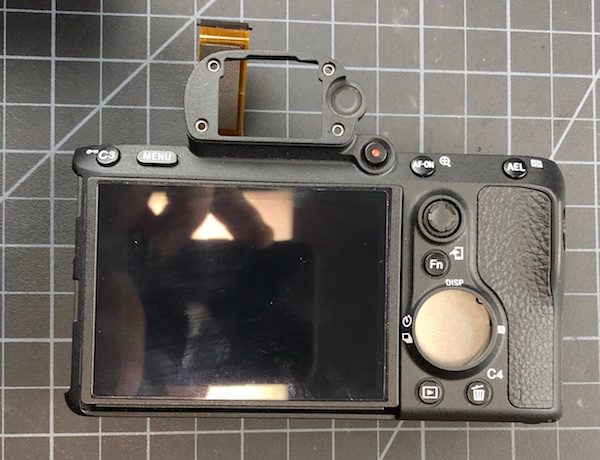
Let’s Look at the Back Panel
The next order of business is taking the back off. Right from the start, we could see some changes and improvements had been made. For one thing, the back panel is a single assembly in this camera; previously the LCD and viewfinder areas were separate. That’s a good thing for disassembly and a good thing for sealing.
We removed the pop-off eyepiece and diopter adjustment wheel. There’s a very nice thick rubber seal under the wheel.
There are several visible back screws, but removing them didn’t let the back come off. Sony likes to include a secret screw or two in all their cameras, and this one is no exception. There’s a screw holding the back on at the top of the battery compartment.
And in a new move for Sony, there are screws under the grip leatherette. This is normal in SLR cameras, but not so much in mirrorless.
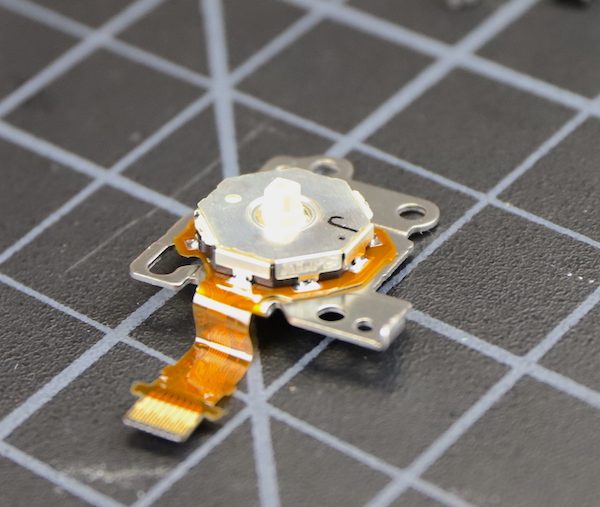
With all the screws finally removed the back comes off, with a long folded flex connecting the viewfinder and back-panel buttons to the main PCB.
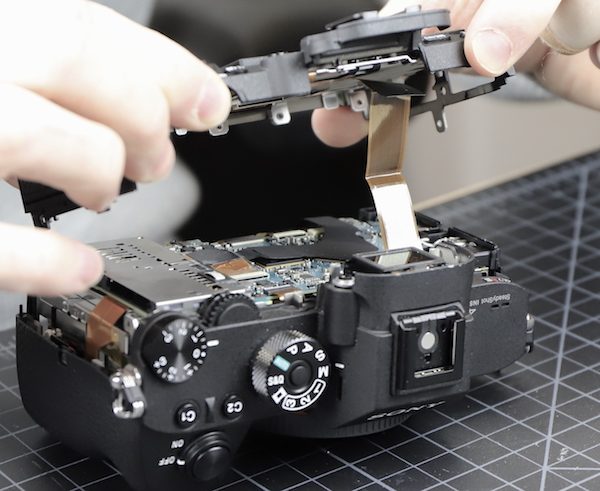
The inside of the back gives a better look at how many circuits are traveling through that one flex. But this is nice engineering, making things simple to repair or replace. (Note the metal covers screwed down on the left over the button assemblies; we’ll be looking under there in a minute.)
Notice the gray piece at the bottom of the flex – that’s a weather seal protecting the opening where the flex travels to the LCD. It’s a nice thick piece of foam that should protect very well.
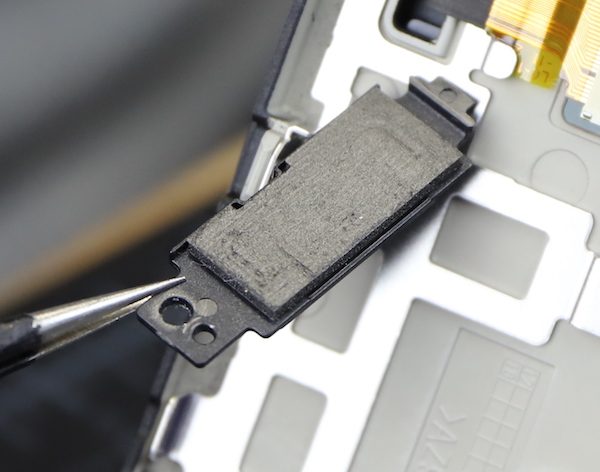
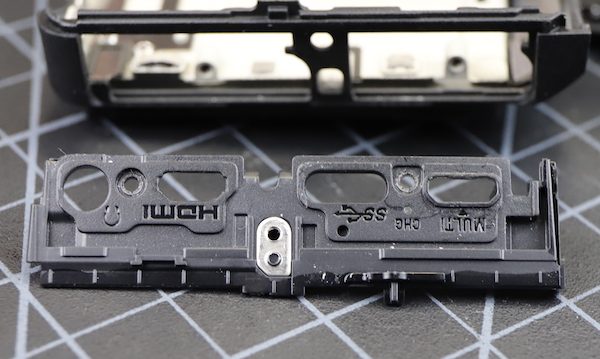
The I/O (input-output) port panel comes right out when the back is off. Note again there is no weather sealing around the panel or around the ports as they pass through the panel. So if you’re in bad weather don’t use the ports and make sure the caps are all closed. The caps are good weather protection, but they are the only weather protection in this area.
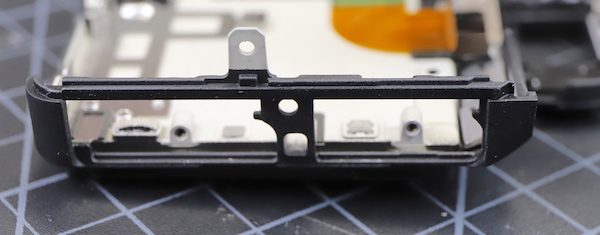
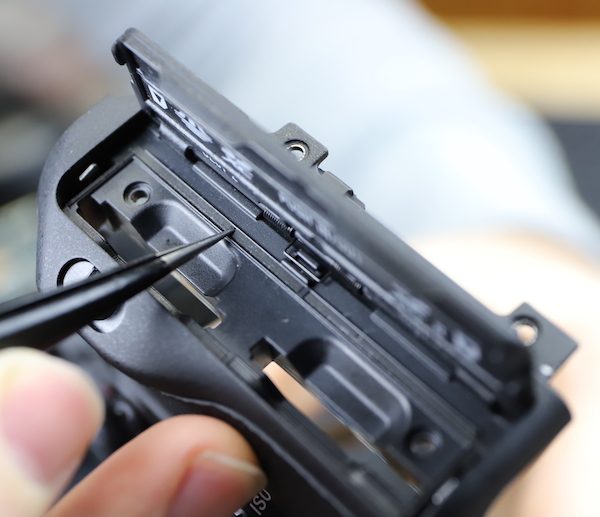
On the other side, the inner card door plate takes a little coaxing to snap out. You can see the thorough weather seals around the card slots. There is no sealing between the plate and the camera body, but the grip rubber overlaps that area, and it’s a pretty tight fit, as we mentioned.
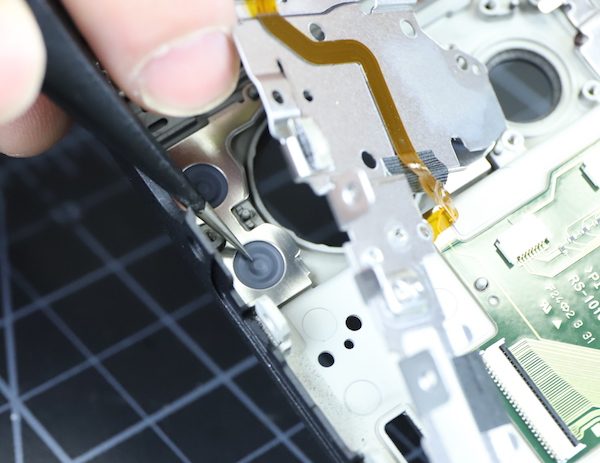
Removing those metal button assembly covers was a rather involved task; they’re all interlocking. I’m not going to show you the 27 color photos with circles and arrows and a paragraph explaining each step; I’ll just say don’t try it at home. Once we got them off, we could see a lot of care was taken in making the back of the camera weather resistant. The joystick button, for example, sets into the rubber cover that you actually touch. That cover is tightly placed in a rubber seal vulcanized to the back of the camera.
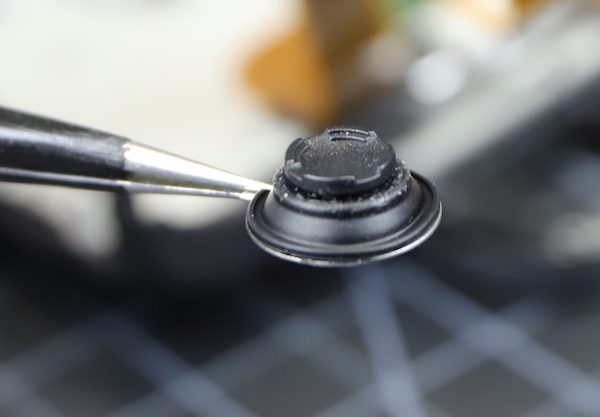
The scroll wheel does come all the way through the back cover but has rubber seals where it mounts, and they are held down very tightly. Again, I can’t see any water coming through here.
We love the modular assembly of the dials, but it does allow one untoward possibility. If you get distracted while reassembling all those buttons and metal plates, you get to take everything apart and do it again.
Even the small push buttons are entirely rubber sealed.
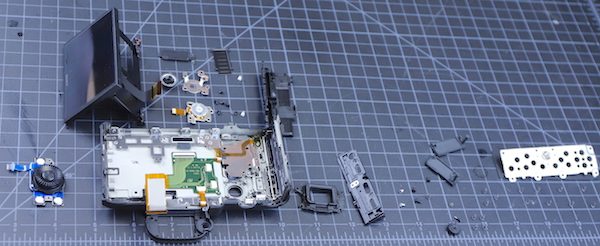
Way back in the day, we took apart an A7R and remarked that it was amazing how simple and how few pieces it had compared to a DSLR. Let’s take a second just to look at the back panel assembly of the A7R III and see how much more complex it is. The entire A7R had 29 screws of three sizes. The back panel alone, on the A7R III has 21 screws of four sizes.
Back to the Camera

The piece that holds the viewfinder in the top assembly has complete sealing around the edges.
As does the viewfinder itself.
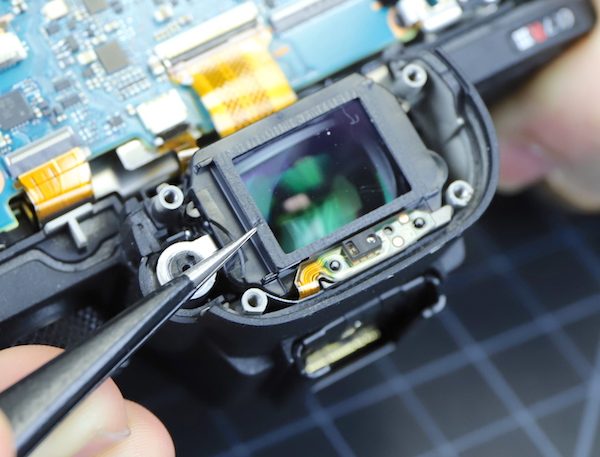
With that covering piece removed, the viewfinder slides right out.
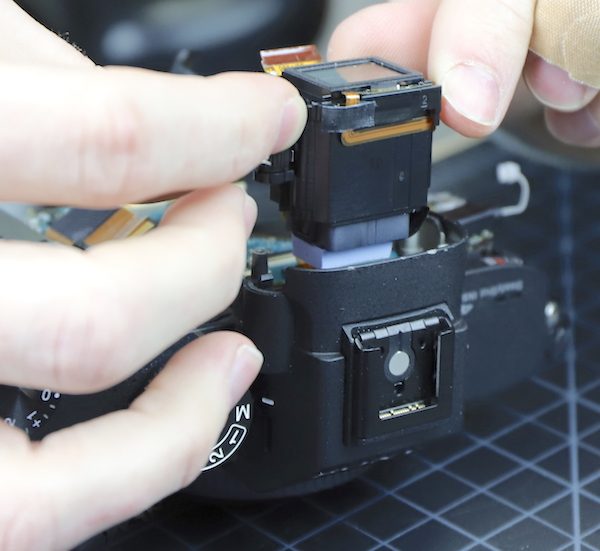
The usual obvious screws and not-so-obvious screws were removed (one was down behind the viewfinder ) and the top assembly came off.
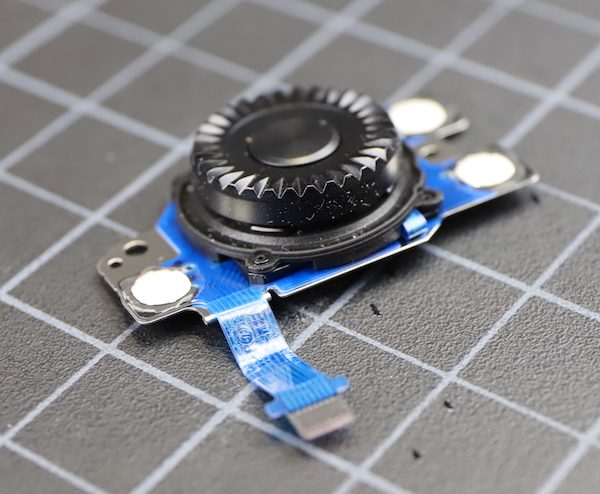
There was impressive weather sealing around the scroll buttons. We didn’t disassemble the top further – it’s a pain to do and for repairs, the part is ‘the top assembly’. In retrospect this may have been a mistake; we didn’t look at how well the scroll wheels were sealed, just the area around them.
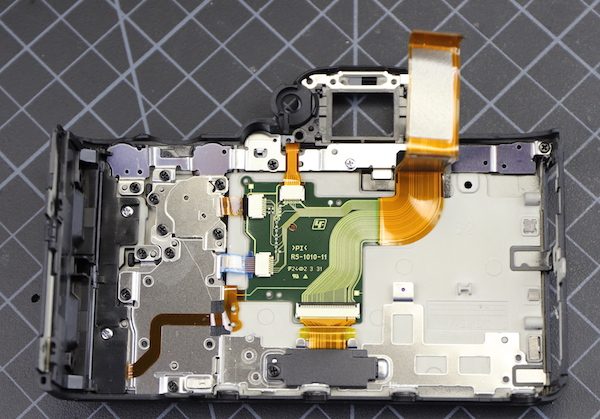
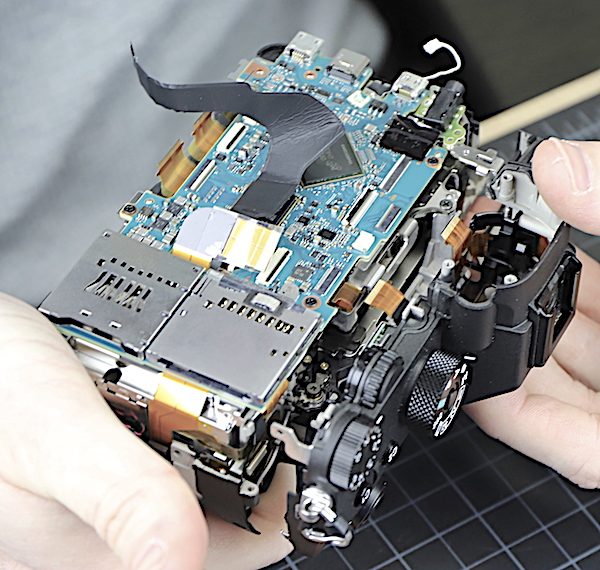
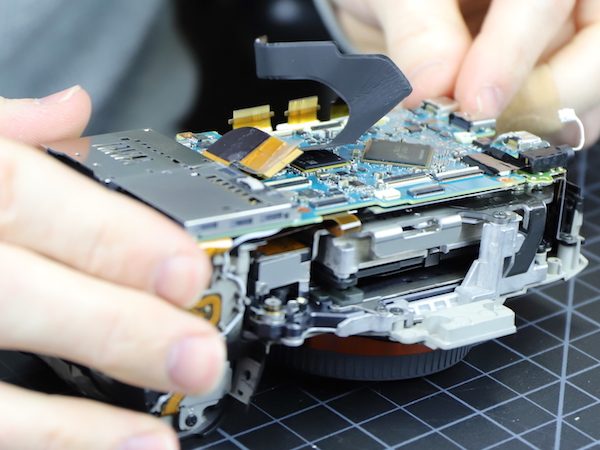
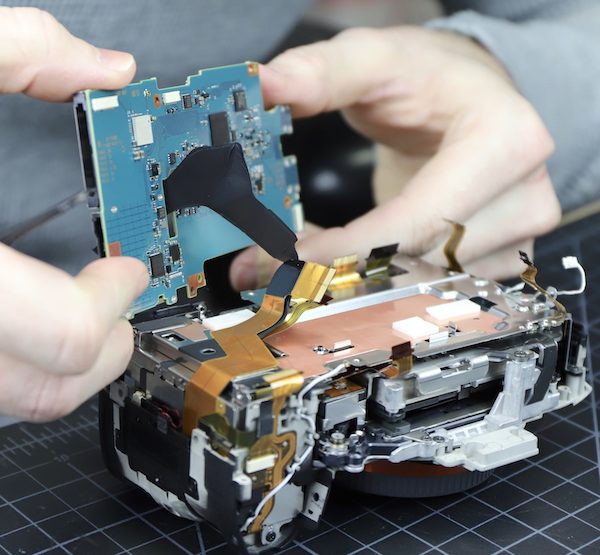
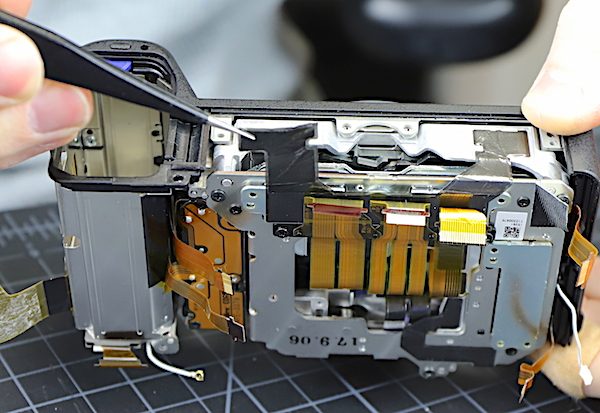
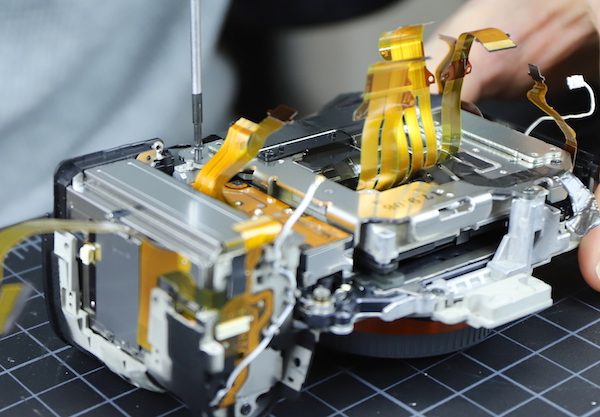
Next was the routine of unhooking flexes and removing screws to get the main board off.
Back in the day of the A7R, we loved the simplicity and direct layout of Sony cameras. Whether it’s the increased complexity, or the addition of some ex-Nikon engineers to their team (Nikon cameras are marvelous things, but their engineers never take a straight path from A to B when they can find a way to wrap a wire around the entire camera twice) or just the fact that things are so much more complex, that elegant layout is long gone. Here we have flexes going in every direction, including one that is about 7 inches long winding up from below through a slot in the board and taking four turns and giving off a tributary before it plugs in.
Of course, it makes no difference in how well the camera works, but the newer Sony cameras are starting to look like their software menus – complex and what you’re looking for isn’t readily apparent.
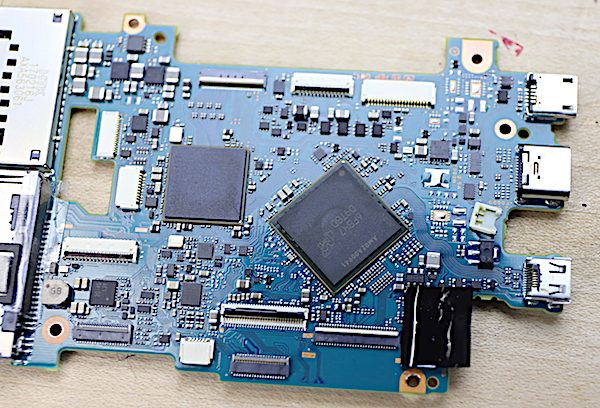
A look at the main board shows that, with the exception of the microphone jack, all the ports are soldered to the board, so if you tug on one a bit too hard, you get to buy a new main board. Same with the memory card readers. I get this – it allows this all to be assembled by machine, but mainboard replacements are a lot pricier than a port or card subassembly replacement.
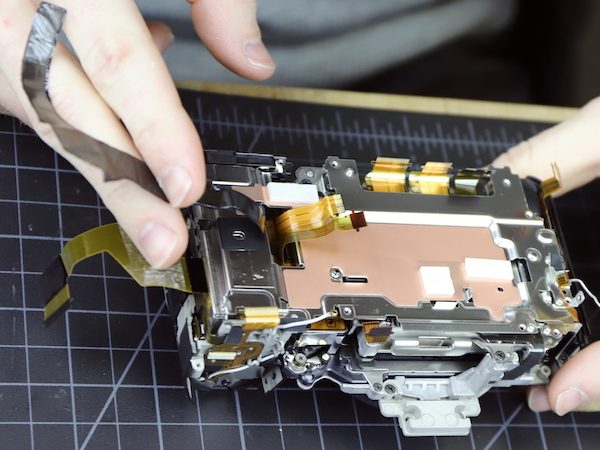
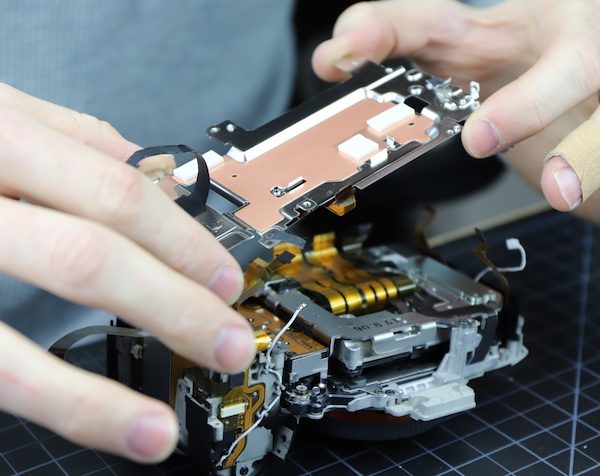
Now that the board is off, we’re really close to the working parts of the camera. You can see a shiny copper shield, as long as Aaron holds The FlexRiver out of the way. We’re looking at the back of the sensor / IBIS assembly, and you can see, almost straight down from Aaron’s thumb, one of the three mounting points of the assembly to the chassis.
Here’s a close-up of the mount. Each of the three points is shimmed to align the sensor with the lens mount, so there’s hopefully no tilt between the two. This shim is .45 mm.
The shield plate comes off next.
Underneath it is the date-time-menu save battery. I think it’s safe to say you won’t be replacing it at home when it goes dead.
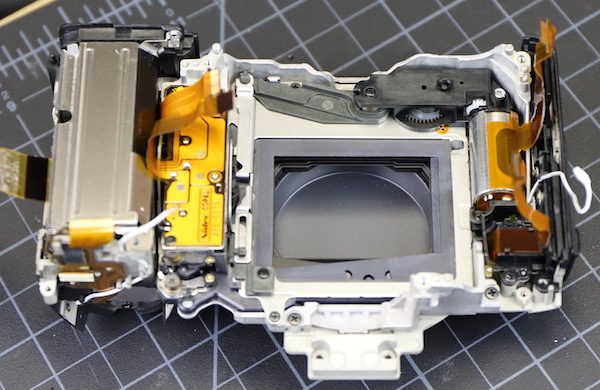
Now we have a direct look at the back of the sensor / IBIS assembly. Looking at the flexes gives you an idea of the amount of information transfer that’s going on. There’s some heat transfer tape going over to the camera chassis since that amount of transfer is undoubtedly going generate a bunch of heat.
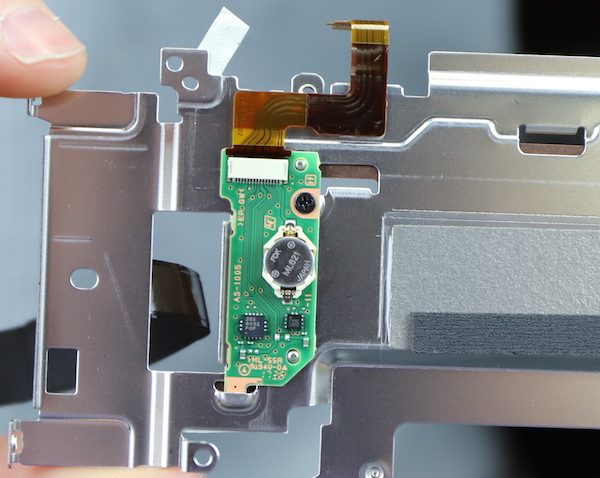
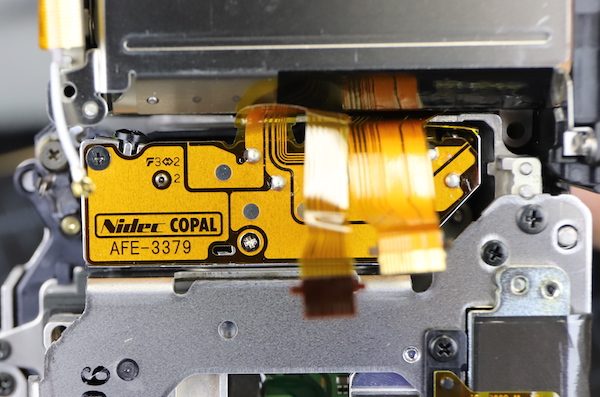
For those of you who like to keep up with who makes what, a close up of the shutter assembly.
Now it’s time to take out the three screws that hold the sensor assembly to the chassis. Note to those of you following along at home: make sure you keep the shims identified by location. This set ranged from .45mm to .05mm. If you put them back wrong, your pictures will be crooked.
A closeup gives you an idea of how thick the shims are.
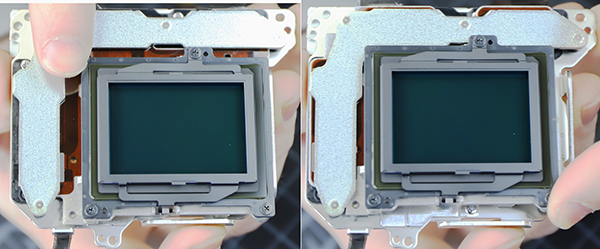
Once the screws are out the sensor / IBIS assembly lifts right off.
The actual sensor is dwarfed by the stabilizing system behind it.

From the side, you can see the two main stabilizer plates which travel in offset arcs so the sensor can be moved in any direction.

The amount of sensor movement that an IBIS has always surprises me. I mentally picture it moving a fraction of a mm, but the range is far greater than that.
What’s left on the table is the back of the front, with a sensors-eye view of the back of the camera cap.
We actually did disassemble the battery compartment, which has several sensors in it, but it’s boring, and this post has gone on long enough. We’ve seen what we came to see.
So What Did We Learn Today?
Sony spoke truly. Except for the bottom this camera has thorough and extensive weather sealing, as good as any camera I’ve seen. (Before you Pentax guys start, I have not taken apart a Pentax so it may be completely sealed in a super glue matrix for all I know.)
That being said, the bottom of the camera is not protected worth a damn. If you’re out in a sprinkle or shower, this probably doesn’t matter; water hits the top first. But if you’re in severe weather, near surf, or might set your camera down where someone might spill something, you need to be aware of that. If I knew I was heading out in such conditions, honestly I’d tape up the bottom of the camera or encase it in plastic taped all around the body. Yeah, battery changes will be a pain, but the new battery is supposed to last a lot longer.
The water challenge test done by the good guys at Imaging Resource provides further evidence that this is so. They expressed some concern about the top right-hand dial, and while we saw good seals under the dial, we didn’t disassembly the dial itself.
And, of course, the port covers have to be snapped shut to keep water out. If you’re out in weather and just have to use a port, then you’d better do what I do and put the camera in a plastic bag. It’s not how great is the weather sealing at the weather sealed places. It’s how bad is the weather sealing at the most unsealed places.
One thing I would like to emphasize for the fun of it. The difference in complexity between the A7R and the A7R III is really quite amazing. If you have a minute, go over to that old blog post and do a quick comparison.
Roger Cicala and Aaron Closz
Lensrentals.com
February, 2018

120 Comments
Adam Sanford ·
“That being said, the bottom of the camera is not protected worth a damn.”
A recent test of some FF ILCs showed as much. Water was found in the battery compartment of the A7R3. Informally conducted, of course, but still worth a look:
https://www.youtube.com/watch?v=c7BG74w0gAw
Roger Cicala ·
Adam, that’s the Imaging Resource article I was referring to. For those who haven’t seen it, it’s informative, well done, and I think maybe going to set standards for this kind of testing. Kudos to them.
Stanislaw Zolczynski ·
On the question why not Pentax they answered – because it`s not relevant.
obican ·
Roger Cicala (from Lensrentals.com) says that A7RIII is the final nail in the coffin of DSLR as it now has a greater number of screws holding it together.
Also Sony has hired all of Nikon’s engineers.
Munchma Quchi ·
The headline should read “Sony – More Screwy Than Ever”
Astro Landscapes ·
This comment thread is so screwed up.
Munchma Quchi ·
Would it kill you to upvote ? Call your grandma and get her to upvote too. I am trying to make it to the finals of “Trolling With The Stars”
Astro Landscapes ·
Hey I actually have a SEVERE upvoting allergy. You wouldn’t want to cause me to experience anaphylupvotaxis, would you?
Munchma Quchi ·
Astro,
My sincere apologies. This is a terrible affliction and I know extremely contagious. I hope that the CDC finds a cure soon. In the meantime, I am painting “Save Astro” over where it used to say “Save Ferris” on the city water tower.
We’re all pulling for you. Even the nurse is coming to restore your pluck.
Tony Thompson ·
Any idea how this weather sealing compares to the A9 ?
Daniel Ockeloen ·
From what we have seen its nearly the same body, only 1mm thicker. Probably designed at the same time i would bet its the same in most parts… Well it was one extra dial that could be a problem 🙂
Daniel Ockeloen ·
So Roger how do you feel about putting a rubber sheet between a l-bracket and the bottom? I did that inside my really right stuff one just based on gut feeling… good or bad ?
Roger Cicala ·
I don’t see any way it could hurt, and it might well help a lot.
Ketan Gajria ·
Roger, I keep the Sony battery grip on the A7R III almost always. Would that provide any sort of protection or not? I have had to use my 5D IV and OMD EM1-2 in the rain quite a bit but am a bit wary with the Sony after seeing the tests.
Roger Cicala ·
I don’t know for certain, but it looks like it would help.
T N Args ·
This drawing : https://goo.gl/images/FjGrQ1 shows the vertical grip and its sealing, which raises the possibility that adding the grip might improve the weather resistance. If not, it would certainly make it easy to tape up the joint for an outing in really bad conditions.
Ketan Gajria ·
Thanks, this is helpful.
Brandon Dube ·
I spy a fancy, overpriced german made screwdriver in image #9 🙂
Roger Cicala ·
You know certain people have ‘favorite screwdrivers’. Sad, isn’t it? To have a favorite screwdriver?
James Erlandson ·
In my experience the favorite screwdriver is seldom the best screwdriver. But it is usually the oldest.
nuitamericaine ·
I have several. But my absolute favourite is a cam operated ‘ratchet’ screwdriver. So it’s like a ratchet, but no ratcheting, just magically smooth… I need therapy…
Thinkinginpictures ·
I take my cameras apart with Walmart screw drivers…..while drinking German whisky.
Barbu Mateescu ·
German whisky? And American beer? Oh no…
Munchma Quchi ·
Only a drunk would boast about that.
Thinkinginpictures ·
About Walmart screwdrivers? Really good deal. I’d say a thrifty person would boast about that.
Munchma Quchi ·
Nah— the german whiskey part.
DONOTUNPLUG ·
Rojer – thanks for another solid teardown, very informative!
Question regarding the tripod socket, given this teardown: what are your thoughts on carrying the camera via strap/clip/whatever that uses the tripod socket as the only attachment point? As opposed to the standard strap loops, that is? Do you guys see/repair many of these sockets? I ask because there are lots of straps (especially those designed for double camera carry) that rely on just the tripod socket as the only anchor and it would seem that at some point something would give – true or too paranoid? I’ve had no issues with using PeakDesign Capture Clip on Sony’s MK2 bodies, but thinking about carrying a heavier lens (new 24-105) on the A7Riii, supported only by the tripod socket.
Roger Cicala ·
We actually repair, replace, and retap a ton of tripod sockets. They’re perfectly capable of hanging the camera from all day long. That doesn’t mean they’re fine for hanging the camera and attached 70-200 lens, etc.
Micah ·
I’m reminded of a story going around a while back about someone having “dropped” their D4 “down a mountain” and having the lens ripped off. They shared pics of themselves using a Rapid type strap before the incident. It was screwed into the body’s tripod socket, while hanging a 70-200/2.8 from the body. Their pics showed the mount having torn out of the camera. Bets on whether it was “dropped” or the lens mount actually failed?!
The kicker: the Rapid strap was attached to an RC2 plate on the body. Bets on whether they also tried mounting it on a tripod that way?!
Having seen how people treat their own gear in the field, I can’t imagine how y’all run rentals. I’m sure you’ve got enough mangled gear stories for a book!
TechUnSupport ·
A lot of photographers now a day use something like BlackRapid or similar which is a sling over shoulder and the other end connected to the camera via tripod hole, which means the camera will be up-side down when it is not in use. Even without the sling, camera will be hold on the grip, and when in idle position, it will be held side way(grip side up), meaning water still be leaking(dripping) in anyway.
Chris Christian ·
Very good point, I use the Peak Design Clutch for hand held combined with the Slide strap. The PD Slide some what exposes the bottom of my camera. Now that I’m aware, I will be VERY cautious. I use both the Sony Battery Grip and the RRS L Bracket too. This REALLY concerns me that my battery door is no longer on my a7R3 AND I shoot 1/3 of my landscapes in portrait mode with the RRS L which has my battery area right at the top. I will definitely be covering my camera setup from now on, I must have been pretty darn lucky so far, because I’ve shot in some nasty rain.
Short of some cleverly added rubber and silicone, what else can we do to protect the a7R3?? Most of what I use this camera for are outside exposed to the elements. And most of the type of photography I do, I don’t let rain or snow stop me (or didn’t, but now, I will be much more cautious)…
THANKS ROGER, for your awesome breakdowns and insights on engineering and optics. I find your work to be top notched and your humor to be hilarious. I usually bust out laughing a couple of times, but this article, I think you got me 6 or 7 times …. lol Have a great day!!!
Dennis L. ·
Probably a good market for someone to produce an L-Bracket to provide both Arca Swiss connections and weather seal the bottom. The battery door would be the first problem area as it needs access as well as protection. Maybe a snap on/off or some other quick access scheme.
Thinkinginpictures ·
“Note to those of you following along at home: make sure you keep the shims identified by location.”
Dang it!
James ·
color “glossy” photos
Roger Cicala ·
James; you, Frank, and I may be the only ones here who would know what glossy photos were.
Scott Kirkpatrick ·
I know, I know! I remember the circles and arrows, too.
Roger Cicala ·
Then you, sir, may join us at the Group W workbench!
Micah ·
I guess jpegs don’t have a back to put the paragraph on?
Roger Engle ·
Not quite. I was detained by Officer Obie myself.
Franck Mée ·
Hey Roger,
I’m going to the US next month, would you like me to bring an old K10D so you can finally tick the “taking apart a Pentax” box in your resume? 😉
Might not be a good idea though: if I come through the customs and say “this old camera? Well, Roger and I just want to take it apart, we wanna see wires and rubber joints and motherboards in our screwdrivers, I mean, take it apart, take it apart, TAKE IT APART”, they might hold me on a group W bench and send me back to where I come from.
Anyway, enlightening reading as usual, thanks!
Roger Cicala ·
Franck, you’d be welcome here at the Group W workbench!
Mel Snyder ·
Next to Guthrie’s “father-rapers'” I assume!
Mel Snyder ·
Franck, you win the throwback memory award of the year.
Scott Kirkpatrick ·
Great post as usual. Seeing that the not very watertight bottom of the Sonys uses a hinged battery door — what is your opinion on hinged doors over the battery compartment vs pop-in batteries with their own exterior sealing surface (Leica SL and probably others)? Hinged doors help the consumer to use reasonably standard batteries with backup sources; pop-ins will always cost much more, but look more sealed.
And have you looked over the New Leica CL with its two top knobs that turn and have buttons in their centers? Nothing is labelled so it’s just sensors timing push or counting rotate steps — is that hard to seal?
Roger Cicala ·
I hadn’t every really thought about pop-in batteries but it seems they could be well sealed with a nice rubber lip. Then again, battery doors could be better sealed if they wanted to seal them.
Push buttons and joystick buttons are easy to seal. I’m not as sure about scroll wheels.
Scott Kirkpatrick ·
A control wheel with all the shutter speeds or exposure compensations marked on it would seem to need a rigid connection (hard to seal), while an unmarked wheel that just moves some internal counter a number of clicks might not. It could just nudge a button inside with each click.
Micah ·
Pop in? You mean the way the (incredibly mediocre) D3/D4/D5 doors seal?
Now that I think about it, I’m not sure why something like that isn’t used for the in-body batteries. My old F100 comes to mind–the 4xAA in body battery clip had a rubber seal around the bottom, if I remember correctly. (the film door is another matter!) That seemed a heck of a lot better than these foam seals. The one on my D500 looks like it’s already deformed to where I don’t trust it.
kai.deus ·
Looking at the IBIS assembly it should be clear, that the demand for IBIS in every camera is not really realistic. Look at how big the fuji x-h1 has gotten with IBIS. I imagine a x-t3 would need to be a complete redesign to fit IBIS in a “x-t2” body.
Lotus Eater ·
But look at the Sony A6500…
kai.deus ·
I do not mean, that it is not possible. I mean, that it is not so easy as some people claim by simply demanding IBIS for every camera. It can be integrated in a small camera, however the engineering is hard.
Gergö Nyirö ·
..which has a much less effective IBIS system especially because of the shrinkage
Lotus Eater ·
Does it? Both the A6500 and Fuji’s latest are rated at 5 stops.
Gergö Nyirö ·
The A6500 is not that smooth because of the limited area of movement in video but I do get sharp results down to 1/8 s with stills.
Lotus Eater ·
Are you on firmware 1.05?
Don Westheimer ·
It’s not just about weather and water. 2 days ago I was in the Sumatran rainforest shooting orangutangs. Very warm and ridiculous humidity. I found that while viewing through viewfinder while hot and sweaty, the view would become fogged and indeed the exposures we’re fogged as well. After reading your analysis I have to believe my breath was getting to the sensor through the base of the camera. When I composed using the display the fogging didn’t occur.
Munchma Quchi ·
We love your work Don! Keep it up. https://uploads.disquscdn.com/images/b64bd8c1569bad87749c8788c3bab5114efa847a39edb6e15fa52ba23194ad89.jpg
Munchma Quchi ·
What happened to my monkey photo ????? It was getting a lot of likes!
John Davis ·
I’m sorry, but the thought of your breath making its way to the sensor is a bit ridiculous, for many reasons. It it MUCH more likely that there was an extreme temperature differential (between lens elements/sensor and the ambient air) when you started using your camera therefore causing them to fog. Even if your breath could *somehow* make its way to the sensor, it wouldn’t retain enough heat or humidity at that point to cause fogging. It was your environment, and it most likely wasn’t due to the weather sealing. We who live in the south deal with this all the time during the summer. Your camera is sitting inside at 70 degrees and you want to go outside to shoot a photo when it’s 98 degrees at 100% humidity? Well everything is going to fog up, immediately. And it’ll stay that way for quite some time until the temp differential isn’t so extreme.
Notna ·
Oh Sony. The stuff they make is good in so many ways, but there’s always some major flaw bringing it down. Like when they make an excellent telezoom, and it’s held together by a much too dinky aluminum disc. Someone should tell them a chain is only as strong as its weakest link.
Huge Daniel ·
I put A7R III on wet suface or snow many times.
but my camera had no problems whatsoever.
In the past, Sony’s smartphone engineer informed me about water repellent technology.
I think that the bottom this camera is possibly applied this technology…
Roger,would you please analyze it.
Roger Cicala ·
First, I need to sell this bridge in Brooklyn I just bought.
Munchma Quchi ·
Quite the opposite – they wick it.
Rick ·
The proof will be in how many fail due to the moisture wicking up into the camera.
Dan Hawk ·
Oh man, I was sort of hoping you’d give some ideas for a permanent fix for that bottom plate- “They also left a screaming ‘leak here’ gap in the sealing that you can probably address yourself.”
Roger Cicala ·
For me, and apparently I’m the only person on the planet who feels this way, if I’m out in weather my camera is in a plastic bag, hole cut out for the lens and rubber band around it. I actually (gasp) carry a plastic bag or two and a couple of rubber bands in my camera bag. Because weather.
Munchma Quchi ·
Because – you’re always cleaning up the messes from dudes that think ‘because f’ it.” and don’t give a damn about taking care of others stuff like it was their own.
Dragon ·
Interesting that they use shims on the back side of a die casting to compensate for shrinkage rather than just machining both faces of the casting. Hard to believe the shim approach is much cheaper unless these things are made in Bangladesh.
Roger Cicala ·
I don’t know of any camera that doesn’t either shim the sensor, or have adjustable spring-loaded screws to level the sensor.
Dragon ·
Maybe mounting the sensor to the PCB isn’t all that accurate (solder thickness) so if you are going to have shims anyway, why bother to machine the casting. Just thought it was interesting because raw die castings are pretty unpredictable dimensionally. Thanks for the insight.
Roger Cicala ·
I think even more than that is the lens mount attached to the front of the camera. Even if the sensor mounts were finely machined, that lens mount is still a variable thing, and the adjustment is sensor and lens mount aligned. The camera is just the place those things mount to 🙂
Some camera both lens mount and sensor are shimmed, but most it’s just put the lens mount on and then align the sensor to it.
Dragon ·
Seems like a lens mount is something that would be machined on both faces and should be accurate to 1/000th of an inch or so, but I guess I haven’t paid that much attention to how cameras are actually built to get the cost out.
Brandon Dube ·
A thou (25 microns) is an enormous tolerance on the tilt of that interface, optically speaking. A tenth thou would be the range you want to be in.
Dragon ·
If the tolerance is that tight, then shimming on a raw (unmachined) die cast surface doesn’t seem like a very good way to get repeatability (i.e. when you take it apart and put it back together, it will have good chance of being out of tolerance). Is it common practice to shim on unmachined die cast surfaces, or is that a Sony thing? In my experience, if you want tolerances that tight, you not only machine the surfaces, but grind (i.e. polish) them as well.
Brandon Dube ·
They aren’t nominal shims, they’re specific to each sample manufactured. Every company I know of either uses shims or kinematic mounts with tensioned screws to align the sensor.
Dragon ·
I wasn’t suggesting that the shims were nominal, but that the uneven surface of a raw die casting would cause the same shim to produce a different result every time you assemble the unit (very torque sensitive).
Thinkinginpictures ·
Any chance the lack of weather sealing below has to do with facilitating heat dissipation?
Roger Cicala ·
It might well. But that means they’re depending on air circulation within the camera to dissipate heat. Can’t say I’m a big fan of air circulating in the camera.
Gergö Nyirö ·
I think that’s pretty much the case sadly..
Still thinking ·
Great article as always, Roger!
Loved the sideways nod to Alice’s Restaurant 😉
Jimmy ·
Roger, there’s not much mention of the top plate but that’s what gets hit the most. Are you confident the top is well-sealed, for example the C1/C2 buttons, the shutter button, mode dial, speaker on the left side, etc…
Roger Cicala ·
The edges of the top plate are well sealed. We did not disassemble the top plate and in retrospect probably should have. But they are a total pain to take apart and put back together and we assumed (given the back assembly) it would be well sealed. But, as has been pointed out, the scroll wheel could be leaky and we wouldn’t know. So once again – assumptions were a bad thing.
Berni Davis ·
Hi
Why not just use a smear of silicone sealant round the base plate?
Great posting!
Many thanks
soundofvoid ·
How about actually making something to seal the bottom? A pre-cut self adhesive foam piece so that anyone can unscrew the bottom and weather seal the camera?
Munchma Quchi ·
Is that how you seal your bottom?
soundofvoid ·
Ha Ha Ha. Funny.
rhymeswithpulverine ·
Silicone would make it a watertight seal.
Mark Rustad ·
Love the form factor of the a7 series for my travel photography. The a7r II has ton of horsepower in that sensor and that is how I approach my care for these tools. I honestly behave as if I am carrying a naked sensor or an exposed electrical wire. I assume zero protection. This approach has never failed me. Tides rise and zero protection on the bottom begs the question as to why they wasted their time sealing everything else. It’s either sealed completely or not at all. If conditions become harsh, I close up shop lest the unit croaks and leaves me high and dry.
Astro Landscapes ·
I hear the D850 is held together with 10-penny nails. SO MUCH better holding power than those wimpy little screws in the A7R3.
Carlos Vitor ·
Roger, is the Sony A9 weather sealing any better?
Roger Cicala ·
Carlos, I haven’t taken one apart yet.
Vladimír B?lohradský ·
Hi! Thank you for this amazing article. I can’t stress enough how much it is useful! It is literally a life saver. I have same concern about A9 as Carlos has. I use this camera for wildlife. I didn’t put it into pouring rain or heavy snow storm yet but more insight would be great. I wonder if LensRental got some “rain drown” A9’s. I wish SONY is more informative about what is recommended do and don’t. Canon and Nikon are pretty clear about what their top flagship cameras can stand. But if SONY marketing A9 as a Sport photography camera, it shall stand some rain since sports (especially winter sports) can be pretty messy.
AlphaPhoto ·
grip resolve the problem?
Roger Cicala ·
Maybe. Grip with tape around the seal, probably. But still waiting to see if that causes overheating.
nuitamericaine ·
Does the grip have a weather sealed rubber strip around the join which would negate the need to tape?
NJ2017 ·
Hi Roger! I am waking up too late to the magic of your team’s write-ups and I am having one of those “enlightened” moments. Reviving an older thread I know but stumbled across this one while researching for accessories for my newly ordered A7Riii and got so nerded out that I couldn’t sleep lol!!
I want to know your thoughts on the VG-C3EM Vertical Grip. The Sony grip for the A7Riii does not fit properly ln my opinion. There is a rubber gasket at the base of the shaft that goes into the camera, and this gasket does not allow the grip to fit snugly against the bottom of the camera. This leaves a small gap between the camera and grip that you can see light peaking though if you level it at the right angle. I do not see this issue on the A7Rii and I am about to send my second one back but perhaps will wait for your thoughts.
Stevepa999 ·
The reason why they did not seal the bottom part of the camera properly is that they want the heat to dissipate and keep the camera from overheating.
Roger Cicala ·
Yes, we all get that. But ‘why’ isn’t particularly important here. Where is the important part.
Primitivelamps ·
Nothing common sense and a piece of electrical tape can’t fix 🙂
Barbu Mateescu ·
So when one buys some weather sealed product, is it “common sense” to immediately dismantle it and patch it with some tape? Oh boy, I hope you don’t work for some car dealership…
Primitivelamps ·
I live at the beach. Since the day I open the box all my equipment is exposed to salt air. I shoot landscapes, street, and sports primarily. I have had almost every mirrorless camera Sony made since the A6000. Used all of them in conditions for below zero, rain, hit by ocean waves and spray. Not one failure caused by moisture. My comment was a joke by the way I don’t even use the tape 🙂
Michael Clark ·
“I have had almost every mirrorless camera Sony made since the A6000.”
In other words, you don’t keep any single one of them for long enough for the slow effects of such an environment to manifest themselves. You’re exactly who Sony is hoping will buy their endless stream of new models every 12-18 months.
By the time the corrosion starts to have an effect, whoever you sold it to has it. And rather than blaming Sony, they’re probably blaming you.
Primitivelamps ·
https://uploads.disquscdn.com/images/9f7dad0d8ede759dc6728f9ea724782f1004c4e940477c14c0e7bfee99ff5a4a.jpg https://uploads.disquscdn.com/images/b9efbc71151c7978d8cf61faca0019c05b042f2eb840377ad3a4509394603982.jpg
Wrong as usual:) Still using the very first Sony I ever bought. No corrosion at all on this the most inexpensive camera I have. And I have beat the living crap out of this and it will not die. Nice try though:) Exposed to Salt air since day one and nothing, nada, zerooooo! So much for your BS theory:)
Carleton Foxx ·
So, is a big Ziploc with a hole cut out for the lens still the best kind of weather proofing?
Roger Cicala ·
In my opinion, yes it is!
Dave Hachey ·
I keep a supply of shower caps in my bag that I get from hotels. Also use the Opteka rain sleeves. Cheap and readily available. I’ll probably add a few slices of parafilm to my bag too.
Bernhard Sedlmaier ·
Have you also taken apart the A9? Is it different to the A7r III?
Chris ·
Are you guys time travelling? some pictures are copyrightet 2016, others 2018… How come?
Rick ·
My guess, those incorrect year designations were to test if you were paying attention or sleeping through the disassembly.
Roger Cicala ·
Hell, I can’t remember what year my kids were born, can’t remember what day it is half the time.
Mel Snyder ·
I’m just a humble customer of LensRentals and LensProToGo. I am in awe of someone who has the courage to disassemble a Sony A7RXX – to me, that would be like standing at the top of an Olympic ski jump, and pushing off. That you could get it back together and functioning should merit a Gold Medal in a new Olympic event. Like Mark Rusted, I treat every camera except my old Nikonos II with great care, carry rain jackets for the camera and lens if I MUST shoot in bad weather.
Nevertheless, I love your disassembly blogs. But I would as soon perform self-appendectomy as open one of my Sony bodies.
Rick ·
In my experience, putting it correctly all back together is when all the skill comes into play. Those unique shim thicknesses would have caught me with a bad case of Dutch-tilt.
Bob Abend ·
Thanks for your informative tear-down. I was wondering if you have any thoughts on a good approach to adding a seal to the body bottom.
Chris Christian ·
Roger, thanks as always on these tear downs. Sony should pay you for finding weaknesses that their engineers should have handled. I find your results to be mildly unsettling. I use both the Sony battery grip and the RRS L bracket; which means my battery door is no longer attached to my camera. Granted it is reattached to the RRS L bracket and they have a fairly decent attempt at sealing the battery opening. Obviously if I’m using an L bracket for landscape photography, I regularly have my camera on its side shooting portrait orientation. I’ve done this through rain and sleet, and now I am thinking I was extremely lucky. I shoot all G Master lenses (except my 90 macro f/2.8 is a G OSS), so between Sony’s claim of improved weather sealing and the G Master lenses being weather sealed, I have just pushed through wet conditions like a boss. But after this, I will be keeping the camera covered until the shot is taken (looking into the Liteflex Silver backpacking umbrella). I use my a7R3 for everything and could not be without it. Now I am concerned, very concerned. I also shoot in some very humid conditions, and what you are exposing would indicate to me that I may see humidity make it inside the camera through the base. Not good!
Any way, on a lighter note, I wanted to personally thank you. You are always very thorough and have really great insights into engineering, design, and usage patterns. Seriously, Sony should consider putting you on the payroll, and assigning several engineers to you, to further improve upon their camera’s. Your knowledge and experience of what works, what doesn’t work, what breaks, what doesn’t break, etc would be invaluable to an engineering team.
Also, besides just great information, I find you to be hilarious. I always bust out laughing reading your blogs, but this one had me bust out 6 or so times. I tried to explain to the people around me after the third out break why this was funny, but they didn’t get it. But I find your remarks a joy to read. Have a great day!
Roger Cicala ·
I think they perhaps would like me on the payroll, but mostly to get me to sign a complete nondisclosure agreement 🙂
Ilya Volkov ·
100% sure that weak bottom design was made on purpose.
Gary Bryans ·
Try getting one of these fellows:
https://www.ebay.co.uk/itm/Silicone-Case-Cover-Skin-Sleeve-for-SONY-A7RM3-A7R3-III-A73-A7III-A7M3-Camera/222901564285?hash=item33e5f7f37d:m:mEzymCEVxK8UzaUMSzo1utQ
Tarik Karim ·
Hi Roger! Could you perform a similar tear down for the immensely popular Sony a7iii?
Marek Trnka ·
I would be interested in this as well…
Ankit Kumar ·
Hi Roger!
As a Sony user myself, would there be any precautions I should take to ‘weatherproof’ my camera? I always use covers, but I can’t predict the weather 😛
I already use a battery grip to stop water seeping in from the bottom, and brush water off of any flat surfaces on the camera. Any help would be greatly appreciated!
Eduardo Gonzalez ·
Hello, can you confirm if the Mainboard of the A7R III and A7 III are the same? Thanks