A Peek Inside the AF-S Nikkor 120-300mm f/2.8 FL ED SR VR
We’ve wanted to look inside the Nikkor AF-S 120-300mm f/2.8 FL ED SR VR lens. When we took apart a Z lens recently, we found Nikon had moved on from their ‘classic’ internal optomechanical and electrical design for a neat, modern design. We were interested to see if newer F lenses would pick that up, or if they would continue in ‘classic’ format. While it’s pure speculation on my part, I thought that if F lenses were starting to pick up Z characteristics, it would, perhaps, signify a unified approach going forward. If not, maybe then Nikon is maintaining separation of the Z and F design teams.
Additionally, Nikon has finally achieved parity with Tamron for most initials in a lens name, so we figured this lens has to be better than lesser lenses with fewer initials. For those of you keeping score, VR is Vibration Reduction, SR a high dispersion glass that affects shorter wavelengths, ED is Extra-Low Dispersion Glass, and FL is Fluorite elements, of which this lens has two. There are also three additional initials for various coatings and special sauces. Mercifully, these didn’t get added to the name, but the nanocrystal coat gets its own shiny gold “N” badge on the side.
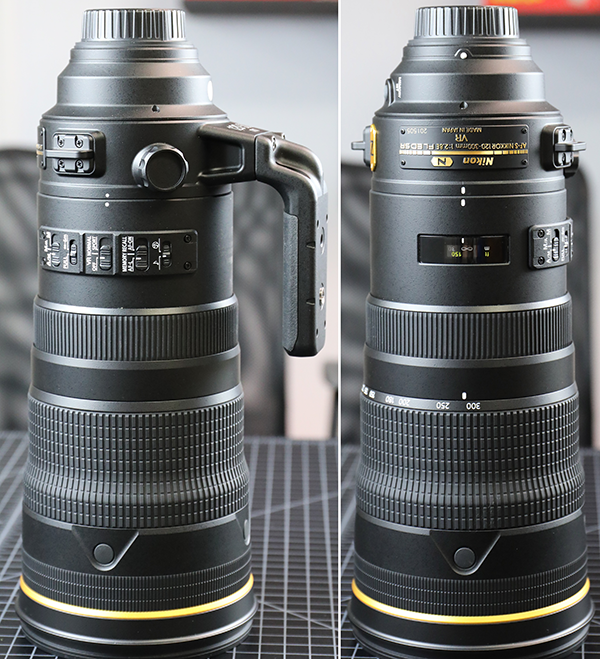
While we don’t have enough copies in stock for a real MTF test, we also wanted to optically test this one copy. This Nikon is not a lightweight, at 3.25 kg and 12 inches long; it’s a tiny bit larger than the venerable Sigma 120-300mm f/2.8 DG OS HSM Sport lens and larger than the Nikkor 300mm f/2.8 ED VR II lens with which it will compete. The price tag for the Nikon is heavier, too, coming in at $9,500.00 compared to $3,500 for the Sigma and $5,500 for the Nikkor 300mm.
So we suspected the Nikon would be awesome optically; better than the Sigma. The Sigma is good, but not amazingly good, so I could see that happening. Maybe the zoom would even close to the Nikkor 300mm f/2.8. The high price wasn’t because it was small and light, so we figured it must be from great optics. And maybe because there was a lot of new internal engineering in addition to the cutting-edge optics.
We only have received a few of these, and they were all rented, so Aaron and I were under strict orders not to dissect them. Luckily, however, one arrived with some obvious dust inside (yes, that happens sometimes). We know that doesn’t affect images, and you know it doesn’t affect images. But customers like to receive really sparkly clean lenses, and we didn’t want to deal with the inevitable “I can’t believe there’s dust in this $10,000 lens” complaint. Returning it for another copy takes time, so we decided to clean it out in house, because, well, then we got to take it apart. And since we were taking it apart, we got to run MTF tests on this copy before and after.
An Aside
Before we begin, those of you who regularly read our teardowns will notice that Aaron’s long-term BFF, his WIHA #00 driver (top), has been largely replaced for this disassembly. Aaron recently spent some training time in Germany and came back with a new driver that is so secretively marvelous it doesn’t even have a brand name.
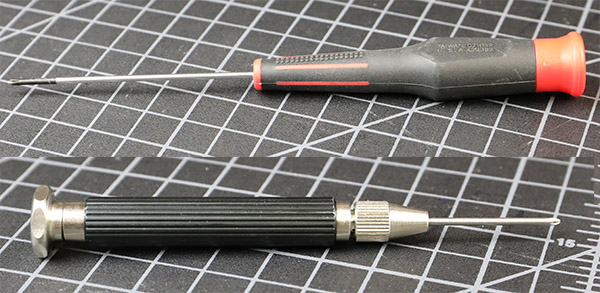
I was as shocked as you are; his new favorite isn’t much to look at compared to the graceful, flowing curves of his ex. But he let slip that he has to disassemble the new driver every so often to lubricate it. Now I understand; Aaron’s Geekness couldn’t resist a screwdriver that requires regular disassembly and maintenance.
Let’s Chase Dust!
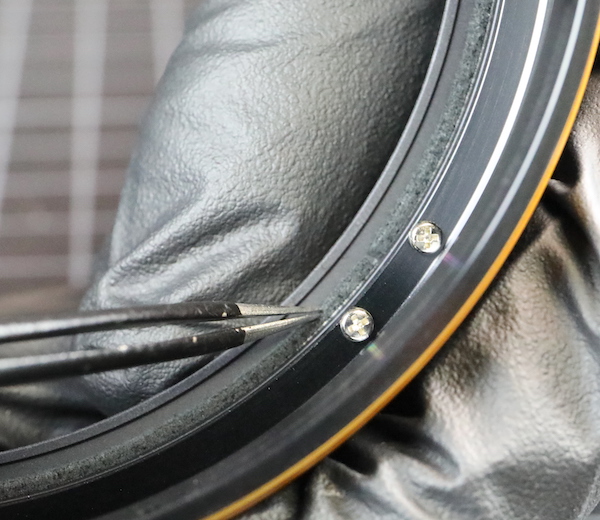
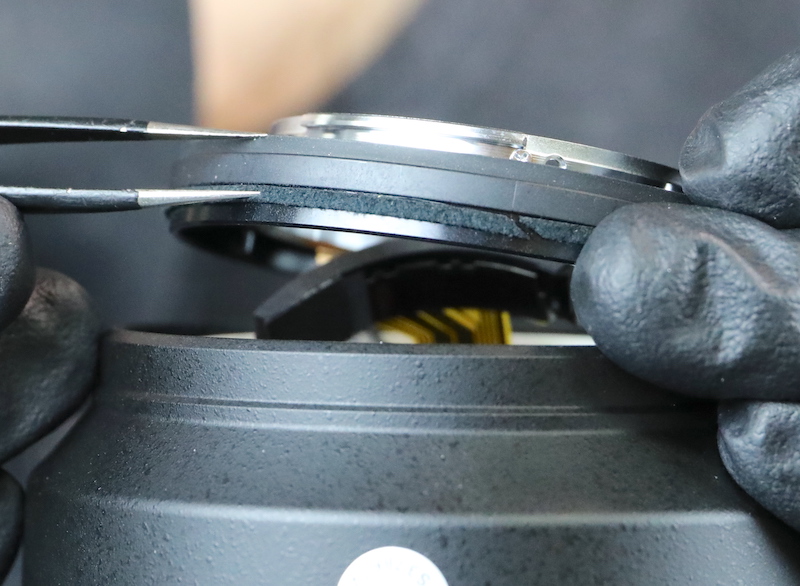
We started at the front end because that’s where the dust was. Under the decorative front rubber, we found six screws that appeared to hold the filter ring on. You can also see in the slot towards the right side that the front group is shimmed.
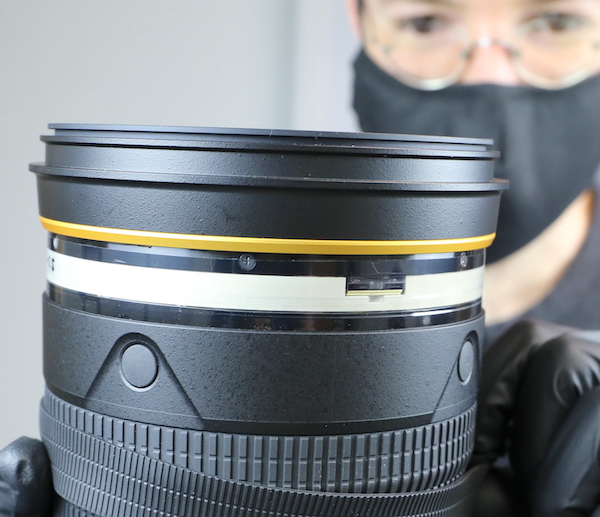
Removing the tape and then the screws let us slide the filter barrel off. We’re really pleased to see this; it’s a filter ring design Nikon used to use in most of their telephoto zooms, making the filter ring an easy item to replace should it become damaged.
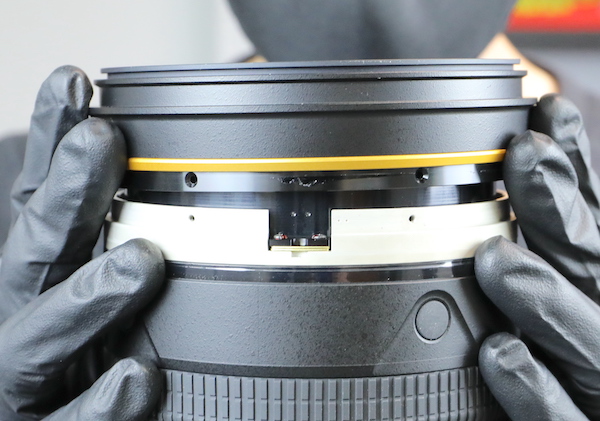
From the underside, you can see there’s some nice, thick, foamed sealant under the filter ring. The ring is actually a two-piece assembly that is held together by three pairs of screws.
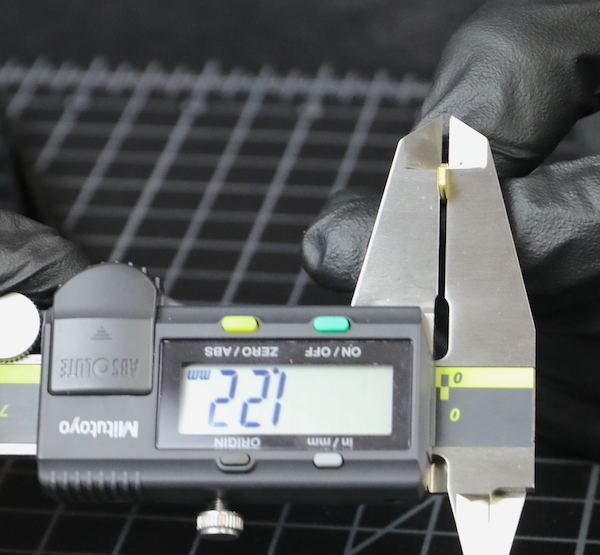
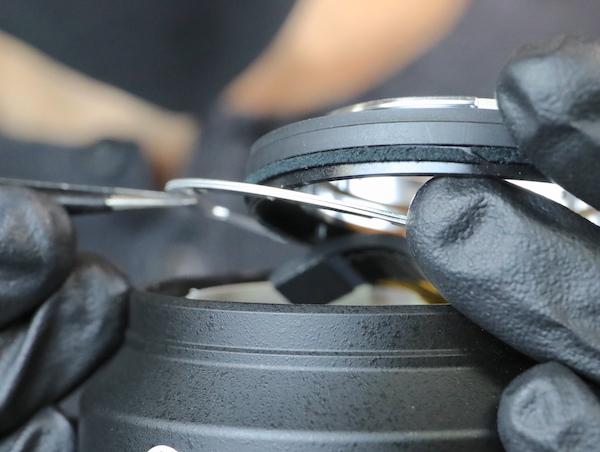
Looking back at the barrel, the shims are held down by two screws, a strong hint that those screws probably also hold the front optical group in place.

We measure each shim group as they’re removed; we can’t be sure if these are just a spacing adjustment, or both spacing and tilting adjustment. In this case, all three shims measured at 1.22mm, so for this copy, at least, only spacing was needed.
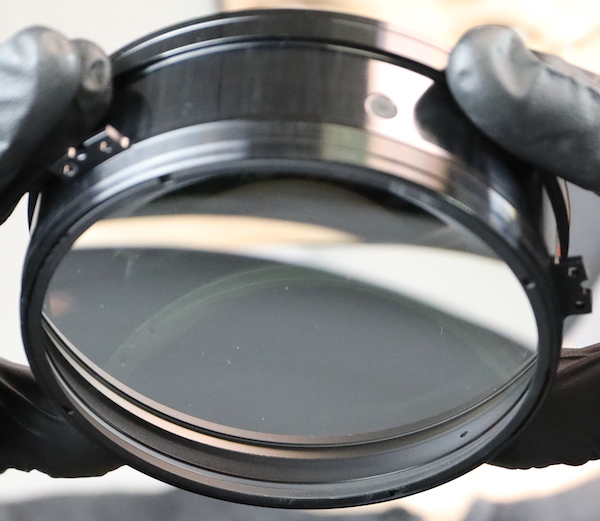
As we had expected, once the six screws and shims were removed, the front group came right out.

We haven’t found a lens diagram for this lens yet, but the front group feels like 3 or 4 elements; it’s a heavy piece. We had seen the dust (you remember, we’re here to clean out some dust) from the front of the lens, so we were a little concerned it might be inside this group and therefore not cleanable. (What looks like dust is sometimes a ‘crumb’ left when cement dried irregularly.)
The dust spec was actually on the front of the zoom group, though, which is the next element down, and blew right off. While we’re here, though, the zoom group has quite a long travel, as you can see.

We took off the zoom rubber to see if there was anything underneath it that we needed to see. There was the usual clear tape over the various openings and the gray strip of friction tape (right side of the image) around the entire ring; this gives a ‘grip’ surface to the rubber and also weather resistance to any openings underneath it.
The aluminum cover made me sad, though. That’s what Nikon uses to cover old-time position-sensor brushes, which means this lens has ‘classic’ brush position sensors, not newfangled optical sensors. They work just fine, don’t get me wrong, but this is a strong hint we’re not going to find new ‘Z- style’ electronics inside this lens.
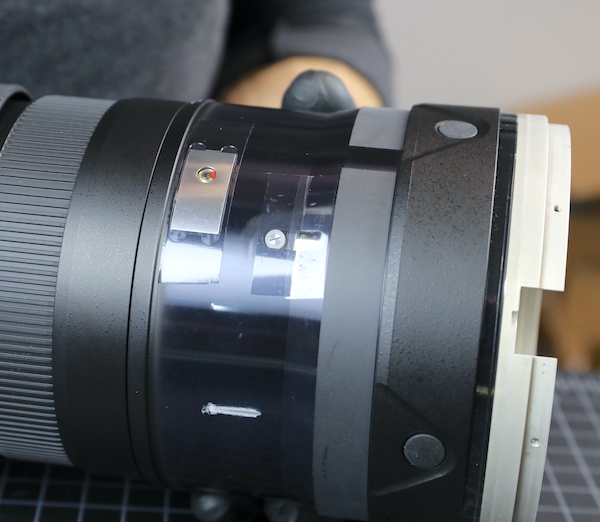
With the friction tape removed, we can see the slot and screws of the zoom hard stops.
We can also get just a glimpse of the rollers and slots that keep the zoom group movements in line. These are sturdy and doubled, as you’d expect on a lens of this size.
There was no obvious further disassembly to be done at this level. While we had removed the dust spec out that was our excuse for this exercise, we decided we had enough time for at least a quick look in the back of the lens.
Rear Disassembly
The bayonet mount and rear light baffle come off after removing the usual screws.
The bayonet mount itself is quite thoroughly weather resistant with both hard rubber and foamed rubber gaskets.
There are the usual spacing shims underneath the mount.
There is a not-so-usual grounding wire soldered to the underside of the bayonet. It’s this kind of unexpected thing that makes first-time disassembly kind of exciting; there are lots of things you can tear if you aren’t expecting them. While unsoldering it would be an option we decided to just work around it since we were trying to move along fairly quickly here.
Like a lot of larger Nikon telephotos, the 120-300mm gives us the option of removing the rear barrel without taking off the bayonet, so we did that next.
Now we could see where the ground wire went and remove it (and the bayonet) with no risk.
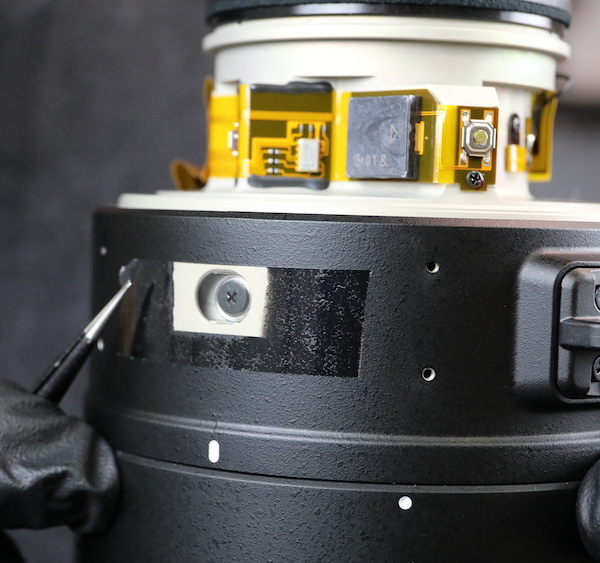
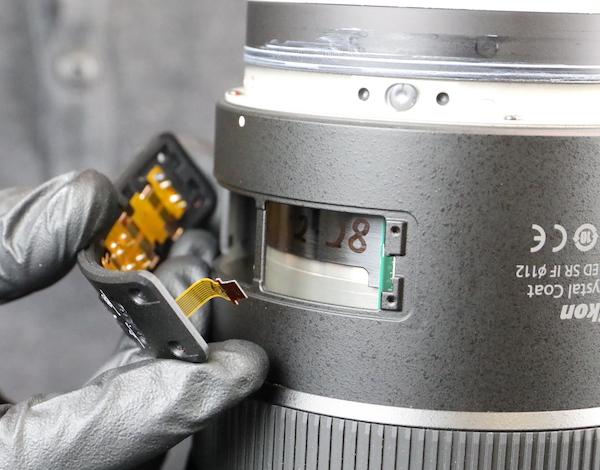
Obviously, we see the 120-300mm definitely goes back to the classic “why have a PCB when we can run huge flexes and stick pieces of circuit board all through the lens” style of electronics. Again, it works fine; they’ve been doing it since before Aaron was born. But I find myself humming “Let’s Do the Time Warp Again” when I see it.
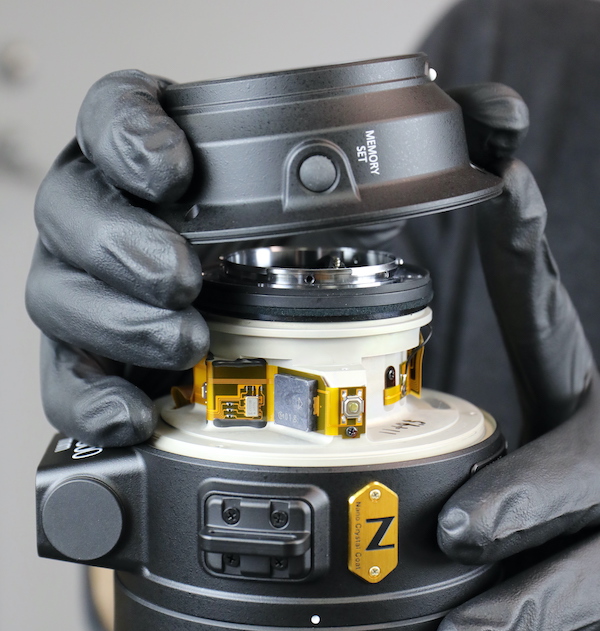
Anyway, this board contains the gyro sensors for the image stabilizer. You can see the Memory Set pushbutton over on the right; the button on the rear barrel is just a soft rubber seal, this is the actual button you push. One less access point for dust and water, so this is always good to see. There’s a big gray thing there, but I forgot to investigate what it was, honestly. The flex tracings go to the memory set button, so maybe a memory chip for that.
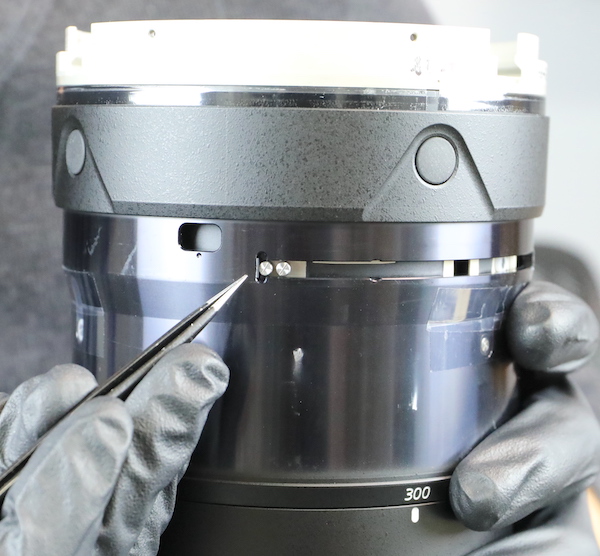
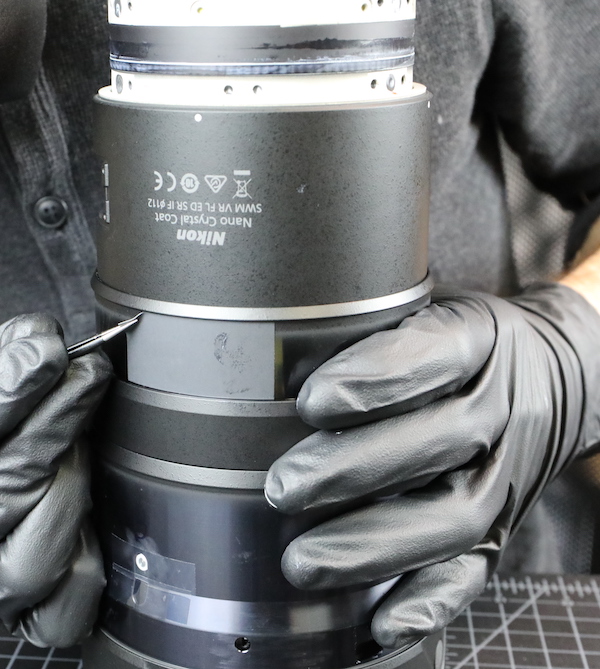
The next step is to take off the tripod mount ring. We know there’s an access port to remove it but weren’t sure where it was. First guess was under the tripod foot. Wrong.
Guess number two was under the strap lugs. Wrong again. Somewhere a Nikon tech is reading this and being greatly amused.
Guess number three was ‘that sure is a big-ole nameplate, isn’t it?’ And once the nameplate was removed, the access port was found.
The tripod ring rollers are robust, ball-bearing types.
And with those removed, the tripod ring comes right off.
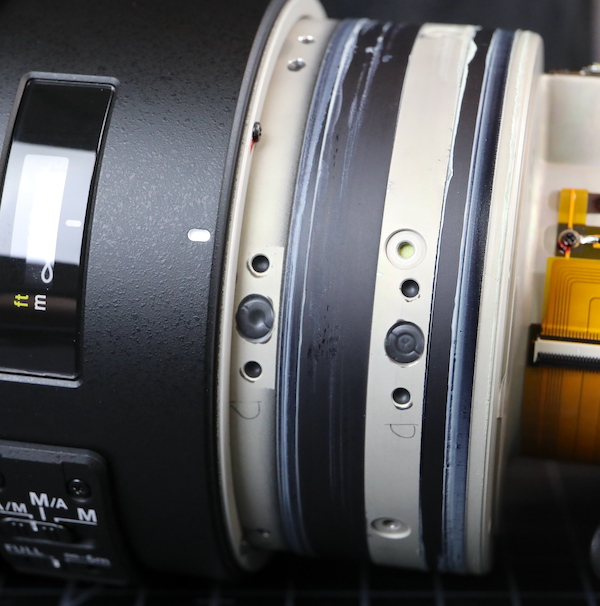
Looking at the inner barrel, we can see several heavy-duty, eccentric adjustment collars. Nikon has upped their “we’re gonna glue these after we adjust them at the factory so you can’t touch them” game here. These are glued with what appears to be rubber and asphalt.
Normally we take that kind of sealing as a challenge to a duel, but this lens needed to go out today. So we smiled and said another day, Nikon, another day. Next, we proceeded to remove the switch plate so we could get ready to take off the mid barrel.
We also remove the focus rubber and untaped the slots underneath it so we could expose any electronics that may be passing through.
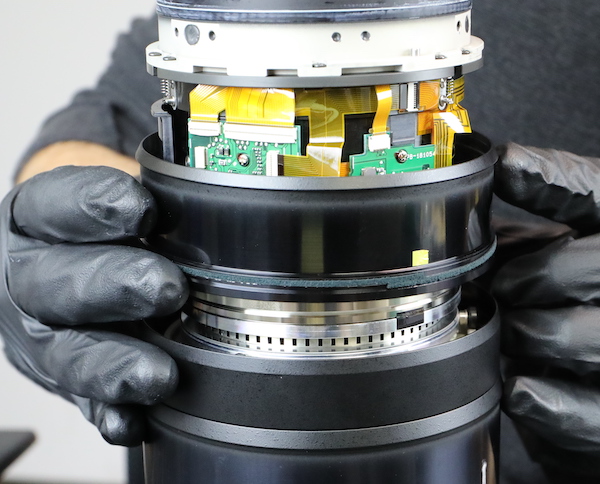
Seeing nothing to make us nervous, Aaron removes the set of six sturdy screws holding the mid barrel in place.
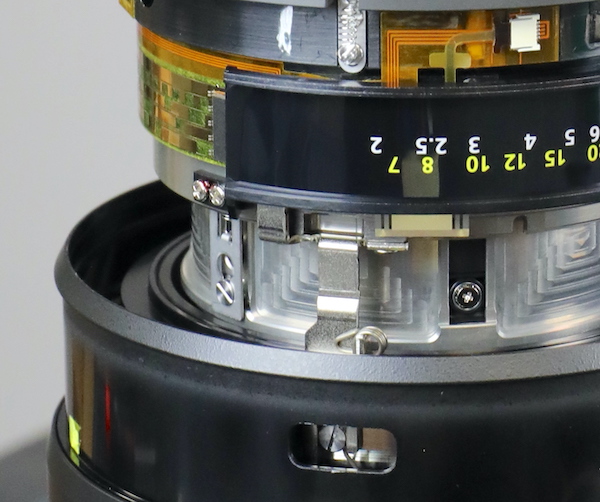
After which, the mid barrel slides right off the back of the lens. To the left of the distance scale, you can make out the copper-on-green tracings for the focus distance brush; underneath it, you see the metal alloy of the lens chassis, and above the focus-distance scale a small traffic jam of flexes.
A closeup of that area might show things better. The vertical aluminum piece with a spring clip is the focus key. I believe the cool designs on the metal of the chassis are left from CNC machining. But it could be some geometric art.
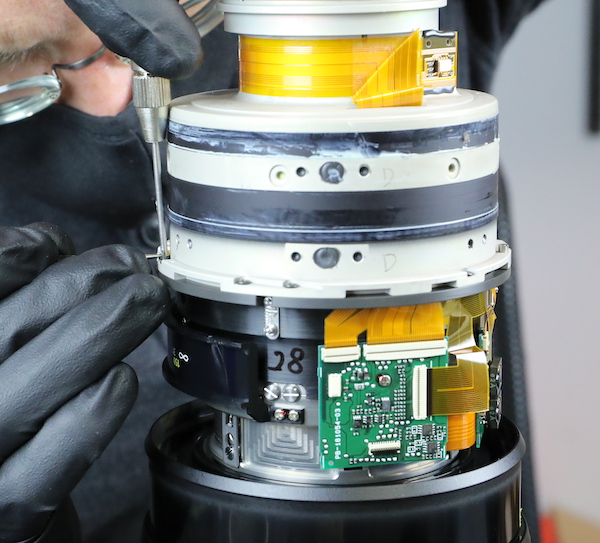
Rotating things around, we see there’s a lot of things making their home in this mid barrel/focus barrel area. The focus position brush and tracings are here.
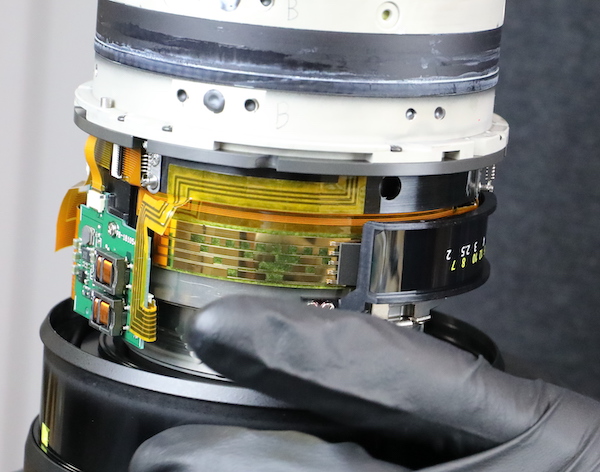
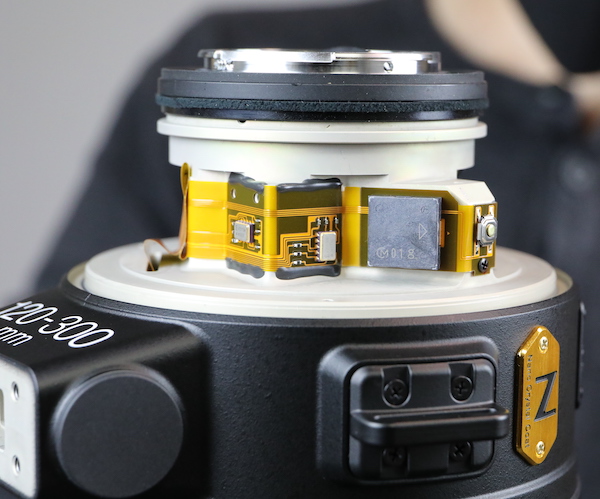
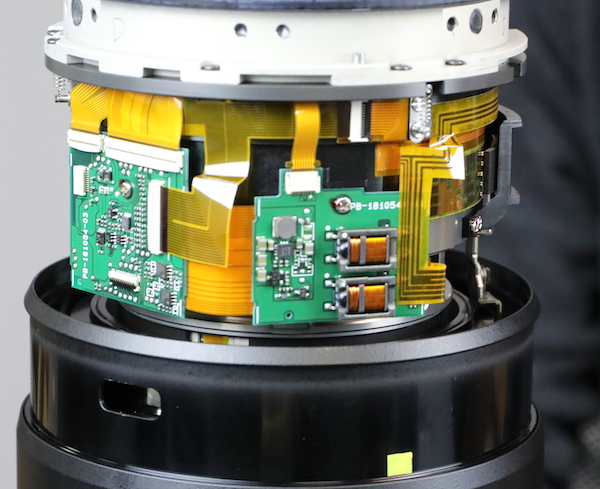
Rotating around a bit, and we have a couple of more circuit boards and additional flex chaos. There’s a couple of manly-sized transformers on the right board, the left board seems to be flex connector central. I don’t know much about designing flex runs, but I do know the thoughtful, direct flex layouts of the Z lens, and this isn’t it. The flex with the seven right angles (just to the right of the transformers) is the new ‘most bends in a single flex’ champion with 720 degrees (two full rotations) of turns, BTW.
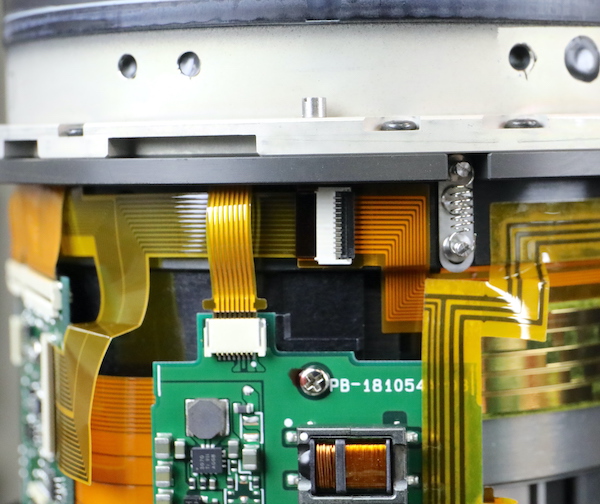
You may have noticed some tension springs around the upper part of this area. Here’s a close up of one if you missed it. There are sets of these on either end of the barrel; we assume to provide a smooth resistance to the ring.
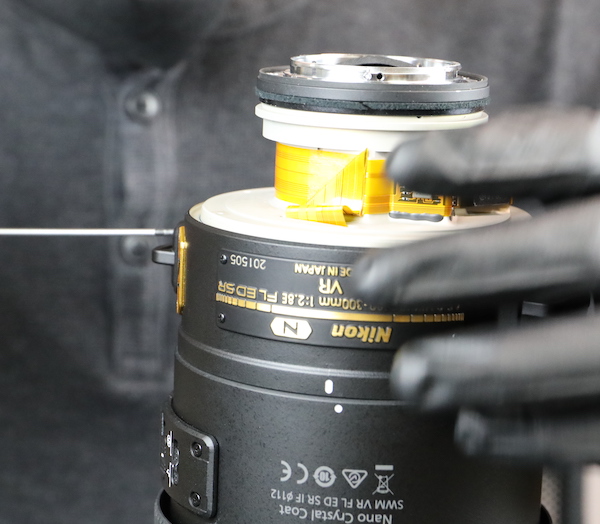
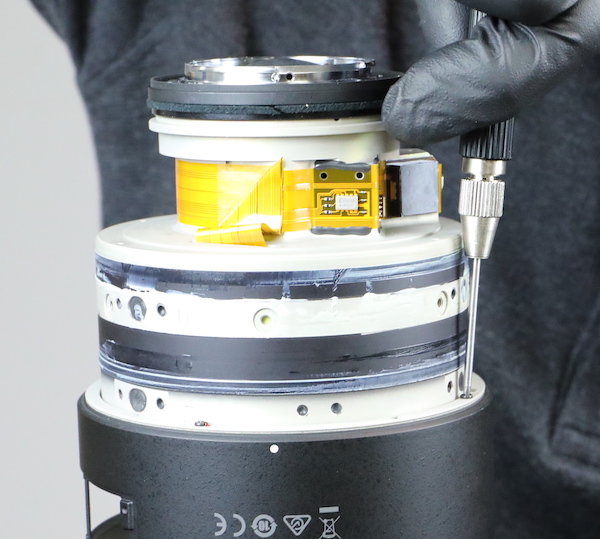
While we’re here, we can lift up the focusing ring, demonstrate another area of nice foamed weather sealing, and take a peek at the big-ass ring ultrasonic motor that drives that big focus group quickly.
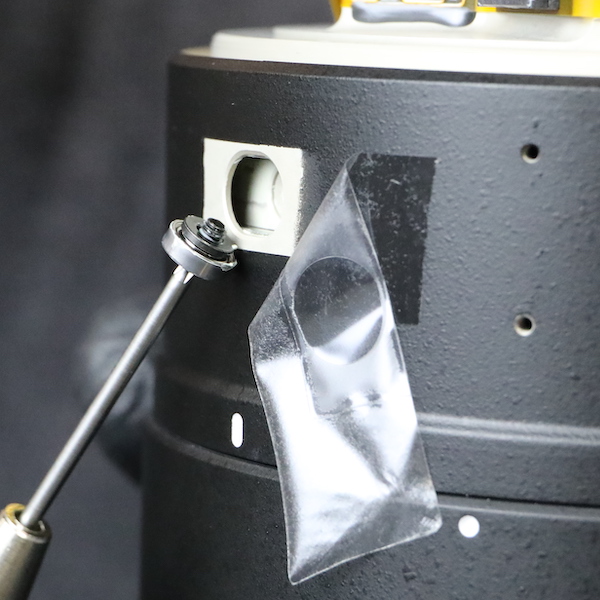
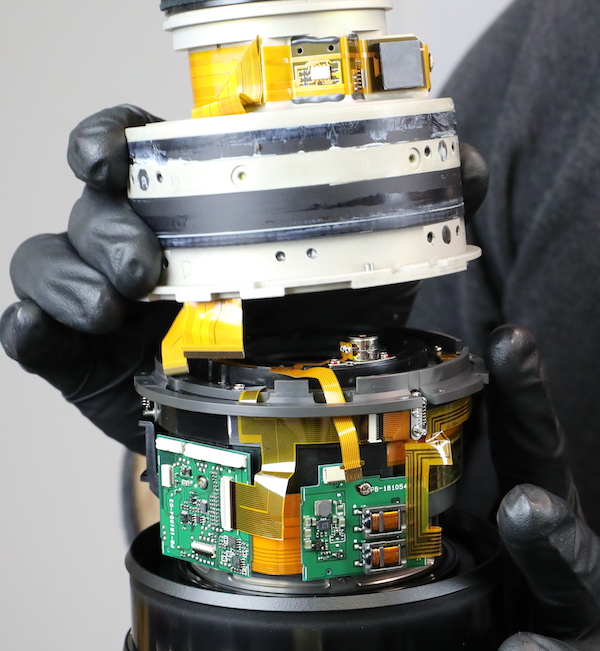
There are a couple of flex connectors that have to be removed now.
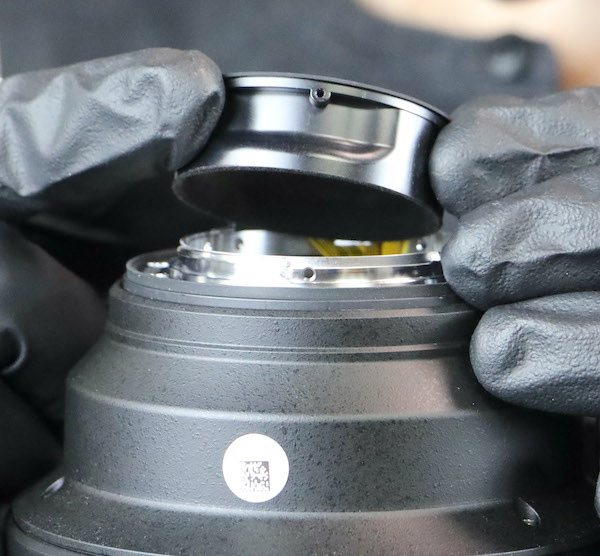
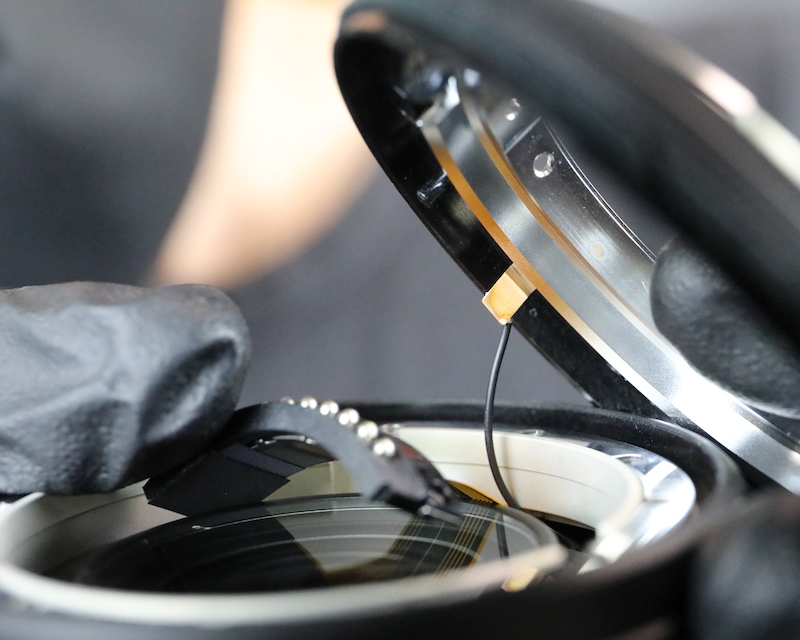
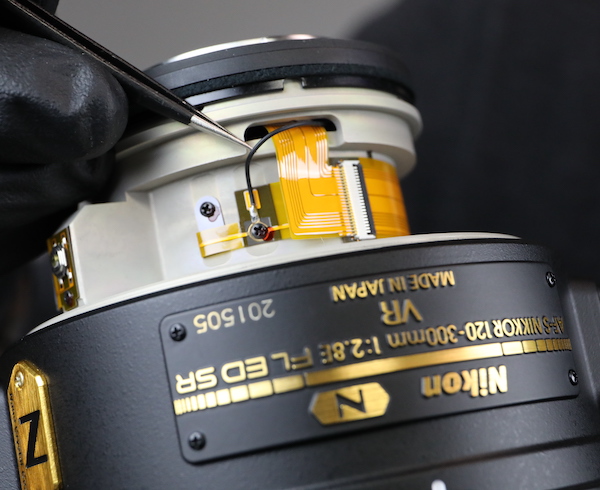
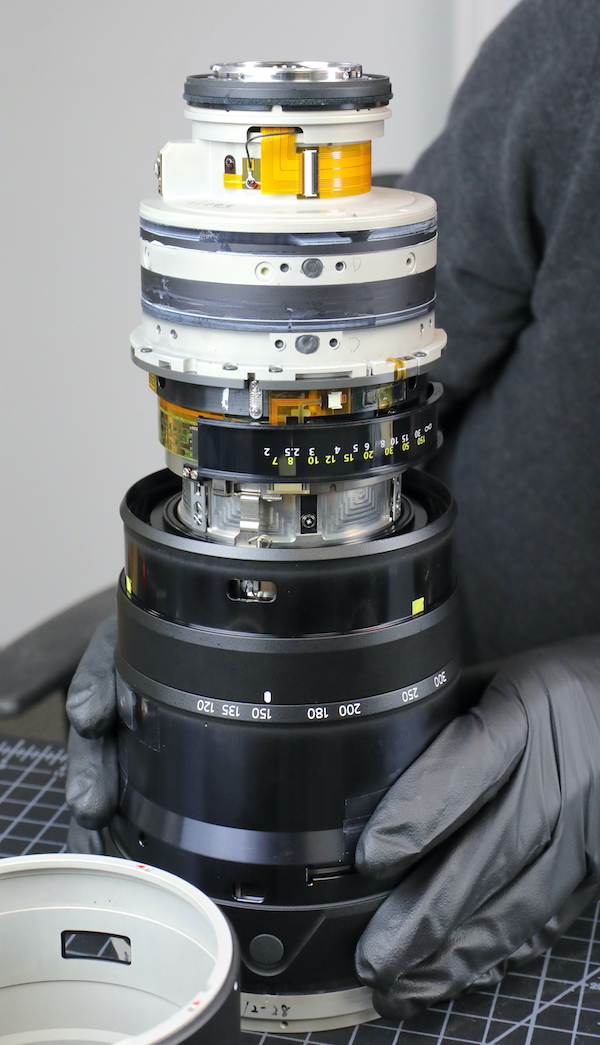
Then Aaron can take out the screws holding the rear barrel to the mid barrel and remove it. You can see the aperture motor peeking up from the mid barrel.
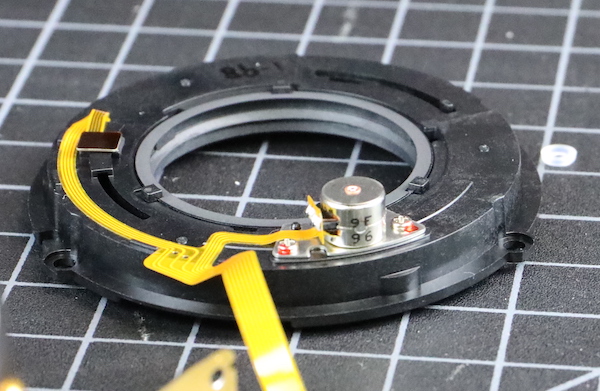
The removed rear barrel appears to have a fixed element closest to us. Underneath that, you can see some of the metal brackets of the stabilizer unit’s electromagnets peeking out of various openings. Given that we had time constraints, and some previous bad experiences taking apart stabilizers, we had no interest in picking out glue to disassemble this unit.

Looking back to the main barrel, you can see the aperture assembly.
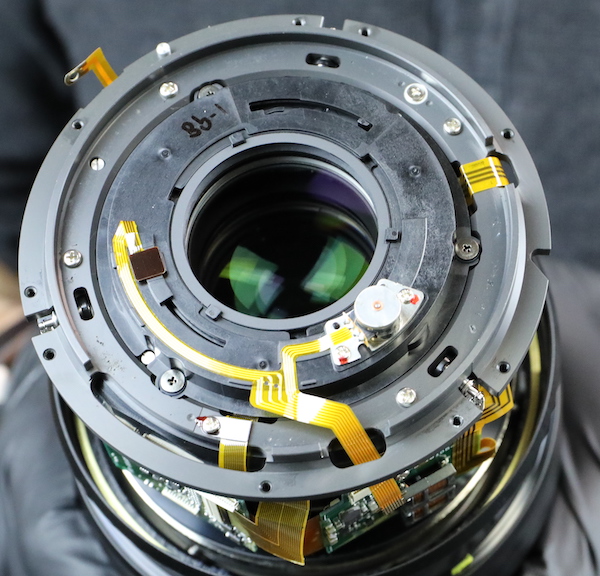
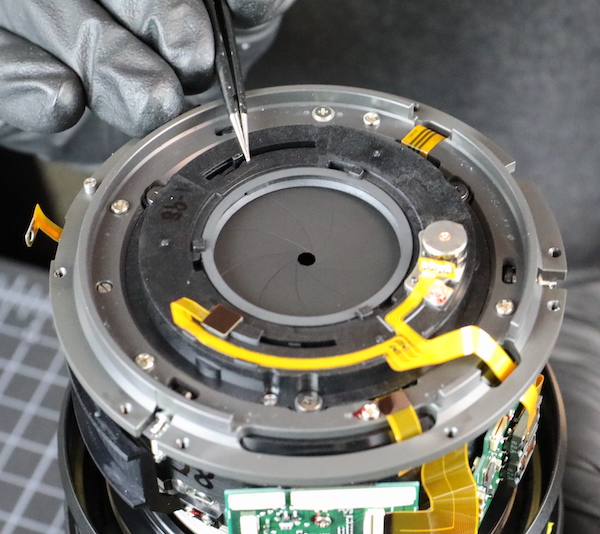
The aperture is a self-contained unit, just held in place with a few screws.
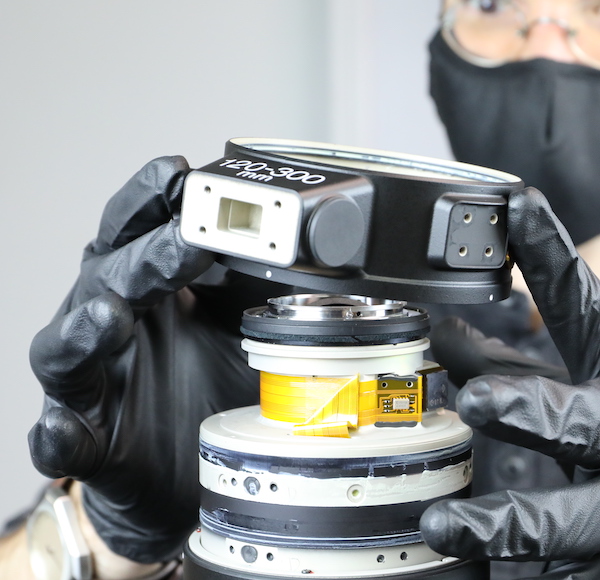
Aaron and I spent the next few minutes taking off the circuit boards and disconnecting flexes, intending to separate the front and mid barrels. Still, it became apparent that it was going to take a long time and probably require removing some adjusting elements. There wasn’t a lot we wanted to see in here; we’ve already gotten glimpses of the roller bearings and focusing motor. Given that this lens was on it’s way to a renter the next day, and we still needed to reassemble and retest it, we decided to call it a day.
We had seen what we most wanted to see. The lens is well built in the old, classic Nikon F way. Obviously, we don’t think that’s pretty, and it’s not fun to work on. But it’s been an effective method of manufacturing for decades. The moving parts are solid, the chassis and assembly are solid, the weather resistance is as good as anything, maybe better.
We assume this indicates that new Nikon F lenses will resemble older Nikon F lenses and not the Z lens line. That’s just an assumption, obviously. They may incorporate Z changes in the F lineup in the future, of course.
About That Optical Testing
Obviously, this isn’t our ’10 copy’ true optical testing. It’s this single copy. There may be better or worse copies; well, actually, there will be better and worse copies. But given the price of the lens, I assumed it should be clearly better than the Sigma 120-300mm lens; it pretty much as to be. I actually had hoped it would be, at 300mm, nearly as good as the Nikon 300mm f2.8 VR II lens, which itself costs only half of what this lens does and is a bit lighter.
This isn’t an ‘end all be all’ MTF curve, but it should give us an idea about the range this lens will fall in. Since most people use telephoto zooms mostly at the telephoto end, let’s start at 300mm. First comparison is to the Sigma 120-300mm.
Sigma 120-300mm f/2.8 vs Nikon 120-300mm f/2.8 at 300mm
Now I’m not saying a lot of people are going to rush out to pay $10,000 for a 120-300mm f/2.8 zoom lens, but if you do, the Nikkor is significantly better than the Sigma. The Sigma, BTW, is a really good lens, so the Nikkor is just awesome.

Nikkor 120-300mm at 300mm vs Nikkor 300mm f/2.8 ED VR II
I say it often. No zoom is as good as a prime. But still, if you’re going to slap down enough money to buy two awesome primes for one zoom, you should know if the zoom comes close to the prime in image quality, right?

Or perhaps Roger is sometimes less correct than he thinks he is. The MTF for the zoom at 300 is actually a bit better in the center of the image. The prime is only better in the outer 1/3 of the image. I doubt this lens sells significant quantities, but for those who buy it, they truly are getting a zoom that is at least as good as, perhaps better than, the prime. There are people who will consider that worth the money, whatever the price, because that is a unique capability. I doubt it’s a lot of people, but some people.
MTF by Focal Length
Again, I want to remind you this is just one lens. Whether other copies will behave this way, I have no clue yet. This one is great at 300mm, not so great at 200mm, and really good at 120mm, although not quite as good as at 300mm.
300mm

200mm

120mm

So, What Did We Learn Today?
First, like every law, Roger’s Law that Zooms Are Never as Good as Primes has at least one very expensive exception. At one of its focal lengths. This zoom is ‘prime good’ at 300mm.
Second, we learned that the Nikkor AF-S 120-300mm f/2.8 lens is spectacularly good optically, particularly at the long end, which is probably the most important place to be spectacularly good optically.
Third, we learned that Nikon F lenses, at least at this point in time, are not incorporating the new electrical and mechanical designs of the Z lenses. This probably matters to Nikon F shooters not at all since this is the same technology their other lenses use. It matters a bit to us, who will work on them. At no time during this teardown were the words “Elegant Engineering” ever spoken.
What does it mean, though? That’s just speculation. Creating a lens takes several years, so this is a look at what Nikon was doing a few years ago. I don’t know, and neither do you (unless you’re reading this post from Nikon Corporate HQ, in which case feel free to leave a comment).
Perhaps Nikon will merge lens technologies in the future. Maybe they will maintain separate design and manufacturing teams for as long as they continue to make F-mount lenses.
Roger Cicala and Aaron Closz
Lensrentals.com
May, 2020
56 Comments
Mike Gregory ·
big kids
Roger Cicala ·
Duh!
Mike Gregory ·
hahaha I am the same, need to pull things apart to see how they work. Was in big trouble at about 9Y/O, pulled a clock apart and couldn’t get it to work again. Major spanking for that one but still the same.
Mike Gregory ·
hahaha I am the same, need to pull things apart to see how they work. Was in big trouble at about 9Y/O, pulled a clock apart and couldn't get it to work again. Major spanking for that one but still the same.
Lester ·
I saw mention of MTF tests “before and after”. Anything interesting turn up after you removed the dust speck (smile)?
Roger Cicala ·
Nope, same ol same ol. 🙂
Lester ·
I saw mention of MTF tests "before and after". Anything interesting turn up after you removed the dust speck (smile)?
Roger Cicala ·
Nope, same ol same ol. :-)
Max Manzan ·
Thank you very, very much, Roger and team.
I’ve been missing your such articles a lot, lately.
Max Manzan ·
Thank you very, very much, Roger and team.
I've been missing your such articles a lot, lately.
Eric Calabros ·
Can’t wait for Z 300mm f/2.8
Eric ·
Can't wait for Z 300mm f/2.8
Andre Yew ·
Thanks once again for the fascinating teardown! Related to one of the questions below, have you guys ever found a lens where the reassembled lens had better MTF, beyond the error bars of your measurement, than before?
Roger Cicala ·
We have had a couple of cases where we did a disassembly knowing the lens wasn’t up to par and adjusted the optics during reassembly. Normally, we’ve tested a bunch before we disassemble, this was different.
I don’t recall ever just randomly getting one much better. The reality is we can adjust a bad lens back to average, but really not an average one to better than average usually.
Roger Cicala ·
We have had a couple of cases where we did a disassembly knowing the lens wasn't up to par and adjusted the optics during reassembly. Normally, we've tested a bunch before we disassemble, this was different.
I don't recall ever just randomly getting one much better. The reality is we can adjust a bad lens back to average, but really not an average one to better than average usually.
John Fragoulias ·
What was Nikon thinking $9.5K, LMAO. Yes it's better than the Sigma which is a seven year old design, but $6K better. Just like the Nikon 500mm f4 is not $4K better than the Sigma 500mm f4 sport. This is the reason Nikon is bleeding money.
https://www.dxomark.com/sig...
https://www.naturettl.com/r...
Deanaaargh ·
Can anyone describe the math behind the focus brushes. I can imagine how a binary pattern could be easily coded into the copper traces. You would have 2^N focus positions where N is the number of traces. Does the pattern utilized here provide significantly greater rotational resolution, (I would have to assume so)?
Does the pattern of the traces illustrated here conform to other traces? Looking at some of the other tear downs on this (excellent) blog, I cannot tell.
Does the pattern seem to agree with a fundamental mathematical pattern?
Olandese Volante ·
Brush type encoders generally use a so-called Gray code aka Reflected Binary.
The particular thing about Gray code is that whenever the output value increases or decreases, only a single bit will change state. This avoids errors due to imperfect mechanical alignment.
As an example, consider a value change from 3 to 4. In straight binary, 3 bits change state: 011 -> 100, but since it is impossible to make sure they all change state at exactly the same position the output might pass through spurious intermediate states, or even stay there if the brush is not actuated in discrete steps.
So yes, the traces use a binary pattern, with a twist.
Deanaaargh ·
Thank you. This is exactly what i was curious to know.
Andrew ·
As Olandese says, it is Gray code (binary reordered so that only 1 bit changes per positional move.).
It’s a great way to know that no errors have occured. if 2 bits change at once then that’s an error.
5 tracks = 32 recordable positions.
Deanaaargh ·
Can anyone describe the math behind the focus brushes. I can imagine how a binary pattern could be easily coded into the copper traces. You would have 2^N focus positions where N is the number of traces. Does the pattern utilized here provide significantly greater rotational resolution, (I would have to assume so)?
Does the pattern of the traces illustrated here conform to other traces? Looking at some of the other tear downs on this (excellent) blog, I cannot tell.
Does the pattern seem to agree with a fundamental mathematical pattern?
grubernd ·
I did not try to decode that pattern but it is very very like some type of Gray Code. (It's a name, not the colour).
https://en.wikipedia.org/wi...
Short summary: special encoding that protects against read errors and allows to determine switch directions from a single change without ambiguity.
Roy Tait ·
It looks like it uses Gray Code which is common in movement and positional encoders. It is a reflected binary code where the difference between one value and the next is always 1 bit. Using a conventional binary sequence to detect position and movement can be unreliable with simple brushes. For example, a focus change from 0111 binary to 1000 could register as 1110 because the the bit 4 brush makes contact and the bit 1 brush breaks contact before the two middle brushes break contact. The focus ring would return wrong position to the camera and the focus-by-wire system. Having only one bit change at a time overcomes the manufacturing tolerances and wear on the brushes. The Gray Code also offers basic error detection (if more than one bit changes, the reading is wrong) and error correction (in Gray code 0111 will be followed by 0101. If 0001 is returned because of some dirt under the bit-3 brush, you can correct the reading to 0101. More at https://en.wikipedia.org/wi...
Olandese Volante ·
Brush type encoders generally use a so-called Gray code aka Reflected Binary.
The particular thing about Gray code is that whenever the output value increases or decreases, only a single bit will change state. This avoids errors due to imperfect mechanical alignment.
As an example, consider a value change from 3 to 4. In straight binary, 3 bits change state: 011 -> 100, but since it is impossible to make sure they all change state at exactly the same position the output might pass through spurious intermediate states, or even stay there if the brush is not actuated in discrete steps.
So yes, the traces use a binary pattern, with a twist.
Max Rockbin ·
You were looking for a lens diagram? Nikon Rumors has one in their release post:
https://nikonrumors.com/2020/01/06/nikon-af-s-nikkor-120-300mm-f-2-8e-fl-ed-sr-vr-lens-officially-announced.aspx/
Gosh1 ·
https://www.nikon-image.com...
cybertec69 ·
Removed my post, fucking clowns.
Roger Cicala ·
Nope. You’re post had links. Given the number of spam links we have to censure posts with links have to be OK’d by a human.
John Fragoulias ·
Removed my post, fucking clowns.
Roger Cicala ·
Nope. Your post had links. Given the number of spam links we get, posts with links have to be OK'd by a human.
gordonyz ·
The 300mm 2.8 prime is not very sharp in today’s standards. It’s the same design over so many years. It needs to be updated.
Robert Bouknight ·
I’m not sure I would want my version 1 300/2.8AFS to be “sharper”. It seems plenty sharp at 36MP, but at the same time it delivers a beautiful rendition of people. Maybe I have a very good sample. Have not used it on my Z7, but am sure it will deliver stunning images.
Fulcrum ·
It’s extremely sharp by today’s standards. You’re a clueless idiot.
gordonyz ·
The 300mm 2.8 prime is not very sharp in today's standards. It's the same design over so many years. It needs to be updated.
Robert Bouknight ·
I'm not sure I would want my version 1 300/2.8AFS to be "sharper". It seems plenty sharp at 36MP, but at the same time it delivers a beautiful rendition of people. Maybe I have a very good sample. Have not used it on my Z7, but am sure it will deliver stunning images.
Alfred Saly ·
Hi. Roger (and team) – thanks for these blog posts. They are great. I wanted to probe a bit on the 200mm results. When I compare this 200mm curve vs the Nikon 70-200 MTF at 200mm from 2019/07, it is at least as good, if not somewhat better. Yet the comment here was ‘no so great’ vs the comment for the 70-200 which was ‘performance at 200mm is pretty strong’. Any further comments/explanation ?
Roger Cicala ·
Not so great compared to same-lens performance at 300 and 120mm.
Alfred Saly ·
Hi. Roger (and team) - thanks for these blog posts. They are great. I wanted to probe a bit on the 200mm results. When I compare this 200mm curve vs the Nikon 70-200 MTF at 200mm from 2019/07, it is at least as good, if not somewhat better. Yet the comment here was 'no so great' vs the comment for the 70-200 which was 'performance at 200mm is pretty strong'. Any further comments/explanation ?
Sean Tomlinson ·
Could you remove this useless post too?
Sean Tomlinson ·
Nikon 120-300 f/2.8, Sigma 24-35, and that’s all I can think of for lenses you guys have MTF for that are as good as primes in the same focal length. Pretty exclusive list.
Sean Tomlinson ·
Nikon 120-300 f/2.8, Sigma 24-35, and that's all I can think of for lenses you guys have MTF for that are as good as primes in the same focal length. Pretty exclusive list.
Steven Gotz ·
Thanks for this. But to be honest, I was actually physically distressed seeing you disassemble a lens that costs that much money. Better you than me. I am rather technical, but that’s just a whole other level of confidence in your own abilities.
I bought this lens hoping that I would be happy with it and that people like you would tell me that I didn’t screw up by buying it. You are the second set of people who seem to admire the lens, so that gives me an indication that I can take a deep breath and not worry that I messed up. So thanks.
Although your statement “not so great at 200mm” does worry me some. I hope that it is as good or better at that focal length than the 70-200mm f/2.8
I am unable to use it for the purpose for which it was purchased until the zoos in California open again. Testing it for anything less than shooting through fencing is not a waste of time exactly, but not all that productive either. Not for me.
I need 300mm at f/2.8 but I want to only carry one lens most days because I am getting old and just don’t want to carry a backpack with a second lens. Putting this monster on a Cotton Carrier up against my chest should relieve some of the backaches and help me avoid taking the backpack off, putting it aside, and walking away from it later. That does happen. Fortunately I have always remembered in time to retrieve it.
Thanks for the info guys. It is appreciated.
Roger Cicala ·
I suspect some of the weakness we noted at 200mm was this copy, it was a bit decentered there. This is why I’m always hesitant to post single copy MTF.
Steven Gotz ·
Thanks for this. But to be honest, I was actually physically distressed seeing you disassemble a lens that costs that much money. Better you than me. I am rather technical, but that's just a whole other level of confidence in your own abilities.
I bought this lens hoping that I would be happy with it and that people like you would tell me that I didn't screw up by buying it. You are the second set of people who seem to admire the lens, so that gives me an indication that I can take a deep breath and not worry that I messed up. So thanks.
Although your statement "not so great at 200mm" does worry me some. I hope that it is as good or better at that focal length than the 70-200mm f/2.8
I am unable to use it for the purpose for which it was purchased until the zoos in California open again. Testing it for anything less than shooting through fencing is not a waste of time exactly, but not all that productive either. Not for me.
I need 300mm at f/2.8 but I want to only carry one lens most days because I am getting old and just don't want to carry a backpack with a second lens. Putting this monster on a Cotton Carrier up against my chest should relieve some of the backaches and help me avoid taking the backpack off, putting it aside, and walking away from it later. That does happen. Fortunately I have always remembered in time to retrieve it.
Thanks for the info guys. It is appreciated.
Roger Cicala ·
I suspect some of the weakness we noted at 200mm was this copy, it was a bit decentered there. This is why I'm always hesitant to post single copy MTF.
Henry Winokur ·
Great article. I too am missing your posts. You’ve spoiled me so badly, that I expect photos from other bloggers and am sorely disappointed when there are none!
I was wondering what camera/lens you used to take the closeups?
Roger Cicala ·
Henry, it’s not very fancy, Canon SLR and the 24-70 f/4 IS lens. It’s plenty of resolution for the internet and the ability to zoom into semi-macro is really useful for teardowns.
Henry Winokur ·
Fancy or not, Roger, it’s still good to know–at least for me–and somehow, knowing this “bunch”, I bet I’m not the only one. 🙂 So thanks!
Dragon ·
That REALLY BIG hunk of fluorite helps to explain the price (and the performance).
GulliNL ·
Ahh yes that driver, if I recall correctly you are also able to store other bits in the handle so you only need one driver with all the bits it can take?
My dad used to be an optician (in Europe) and I used these drivers to repair glasses with in the workshop. I think most of the tools he used were of german origins.
Roger Cicala ·
Henry, it's not very fancy, Canon SLR and the 24-70 f/4 IS lens. It's plenty of resolution for the internet and the ability to zoom into semi-macro is really useful for teardowns.
Andreas Werle ·
OMG, soldered wires, springs and a new flex champion. Nikon did it again! Thanks for that, Roger and Aaron. Always a pleasure to read your Blog-Posts.
Greetings Andy
Andreas Werle ·
OMG, soldered wires, springs and a new flex champion. Nikon did it again! Thanks for that, Roger and Aaron. Always a pleasure to read your Blog-Posts.
Greetings Andy
TPJ Verhoeven Photography ·
This is a spectacular article. I actually bought this lens last week. It should arrive some time in week 1 of January 2023. First of all, compliments on the article. I was actually holding my breath a bit to see this teardown.
Nikon indeed doesn’t make much copies of this one because they don’t expect to sell many of these. But your article actually confirmed my previous assumptions about this lens completely. Of course it’s only a result of one copy, but I think we can quite safely say that this might be true for more than just this one.
In daily life I’m a full-time international Nikon professional photographer and videographer. Shooting all over the world in conditions like both the freezing Poles and deserts in the Middle East, I need my gear to be 100% reliable. Nikon is a brand I trust since the very beginning of my career.
I am using my lenses on the Z9 and while I have almost all Z lenses, I still own, use and love one F mount lens in particular that’s not going anywhere anytime soon: the 180-400mm f/4E TC1.4x, which is basically the 120-300mm f/2.8E’s slightly larger brother. I love that lens, plain and simple. And since I take full confidence in using that one, I am 100% sure this one will do just as well.
There’s not many articles about this lens out there. Let alone such an elaborate one such as this one. So I want to say thanks for the infotainment. It’s been fun to read and again, it confirms my previous thought and research. F mount isn’t dead and this lens proves it. I have to be honest though. If at this present point in time there had been a Z mount equivalent in existence, I would’ve gone with it in a heartbeat. But there isn’t so it turned out to be this one and I’m fully confident that it will do the job.
Thanks, have a good one, guy’s and keep tearing things down.
Kind regards,
Thushara Verhoeven
TPJ Verhoeven Photography, Breda, NL
TPJ Verhoeven Photography ·
This is a spectacular article. I actually bought this lens last week. It should arrive some time in week 1 of January 2023. First of all, compliments on the article. I was actually holding my breath a bit to see this teardown.
Nikon indeed doesn't make much copies of this one because they don't expect to sell many of these. But your article actually confirmed my previous assumptions about this lens completely. Of course it's only a result of one copy, but I think we can quite safely say that this might be true for more than just this one.
In daily life I'm a full-time international Nikon professional photographer and videographer. Shooting all over the world in conditions like both the freezing Poles and deserts in the Middle East, I need my gear to be 100% reliable. Nikon is a brand I trust since the very beginning of my career.
I am using my lenses on the Z9 and while I have almost all Z lenses, I still own, use and love one F mount lens in particular that's not going anywhere anytime soon: the 180-400mm f/4E TC1.4x, which is basically the 120-300mm f/2.8E's slightly larger brother. I love that lens, plain and simple. And since I take full confidence in using that one, I am 100% sure this one will do just as well.
There's not many articles about this lens out there. Let alone such an elaborate one such as this one. So I want to say thanks for the infotainment. It's been fun to read and again, it confirms my previous thought and research. F mount isn't dead and this lens proves it. I have to be honest though. If at this present point in time there had been a Z mount equivalent in existence, I would've gone with it in a heartbeat. But there isn't so it turned out to be this one and I'm fully confident that it will do the job.
Thanks, have a good one, guy's and keep tearing things down.
Kind regards,
Thushara Verhoeven
TPJ Verhoeven Photography, Breda, NL