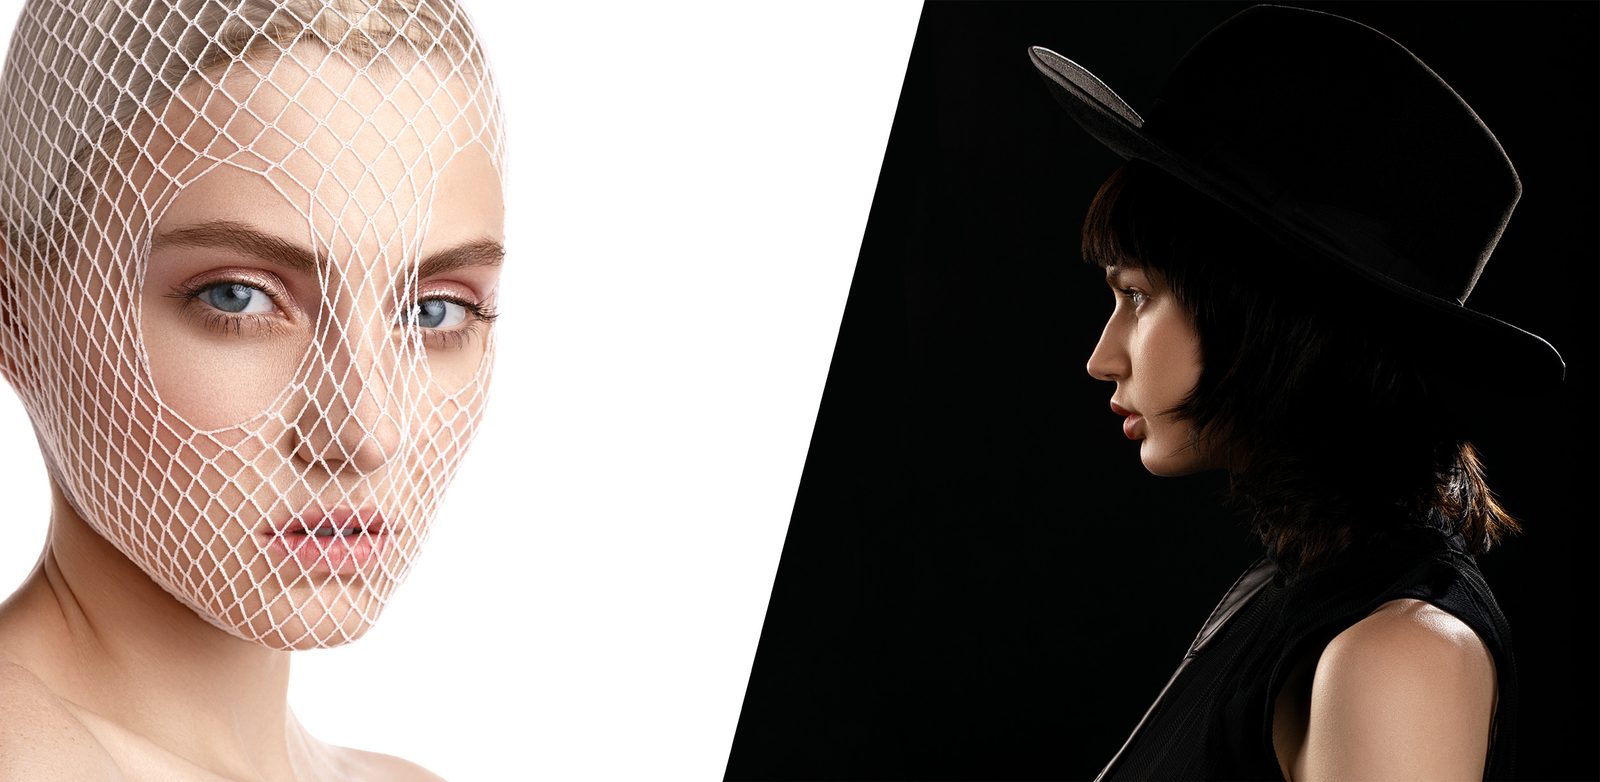
If you’ve dabbled in off-camera lighting or even natural lighting at times, you’ll quickly discover how difficult working with white can be. It’s no surprise that many people ask their subjects specifically not to wear white clothes, as it’s easy to blow out the highlights and ruin an otherwise good photoshoot. Shooting white, especially when it’s also on white, takes a lot of finesse, and so, I decided to provide you with some tips on how to light white on white, and by contrast, black on black.
If you’re a frequent reader of this blog, you may have read my article about shooting on white backdrops last month. While I feel like that article provided a lot of helpful information, I admittedly didn’t cover exposure and how to best correct exposure levels to assure you get the white look while maintaining detail where needed.
How Light Functions
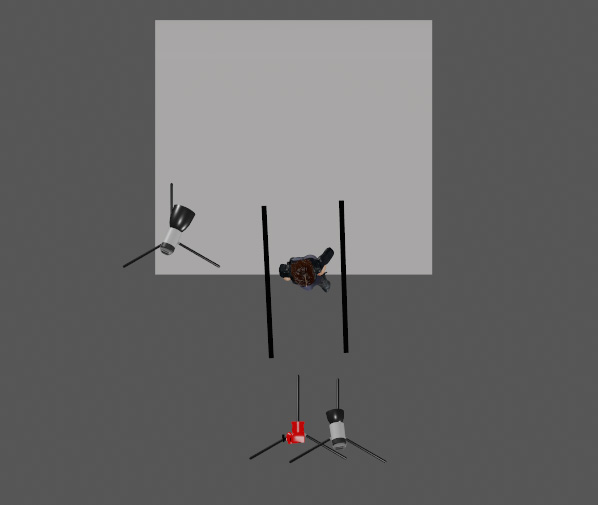
Before we dig into the nitty-gritty finesse of shooting white on white and black on black, we must first have a principled understanding of how white and black reflect and absorb light. If you’ve been in a studio before, you may have seen a few V-flats lying around. These large pieces of foamboard may be unassuming at first glance, but they can provide a lot of technique when shooting. Most frequently, these V-flats are white on one side, and black on the other because white will reflect light, whereas black will absorb it. To illustrate this, I’ve brought along my friend Jill to show how a Vflat will add highlights and shadows to her face, depending on its position.
While this example is minimal in execution, the results are much more visible when shooting with strobes (We had a video light going and some natural light bleeding into the windows). When shooting highly contrasted images, I will always implement black Vflats to control the light better. When shooting on white, the black Vflats on each side of your subject will ensure that the backdrop light isn’t spilling back onto your subject, and when shooting on black, the Vflats will better control the light spill, so it isn’t lighting the backdrop.
Shooting With Contrast
Now that we have a basic understanding of how light will reflect or absorb based on the color it’s shining against; we can better determine how to light a subject based on their wardrobe selection. Depending on how you think of lighting will help determine which will be easier for you – shooting white on white or black on black. For me personally, I always look into lighting a subject by controlling the light. More often than not, I’m focused more on my shadows than my highlights when shooting in a controlled environment. And as such, shooting black wardrobes on black backdrops is inherently easier for me. So let’s start with the one which is more challenging for me.
Shooting White on White
As mentioned in my Shooting on a White Backdrop, I mention distance is everything – and this absolutely holds true when shooting white on white. Like most things, the best way to tackle this is to work step by step, with the background and subject lit independently. The best way to do this is to add as much distance between your subject and your backdrop, to prevent any light from spilling onto each other. By lighting each element independently, you can better control your lighting, and as a result, your highlights.
Monitor your Histogram

When shooting white on white, you want to have a good eye on your histogram to assure you’re not blowing out any highlights unnecessarily. As you know, a blown-out highlight will have no detail retained. So while that can be nice for backdrops, it can be bad news for wardrobe or pale skin tones. Most cameras have a highlight alert setting, where you can have it blink when something is blown out and lost detail. Using this tool, along with the separation of your backdrop and subject, you can tinker until you get the desired results. Backdrop not blown out? Bump up the lights, a stop of power, and try again. Subject’s light is too bright? Turn the light independently lighting your subject down.


Shooting Black on Black
Now that you’ve gotten a general understanding of how to control your highlights, the same technique applies here, but with shadows. When shooting black on black, the secret is going to be controlling your light spill. This is where tools like Snoots, Barndoors, and flags will be exceptionally important. One of the most important tools I’ve learned to use when shooting black on black is implementing the modeling lights on your lights., By turning on your modeling lights, you can hyper-tune your rim lights and spill by getting a visual representation of where your light is going.
Another technique to avoid light spills is to feather your lights away from the backdrop. By feathering your light, you can have it spill onto the subject without adding light to the other elements. This will ultimately give you better control, and as previously mentioned, be sure to check your flashbulb style to ensure you’re feathering your lights properly.


Once you’ve developed a strong understanding of how to light bright subjects on light backdrops, and dark subjects on dark backdrops, you’ll better learn how to cut the light using flags, snoots, and barn doors to further experiment with your lighting principles. For example, in the photo below, I shot Evonique in my standard high key style – lighting both her and a solid white backdrop independently. But using black Vflats and strong light control, I created high key images with a lot of contrast around her face, giving a three-dimensional feel to the image.

Do you have your own tips to better photograph light-colored subjects on light backdrops, or dark subjects on darker backdrops? Feel free to chime in in the comments below.

3 Comments
Lars Stakston Kvinge ·
A highly informative and helpful article. Thank you!
Lars, Norway
Jim A. ·
I agree with Lars, this is great info shared in a very intuitive way. Thanks for your help!
nancy facey ·
Hello views, I am so excited to share this wonderful story here .
I was diagnosed with herpes virus and I was told there was no cure except medication that can control it, I totally lost hope, all I could think was losing my life because I was so depressed and confused about the whole situation , few weeks ago I read about Dr Oso online how he cured someone from cancer which was guaranteed, but i never still believe on it but i decided to give a try on him so I ordered the medicine after using it for few days i started experiencing changes all over me so i waited until i finish using the medication, so after everything I went for blood test to confirm if i am really healed from this virus to my greatest surprise it came out negative i jump up and shattered oh my goodness what a wonderful miracle i never believed in . I am so excited to share my testimony. Thank you so much Dr Oso . You are a great man. I must tell everyone I know who has any kind of disease or virus. you can also email him on via drosohaberhome@gmail.com or Call/Whatsapp +2348162084839
you can check on Dr oso site : https://sites.google.com/vi...
you can also contact me for more info about Dr Oso faceynancy1@gmail.com ...................