When teaching basic lighting principles, I break down how to light a subject into having three basic variables – Intensity of Light, Quality of Light, and Direction of Light. The intensity of light is pretty simple in its execution – how bright or dim your light is. Quality of light refers to whether it’s soft or hard light and all of the principles within that category. The third topic – direction of light – is the principle that I’d like to talk more about today.
In the past, we’ve discussed how the design of a flash tube will affect your light and that the beam angle can have differing effects on your output, but there are some core principles that need to be addressed beyond that. One of those basic principles is light placement.
For these examples, I’ll be using studio photography as my key reference – as it’s a controlled environment. But these rules apply across the entire photography spectrum. I’ll also preface this by saying that there is no core right way or wrong way to lighting a subject – using your light position in unique ways is a great way to be creative. That said, some core fundamentals are considered more natural in execution, so we’ll be touching on those as the standard.
Light From Above
Of those fundamentals, none is more prevalent than lighting your subject from above. To the human eye, lighting someone from above feels the most natural. After all, when you go outside, the sun lights you from above, and when you walk indoors, lighting is most often on the ceiling shining down. When you light someone from above, you most accurately display them as the world sees them. As such, when you light someone from below, you most frequently get an unnatural and almost sinister vibe from the subject.
To illustrate this, I had my lovely friend Evonique come by the studio. Using a Profoto C1+, a couple of Manfrotto Super Clamps, some scrap wood, and a lazy susan kit I picked up from a local hardware store, I was able to construct a pendulum system to illustrate how light direction changes the shape of the face and the feelings it invokes. By cutting a hole in the center of the two connected pieces of wood, I am able to use the camera lens as the rotational axis point as the light spins around the lens. Think of it as a strange rotating ring light.
With the video above, you can see how drastically Evonique’s features change based on light placement. Our eye’s preception of features is very much dependent on where the highlights and shadows most often lay on the face, so when the light rotates around and lights Evonique from below, her face appears to shapeshift and change to something far less natural. Slowing this video down, you’re able to see where the light is most flattering for her face, and you’ll start to see trends as they correlate with traditional portrait photography.
The 45 Degree Standard
Reading enough lighting diagrams and BTS notes, you’ll notice a common trend – light placement is often referred to using angle degree. This angle degree is referred to the placement of the light in correlation to your subject. To illustrate this, I’ve put together this small chart below.
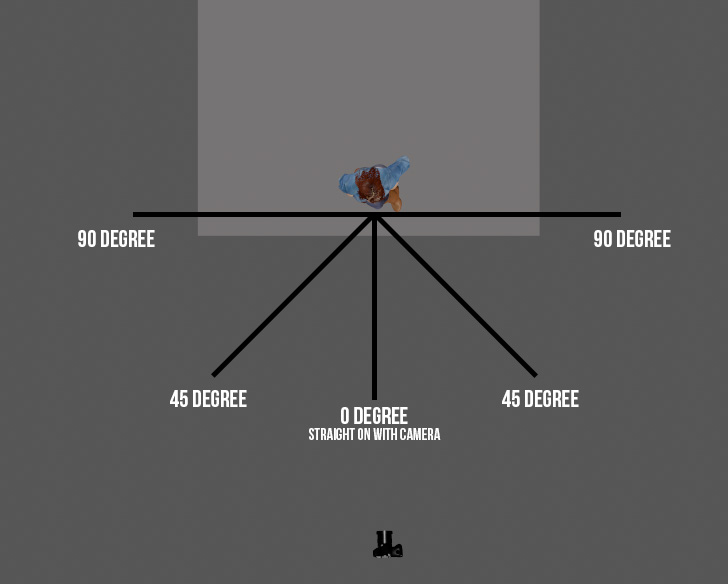
45 degrees is among the most common placements, and it means that the light is placed at a 45-degree angle from your subject. At 45 degrees, you’re most closely emulating what is referred to as Rembrandt Lighting, which produces a natural and generally flattering light on your subject. Changing the light’s degree angle on your subject will make highlights and shadows more prevalent depending on your placement. To help emphasize, I took a Profoto B1, a Beauty Dish with grid, and moved the light around to light Evonique from several different angles.
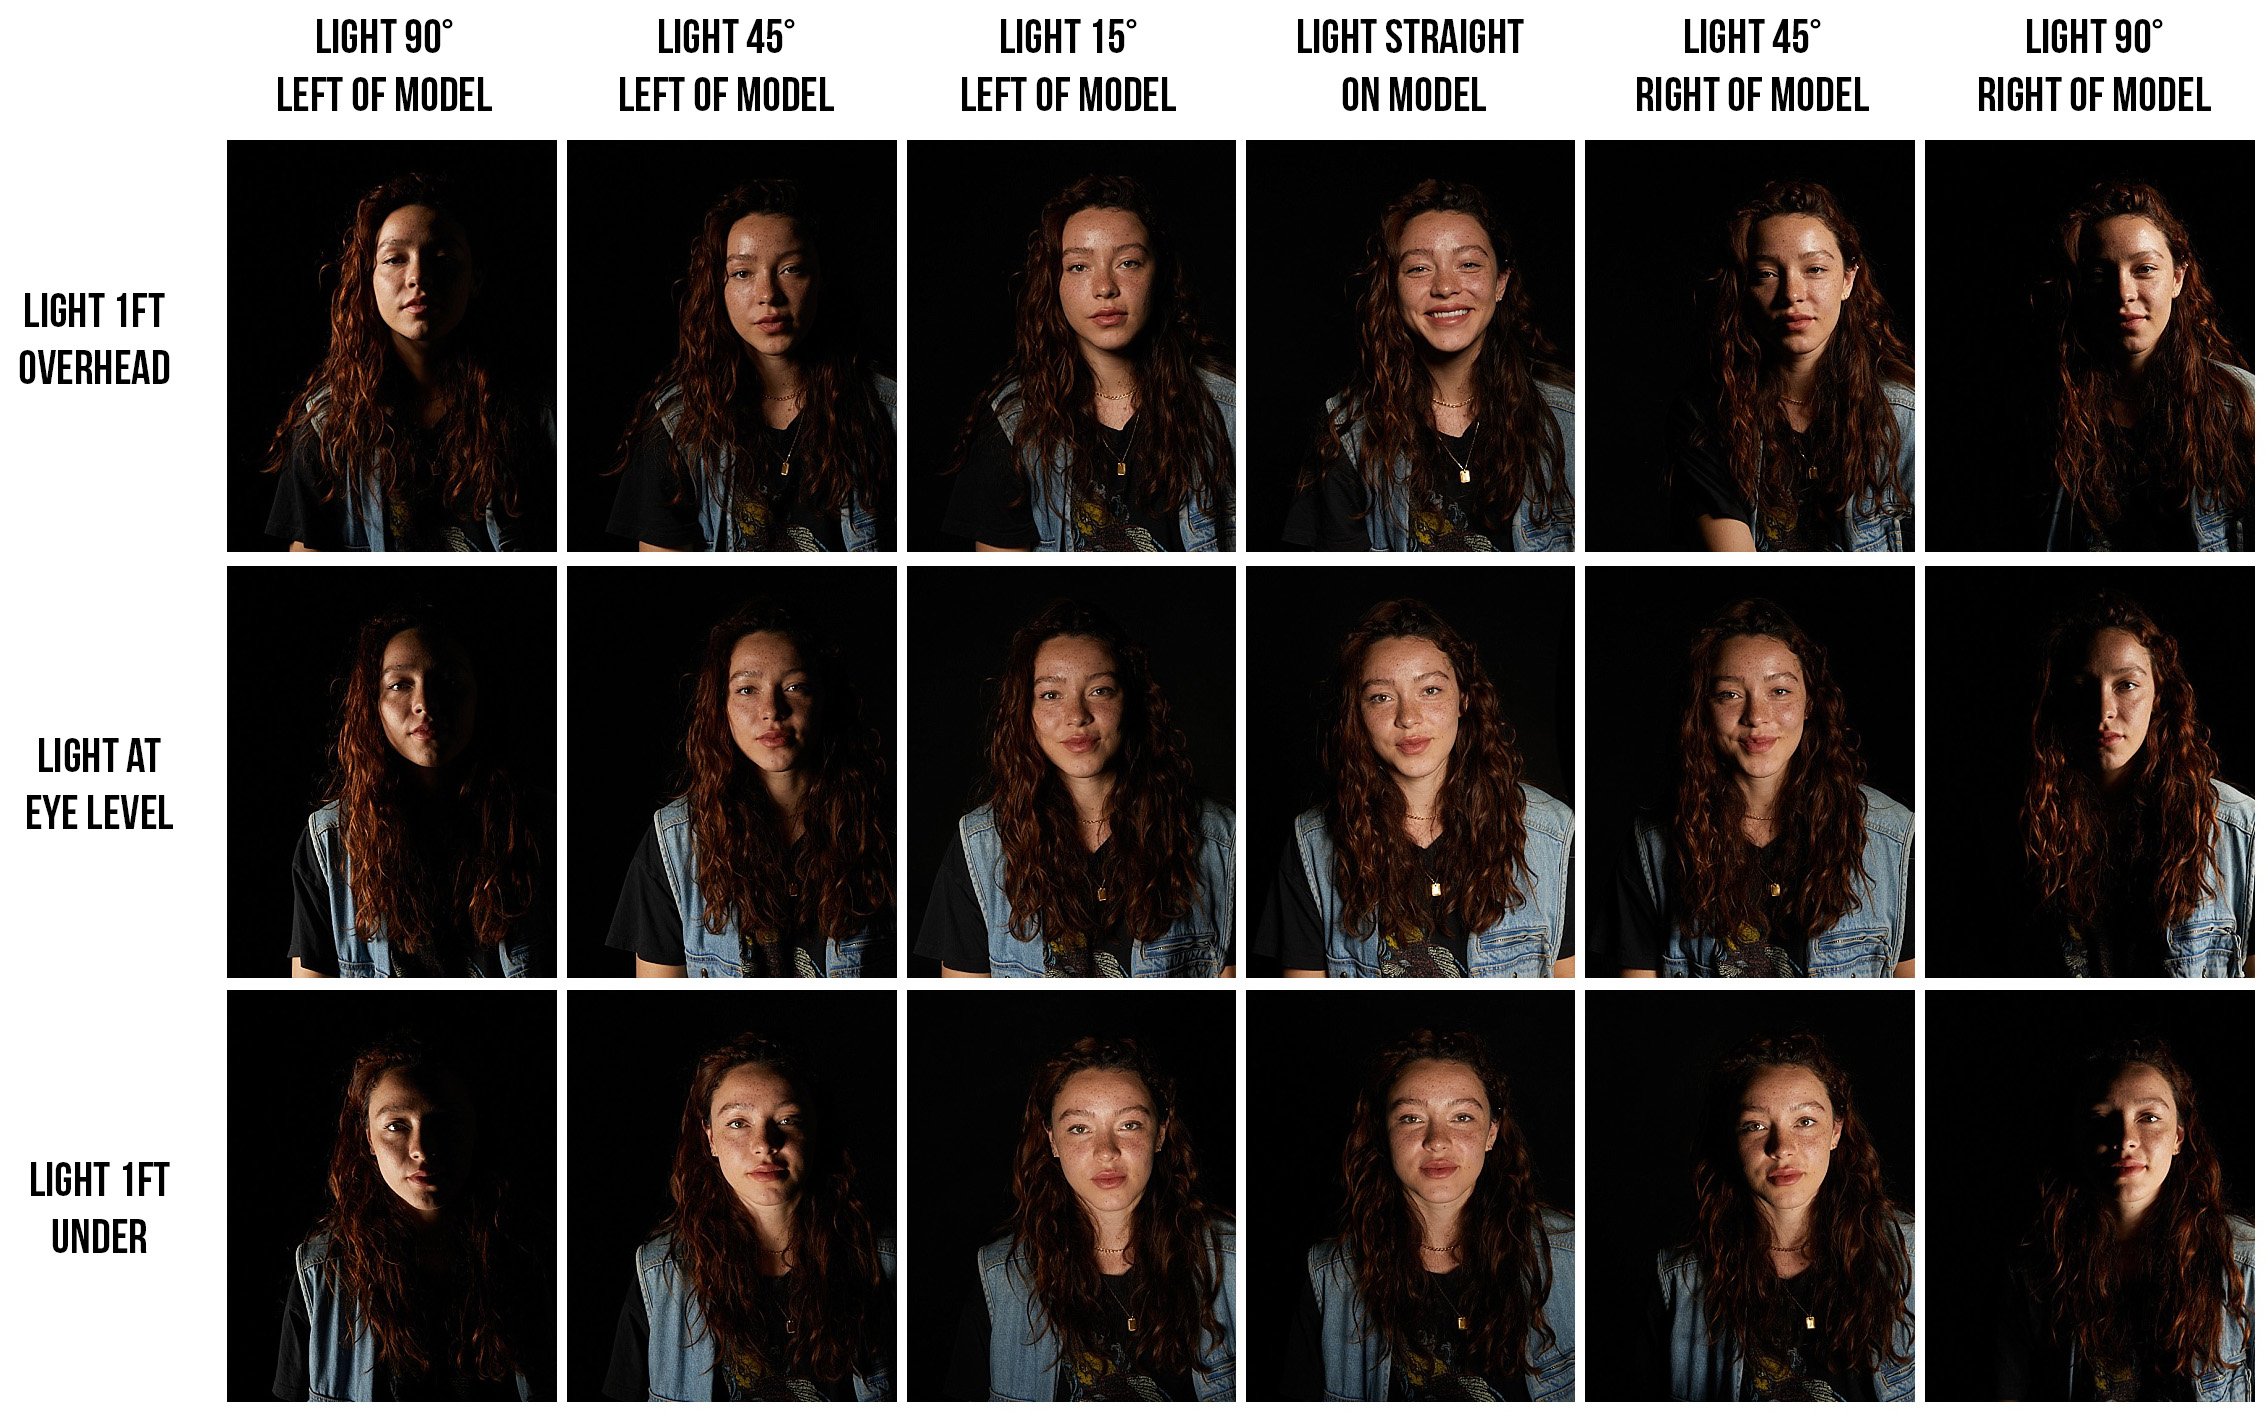
While all faces are round, each person has different angles on their face that will help correlate which light placement works best for them. There is no secret sauce or one-step trick to find which light is most flattering for all people, so it’s important to experiment and better understand your subject’s face so that you can light them in the most flattering ways. Short lighting faces can help slim them down, and broad lighting can help soften details on the face. Each subject is unique, so spend a little time experimenting with your light setup to ensure you’re lighting them in the most flattering way – or in a way to match your creative theme.
The Green Zone
The green zone is an area that I have classified as the most commonly lit area within portrait photography. When setting up your main light, beyond all else, you’re looking to light your subject in a flattering way, and implementing the green zone will best give you a flattering light on your subject.
The green zone is lighting your subject with your light at eye level or above, and within the 90-degree zone between the two 45-degree zones for your subject. To better clarify, the graph below indicates what I call the ‘green zone.’

Using the ‘green zone’ will assure that you have a light that will help show their face evenly, and usually, in a favorable way. Again, I’ll conclude by saying there are no absolutely correct and incorrect ways to light someone, but there are some common standards. Using the green zone will help you with those common standards, and is a great starting point to light your subjects in both a natural and elegant way.
To better understand light in general, without spending countless hours renting a photography studio to experiment, I highly recommend Set.A.Light 3d. I’m not being paid or endorsed by them in any way; I just really think they make an exceptional product for both lighting diagrams and learning. By working in a 3D environment and accessing virtually unlimited lighting modifiers and settings, you can see how lighting works in live time using 3d models.

3 Comments
Light It Up ·
Film lighting rental is a amazing topic to read about. I really love reading knowledgeable blogs all time. Also, I am always ready for discussions on such an interesting topic.
Wendy Ruth ·
A MIRACLE TESTIMONY FOR WHAT DR SAYO HERBAL HEALER HAS DONE FOR ME AND MY FAMILY I was cured from CANCER with the used of natural herbs. My name is wendy ruth and am from USA. I love herbs so much. Most times, injection and drugs are just a waste of time. I was cured 2 months ago, i suffered from CANCER for 3 yrs but with the help of Dr.Sayo herbal medicine, i was cured within 3 weeks of drinking the herbs he sent to me through courier delivery service. This same doctor also cured my aunty from FIBROID, as soon as i heard she had FIBROID, i quickly refer her to Dr.Sayo and she was cured too after drinking his herbs.I have referred more than 15 persons to Dr.Sayo and they were all cured from their various illness. Have you taken herbs before?. You have spent so much money on drugs, injections, surgeries etc and yet you have no good result to show for it. Contact Dr. Sayo now, he is a herbalist doctor, i assured you of a cure if you drink his natural herbs. Dr.Sayo have herbs that cures Hiv, Herpes, diabetics, asthma, hepatitis, HBP, PAD, STD, cancer, chronic, etc. Contact Dr Sayo through his Email address on: sayoherbalhealer@gmail.com or WHATSAPP/CALL him on +2349012175679
..
Leighton Austin ·
Light placement is pivotal in photography and stage design, as it can dramatically alter the perception of your subjects. Strategic positioning can enhance textures, create depth, or convey specific moods, from dramatic shadows to soft, evenly lit scenes. Understanding the nuances of light direction and intensity can transform the visual impact of your images or performances. For innovative lighting solutions that can elevate your creative projects, click here to buy moving head stage lights from Color Imagination.