Lenses and Optics
The Glass in Front of Your Glass: All About Filters
In the ancient days of film, any photographer worth his flash bulbs had a large set of filters in his bag. Filters to correct light, enhance contrast, add special effects to his images, you name it, there was a filter for it. Then came Photoshop and RAW and filters became quaint. Many of them, anyway. But there are still several filters that should be in every photographer’s bag because they can give you tools that postprocessing just can’t. There’s a lot of discussion about what type of filters are useful, and we’ll be adding our opinions in this article.
But before we do that, one thing that needs to be discussed in depth is the quality of filter used. I’d rather take sandpaper to the front element of my lens than use a bad filter. Because the lens with the sandpapered front element will have better image quality than a perfect lens with a cheap filter.
No, I’m not going to go on for 4 pages about whether you should put a UV filter on the front of your lenses. There’s already 6,435 internet arguments about that. But like most strident internet arguments, the majority of participants come to battle poorly armed.
I’ll give you a good example. The other day I was having this discussion with someone who told me they always use xxxx Brand filters, they were the best.
“Great,” I answered. “Are those glass or resin? Are they coated glass or a filter sandwich? Multi-coated, double coated or single coated? What kind of glass do they use in those, do you know what its refractive index is? What’s the tolerance of the glass thickness and smoothness? How about the transmission index and reflectivity? What about the tolerances of the mounting ring? How close to square is it?”
The only answer I got was “I don’t know that crap, I just know they’re the best. My camera store salesman told me so a dozen times.” So there it was. A perfect example of how most filter discussion follow the general rule of internet debate: if you have facts, state the facts. If you don’t have facts, scream insults. But the reality is that information IS very important. All of the light that enters your lens is going to pass through any filter you use. When light passes through glass, bad things can happen.
One more example of just how bad that can be before I move on to something constructive. We test every returning lens for sharpness when it comes back and the other day I took test shots with a Canon 17-55 f/2.8, which is a nice sharp lens. But instead of resolving the 20 line pairs I expected shooting our test chart, this one barely resolved 14. Even stopped down was still horridly soft and vignetted, plus it seemed a bit worse on the left side. I dismounted it to send it back for repair. Then I noticed the renter had replaced the reasonably good filter we sent out on it with a cheap, Ebay no-name filter. I took the filter off and it resolved 20 line pairs, was sharp as a tack and looked perfect. That’s an extreme example. Even most cheap filters aren’t that bad.
So About Construction
The Filter
Photo filters are commonly made from glass but may also be made from polycarbonate or other plastics. (Plastic sheet filters are often called gel filters, but that’s a historic legacy from when they were actually made of gelatin based products.) Cheap filters may not use optical glass (so the glass may have striae or clouding). The glass may be stamped out of a sheet, making the edges different thickness than the center or even warping the filter glass, making it a lens. It may be poured into a mold and not be ground and polished to perfect smoothness making it scatter light and reduce contrast.
The glass may not be coated (making it reflect light and possibly cause ghosting) or may only be single coated (so only one side has a coating) rather than double coated. An uncoated filter can reflect up to 9% of the light that hits it. Double coated filters can reduce light reflection down to 2% or less. A good multicoated filter will reduce reflection to 0.3%. The loss of light reflecting from the front of the filter may be important, but light reflected inside the lens is even more important. It can produce flare and reduce contrast significantly.
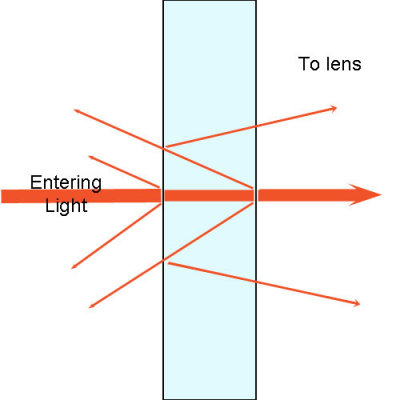
Figure 1: Light reflected from the filter into the lens may reduce contrast and cause flare or ghosting.
The active filter material may be incorporated in the coating, may be incorporated as a dye in the glass or plastic of the filter, or may be a sandwich of filter material between two sheets of clear glass or plastic.
The Mount
Round Filters (lens mounted filters)
Most round filters are mounted in aluminum rings although sometimes brass is used in more expensive filters. One is not clearly better than the other. Brass rings are less likely to bind or freeze on the lens than aluminum rings. Aluminum rings may dent or deform more easily, which some people feel helps provide more protection to the lens. The important point is that the lens must fit precisely in the ring so that when mounted to the lens it is not at an angle, which can distort light rays coming into the lens. Filters, whether glass or plastic, will refract light to some degree. If the filter is tilted in respect to the lens, this refraction can distort the image.
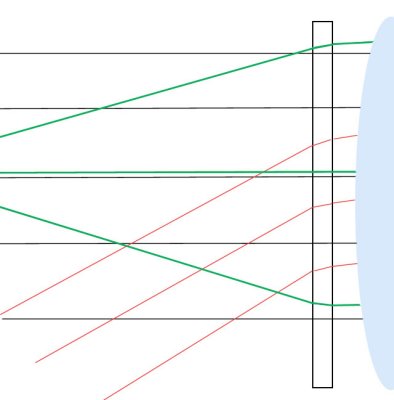
Figure 2: Filters will refract light to some extent. If the filter is angled from the front element (because the filter isn’t flat in the mount) refraction can be different on one side than the other.
Slim Filters
Often called Slim Line, Ultra Thin, or similar names. These filters usually have thinner glass and thin mounts making them less likely to cause vignetting or other irregularity. Thin filters are most important on wide and ultra-wide lenses where the angle of view is very wide and a lot of light comes in around the edges of the filter. Thin filters are less likely to cause vignetting (darkening of the corners) on such lenses. While this is a clear advantage, thin filters do not have ‘front filter rings’ so you can’t put a second filter in front of the thing filter (usually not a great idea anyway) and they are probably a bit more fragile than standard filters. They’re certainly more expensive.
Rectangular Filters
Square and rectangular filters are generally the only type of filters used for video work, where most camera set-ups include a matte box with filter holder built in. They are not used as frequently by photographers because they’re less convenient and more time consuming than round filters. They do offer several advantages, however, and are enjoying a resurgence of late. This is due in some part to newer wide angle lens designs that don’t allow the use of front-mounted round filters. It probably is also due to the increasing use of SLRs for video work, often with matte boxes mounted.
Reality is that photographers should probably use rectangular filters more often, they do bring some clear advantages, especially to split neutral density filters. Videographers using SLRs should probably consider the convenience and lower cost of round filters more frequently, especially with circular polarizers.
The highest quality rectangular filters are usually made of glass and the same points made above about glass filters apply to them. Many are also made of polycarbonate and, as mentioned above, are referred to as gel filters. Gel filters are generally less expensive but may have more irregular surfaces and are much more prone to scratch.
For video work, rectangular filters are usually mounted inside a matte box on the front of the camera. For still photography (and some video work) a rectangular filter holder is attached to a mounting ring which screws into the filter mount of your lens. The holder can be set up to hold one or several different rectangular filters.
While a bit more combersome than a round screw-on filter, the rectangular filter has several advantages. One set of filters can be used with all your lenses, only different sized mounting rings are needed. The filters more than cover the front element of the lens, which can help minimize vignetting. And with split filters the split can be adjusted up or down as needed, while round filters always put the split in the center of your image.

Figure 3: A Lee mounting ring and filter holder (left) and a Cokin rectangular filter set mounted to an SLR camera (right).
Step Rings
A step (up or down) ring is basically a double threaded ring, so a filter of one size can be mounted to the ring, which is then mounted to a lens of another size. Using a 77 to 72mm step-down ring, for example, you could use a 77mm circular filter on your 72mm lenses. There are many sizes available so a set of filters can be used on many lenses.
There are two warnings, however. First, never ever use a step-up ring (putting your 67mm filter in front of your 72mm lens for example). You will get horrible vignetting. Second, while its possible to use a series of step-down rings (For example you could use a 77mm filter to a 77-72mm ring, that to 72-67mm ring, and then to a 67-62mm ring mounted to your 62mm lens) in practice the filter is often not square to the lens, the set of rings may cause serious vignetting.
How to Tell a Good Filter
You should at least be able to tell from the manufacturer’s literature if the filter is multicoated and what material the mount is made of. Examine the filter next. When you shine light across it at an angle does the surface appear smooth and uniform? If you can see striae or irregularities with the naked eye, the filter is probably not good. Similarly examine how the filter is placed in the mount. Is it seated firmly with no rocking of the glass within the mount? Is there a cheap rubber band holding it in place in an overly large slot in the mount?
How good a filter you need is always a judgement call, but a little common sense goes a long way. If you’re shooting with a high quality lens on a high resolution camera you’d better plan on investing in a good filter. A consumer grade zoom lens on a moderate resolution camera still can be ruined by a cheap filter, but it doesn’t necessarily need the very best money can buy. The bottom line is make sure you compare some pictures with the filter on and off to be certain the filter isn’t degrading your image.
The Important Digital Photography Filters
We’re going to stick with filters of general interest and widespread use. If you have a Leica M8.2 you need UV/IR filters, etc. but not many other people do, so we’ll limit this to filters of general usefulness.
UV
There, I listed it. I’m not going to even get into the discussion about lens protection. I just want to point out that the need for UV filters are basically a film need, the majority of digital cameras don’t benefit from filtering UV light. That function is built into the camera. So if you feel the need for a protective filter a UV, clear, haze, skylight or whatever will give you the same benefit.
Circular polarizing
The one filter every photographer should have available for every lens they plan to shoot outdoors. The wavelengths of light in the world are oriented in any direction. (While not totally accurate you can visualize some light rays as vertical rays, some as horizontal, and every orientation between.) When light reflects off of a nonmetalic object like water or glass the rays become polarized: they are all oriented the same way and at the same angle to the viewer, resulting in glare. The sky also polarizes some of the sunlight as it passes through, resulting in some glare and reducing the blueness of the sky on bright, sunny days.
A polarizing filter only lets light through in a single orientation (by rotating the front of a polarizing filter you change what orientation of light you choose to let through). This lets you block all of the reflected glare from water, glass, shiny plant leaves, etc. (it doesn’t work on glare resulting from metal, however, that light isn’t polarized). The result of using a polarizing filter are bluer skies, elimination of glare ‘whiteout’, and usually an ability to see into water or through windows rather than simply seeing the glare reflected from them.


Figure 3:Effect of polarizing filters.
I should note that linear polarizers, which are sometimes still sold by less reputable camera vendors, will interfere with phase-detection autofocus systems and should never be used on autofocus SLRs for that reason. Circular polarizers have two layers: a linear polarizing filter on the front and then a second stage that “twists” or rotates the polarization of the light, allowing the autofocus system to function properly. If you aren’t sure if a polarizer is linear or circular its easy to tell: A linear polarizer works in either direction. A circular polarizer only works if the you look through it from the camera side, there is little or no polarization if you look through it in the opposite direction.
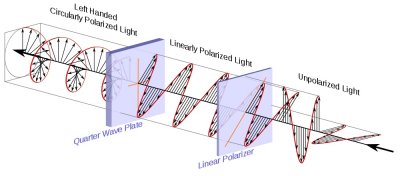
Figure 4:A circular polarizing filter schematic. Courtesy Wikipedia Commons
A linear polarizing filter will work fine, though, if you are using Live View or manual focusing, or if your camera (like many of the small mirrorless systems) is using only contrast detection autofocus. One other point to remember: a polarizing filter will take away a stop or two of light. Since we’re using them to reduce glare from bright sunlight that’s rarely important, but I thought it was worth mentioning.
Neutral Density
Neutral Density filters basically darken the entire image. While photographers are often screaming for more light, there are times when there’s just too much. Decreasing the amount of light coming into the lens can allow you to use a wider aperture for a narrow depth of field when there’s so much light that without a filter shutter speeds would be faster than the camera can handle. They can also be used to let you shoot with a longer shutter speed than normal, most commonly when photographing moving water, allowing the ‘smooth waterfall’ look that everyone but me seems to love.
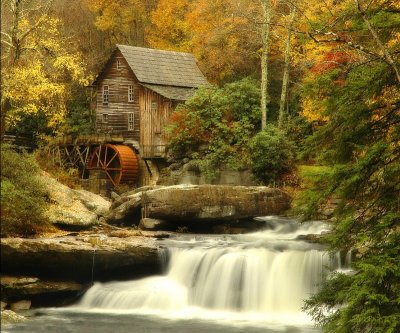
Figure 5: Image courtesy Steven Carter
There are a host of other uses, although most are less common. I’ve seen interior architectural shots done with ND filters allowing loooong exposures. Long enough that the moving people disappeared and the building or scenery appears empty. Or long enough to allow motion blur in moving objects to provide an artistic effect. ND filters can be a very useful tool for photographers, but for those of you moving toward shooting video, you’ll find they are absolutely indispensable.
One thing that does confuse some people are the various ways to grade the degree of light absorption the various strengths of ND filters have. Different manufacturers and photographers use different terms like ND filter grade, ND filter factor, and f-stop reduction when describing filters that basically do the same thing.
| Filter grade | Filter factor | f-Stops reduction | % Light transmitted |
|---|---|---|---|
| 0.3 | ND2 | 1 | 50% |
| 0.6 | ND4 | 2 | 25% |
| 0.9 | ND8 | 3 | 12.5% |
| 1.2 | ND16 | 4 | 6.25% |
| 1.5 | ND32 | 5 | 3.125% |
| 1.8 | ND64 | 6 | 1.563% |
Of course you can add ND filters on top of each other (remembering that each additional filter may mean a further slight degradation of image quality). For this reason I find the Filter Grade or f-stop reduction method of description is the easiest to use. Putting an 0.3 ND on top of an 0.6 gives the same effect as an 0.9 filter (or 1 stop plus 2 stops equals 3 stops).
If money is no object, Singh-Ray has come up with a novel type of ND filter that lets you leave a lot of filters at home. The Singh-Ray Variable ND filter has a twist mechanism like a circular polarizing filter that allows you to change the filter from roughly 2 to 8 stops in strength. Its very convenient, but almost as expensive as a set of regular ND filters.
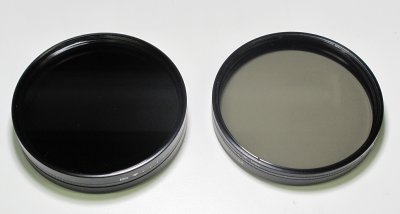
Figure 6: Singh-Ray Variable ND filters set to maximum (left) and minimum (right) density.
Graduated (split) Neutral Density
Sometimes you only want to neutrally densitize (I know its not a word, but I like how it sounds) only part of the image. Typically this involves landscapes where you want to darken the sky without blacking out the foreground. You can combine an underexposed and an overexposed image in Photoshop, of course, but that can be time consuming. You can use an HDR program to do it for you, but some of us want a more natural look, at least some of the time. Split Neutral Density filters provide just the ticket, and should be in every landscape photographer’s bag. The upper part of the filter darkens the image from one to three stops (depending on the strength chosen) decreasing the dynamic range between the sky and the foreground in the image.
Split ND filters can have a sharp edge where the gradation changes suddenly, but most prefer to use a soft-edge filter with some degree of transition between the clear and darkened areas of the filter. Its important to realize different manufacturers define these terms differently. Some consider a hard-edge to be just that, a line across the filter with darkening on one side but not the other. Some consider a soft edge to be a gradient with the full filter effect just at the top and clear areas just at the bottom, while others just blur the hard-edge line a bit. Its important to actually look at the filter and make sure the gradient is appropriate for what you are shooting.
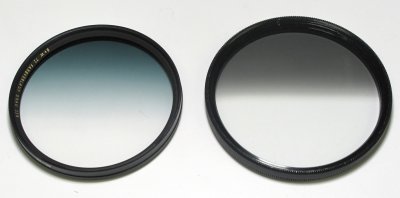
Figure 7: Soft (left) and hard (right) circular graduated ND filters.
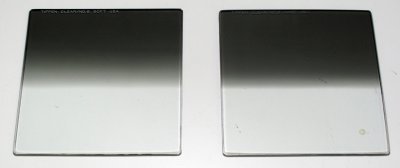
Figure 8: Soft (left) and hard (right) rectangular graduated ND filters. Note the soft filter here has a much sharper transition than the B&W filter in Figure 7.
Split ND filters are one area where photographers should definitely consider using a rectangular filter and filter holder. Since the change from ND to clear occurs in the center of a round filter, you are limited to composing your picture with the horizon near the middle of the image. You can crop to change composition, of course, but that may not be the best solution. WIth a rectangular filter the split can be adjusted anywhere from the upper 1/3 to the lower 1/3 of the image, allowing a lot more freedom in composition.
h4. Other filters
There are literally hundreds of other types of filters on the market: color correction, contrast, black and white, Infrared, you name it there’s a filter for it. In the days of film many of these were critically important. With digital images, they are much less so: many of the effects can be easily mimicked in postprocessing or even in-camera. Certainly some can prove useful in certain situations for certain photographers, but few are considered necessary today. Unless you’re talking to the filter manufacturer, of course. Then you’ll hear that its impossible to take a decent picture without at least a couple of filters in place on the front of the lens.
Do you really need filters?
How much of the filter marketing is hype and how much real? It depends a lot on what you are shooting and what you are shooting it with. But I hate overblown marketing hype so I leave you with a couple of thoughts from someone who buys filters wholesale.
- In general, there is no item in your local (or online) camera store that has a higher markup than filters. When they tell you that “you have to have it” they really mean “we have to sell it”. Trust me on this. Several current Lensrentals employees used to work at camera stores and can talk for hours about the pressure to sell filters.
- A cheap filter won’t make your pictures better, it will make your pictures worse.
- A good filter won’t make your pictures worse. But if you can get the same effect in 30 seconds with Photoshop it may not be a good investment.
- There are certain filters, though, that postprocessing can’t mimic. Circular polarizers and neutral density filters are clearly among these. Others, like split ND filters and a host of less common filters, can often be recreated by postprocessing, but you may save a lot of time (and time is money) by using the filter in the first place.
- If you’re planning on shooting a lot of video, you’re going to need a lot more filters. Most photographers use filters in certain situations. Most videographers use filters, often several filters, in almost every situation.
But we’ll get into video filters in our next article.
Author: Roger Cicala
I’m Roger and I am the founder of Lensrentals.com. Hailed as one of the optic nerds here, I enjoy shooting collimated light through 30X microscope objectives in my spare time. When I do take real pictures I like using something different: a Medium format, or Pentax K1, or a Sony RX1R.
-
Roger Cicala
-
PSAGuy
-
Jeff Allen
-
Glenn
-
Foto Nunta Brasov
-
rondhol
-
Sue Berry
-
Rosetta
-
Tom Cavanaugh
-
Mark
