The Annular Eclipse of October 2023 provided valuable experience to practice for the 2024 Total Eclipse. Preparing to photograph the eclipse made all the difference in getting the photos I envisioned, as well as actually enjoying the event without being glued to my camera the whole time. I’ll be covering what I plan to shoot, my planning process, the equipment I’m going to use, camera settings, editing techniques for post-processing, how to enjoy the eclipse, and finally some of my key takeaways from the Annular Eclipse in order to help you be prepared for the 2024 Total Eclipse.
Determining Where to Shoot
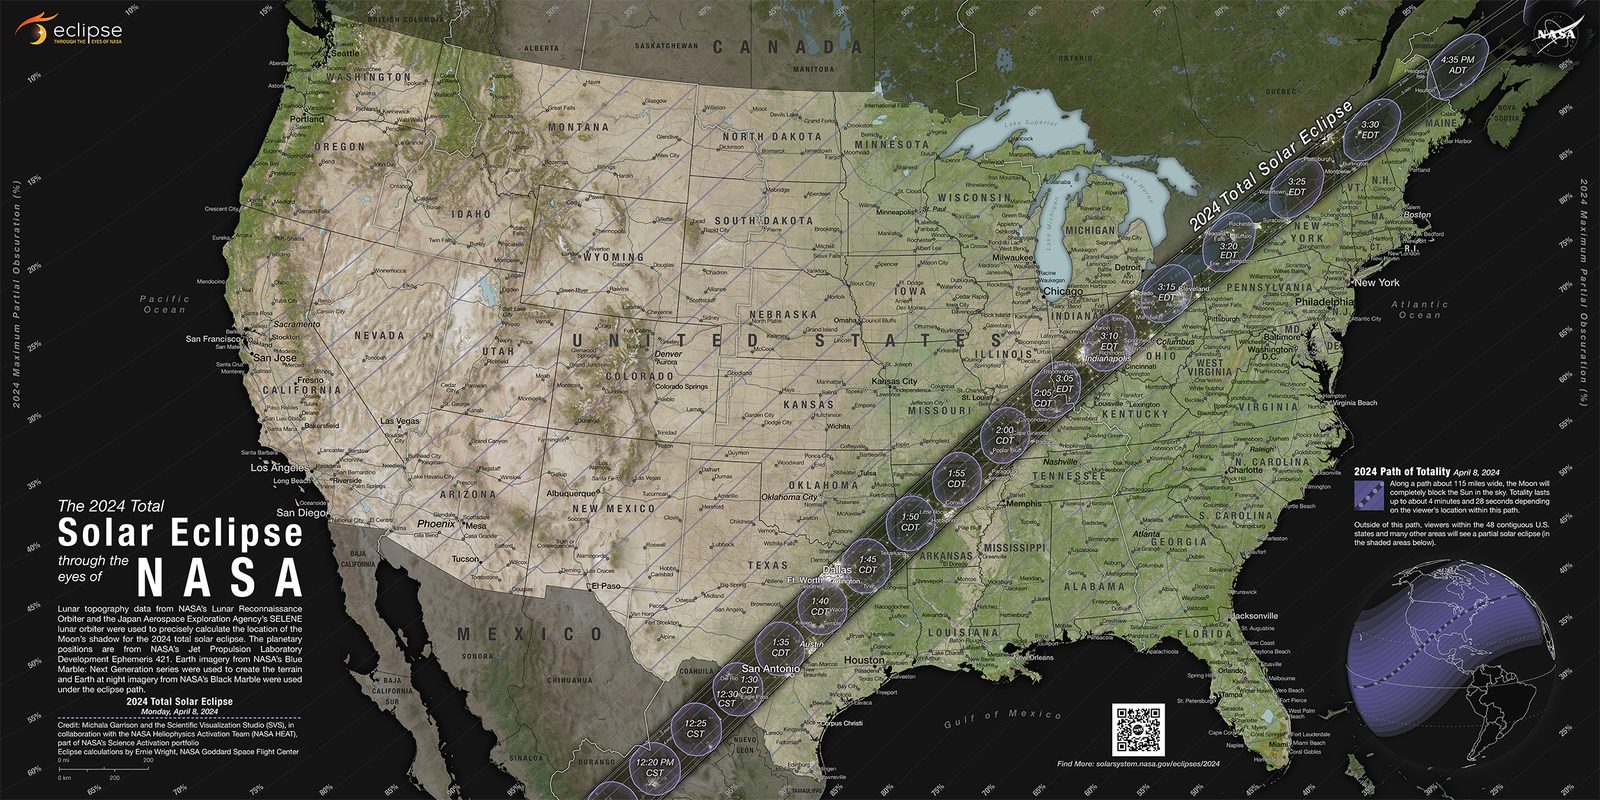
For the April 8, 2024 Total Eclipse, I’ll be targeting a line that stretches from Fredericksburg, Texas, through the southeast corner of Oklahoma, and ending in Gillham, Arkansas. This puts me within about a 4-hour drive in either direction from my home in Dallas-Fort Worth to find a foreground subject for my wide-angle shot, while also giving me a chance to break free of any cloud layers that might exist. Unfortunately, there’s always the chance the weather blocks out the eclipse and that won’t be known until a few days in advance.
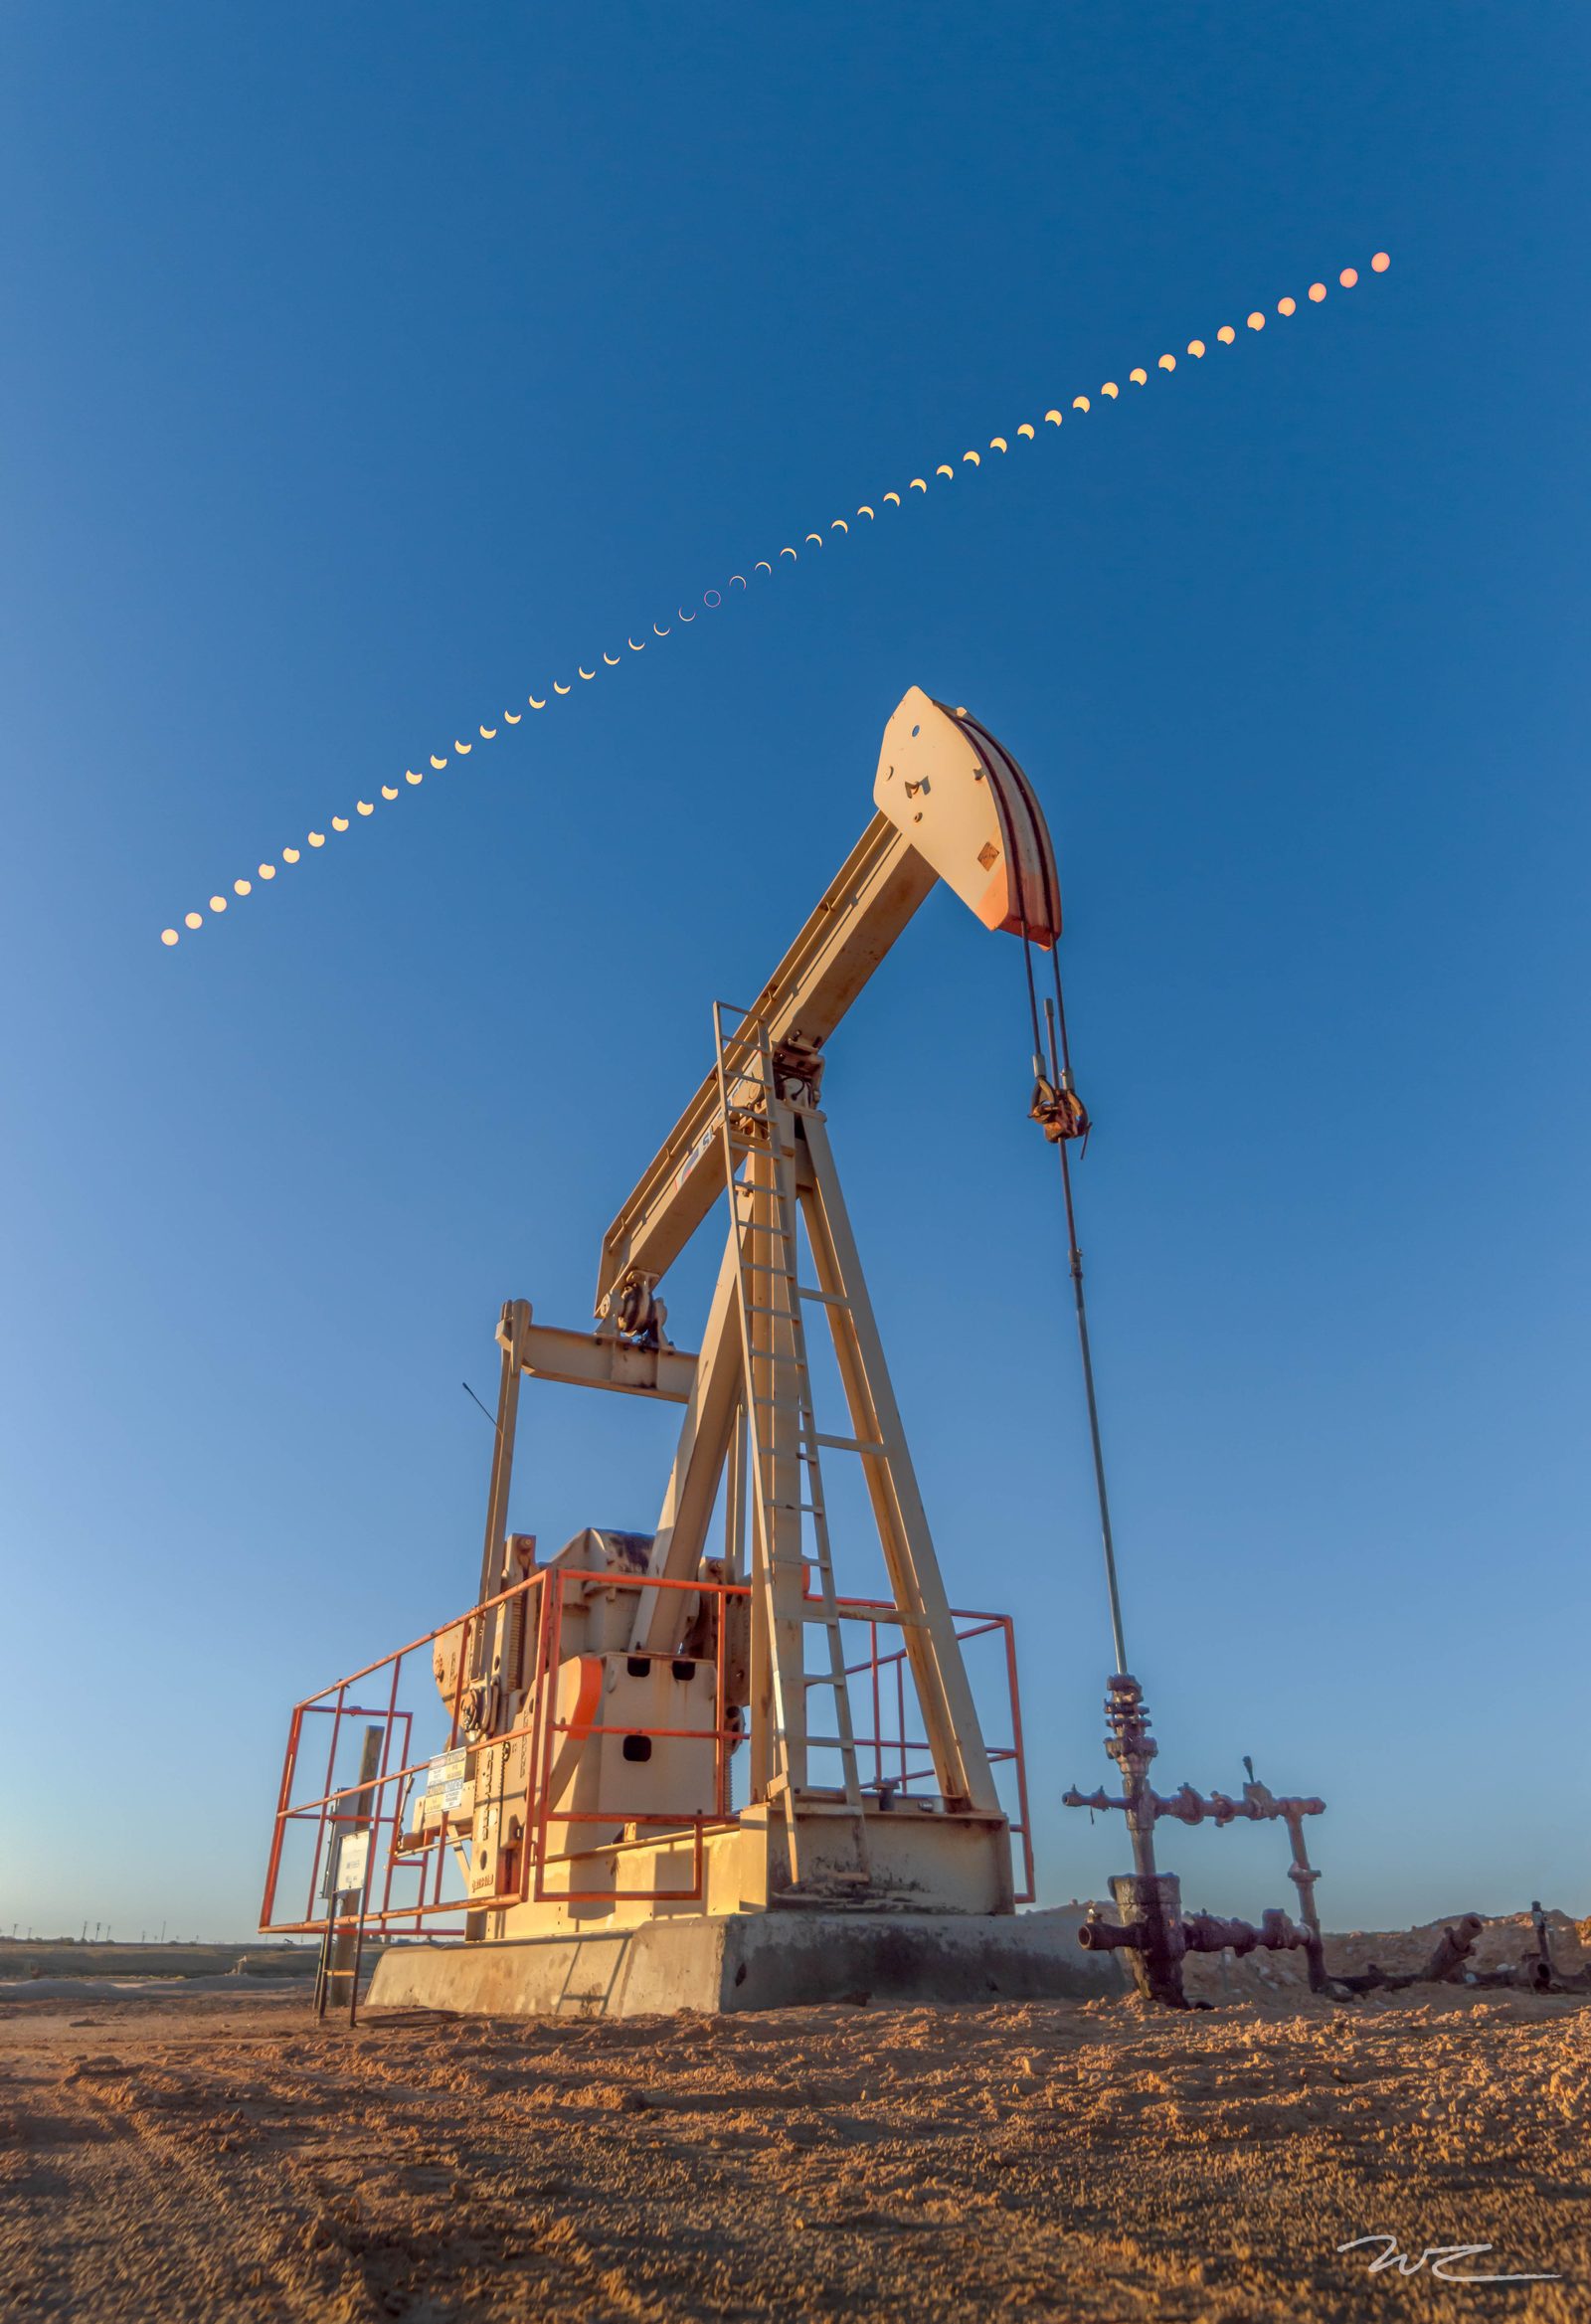
There are several foreground subjects I’d be happy with that fall along my path of opportunity ranging from Bluebonnets, courthouses, log cabins, and windmills. For this guide, I’ll use downtown Waco as the shooting location and the Brazos Riverfront as a foreground subject. I’ll hypothetically plan that the image will be combined with a wide-angle progression of the eclipse to produce an image similar to the one I took of an oil field pump jack in October with the Annular Eclipse.
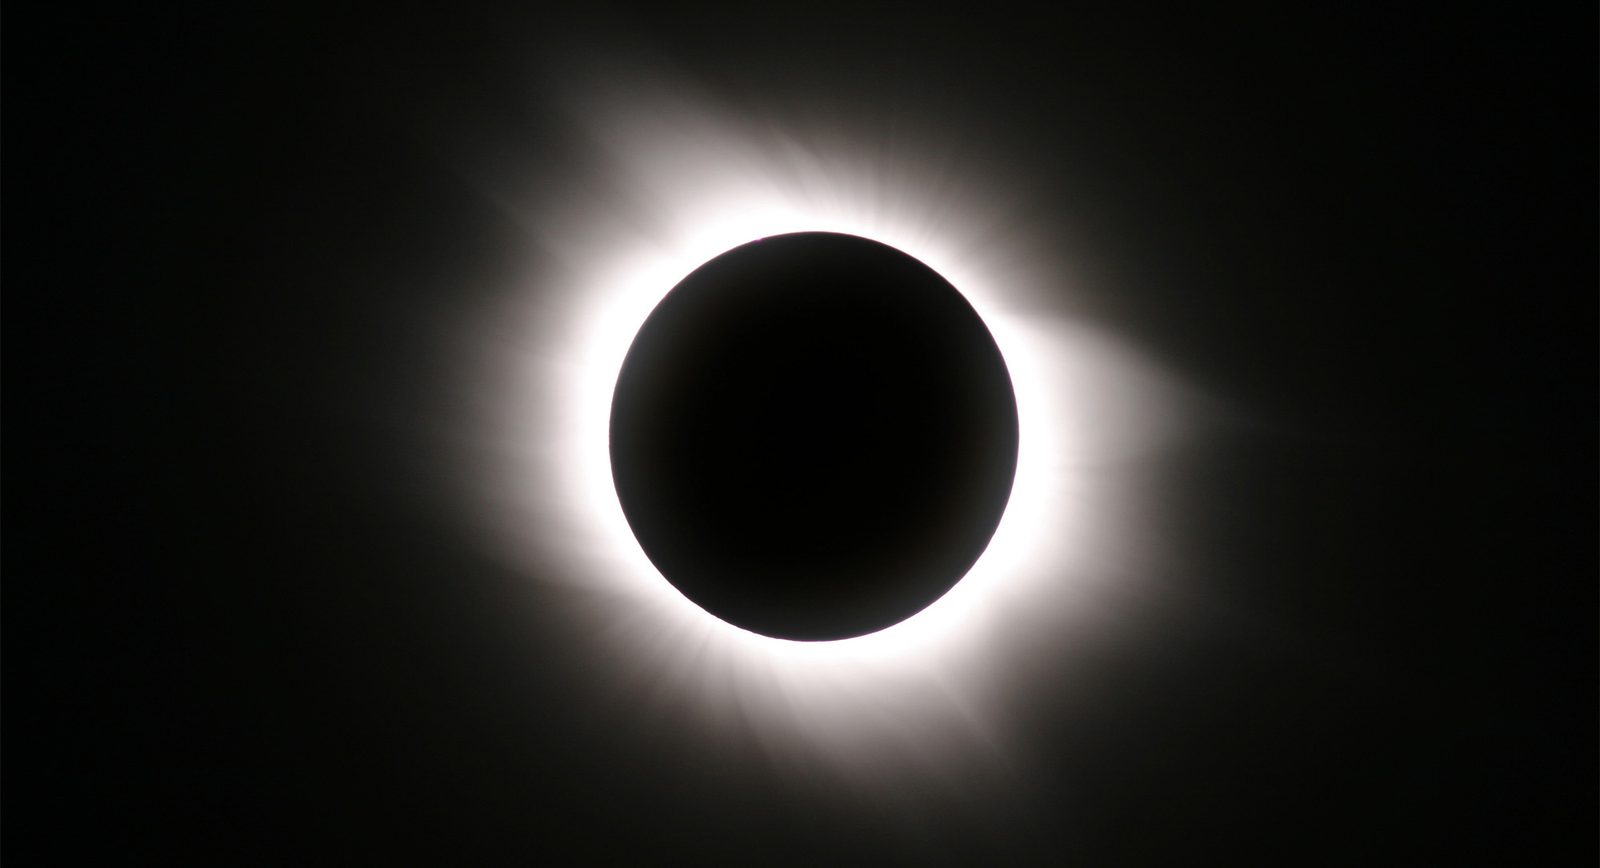
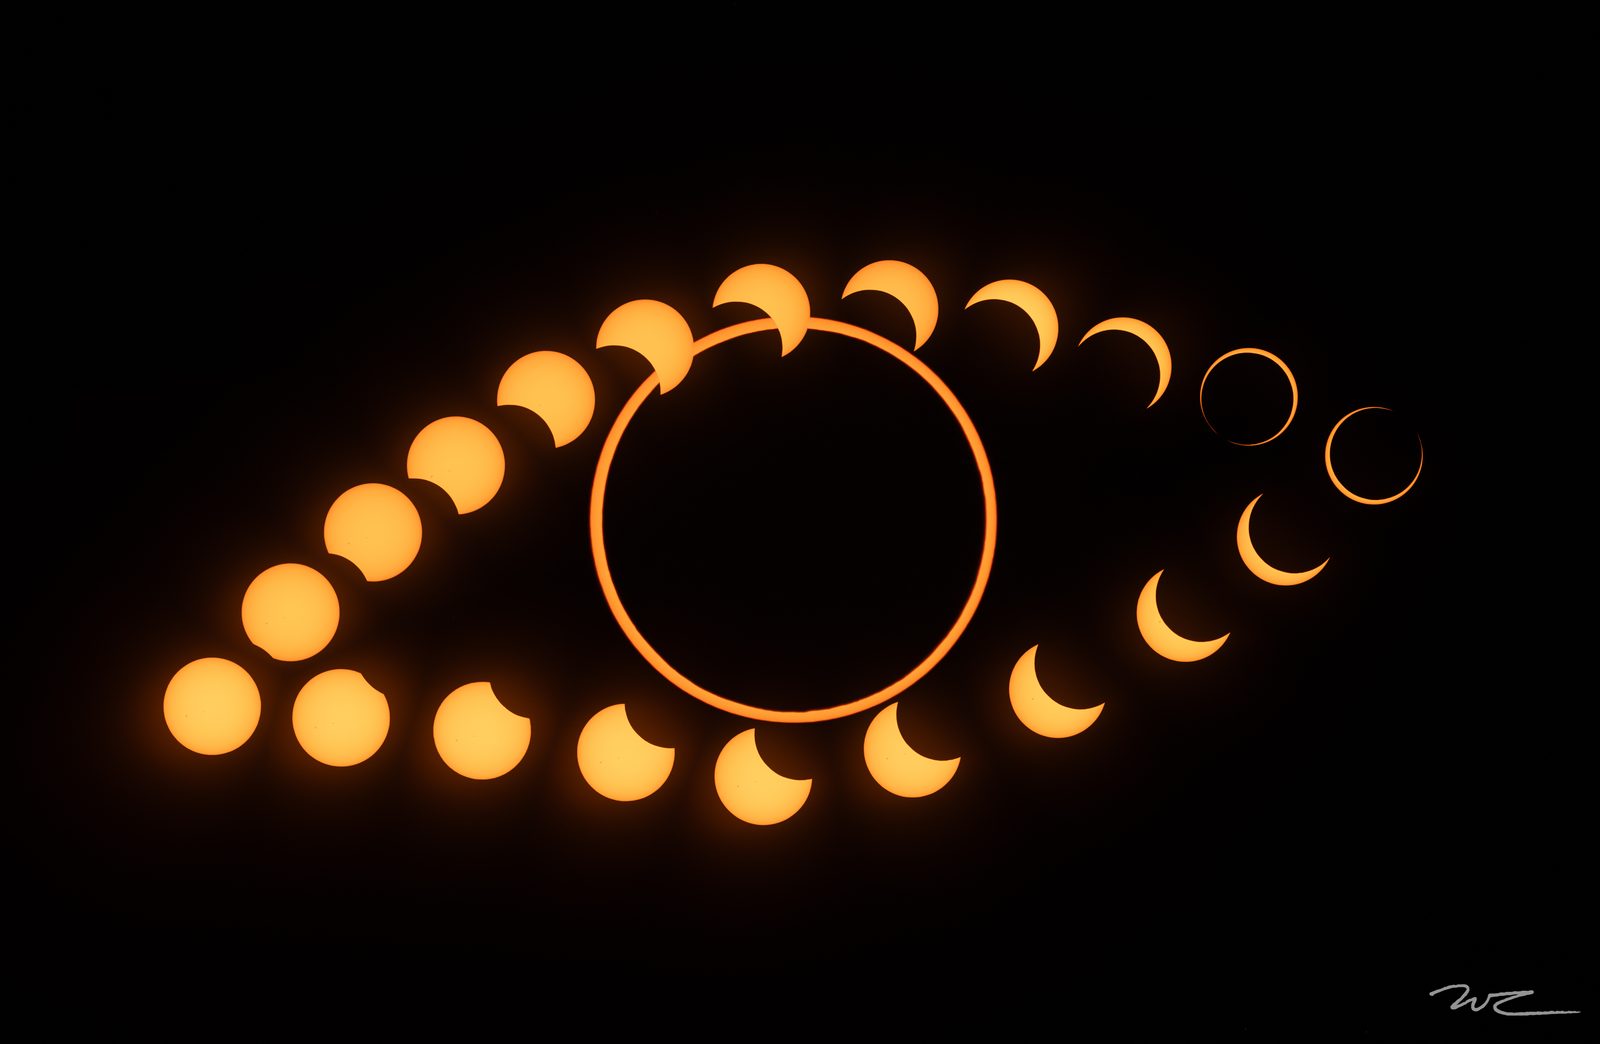
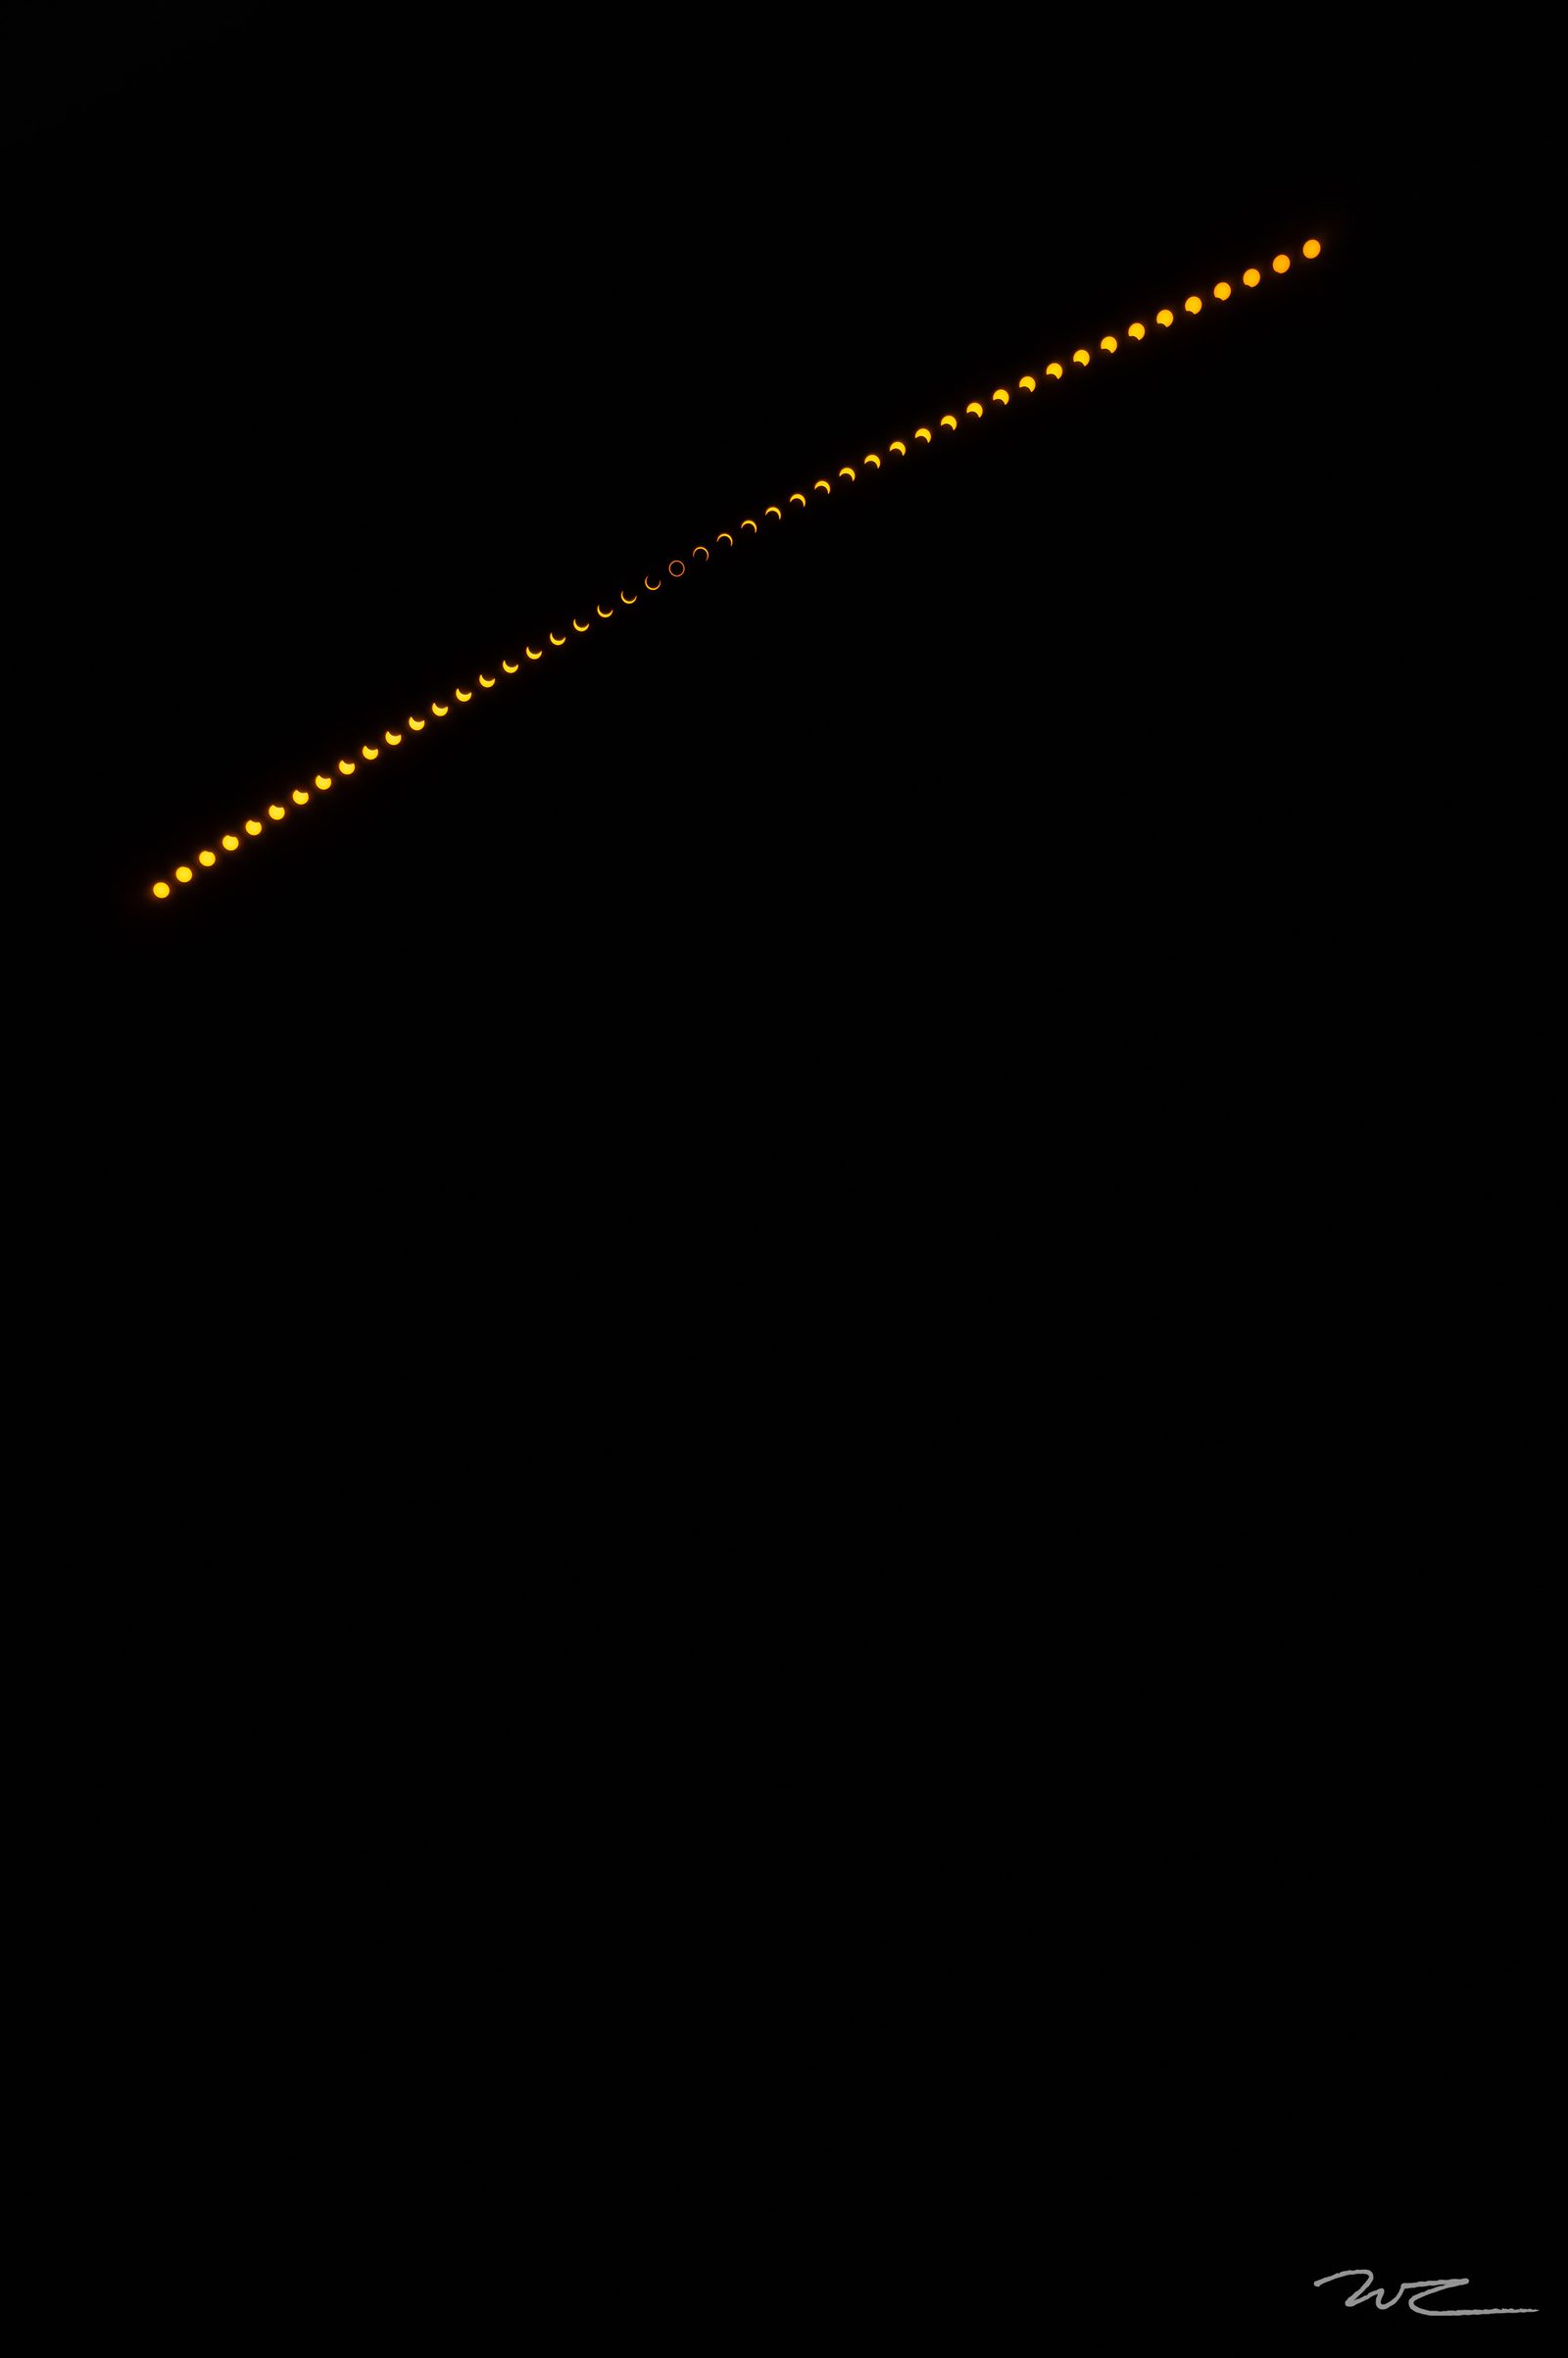
The second image I will be after is a closeup of the full progression of the eclipse utilizing a telephoto lens. By taking photos while zoomed in on the eclipse, I’ll be able to produce multiple composite images of the progression, a single image of totality, as well as a timelapse of the entire event. I plan to recreate the eye progression image I created from the Annular Eclipse, but with the sun completely eclipsed and the corona visible.
Now that you know what I plan to shoot, the next step includes a lot of planning utilizing several tools.
Planning the Photos
In order to determine the locations I’m considering, I used the popular planning app PhotoPills. Within the “Planner” portion and utilizing the solar eclipse mode, I am able to see the exact path of totality. The user-defined pin location displays various metrics such as the amount of totality time given along with the time for first contact, second contact, midpoint of totality, third contact, and fourth contact. Knowing those five times is crucial for timing the total set of shots for the wide-angle and telephoto images.


Using the screenshots I’ve taken from PhotoPills for Waco, TX, I’ll need to time the start of my 30-second intervals. Since 1:40:05pm is the midpoint and my intervals are 30s for the photos, I’ll start my intervalometer at 12:15:05pm, which gives me a few shots before first contact. I’ll then plan on shooting until 3:05:05pm which will give me a total of 340 shots for the full progression. However, I’ll set my intervalometer to shoot 400 just to be safe.
In addition to timing the eclipse, I’ll use PhotoPills to gather the sunrise time so that I can capture an image of my foreground subject under soft light to use in my wide-angle shot.
That leads me to the next tool I’ll be using for planning: Stellarium. I’ll use this tool to figure out how to orient my wide-angle lens to capture the entire progression of the eclipse. After setting the date and time to April 8th and the latitude and longitude, it’s possible to see exactly where the sun will be with respect to the FOV of a lens. This is extremely useful in setting up a foreground subject in the frame to ensure the sun will progress over the top of it and still be within the image.

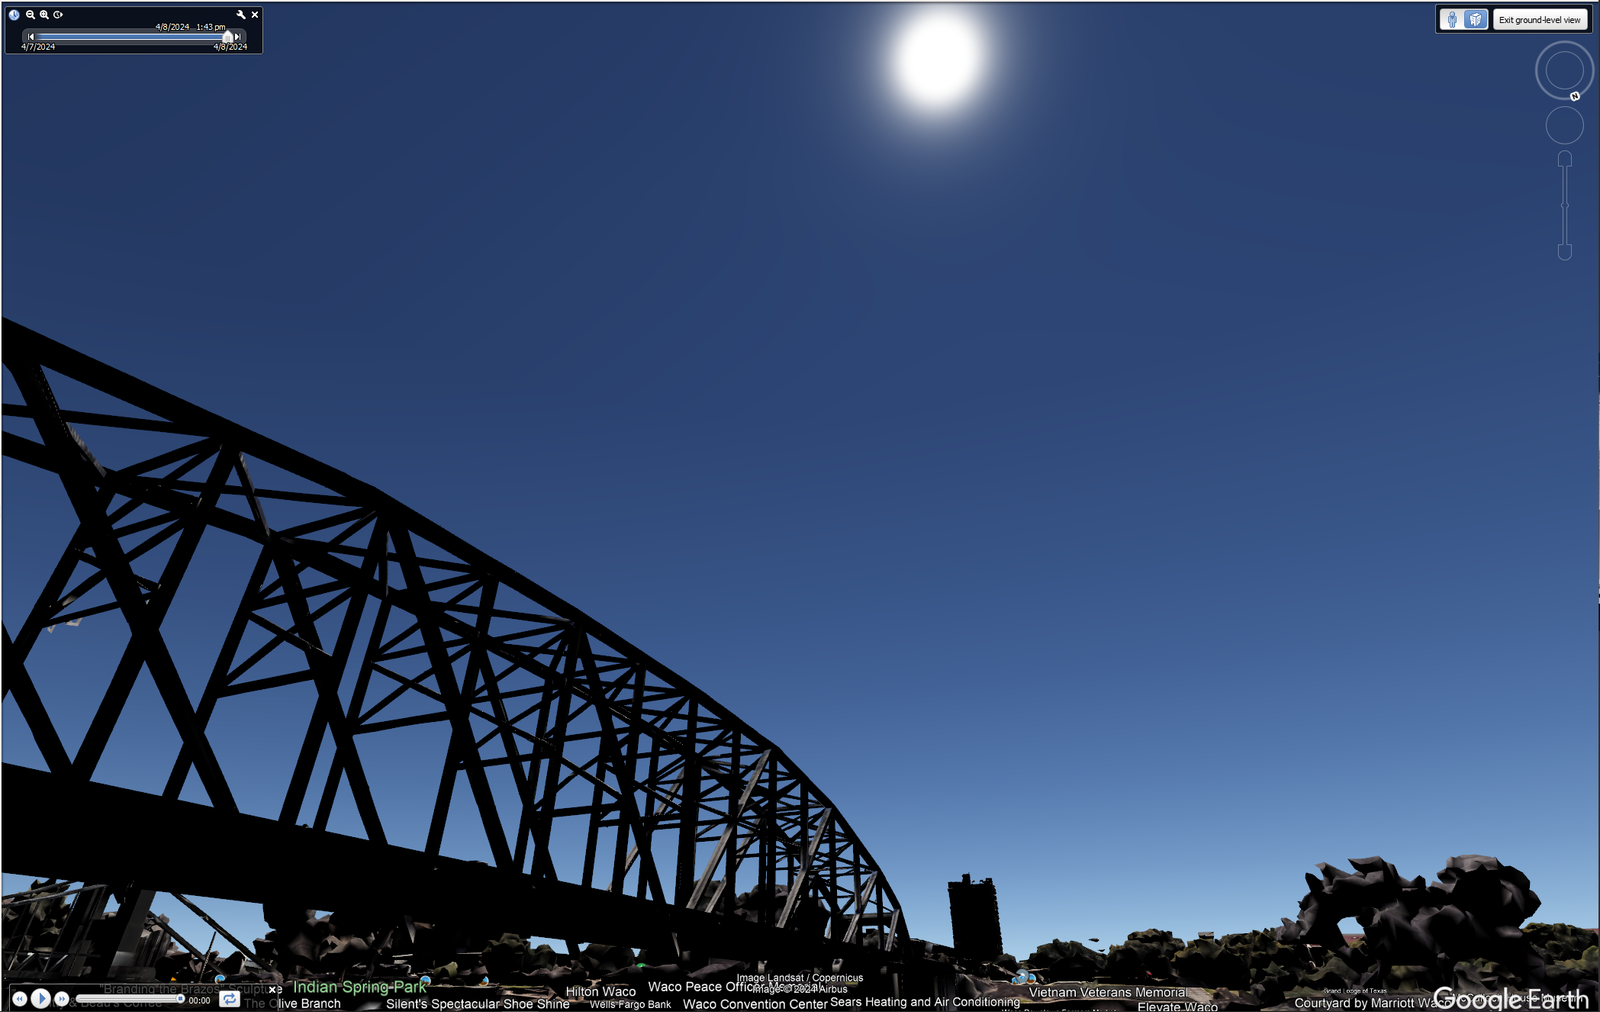
The final tool I’m using in my planning is Google Earth. Rather than drive a lot of back country roads to spot foreground subjects, I’ll utilize street view to pinpoint several points of interest along the path that I’m willing to drive and see in the weeks leading up to the eclipse. One thing I’ve learned over the past few years is that it’s a good practice to visit points of interest beforehand because sometimes what is seen on street view or Google Earth doesn’t match reality at the chosen site. Here’s an example for the Brazos River in downtown Waco. Notice that the sun is even shown in the correct location for the time and date.
Camera Equipment List
I plan to shoot the eclipse with two different cameras and lenses. For the wide-angle photo with a foreground subject, I’ll be using a –
- Nikon Z6
- Nikon Z 14-24mm f/2.8
- Tripod
- Wireless intervalometer
- 120 Gb Sony XQD
- 3x EN-EL 15b batteries
As batteries die, I’ll be utilizing an inverter in my car to recharge them for backup. However, I know from the 2023 Annular Eclipse that three batteries should be more than enough for the Nikon Z6.
The eclipse close-up will rely on a Nikon Z8 with a Nikon Z 600mm f/4, provided by Lensrentals, mounted on an iOptron SkyGuider Pro tracker and tripod to help combat how quickly the sun will move through the frame. Even though I won’t be able to align the tracker with the North Star perfectly during daylight, I’ll be able to utilize a compass to point the tracker toward the North. Also, by knowing my latitude, I’ll adjust the elevation angle of the tracker to get it oriented as accurately as possible to the North Star. This will play a big role in getting to enjoy the eclipse as an observer.
With the Nikon Z8, I’ll also utilize a –
My battery setup will be a little different as I will have two EN-EL15c batteries on hand, but will primarily power the camera via an Anker PowerCore III Elite 25,600mAh external power bank.
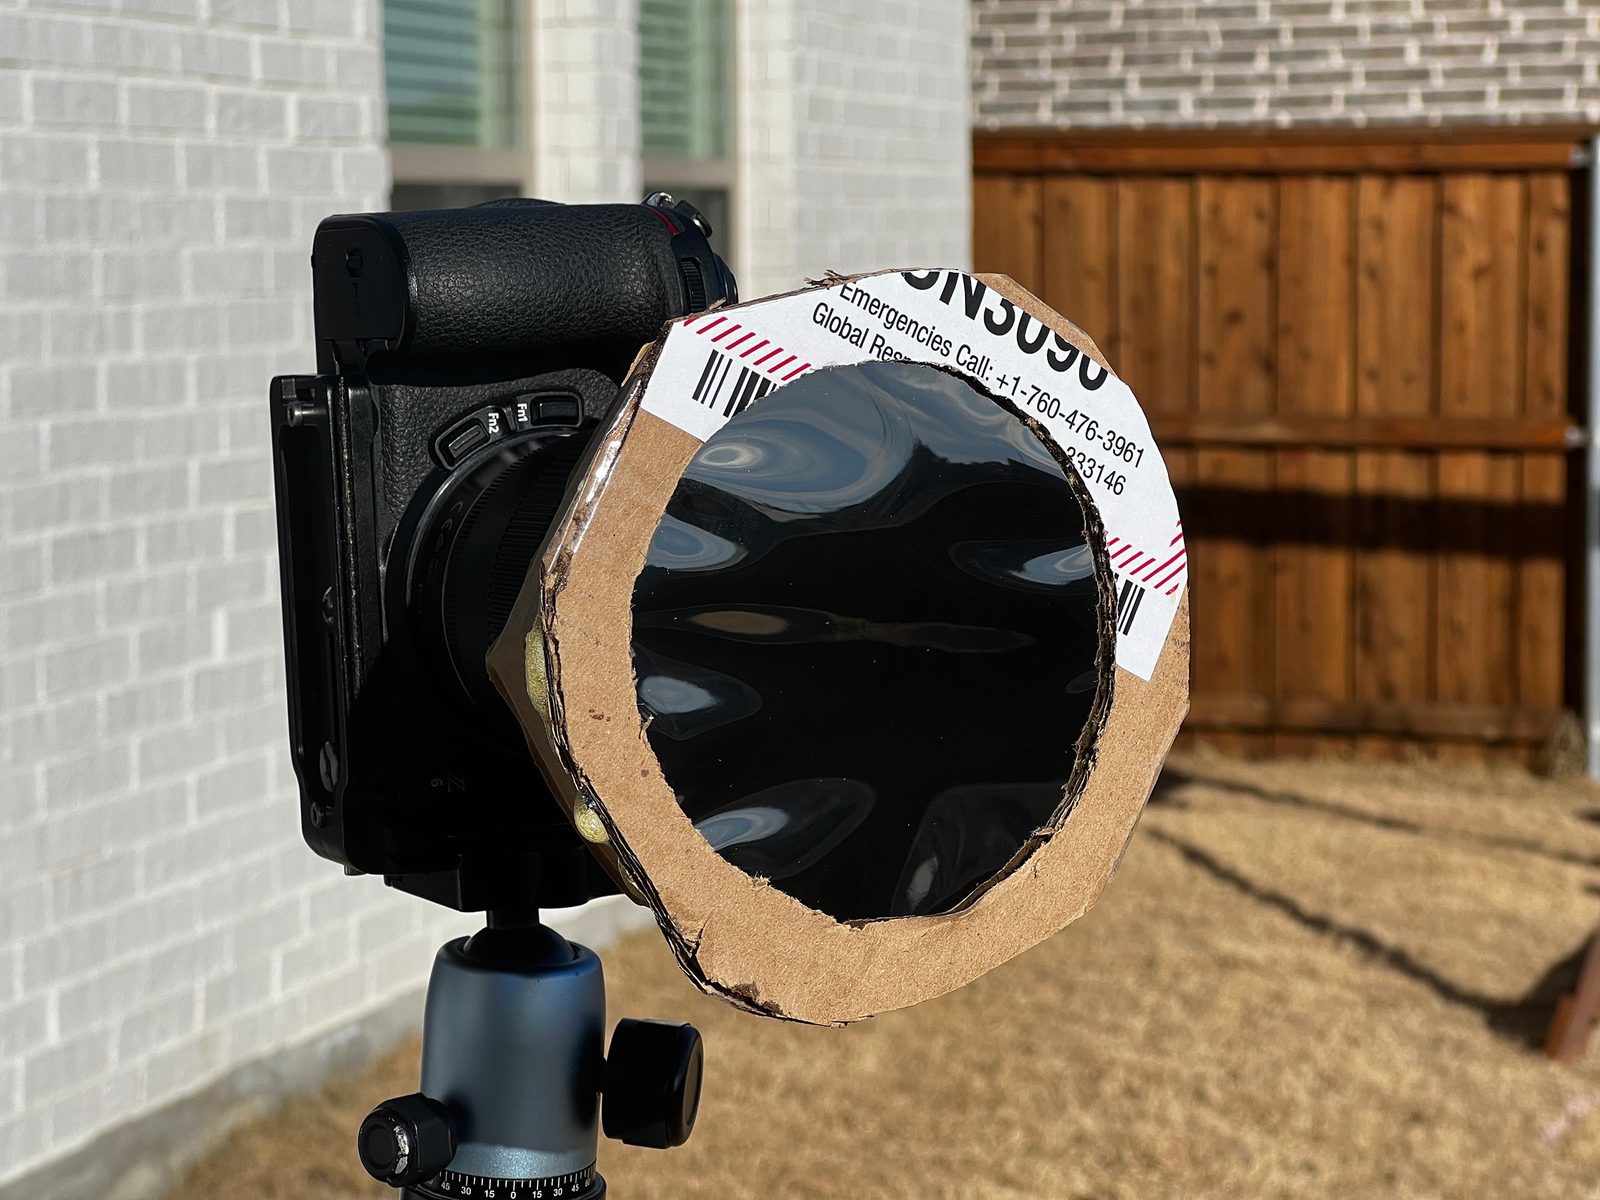
One of the most important pieces of equipment I’ll have on hand is a solar filter to protect my camera sensors in the times before and after totality. Rather than buying expensive screw-on filters, I’ve made two homemade solar filters using solar film that can be purchased on Amazon. I have a YouTube video on that process here. This approach worked great during the Annular Eclipse
Camera Settings
Before taking the photos, check your camera’s settings to ensure that Long Exposure Noise Reduction and Vibration Reduction are both turned off. Additionally, if your lens has stabilization, make sure that it is turned off. Finally, ensure that your lens is in manual mode to prevent any chance of auto mode trying to refocus during the eclipse.
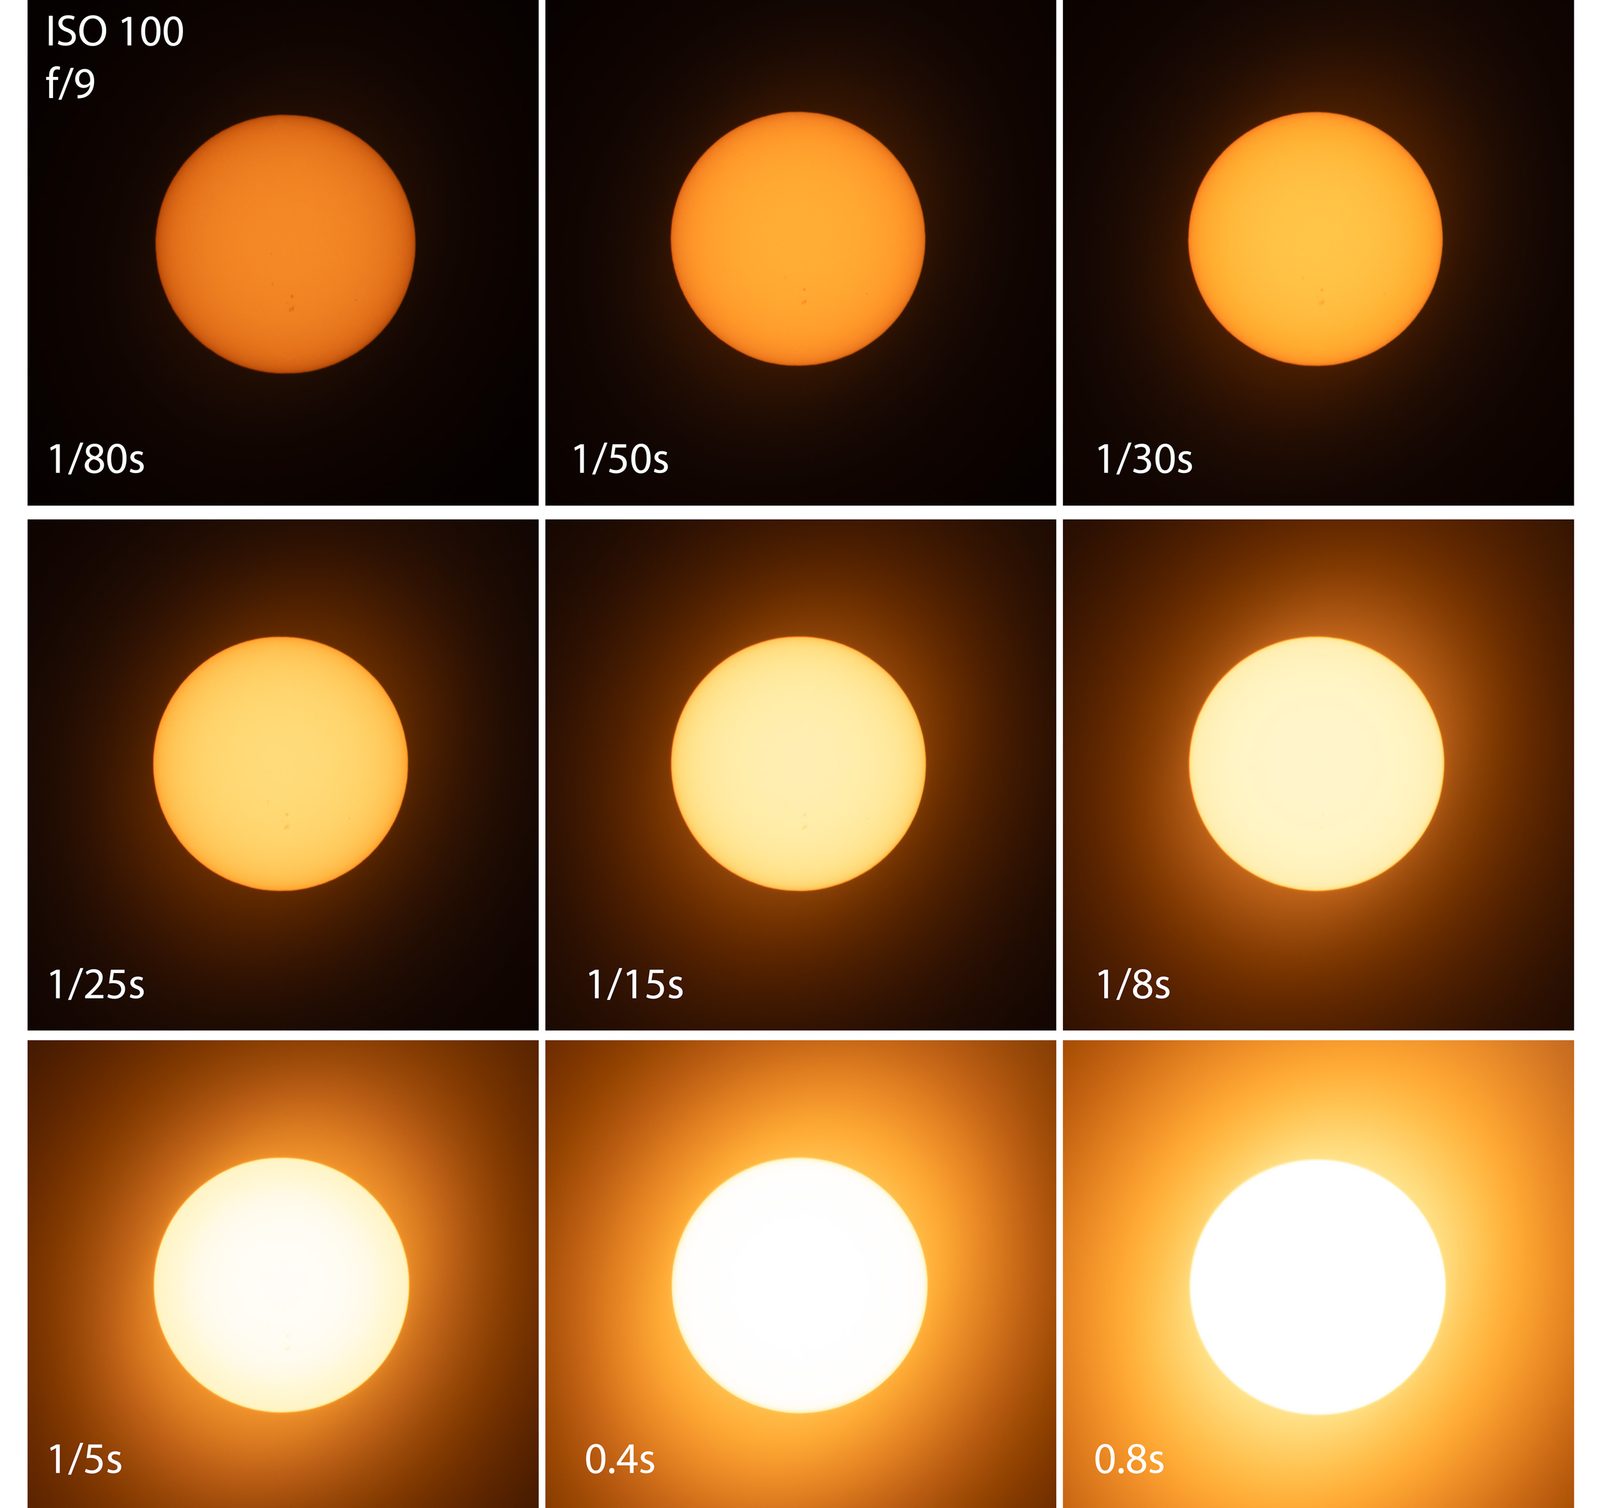
Throughout the eclipse, on both cameras, I’ll use bracketing to ensure that I gather a range of exposures on my images. For this to work on Nikon Z series cameras, the release mode must be set to “Continuous H” along with the following settings for the Intervalometer and Auto Bracketing. The intervalometer settings allow for enough time for all of the auto-bracketed photos to be captured and a delay long enough to keep in line with taking photos every 30 seconds.


Using this method will mean that when totality begins only one setting has to be changed on the camera: exposure. Bracketing gives a large range of photos that are taken throughout to ensure that proper exposures are captured. With the telephoto images, bracketing will give the ability to create an HDR image of the corona. One disclaimer though, there is no guarantee that these will be the exact settings I use, or that one should use during the eclipse. They simply serve as starting points. The best way to figure out the settings for before and after totality is to practice in the days before the eclipse. Totality will be harder to plan for though since practicing ahead of time isn’t a possibility.


One final note, this is going to produce a lot of images. Based on the Waco example, the total will be 340×9 for a grand total of 3,060 per camera! Make sure you’ve got enough batteries and large enough memory cards for this technique. If you aren’t comfortable using the bracketing technique, use the exposures above as a starting point and take single images throughout with an intervalometer snapping photos every 30 seconds.
Editing Technique for Wide-Angle Image
The wide-angle image is a fairly simple edit but may take some time based on how powerful your computer is. I like to start by editing the foreground shot that was taken during Golden Hour in Lightroom. After editing that one, the next step is to open it in Photoshop by right-clicking it. Once it’s open, go back to Lightroom for the wide-angle photos of the eclipse progression.
- Edit the foreground shot that was taken during Golden Hour in Lightroom.
- Open it in Photoshop by right-clicking it, Edit in > Edit in Adobe Photoshop.
- Return to Lightroom for the wide-angle eclipse progression.
- Select one of the eclipse progression photos and adjust the exposure
- Right-click the photo and select Develop Settings > Copy Settings > Check All > Copy
- Starting with the middle photo, select photos at 4-minute intervals (every 8th photo) going both directions through the progression.
- This will provide a small gap between each image of the sun when merged.
- Right-click the selected photos, Develop Settings > Paste Settings
- Right-click the selected photos, Edit in > Open as layers in Photoshop
- This part may take a bit as you’ll have around 50 layers to open.
- After they’ve loaded, select all of the layers and set the blend mode to “Lighten” in Photoshop.
- You’ll now see the full progression of the eclipse as a single image.
- Select all of the layers, right-click, and select Flatten Image.
- That will reduce the photo to one layer.
You’ll now have two photos open in Photoshop to merge together.
- Drag the Flatten Image layer from the progression to the foreground object file
- Select both layers and choose the Lighten blend mode
- Make any additional edits needed to balance the eclipse with the foreground
Editing Technique for Telephoto Image
This edit is going to follow the same blend mode technique as the wide-angle shot, but the best part is you can be as creative as you want with the way you present the progression.
- Select one of the telephoto images of the sun and make adjustments as needed.
- Copy those settings to the other Sun photos that you will use in your progression, but don’t add them to your totality image.
- Edit the totality image to your desires, likely adding contrast to the corona.
- Crop each of the chosen eclipse photos to a smaller size and open them as layers in Photoshop
- Expand the canvas size by choosing Image > Canvas Size and adjust the values to one that will allow all of your images to fit inside of it.
- I suggest going much larger than needed and cropping later.
- Create a black background layer by creating a new layer in Photoshop. Place it as the bottom layer, and fill it with black paint.
- Change all of the photos, except the background layer, to the Lighten blend mode.
- Mask the photos as needed to get the desired overlays, orientate your images to your desired positions, and ensure the sun is close to the same size in all of them.
- Tip: To do something interesting like the eye that I did, find a drawing online that can be toggled off and on as a layer to position the photos as needed to create the shape.
- Crop the image to the desired size.
- Save the image.
Other Ideas for Your Photos
With all of the photos captured throughout the eclipse, don’t feel limited to just the two images above. Other options to use all of your photos for include:
- HDR image of the corona
- Closeup time-lapse of the entire eclipse
- Time-lapse of eclipse over the wide-angle foreground object
Other Equipment
Camera equipment is the easy thing to think about for this event if you’re a photographer, but there are several other items to think about bringing with you to get the most enjoyment:
- Eclipse Glasses
- Sunscreen
- Bug Spray
- Chairs
- Food
- Water
Things to Enjoy
I’ve mentioned a few times that by planning, you’ll have a better chance of enjoying the eclipse. One of my favorite things to observe, other than the eclipse through specialized glasses, is the way shadows change throughout the progression of the moon. Along with that, I find it super eerie how it slowly gets darker and darker. This is also the first time I will be experiencing totality and I cannot wait to see it appear dusk-like outside during the middle of the day, feel the temperatures get cooler, and hear some of the wildlife become active.
Takeaways from the 2023 Annular Eclipse
Again… Planning is crucial for your enjoyment of the eclipse and for ensuring you get the photos that you want. Practice how to focus on the sun with your filter on in the days and weeks before the eclipse, practice taking your filter on and off, practice any adjustments you need to make to your camera settings during totality and practice taking photos of the sun ahead of time to know the settings you need to use in the points before and after totality.
Something we often take for granted is cell phone service, so be prepared for large crowds that will reduce signal or for being in a location that does not have internet. Download offline maps ahead of time, take screenshots of your plans, and write down key times of the eclipse for the location you choose.
I also recommend writing out a checklist for the event noting each action that needs to be taken in chronological order. That will ensure that as you get excited about the eclipse, you are staying on track with your images.
Finally, make sure to be on location early. For one, you might need a foreground image during golden hour, but this also helps you avoid any potential traffic. I plan to be onsite 1-2 hours before sunrise. I also expect there to be large amounts of traffic. During the 2023 eclipse, I was parked on the side of a remote road 50 miles North of Odessa, TX and still had five other cars in view. The one closest to me made the drive from Denver, CO to experience it with his parents.
I hope this guide prepares you to get the image that you want to take of the 2024 Total Eclipse. With adequate planning and practice, I know that you will, but I also want to ensure you have time to enjoy this spectacular event. If you have any questions or find that something wasn’t clear, be sure to ask a question in the comments so that I can try and help you further. You’re also more than welcome to reach out to me via social media. After all, we don’t get another shot at this in the United States until 2033 in Alaska!

3 Comments
Ralph Hightower ·
You’ve got the bases covered. I agree with your decision to avoid screm-on filters. You don’t want to waste time during the OMG moments to get a screw-on off, then back on.
There are a few brands that are universal slip-on. DayStar and MrStarGuy have ranges that fit the outside diameters. For example: 66-94mm, 86-117mm, 145-177mm.
Ralph Hightower ·
PS: A LensRentals YouTube video of the eclipse suggests using a neutral density filter. Nope! The filter needs to block IR and UV rays.
Also, Canon warns that the drop-in filters for their super telephoto will destroy the lens. Use a slip-on filter in front of the lens.
[Photographing the Total Eclipse / Canon U.S.A., Inc.](https://www.usa.canon.com/l... )
Rene Wagler ·
I was just west of Andrews, TX for the 2023 eclipse, about 15 miles from where you were. Only one other car there.
Caught the April 8 eclipse from Casa, Arkansas, again only 1 other car there and they were from California.