Lenses and Optics
The Seven Deadly Aberrations
This article is aimed toward the gearheads among us, those who want to know more about how things work. Reading it will not improve your photography even a microscopic amount. Then again, it might, actually, at least a bit. But for those who are interested in such things it’s a fun read.
And for many of you, there will be cool terms you can pick up and use in various online forum arguments. Nothing is more fun than being able to say stuff like “Given that the Wangmeister 12-600 f/2.8 is a nonsymmetrical design with strong field curvature, you must expect that you will see some spherochromatism in the out-of-focus highlights with astigmatism and coma in the outer one-third of the image”. You may want to copy-paste that sentence right now because that’s a thread stopper right there, my friends, and there’s not a much better feeling than ending a 4 page thread by slapping something like that down. It may not be appropriate to the topic, but 99% of the people reading it won’t have any idea if it is or not. Game, set, match.
In practical terms (as practical as I can stretch here, anyway), understanding a bit about the various optical aberrations will explain why many lenses struggle at wide apertures and away from the center of the image, and while almost any lens is sharp in the center at f/8. And it may help you, at times, pick the best lens for the job at hand.
Introduction
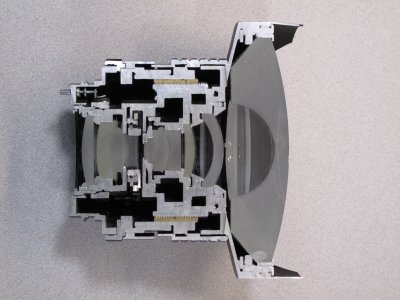
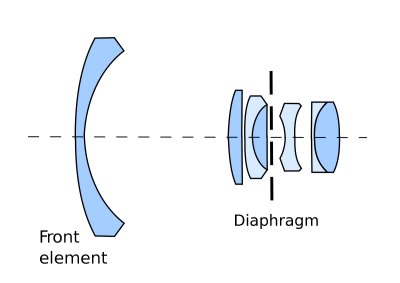
Figure 1: Elements in a typical lens.
Do you ever wonder why a modern lens may have a dozen or more elements in several groups (Figure 1)? The large number of elements are required to minimize aberrations. (An aberration is defined as any imperfection of the image formed by a lens). If a lens were perfect, then every point of light from the object being photographed would form a single point of light on the image sensor. In reality (even in theory) this isn’t possible, but the goal of every lens designer is to get as close to perfection as they can.
This isn’t a new goal that started in the recent days of computer enhanced optical design, fluorite elements, and laser measurement. It has been the goal of lens designers since well before Ni?pce produced the first successful photograph in 1827. (Yes, before. There were microscopes, telescopes, and spectacles using lenses long before there were cameras.) In fact, Phillipe von Seidel had identified and mathematically described the 5 monochromatic aberrations (spherical aberration, coma, distortion, field curvature, and astigmatism) by 1857. The other two major aberrations, longitudinal and lateral chromatic aberration, were known well before that.
Most of us know what some of these aberrations are, at least generally. But like the term “sharpness”, people often use these terms inaccurately, so I thought it might be worth defining them and briefly describing their causes, and for a few examples, how they are prevented.
Chromatic aberrations
There are two types of chromatic (color) aberrations. One of these you are probably quite familiar with because it remains an issue with many lenses even today. The other, which actually causes more severe problems, is less well known because lens designers largely learned to correct for it in the 1800s.
Longitudinal Chromatic Aberration
We all know that glass lenses bend light rays, and most of us are aware that the blue rays bend more than the red rays: the same effect that splits white light into a rainbow of colors when it passes through a prism occurs when light passes through a lens. With a simple lens this causes red light to focus behind green light, and blue light to focus in front of green light (Figure 2). Because it is longitudinal, the entire image is affected, both the center and the edges.
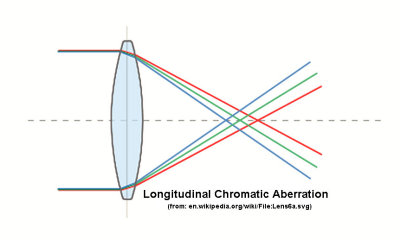
Figure 2: Longitudinal Chromatic Aberration. (Courtesy Wikepedia Commons)
Even in the early days of black-and-white photography this caused a major problem because humans, who see green light best, focused the image on a ground glass screen of their view camera, but the plates used were most sensitive to blue light which was focusing slightly in front of the green light. Luckily, this problem had been solved to some degree by the invention of the achromatic doublet (Figure 3) for use in telescopes prior to the advent of photography. The doublet uses two different types of glass with different refracting and dispersing properties to largely correct longitudinal chromatic aberration—enough so that two different wavelengths of light (green and blue, for example) actually impact the sensor at the same point. If you look at the modern lens shown in Figure 1 (and almost any other lens for that matter), you’ll see one or more achromatic doublets. In modern lenses one of the elements in the doublet is usually an ultra-low dispersion type of glass.
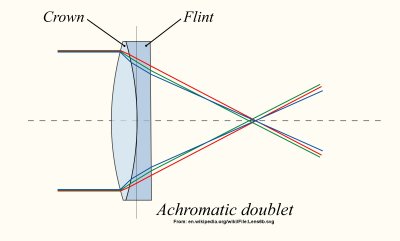
Figure 3: An achromatic doublet. (Courtesy Wikepedia Commons)
There’s an interesting story about the achromatic doublet’s invention. Chester Hall, around 1730, came up with the idea in an effort to make a better telescope. Not wanting to let anyone else in on the secret, he went to two different opticians, Edward Scarlett and James Mann, each of whom was contracted to make just one of the elements, which Hall planned to fit together himself. Each of the opticians then hired the same lensmaker, George Bass, to actually manufacture the lens they had agreed to supply. Bass noted the achromatic properties of the pair but kept the knowledge to himself for years. Hall had a few achromatic telescopes made but never patented his invention. Bass mentioned the properties of the lens pair to another customer, John Dollond, who presented a paper in which he claimed to have discovered the effect and patented the technology in 1758. Thirty years of legal battles ensued. (Hall had passed away, but opticians sued in his name in an effort to break the patent).
An improvement, the apochromatic lens (Figure 4), can correct 3 different wavelengths of light, improving things even further. Interestingly, the inventor of the apochromat was Peter Dolland, the son of John Dollond.
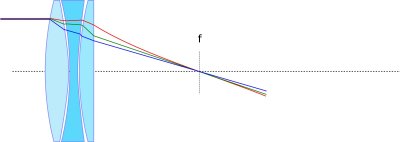
Figure 4: An apochromat lens. (Courtesy Wikepedia Commons)
Lateral Chromatic Aberration
Lateral chromatic aberration is quite different from longitudinal chromatic aberration, although it results from the same principle: that glass refracts different wavelengths of light differing amounts. Lateral chromatic aberration (what we often call purple fringing) occurs when off axis light rays are bent to varying degrees. Because the rays enter the lens at an angle, the standard achromatic doublet, which works best on parallel rays entering the lens directly, doesn’t correct them.
Lateral chromatic aberration doesn’t affect the center of the image at all, but has an increasing effect the further away from the center you look. While the actual purple fringing is only visible in areas of high contrast (usually a dark object on a light background), the effect still softens the image in the edges and corners, even if actual purple fringing isn’t noticed (or if it is corrected in post processing).
The best way to avoid lateral chromatic aberration is for the lens to be designed “symmetrically about the stop (aperture ring)”. Such designs were first used in the Rapid Rectilinear lens of 1866 and continued today in lenses like the Planar (Figure 5). It stands to reason, therefore, that Lateral Chromatic Aberration would be most apparent in lenses that are very nonsymmetrical, such as telephoto and reversed telephoto lenses (Figure 6).

Figure 5 and 6: The Rapid Rectilinear Lens (above) and a reverse telephoto lens (below)
The Monochromatic (von Seidel) Aberrations
Spherical Aberration
Spherical aberration occurs because a spherical lens refracts light that enters near the edge more than light that enters near the center (Figure 7). As a result, the image cannot be focused to a sharp point. A point of light seen through a lens with spherical aberration will have a fairly uniform halo, and the effect is seen in the center as well as the edges of the image.
The hallmark of spherical aberration is that the effect is reduced at smaller apertures since the edges of the lens are blocked. Spherical aberration can also contribute to “focus shift”. While this is an oversimplification, if you look at Figure 7, you can imagine that if we closed the aperture, eliminating the most lateral rays of light, the area of best focus would seem to shift away from the lens. Reducing spherical aberration can be done by using combinations of convex and concave lenses, by using meniscus lenses, and by using aspheric lenses.
Figure 7: A perfect lens (top) and one with spherical aberraton (bottom). (Courtesy Wikepedia Commons)
Spherical aberrations are minimized in several ways. Bending of lens elements (Figure 8) allows the lens to have the same amount of refraction but changes the amount of spherical aberration it causes. Using several different elements to refract the image a given amount instead of one strong element can also minimize the amount of spherical aberration.
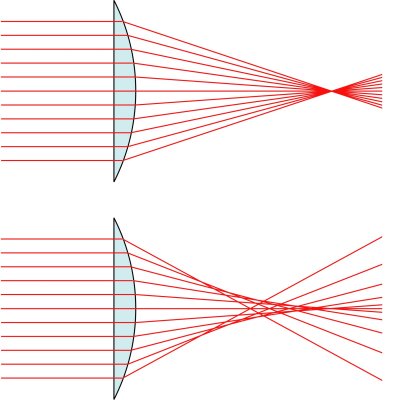
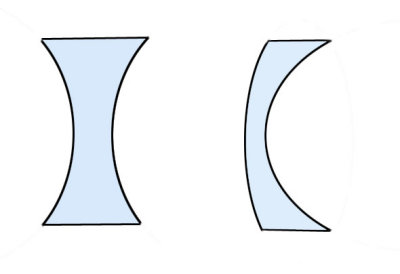
Figure 8: Both lenses have the same refraction, but the one on the right has been “bent”.
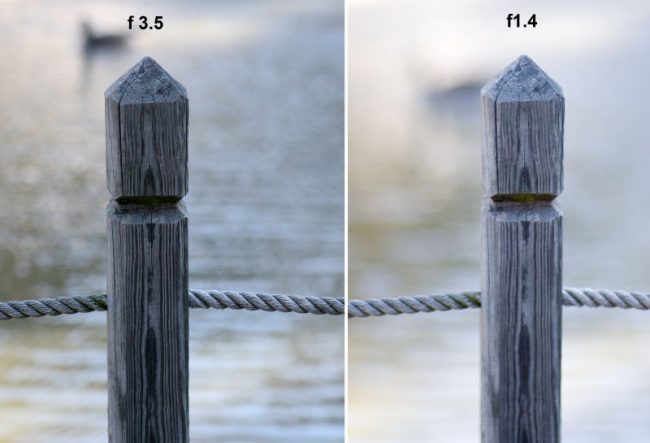
There is one form of spherical aberration that you may have seen if you’ve used very wide aperture lenses: spherochromatism. Like chromatic aberration, some lenses have corrected spherical aberration at some wavelengths better than others. This may result in a magenta tinge for out of focus areas in the foreground and a greenish tinge in the out of focus portion of the background (or vice-versa).
Coma
Coma is a complex aberration that affects only light rays from a point that pass through the lens at an angle. With coma, the rays don’t refocus to a point, they flare out from the point (Figure 9). This makes points of light look like a comet with a blurred tail, hence the name. Usually the flare is further away from the center (positive coma) but in some cases it can be toward the center (negative coma). Coma is asymmetrical: the further away from the center of the image, the more noticeable the effect. Light rays passing straight through the center of the lens are not affected.
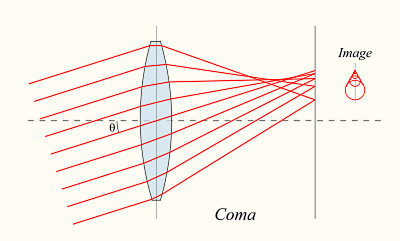
Figure 9: Lens Coma (Courtesy Wikepedia Commons)
Because stopping down the aperture reduces the rays entering from the lateral edge of the lens, it will reduce coma. Many of the same lens techniques that minimize spherical aberration also reduce coma, particularly a lens design that is symmetrical around the center. A lens that has no spherical aberration and no coma is called an aplanat.
Field Curvature
Field curvature is considered by some to be an aberration, because it causes all manner of problems. Others consider it to be a natural effect of the lens because it is inevitable: curved lens surfaces do not naturally project their image onto a flat sensor, but rather they naturally form the image on a curved survace (Figure 10). Petzval’s sum is a mathematical formula (and Petzval’s quite a story in his own right) that describes the curvature of the image created by every lens. Obviously field curvature affects the edges of the image and not the center.
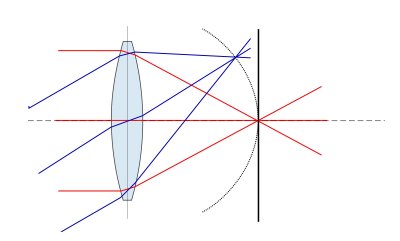
Figure 10: Field Curvature. (Courtesy Wikepedia Commons)
Field curvature can be reduced by a combination of convex, concave lenses, and meniscus lenses, often in doublets or triplets. In some lenses a field flattener, a weakly negative lens often placed closest to the imaging surface, is used to correct any residual field curvature. Like most aberrations, stopping down the aperture also reduces field curvature.
Floating Elements and Effective Focal Length Change
Lenses are often designed so aberrations, particularly field curvature, are corrected well when the lens is focused at infinity, but less well corrected when the lens is focused on a closer object. The use of a floating element, a lens group that adjusts its position when focusing on closer objects, is sometimes used in better lenses to keep the aberrations corrected when the lens is focusing on close objects. As an alternative, the lens may be designed so that other elements within the lens move when focusing on nearby objects, with the result that the effective focal length of the lens is reduced when focusing nearby. There was quite a fuss raised when this method was used on a recently released 70-200 f/2.8 zoom. People somehow felt cheated because the maximum effective focal length of the lens dropped to 145mm or so when focusing on close objects, but this was simply a method used to keep the lens as sharp in near focus as it was at infinity focus.
Astigmatism
Astigmatism is really a subset of field curvature, but even more difficult to correct (and understand). It occurs when light rays entering the lens in the sagittal plane are focused at a different place than light rays entering in the tangential plane. A point of light therefore becomes spread out into a line to some degree (Figure 11).
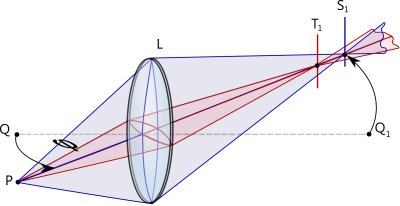
Figure 11: Astigmatism—the focus of Tangential rays (T1) and Sagittal rays (S1) are at different points. A point light source will be distorted linearly.
Correcting astigmatism requires at least 3 lens elements, usually two convex and one concave. In some lenses, a weak meniscus element (Figure 12) is added to reduce astigmatism. Even in the best lenses, it cannot be corrected completely, although the correction can be pretty close. For those of you who look at MTF charts, the curve showing the difference in the sagittal and tangential MTF often gives a hint about the degree of astigmatism a lens will have.
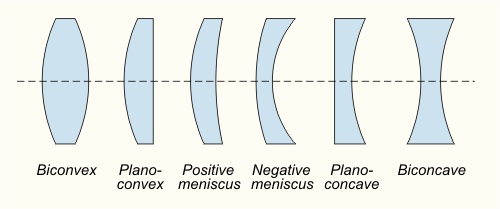
Figure 12: Types of lens elements (Courtesy Wikipedia Commons)
Astigmatism does not affect the center of the image. It becomes more pronounced further from the center of the image and is most severe at the edges and corners of the image. It is reduced, like most off-axis aberrations, by stopping down the lens to reduce the aperture.
Severe astigmatism may occur when an element in a lens is decentered or not parallel to the other elements in a lens. Sometimes the lens will appear to function properly during routine tests and only a specific test for increased astigmatism will show that the lens is actually defective.
Distortion
Distortion is when the image deviates from rectilinear. It doesn’t necessarily affect sharpness, but can subtly or grossly affect how straight lines appear in an image. The two most common types of distortion are barrel and pincushion distortion (see Figure 13). A less commonly seen distortion, moustache distortion, is actually a combination of the other two, having the appearance of barrel distortion close to the center of the image and pincushion distortion near the edges.
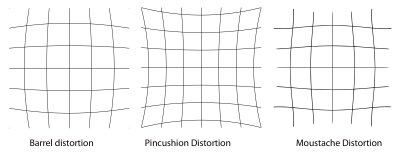
Figure 13: The three common types of distortion
Distortion is most commonly seen in zoom lenses, particularly zooms of wide range near the extremes of their range. It does occur in some prime lenses, though. Wide angle and retrofocus lenses are more likely to exhibit barrel distortion while telephoto lenses can exhibit pincushion distortion. Zoom lenses may exhibit barrel distortion at the wide end and pincushion distortion at the telephoto end. Distortion can also vary with focal distance: some lenses exhibit distortion when focusing on nearby objects, but are distortion free when focused on objects near infinity.
The position of the stop (aperture ring) in the lens can greatly influence the amount of distortion. In a simple lens, if the stop is near the lens, there is little distortion, but if it’s located far in front of or behind the lens, then distortion is more likely. Changing the position of various elements when zooming or focusing a lens in relation to the stop may increase or decrease the amount of distortion in that lens.
The point of it all?
Designing lenses with no aberration is really an impossible proposal. Correcting one type of aberration may worsen another, correcting that may require adding more elements, etc. The movement of elements within a zoom lens compounds the various aberration problems, and most zooms will exhibit at least some readily detectible aberration. Even some prime lenses, the very best prime lenses, have problems. For example, the Zeiss 21mm f/2.8, possibly the sharpest wide angle lens made, has significant moustache distortion. The Nikon 28 f/1.4, one of the classic lenses, had significant coma. The Canon 50 f/1.2 has field curvature.
My point in discussing the various aberrations is not to provide ammunition for trashing this lens or that. Rather, the point is that a good photographer should know the weak points of his or her lenses, as well as their strengths. No lens is perfect, each one has some weakness. And each should be used in a way that minimizes its weaknesses and plays to its strengths.
While modern lenses largely correct field curvature, the early lenses used in the mid 1800s had severely curved fields. If you ever see a group portrait from the 1850s you’ll notice the group is usually posed in an arc: the photographer, being aware of the curvature, would position his subjects in an arc so they were all in the focal plane. Artistic vignetting (darkening) of the corners was popular, because the corners were usually just blurs anyway. And oval portrait frames where the norm for the same reason.
Good photographers today also know the weaknesses of their lenses. They don’t focus recompose with the Canon 50 f/1.2 because the change in the field curvature may take the subject out of focus. They realize if they use the lateral autofocus points, the center of the image may be soft. The Sigma 50 f/1.4 is best when shot wide open or at f/2.8 or higher. In between f/1.4 and f/2.8 focus shift may cause the image to be out of focus. The Zeiss 21mm f/2.8 can make a straight fence top or roofline appear wavy because of moustache distortion. I’m not picking on these lenses for any reason other than they come to mind. In good hands they are all spectacular lenses, but some photographers, not understanding their weaknesses, complain bitterly about each of them (OK, maybe not the Zeiss 21mm).
For every lens, I try to keep a mental “try not to do this” checklist associated with it. How did I establish this list? Well, by reading and discussing lenses in online forums and learning what aberrations they had. And by taking bad photographs, examining what was wrong, and adding “this one has field curvature, this telephoto zoom pincushions after 300mm, this other one has bad astigmatism, but it’s beautifully sharp in the center” to my mental list. By understanding the general types of aberration (and taking lots of bad photographs) things like this are second nature:
Don’t shoot buildings at the wide end of a zoom lens because the barrel distortion will make vertical lines curved. Even staying just a few mm from the widest angle helps immensely.
If your lens shows coma or astigmatism in bright lights shooting a night image, stop the aperture down and take a longer exposure.
If your lens has soft corners and edges, stopping the lens down can work wonders.
Unfortunately, the manufacturers aren’t going to advertise what aberrations one of their lenses has. Lab bench reviewers usually do a good job of describing distortion and lateral chromatic aberration. Field curvature and astigmatism are occasionally described by reviewers who use the lenses in the field. But using the lens yourself, learning its flaws and strengths so you can make the most of the tool that it is, rather than focusing on the fact that it isn’t perfect, is a big part of what makes a good photographer.
References
- Ceragioli, Roger: Primer of Image Aberrations and their Graphical Representation. In A Survey of Refractive Systems for Astronomical Telescopes
- Fischer, Robert, et al.: Review of Specific Geometric Aberrations and How to Get Rid of Them. In: Fischer, Robert: Optical System Design, 2nd Ed. McGraw-Hill, 2002.
- http://en.wikipedia.org/wiki/John_Dollond
- http://en.wikipedia.org/wiki/Achromatic_lens
- http://en.wikipedia.org/wiki/Wide-angle_lens
- http://en.wikipedia.org/wiki/Aberration_in_optical_systems
- http://en.wikipedia.org/wiki/Optical_aberration
- Kerr, Douglas: Astigmatism in Camera Lenses – Meridional and Sagittal MTF respons. http://dougkerr.net/Pumpkin/
- Kingslake, Rudolph: A History of the Photographic Lens. Academic Press, 2004.
- Ray, Sidney: Aberrations – Defects in Imaging Systems. In: Ray, Sidney: Applied Photographic Optics. Focal Press, 2004.
- Smith, Gregory: Camera Lenses from Box Camera to Digital. SPIE Press, 2006.
- van Walree, Paul:Distortion. http://toothwalker.org/optics/distortion.html
- van Walree, Paul: Astigmatism and field curvature: http://toothwalker.org/optics/astigmatism.html
- van Walree, Paul: Chromatic Aberrations http://toothwalker.org/optics/chromatic.html
Author: Roger Cicala
I’m Roger and I am the founder of Lensrentals.com. Hailed as one of the optic nerds here, I enjoy shooting collimated light through 30X microscope objectives in my spare time. When I do take real pictures I like using something different: a Medium format, or Pentax K1, or a Sony RX1R.
-
Bulletcalledlife
-
Federico Ferreres
-
Franz Elias
-
Michael Clark
-
Light Genesis
-
Manuel Fernando Herrera Pinale
-
Bojan Stajcar
-
CodeCurmudgeon
-
Devil’sAdvocate
-
David A. Grano-De-Oro
-
Europa and JDM
-
Ben Lassing
-
HelgeM
-
NancyP
-
ryflow
-
Chris
-
intrnst
