Teardowns and Disassembly

The A7R teardown: A look inside Sony’s awesome full-frame mirrorless camera

Published January 29, 2014

The usual warnings apply:

  • Do not try this at home. This post was made by semi-trained, semi-professional repair technicians who sort of know what they’re doing.
  • The following blog post contains graphic images of the inside of a very nice camera. If such things make you squeamish, don’t read further. 
  • No cameras were harmed in the making of this blog post. The camera has been fully reassembled and is functioning normally.

Yeah, We Had to Do It

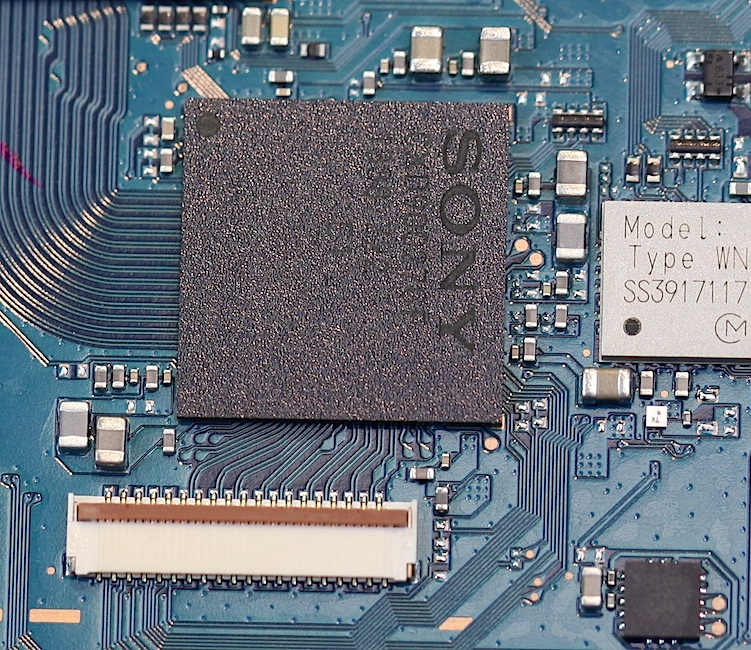
Ever since we first tested a Sony A7R, we were dying to take a look under the hood. Say what you will about Sony as a company, but they create some of the most elegantly-engineered camera bodies we’ve seen. Plus, the A7R is something of a groundbreaking camera, and we wanted to see how they crammed all that stuff into its little body. Oh, and finally, we’ve wanted a closer look at how thick the cover glass over the A7R’s sensor is, since there is some evidence that it may affect the edge performance of certain adapted lenses.

But we were a bit afraid of what we were getting ourselves into. Because Sony engineers its cameras so efficiently, they tend to be difficult to disassemble, let alone reassemble. And Tyler, knowing us like he does, had probably set computerized alarms on the inventory control system, notifying him the instant an A7R got sent to the repair department for any reason. But Tyler was out sick for half a day — and there were actually some A7R bodies in stock. So we did what we had to do.

A Quick SLR Comparison

Mirrorless cameras tend to be simple and elegant compared to SLRs — in part, because they have a lot less stuff in them. Just to set the stage, let’s remove the body caps and compare the front of a Sony A7R with a Canon EOS 5D Mark II.

If you take the body cap off the A7R, here’s what you see:
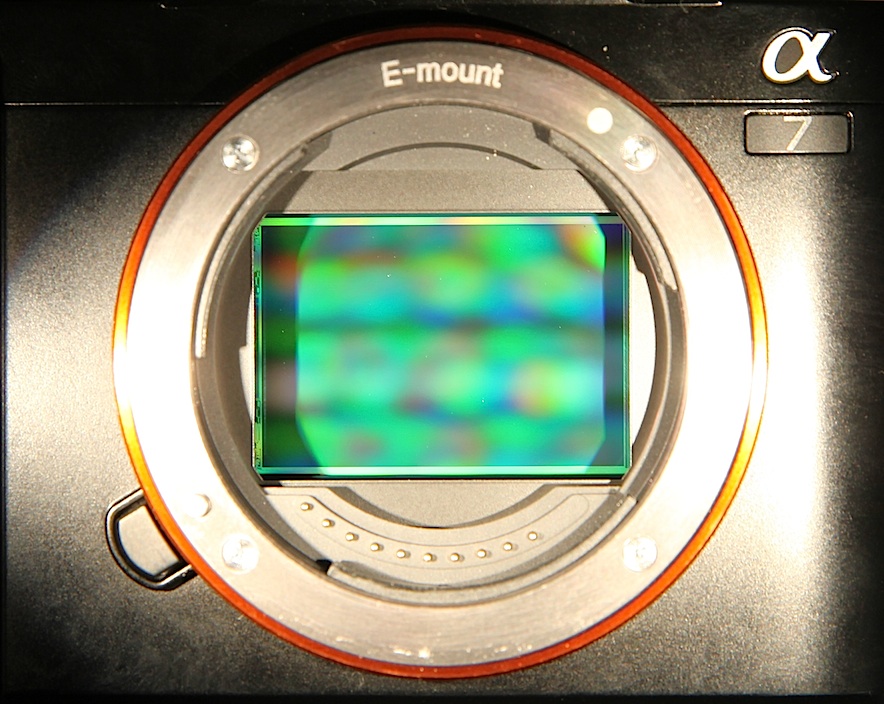
 

Take the body cap off the 5D Mark II, and there’s a whole lot more to see.
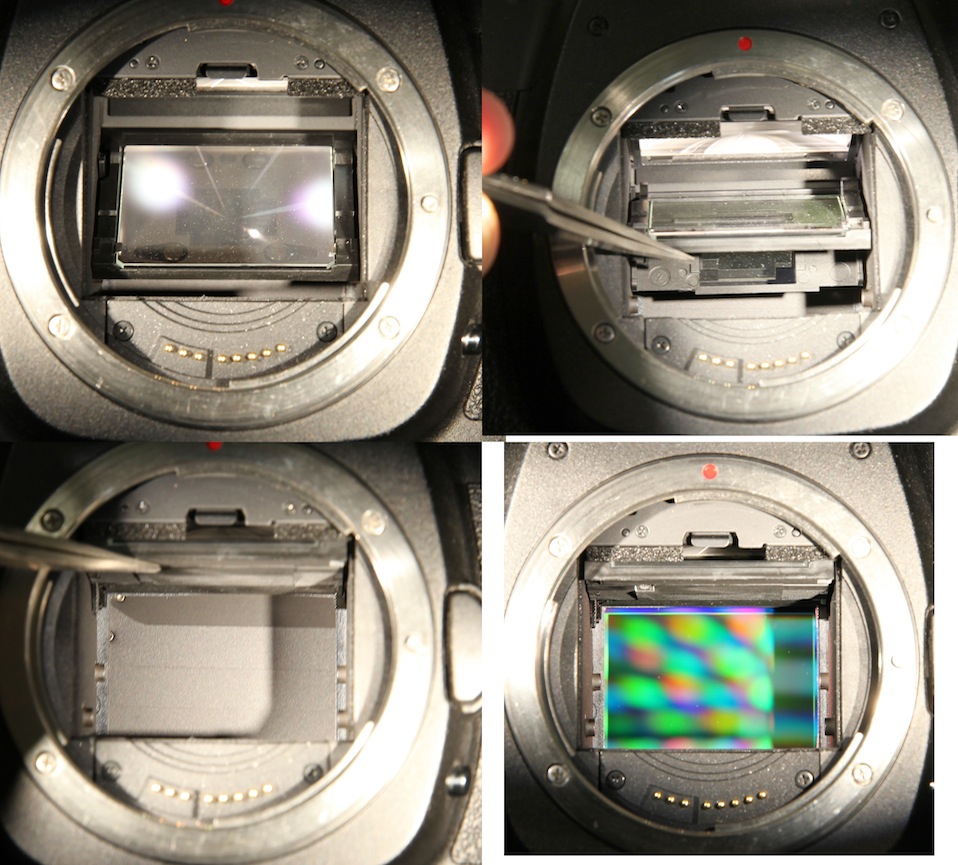
Canon EOS 5D Mark II showing main mirror (top left); partially lifted to show submirror (top right); fully lifted to show the shutter (bottom left); and with shutter opened to show the sensor (bottom right). The white area atop the mirror box is the focusing screen. 


If you flip things around and look at the bottom of the mirror box, you can also see the phase-detection autofocus sensor.
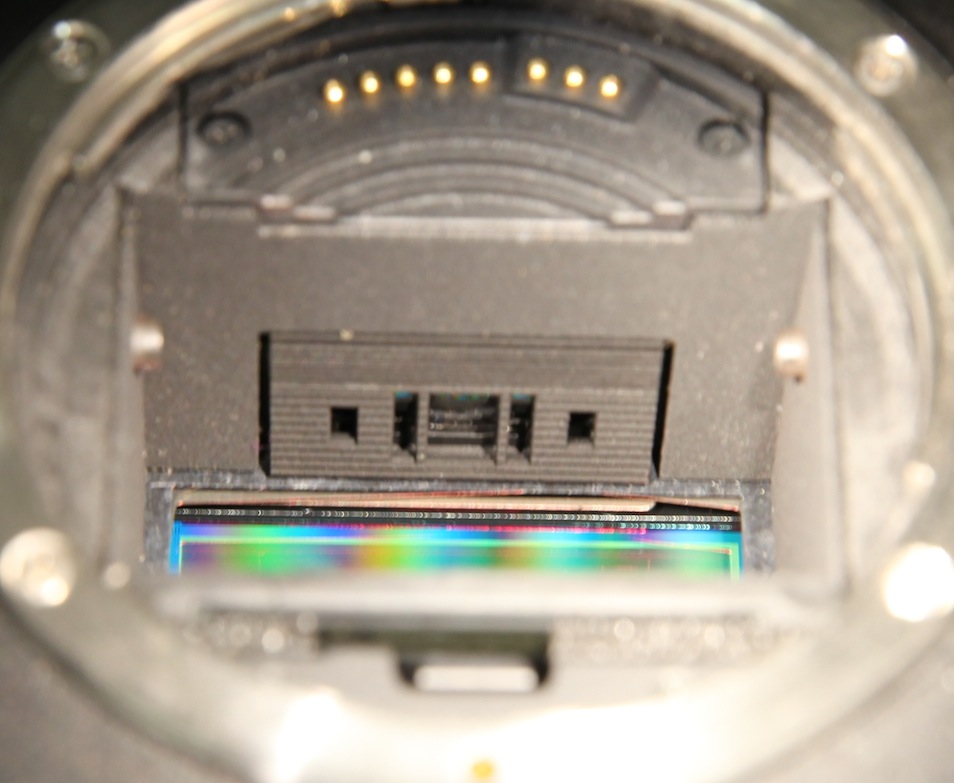
 

This isn’t particularly important for today’s teardown, I’m just trying to show why a mirrorless camera can be simpler inside than an SLR ever could. If you’d like to compare this article to a teardown of an SLR, you might like our Nikon D7000 Teardown, or perhaps this teardown of a Sony NEX-3.

So Let’s Get To It!

As usual when we do these things, Aaron drives the screwdrivers, while I take the pictures and offer helpful comments or suggestions, like “Don’t tear that flex”. This teardown was a bit like Indiana Jones and the Temple of Doom, as we survived one near miss after another without quite destroying the camera. I’m sure my comments were most helpful.

The first trap we encountered was entirely of our own making. With almost every camera, you begin disassembly by peeling off the rubber grips to get to the screws beneath. Not with the A7R. The good news is that the A7R’s grips are completely bonded to the camera body, not held on with sticky tape, because there are no screws beneath them. They’re never going to come loose over time, unlike some cameras we know all too well. The bad news is that we found this out by spending half an hour trying to remove the unremovable grips.

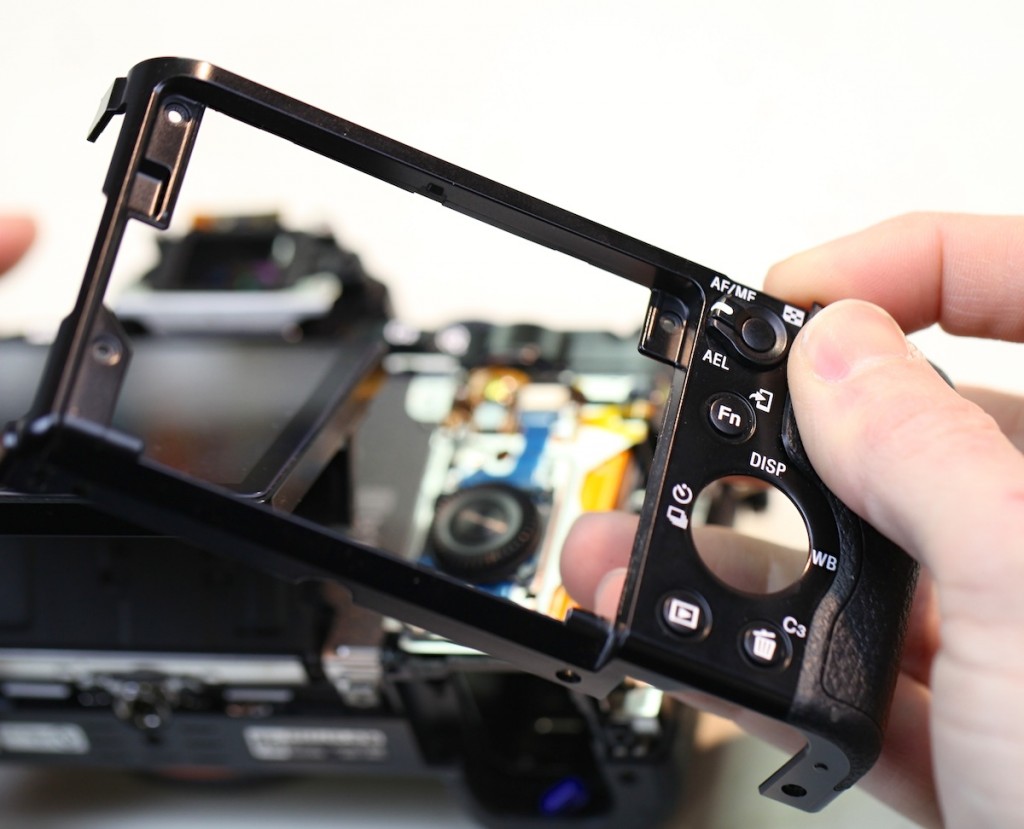
Once we gave up on grip removal and started taking out the screws we could see, things progressed quickly, and the back was off in no time.
The electronic viewfinder cover came off just as easily. That’s the eye proximity sensor on the flex above the viewfinder.
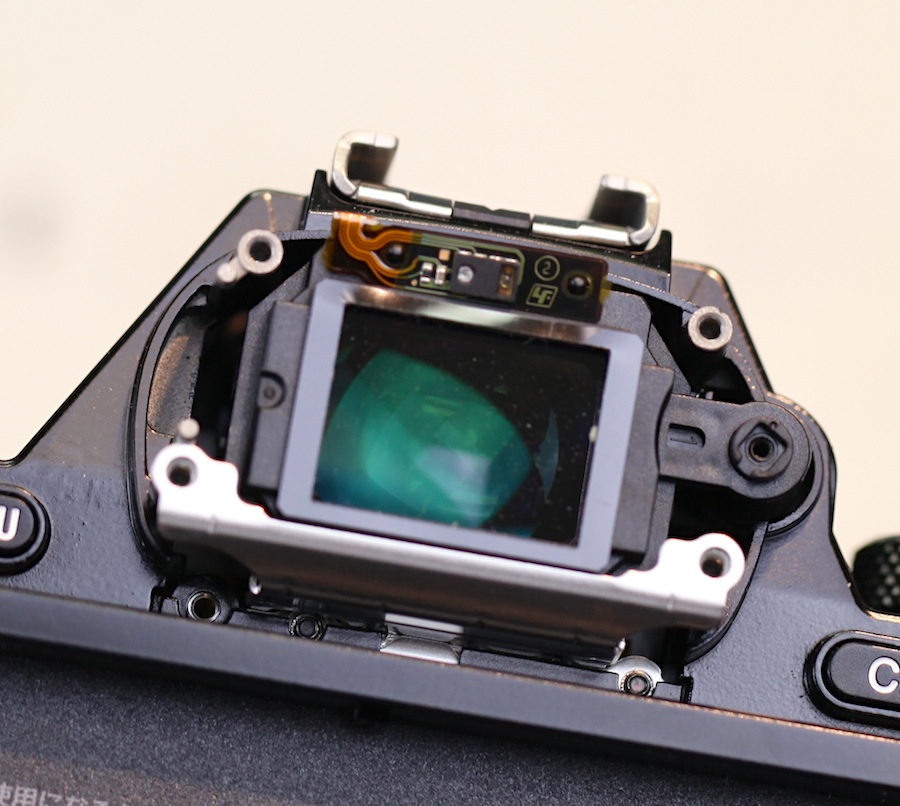
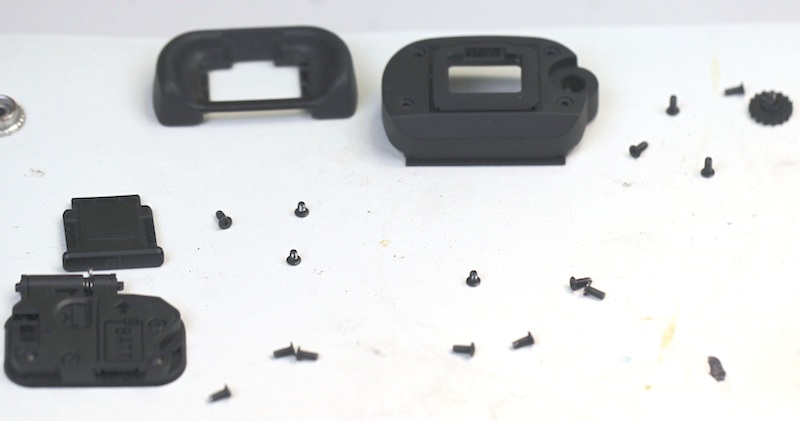
A very nice thing — and one that’s quite typical of Sony engineering — was that there were only two different screw sizes used thus far: one size for the casing, and another for the EVF cover. A typical Nikon or Canon camera has four to seven different screw sizes by this point.
Back to the camera. With the back plate off, the LCD assembly is now exposed.
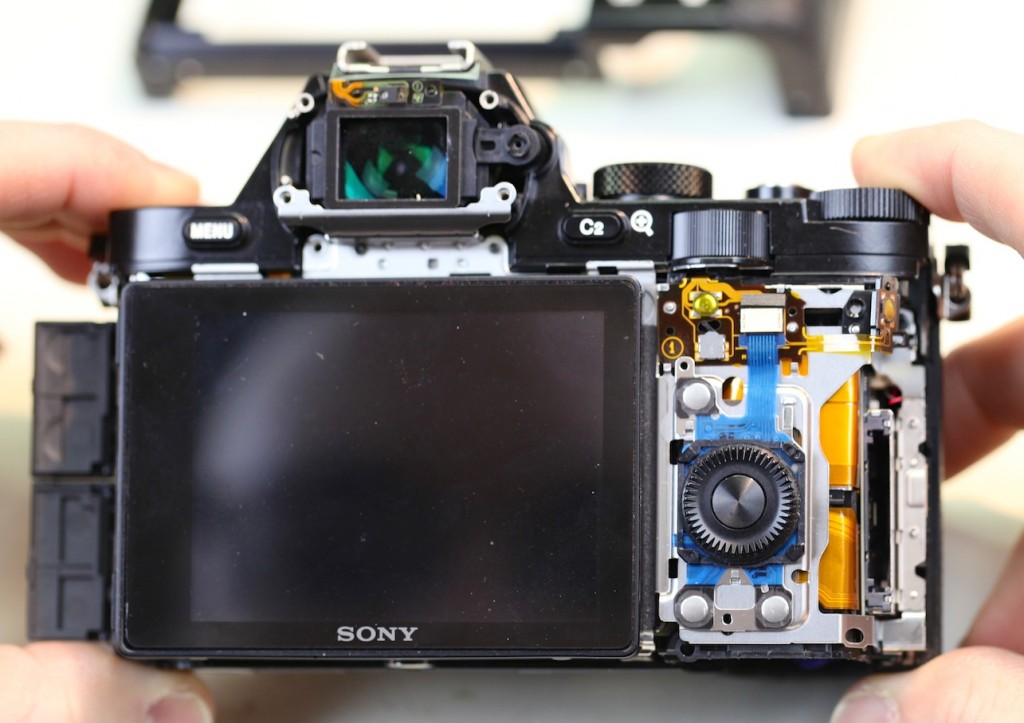
Removing a few more screws frees the LCD to be lifted up, showing the single large flex that connects it to the main PCB.
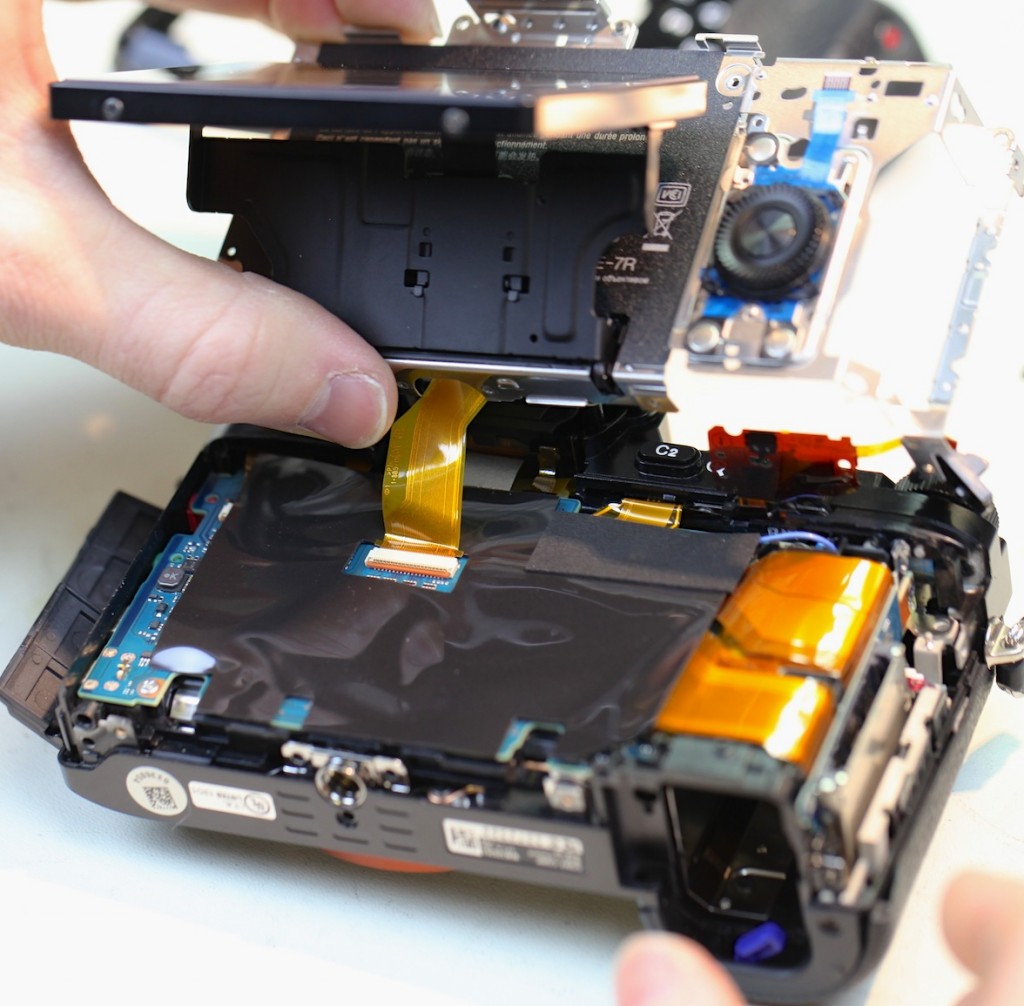
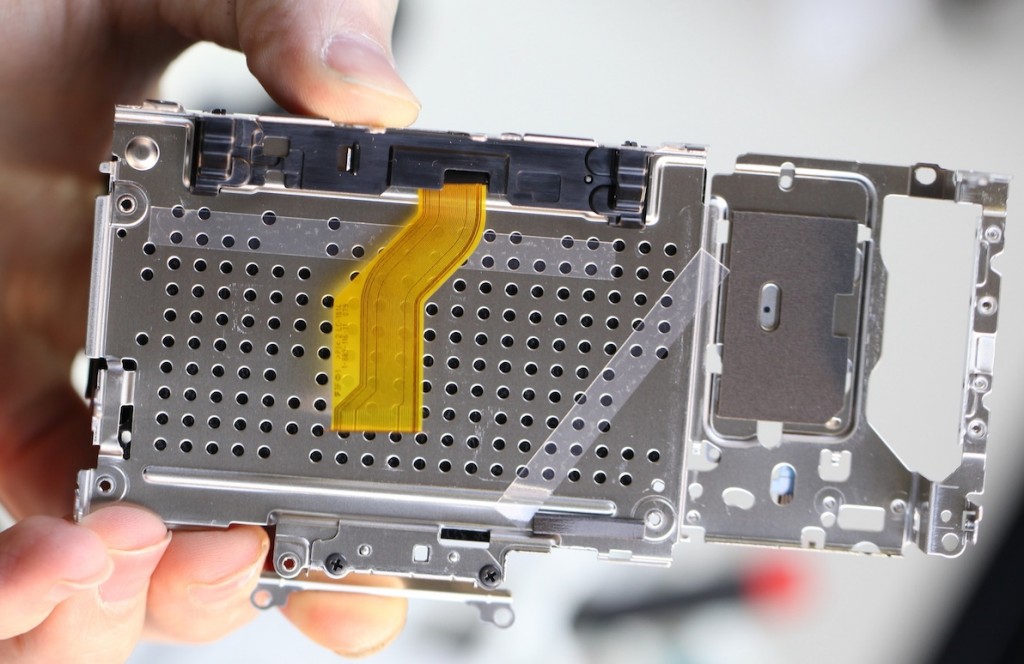
The LCD assembly is a very sturdy piece of metal that is totally rigid, even when taken out of the camera. That may seem inconsequential, but LCDs get pushed and pulled on quite a lot. When they’re weakly mounted, as we’ve seen on some very pricey DSLRs, they can get quite loose or even bent into the camera a bit.
Near-doom adventure number two came as we started to peel back the thick shielding tape over the main PCB. On the right side, there are several flexes under the tape that badly wanted to tear themselves as it was removed.
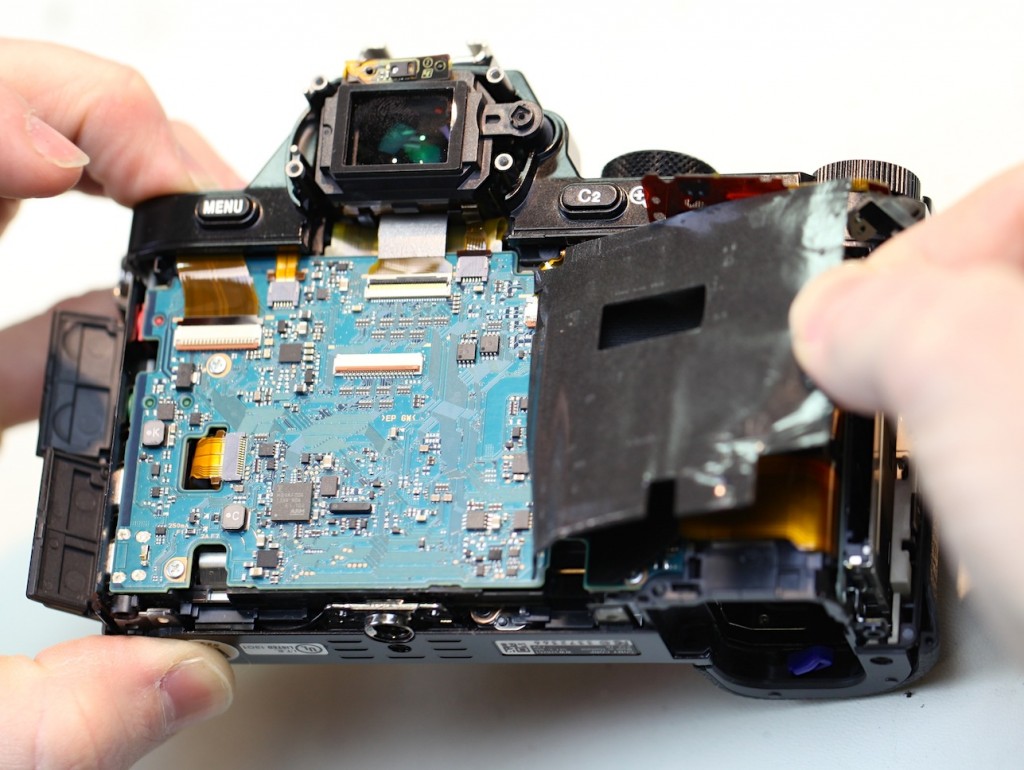
But the tape came off without any major mishaps, showing a typically clean Sony layout. All flexes are arranged to have the shortest possible runs, with no wires winding across, around, or under the PCB as we see all too often in other brands.  There’s even a nice little cutout to let the PCB on the bottom left come up through the board, rather than making it 10 times longer so that it can wind around the edge from underneath.
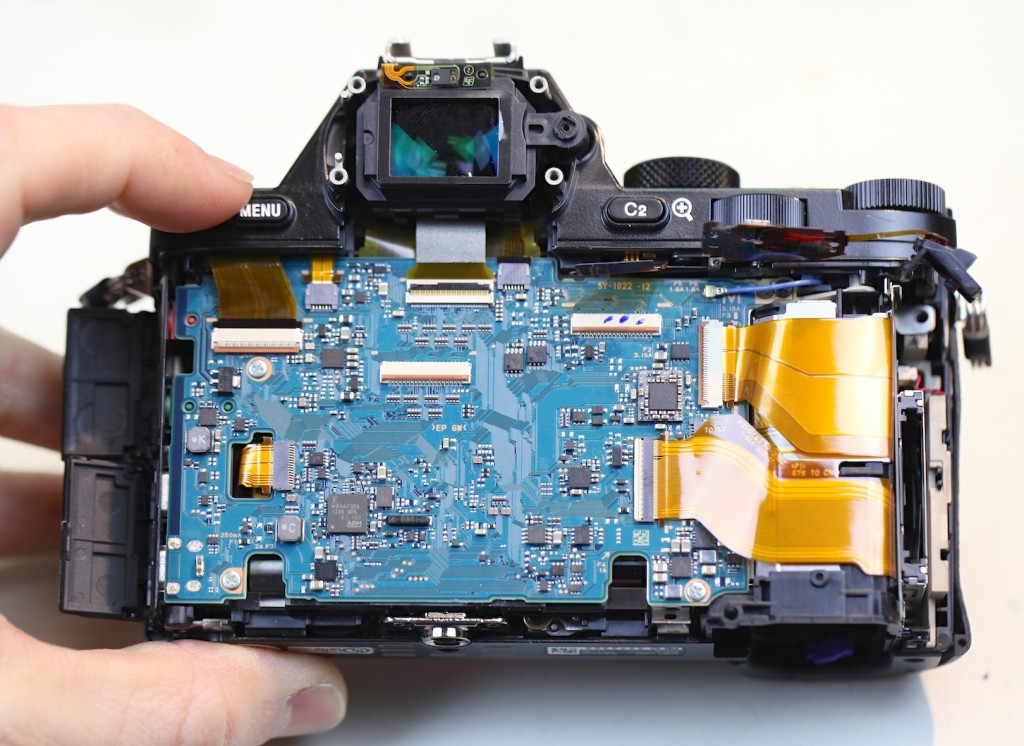
The nice layout continued as we lifted up the large flexes on the right, showing smaller flexes laid neatly under the larger ones, rather than winding their way around them. The lower flex leads to the memory card slot.
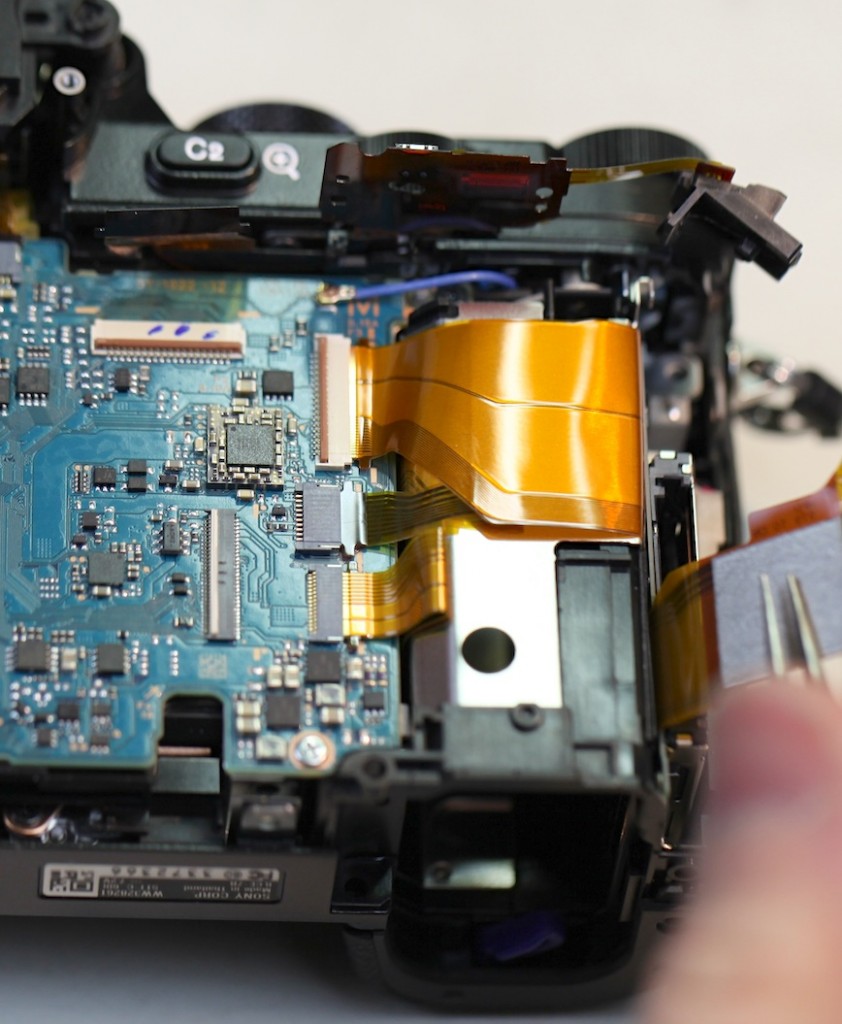
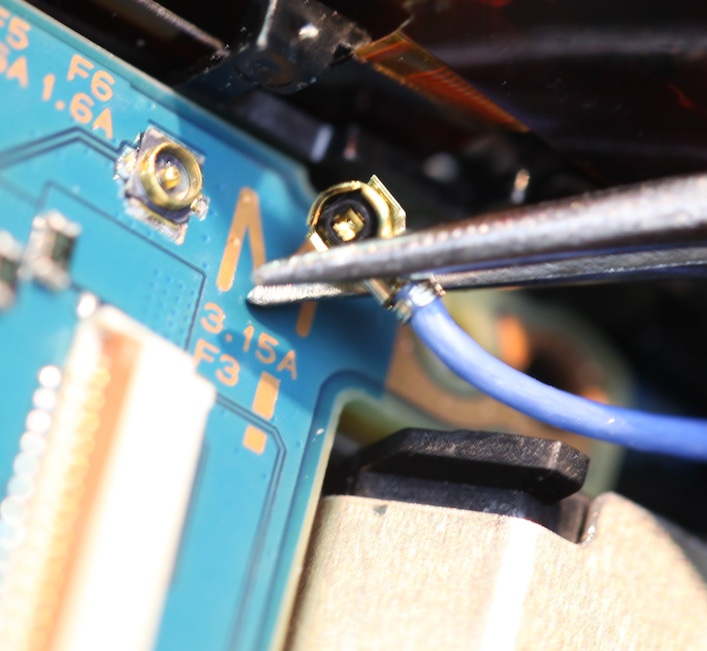
And a repair guy’s dream: That blue (I assume grounding) wire has a neat little snap connector, rather than being soldered to the board.
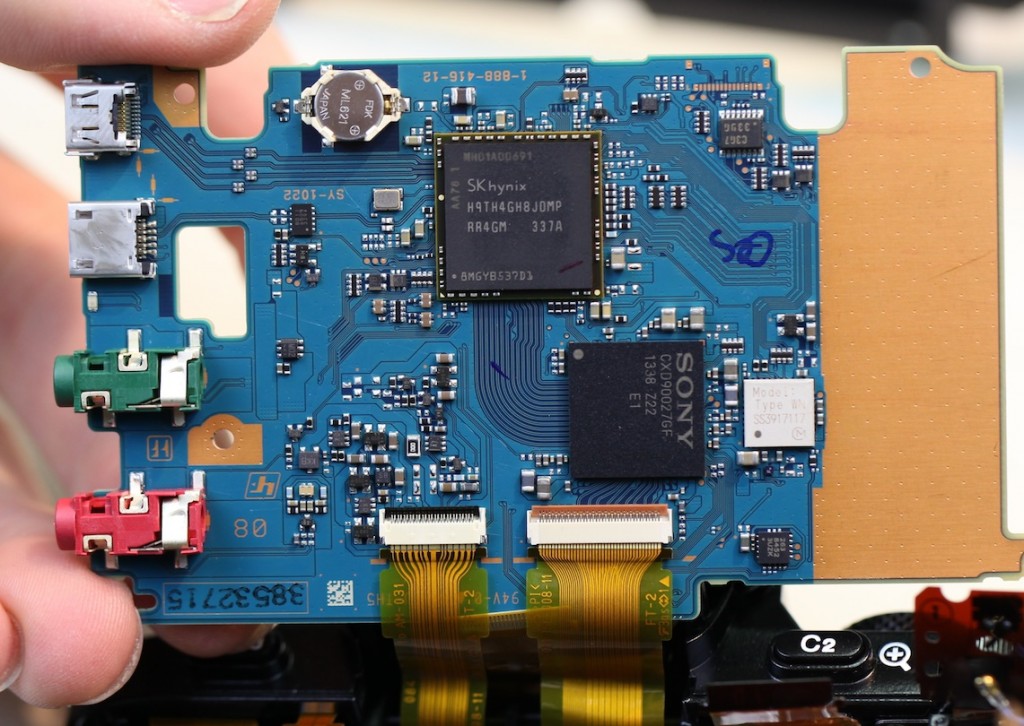
Disconnecting all the flexes lets us lift up the PCB, showing the input connectors and a couple more flexes coming in from underneath the board.
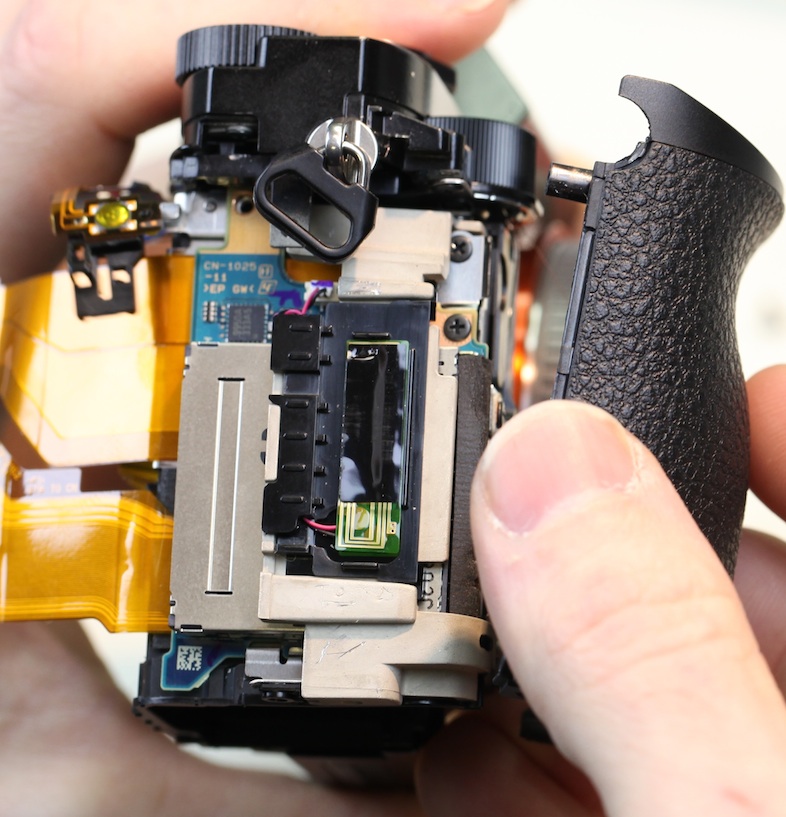
At this point, we thought we’d reached a dead end. The PCB was out, and so were all the screws, but neither the top nor the front would come off of the camera.  We pried. We cursed. Finally, we realized that we’d been working so long that our caffeine levels were probably too low, so we went and had some coffee. And a snack. Once we came back, Aaron immediately discovered the Secret Screw of Sony, hidden away at the bottom of a hole in the right side of the camera.
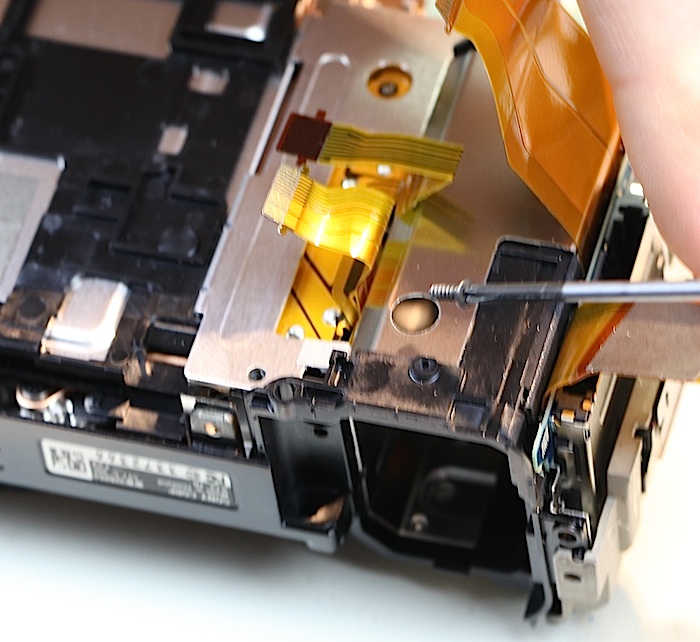
Once the Secret Screw was removed, the grip came off. With the grip off, the top came right off. And at last, the deepest secrets of the A7R were ours!
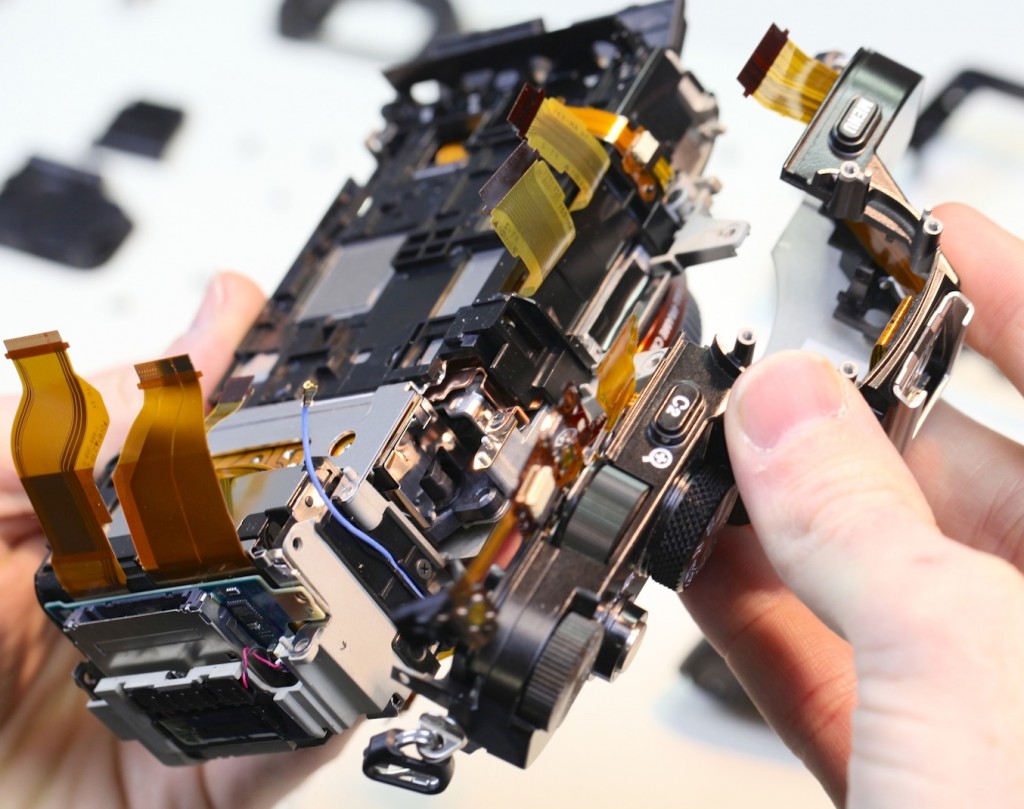
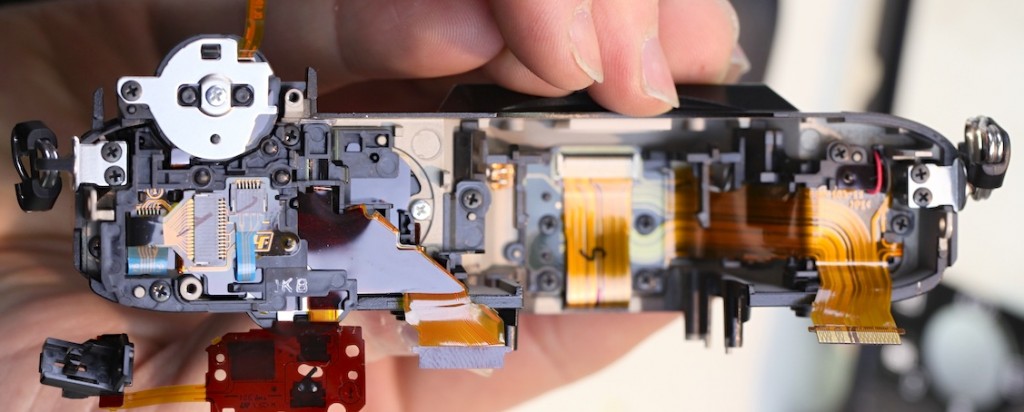
For completeness, here’s a picture of the top assembly. This can be disassembled further, but reassembling it is another matter. (This is why when you break a button on your camera, the repair is usually listed as ‘Replaced top assembly’. It’s cheaper to do that than it is to pay someone to spend hours reassembling the multiple flexes and buttons in the top assembly.)
The Nice Surprises

With our disassembly down to the core of the camera, things got even better. We had now exposed the back of that big, bad sensor, complete with heat sink tape and copper sink / shielding.  (By the way, if you wondered who made the A7R’s shutter, now you know.)
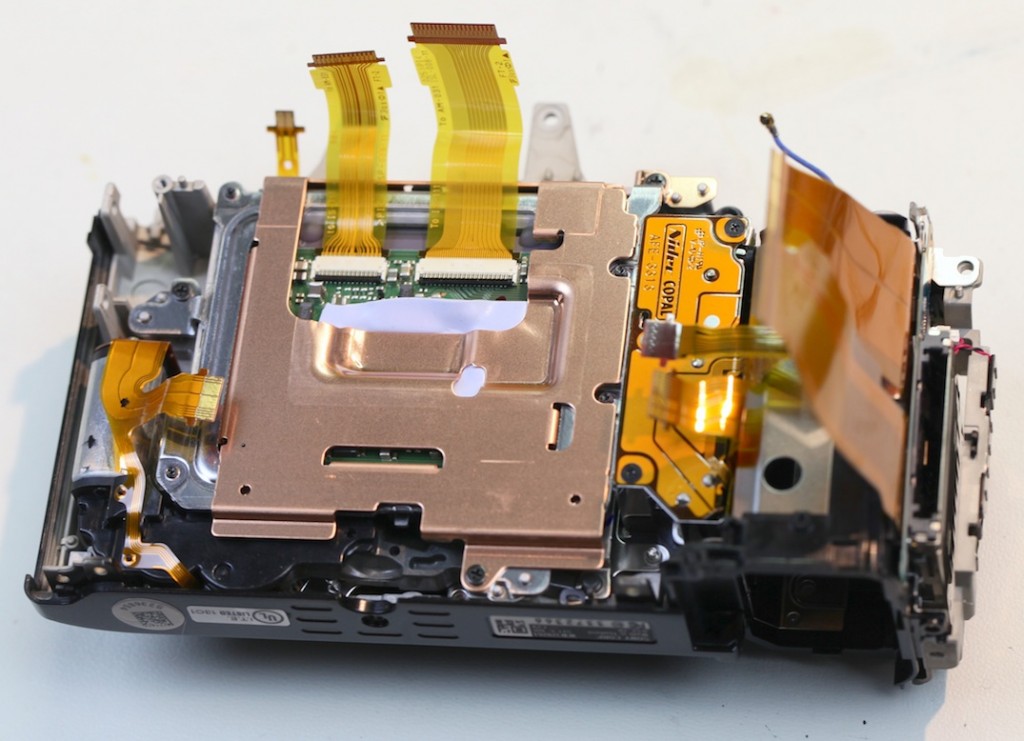
A couple more screws, and the sensor can be removed from the main mount of the camera, exposing the shutter.
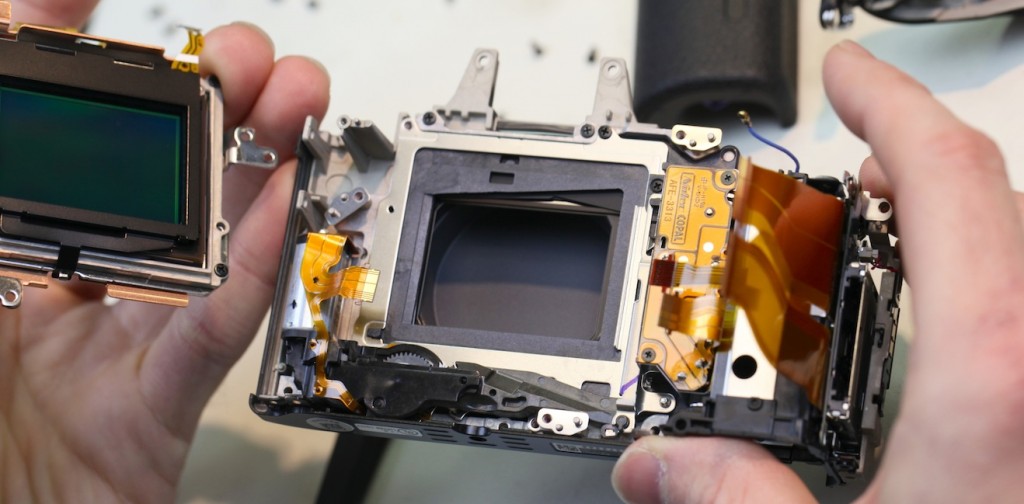
Note that the sensor doesn’t mount to the shutter. It mounts directly to the metal chassis of the camera, with shims in three locations to make sure that the sensor is properly aligned to the lens mount.
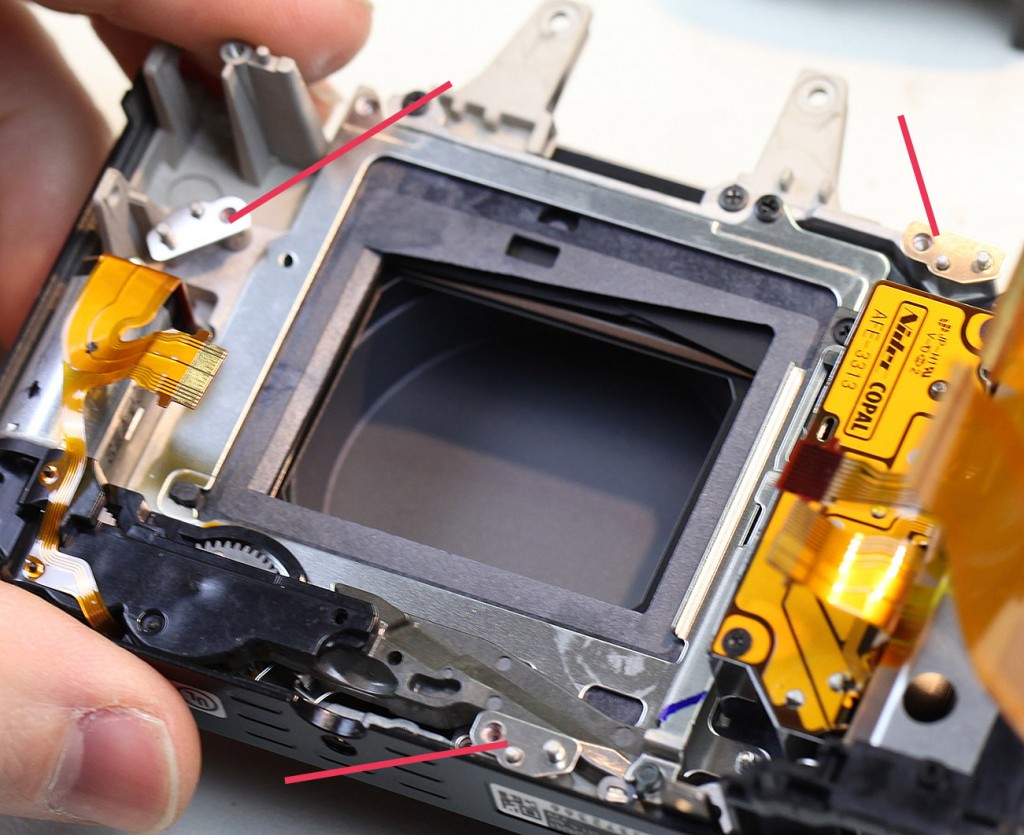
The simplicity of the design becomes easier to see with the shutter removed, and only the metal chassis of the camera left.
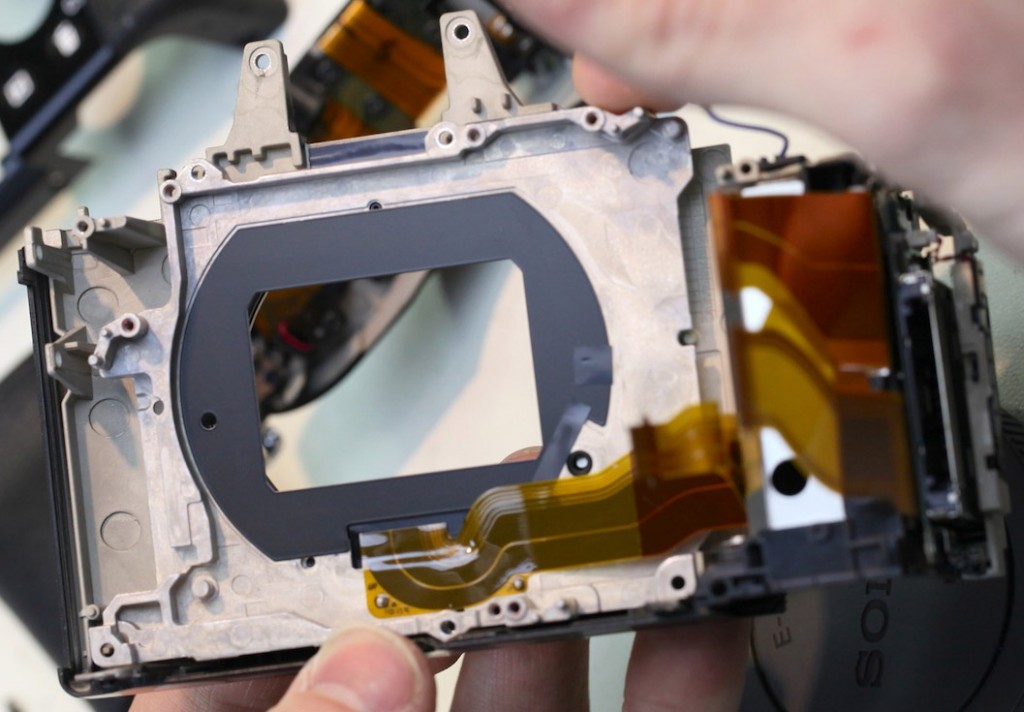
 

The sensor is mounted and shimmed on one side of the metal chassis, as indicated by the red arrow. The lens mount is attached directly to the other side, marked with a yellow arrow. There’s nothing else that needs to be calibrated or aligned.
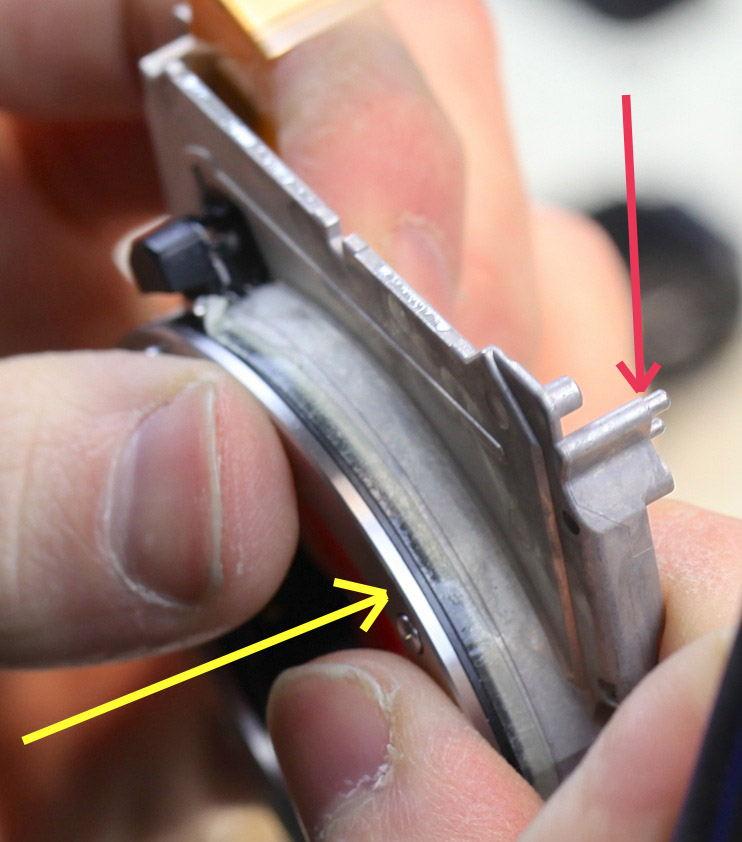
Compare that to the pictures of DSLR mirror-boxes at the start of this article, where there’s a lens mount, two mirrors, an autofocus sensor, the main image sensor, and the focusing screen, each of which must be aligned and calibrated to the other.

The Sensor

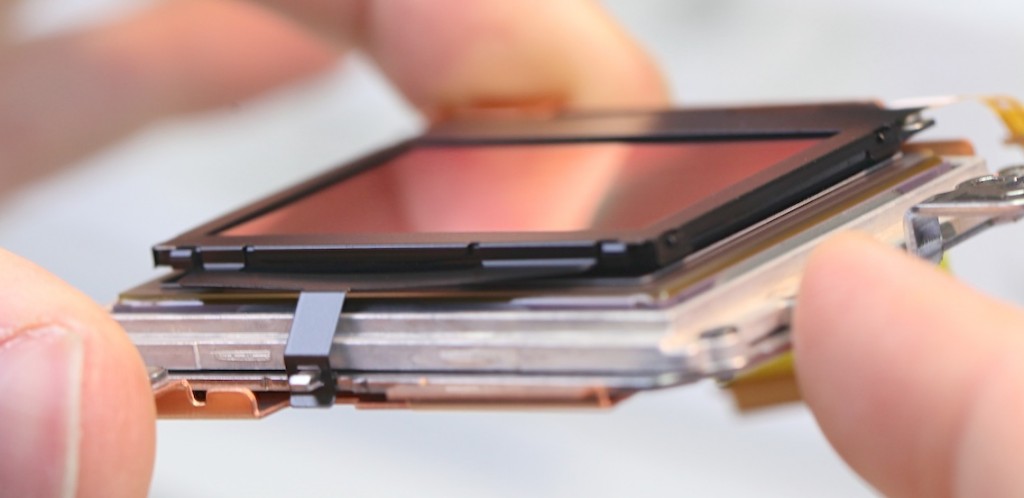
The sensor assembly is a nice, self-contained unit. One thing that was immediately apparent is that the cover glass on the sensor is held onto the assembly with three strong clips.

It does seem that — in theory, at least — replacing a scratched cover glass might be done without a complete sensor assembly replacement. Not to mention that there has been some discussion regarding removing or replacing the cover glass, possibly improving performance with adapted lenses in the process. I can’t say for certain, but it appears this should be a simple matter. But the clips didn’t pop off easily and we’d already pushed our luck with this camera enough, so we decided not to force the issue.
One Last Image
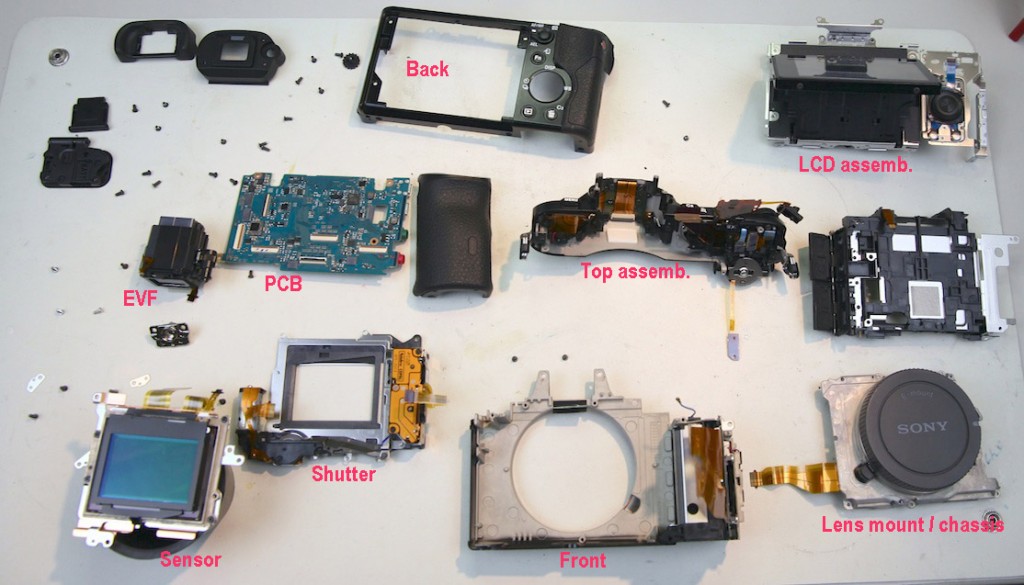
This is rather amazing. The completely disassembled Sony A7R consists of about a dozen major pieces, held together with 29 screws of just three different sizes. A typical DSLR has around 120 screws of 11 different sizes. You might not care less about that, but do you know what I thought about? How much easier it will be to fix this camera when it breaks. How much simpler it must be to perform all the calibration that must be done during assembly. And how much simpler it must be to assemble the A7R in the first place. In other words, how much cheaper it must be to make this camera, than to make a DSLR.

Roger Cicala and Aaron Closz

Lensrentals.com

Jnauary, 2014

Addendum: The A7r cover glass was about 1.5mm thick, compared to 0.75mm for a Canon 5D II.

Author: Roger Cicala

I’m Roger and I am the founder of Lensrentals.com. Hailed as one of the optic nerds here, I enjoy shooting collimated light through 30X microscope objectives in my spare time. When I do take real pictures I like using something different: a Medium format, or Pentax K1, or a Sony RX1R.

Posted in Teardowns and Disassembly
  • Kai poured a watering can full of water over a running one, no problem.

  • Roger Cicala

    Doug, I haven’t seen any claims by Sony in writing, only the reviewers claims (which I assume came to them verbally from a rep). The top looks well sealed by itself, and that’s a positive thing. I saw no gaskets of any kind anywhere. So either the plastic shell is supposed to be so tight that it’s weather resistant, or it’s not weather resistant.

    The magnesium alloy body being weather resistant particularly doesn’t make sense: there’s a strong magnesium alloy chassis inside a plastic shell. The body, other than the chassis, isn’t magnesium alloy.

    It’s very possible Sony has designed some weather resistance via a method I don’t recognize, but it’s not gasketed. Until I see a Sony claim for weather resistance, I’m not taking mine out in the rain.

    Oh, heck, even if Sony does make a claim for weather resistance I’m not taking mine out in the rain. My faith in weather resistance will reappear right after the Abominable Snowman rides in on his Unicorn and brings me a guarantee in writing from the manufacturer that a camera is weather sealed. You want to know how many ‘weather sealed’ cameras and lenses we write off for water damage every year?

    Roger

  • Doug Dunlap

    Hi Roger,

    I’m wondering if you can clarify some of the claimed waterproofing characteristics of A7/ARr made my other reviewers, such as:

    Over at DPReview in the review of the A7 they claim on the first page that the camera has a:

    “Weather-proof alloy and composite body”

    later in the review they qualify the statement somewhat and say:

    “The body and lenses are sealed against dust and moisture”

    David Pogue, who is now at Yahoo Tech says, ( I would not take his technical opinion especially on cameras, but he is the most widely read of all the reviews I think.)

    “you can use it in the rain.”

    Over at imaging-resource their review of the A7 has this statement ( it’s way at the bottom)

    Weather-sealing / cold-proofing. Although it doesn’t provide a count for the number of seals, Sony describes the A7’s magnesium-alloy body as both dust and moisture-resistant.

    To be fair to Sony, I have looked through their description and specifications of the A7/r on their own site and I could find no claims of any kind of weather proofing, dust resistance, sealing built into the system for either camera. They do mention a method of cleaning the sensor of dust, but I don’t consider that dust sealing or proofing.

    My rule of thumb is: If it has an interchangeable lens and it doesn’t have an “O-ring” on the lens or body you don’t have nothing.

    So what do you think, Roger? There is obviously no provision for an O-ring but maybe there are other seals which you didn’t mention.

    Please keep up the great work!

  • Roger Cicala

    Sciman,

    I can’t think of a good logical answer other than this is a bit of a trial camera for them. I think they have several things they can consider: in-body IS, on-sensor phase detection, etc. in the next version. Or perhaps they want to go the Nikon and Canon route with in-lens stabilization.

    One thing I find very interesting in the tear down: do you notice how modular everything is? As long as you get the outside dimensions and flex connections the same, any part could be easily replaced. Different sensor, shutter, PCB, even outside body and grip etc. would be very simple swaps. The cost of coming out with a new version of the camera is basically just designing the new part.

  • Sciman

    Roger, I’m trying to understand why they didn’t add sensor stabilization. Now that you can see what’s squeezed inside,how much bigger would it have made the camera? Surely alot smaller as a combo when IS lenses are added to the equation? It seems ridiculous. What am I not understanding about their rationale.

  • Everything seems very neatly arranged, but at the same time your pictures convinced me that I’ll never be able to reassemble one by myself.

  • Oskar Ojala

    Nice one. Having some time ago disassembled a Sony camera myself, I admire their skills in electronics design; very clean, very compact. Still, all of this will probably look primitive in 10 years time.

    A 1.5 mm cover glass is what I would expect, as IIRC, Nexes have something on the order of 1.7-1.8 mm. Performance would improve a lot going thinner and I’m surprised that Canon has 0.75 mm — they must be good and put effort into the filter design.

  • Ray

    Stamped steel and plastic. Hardly elegant but it works.

    Do all those screws suggest Sony did not believe this camera would sell well?

  • Mathieu

    Thats quite cool!

    The blue wire is definitely a coaxial connector to connects an RF cable. It looks similar to an U.FL connector made by Hirose. Its surely used to feed the wifi antenna that needs to be out of these shields to radiate properly.

    By the way, to answer Peter’s comment, EMI reduction is not that much of a black art, as some EMI engineers like to say. If you really know what your doing, and I’m pretty sure Sony’s engineers do, its usually not that difficult. They must use the same EMI tricks learn from previous designs anyway. And it do helps for reliability because it does not only shield EMI that can comes out, it also shields for external interferences that could comes in as well. It really helps to keep your camera from working properly when your cellphone is transmitting nearby for example.

  • mrc4nl

    Ah, sometimes i think about how awesome it would be f i put the a7 electronics into a old Minolta body, with working stock top dials (XG9 X700)

    i thought it was possible, but now i see this assembly i am not so sure.

  • I had rented an A7R from you guys about three weeks ago. I really took great care of that camera, so the one you took apart had better not be the same one! Lol

    Fascinating article and pictures. 🙂

  • Adam

    I’m a bit curious why there is a physical shutter at all. I’m an old vidoe guy and pretty familiar with older Sony video cameras that had adjustable shutter speeds via an electronic shutter. (If you wan’t 1/100th of a second, well then the sensor is active for 1/100th of a second and off until the next frame.)

    Granted videographers have to settle for fewer options in the shutter speed department. (You’re not gonna get a speed longer than your frame rate, and faster speeds aren’t helpful in eliminating camera shake when you’re shooting video.) Is there something about very fast or very slow shutter speeds that makes relying on an electronic shutter impractical? Or do you just need to hear a sound and feel something move to make it feel like you bought a “real” camera?

  • Kib

    I always love your teardown 😉 using A7R it is nice to see how it is done inside.
    Just a question : what do you think about tripod mount ? Is it robust like on DSLRs ?

  • me

    Who is going to put it all back together?
    How many “extra” pieces will remain at the end?

    Great article!!

  • Francis E.

    Your shot of the logic board shows the “rechargeable internal battery”, marked ML621, at top left near the undercaffeinated thumb. This is the one Sony says keeps the clock running when you take the main battery out, and which takes a day to recharge if you let it run down by storing the camera without a battery in it.

    They use the same scheme in several other cameras, including the RX1. And, as here, it is not user-changeable. Now we know that it is not a magic Sony battery, but a stock 33c part. Some quick research reveals that this is a manganese lithium rechargeable battery, but I have no idea how long it is supposed to last (in years) before it has to be replaced – and the camera dismantled to do so.

    I guess (i) you know how to do that now, and (ii) you won’t keep the cameras long enough for it to be a problem. And I guess an interesting question for you would be whether the cameras should be stored with the main battery in or out.

  • You mention that the top assembly is especially delicate in most cameras. I swore off Sony after the two control dials, close to if not on the top assembly, on two A700s went into intermittent malfunction. I paid Sony’s U.S. camera center for repair; it lasted about a month. A good number of other users report this dial problem on the Ax00 dSLRs.

  • Roger Cicala

    Max it doesn’t seem to be, we haven’t had any more. The one thing I do have to report is the first one came back from Sony – and they gave us a new camera, saying they found a problem with that sensor’s glass. That’s amazing – I’ve never had any company do that before.

  • Roger Cicala

    Peter, that’s interesting about the EMI part. I had imagined it to be more realistic and scientific. And I guess I’d assumed (that one always burns me, too) that it was more important for interference.

  • Max

    Roger, any further info on the sensor glass scratches you reported about a month ago? Is the A7r more sensitive to these ?

  • BenC

    This makes me really curious about the sensor alignment process. It seems like it must be somewhat trial and error based. Perhaps they start with just the lens mount chassis, add three shims of equal thickness, place the sensor on them, attach the sensor lead to a test harness, temporarily secure it against the chassis, and then expose the sensor to a projected test pattern. The test harness analyses the image and recommends a different combination of shim thicknesses. The assembly person then swaps out the shims and repeats until it is “within spec”.

  • Greg Hoyle

    You guys are amazing. I took apart an old film camera once–with some electronics. Absolutely destroyed it in the process! Gives me great respect for your skill. Thanks. This was fun.

  • JTB

    I dropped mine on the ground. Don’t try that. The mount became loose, but the camera still worked fine. I hope it’s not mine you have “repaired” 😉

  • Nice, with this teardown in hand it should not too much trouble to convert one for Infrared! it looks to be no more tedious than the NEX-6 which I also thought is neatly built. I am looking forward to see someone a an IR conversion (or if someone sends me a body I will and post a full report…:-) )

  • Paul B

    Roger and Aaron–thanks for letting us see the “innards” of the A7.
    Great stuff!
    Paul

  • cpceter

    Sony have been making high-quality, reliable yet repairable, COMPACT electronic devices for many decades so this strip-down offers no real surprises from an engineering point-of-view.

    Sounds like the other guys are still playing catch-up.

  • Thanks to you both for an informative and entertaining piece.

  • EricE

    Tyler needs an assistant (Guido) who’s been issued Shoot-to-Kill orders to protect his inventory…

  • Mark

    Great article.
    I know Copal makes most of the shutter assemblies for todays cameras but are there any other suppliers of focal plane shutters? Does anyone still make their own?

  • Peter

    I do know to keep my fingers off of oil-sensitive parts. I’m not always successful.

    On a sidenote, with regards to shielding (perhaps more related to NEX than here), it does not help reliability; mostly, it nominally prevents interference with other devices. EMI is basically voodoo. You design a piece of electronics. You take it to TUV to do testing, and drop $50k. TUV tells you it didn’t pass. You add some EMI gaskets, ferrite beads, and swap out copper for aluminum. You do some in-house testing, say a prayer, and resubmit. You do this until it passes. Once it passes, you ship. Perhaps, if you make a million units, you try to redesign for lower cost at some point, and then ship, but it really has to be a lot of money. Each EMI test is big dollars.

    How EMI ends up in testing really has to do with things like:

    * Luck
    * Whether signals are differential or single-ended
    * Phase-of-the-moon
    * Length of wires and how well boards are grounded
    * Exactly where TUV happened to place your box relative to their machines, and whether they left a wrench out.
    * If you smeared your clocks to spread out the spectrum.
    * Etc.

    I’ve never seen a company do additional shielding beyond what’s needed for regulatory compliance. Except in a lightning storm or maybe near a defibrillator, I’ve also never seen it impact reliability.

  • KeithB

    Billy:
    The sensor is just a chip with no packaging. Since Fuji probably designed (layed out) the sensor to the foundry’s design rules, so there is no guarantee that the foundry’s name is on the chip. In fact, it could say Fuji, even if they don’t fab it.

Follow on Feedly