Equipment
Lensrentals’ Canon 5D Mk IV Teardown

Lensrentals.com, 2016
Courtesy Canon USA
Lensrentals.com, 2016
Today the Canon 5D Mk IV cameras are out and I’m sure by this afternoon there will be unboxing videos all over YouTube. Aaron and I decided to do an unboxing post, too. By unboxing, of course, we mean taking it apart. If you want to make comparisons, you can look at our old (2012) 5D Mk III teardown or the fairly recent 5Ds teardown.
The lawyers would like me to mention that even though we (often) make this look incredibly easy and fun, you should not do this yourself. If you leave a small leak during reassembly, then when you put the battery back in the smoke leaks out of the camera. It’s important to keep the smoke inside the camera. Trust us on this, for we have experience. Every time we’ve let the smoke get out of a camera, it never works again. And your warranty will be null and void.
Expectations
To be blunt, we didn’t expect a lot of surprises inside the Canon 5D Mark IV. From the outside, it looks just like the Canon 5Ds and Canon 5Dsr, which look a lot like the Canon 5D III. We expected to find some new chips inside, because, well, the camera does some new stuff that should need some new chips. And, of course, as with every camera ever made throughout history, this one has ‘improved weather sealing’. It’s not improved enough for the warranty to cover water damage, of course, but still, that’s worth a look. If nothing else, we usually enjoy opening up Canon cameras because the engineering is always nicely laid out and usually pretty. And we’re the kind of guys that value inner beauty.
So lets take some screws out!!!
Getting the Case Off
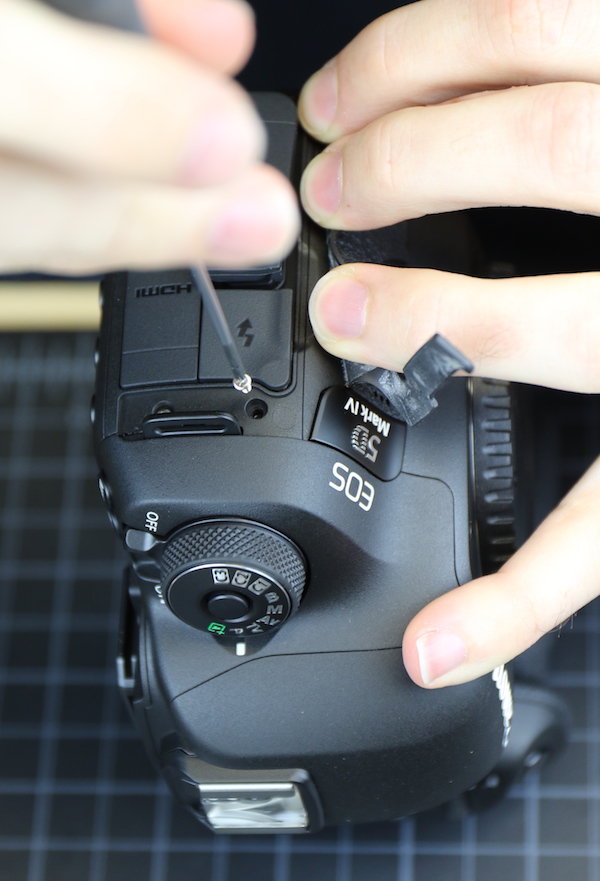
This was the first surprise we had and it goes on through the whole disassembly. Until now Canon cameras have all been pretty straightforward in their disassembly: you take out screws, that part of the case comes off, repeat for another part of the case. This time, we did the usual first step, removing the cover of the I/O ports.
Lensrentals.com, 2016
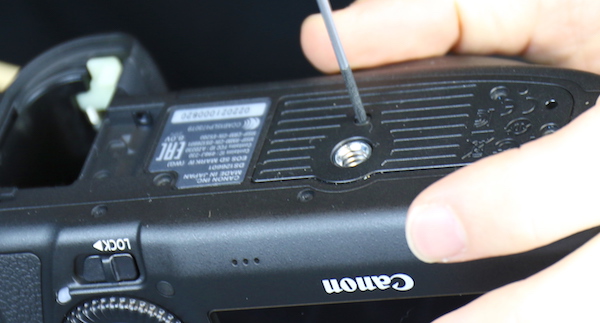
But it didn’t slide out. Next, out come the bottom plate screws.
Lensrentals.com, 2016
It loosened, but it wouldn’t come out either. Peeled back the grips and went to work on the front plate. No joy again. The various plates all loosened but wouldn’t come off. And when you’re disassembling a camera for the first time, you don’t pull on stuck things because you don’t know what they may be stuck to inside.
Lensrentals.com, 2016
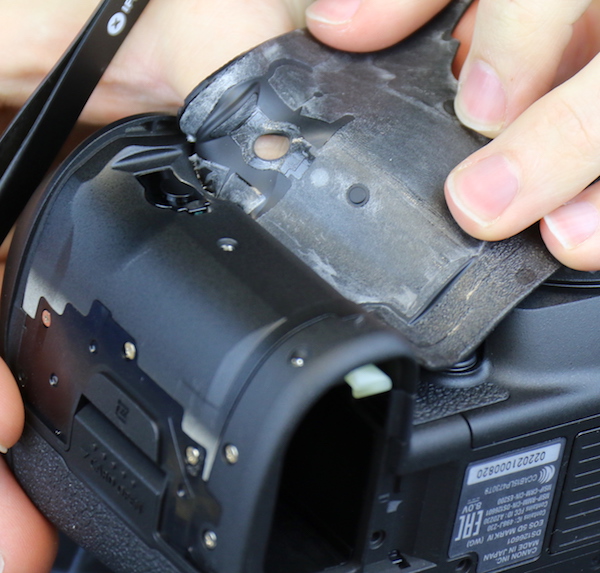
Finally, we did take off the one thing that came off in the usual fashion; the back cover assembly. Canon techs are reading this and laughing their butts off by now, I’m sure.
Lensrentals.com, 2016
After we looked around a bit we realized that basically to take off any part of the shell, other than the back assembly, you had to take off most of the shell because Canon has added lots of plastic pegs and latches to the various parts of the shell, making it much more interlocking than in previous cameras.
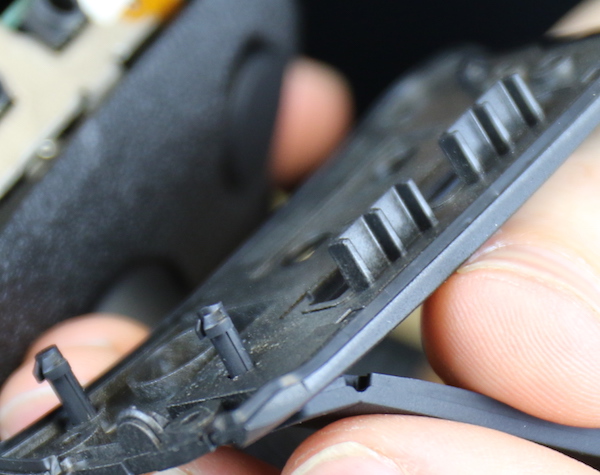
Pegs under the I/O cover plate. Lensrentals.com, 2016

Interlocking latches around the bottom plate. Lensrentals.com, 2016
What does this do? Well, it certainly would strengthen the shell, making it more resistant to bangs and drops. It might, (I can’t say for certain), make the seals between the various parts tighter and more water resistant. From my point of view, (but not any of yours), it’s going to make it more difficult and time-consuming to work on this camera, but not hugely so.
Speaking of water resistance we did see, like we did with the Canon 7DII and Canon 5Ds, lots of foamed seals along doors and joints.
Lensrentals.com, 2016
Even the inside of buttons has very thick rubber gaskets everywhere you might look.
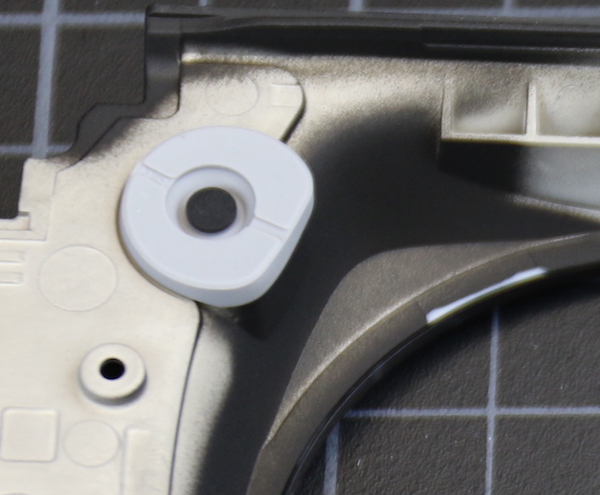
Lensrentals.com, 2016
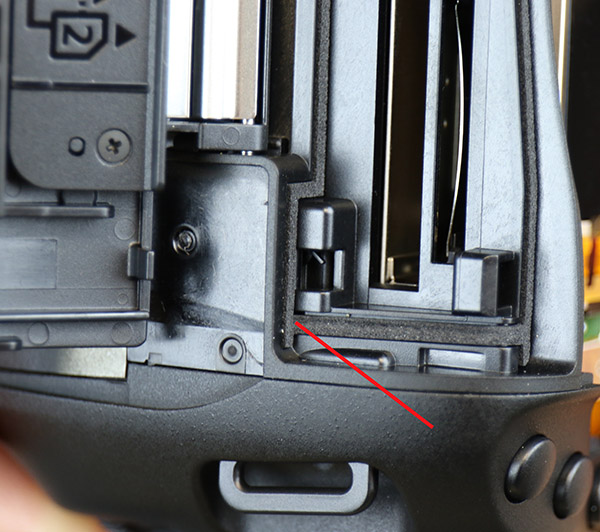
This next part might be useful to you, though. There was only one area where we didn’t see any seal except plastic-on-plastic. This was in the top right corner where the back plate and top plate come together. Between the two red lines, there’s just a plastic to plastic seal with no gaskets. This may be completely watertight because of pressure between the two shell plates. But I might put a bit of tape over it if I was going out in the rain. (OK, as you all know I don’t take cameras out in the rain without plastic covers. Because we write off ‘weather resistant’ cameras for water damage every week. But I know you young people live life in the fast lane and like to take risks.)
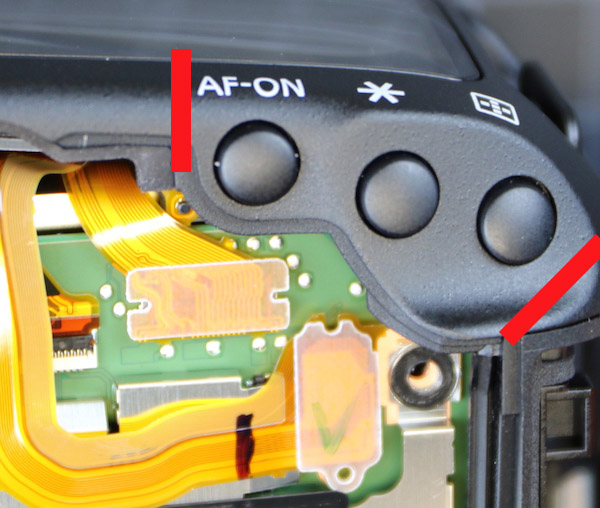
Lensrentals.com, 2016
OK, Let’s Look at the Insides
I mentioned earlier that we had the back cover off. Inside it looks very much like other Canon back covers. There are aluminum shields over the button panel and LCD. The flexes running to and fro over the LCD are more complex than other Canons because of the extra processing for the touch screen.
Lensrentals.com, 2016
We took the back assembly apart a bit and you can see the button panel is similar to other 5 Series cameras, with the addition of the new focus select button added. It’s one of the two small, round, copper plates below (to the right in the picture) the tilt button.
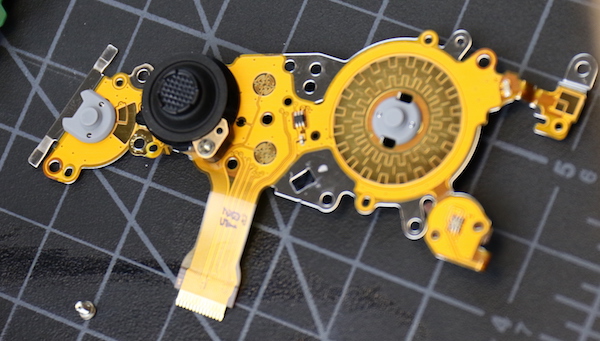
Lensrentals.com, 2016
Once all the connecting flexes have been removed we could slide off the large, stiff, main LCD flex, which really is a circuit board almost.
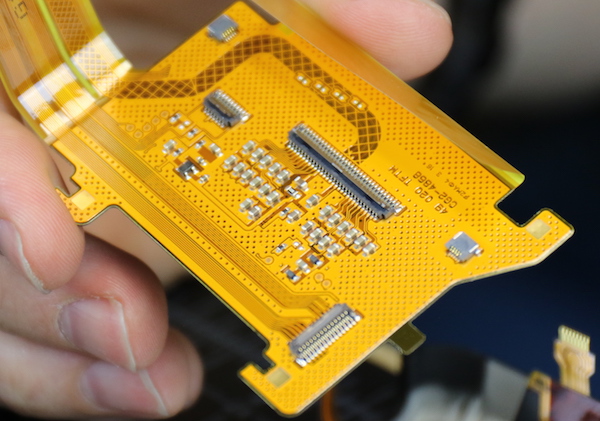
Lensrentals.com, 2016
And now we see the LCD. Well mostly the aluminum shield/brace over the LCD with a little window with tape showing the LCD. Again we saw nice rubber seals all around the LCD panel. We didn’t remove it because we don’t yet have replacement double sided tape to make sure it stuck down properly, but other than the extra connections of the touch-screen, it was similar to what we’d seen before.
Lensrentals.com, 2016
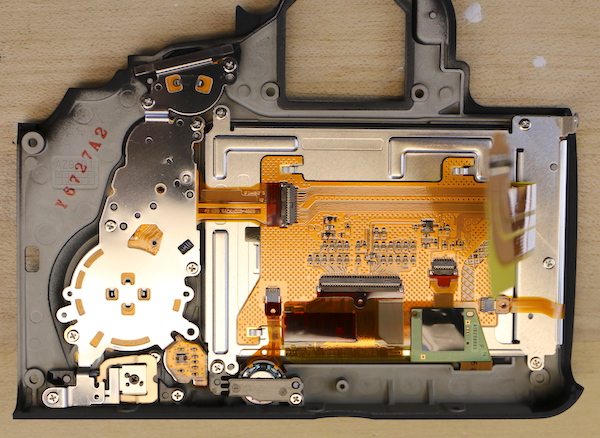
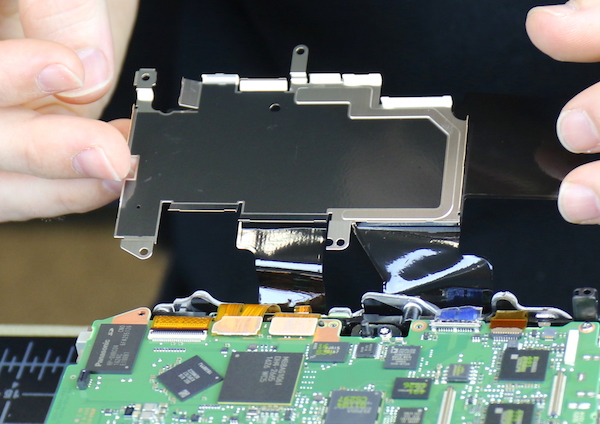
Turning back to the rest of the camera, we see a couple of interesting things on the back of the camera. First, there are more flexes connecting to the main PCB than most other models. Second, we were very pleased to see a thick, stiff, sheet of rubber covering the back of the PCB (it’s actually very shiny black; the lights give it that gray and blue appearance). Underneath it, you can see the aluminum shielding and protecting panel that covers chips on the grip side of the PCB.
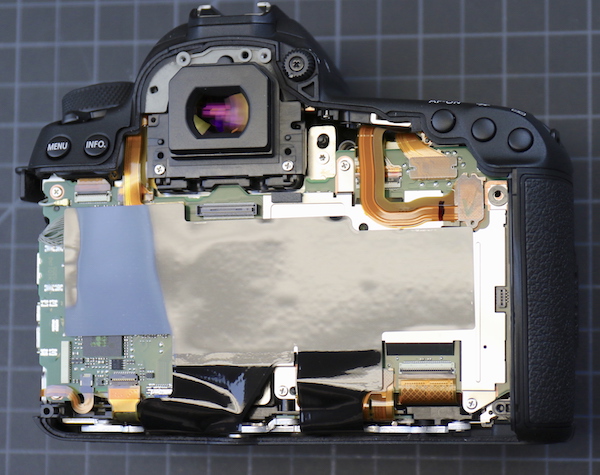
Lensrentals.com, 2016
You can get a better idea of how much nicer this is than the old foamed-tape flimsy thing that we dealt with in the Canon 5DIII in the picture below.
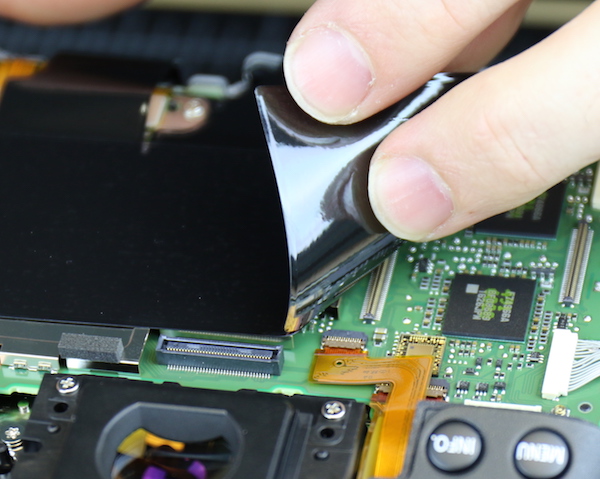
Lensrentals.com, 2016
With the back, bottom, and front plates loose, we could now take the I/O cover panel off at this point and you can see the various ports.
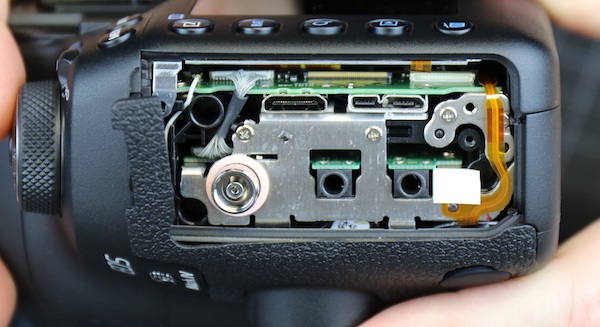
Lensrentals.com, 2016
Here was our first real disappointment. Skipping ahead for clarity, the USB and HDMI ports are soldered to the main PCB. Only the flash sync and audio ports are on a separate board. This means (as often happens) when a USB or HDMI cable gets jerked hard the port can get pulled off it’s solders to the board. The repair, in this case, is a complete main board replacement. We’d much rather see these ports on a sub-board, but understand this is a lot cheaper to manufacture this way. Almost every SLR made does this, but I sure wish they’d brace the ports or something.
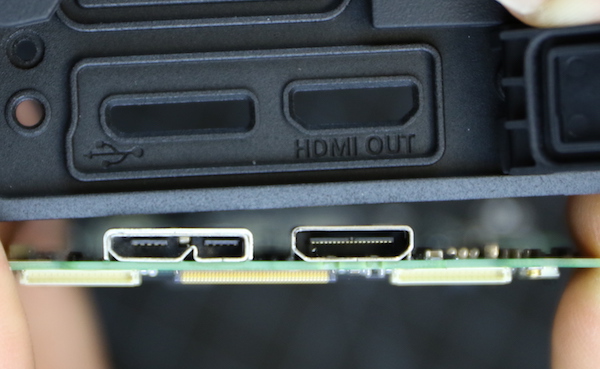
Lensrentals.com, 2016
The CF card door came off next. Usually, this just requires removing the screws and the door slides off, you just have to be careful not to mess up the door position sensor. In this camera, though, there’s a flex right under the door that wanted to stick as we removed it. No harm was done, just another case of this camera being a bit tougher to disassemble than most.
Lensrentals.com, 2016
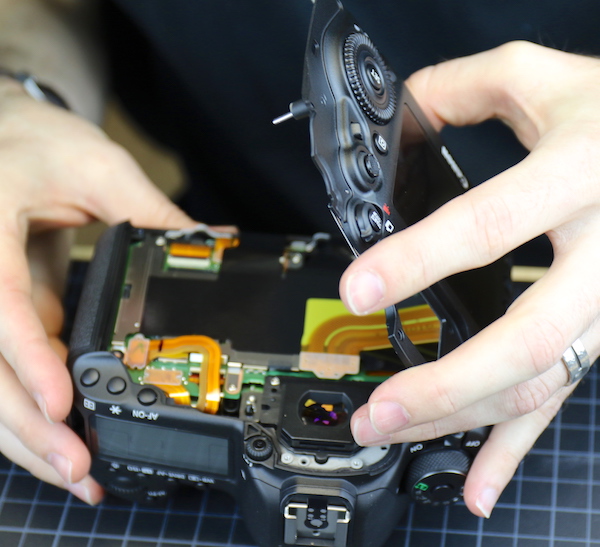
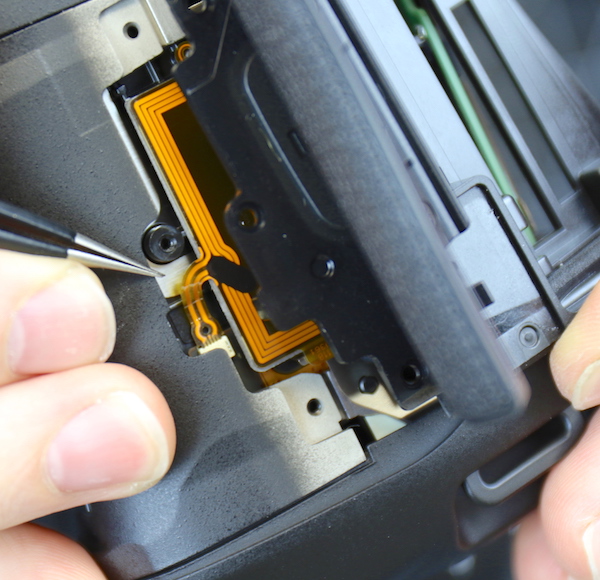
We next took the front cover off. This was a lot more complex than it would seem because Canon runs some connecting cables from the front cover, around the side of the camera, to the back PCB. This is one of those ‘why you don’t do it yourself’ moments. One good tug and some important parts would never work again.
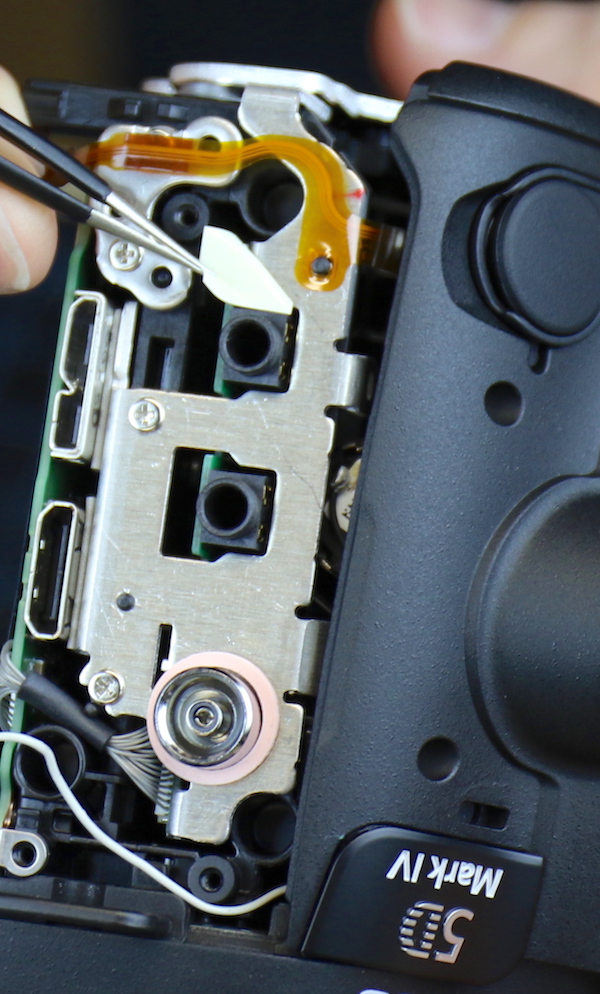
The flex that Aaron is removing tape from, and the small white wire at the bottom, run from the front cover, across the I/O ports, to the PCB in the rear. Lensrentals.com, 2016
But once those were unhooked, the front slide right off.
Lensrentals.com, 2016
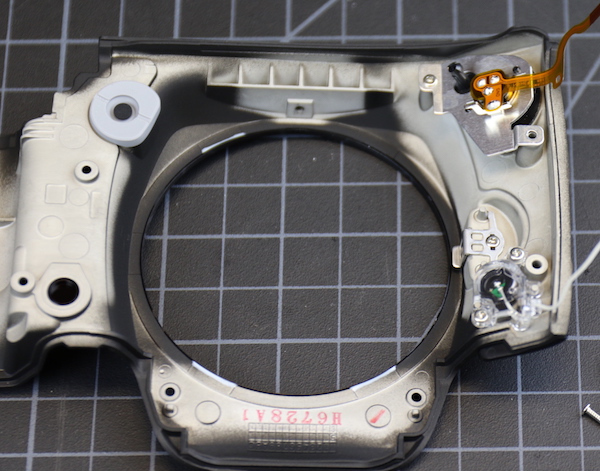
And now we have a nice look at the front of the camera.
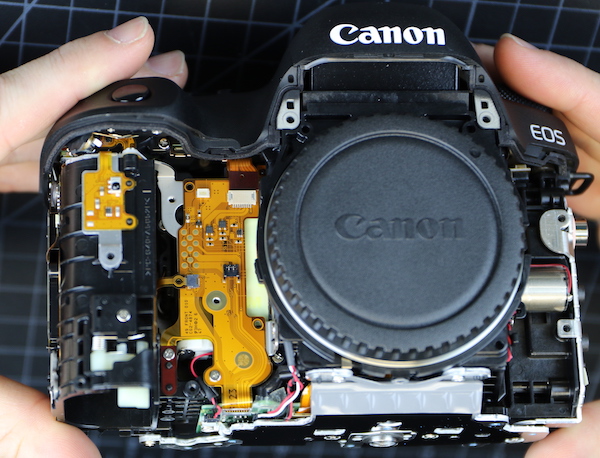
Lensrentals.com, 2016
That’s the mirror motor over there under the EOS on the left side. Here’s a closer look.
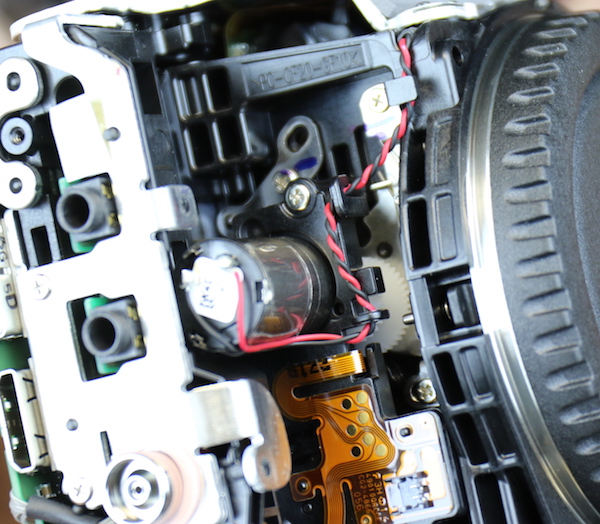
Lensrentals.com, 2016
Finally we were able to remove the top assembly. From underneath, it looks pretty much like every other top assembly, and we’ve learned from long, painful experience not to take these apart unless we absolutely need to. In general, if something is wrong with the top assembly, you just replace the top assembly.
With the top off we have a nice view looking down onto the pentaprism. Again, we don’t disassemble these and further. There’s a lot of alignment and calibrating that needs to be done if you do. And no, I have no idea what the writing or initials are for.
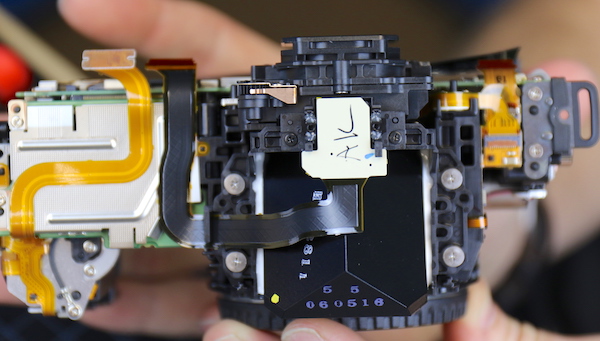
Lensrentals.com, 2016
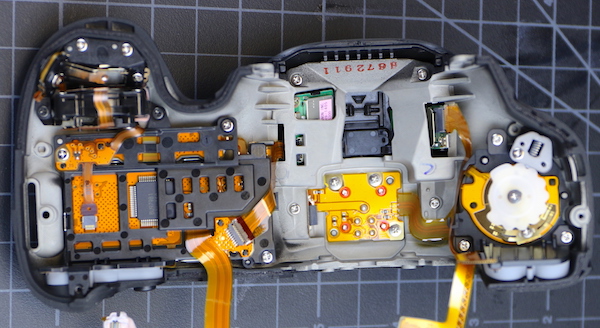
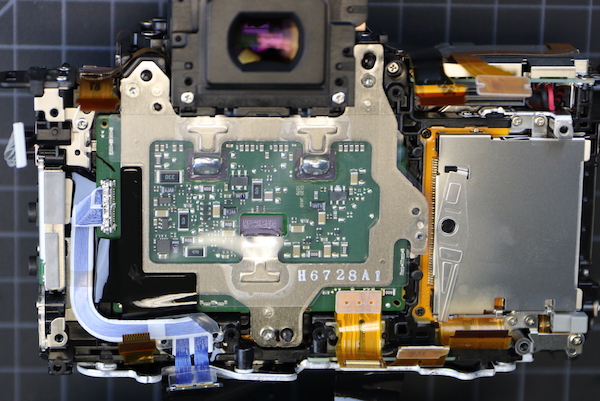
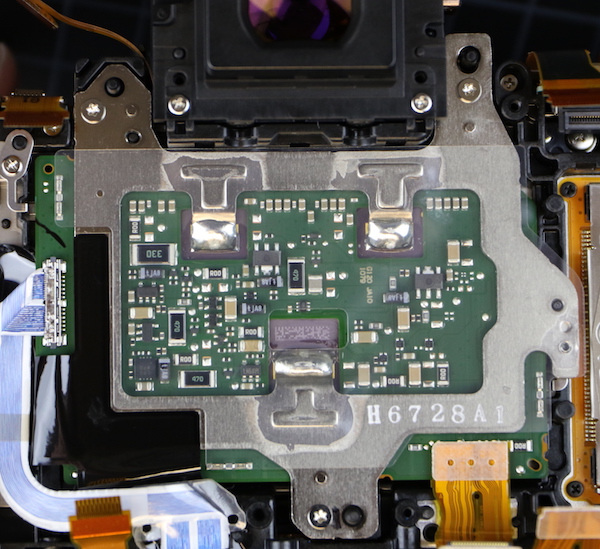
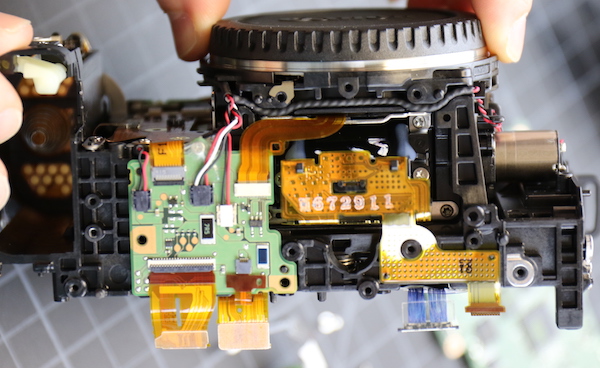
OK, let’s get back to the main part of the camera. After taking out some screws we can pull up the aluminum and rubber sheet shields in one piece, exposing the PCB.
Lensrentals.com, 2016
There are a lot, a whole lot, of flexes connected to the board from every direction. They are thicker and more complex than previous cameras and a lot end up in thick ‘press in’ connectors instead of simple flex cables.
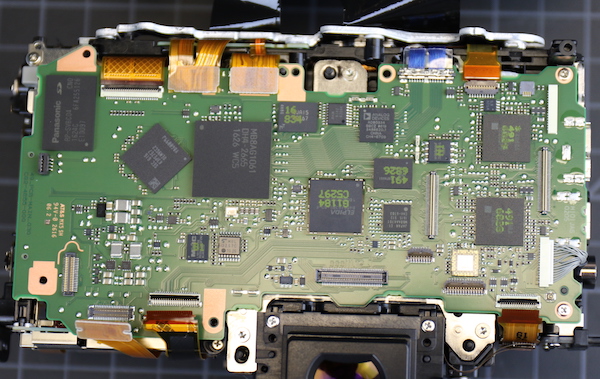
Lensrentals.com, 2016
Basically, there was a lot of unhooking of connections and a few screws to remove before we could take the main PCB out. There was also a very large connector mounting from under the board that you can see here, just above the SD card. The SD card reader, as is usually the case, is soldered to the board. There wasn’t anything else very interesting on the underside of the board.
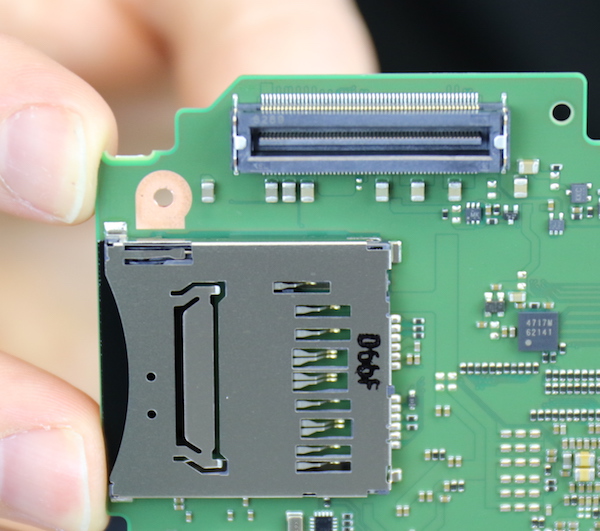
Lensrentals.com, 2016
Underneath where the PCB was we now see the circuit board of the image sensor, and to the right of that the CF card assembly. You can see reflections from the clear plastic shield over the sensor circuit board.
Lensrentals.com, 2016
If you look closer at the sensor assembly you see three special screws, one on either side of the viewfinder, one at the bottom. These are the adjustment screws used to level the sensor so that it’s in exactly the same plane as the lens mount.
Lensrentals.com, 2016
You can see from this not-so-great side view that it’s a simple screw-over-spring tension adjustment.

Lensrentals.com, 2016
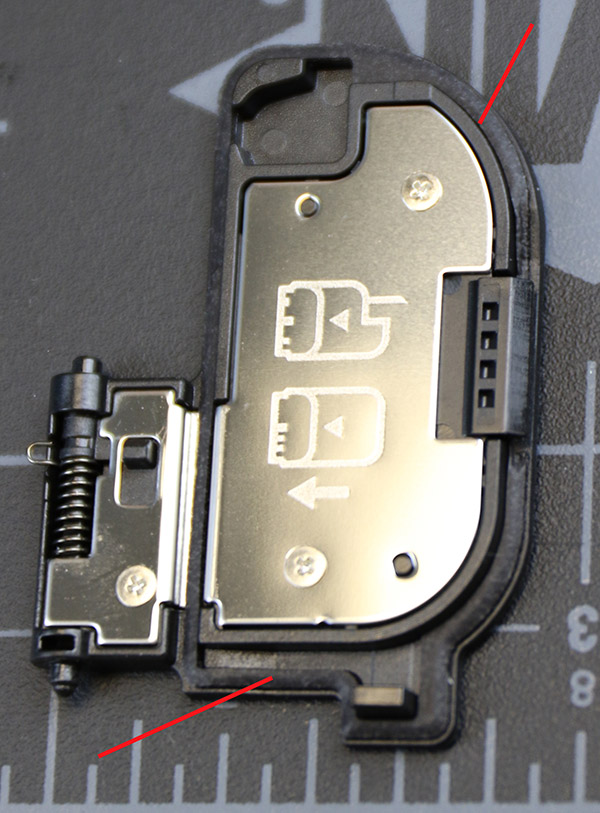
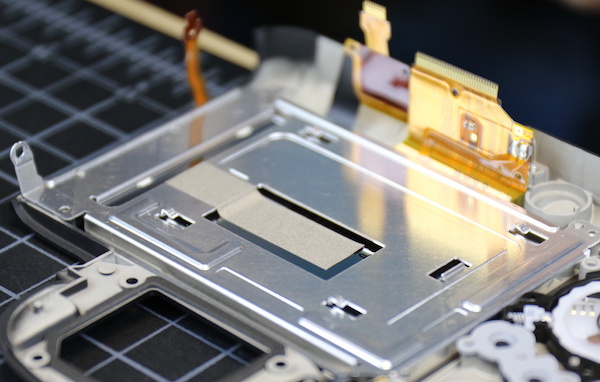
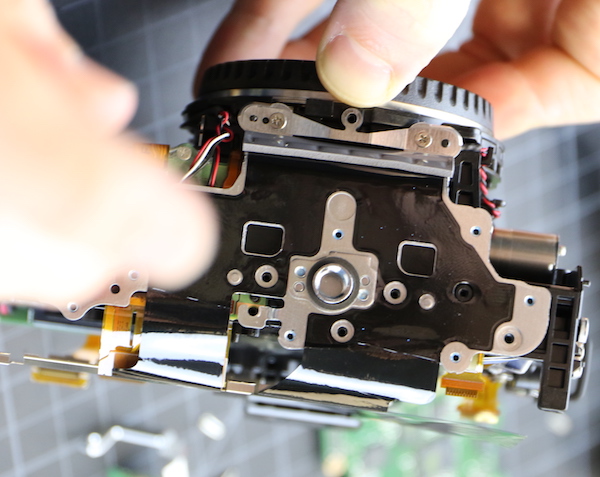
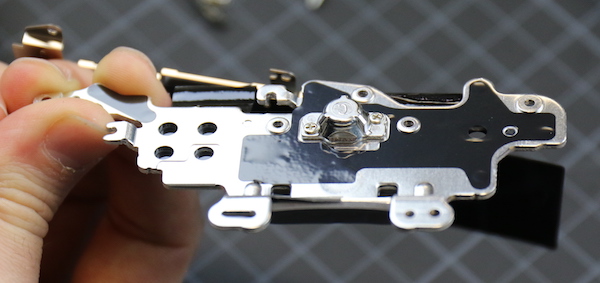
The next thing we wanted to do was remove the CF card assembly. Bent CF pins happen with some frequency and this is a common repair. We’d already seen that just disassembling the camera enough to expose them was going to be a chore. Removing the CF assembly actually ended up being more of a chore. Usually at this point removing the CF assembly is just taking out a couple of screws and unhooking a flex (the CF card door was removed earlier). In this case, we had to remove the battery door lock plate first.
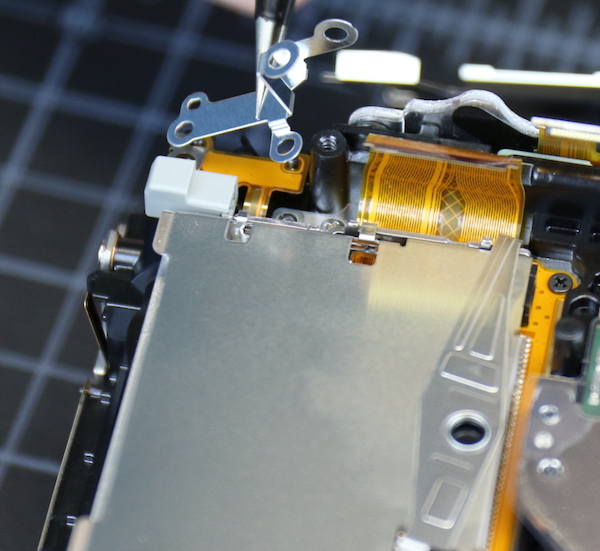
Lensrentals.com, 2016
And then could remove the CF assembly. Once it was out we saw why we had to remove the door lock: the CF assembly also contains the battery-door-closed sensor (in front of Aaron’s thumb). Not a big deal, just different, and well, we do replace CF assemblies a fair amount.
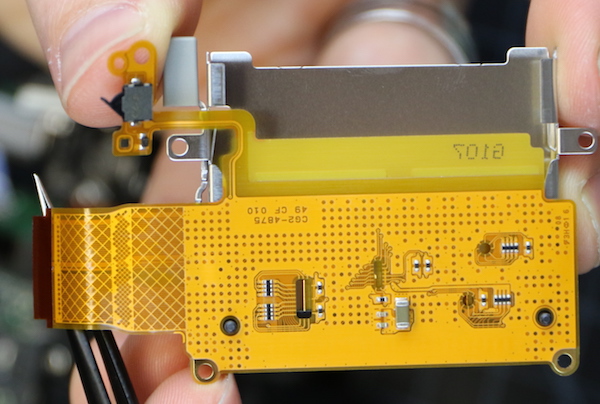
Lensrentals.com, 2016
The last piece we took off was the bottom plate, just because we wanted to see how strong it looked. I should note even the tripod ring has a nice rubber seal around it.
Lensrentals.com, 2016
And when the plate comes off it’s quite thick and sturdy as you can see. A lot of cameras have really thin metal plates here.
Lensrentals.com, 2016
Now looking under the camera we can see the DC boards and other power boards, but not a lot more of interest. We really saw no reason to disassemble the mirror box and take off the battery compartment so we decided to quit while we were ahead.
Lensrentals.com, 2016
So What All Did We Learn Today?
Well, let’s see. The weather sealing on the Canon 5d Mark IV appears pretty robust, although you know my opinion on weather sealing in general. The shell of the camera has an interlocking construction with lots of pins and clips and more screws than previous Canon cameras. This makes it kind of a pain to get into, but I’m sure it adds to the shell’s overall strength. It might make it more weather resistant if the parts are held together more tightly, but I couldn’t say for certain.
There are more chips, and more and heavier connectors moving electrons from board to board than even the Canon 5Ds cameras have. This kind of makes sense because there’s lots of new stuff in here: a touch screen LCD, dual-pixel technology, WiFi, GPS, the list goes on. One thing that didn’t really come across in the pictures, though, is there’s more air inside this camera than we’re used to seeing. There are some empty spaces that aren’t packed full of electronics. In other words, this camera probably could have been a bit smaller but Canon wanted to keep the form factor the same.
Construction is at least as robust as the recent 5 series releases and better than the Canon 5DIII, which is as it should be. There’s a little more complexity with cables running hither and yon more than in previous Canon cameras, but that isn’t going to affect operations at all. It may make repairs a bit more difficult. And I’m, as I always am, disappointed to see HDMI and USB ports soldered onto the main PCB. They get torn off a fair amount on every camera that’s made this way (which is most cameras that aren’t dedicated for video). On the other hand, the main PCB replacement may not be much more expensive than a sub-board replacement.
So overall, it was an interesting disassembly with a fair amount of new quirks and tweaks, rather than the rather straightforward upgrade I was expecting.
Roger Cicala and Aaron Closz
Lensrentals.com
September, 2016
Because people still insist on asking or speculating: Yes the camera is reassembled. Yes, it’s working just fine. No, it won’t go out on rental this week, we’re having some of the guys here shoot with it while they do their own write-ups about actually using it. But it will be rented after that.
Author: Roger Cicala
I’m Roger and I am the founder of Lensrentals.com. Hailed as one of the optic nerds here, I enjoy shooting collimated light through 30X microscope objectives in my spare time. When I do take real pictures I like using something different: a Medium format, or Pentax K1, or a Sony RX1R.
-
GriffinClubMerv
-
Keenan Adams
-
Carl Eberhart
-
Carl Eberhart
-
Roger Cicala
-
Nick Mays
-
Omesh Singh
-
Curtis Krawchuk
-
Roger Cicala
-
Vlad Bieg
-
Nic M
-
akkual
-
Adam Fo
-
Jon
-
Class A
-
Mike
-
Roger Cicala
-
Lee
-
Diko Jelev
-
pedant
-
Kai Harrekilde-Petersen
-
AaronClosz
-
Tolot
-
Brandon Dube
-
Michael Burch
-
Rick
-
Roger Cicala
-
AaronClosz
-
Brandon Dube
-
Brad Andresen
