Guide to Photographing The Solar Eclipse on August 21st 2017
On August 21st, 2017, a solar eclipse will be happening throughout the United States, which has created a lot of excitement and questions from our readers and customers. As a result, I wanted to put together a small guide on how to properly and safely photograph this incredibly rare event. Let’s get out and photograph the first full solar eclipse in the United States since 1991! But before you run out and point your expensive DSLR directly at that big ball of fire we orbit, maybe we should talk about safety, what’s happening, and gather some equipment first. Cool?
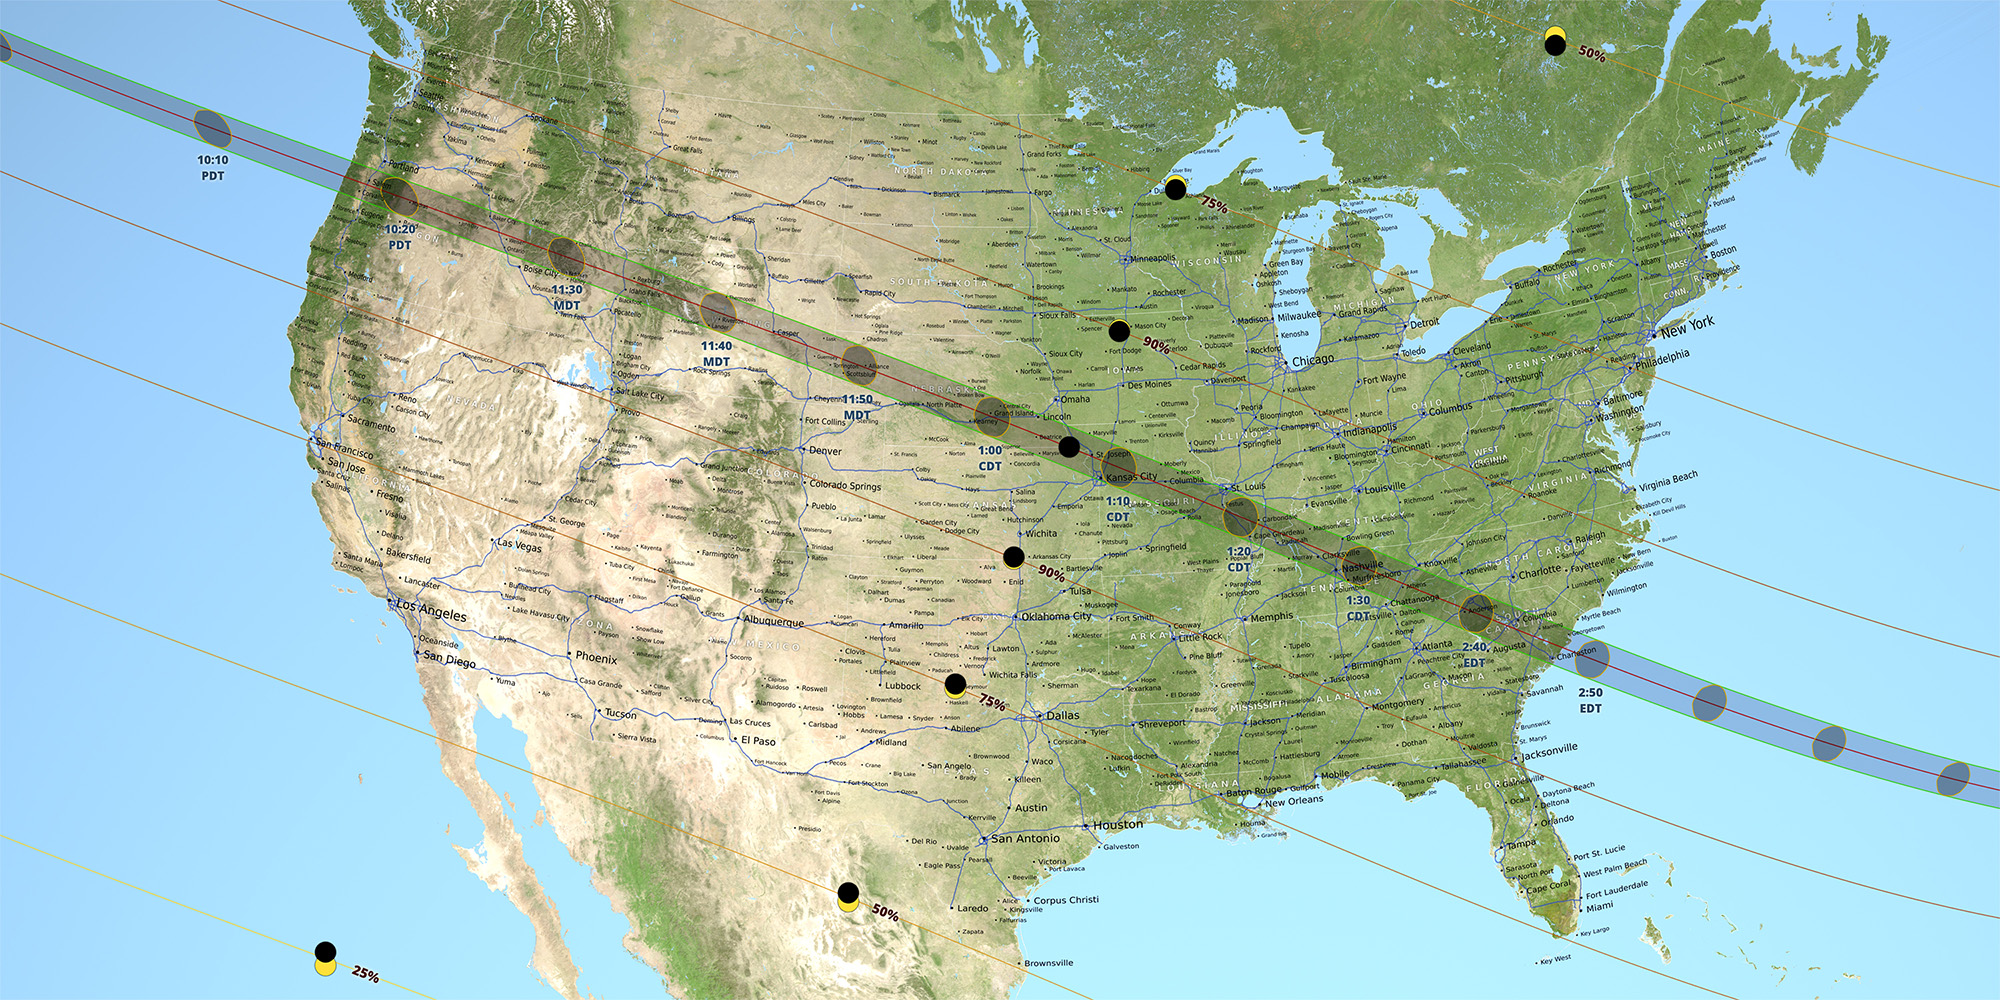
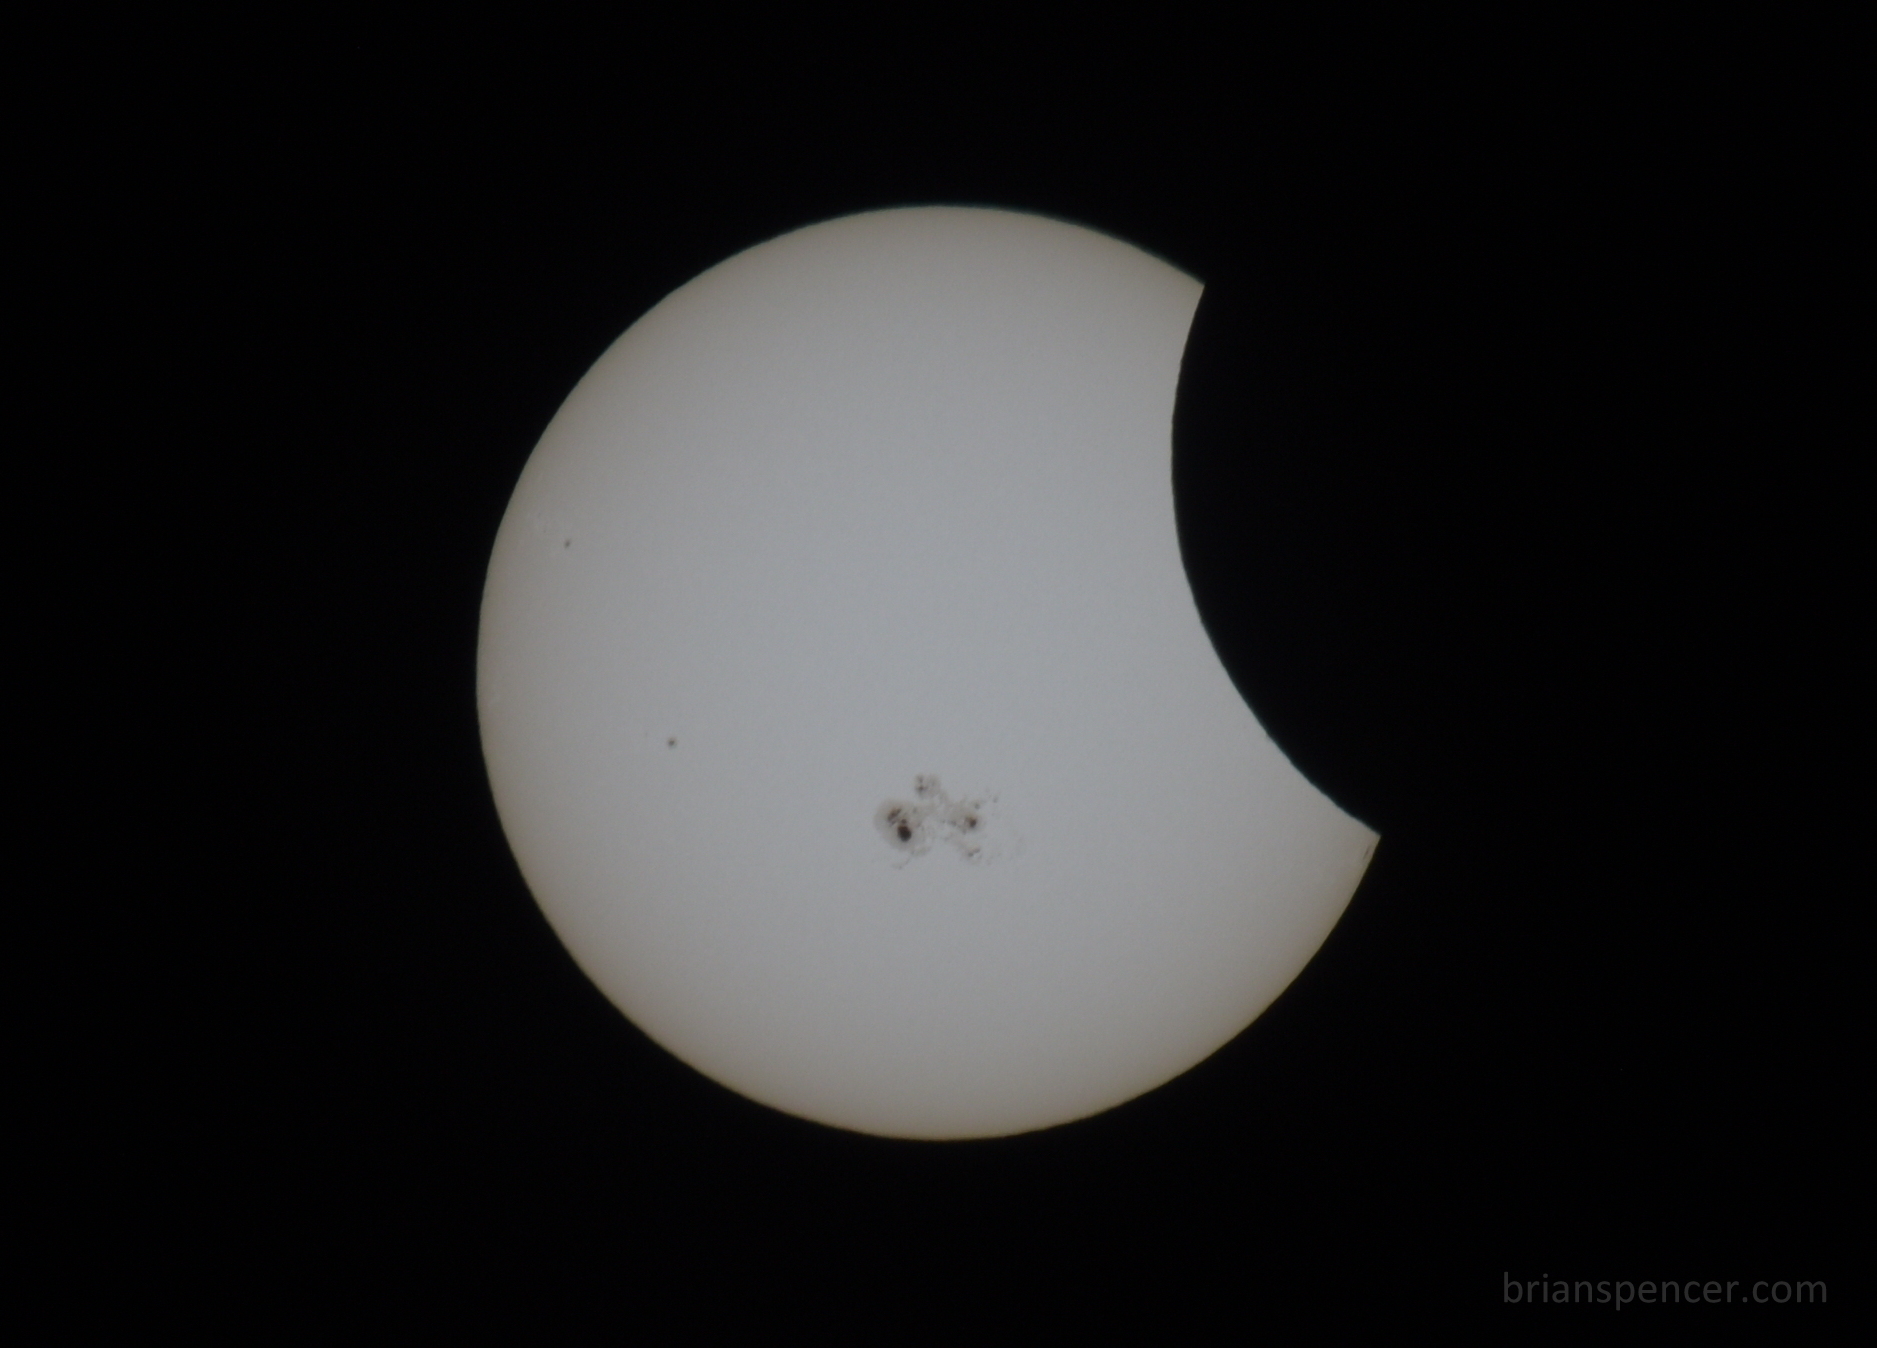
Ok, so what’s happening? On Aug 21st, 2017 the sun will disappear behind the moon totally eclipsing the sun. This will effectively cast some degree of twilight across the United States and especially in the path of totality. The path is about 70 miles wide and extends in a straight line from South Carolina to Oregon. The last time the United States saw a coast to coast total eclipse was in 1918. The eclipse duration is about 2.5 plus hours long with totality lasting up to 2 minutes and 40 seconds in some locations. What’s really exciting about this is you will be able to view the suns corona with the naked eye during totality. This time around the United States is the only country that will be able to view this eclipse in its entirety.
The eclipse starts and ends at different times depending on your location. Wanna know more? Space.com has an excellent guide including eclipse start/end location time charts.
Safety
WARNING: Permanent eye damage will occur if viewing the sun either directly, through binoculars, through a telescope, or through the view finder of your camera. Never view the sun directly without solar viewing glasses.
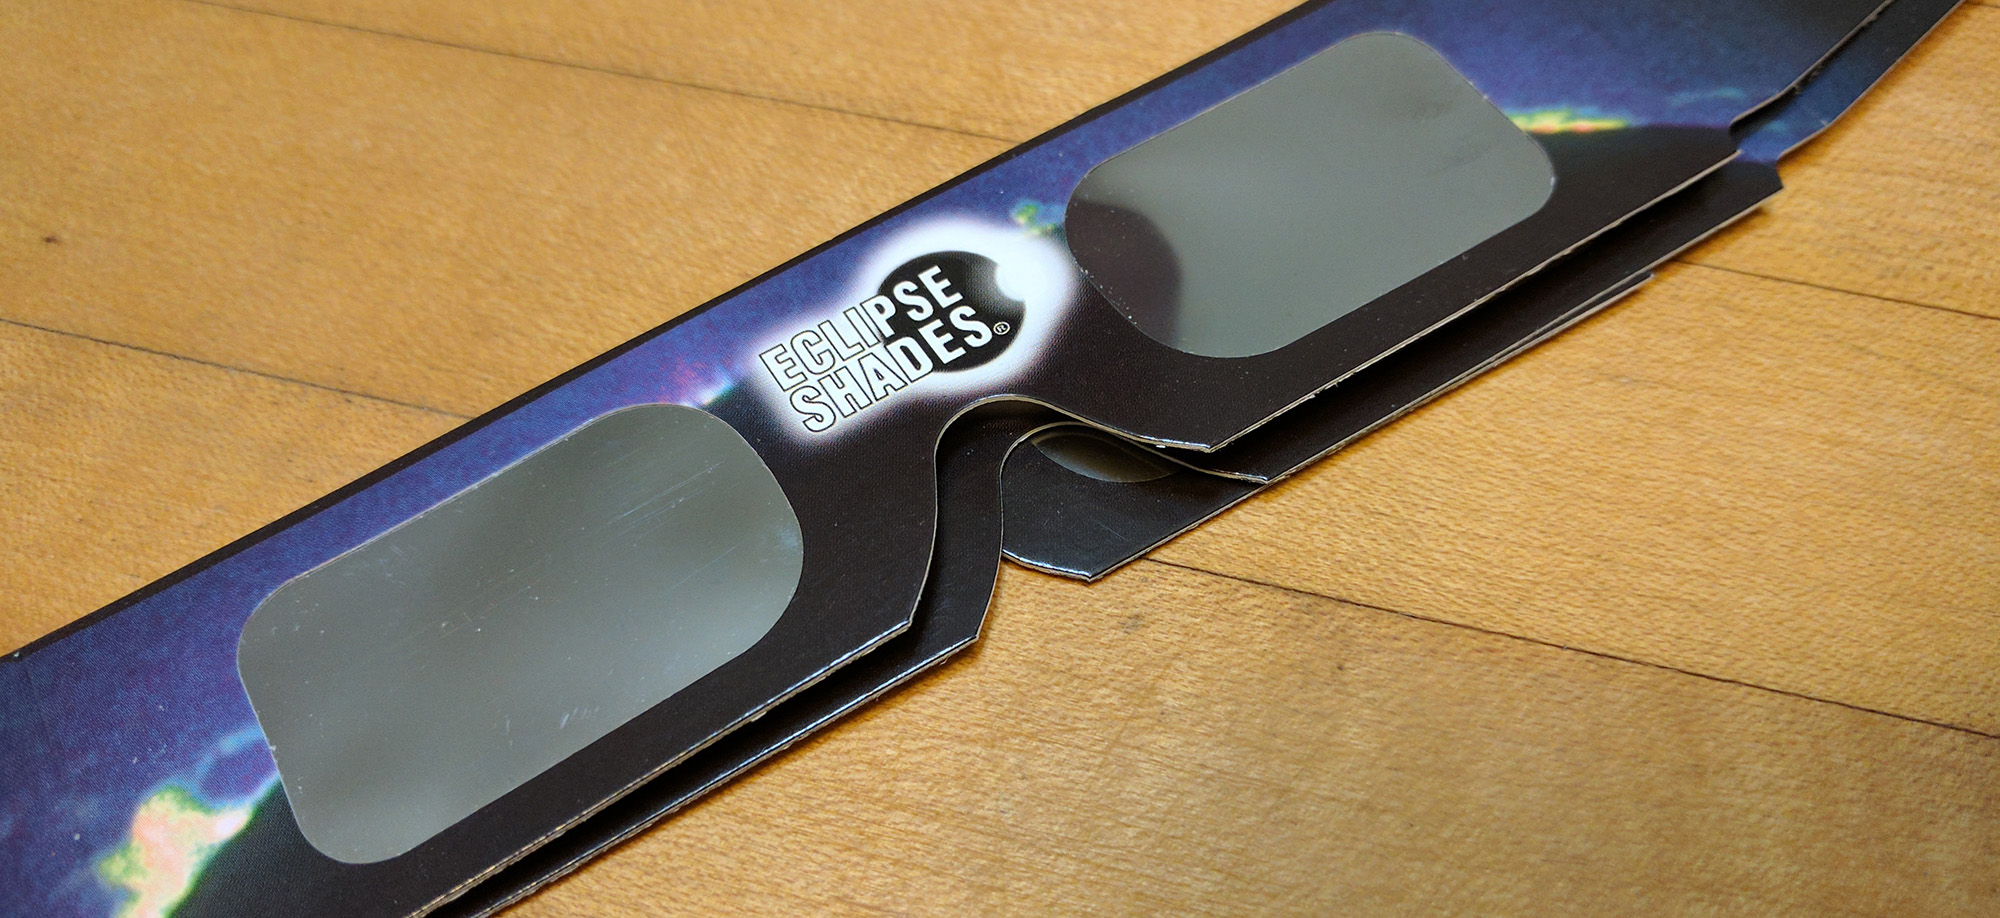
The first and MOST important item in your bag should be eclipse viewing glasses. It’s paramount that you protect your eyes at all times when looking at the sun. They are cheap and you can get a ten pack for about 15 bucks on Amazon. I’ve used these for years and have never had a problem. Finally, don’t forget other items to make your adventure more enjoyable like a small chair, umbrella, sunscreen, water, snacks and a hat.
Location of Eclipse
Your success of eclipse will depend on your location within the United States. While the eclipse will be seen throughout the entire United States, the best viewing spot of the eclipse occurs through Salem, Oregon down through Charleston, South Carolina. Use the map below as a reference guide, and if you’re able to increase your magnitude, take the extra effort to make it happen.
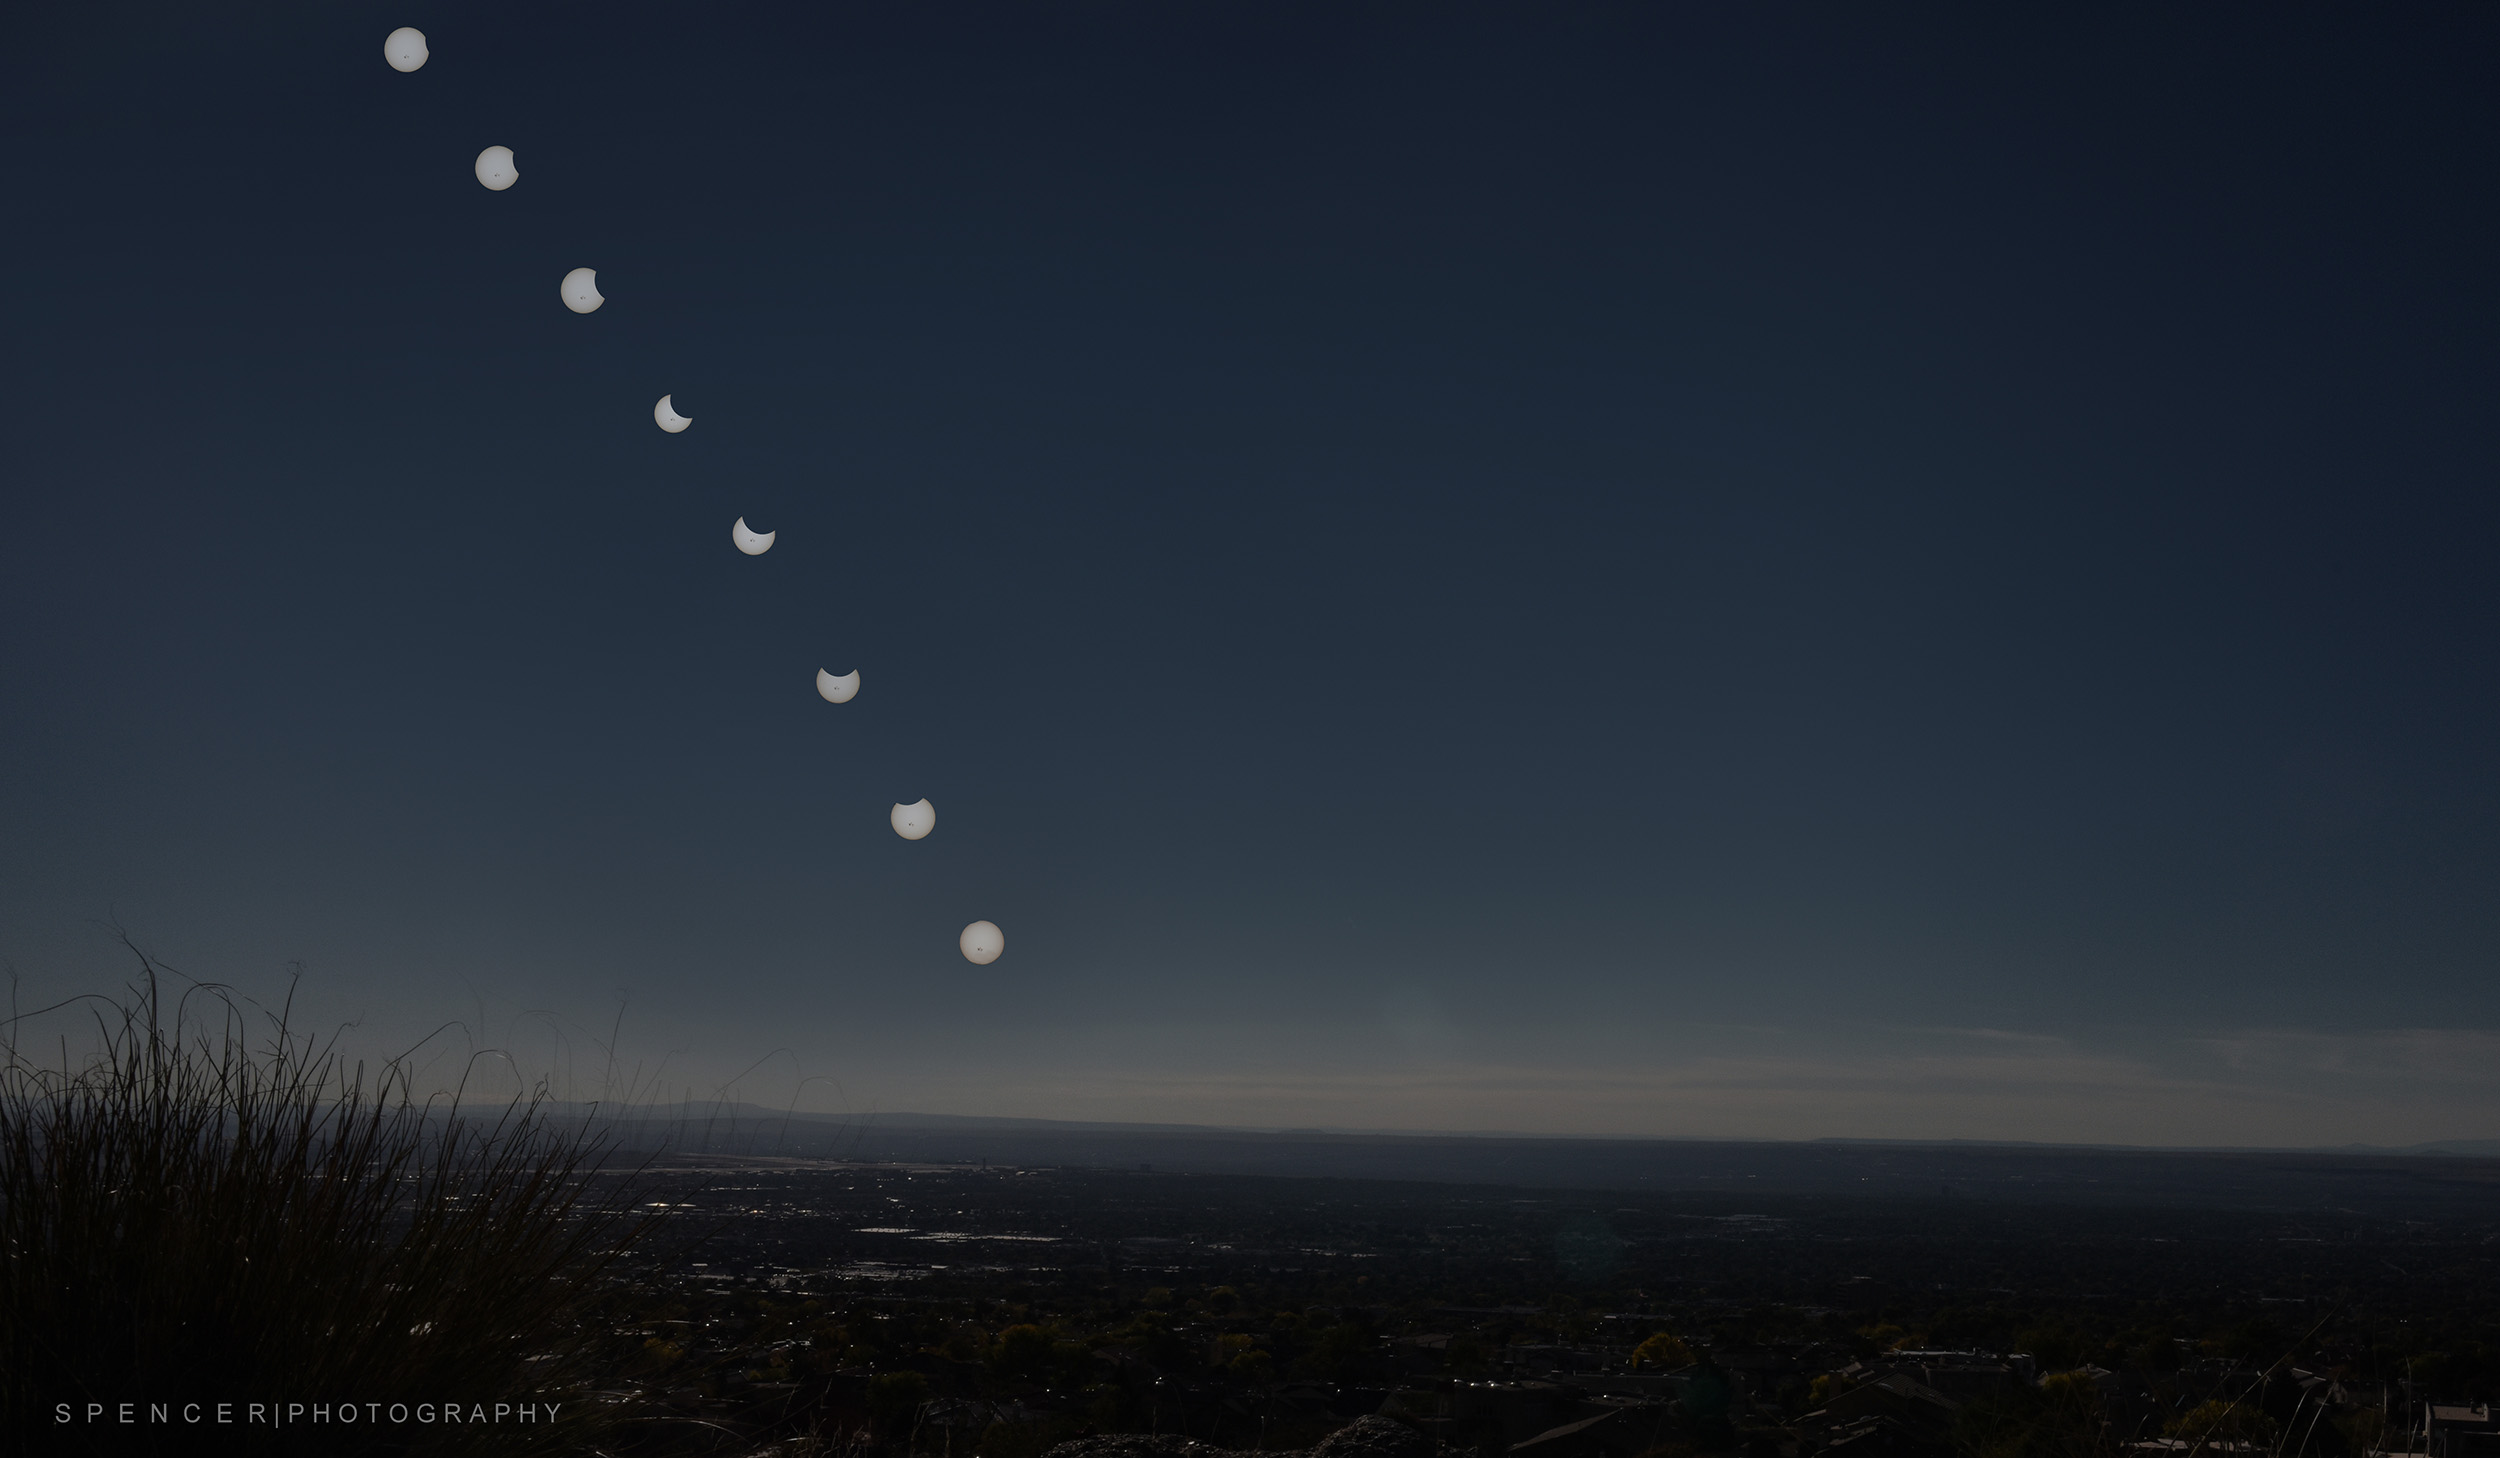
As for your location during the setup process, it’s entirely up to you. Do you want to grab 10 good shots of the eclipse progression and then stack them on an underexposed base image to give your final image a good composition and perspective? If so, then get out and grab a shot of a pleasant landscape that fits the eclipse location and elevation. If you do want to stack, remember this eclipse is happening mid-day. So stacking the eclipse low on the horizon of a base image won’t make much sense. If not, then just shoot anywhere you can get the full effect of the eclipse and then put together a cool collage of the progression.
What Equipment Will I Need for My Camera?
WARNING: Do not photograph the sun without a solar filter on your lens. Using a long zoom lens and pointing your camera at the sun for extended periods can overheat the interior. This will result in an expensive repair or unrepairable equipment damage.
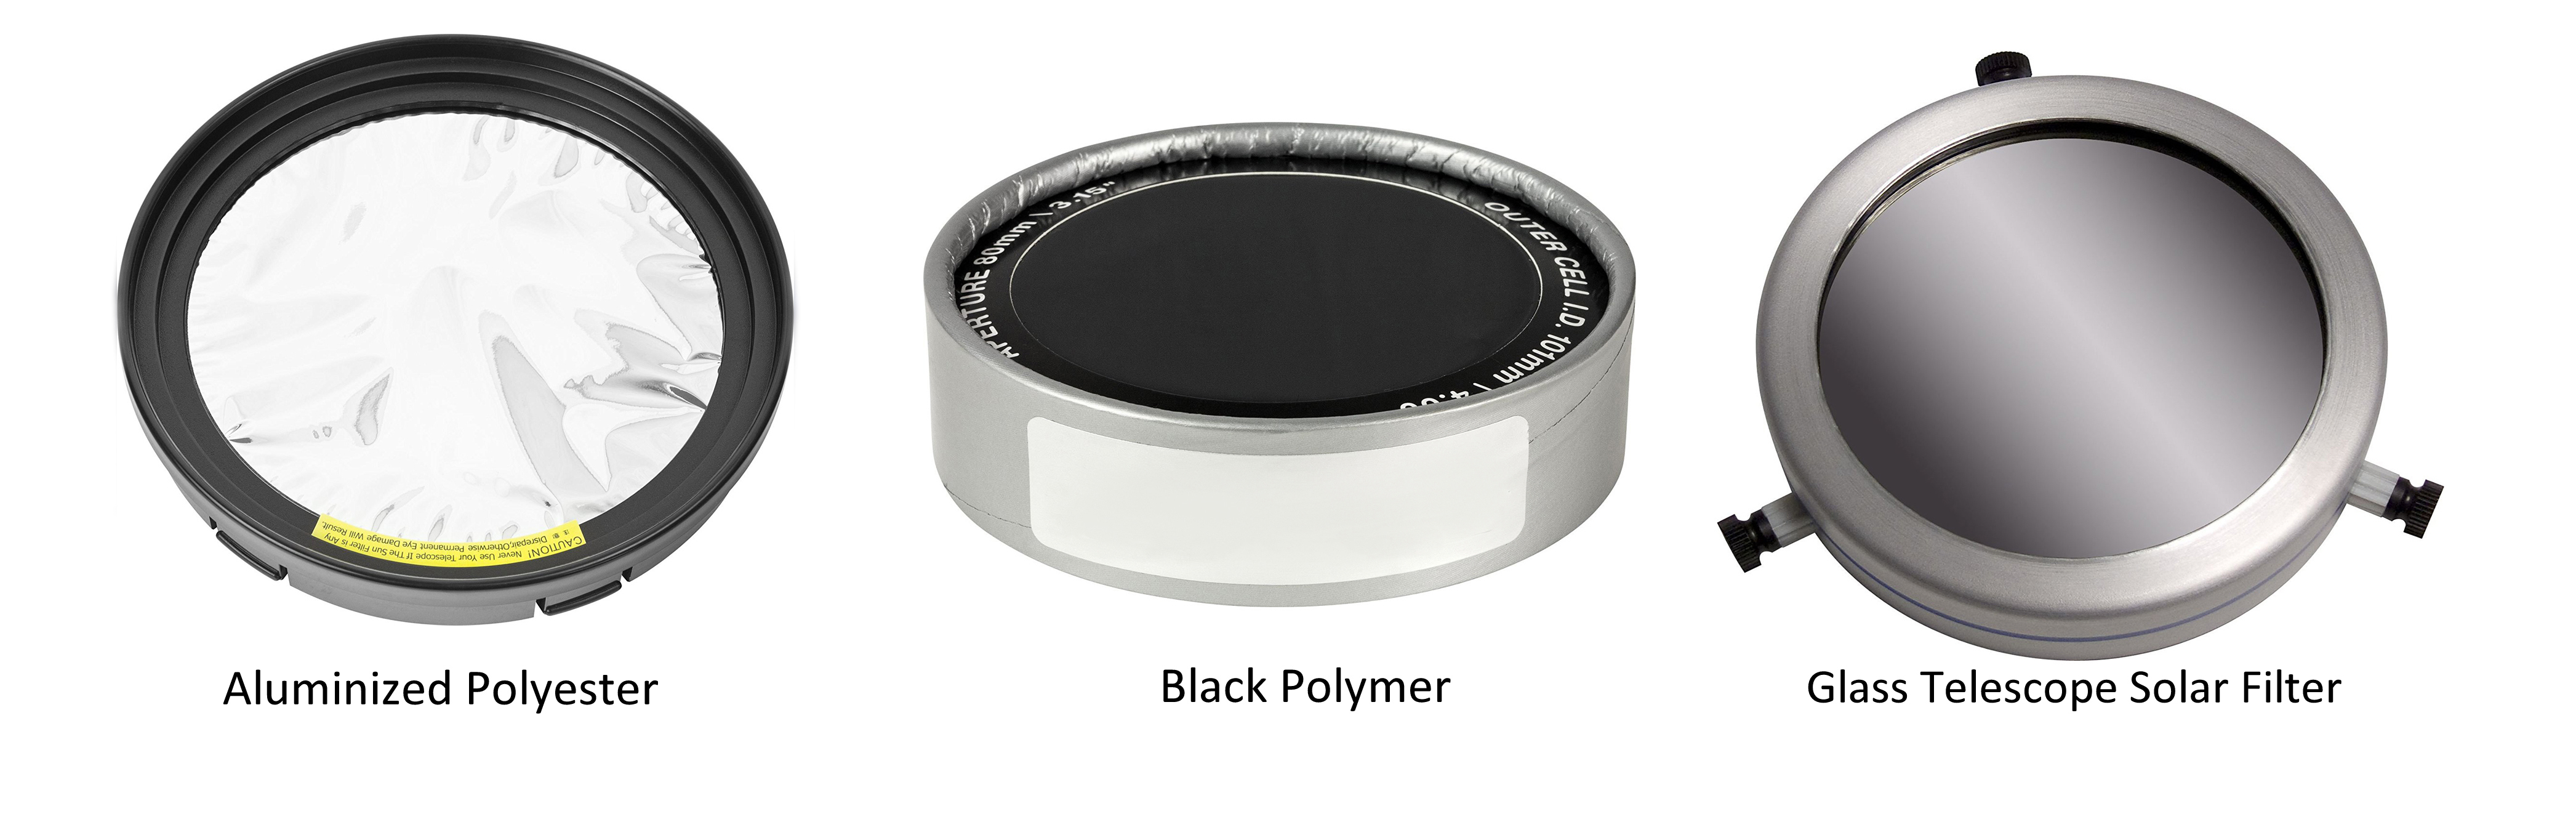
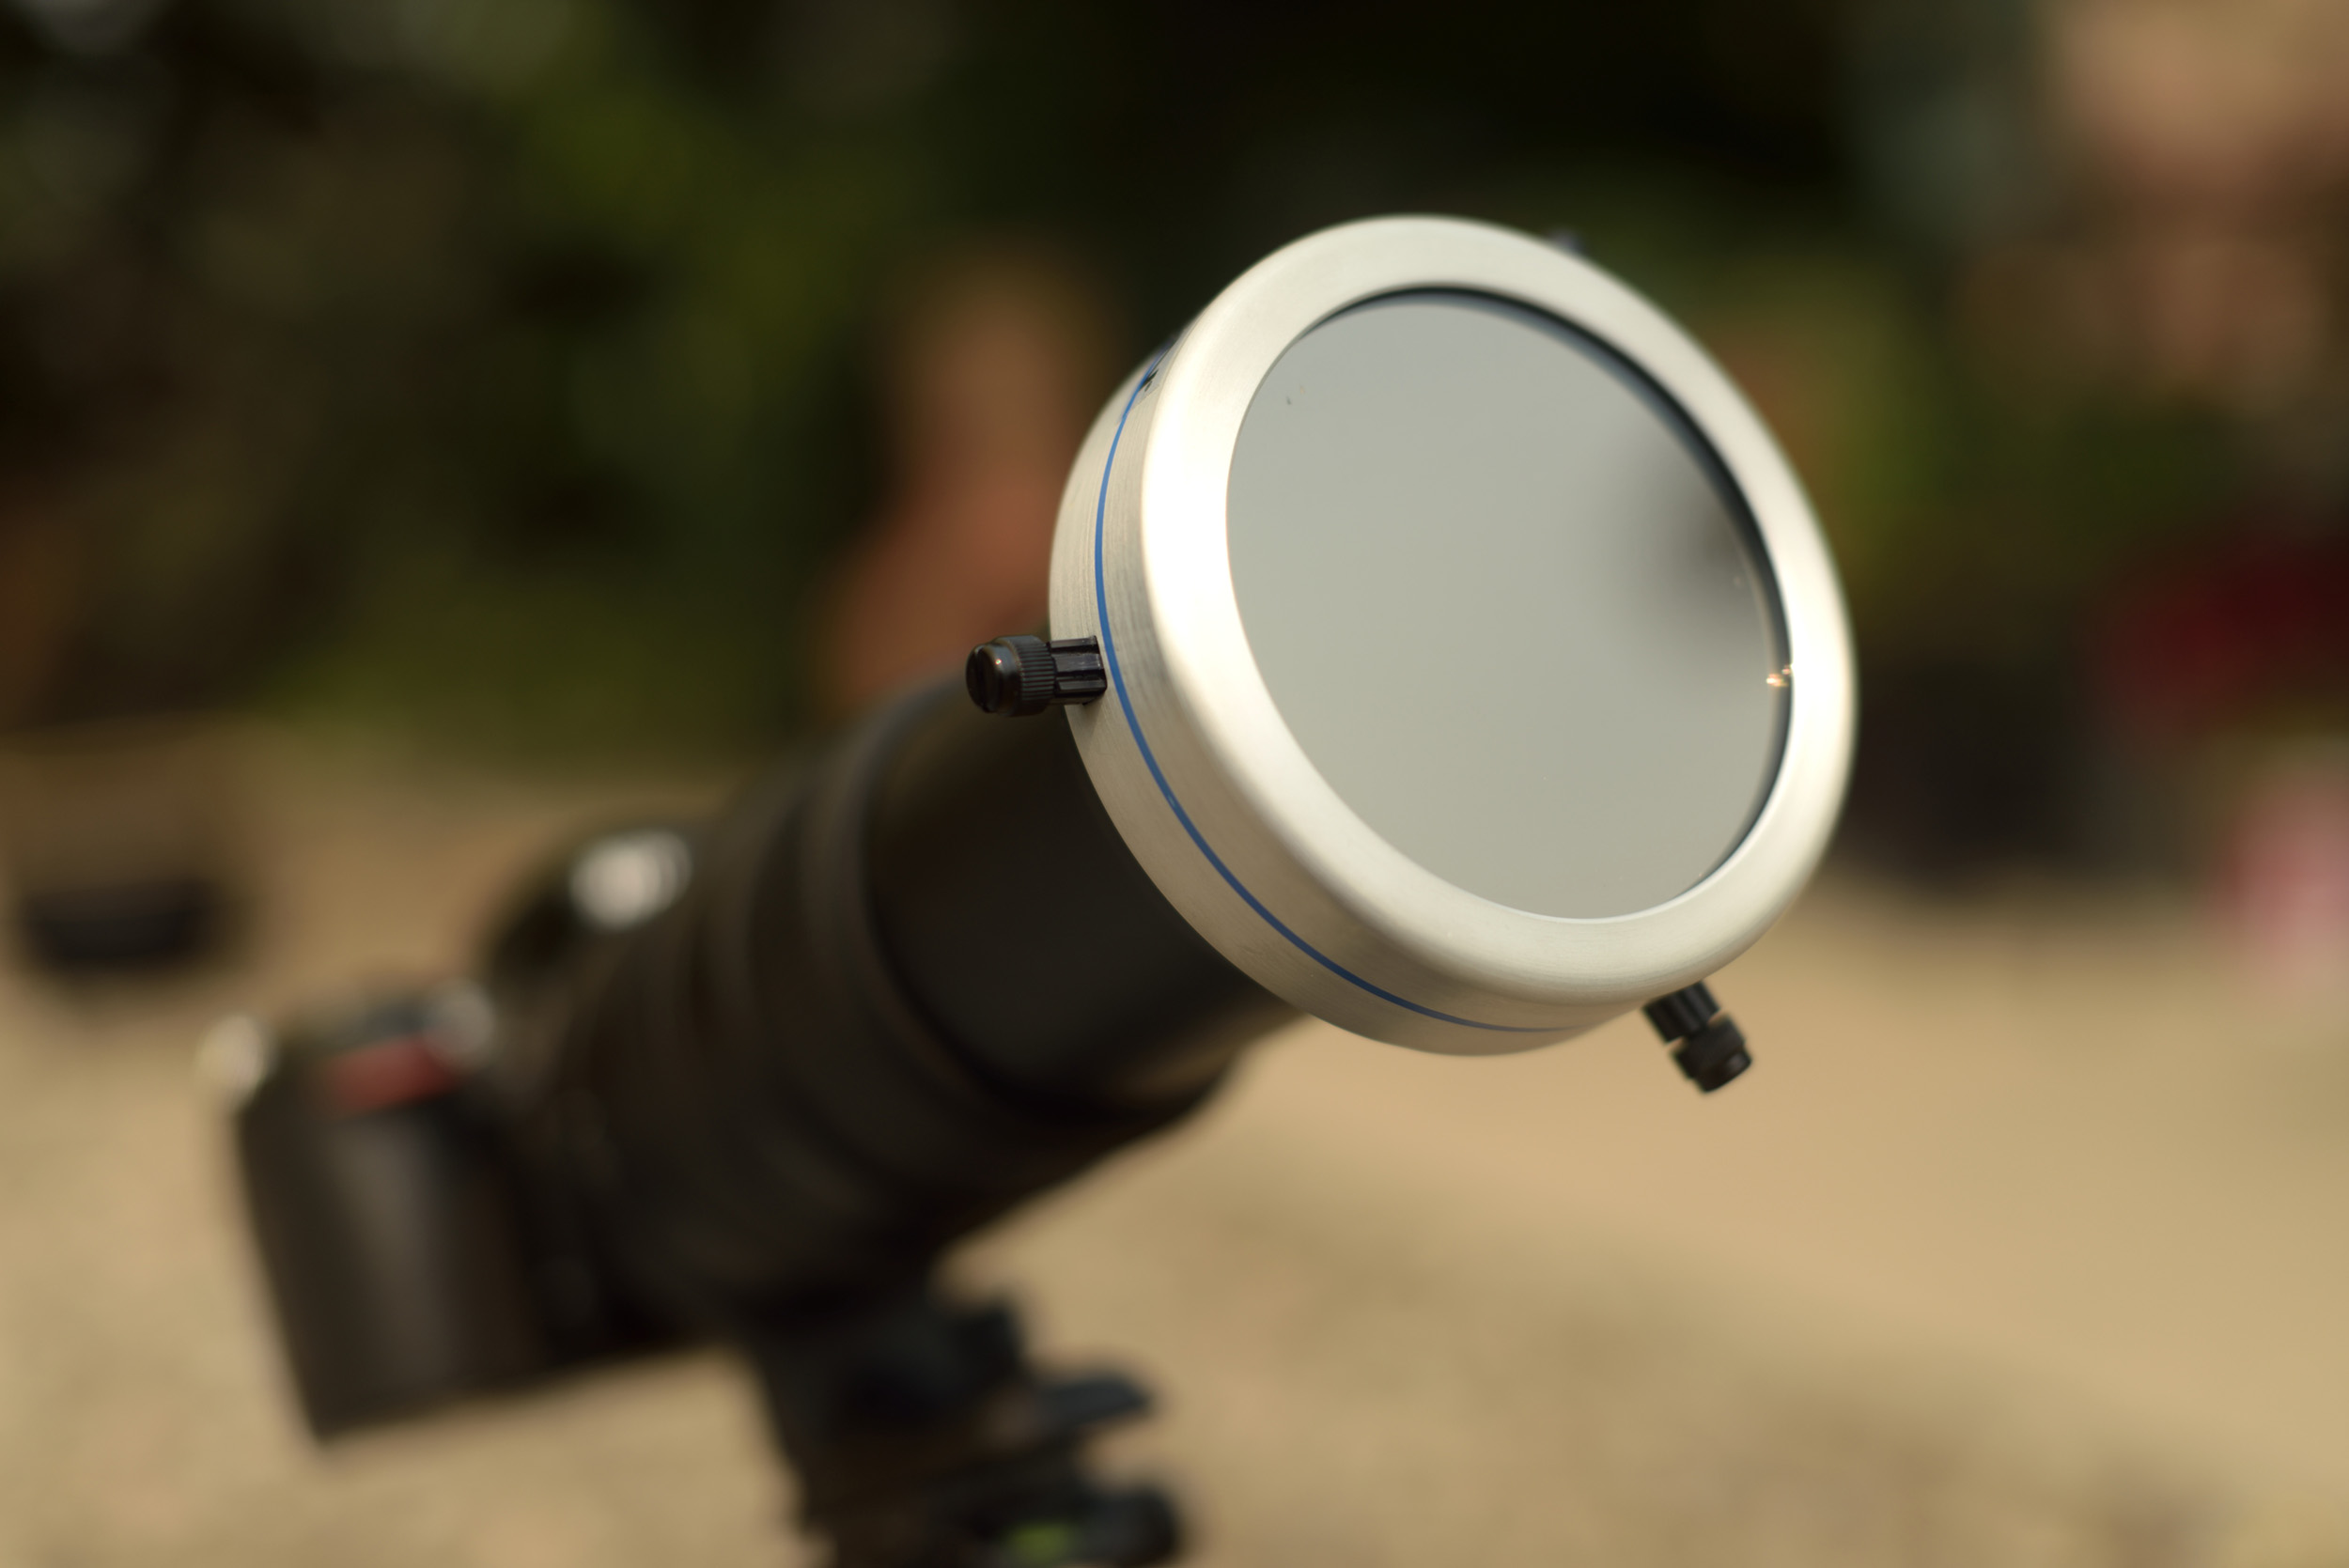
Solar Filters Solar filters affixed to the end of your lens block 99% of the suns light from entering into your telescope or camera. You cannot take a usable photo without a solar filter. The two most popular type of solar filters are aluminized polyester and black polymer (both plastic). Both are excellent choices for the eclipse photographer on a budget, come in multiple sizes to fit your lens, and are about 20 dollars. I prefer a telescope glass solar filter for its better optical performance. It’s about three times the cost but worth it, as we all remember what Roger says about putting a cheap filter in front of your expensive glass.
Some telescope filters are tricky to fit. I measured the diameter of my lens and then ordered a glass solar telescope filter with a diameter a bit larger to secure in place.
So what about neutral density (ND) filters and what’s the difference between those and a solar filter? Depending on what optical density (how dark the filter is) you choose, ND filters only block 10%, 20%, etc of the suns light. That is not nearly enough to protect your camera or capture a usable photo. Sure, you can stack about 5 to 8 ND filters to achieve the 99% block of incoming light, but now you’ve given up most of the optical quality of your lens resulting in blurry and unusable photos. This is where a solar filter comes in. A single solar filter blocks 99% of the suns light while maintaining sharpness and clarity.
Camera
I’ll be using a Nikon D810 and a Nikon D750. However, a full frame (FF) camera vs a crop sensor doesn’t matter too much. Of course, a full frame sensor is going to generally yield a better image quality, but we will be shooting at long focal lengths, and the added focal distance when using a crop sensor can be advantageous. The added dynamic range of a full frame sensor isn’t entirely important because this is, for the most part, a two color photo. Black background and the color of the sun. Also, ISO performance is not a factor here since all cameras, for the most part, perform really well at ISO 200.
Lens
Ok, this is the most important part. You need a good long piece of glass to photo the sun – at least 400mm plus. If I had my choice, I’d use a Nikon 800mm f/5.6E FL ED AF-S VR. But I don’t have that and it’s $15,000. So, I’ll be using a Sigma 50-500 f/5.6-f/6.3 and then cropping it a bit. In the past, I’ve used a Nikon 18-200mm with a 2x teleconverter that proved to be pretty good. If you’ve chosen to use a crop sensor, remember to multiply your focal range by your crop (usually 1.6) to get a representation of your true focal range. To wrap up, no matter what camera you are using, find a good long FF 400mm (or longer) lens. When photographing the sun, fast lenses (f/2.8, etc) won’t buy you much except faster shutter speeds.
Tripod
You can photograph this event without a tripod. But I wouldn’t recommend it.
Why? You will be shooting at 400mm or more. Even if you have an image stabilized lens there is still a chance for soft focus if you are shooting handheld. Also, during the shoot, the sun and moon will be moving. You will constantly need to adjust your cam to compensate for the movement, so a tripod will come in handy to make minor adjustments. Additionally, your arms and shoulders won’t get tired holding up all that equipment for the duration of the eclipse.
Camera Settings
Ok, so what settings should you start out with? All cameras will be different and your filter choice will affect this too. However, most will expose nicely at around f/7.1, 1/160th of a second shutter speed, and an ISO of about 100 – or close to that. It’s a good place to start and you can make adjustments from there. If you do need to make any changes, start with your shutter speed and then ISO adjustments. You really should use an aperture of f/6.3, f/7.1 or f/8 because a shallow depth of field is unnecessary here, and lenses generally yield sharper images at these f-stops. And remember you will be making constant changes to your settings as the moon moves in front of the sun. In fact, as the full eclipse happens you may have to lower your shutter speed and raise your ISO to compensate for the lower light coming from the full eclipse – so be ready. For those 2 minutes and 40 seconds, you should be standing in front of your camera and ready to make adjustments to your settings. Ultimately, you should end up with 200 plus photos during that time period. Its digital, take a photo every 2 to 5 seconds and adjust.
Remember to turn off Auto ISO and shoot in RAW to take advantage of the shadow and highlight adjustments in your favorite RAW editor.
Finally, autofocus once and then turn off the autofocus on your lens. Why? You may miss a shot if your camera can’t AF on the sun during the shoot. Get on site early, focus and then turn off AF.
Settings for Eclipse Totality
Now we get into the tricky and risky part. Experts at NASA and Space.com say it is safe to view the full totality of the eclipse without solar glasses. Equally, once totality is happening you will have to remove the solar filter and you might have to quickly adjust your camera settings for totality. Just in case, be ready to do this and know exactly how to quickly adjust your ISO and Shutter Speed. However, your camera settings should be about the same. Consider this; A solar filter blocks 99% of the suns light and the moon will be blocking 99 to 100% of the suns light during totality. So, you may even have to lower your shutter speed a bit and raise your ISO a bit during totality.
Quick Ref – Settings
- Use a Tripod
- AF off after you focus once
- ISO 100 to 200
- Shutter Speed 1/125 to 1/200th of a sec
- Aperture f/6.3 to f/8
- Auto white balance or if you have the option: 4000 to 5000 K
Final Thoughts
Practice. Practice. Practice. This is important. A few weeks prior, you should get out and practice photographing the sun then go home, edit and if need be, adjust your settings, etc. Experiment a bit and see what might be best for you and your equipment. What’s cool is, you can do this in your backyard every day until you feel confident enough that when Aug 21st arrives you will capture this event like a pro. And most important, take your friends and family and have fun.
38 Comments
Claudia Muster ·
One additional remark: I’ve once had the chance to watch a total eclipse. It’s a really impressive experience. If you have the choice between watching a partial eclipse from your home or traveling a couple of hundred miles to see the total eclipse, don’t think twice and go for the total. It really makes that much of a difference. And most important: Taking photos is fine, but don’t be absorbed by it. No photograph comes even close to the live show.
B Spencer ·
Hey Claudia – Right! Really good advice with enjoying the whole show instead of being super focused (lol – get it?) on getting a good shot. 🙂
watch mayweather fights ·
This time around the United States is the only country that will be able to view this eclipse in its entirety.
Green Images Instagram ·
thanks for feedback.
Frank Rodrick ·
Great article, Brian, but I’m confused on one issue. You’re not the first writer to recommend a solar filter instead of a 10-stop ND filter, but I can’t understand why. Surely my pricey B+W 10-stop is better glass than the $29 filters I’m seeing on Amazon? At 10 stops I’m shooting about about 1/8000th at f/22 or higher; I don’t think that’ll affect sharpness. https://uploads.disquscdn.com/images/299feaefa2214ccc8b0d2fe3bd44dfa315b9955bfaec404fb1f62edfcfaea0bc.jpg Here’s a pic from about a week ago; probably a little overexposed but that’s not the filter’s fault.
B Spencer ·
Hey Frank – Really great point. So, in the past, I’ve stacked ND’s to achieve a 10 stop (roughly) and I gave up a lot of optical quality when I did so. At that point I went straight for the telescope glass. I never thought of using a 10 stop. Great idea! However, some cams like my D750’s max shutter speed is 1/4000th of a sec – so the 10 stop wouldn’t work for me on that cam. This will be the case for a number of others too.
B Spencer ·
BTW – beautiful shot of the sun.
bozs13 ·
PLEASE do not use just ND filters (no matter what the density). While they dim visible light, they do NOT block infrared and ultraviolet light that can damage your retina/etc. Do not use ND filters, sunglasses, negative film, smoked glass, space blankets, DVD’s etc. Please take care of your eyeballs and equipment.
More so, don’t ever put filters behind your optics. Always in front
Frank Rodrick ·
Thanks; I’m digging around on the web and starting to understand.
michaelq83 ·
Remember, there are no pain receptors in your retina. You can do permanent damage an not feel a thing.
Athanasius Kirchner ·
Mirrorless users do not suffer from this problem – sensor stacks contain powerful UV and IR filters, and the sun can’t burn through an EVF. An ND filter with other light-reduction tricks will be fine. On a DSLR you can (and should, in this case) shoot in LV to bypass the problem.
B Spencer ·
Interesting. I’m gonna research. Thanks for the info.
Tuolumne ·
Powerful enough to effectively eliminate UV and IR in ordinary photography is not the same as powerful enough to adequately attenuate the UV and IR intensity obtained by looking directly at the sun. Solar filters attenuate UV/visible/IR by a factor of 100,000 for safe visual use, and some intended for photographic use attenuate these wavelengths by a factor of 6,000. Do the filters in the filter pack over the sensor attenuate IR or UV by a factor of 6,000? Maybe, maybe not.
Here’s an example of what can happen to your camera from sunlight entering a long telephoto lens: http://www.the-digital-picture.com/Help/Flare.aspx. The image of the sun was (almost) focused just off the sensor and this damage took about a minute to happen. There was no ND filter in use; with an ND filter letting through IR the damage would have take a little over twice as long but it still would have happened after a short time.
On the other hand, if the eclipse is at a stage (diamond ring or Bailey’s beads) where the visible fragment of solar disk (not including “blooming”) is extremely narrow then the area of intense heating on a sensor or filter pack will move to a new area fairly fast and there will also be faster heat dissipation at all times. There have been a lot of unfiltered photos taken at these eclipse stages without complaints of sensor damage.
If you’re using a DSLR, please tape over the viewfinder just in case live view shuts off at any time. You don’t want to take any chance on getting even an accidental glimpse of magnified sun through optics, or having it projected onto other body parts that happen to be in the line of sight.
Athanasius Kirchner ·
I should’ve qualified my statements, yes. The sun’s rays, magnified through a telephoto lens, can definitely damage a sensor if care isn’t taken. This won’t happen, as you pointed out, in a matter of seconds, but rather minutes. Still, people should be very careful when photographing the sun, as it can indeed be dangerous.
CA Geographer (near Roseville) ·
Powerful enough to effectively eliminate UV and IR in ordinary photography is not the same as powerful enough to adequately attenuate the UV and IR intensity obtained by looking directly at the sun. Solar filters attenuate UV/visible/IR by a factor of 100,000 for safe visual use, and some intended for photographic use attenuate these wavelengths by a factor of 6,000. Do the filters in the filter pack over the sensor attenuate IR or UV by a factor of 6,000? Maybe, maybe not.
Here's an example of what can happen to your camera from sunlight entering a long telephoto lens: http://www.the-digital-pict.... The image of the sun was (almost) focused just off the sensor and this damage took about a minute to happen. There was no ND filter in use; with an ND filter letting through IR the damage would have take a little over twice as long but it still would have happened after a short time.
On the other hand, if the eclipse is at a stage (diamond ring or Bailey's beads) where the visible fragment of solar disk (not including "blooming") is extremely narrow then the area of intense heating on a sensor or filter pack will move to a new area fairly fast and there will also be faster heat dissipation at all times. There have been a lot of unfiltered photos taken at these eclipse stages without complaints of sensor damage.
If you're using a DSLR, please tape over the viewfinder just in case live view shuts off at any time. You don't want to take any chance on getting even an accidental glimpse of magnified sun through optics, or having it projected onto other body parts that happen to be in the line of sight.
Frank Rodrick ·
Good point about the shutter speed, Brian. I have a 6-stop and others I could gang up, but then I’d be getting into that area of softening the image. On the other hand, with my 2X extender on the Canon 100-400 lens, my max f-stop reads 64! Without the extender it tops out at f/40, but either way that gives a lot of room even at 1/4000th. I’m guessing Nikon’s numbers are similar. In my next practice session I’ll try higher f-stops and see how low my shutter speed can go.
B Spencer ·
Ahhh good call with the 2x. Good luck at f/40 – but I have a feeling you will rock it.
dslr pundit ·
How about using a 10 stop hard ND filter fitted in front of my lens using a square mount? I will be using a 300 mm FF lens on my apsc body, so it would be like 480 mm approx.
B Spencer ·
Yup… Frank below mentioned using a 10 stop and he’s had some good results. But I believe you would need a cam body with a 1/8000th shutter speed.
bozs13 ·
PLEASE do not use just ND filters (no matter what the density). While they dim visible light, they do NOT block infrared and ultraviolet light that can damage your retina/etc. Do not use ND filters, sunglasses, negative film, smoked glass, space blankets, DVD’s etc. Please take care of your eyeballs and equipment.
And don’t ever put filters behind your optics. Always in front.
Frank Rodrick ·
Thanks for getting me to look into this further–just ordered a Formatt Hitech Firecrest Solar Eclipse Filter from B+H. Didn’t really understand about the IR an UV light but now I do. My eyeballs thank you very much.
dslr pundit ·
Thank you, I didn’t take any photos this time because I had no solar filters. just watched the eclipse using my solar glasses. 🙂
B Spencer ·
Hey all. – So there has been some discussion about not using ND’s to photo the sun. I know some photogs do this, however there are specific products made just for this purpose. I’m inclined to stick with those protective products that are made specifically made to protect the equipment and the eyes. 🙂 – Have fun.
Ben Nieves ·
Interestingly enough, I’ve photographed three solar eclipses going back to 1979 and have never used a solar filter and have had great success and no damage to my camera. The first I shot on Kodachrome with a Minox camera, the second on Fuji Velvia with a Nikon D3 with a 500 mm f8 mirror lens, and the most recent, the annular eclipse in 2016 with a Nikon D600, 300 mm f 2.8, and 2X teleconverter with stacked ND Filters. ND filters worked fine, I just waited until totality to point the camera directly at the sun. I focused by holding a piece of paper behind the viewfinder and focused the light on it. The shots turned out great. Was I just lucky three times?
B Spencer ·
I’ve used stacked ND’s once and didn’t like the blurry result and moved straight to solar filters and have used them for years. After Bozs13’s comments I did some additional research and found that indeed ND’s do not block UV and IR. However, I cant find any info about the immediate or long term effects with using ND’s on a lens when photographing the sun. But yes there are tons of photogs that have used stacked or 10, 12, etc stop ND’s with success. As for me, I’ll err on the side of safety and stick with solar filters.
Sebastian Sassi ·
I was interested in this topic, and from what I can tell, the only UV and IR wavelengths that transmit well through optical glass are the “near” wavelengths that are close to the visible spectrum. Not saying there’s not a difference between an ND stack and a solar filter at those wavelengths, but I’d need to see the scientific evidence. I’m skeptical that ND filters with low transmission rates for visible wavelengths pass near UV or IR wavelengths unimpeded. In the absence of much evidence either way available in the scientific discussions I’ve seen I’d avoid looking at the sun through ND filters mounted on a telephoto lens, sure…but there seems to be more to it than you might think.
asad137 ·
“ND filters worked fine, I just waited until totality to point the camera directly at the sun.”
Sure, during totality you don’t need ND filters at all, so of course it worked fine.
As for the film cameras, I suspect because you weren’t taking very many shots (because film!) and probably also not constantly tracking the sun, you were saved from melting anything in the camera.
Astro Landscapes ·
Yeah, there is a huge difference between “burning” a piece of film, and ruining a digital sensor. So all correlation between shooting the sun with film, and shooting it on digital, should be thrown out.
But I digress.
The real problem is going to be, how do people know when totality has truly begun? I fear that a lot of people may turn their big giant telephoto “guns” sunward a minute or so too early, and will indeed risk damaging their sensor, or their eyes.
Make a note of the exact second at which totality has truly commenced in your particular area, and then use an atomic clock app on your phone to track that down to the last second. DON’T START STARING AT THE SUN WHENEVER IT STARTS TO *FEEL* DARK ENOUGH!!!
tewart ·
Astro, are you saying that there is no chance of burning though a shutter, just the film or sensor…I don’t think you understand all the things that could get damaged in in this operation. I actually think technically you would have to worry more about pointing wide angle lenses at the sun because they take all the light engery of the sun on make it smaller on the film/imaing plane so it would concentrated the light in a smaller point… I’ve always been especially concerned with leaving wide angle lenses on my camera bodies with out in the sun. A longer lens would take the image of the sun and make it look closer and thus spread the light over more of your film/sensor…just think about it for a minute.
Trenton ·
Most importantly – don’t forget to photograph everything else, not just the Sun. Crowds of eclipse watchers, odd shaped shadows etc.
B Spencer ·
Good call, Trenton!
Green Images Instagram ·
Thanks.
Eric Bowles ·
Good article Brian.
I understand everyone has their own ideas about personal eye safety. If you are convinced you are right, my comments are not to persuade you otherwise.
Many of the filters identified in the responses here are unsuitable for safe solar viewing. 16 stop ND filters, stacked ND filters, and some of the “solar” filters are not safe. It is possible to block visible light adequately. But many filters that block visible light do not adequately block UV and IR spectrum. There are different standards for different wavelengths of light.
Many types of protection we thought were safe have subsequently been found to be unsafe. For example, exposed film was thought to be safe, but it was only exposed B&W film – not color film. Welding glass was supposed to help – but it is only #14 welder’s glass that provides enough protection. Welding does not emit significant UV light – only heat and visible light.
The public standard for safe solar filters is ISO 12312-2 . The Lee, Marumi, Firecrest and Hoya ND filters do not meet this standard for safe optical viewing of the sun. They should be safe for use with Live View or an electronic viewfinder as long as you do not use them for optical viewing.
https://eclipse.aas.org/eye-safety/iso-certification
There are only a handful of companies that produce optical firms that are safe for solar viewing. If your filter does not carry ISO certification, it probably does not meet the standards. Typically there are specific wavelengths that pass through the filter that are problematic.
Your filter must be placed on the front of a lens or telescope. If you magnify the light using a long lens you are concentrating the energy – similar to using a magnifying glass to burn a spot or start a fire. A filter that works on the front of your lens won’t work on the back of the lens. Drop in filters don’t work. You can’t get protection from solar glasses looking through an optical viewfinder because the light has been concentrated.
If you use a filter that is not safe, you can damage your retina in a few seconds. The potential damage is from both chemical reactions causing retinal damage and corneal burns depending on the wavelengths. You will not feel these injuries as it occurs. It typically takes 12-48 hours for damage to show up. It is not reversible. Jay Meisel has a cataract on one eye – his shooting eye – that he attributes to repeatedly photographing the sun at sunset with a long lens.
It’s probably worth some caution to protect your shutter. I’ve seen a melted shutter. If you have prolonged buildup of solar heat, it might be possible to damage your shutter or sensor. I can’t speak to specific wavelengths so I just don’t know whether blocking visible spectrum is enough to prevent damage to the shutter. I plan to cover my lens between images using a towel or a lens cap.
bwana ·
I’ve read the comments. Stop this nonsense about neutral density filters and simply go with a good quality solar filter. They’re called a “solar” filter for a reason!!
Stephen Agnew ·
Remember that you want a filter that you can easily and quickly take off at totality and put back on after totality. If you go the ND filter route, or solar filter with screws route even, then you’ll have to fiddle with the filter to get it off and on in time and you’ll miss good portions of the eclipse.
I ended up making my own solar filter that was specifically fitted to my lens, it’s time consuming but worth it. I recommend doing this.
Andy Kowalczyk ·
I add my voice to Trenton’s.
There will be hundreds, probably thousands, of astronomy fanatic photographers taking pictures of this. They have done the math, they know what they are doing, they have already invested in telescopes and great lenses. You can grab their pictures off the internet.
Your job, especially if you are not going to practice beforehand, is to experience the eclipse yourself.
Get a solid tripod and set your camera on video. Record the crowds going “ooh ahhh”. The birds falling asleep and waking up. The street lights and house lights with light sensors turning on. Maybe even a rush of wind as the deep shadow cuts through the summer heat.
If you will only be in a partial eclipse zone, remember that every little spot of sunlight that filters through the trees or shines through the cord lift slots on a set of window blinds will be in the shape of the eclipse – like a thousand pinhole eclipse viewer boxes.
JCT ·
For anyone still “on the fence” about using a solar filter or ANYTHING else, use a solar filter. It is by far the safest way to go. Last I checked Explore Scientific still had filters in stock based on Aperture size of scope or lens (under $20). They are using materials from Thousand Oaks Optical (who have been doing solar filters for decades – I have their glass filters). For all the safety reasons in the world, get a filter. We also got the larger one to fit over our Canon 15×50 binoculars.
https://explorescientificusa.com/collections/sun-catcher/products/sun-catcher-full-aperture-solar-filter
Daryl ·
Well, I’m late to this discussion. The fear mongers here are greatly appreciated for their concern about our precious eyesight. It isn’t worth the permanent damage that can be done. I question their knowledge and as so often happens the internet confers expertise on many who read and then pass the knowledge without any experience. Firstly, two filters stacked always degrades image quality, test it yourself, that is why the variable ND filters are often horrible. Secondly, I’ve used both 10x ND and IR filters to photograph the sun without damage to either my eyesight or the camera/lens. Use a EVF, not an optical viewfinder, cover the lens when not shooting and all is good. Most digital cameras have strong IR filters in front of the sensors, that’s why they have to removed for everyday IR unless you want to shoot 1/30 sec at f1.4 iso 6400 at noon in the summer. Thirdly, ours eyes are not delicate, I’ve starred into many sunrises and sunsets without damage let alone all the times starring into the sun while driving. But please do your own due diligence with this subject, your eyes are very precious….I’m no expert, just reporting my own findings.