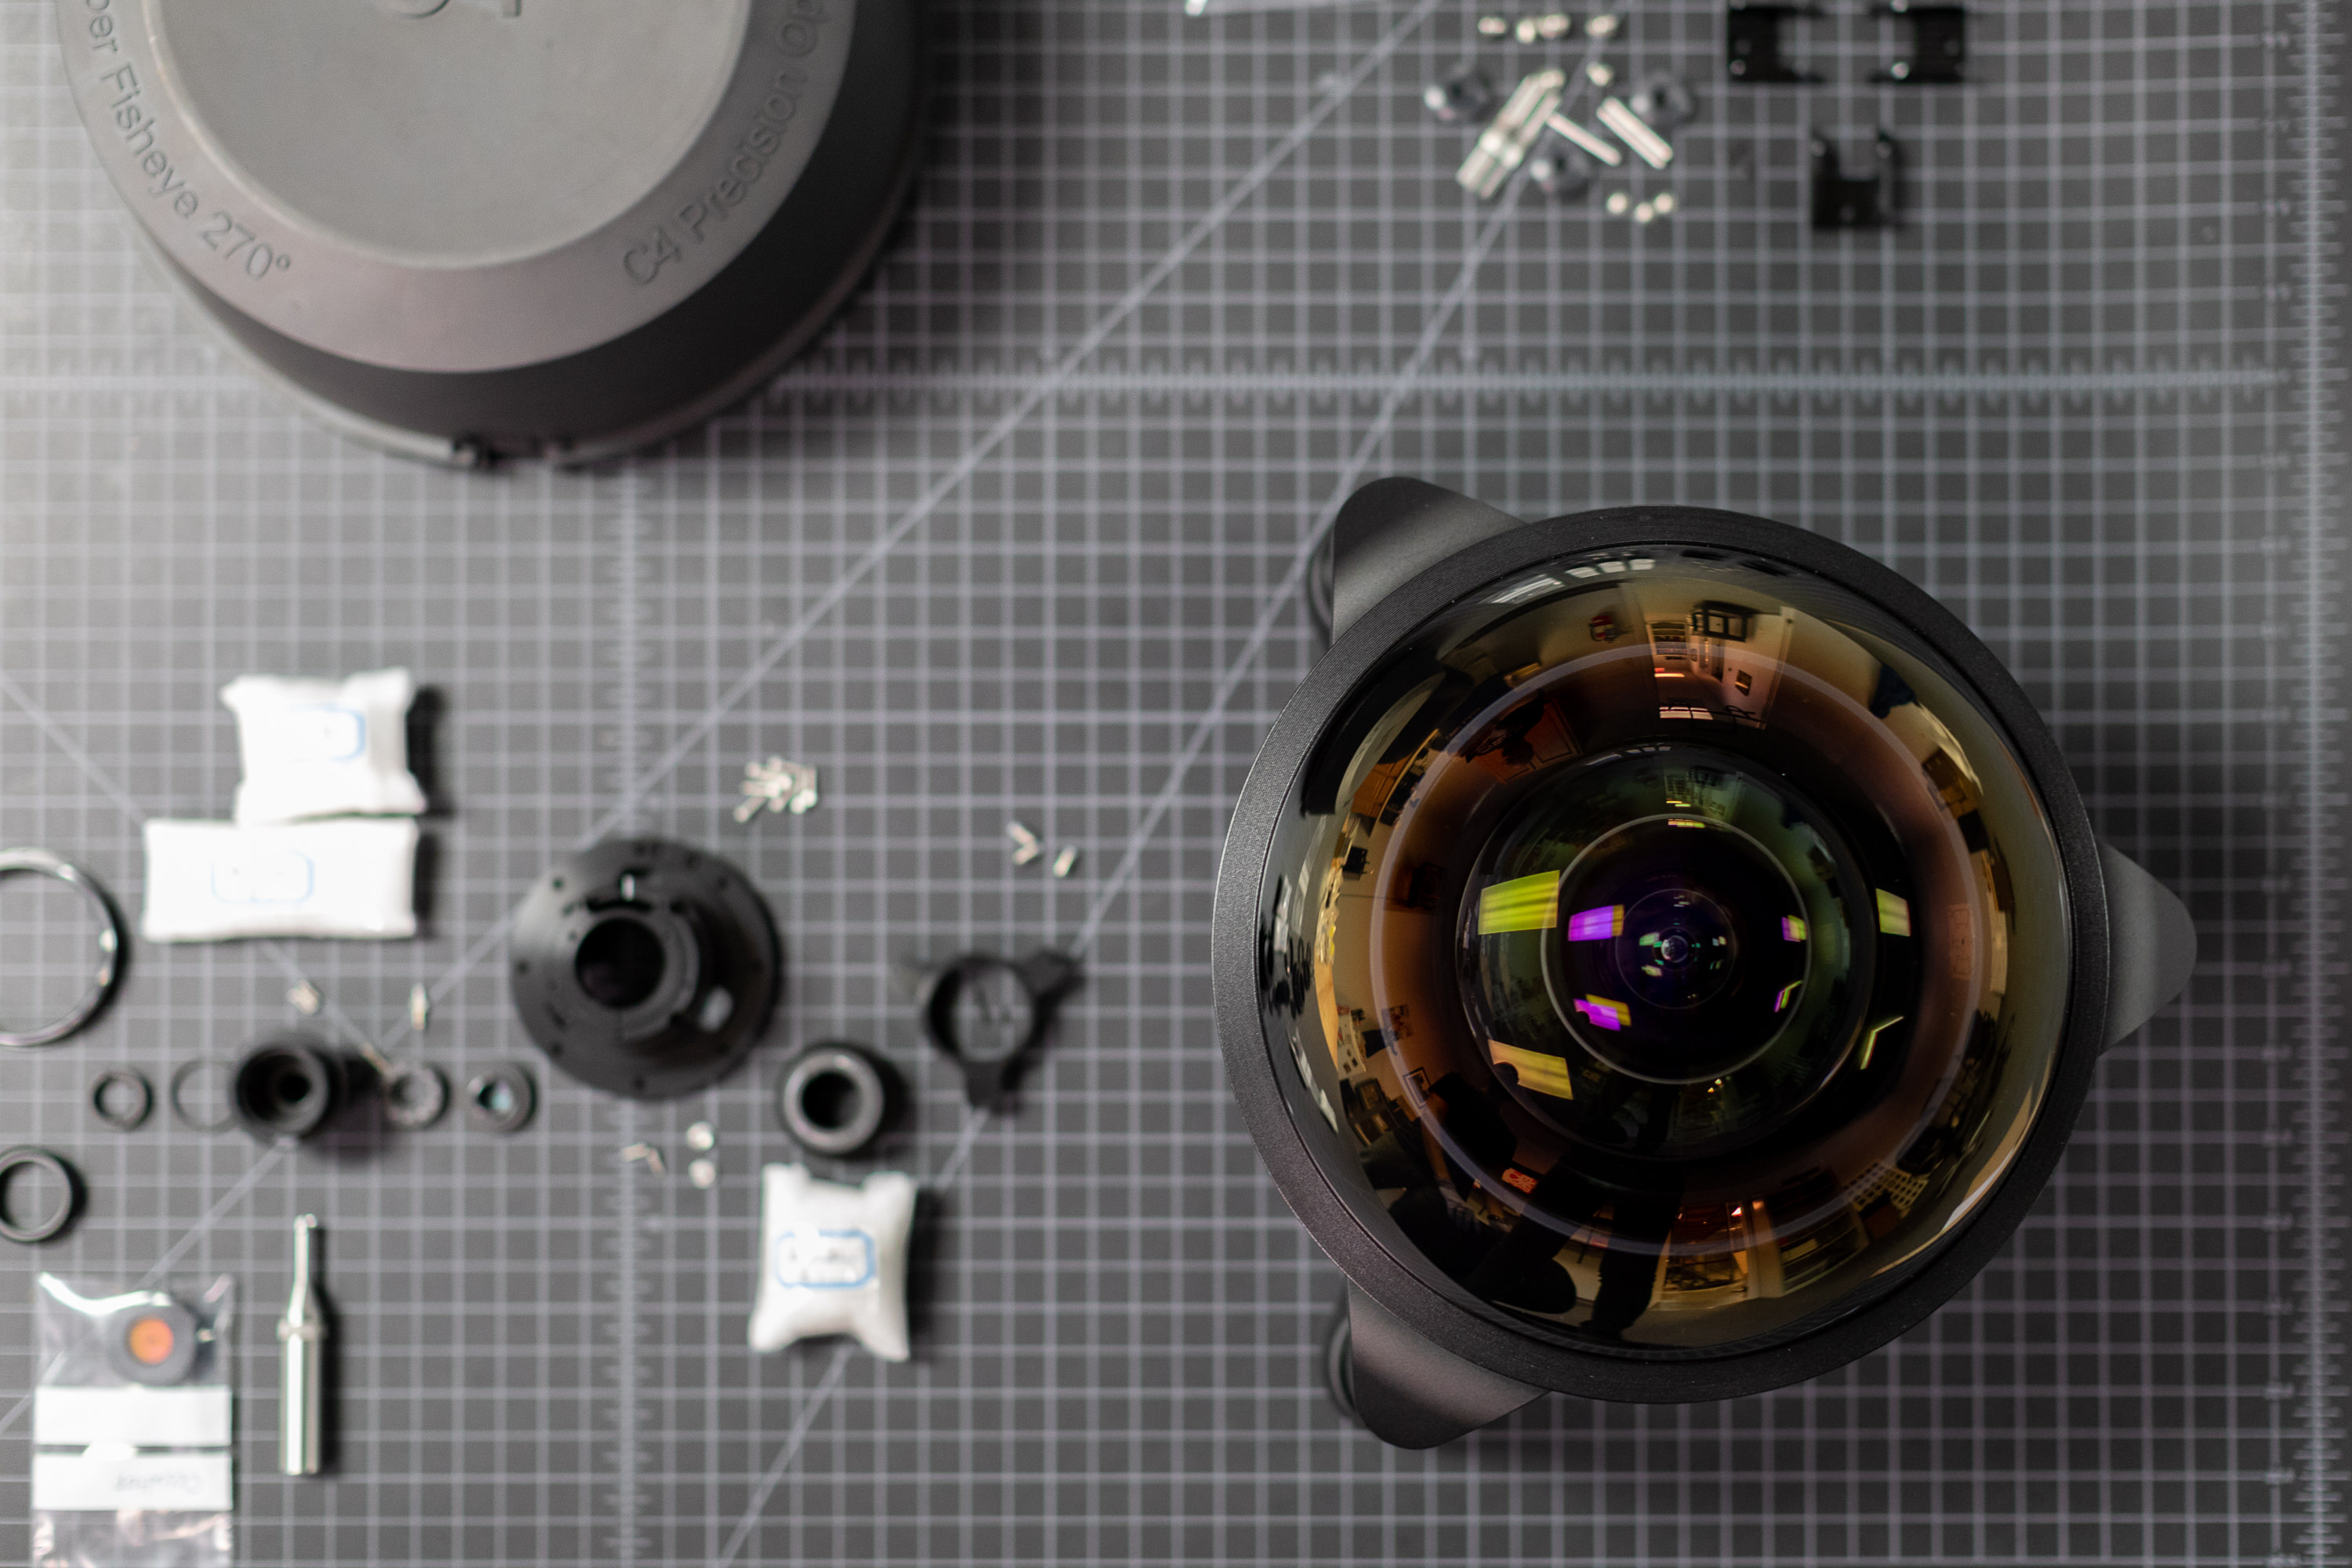
You guys have watched us gut a lot of lenses and cameras over the years. So I thought it would be fun for you to see us put one together from scratch. Compared to many of the lenses we’ve taken apart, this is all mechanical lens is rather simple: no focus motors, image stabilizers, etc. But even a simple lens is a very complex structure. This post will probably give you a good idea of how much mechanical design is required to make even a very basic lens.
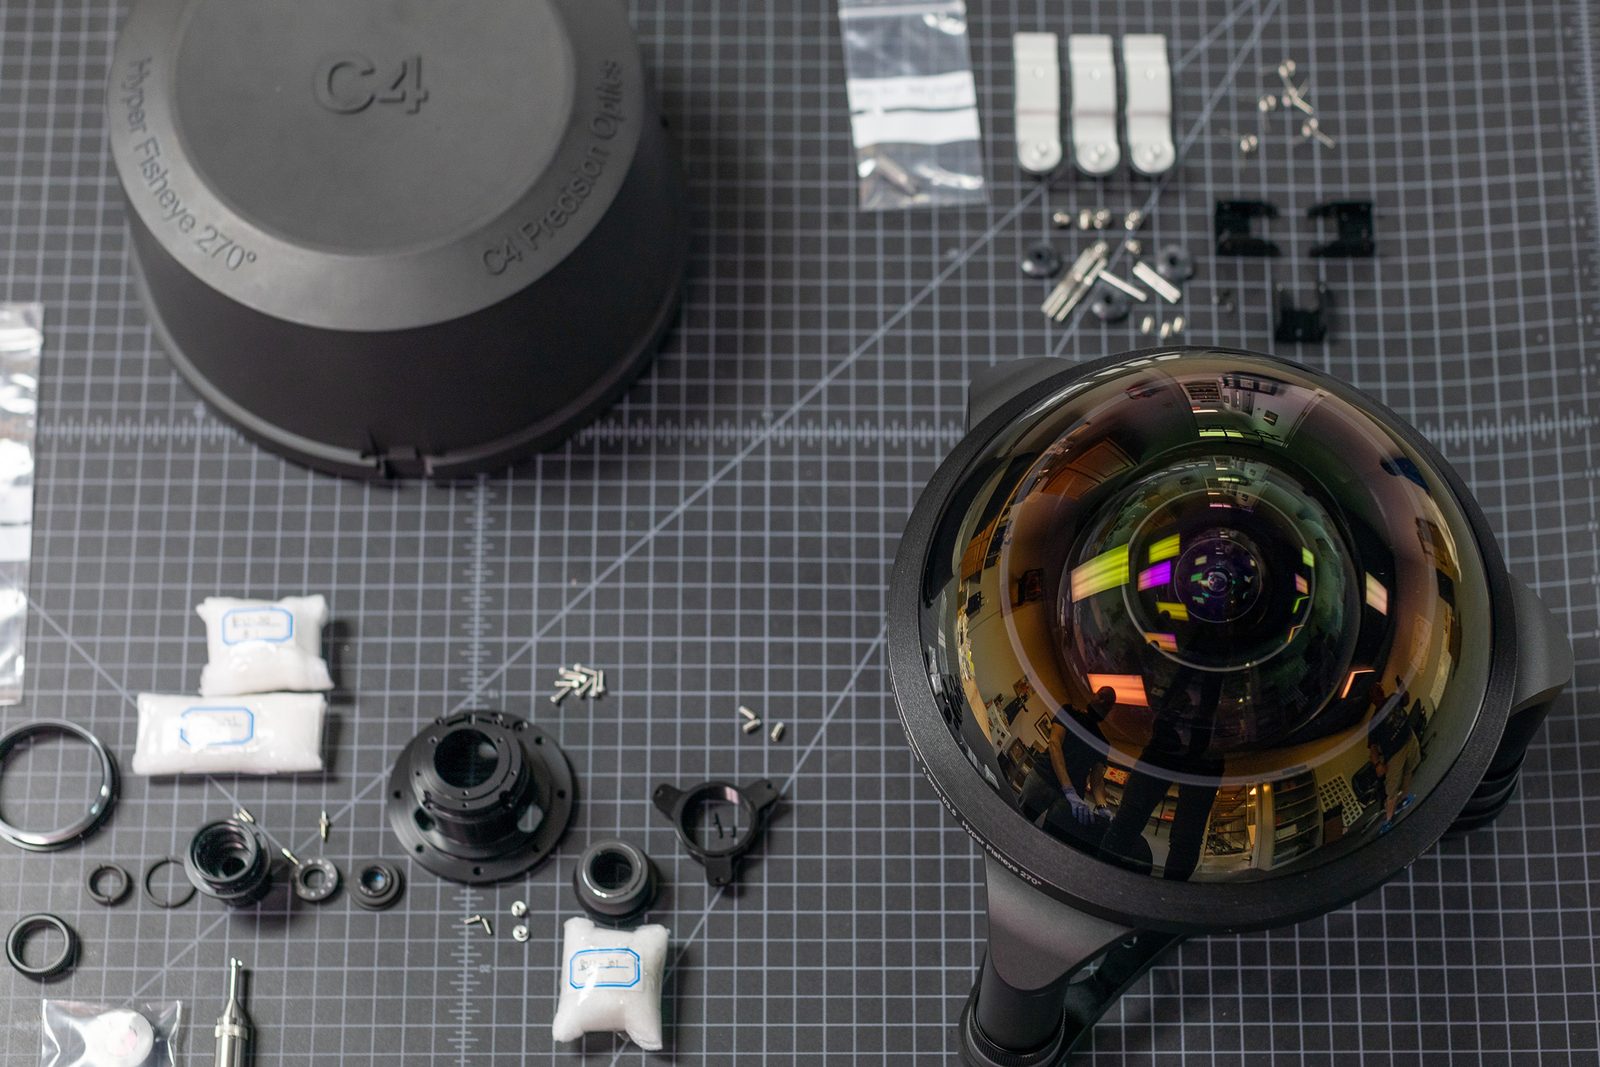
The lens is also unique; it’s a prototype C-4 Optics 4.9mm f/3.5 circular fisheye. It’s a massive lens giving a 270-degree field of view, meant for immersive video and specialty shots. To give you an idea of what 270 degrees means, the lens sees behind itself. An ultra-wide 15mm fisheye lens gives a 180-degree field of view while an 11mm rectilinear lens is less than 120 degrees.

The closest thing that’s existed to this is the 1970s classic Nikkor 6mm f/2.8 fisheye, which gave a 220-degree field of view, weighed 5 kg, and can be rarely found for $100,000 and up these days. The C-4 optics lens weighs every bit as much as the Nikkor, but should be far sharper, have less distortion and vignetting, and cost somewhat less than those do today. (‘Somewhat’ being defined as ‘less than half’.)
So let’s put stuff together!
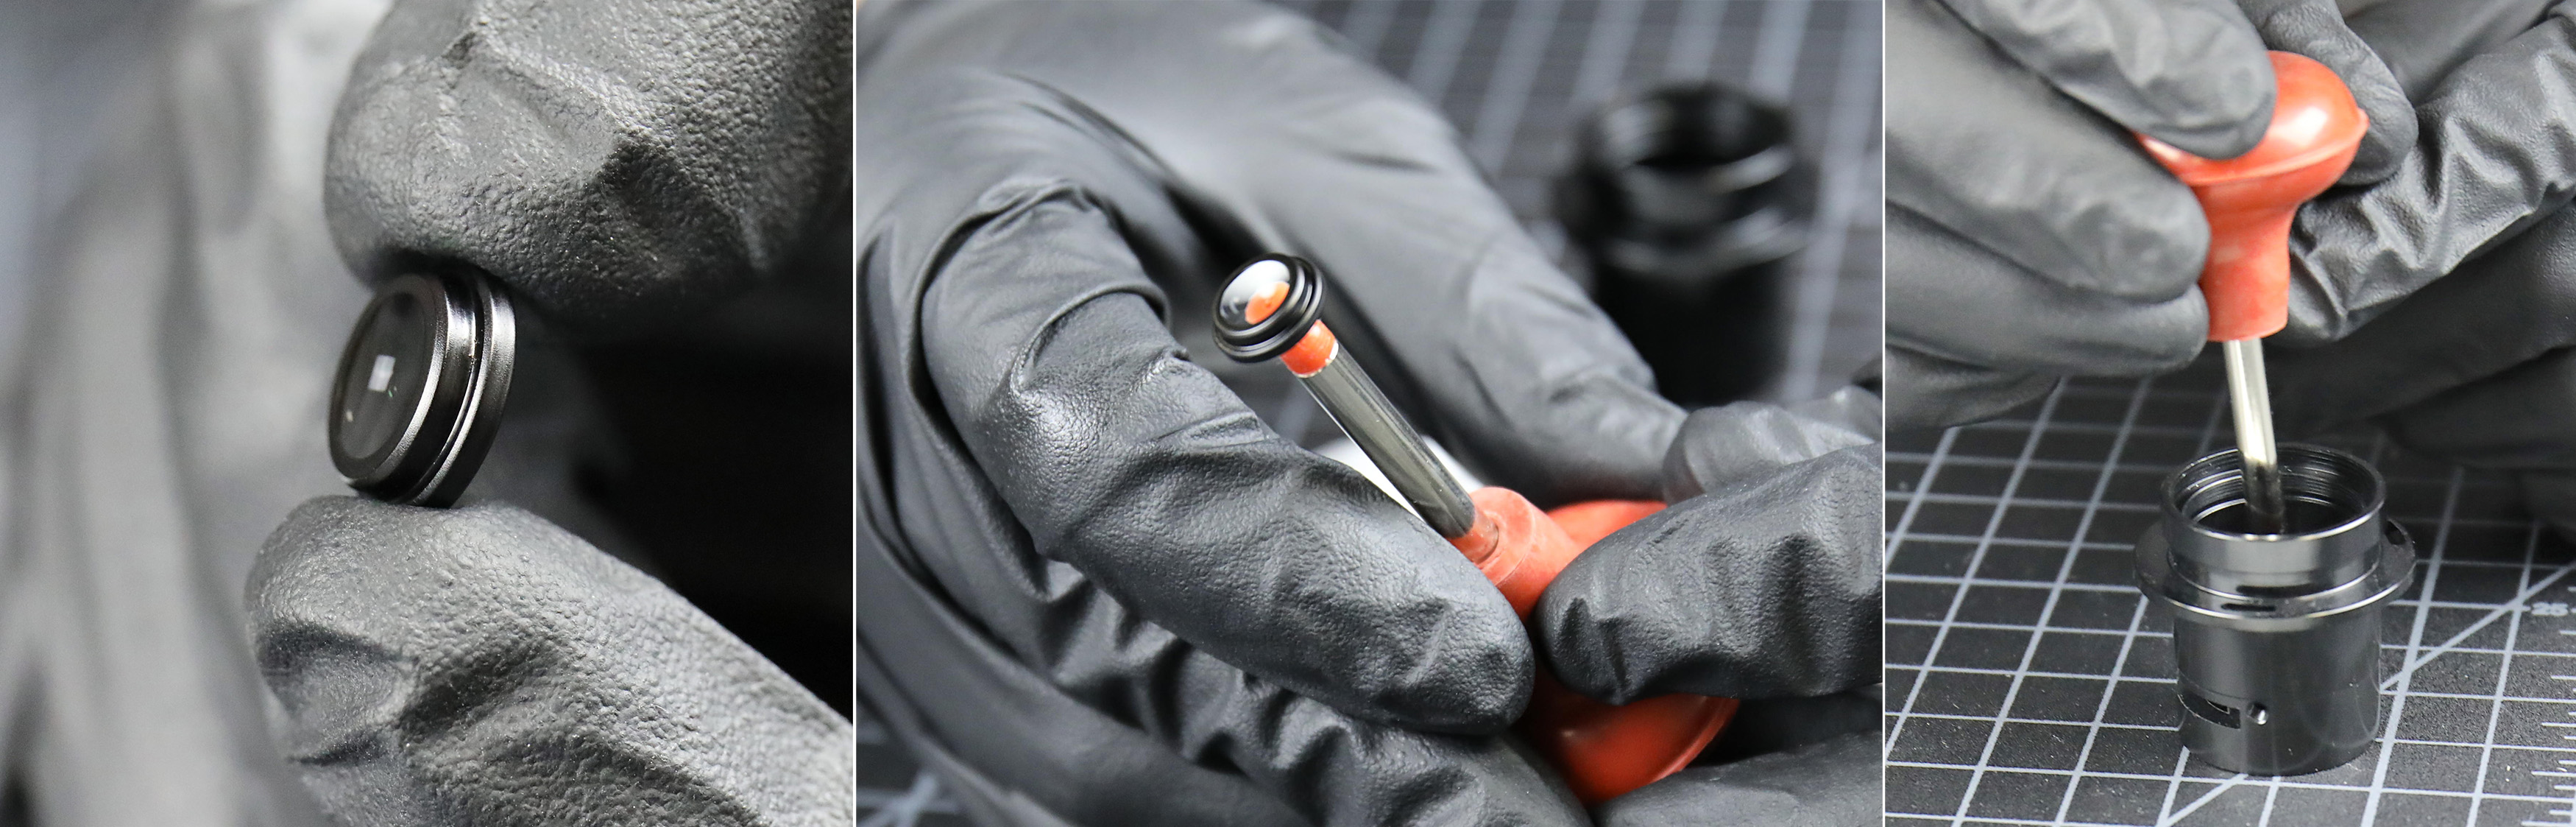
Potting Elements
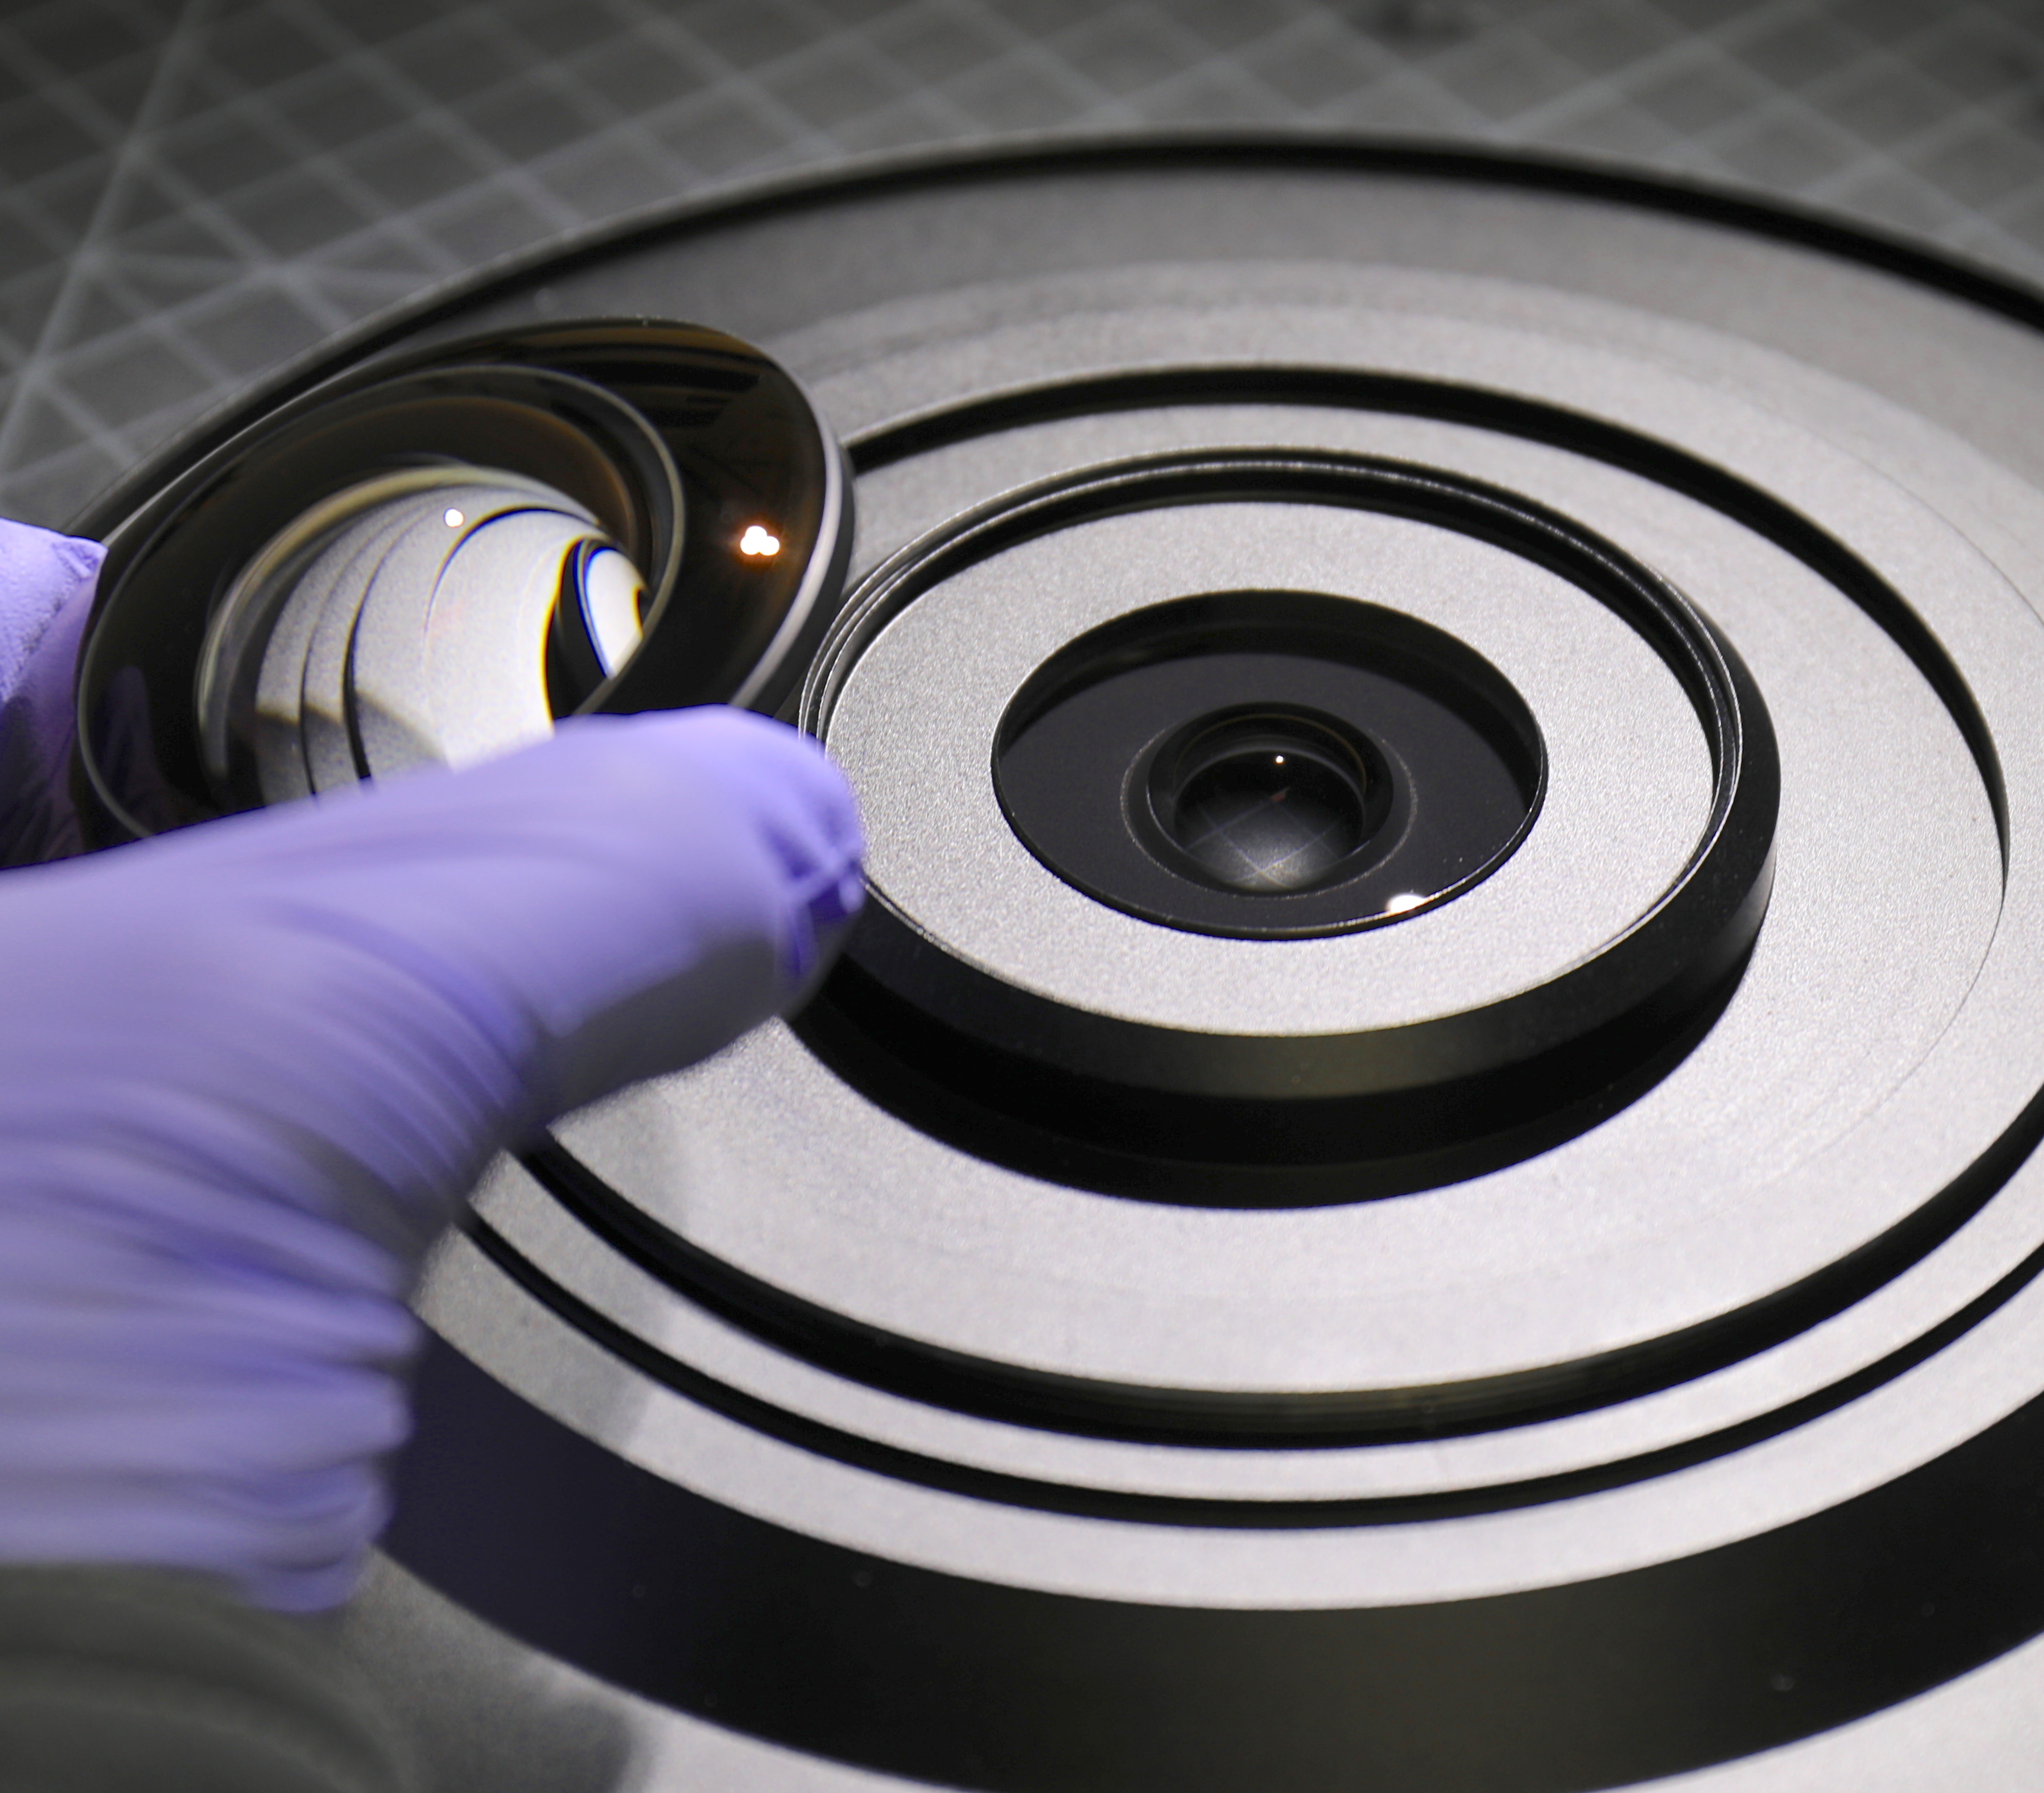
Several of the elements need to be potted (glued) into their metal holders before we begin assembly, then let dry for 24 hours before we really get started. This requires a steady hand, which is why I write the posts and take the pictures while Aaron does all the work.
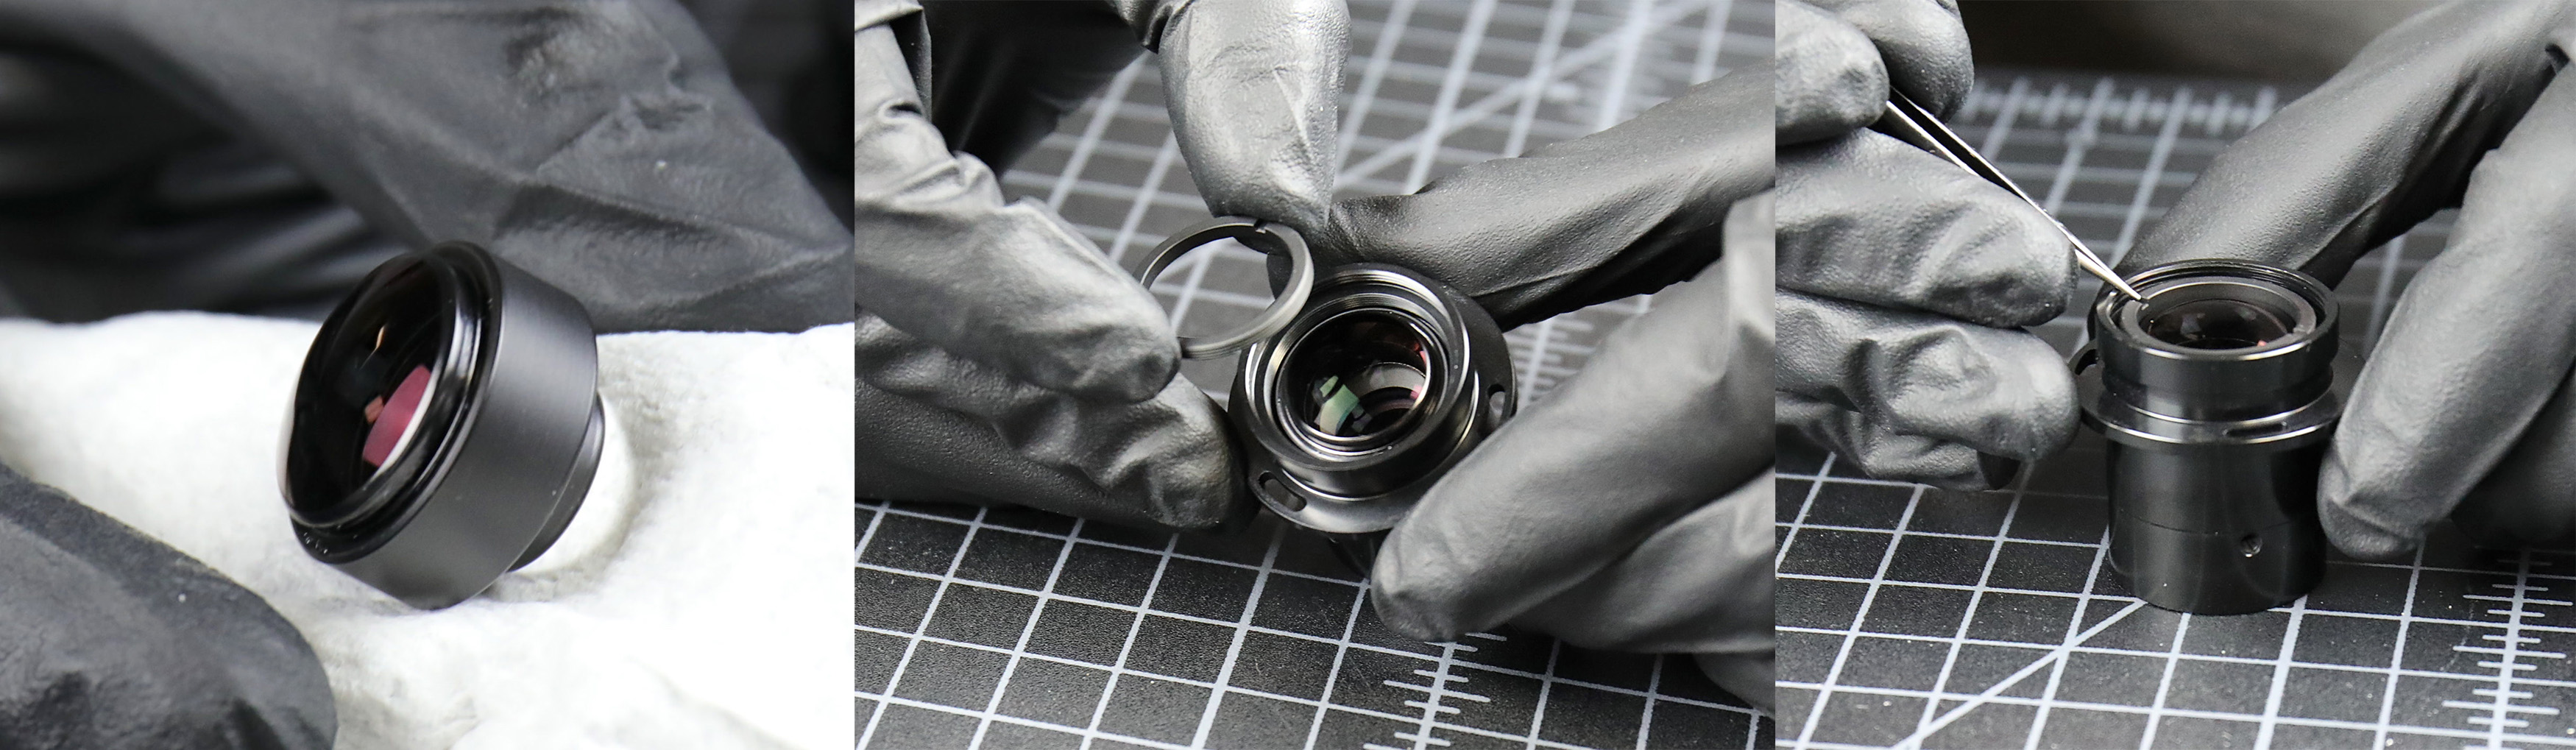
We start with the smallest element in the lens, a tiny one that sits right by the aperture when assembled.
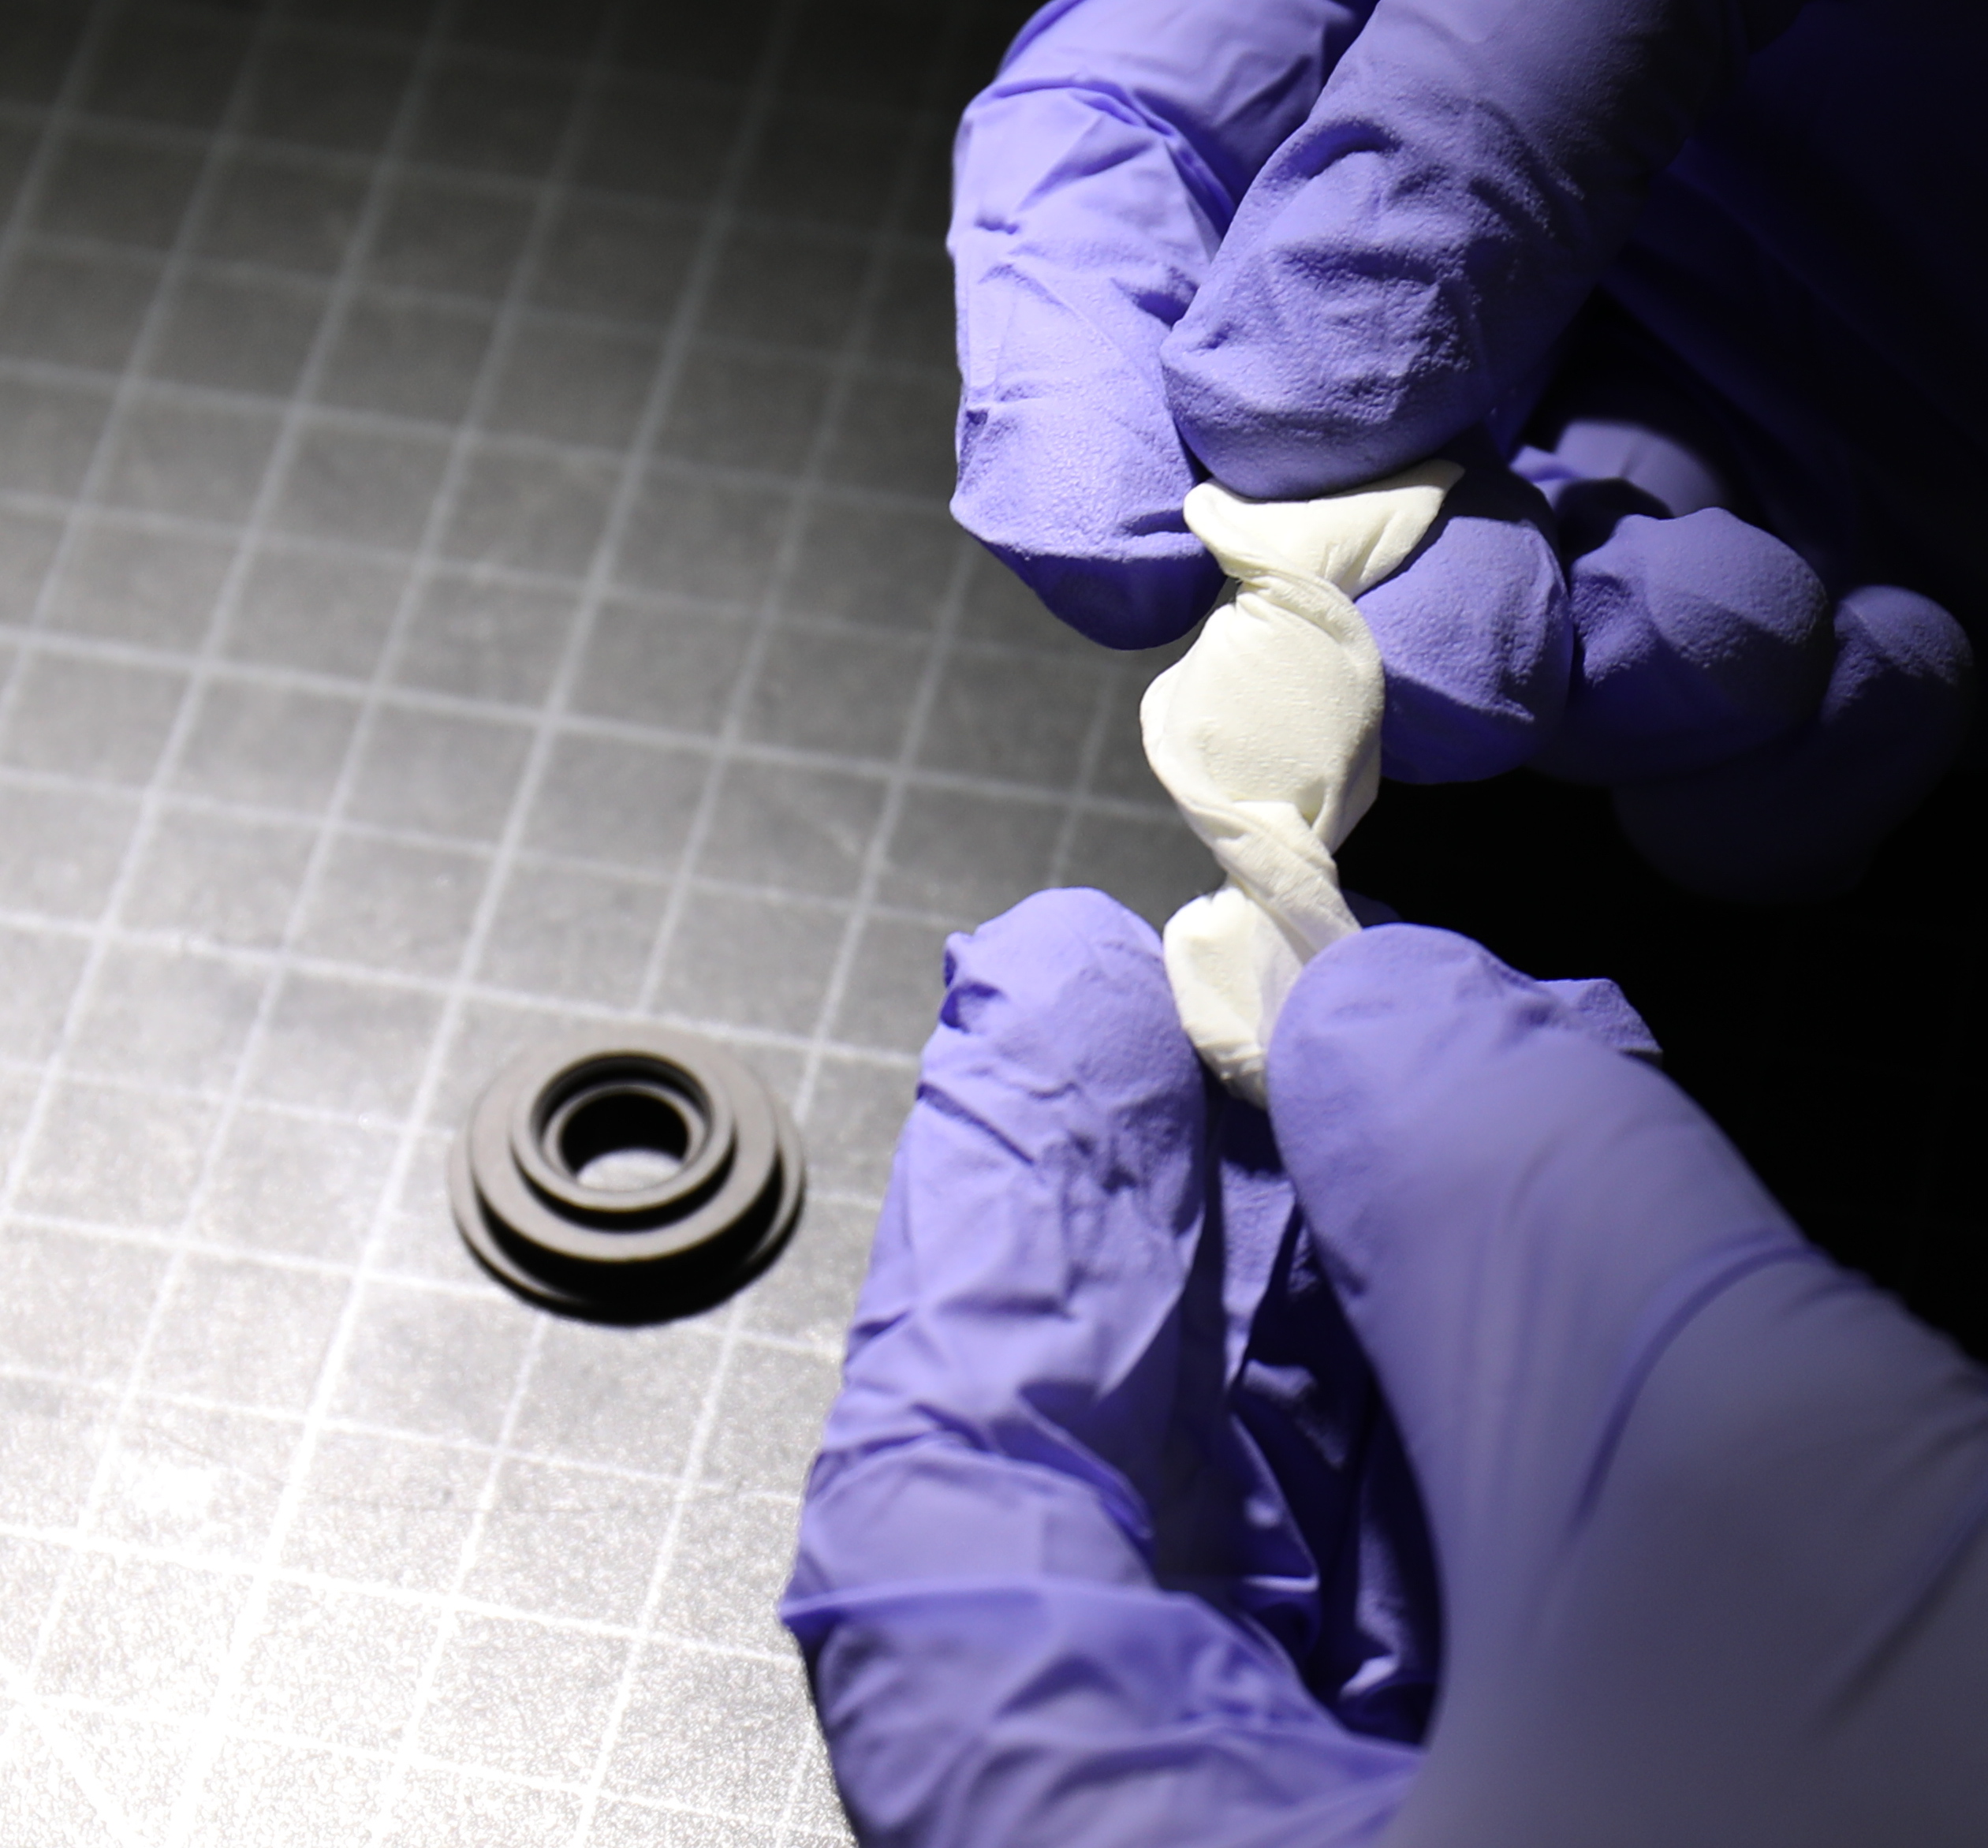

Once the lens is placed in position, a syringe full of potting cement … .

is used to lay a bead around the edge of the glass, cementing it in place.
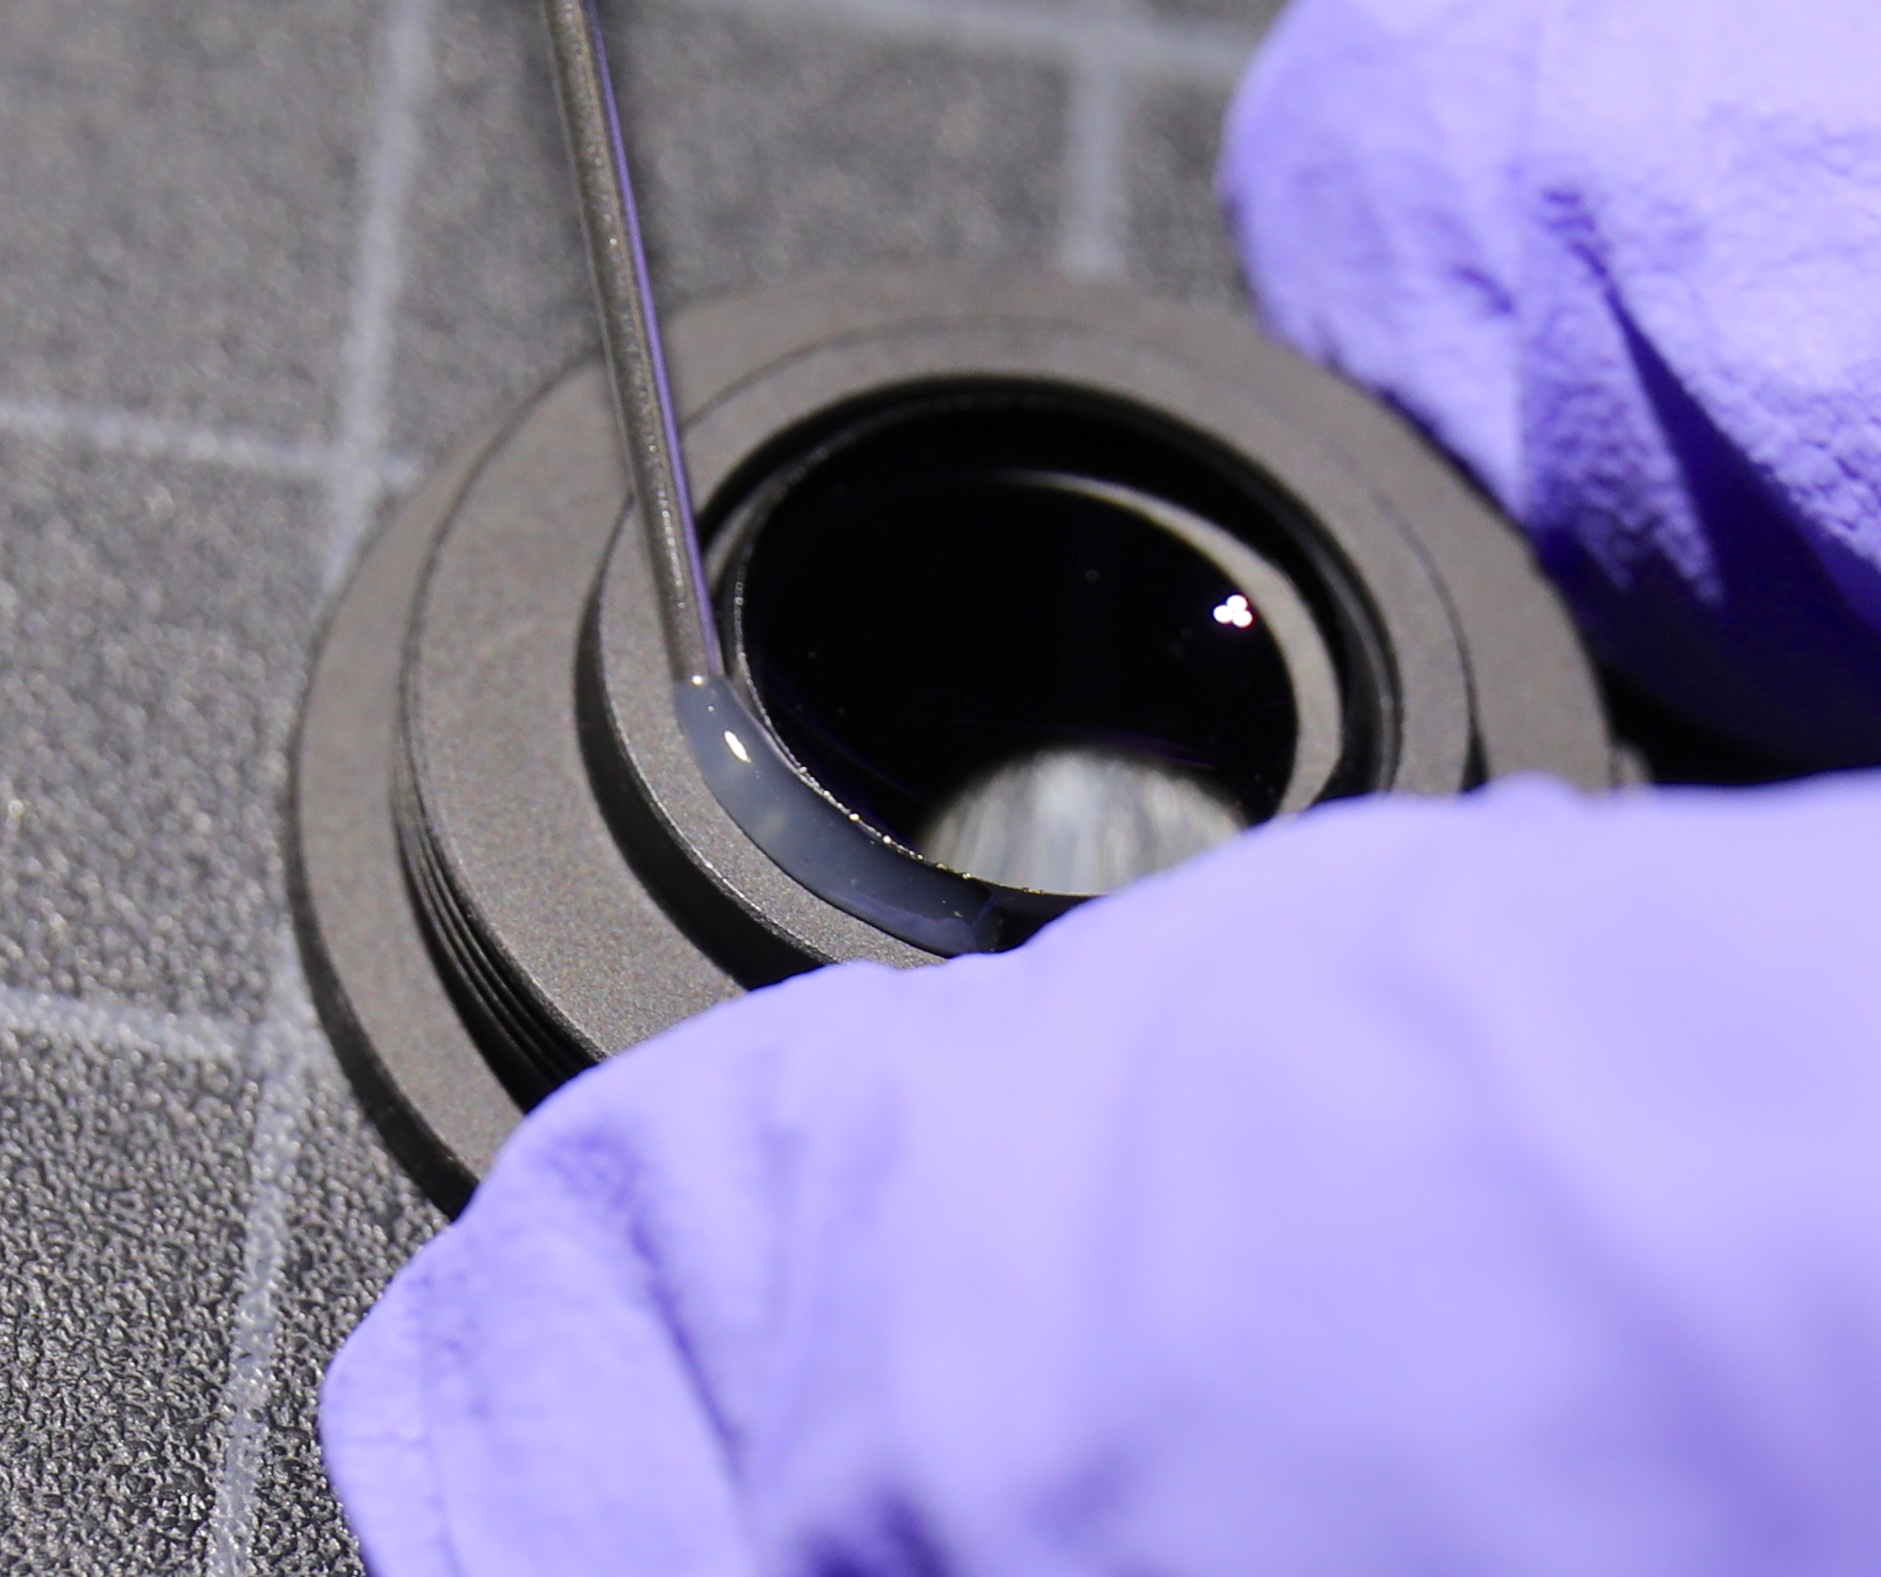
The much larger second element also gets potted. This is a two-syringe-worth-of-cement job. (Yes, everyone, we know it’s dusty. Cleaning comes during assembly.)
The third and fourth (already in place) elements both get potted into the main support plate.

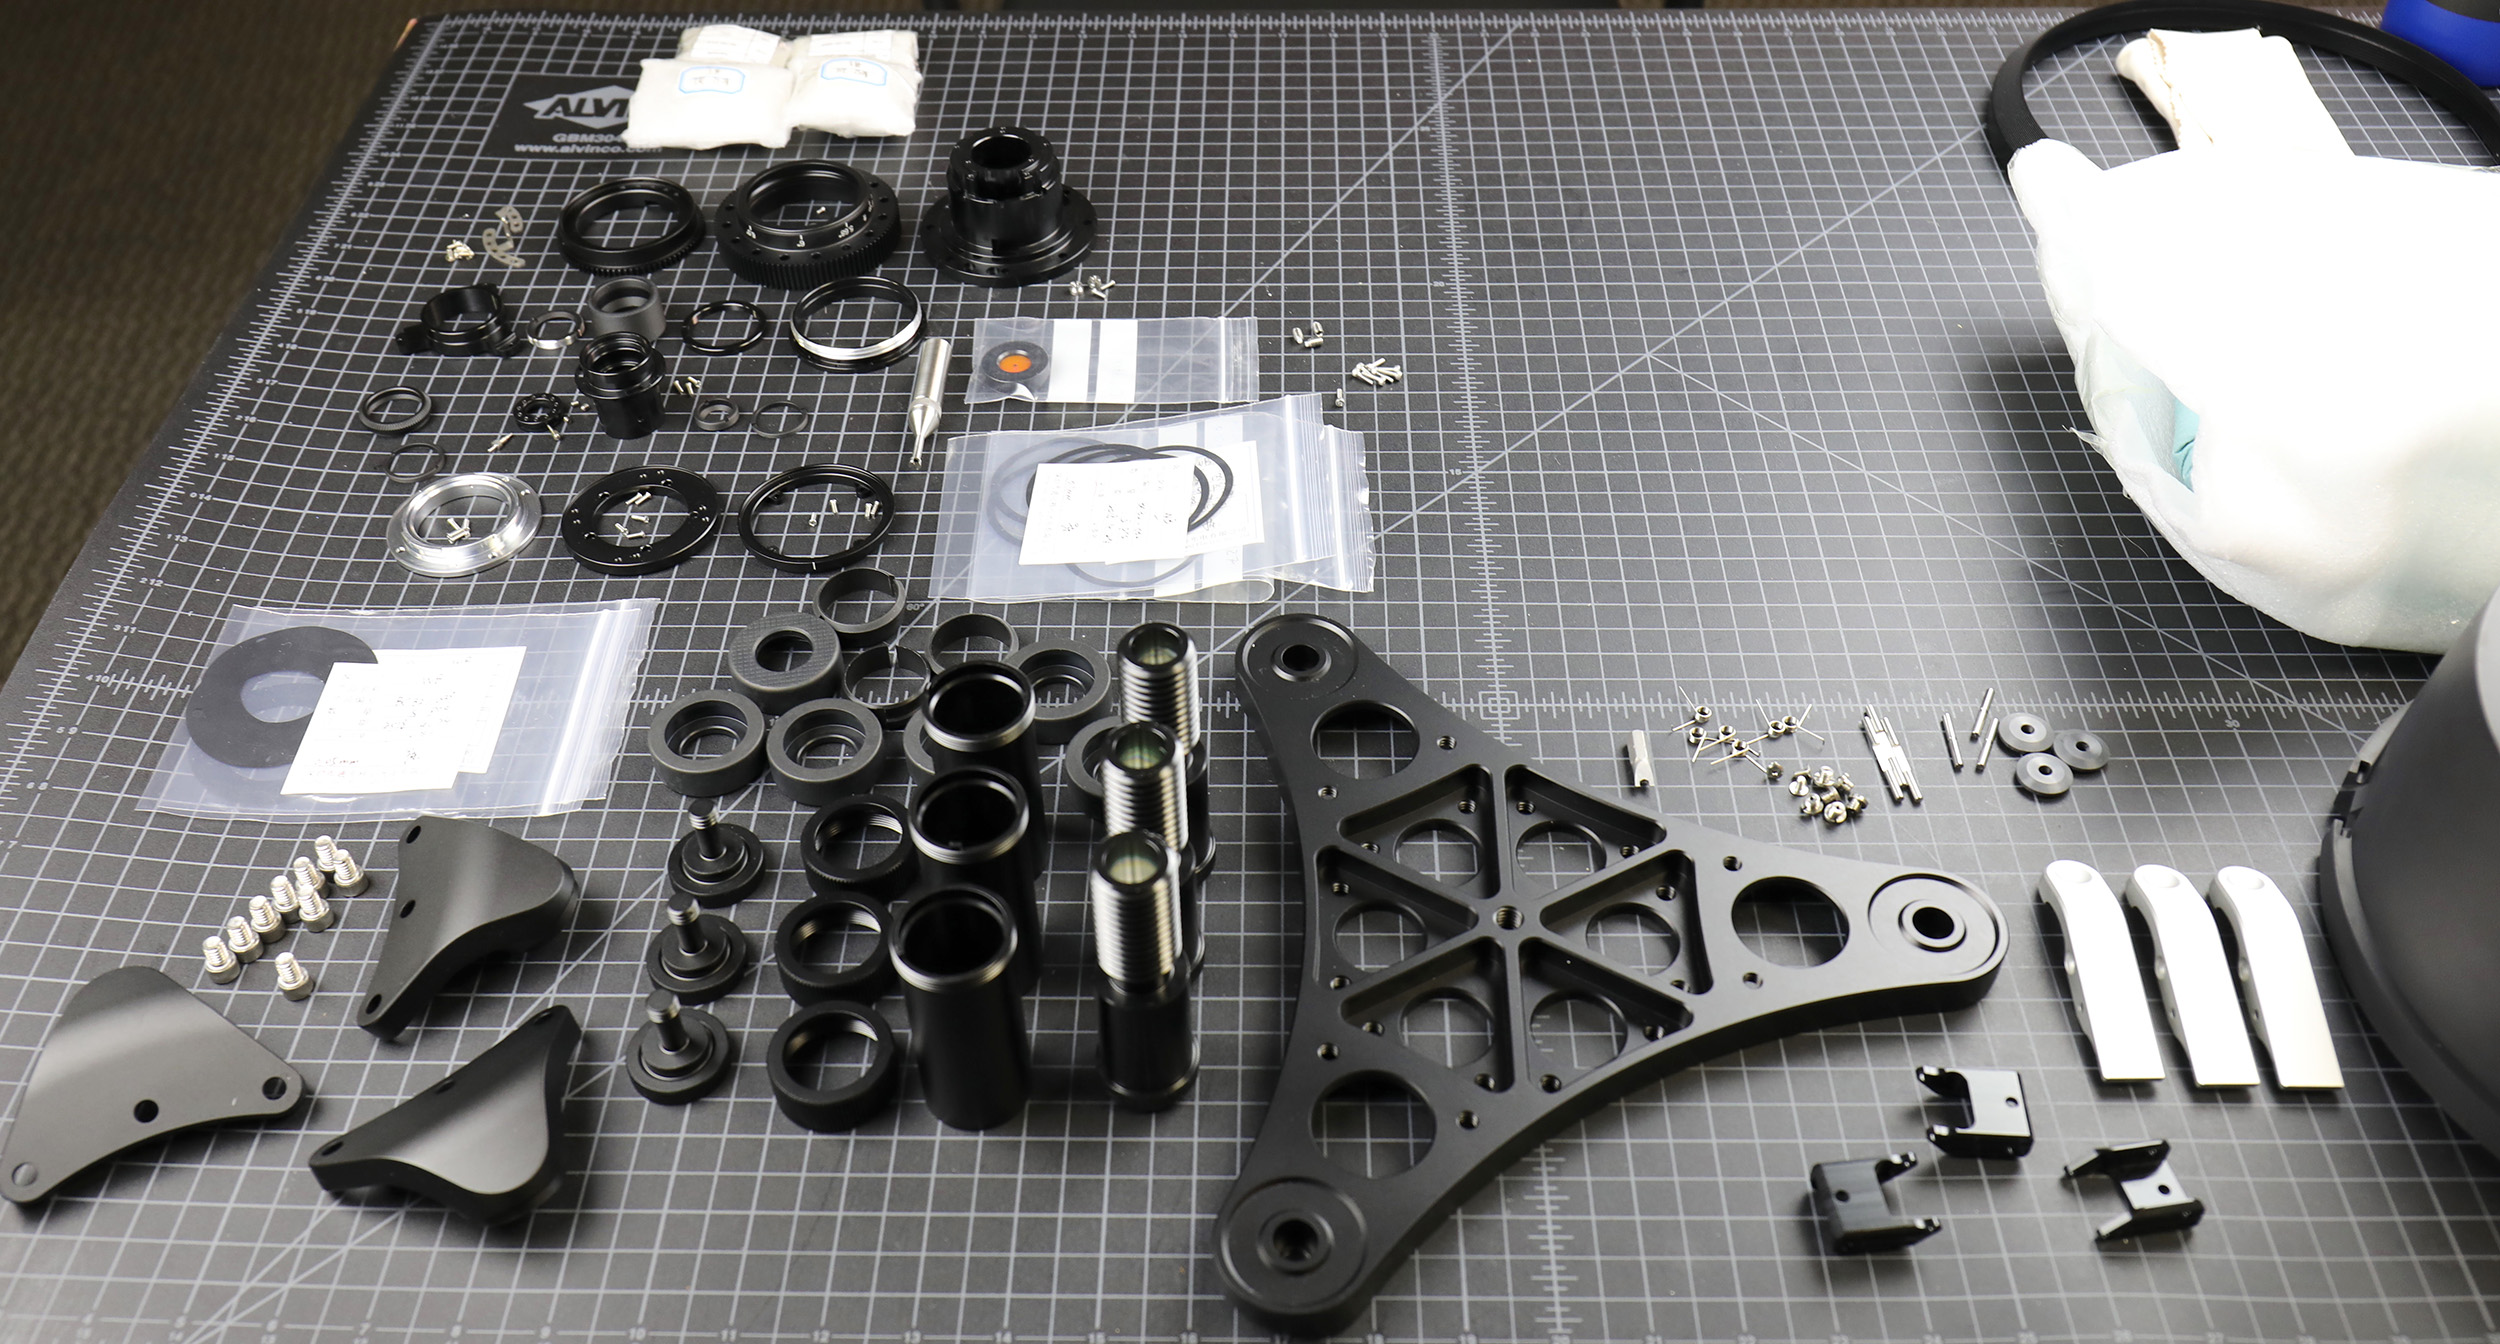
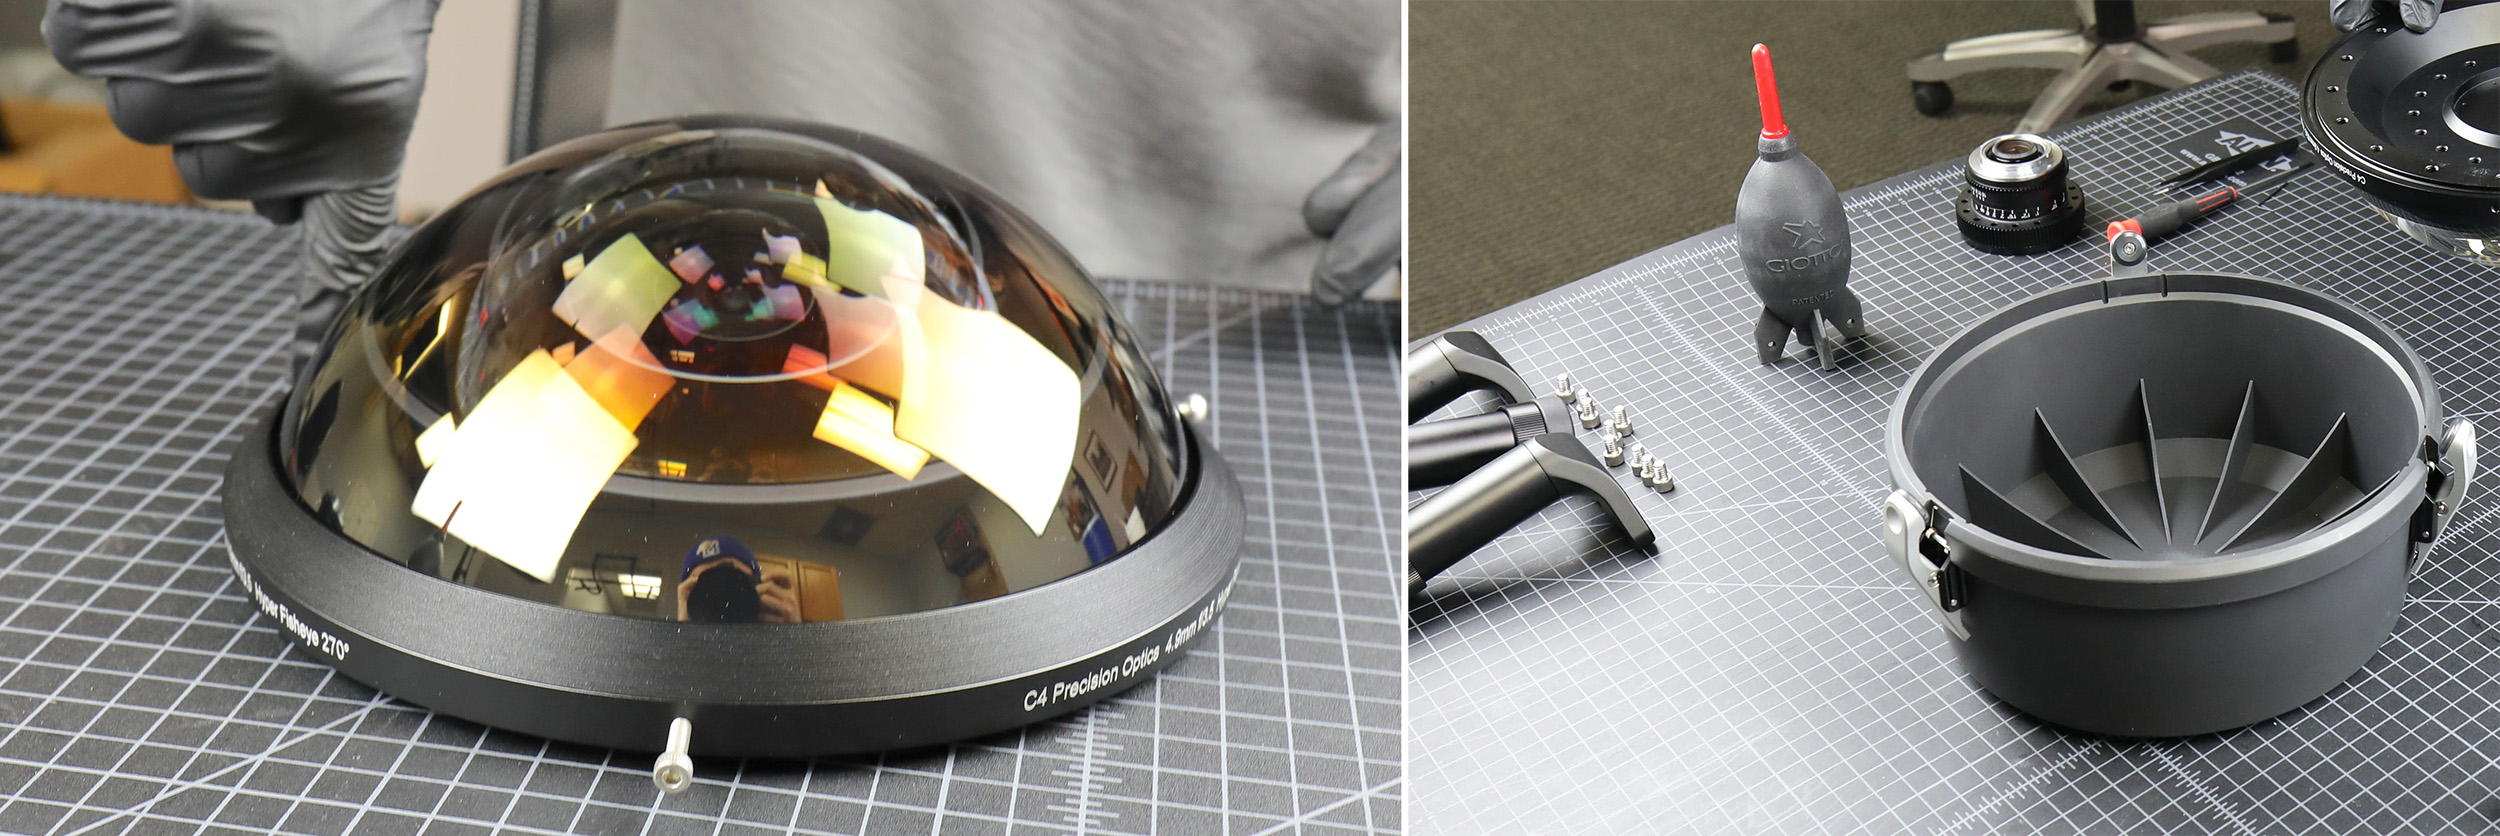
This all dries overnight and then we get on to the actual assembly. Aaron laid out the parts for the assembly before we quit for the day.
Base and Cap Assembly
You probably just think of these as accessories, but on a lens of this size, they are critical pieces that took up as much design effort as the lens itself. Actually, most of the parts you saw in the image above are for them.
Each extending leg/handle is six pieces.
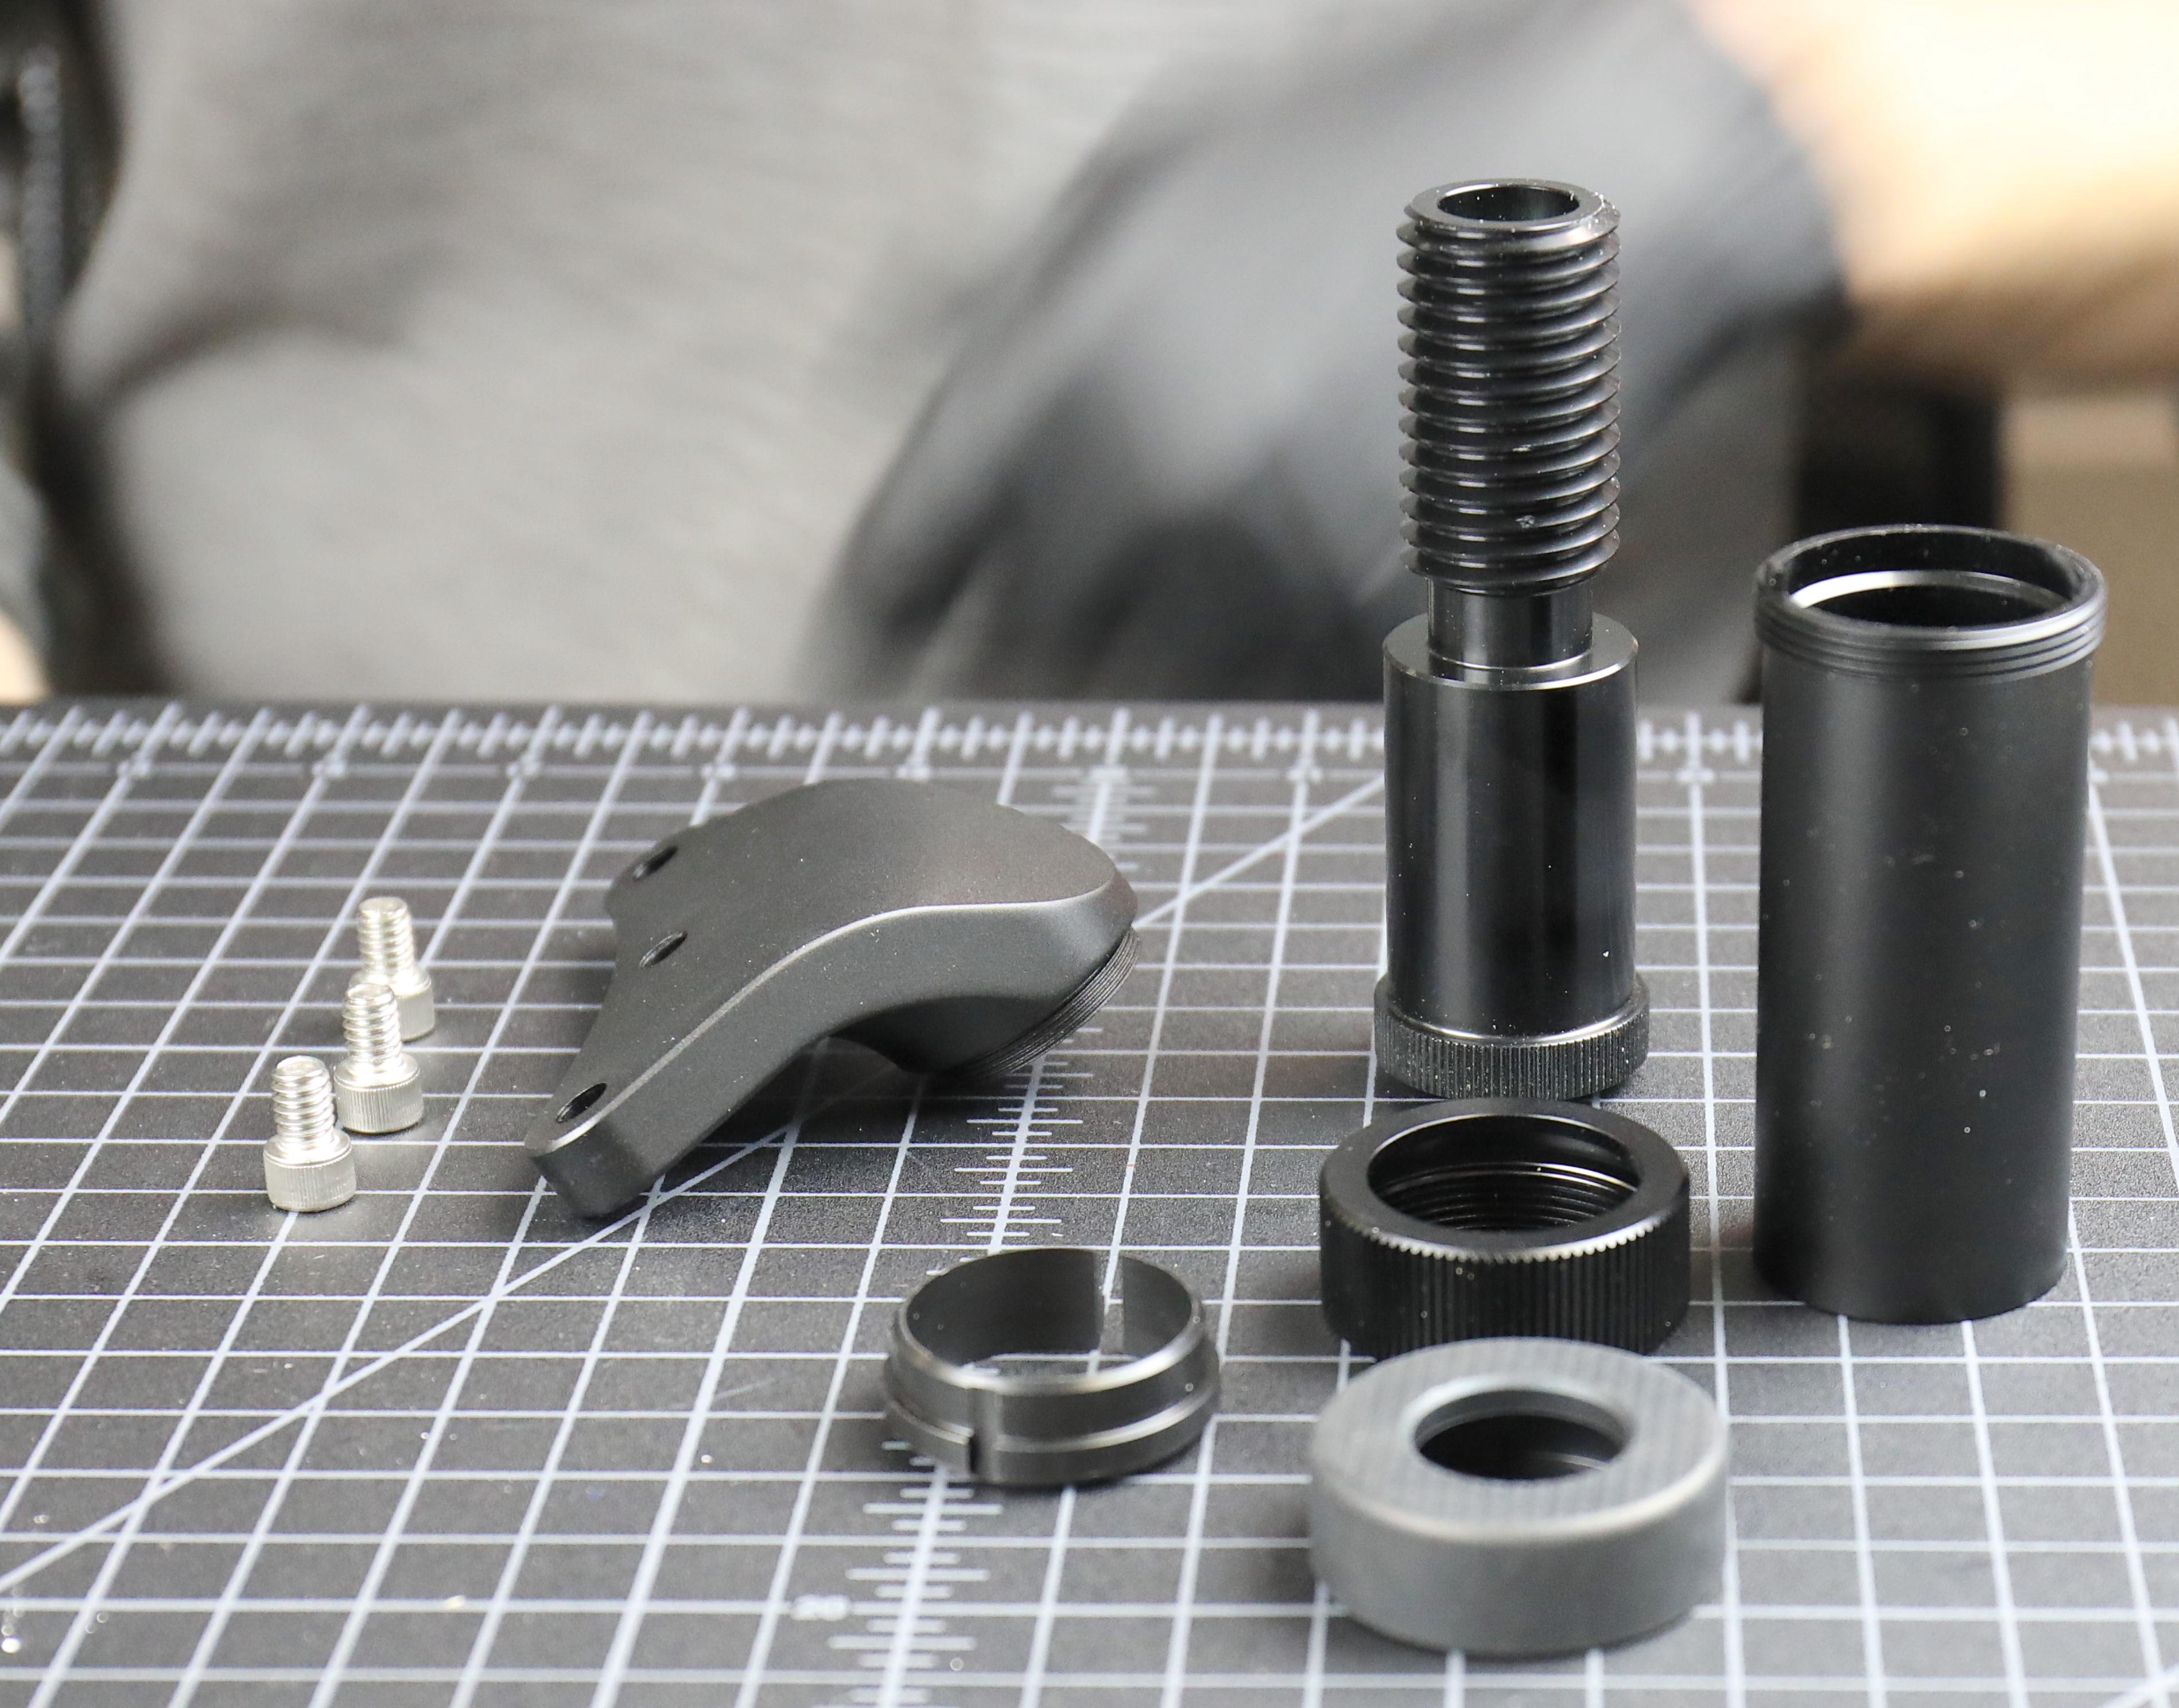
They go together like this: The inner leg threads get lubed, the lock ring inserted, and then the inner leg inserted into the barrel.

After handle’s locking ring is tightened down, the rubber foot gets put on and the leg screwed onto its mount.

The bottom platform just needs its three adjustable feet covered, their rubber bumper added, and then screwed in.

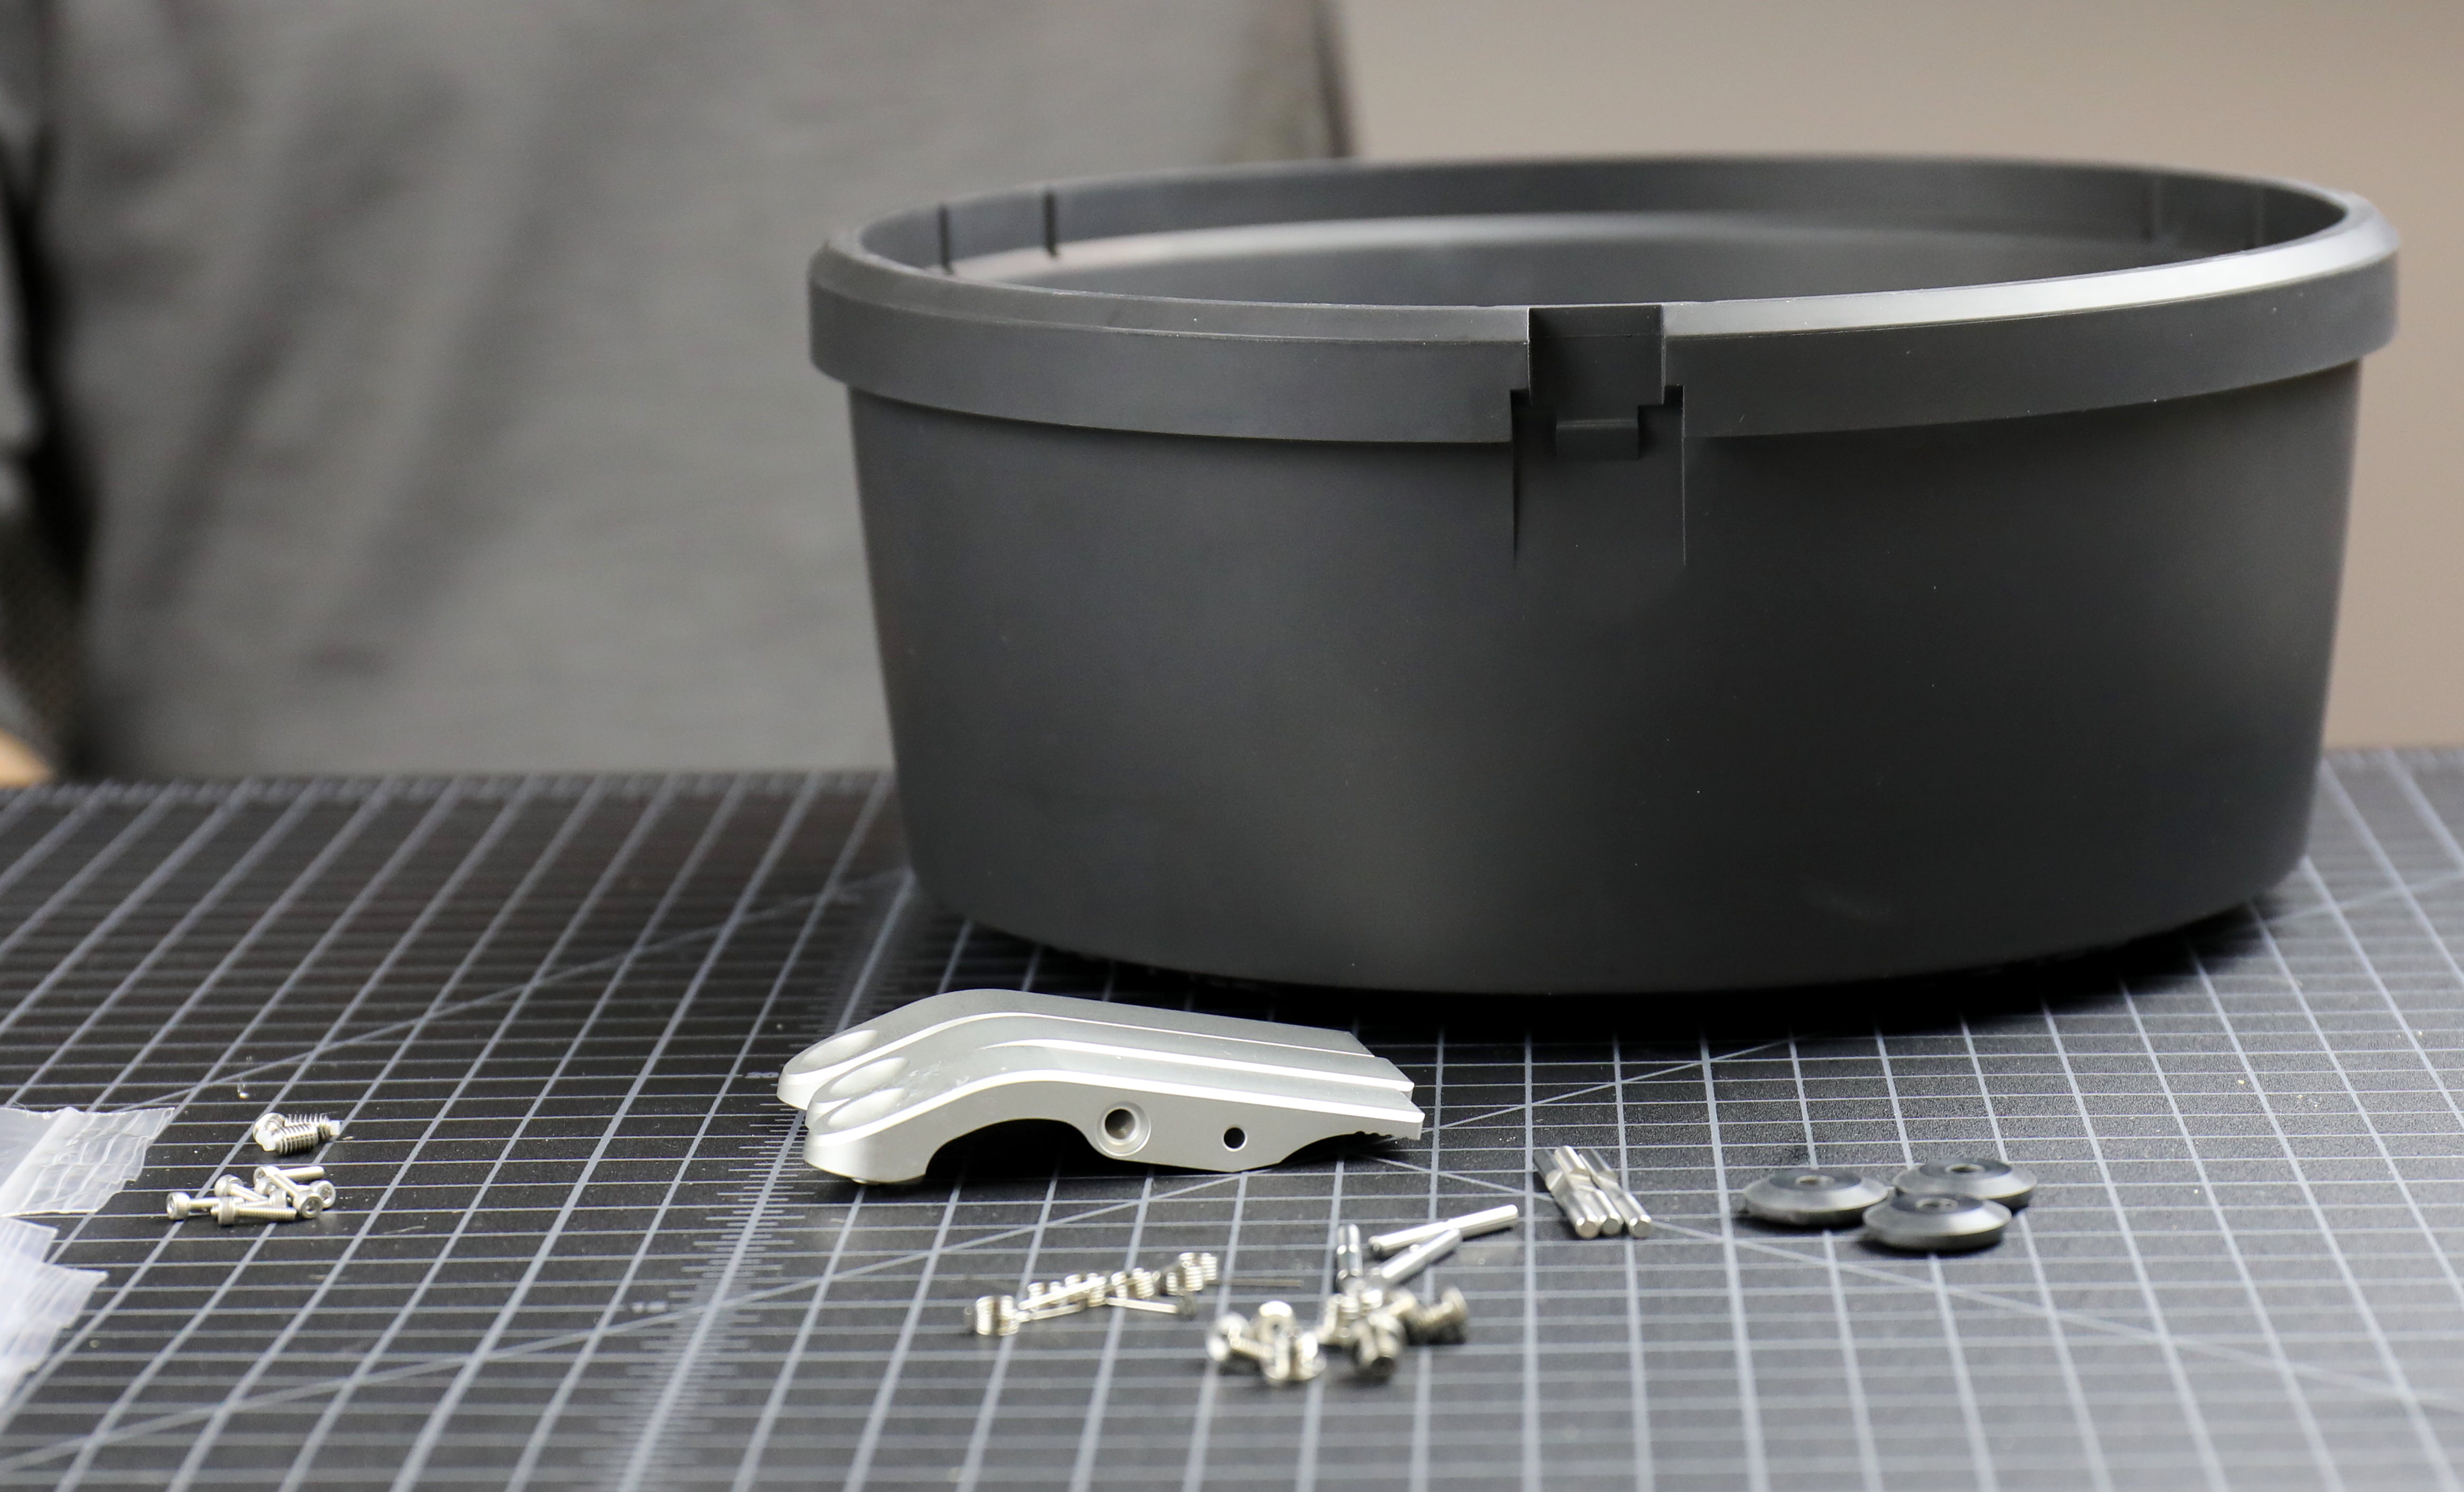
Finally, the lens cap (it really should be called the lens helmet) needs to be assembled. This isn’t just a cover; it has to be capable of supporting the entire lens since that’s the only way to place it face-down to attach cameras, follow-focus, and other assorted gear to it. The cap itself weighs almost a kilogram and has to have air-release vents; otherwise, it can become immovable if it suctions down around the lens. (Yes, there is a story about how we figured out the vents were necessary.)
The latches have a ‘ball-bearing screw’ inserted on each side as a latch-lock, then the latch itself goes on over an inserted rod which is then locked in place with a set screw.

After that, we screw on the rubber stopper, add another rod containing the tension springs, and then mount the latch assembly to the hood. The plastic of the hood is plenty thick enough that it has nice 5mm molded latches to attach the latch rods with.


Now to the Lens
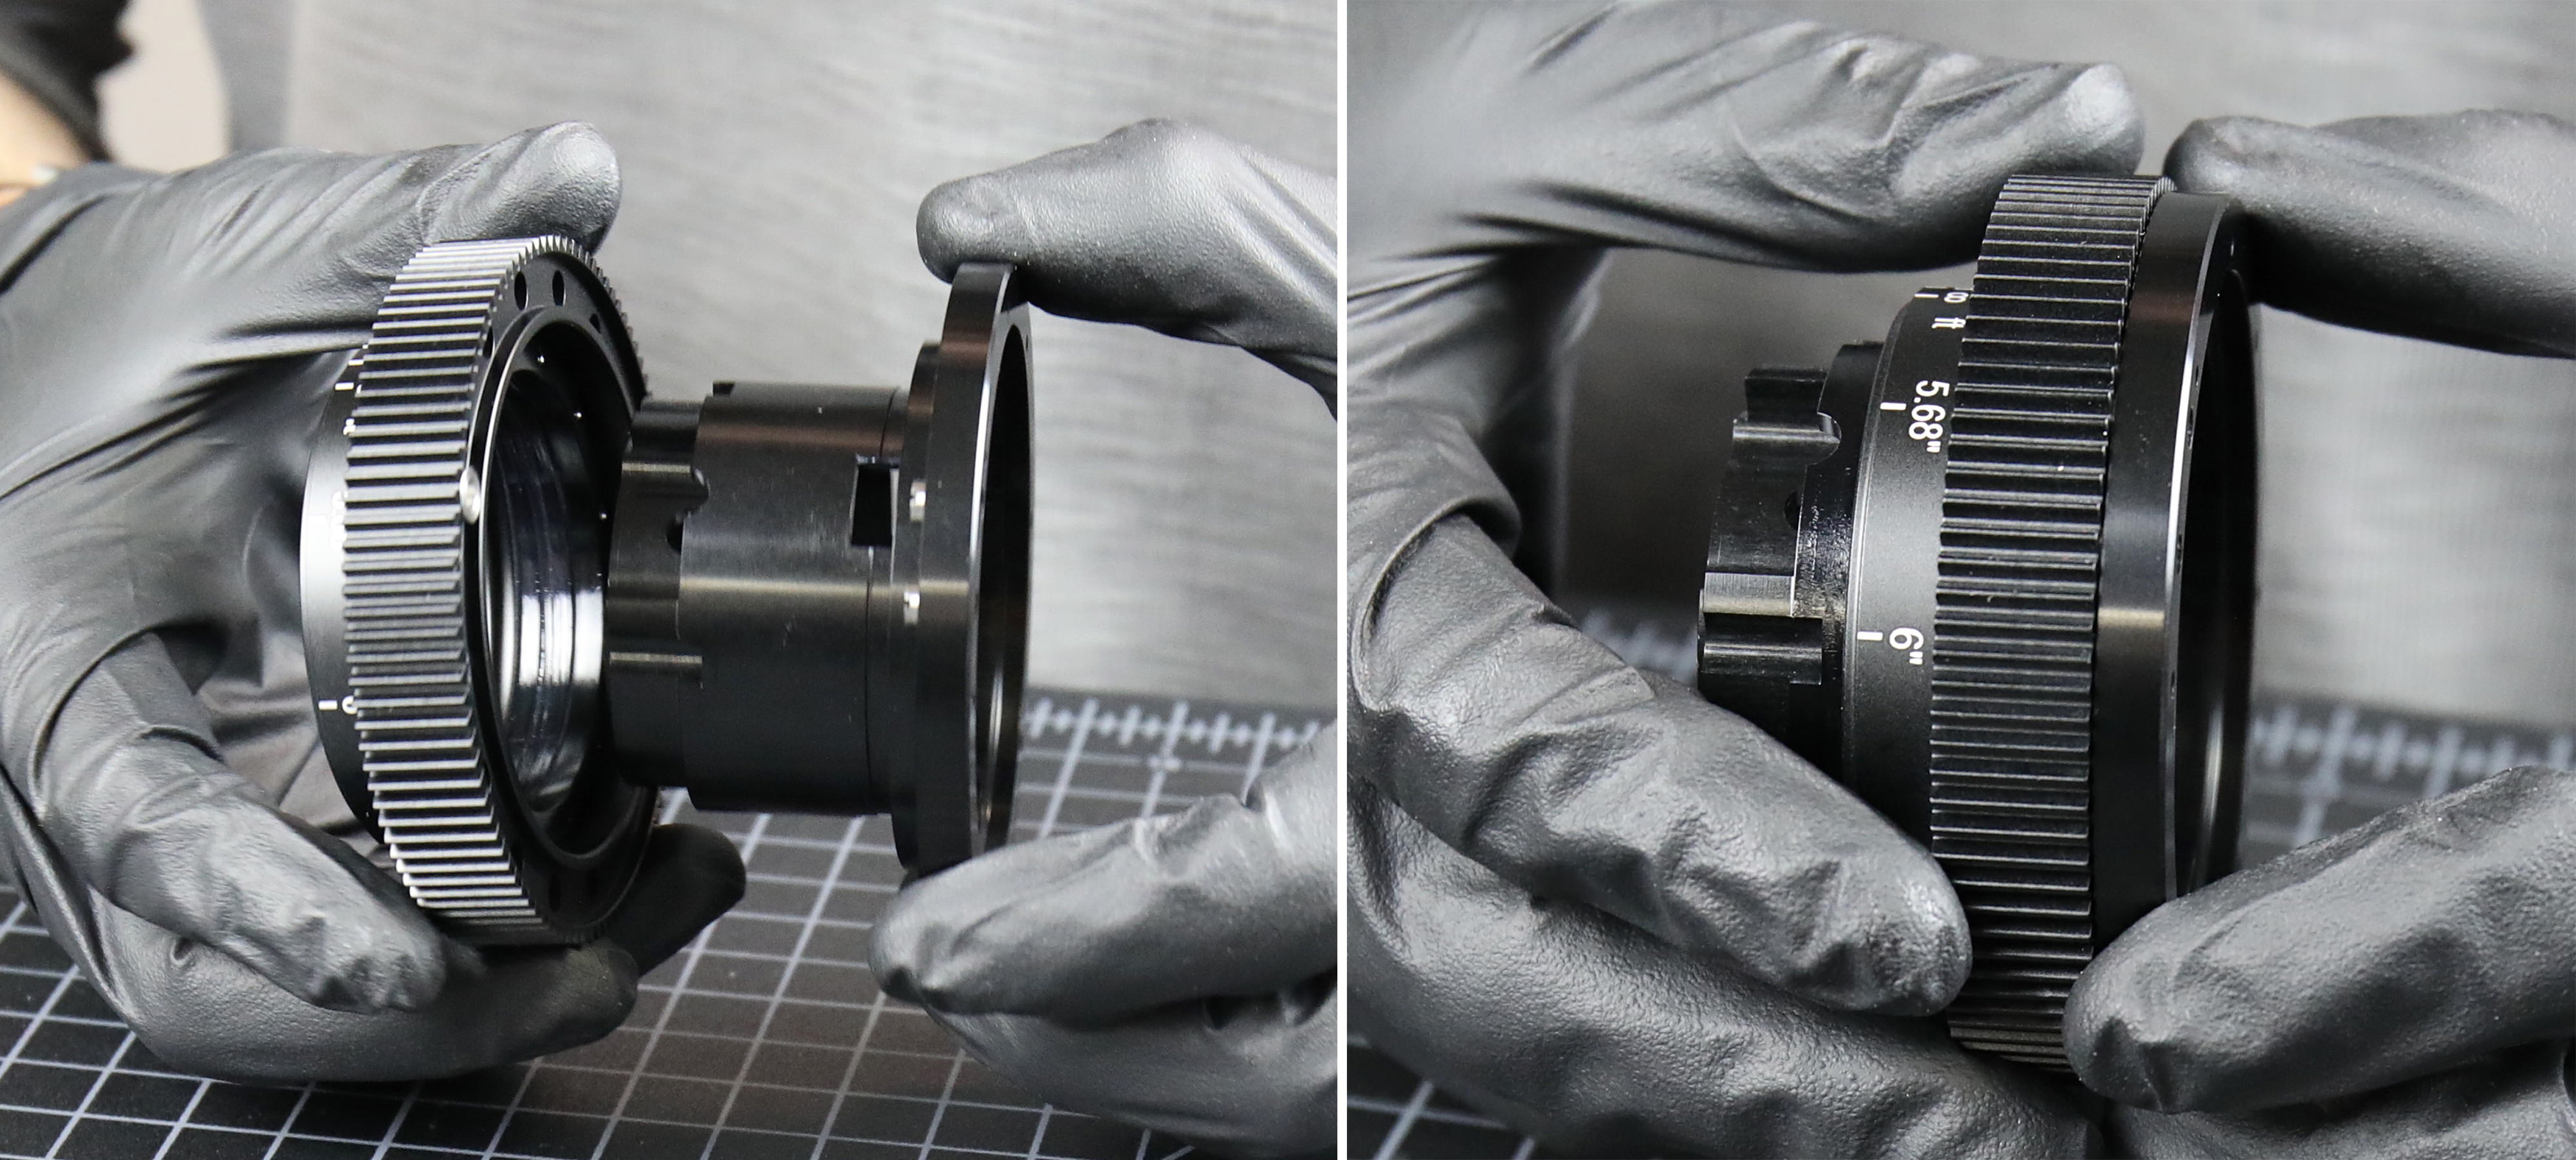
Focusing Barrel
We start with the focusing group, a doublet that comes to us cemented with black lacquered edges.

This gets placed into the larger focusing barrel and an internal retaining ring used to fix it in place.
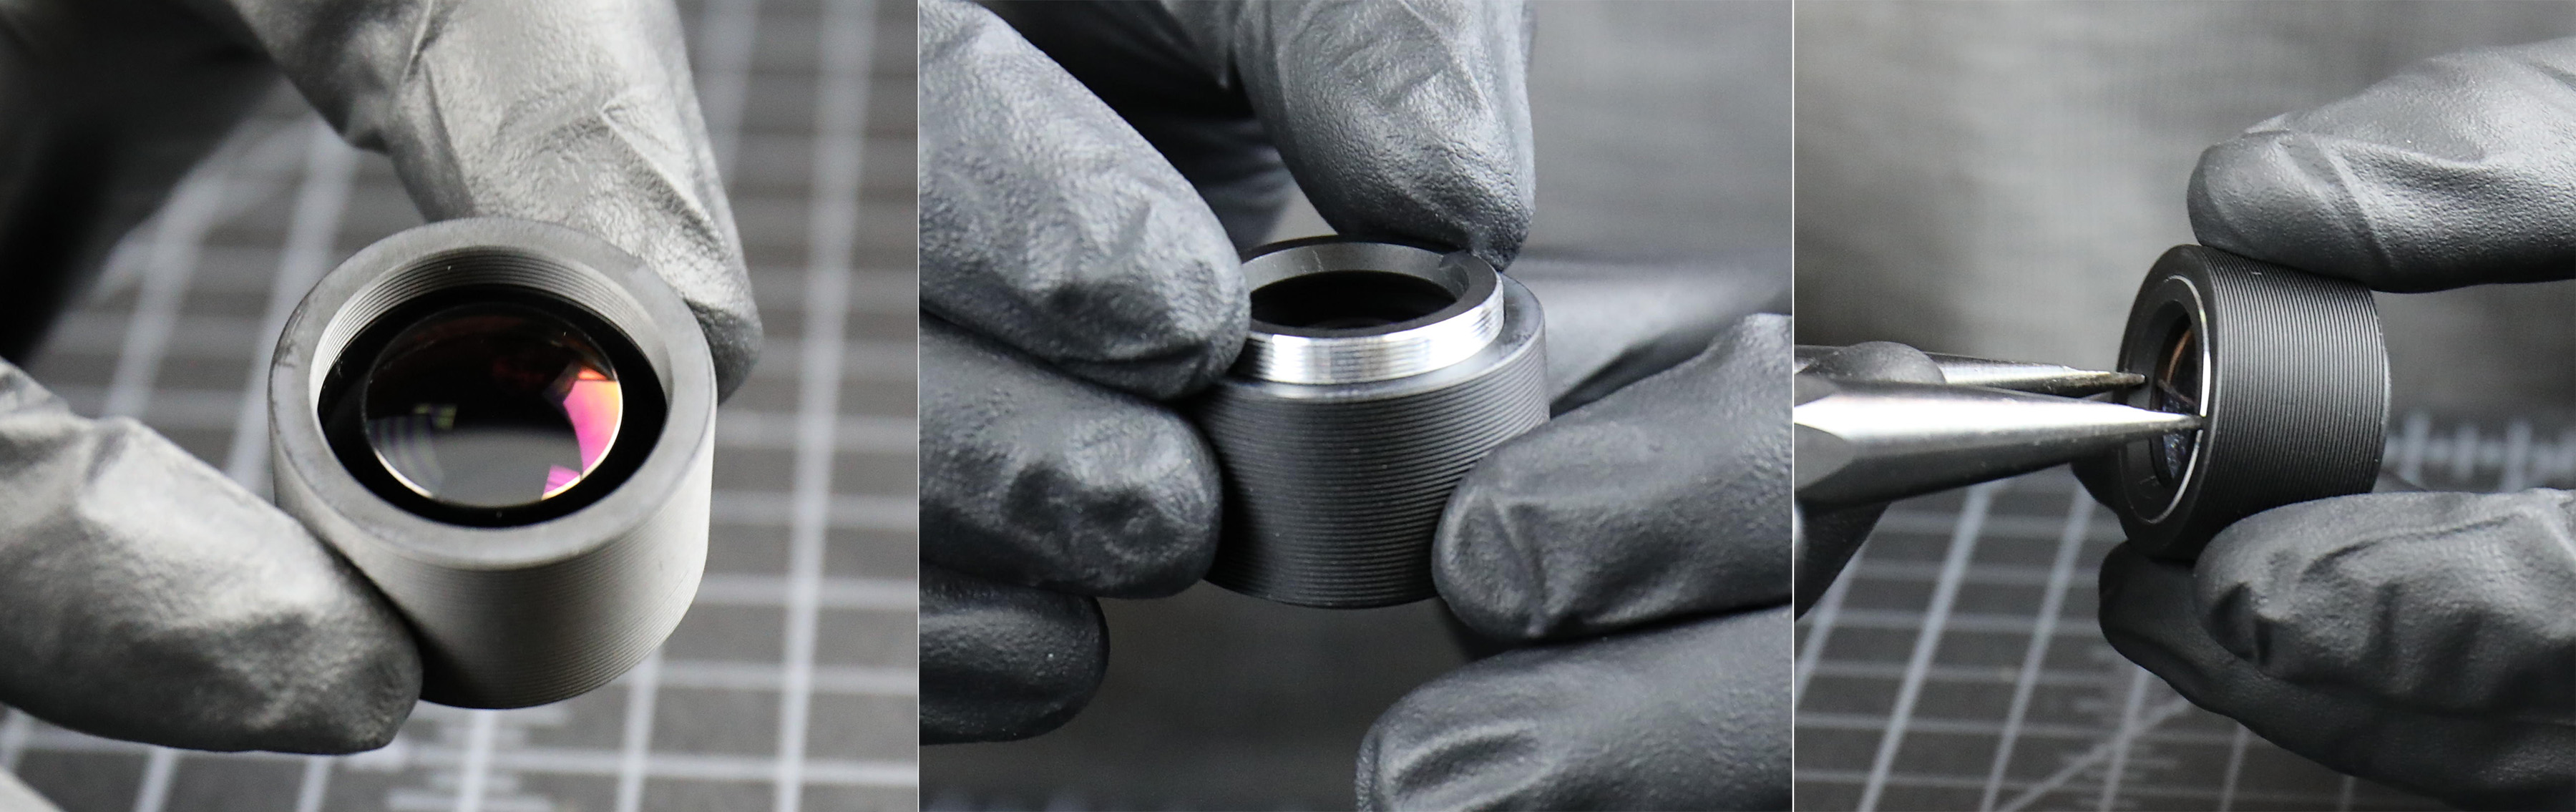
It doesn’t show well in the above pictures, but the outer barrel is threaded to receive the focusing link; the metal arms that will mount it to the mechanical focusing apparatus. Once this is started by hand, a spanner is used to thread the barrel to a measured position. Then the focus lock ring is placed to keep everything there.
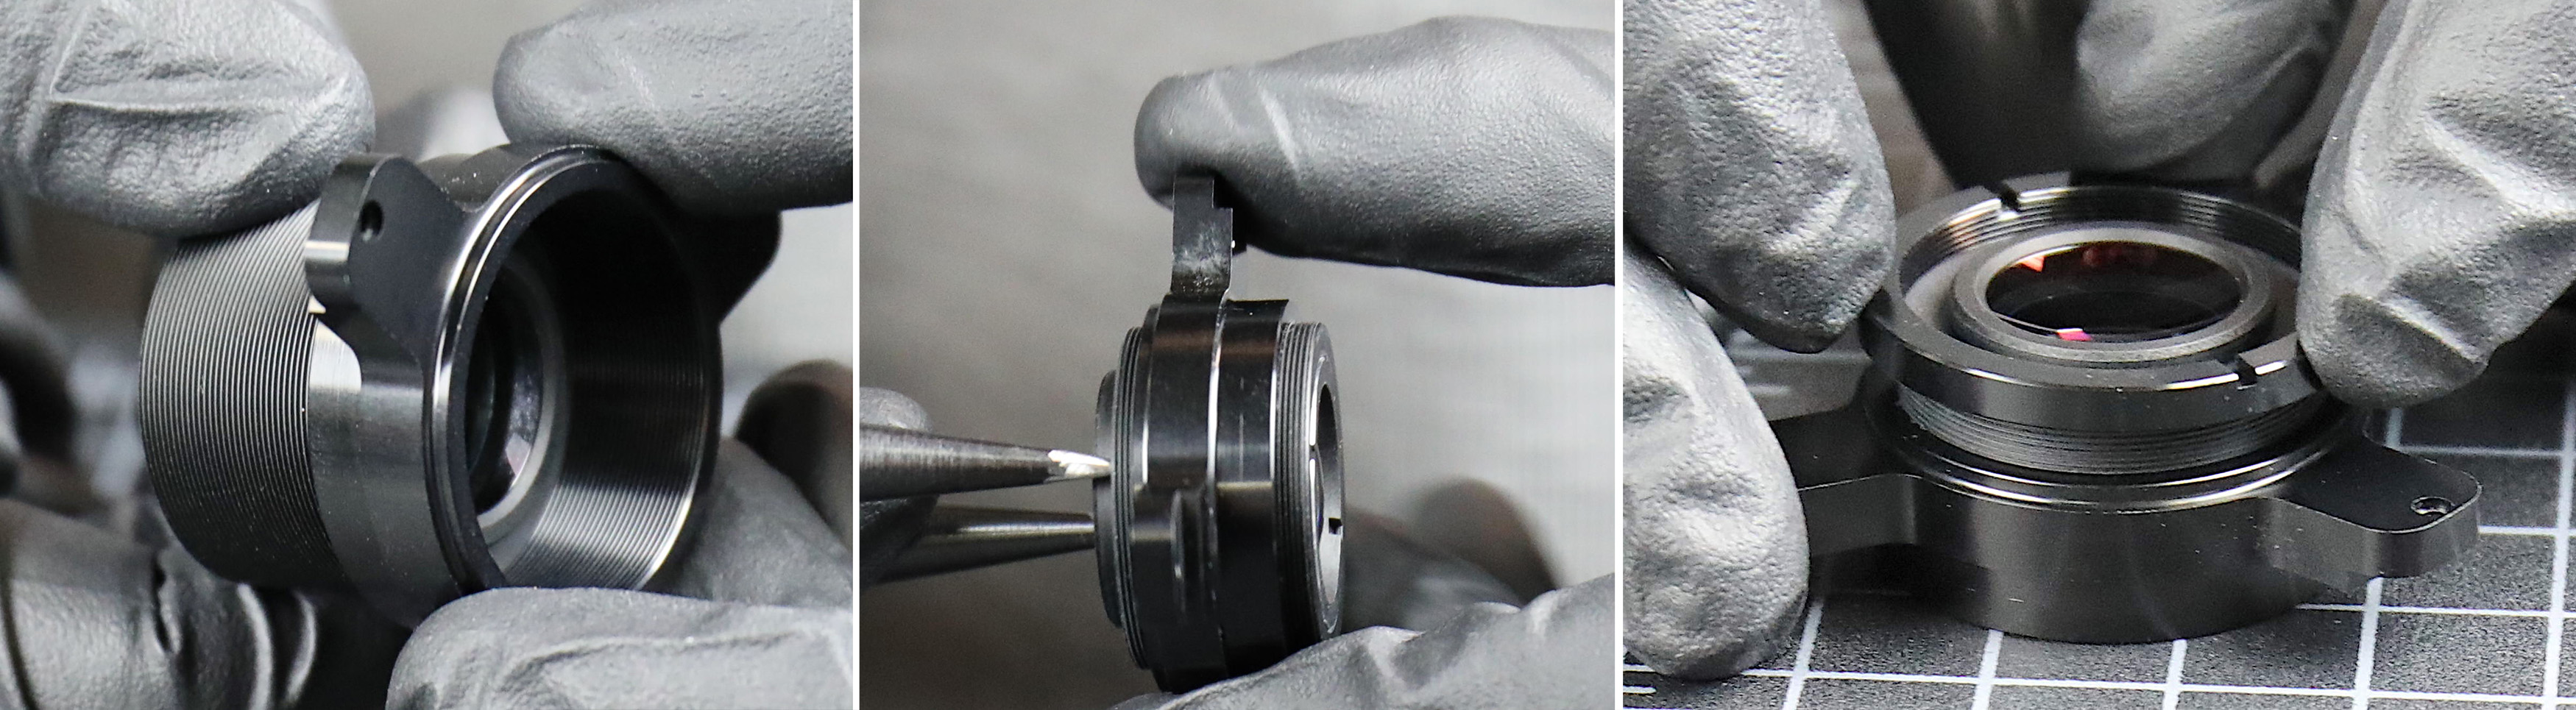
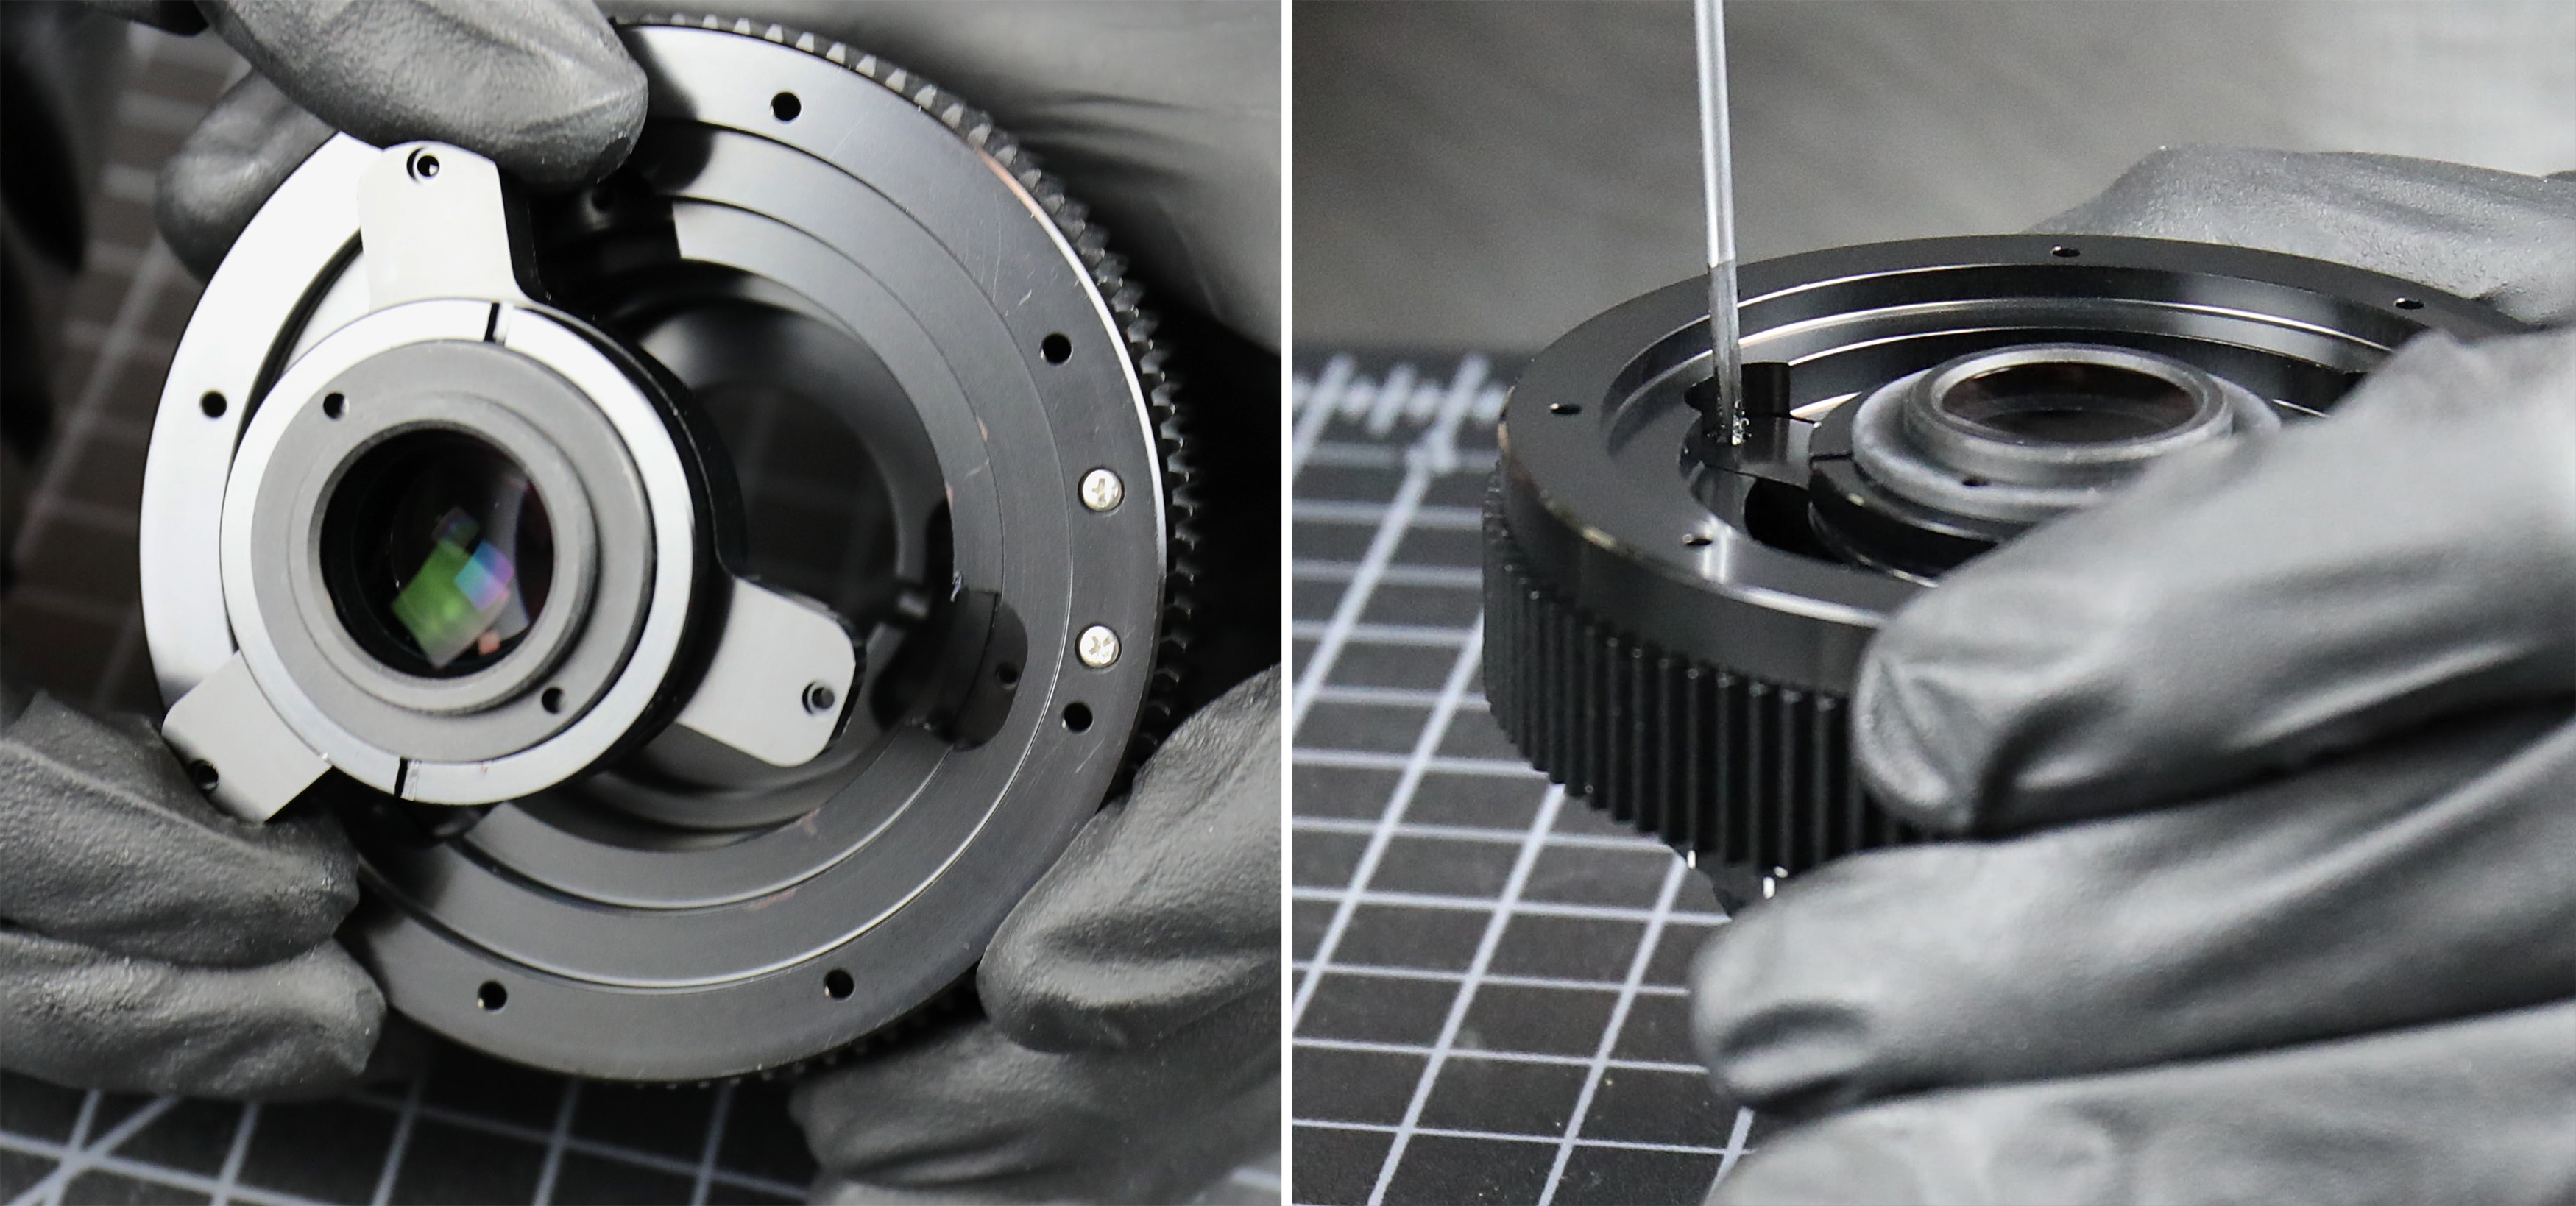
Main Barrel
The main barrel, which contains the aperture and several optical elements, is the most complex part of the lens. The first piece in is a tiny doublet that goes right behind the aperture.
And then gets locked in place with a retaining ring.
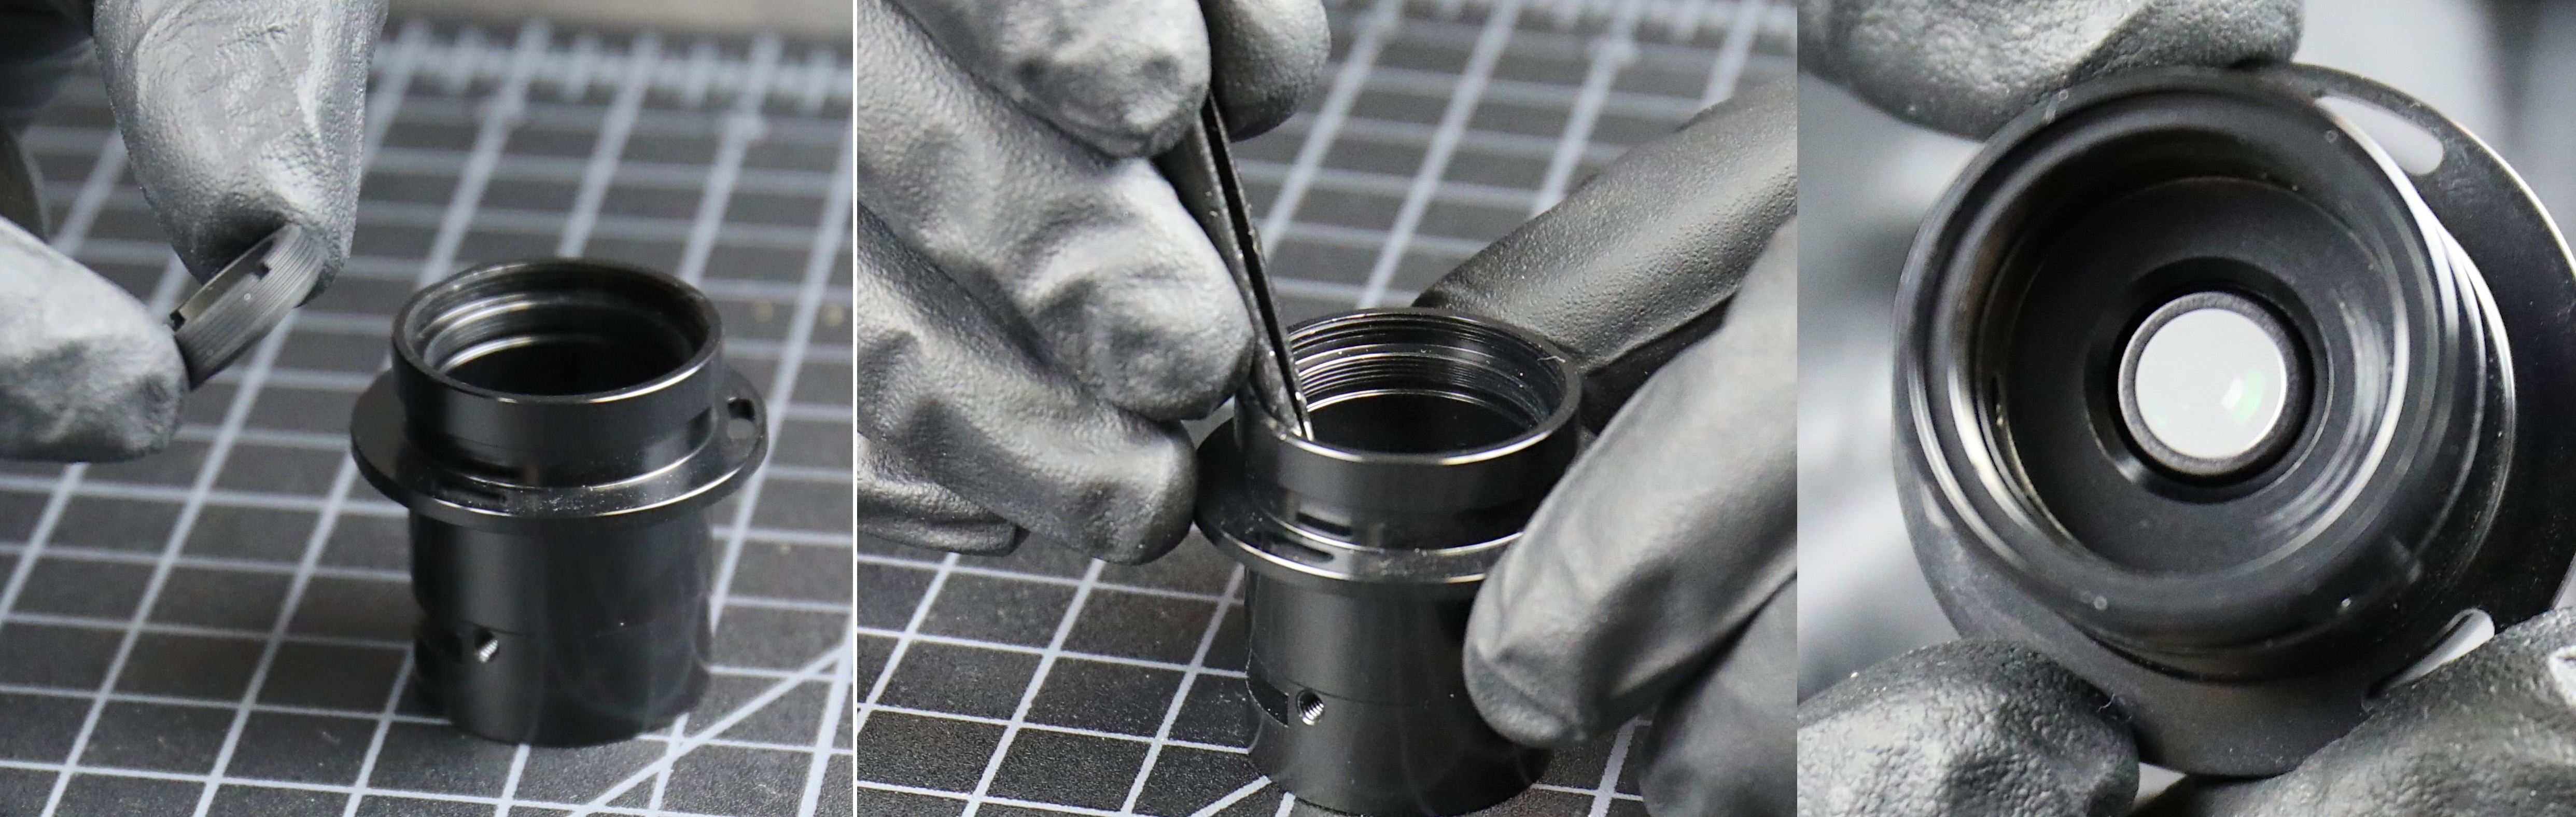
Behind that goes a cemented triplet that is slightly larger.
A flat element gets mounted in its holder and then placed at the very rear of the lens. You can see by the knurled finish that this can be removed and replaced with various filters if needed.

Turning the barrel over, the aperture assembly gets placed in the other end, right in front of the doublet we inserted first. It has to be rotated to the proper orientation, then it’s locked down with a hex screw.
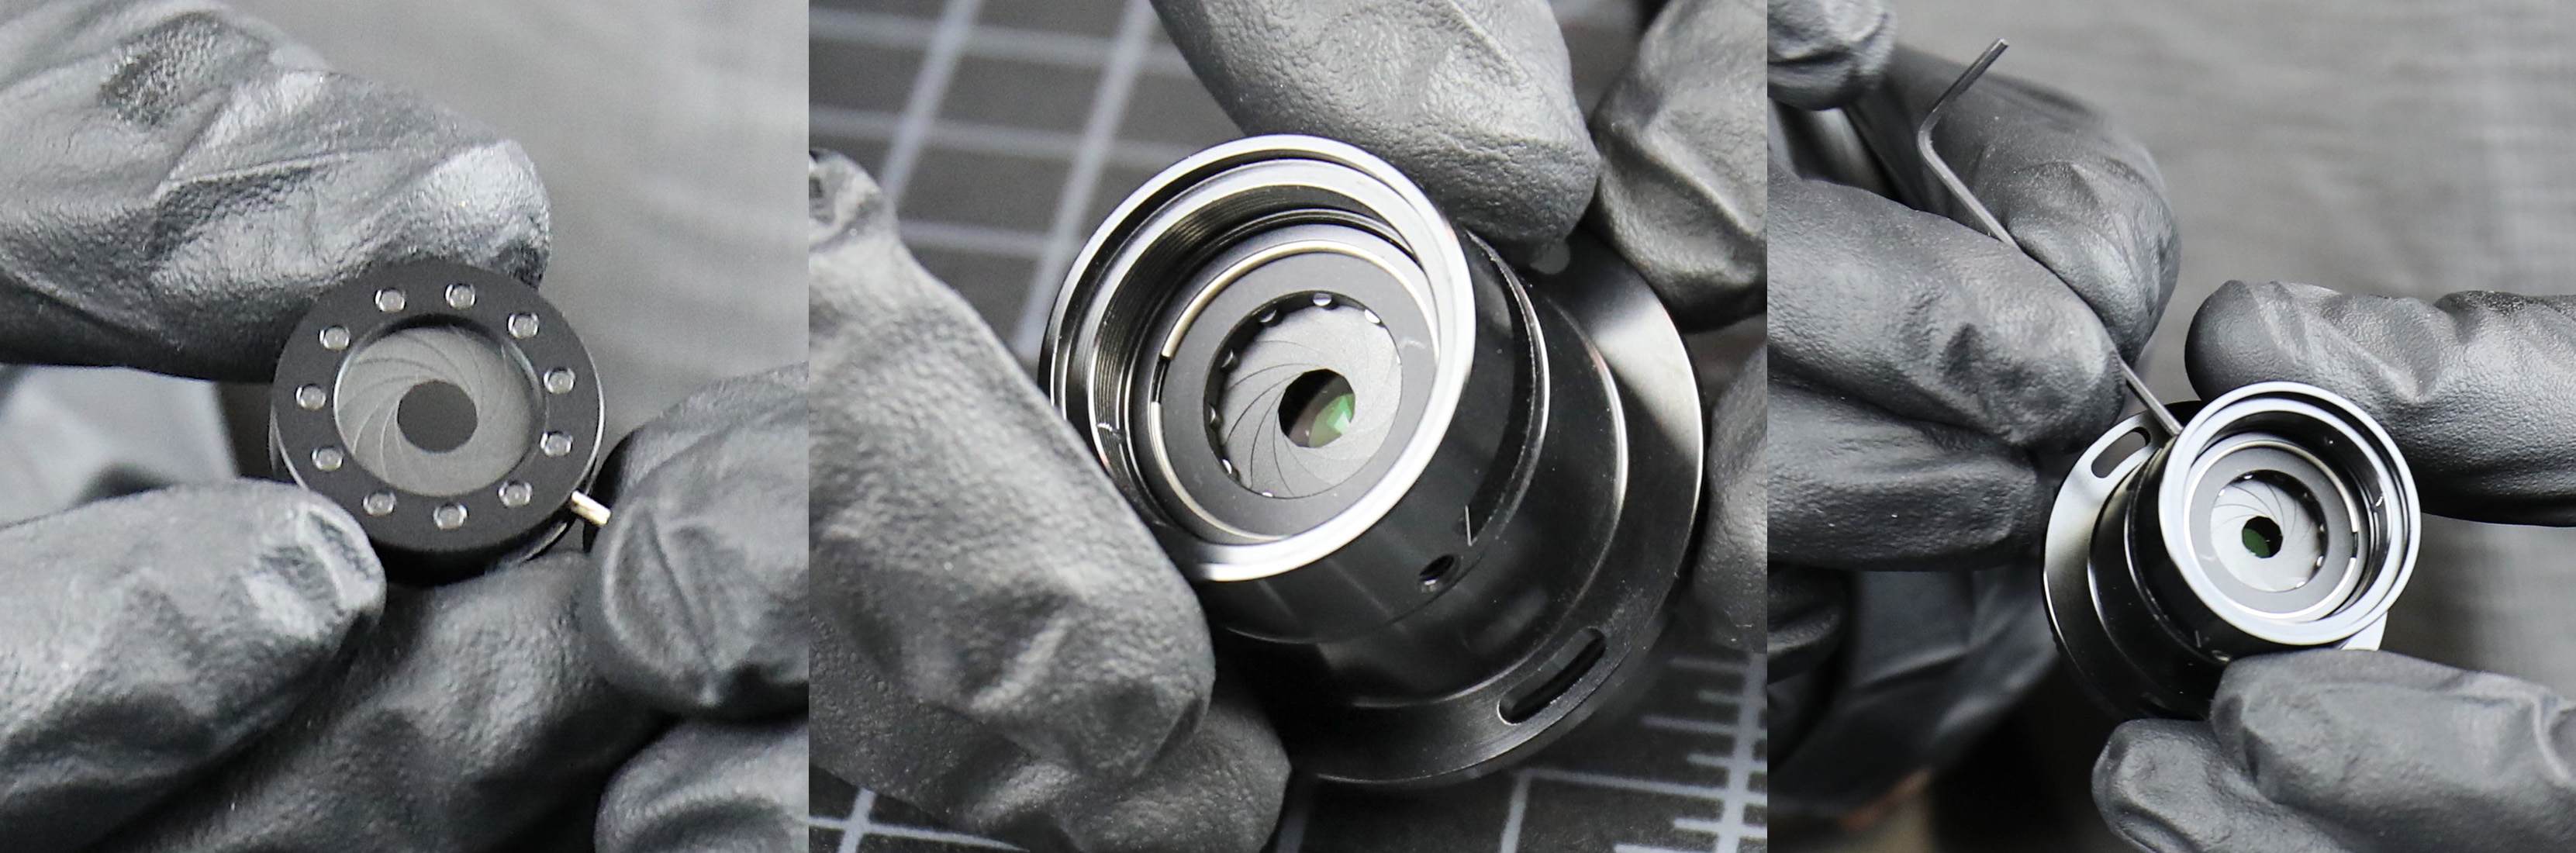
We finish up the barrel with an old friend. The small element we potted yesterday mounts to the front of the barrel. It’s hard to see in the pictures, but its mount is threaded and screws into the barrel.

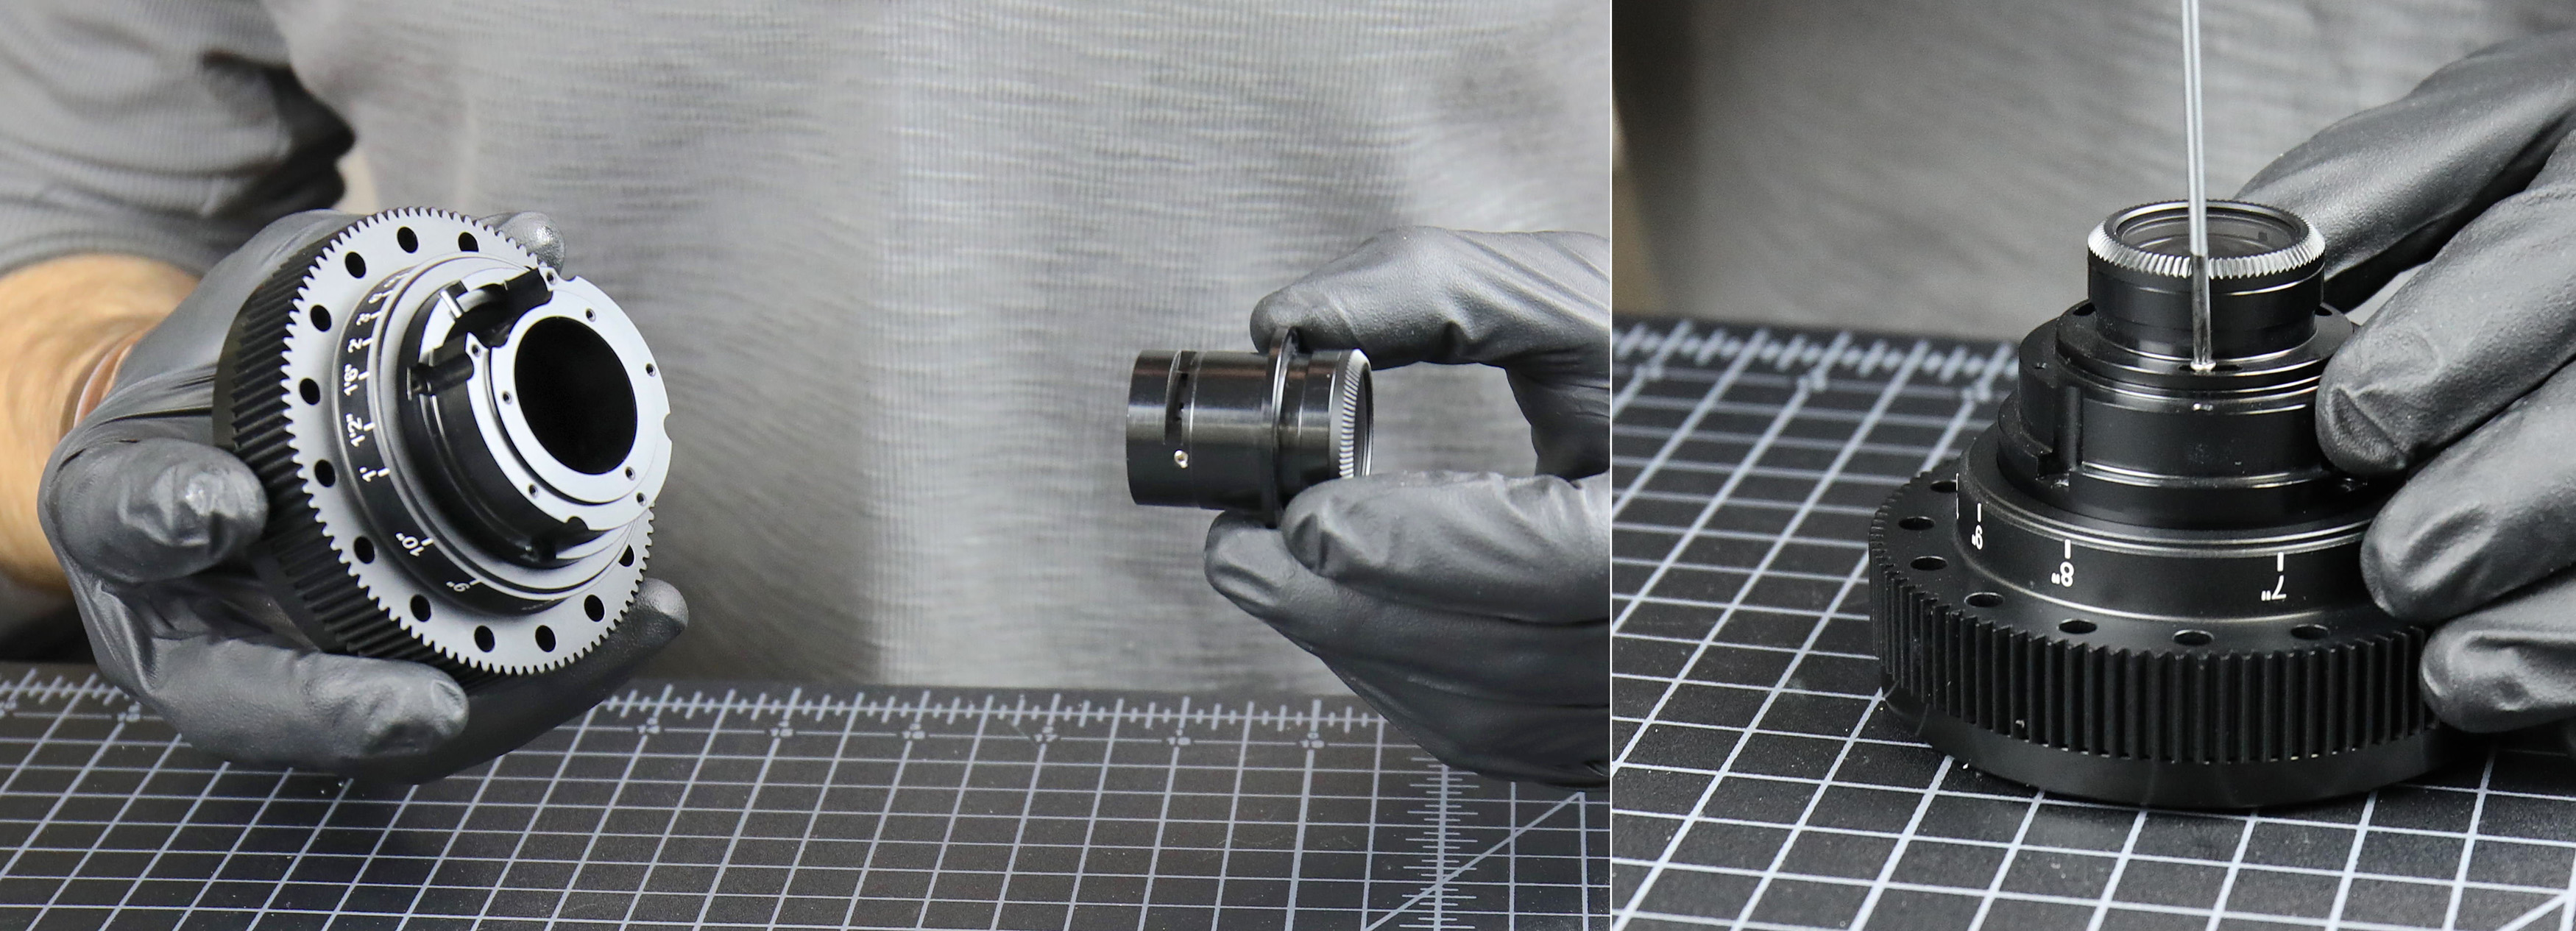
Main Barrel and Gear Assembly
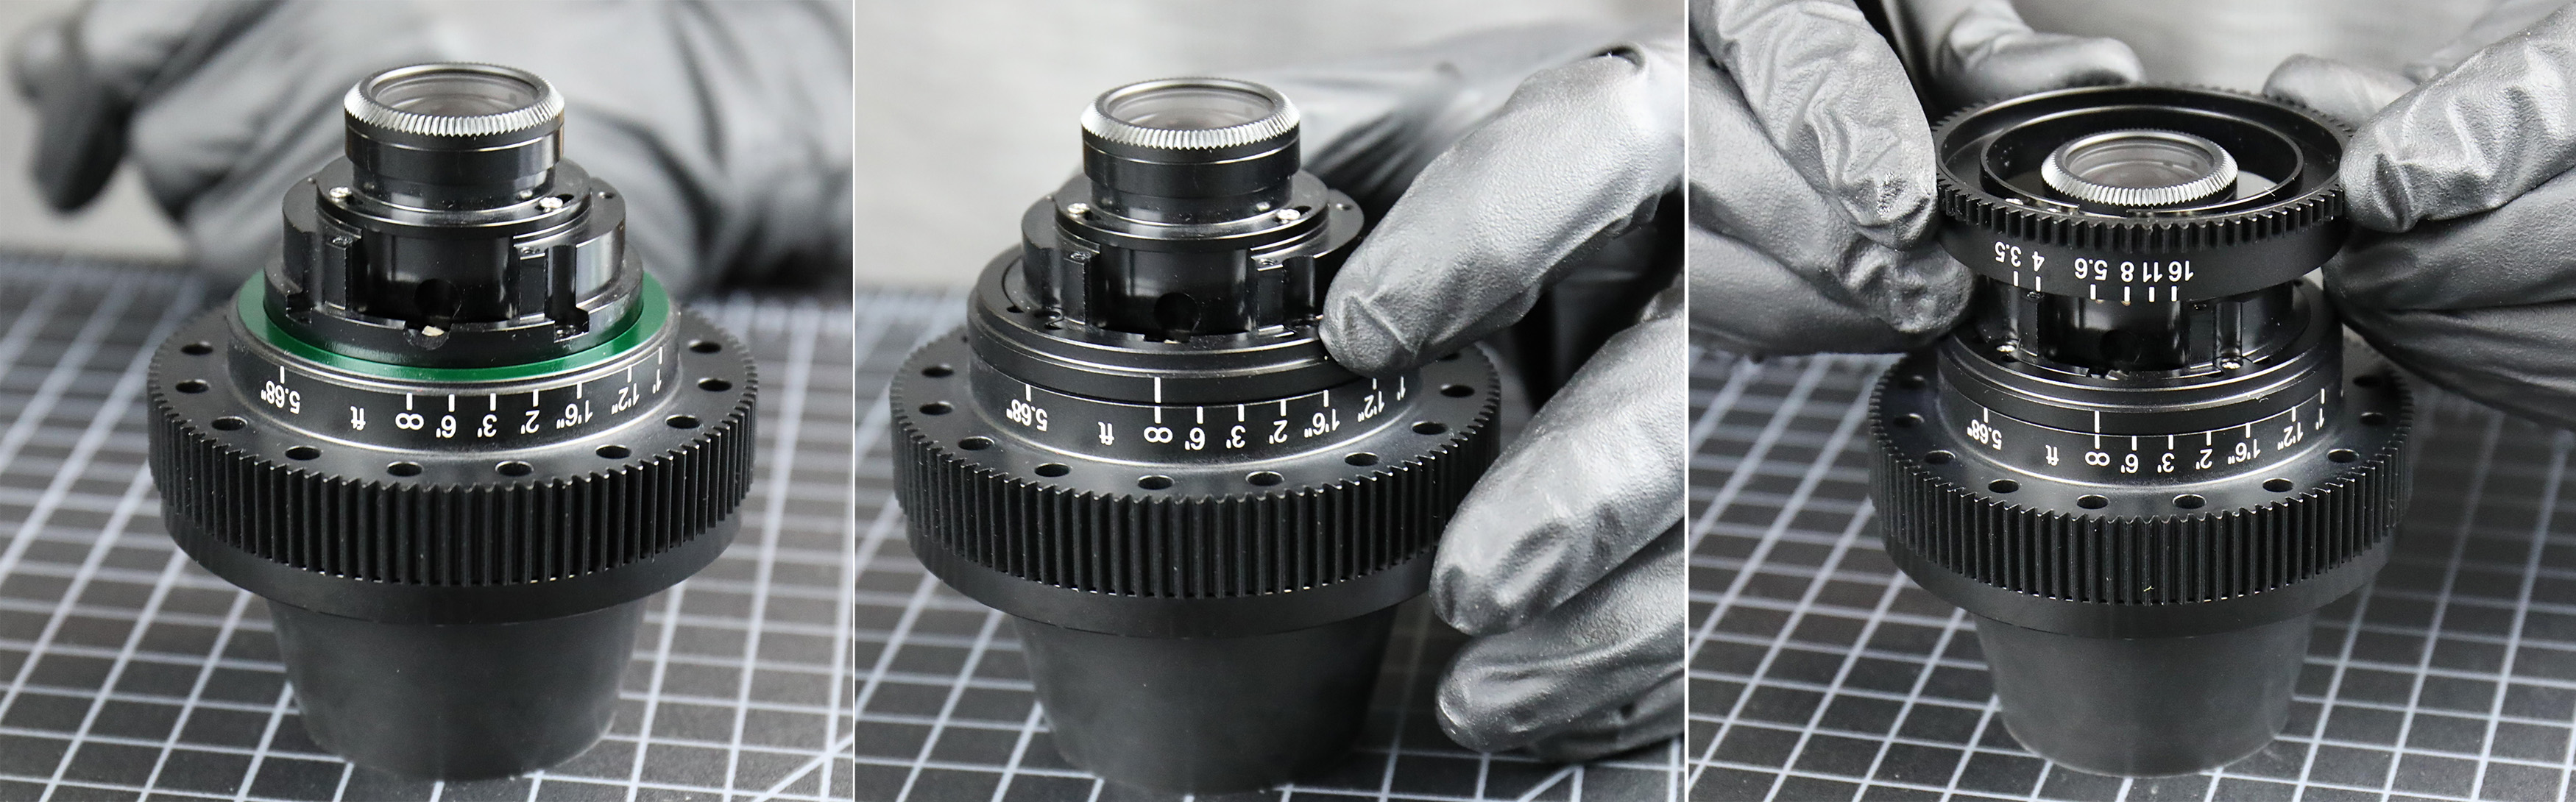
We start by lubing the focus gear and inserting the focusing helicoid, which is then adjusted to a measured depth.
The aperture fork is mounted to the aperture ring. The fork comes in two pieces that overlap. The reason for the two pieces is that these are adjusted to be the aperture stops on either side.

A hard stop is screwed in place in the focusing barrel and two more into the main barrel. The ones in the main barrel are eccentric; adjusting them sets the focus stops accurately.

Now the focus gear is slipped over the main barrel and the stops all aligned.
Then the focusing group that we assembled earlier is placed into the focusing helicoid and screwed in place.
Following that, the aperture / rear optical assembly gets put in place.
The aperture pin then gets screwed in place with a really nice, expensive tool that does nothing other than screw the aperture pin in place. That’s it.
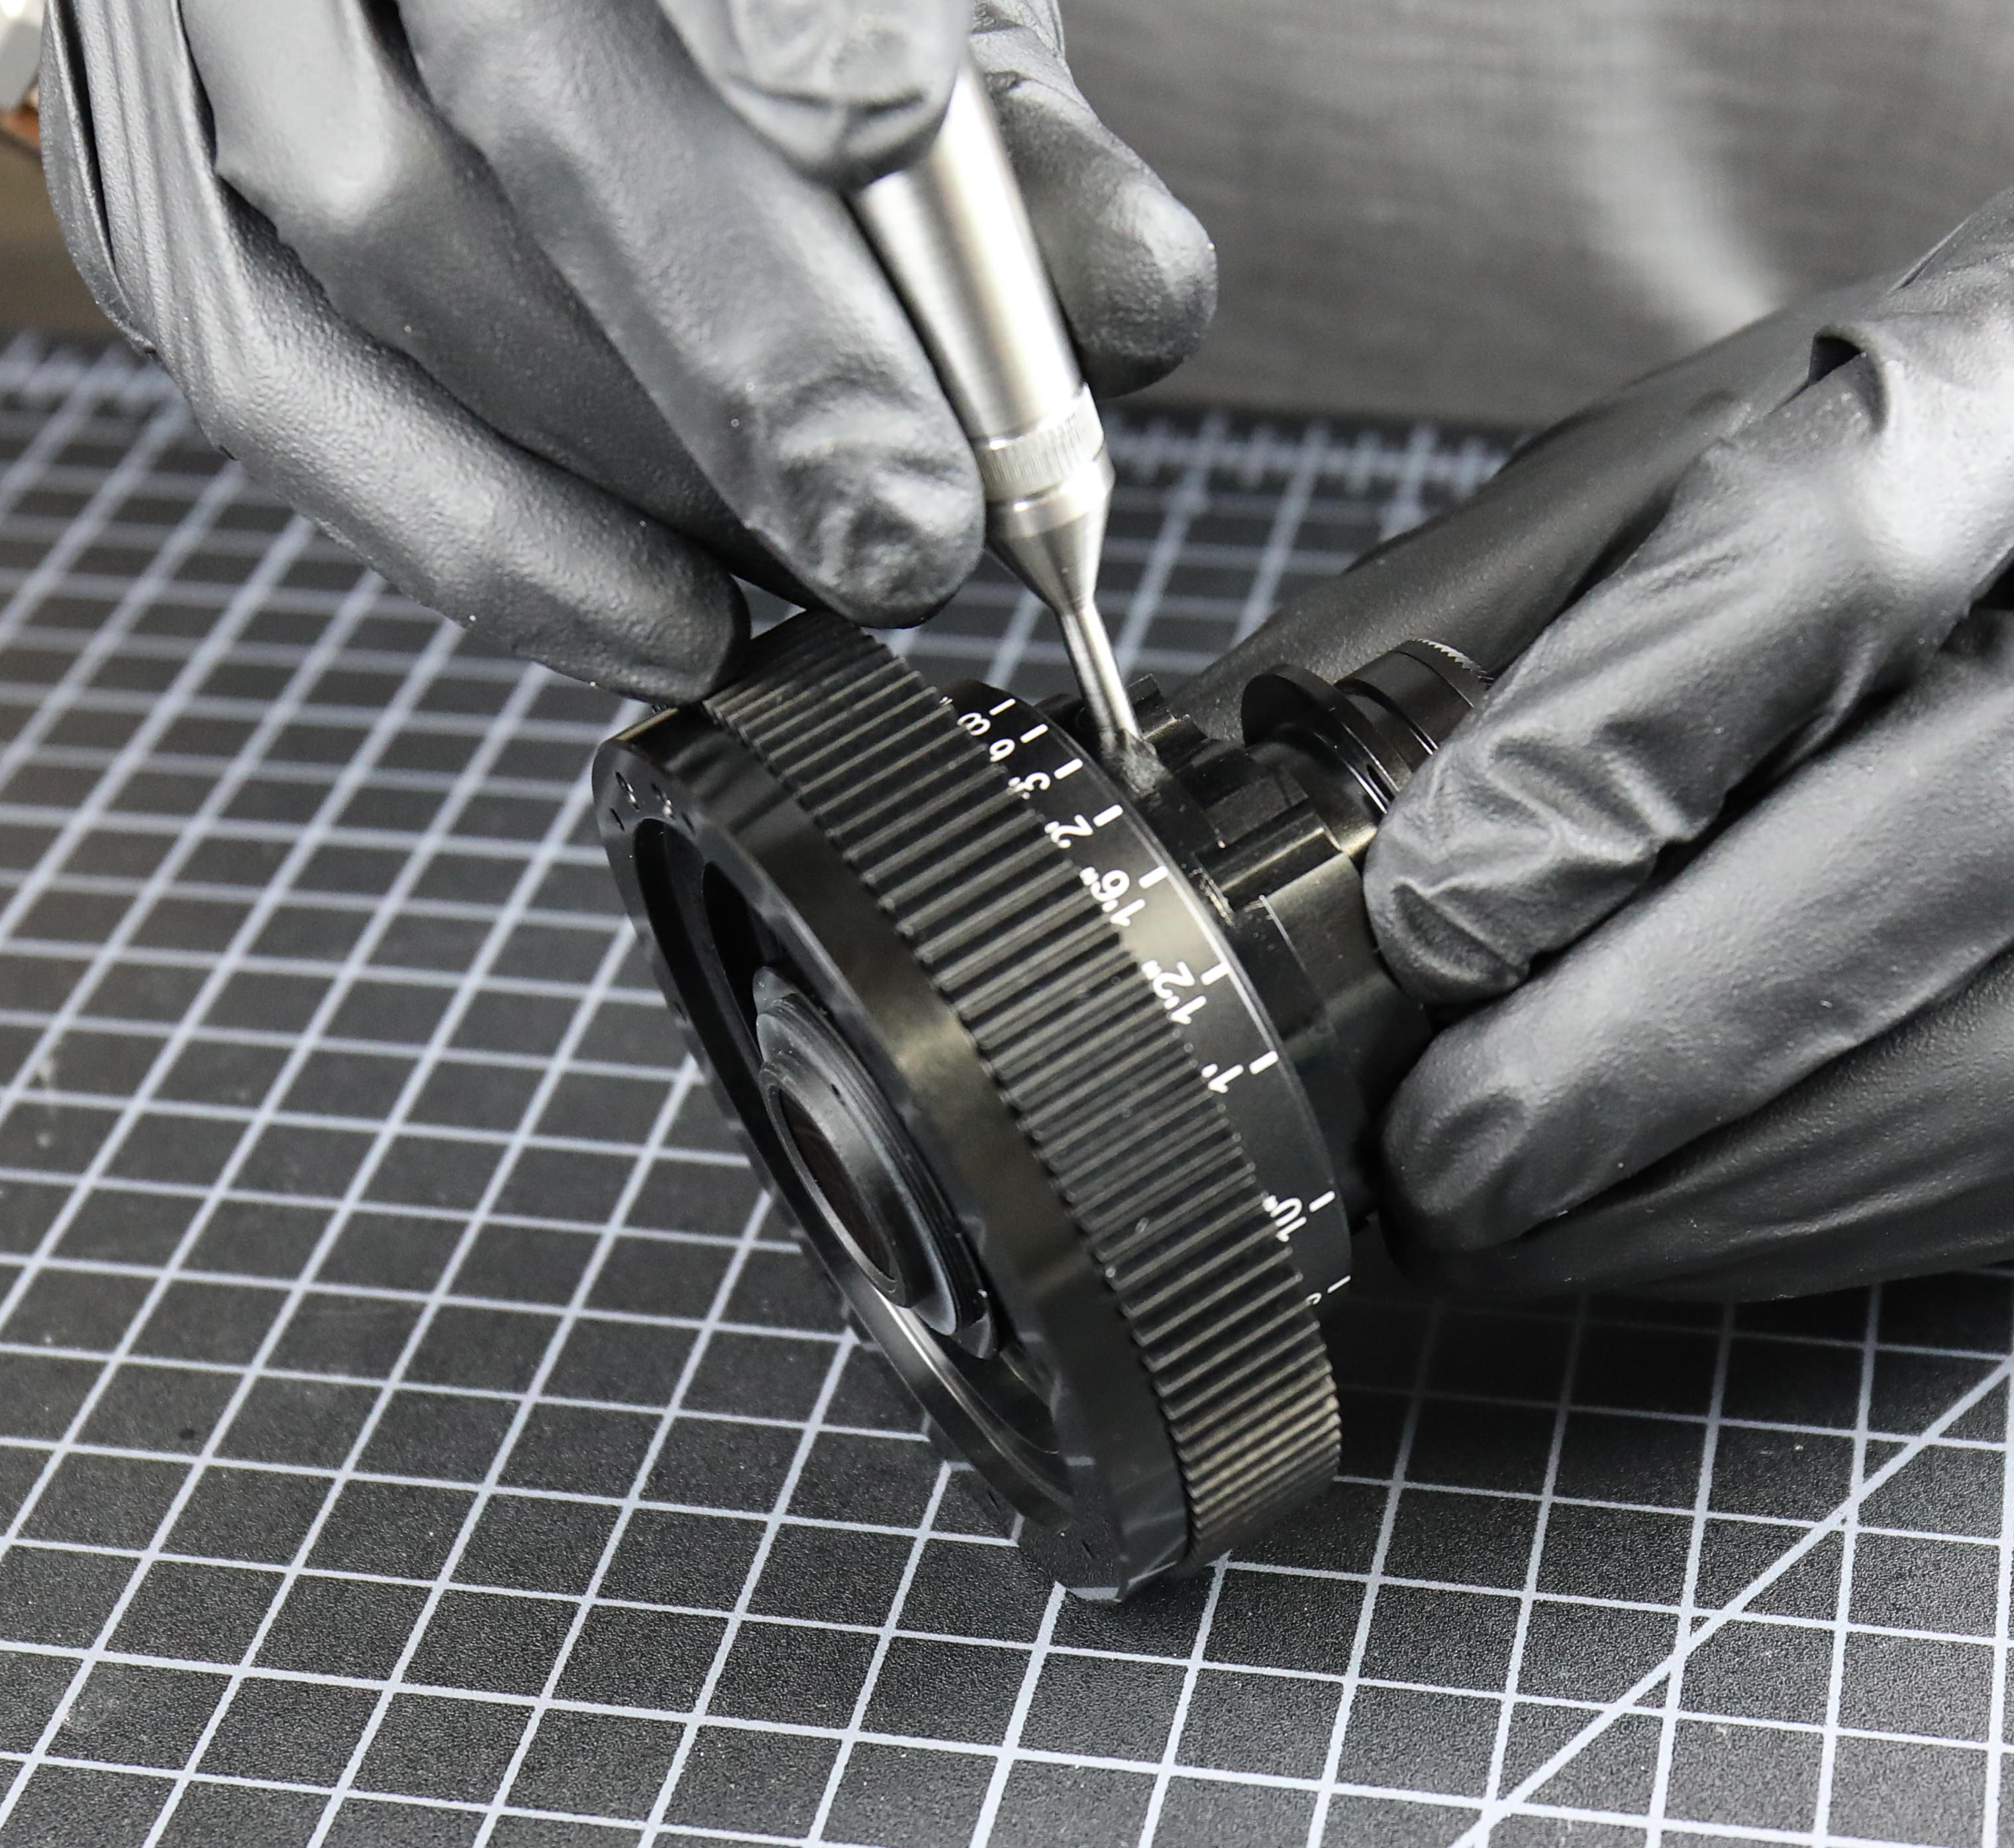
Then a nylon spacer goes on (the green shim), which keeps the focus smooth and with just a bit of resistance. After that, the index barrel is placed and screwed down, and then the aperture gear can be slid on.
We’re getting close to being done with the rear part of the lens. The mounting ring goes on, then an infinity spacing shim (we just guess the thickness at this point, it gets reshimmed later), and finally the bayonet mount.
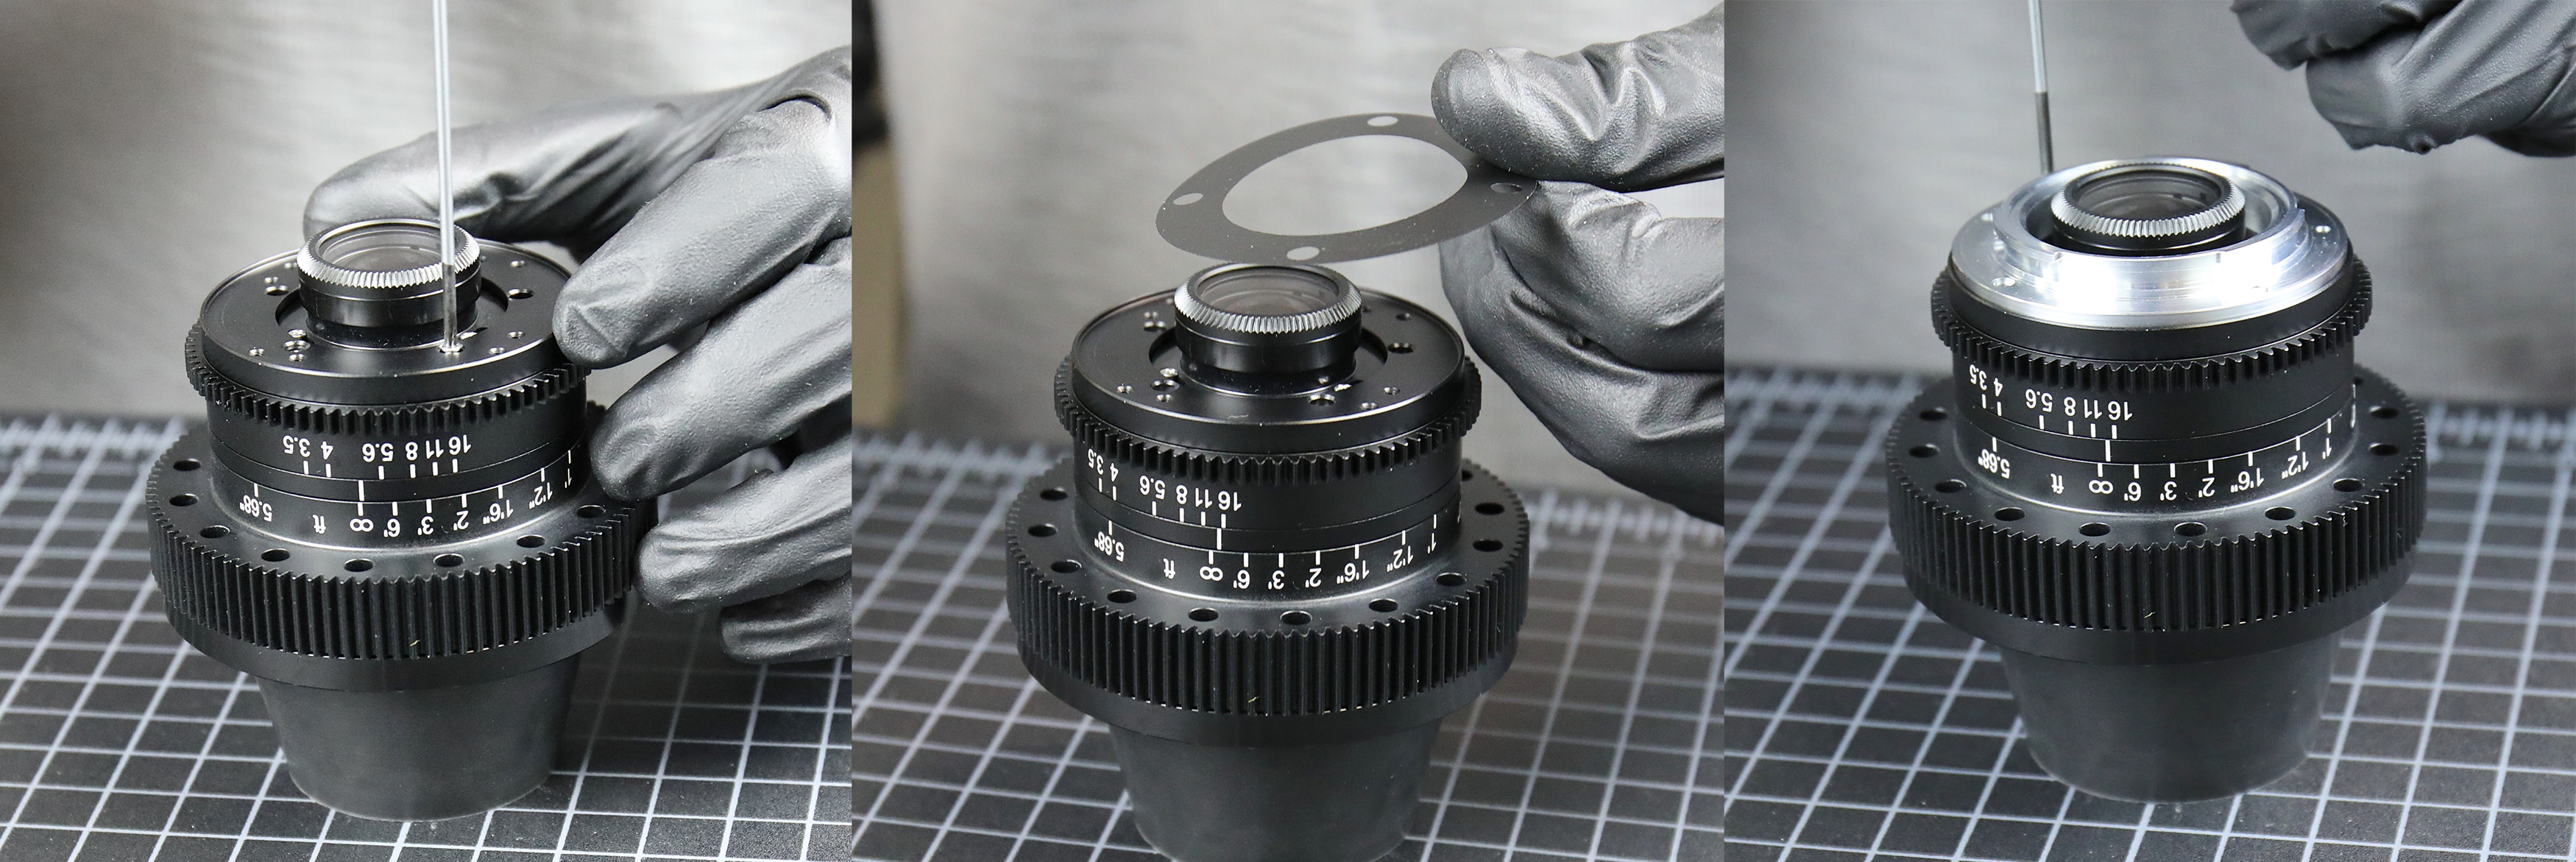
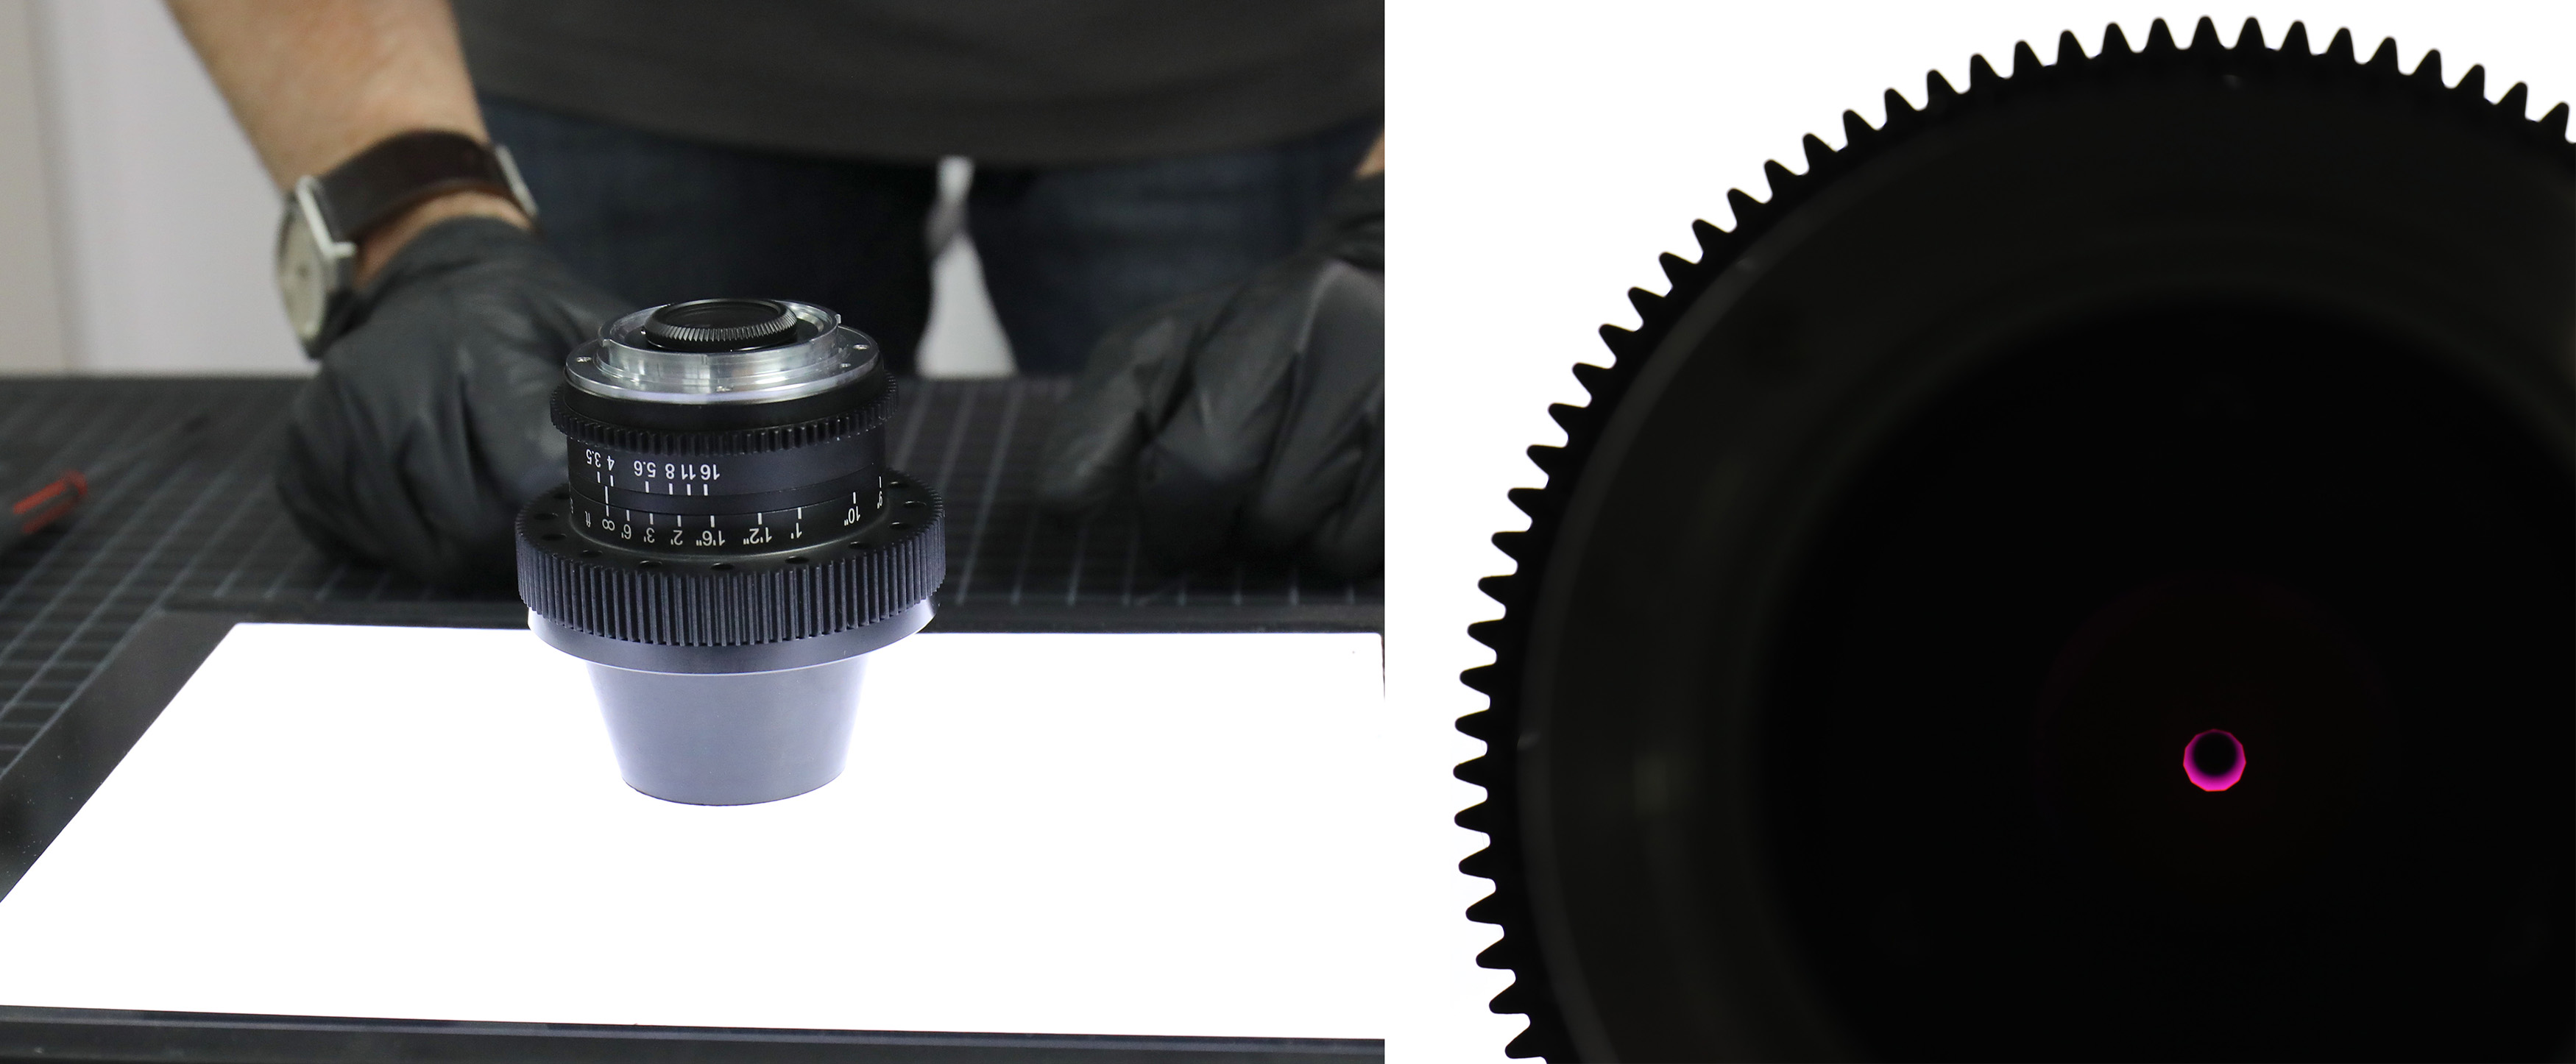
There’s only one more step to completing the assembly of the rear part of the lens; calibrating the aperture. We use an occulter, basically a semitransparent disk with a blackout that will be the size of the aperture at f/16.
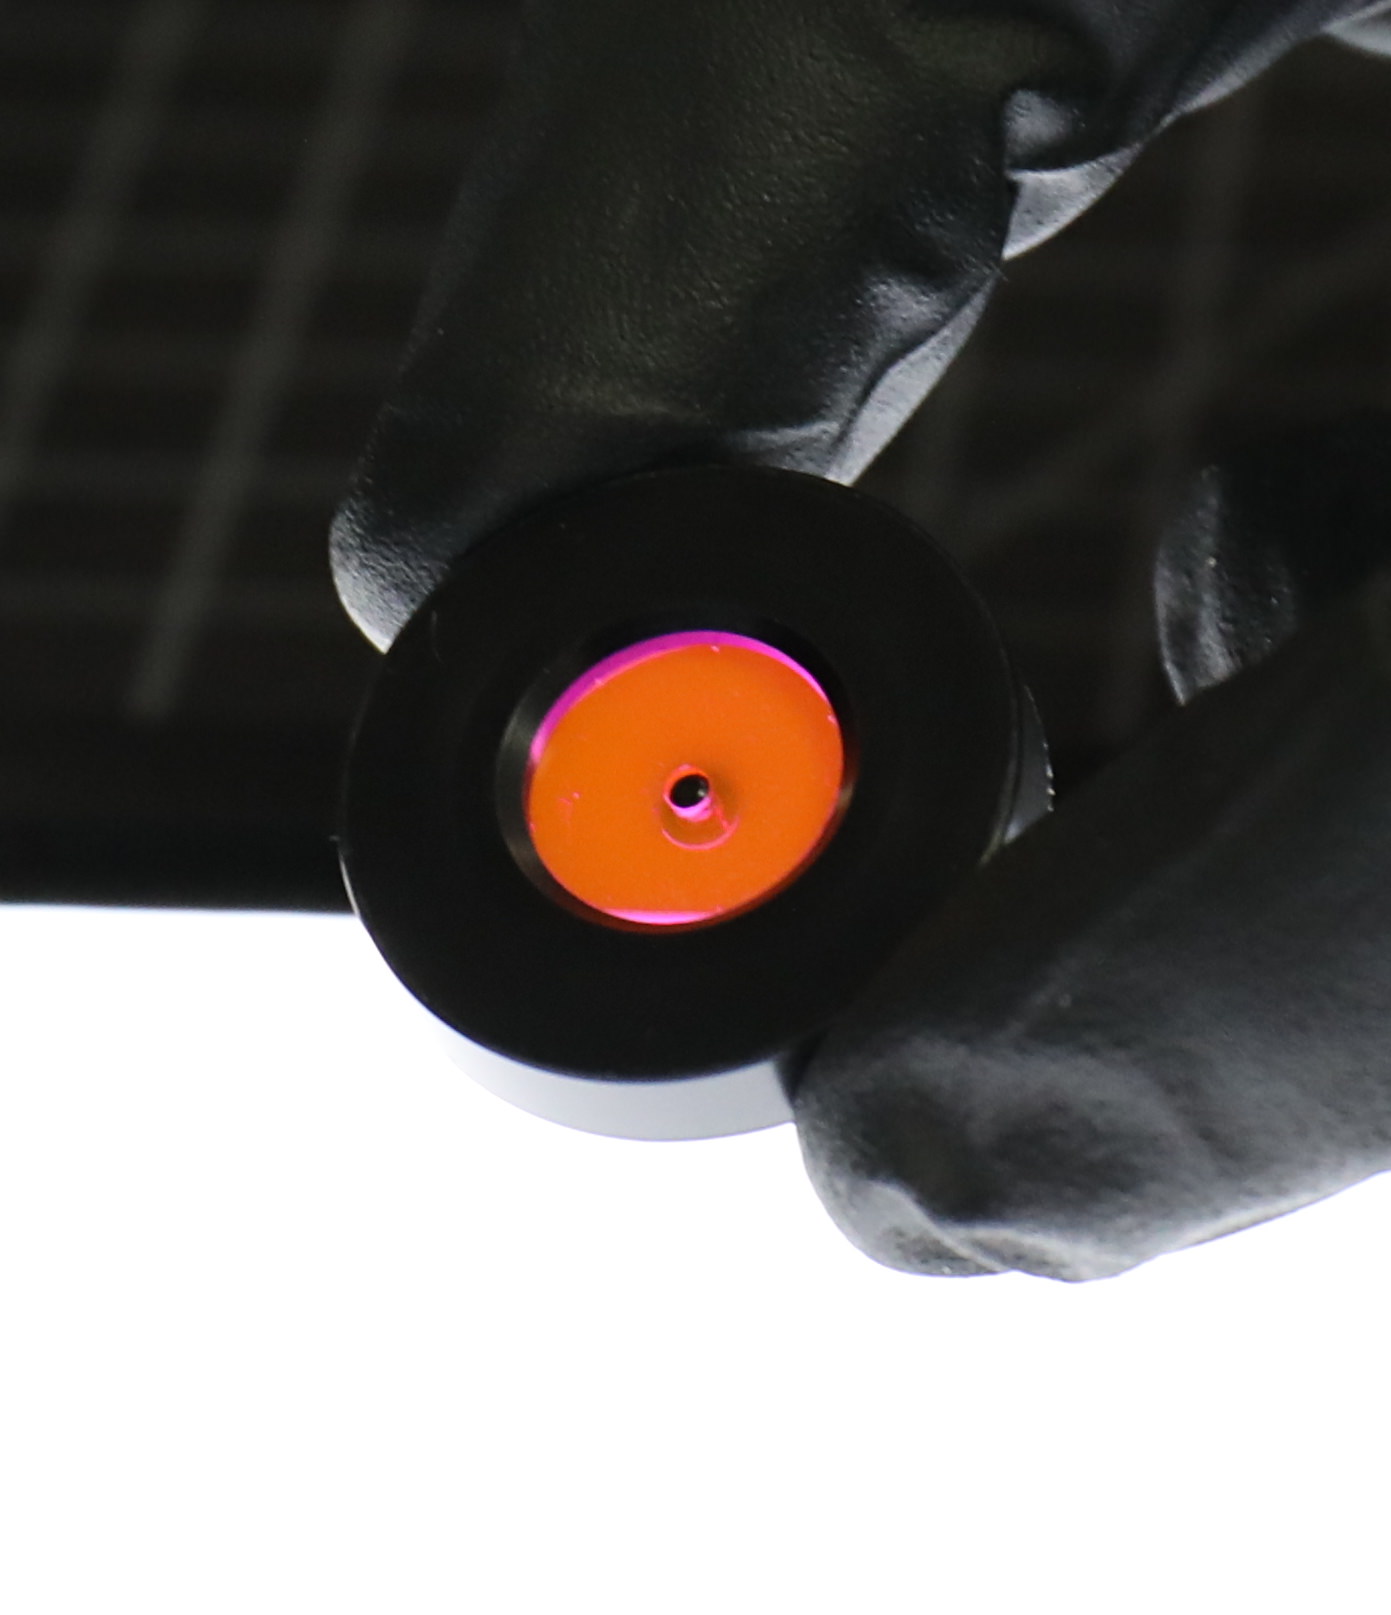
The lens is placed on a light table, the occulter placed over the rear element, and the iris adjusted until the f/16 setting just occludes the occulter’s central black disk (it’s not quite there in the image).
Putting It All Together
All of the complicated parts of the lens are in the rear we’ve just assembled, but that’s not really the part you notice when you look at the lens. It’s time to put those together now.
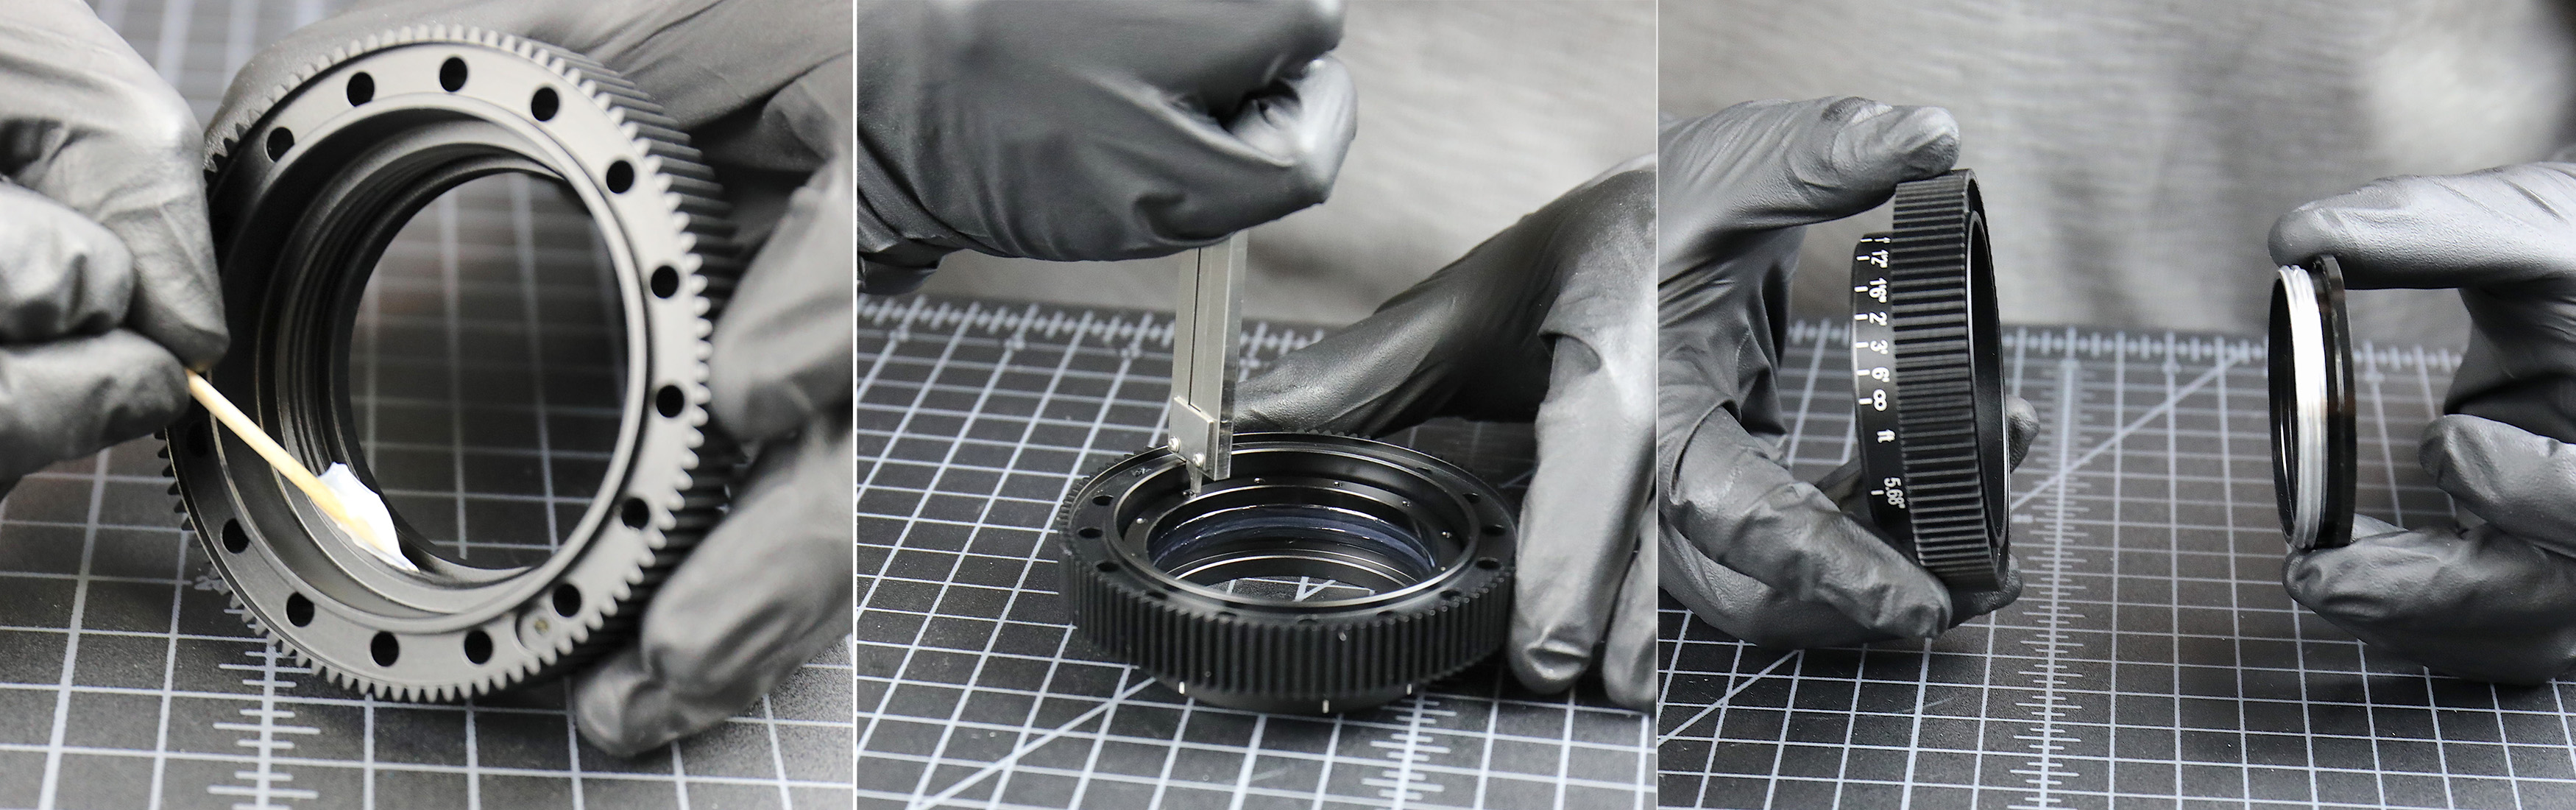
First, we get the base plate (AKA cheese plate) that we had potted the third and fourth elements to. The top side of the plate is the base of the large front elements, the back side functions as a cheese plate for inserting rods and other support items. The second element, which we also potted yesterday, then threads on.

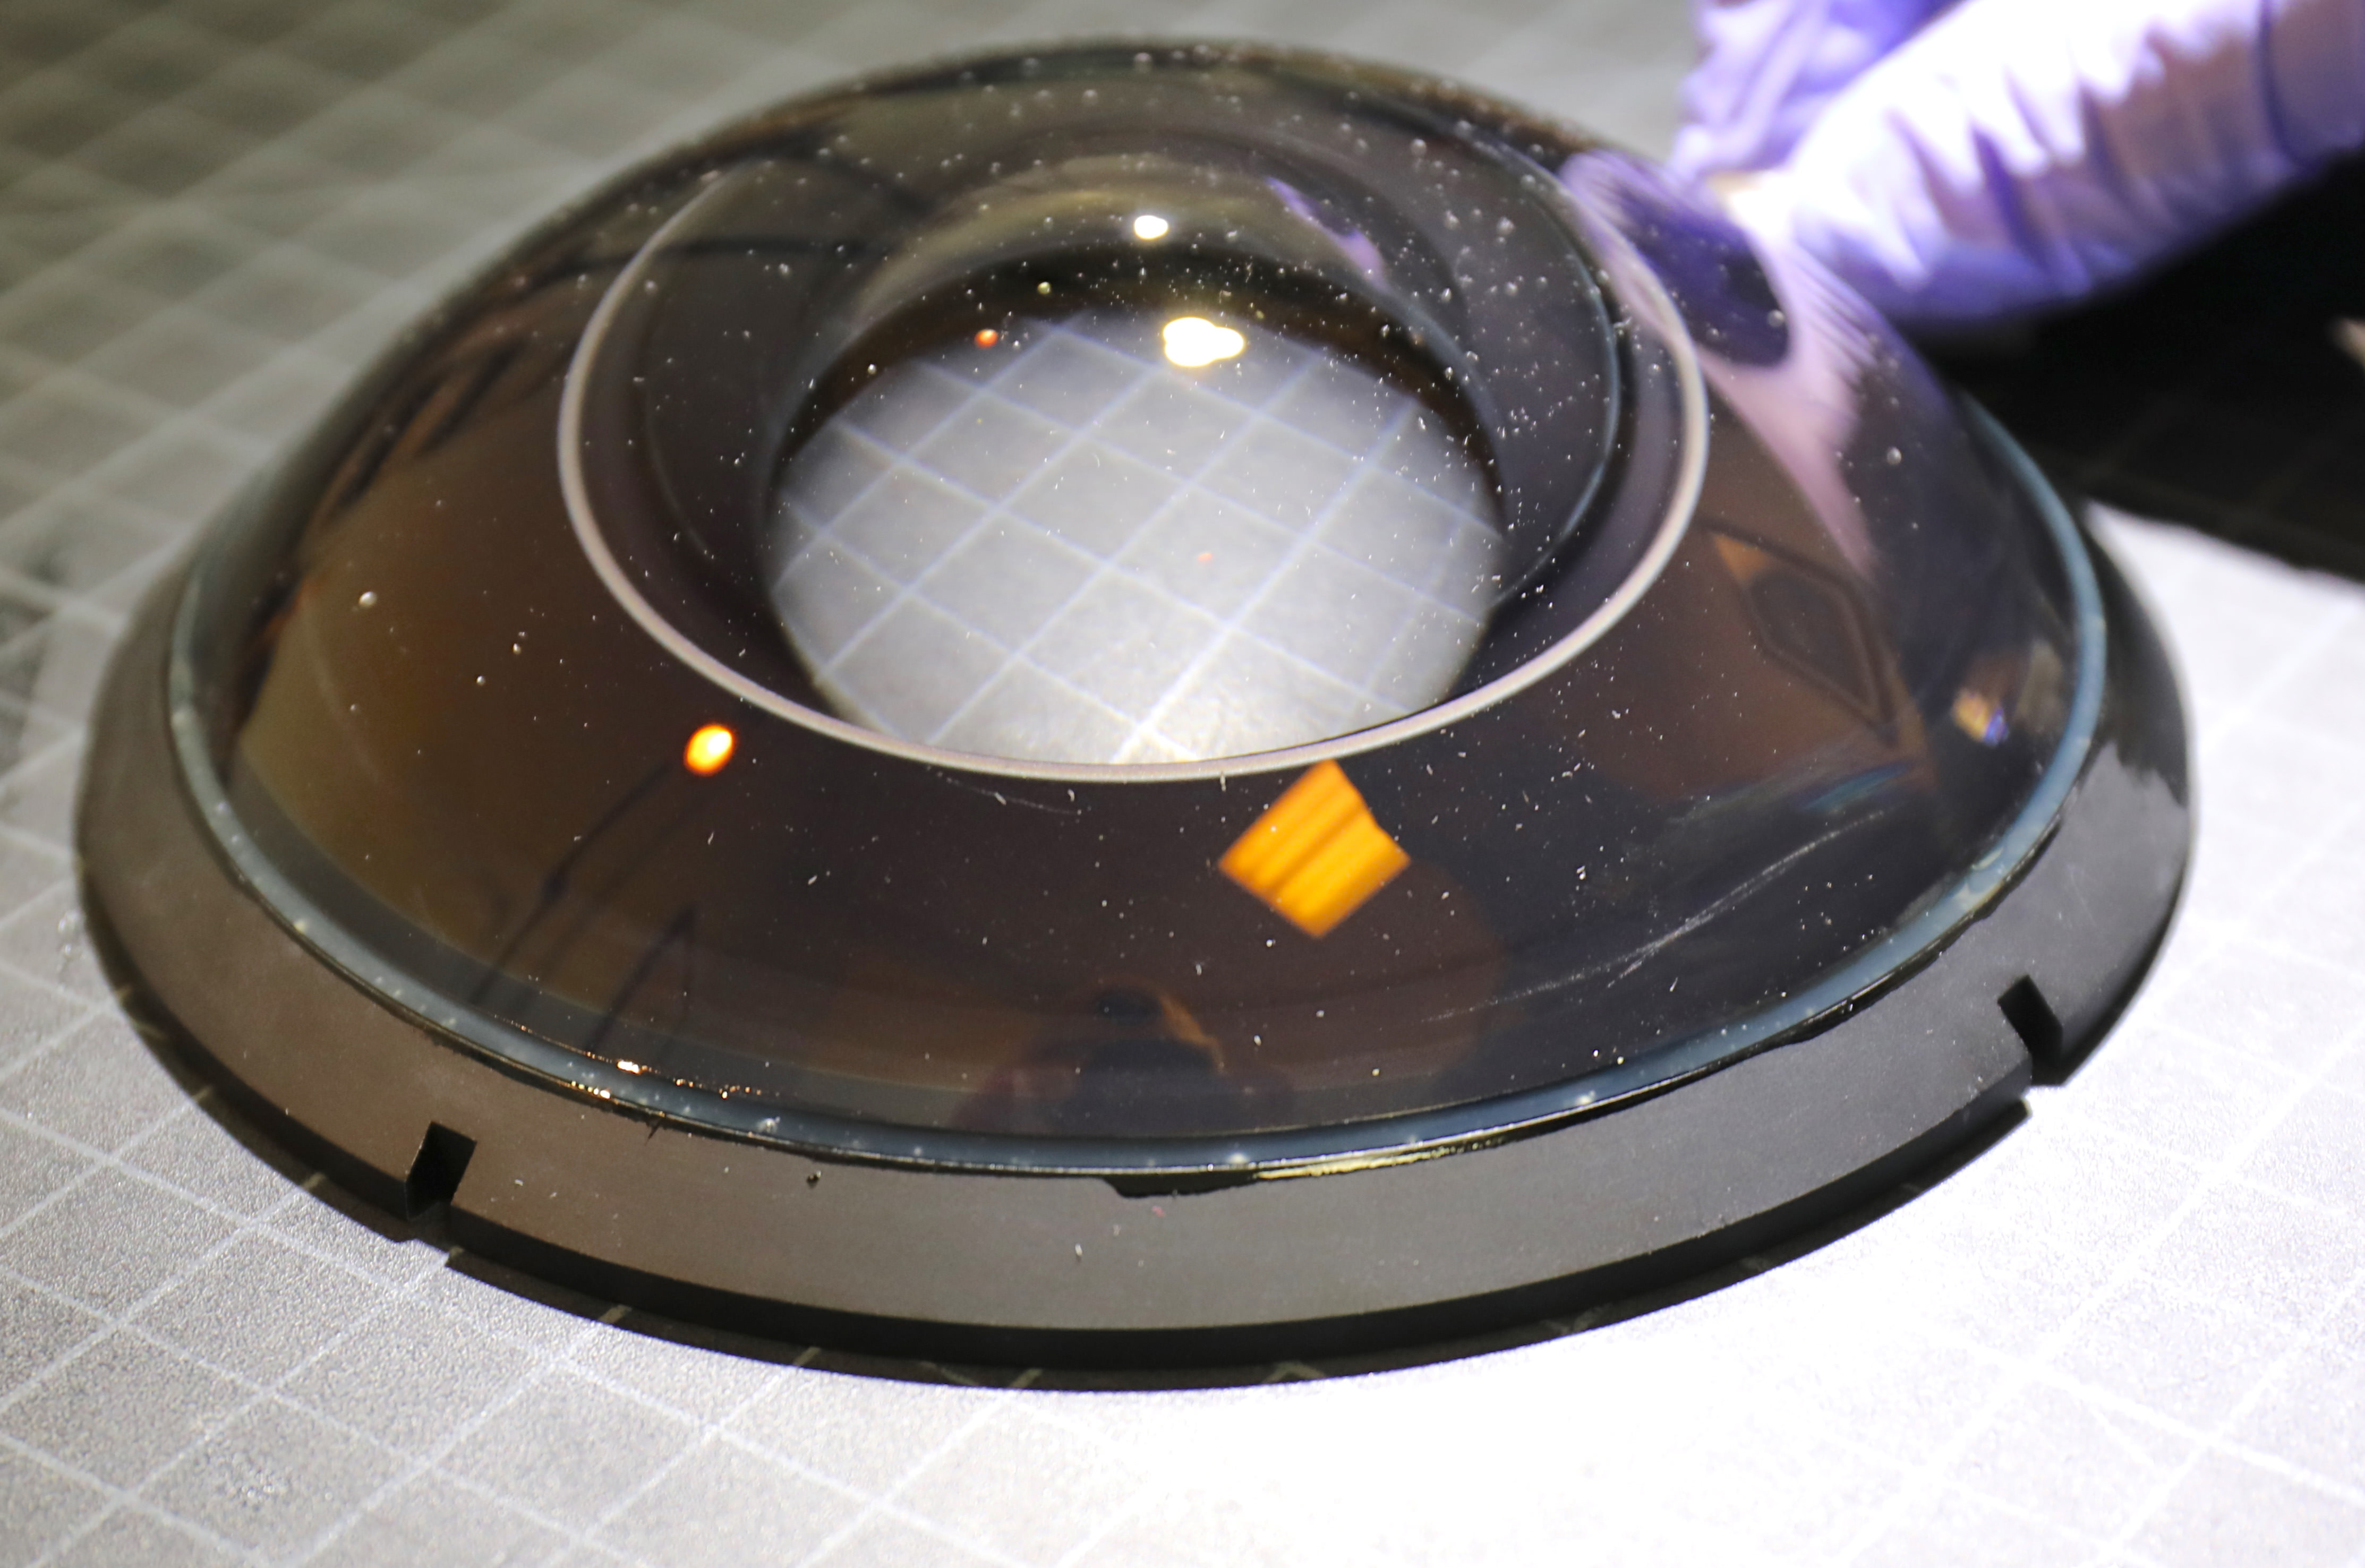
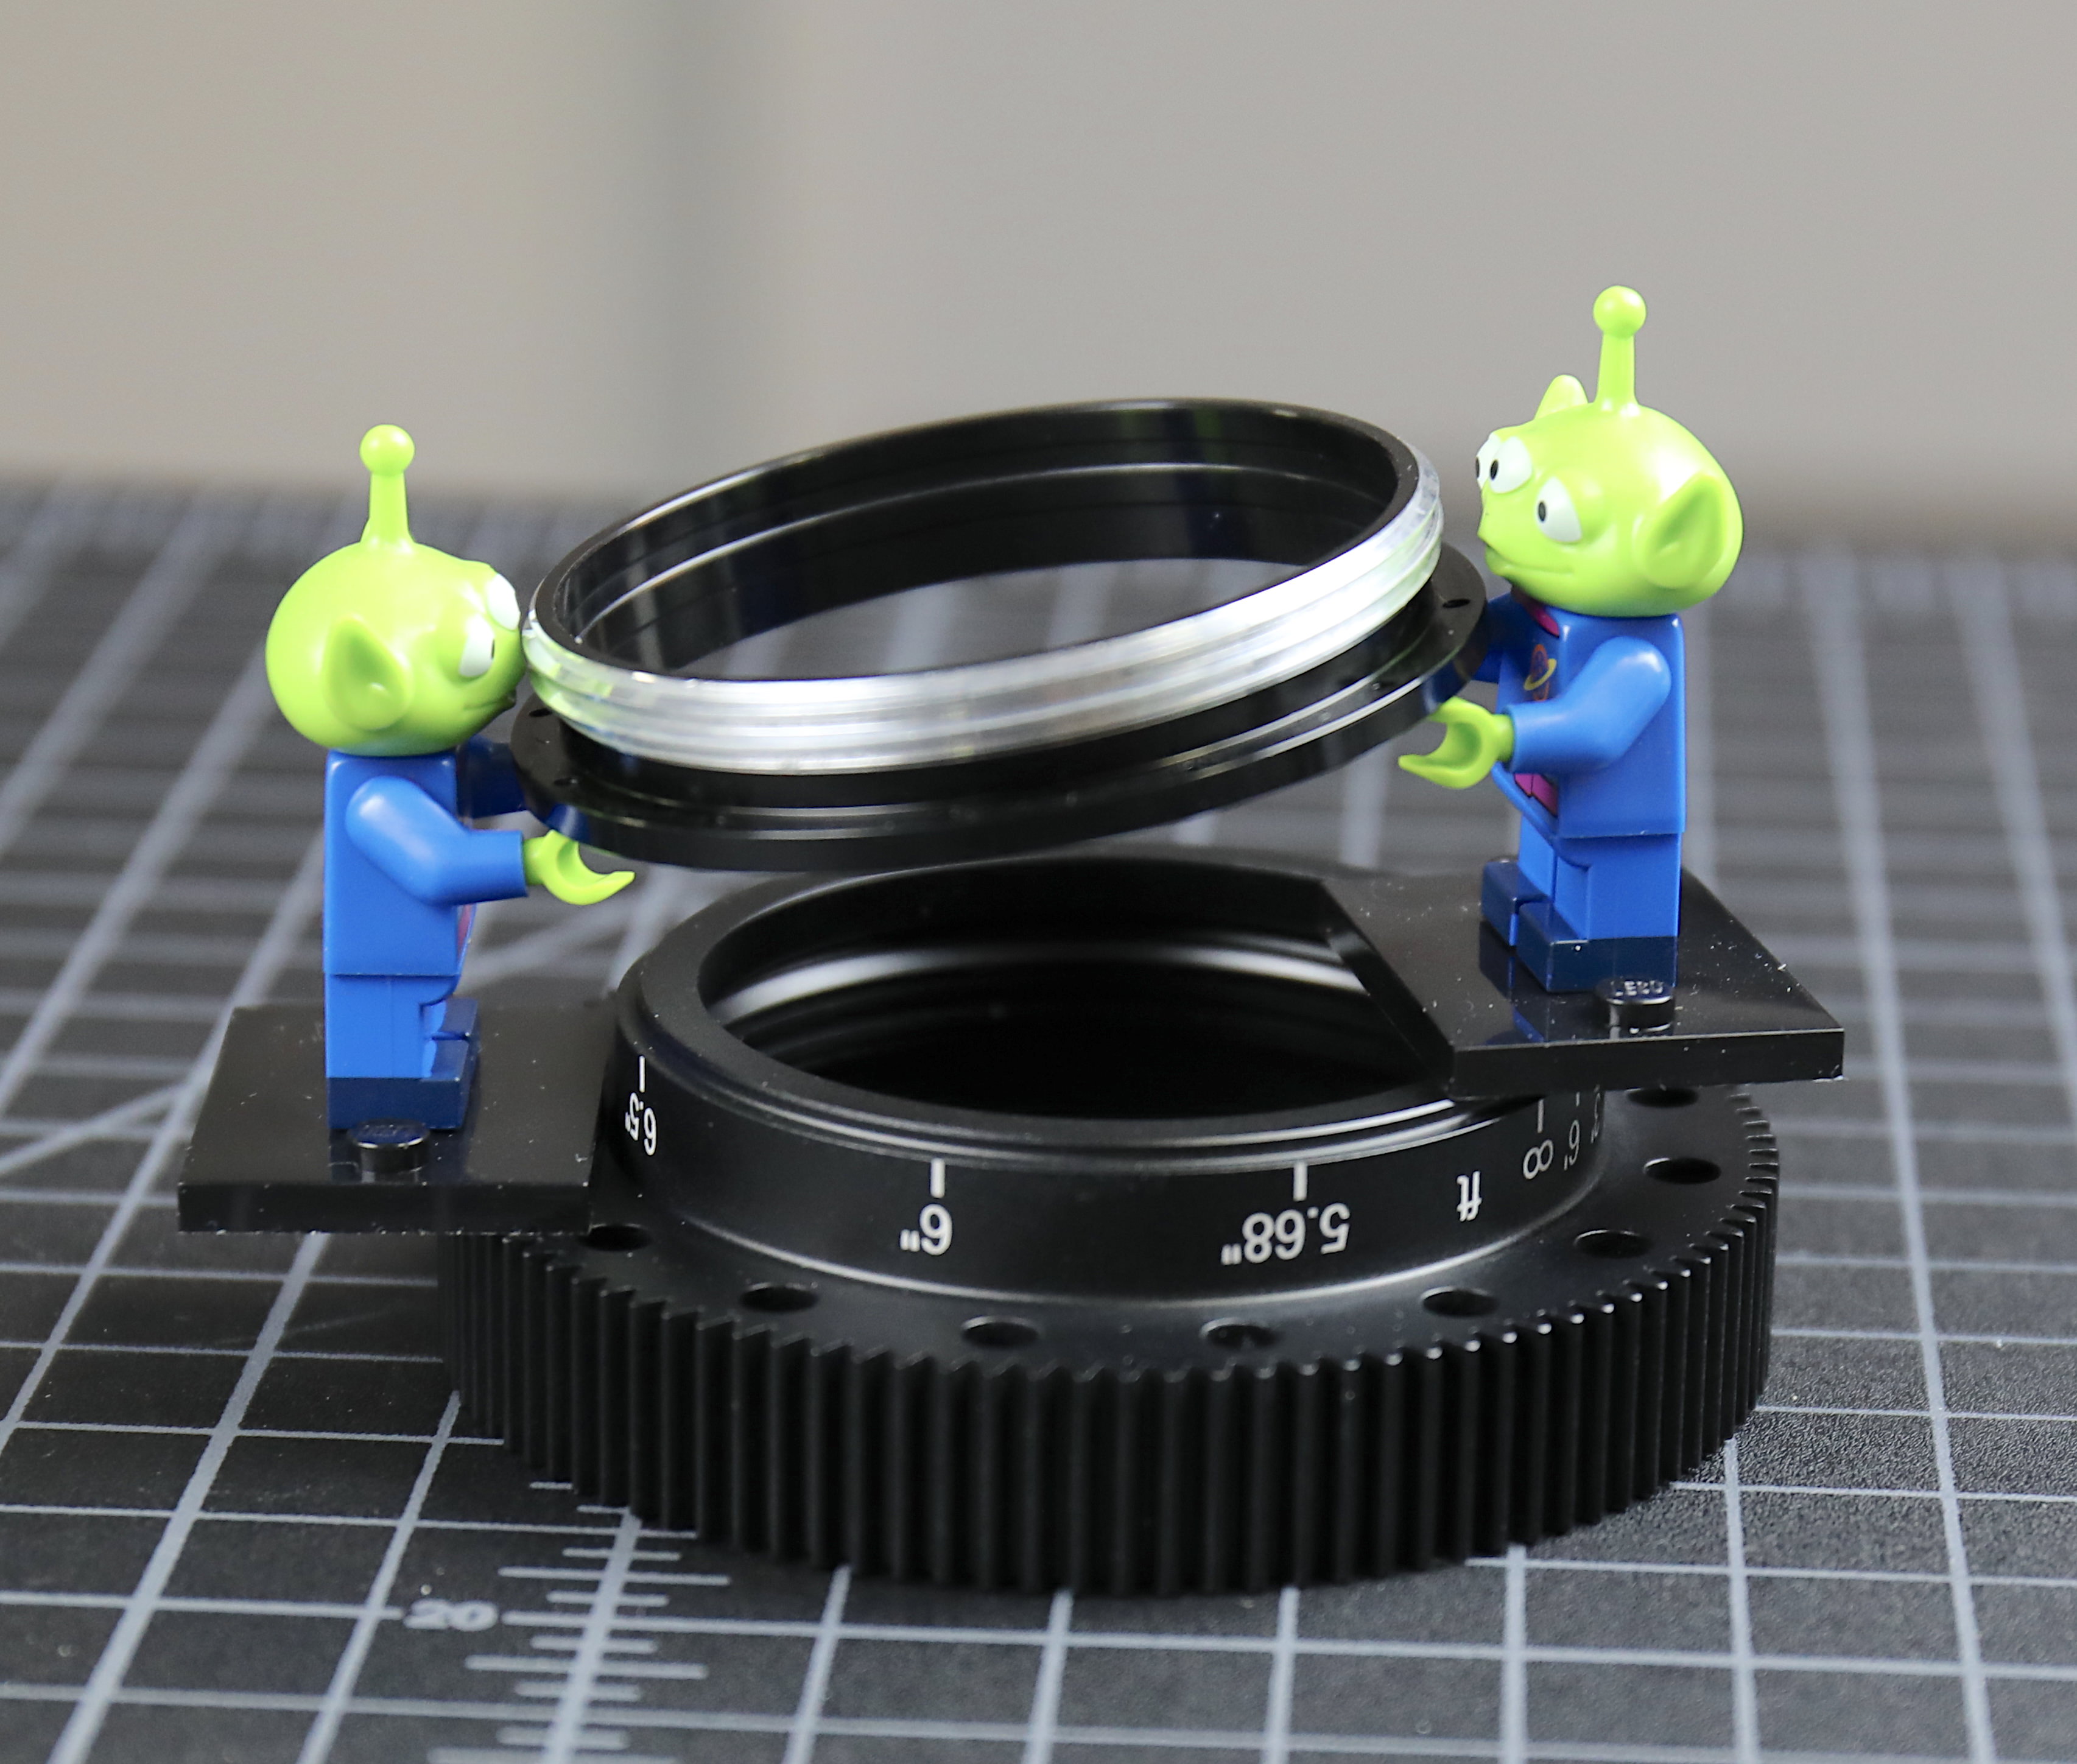
Finally, we unwrap the first element. These cost about $5,000 each so we tend to be a little paranoid about them.
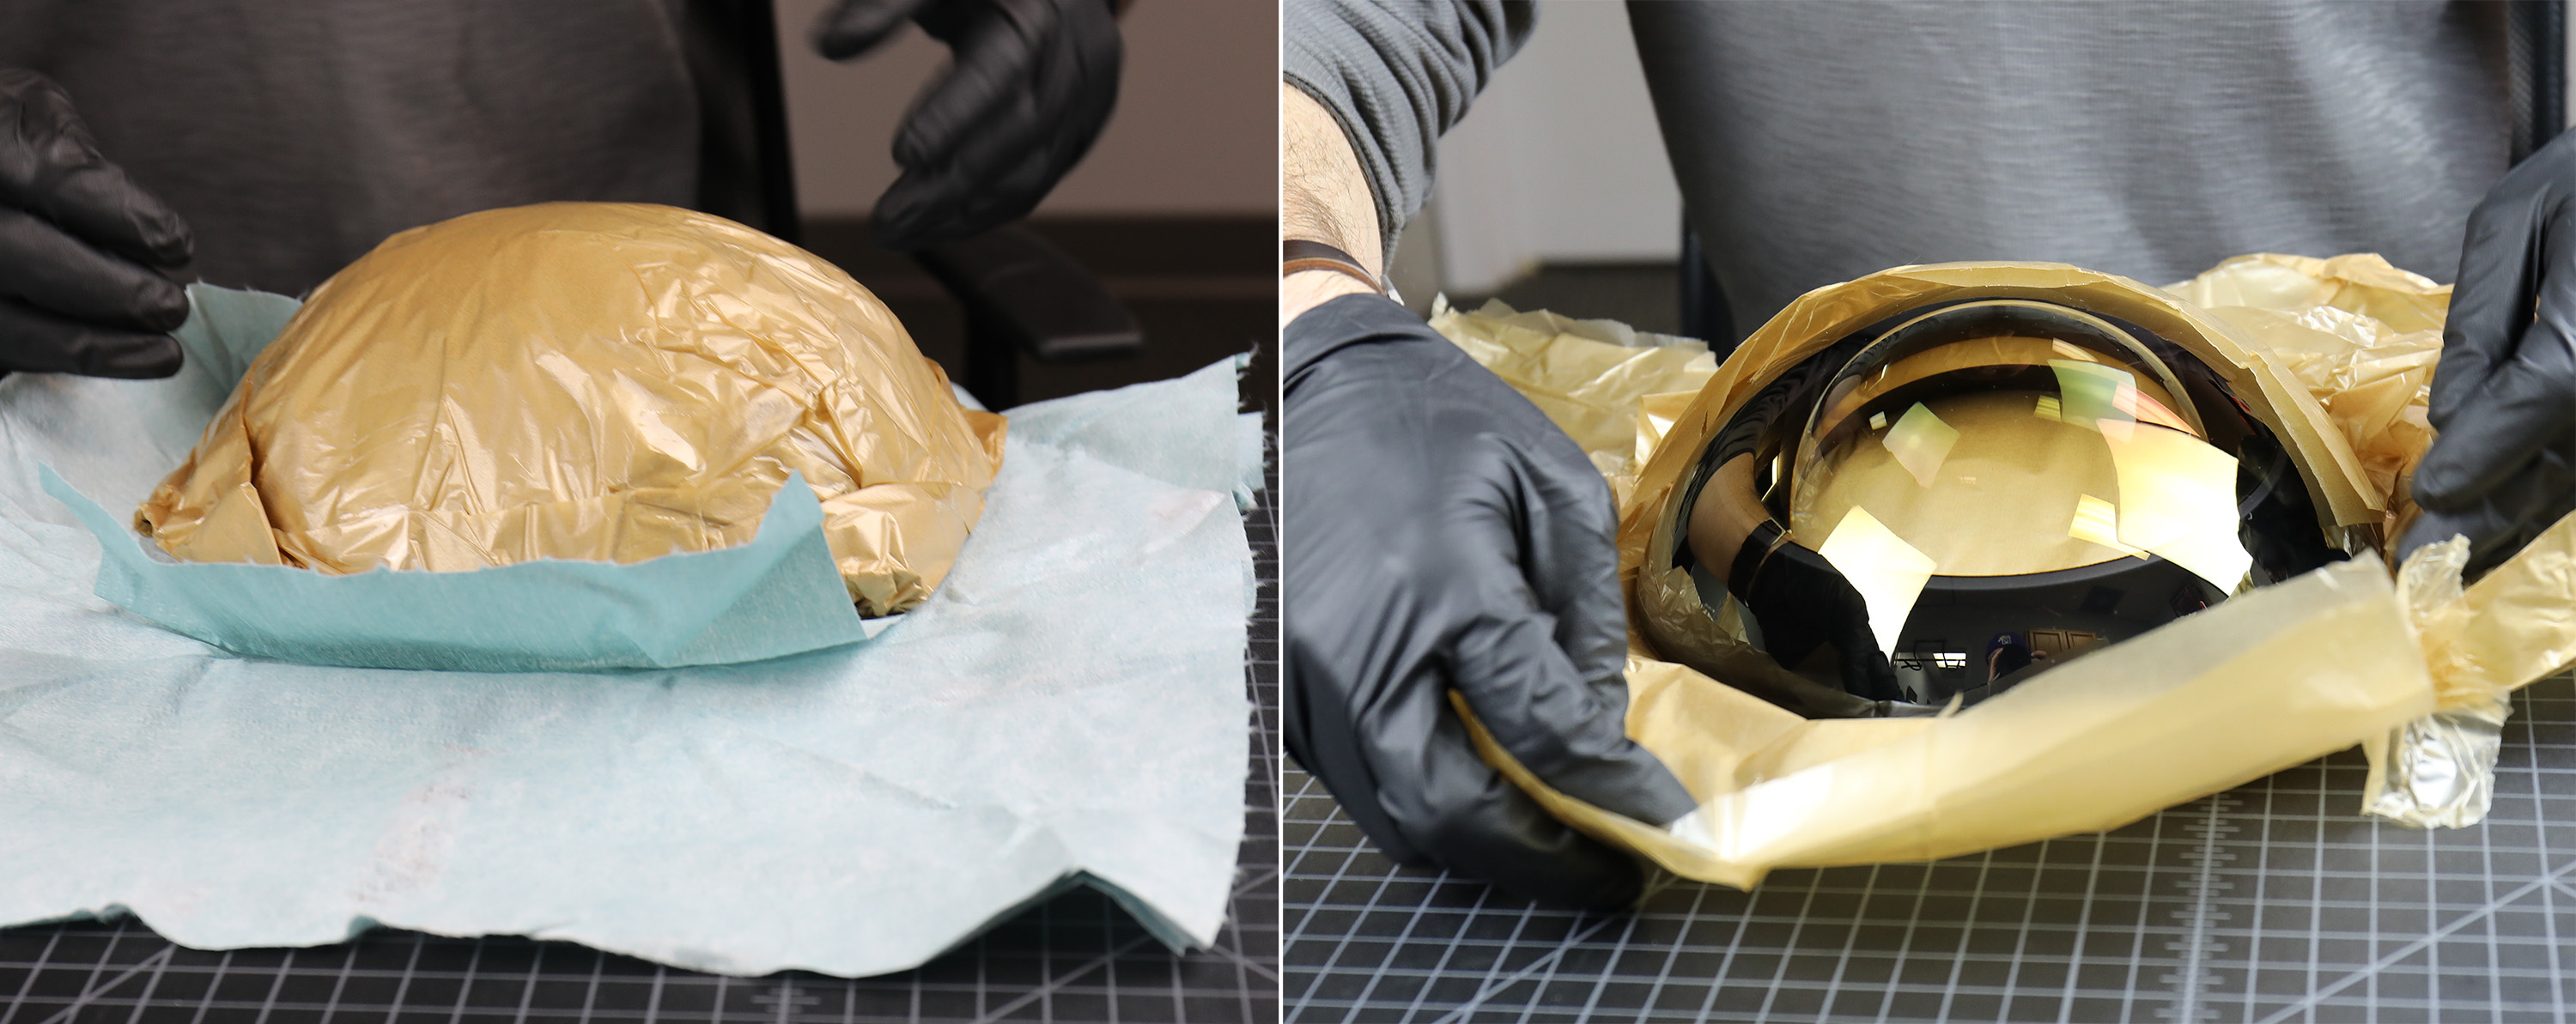
Once it’s set in place, it will be held by what we think is the world’s largest retaining ring.
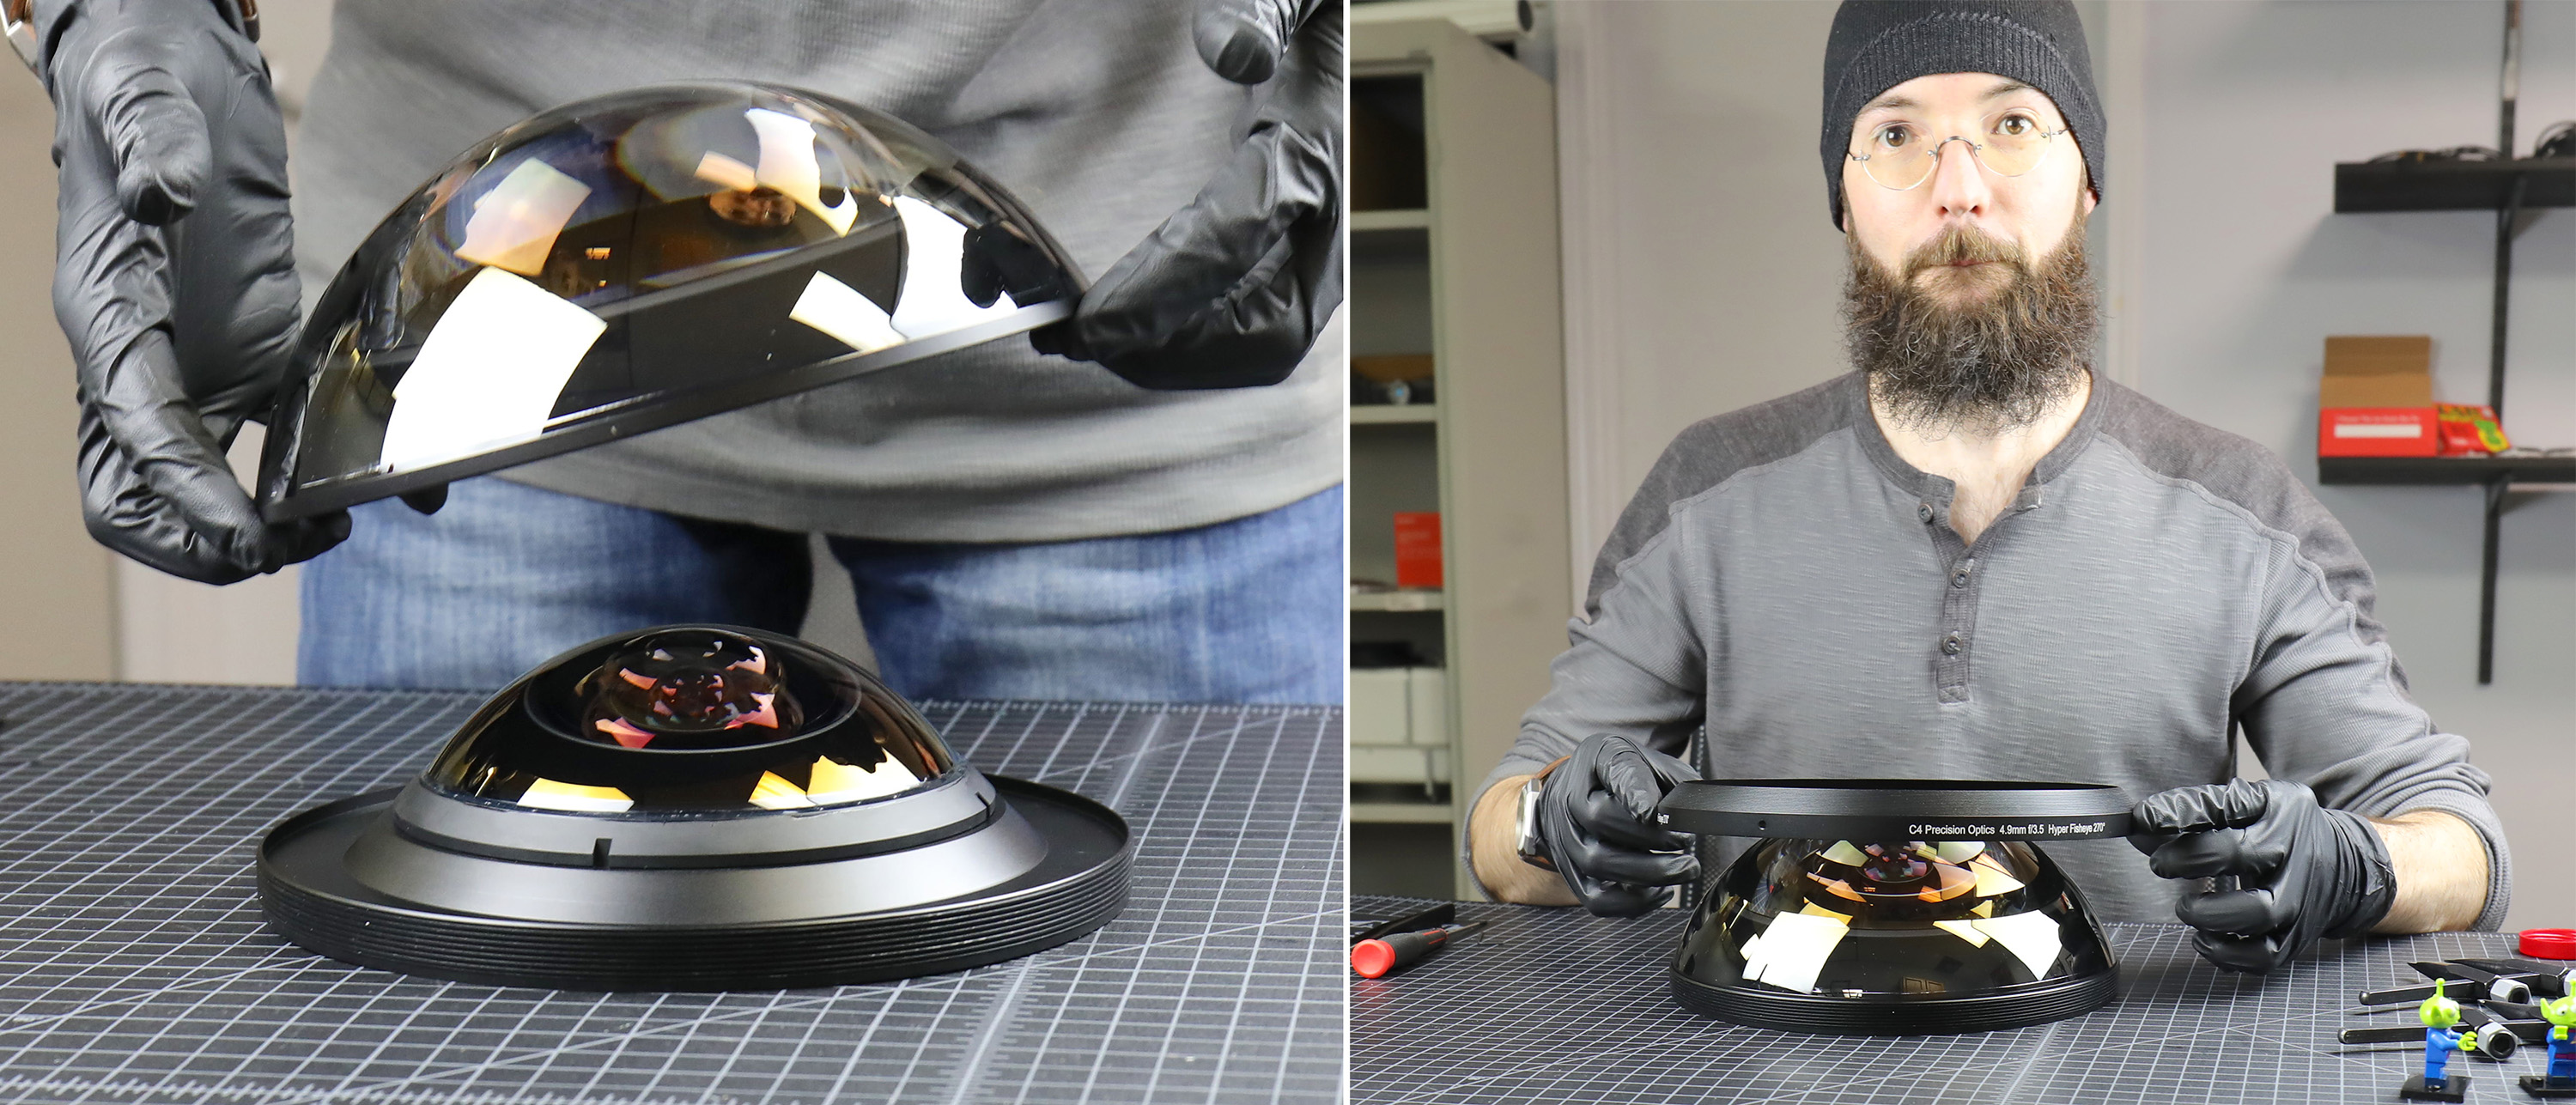
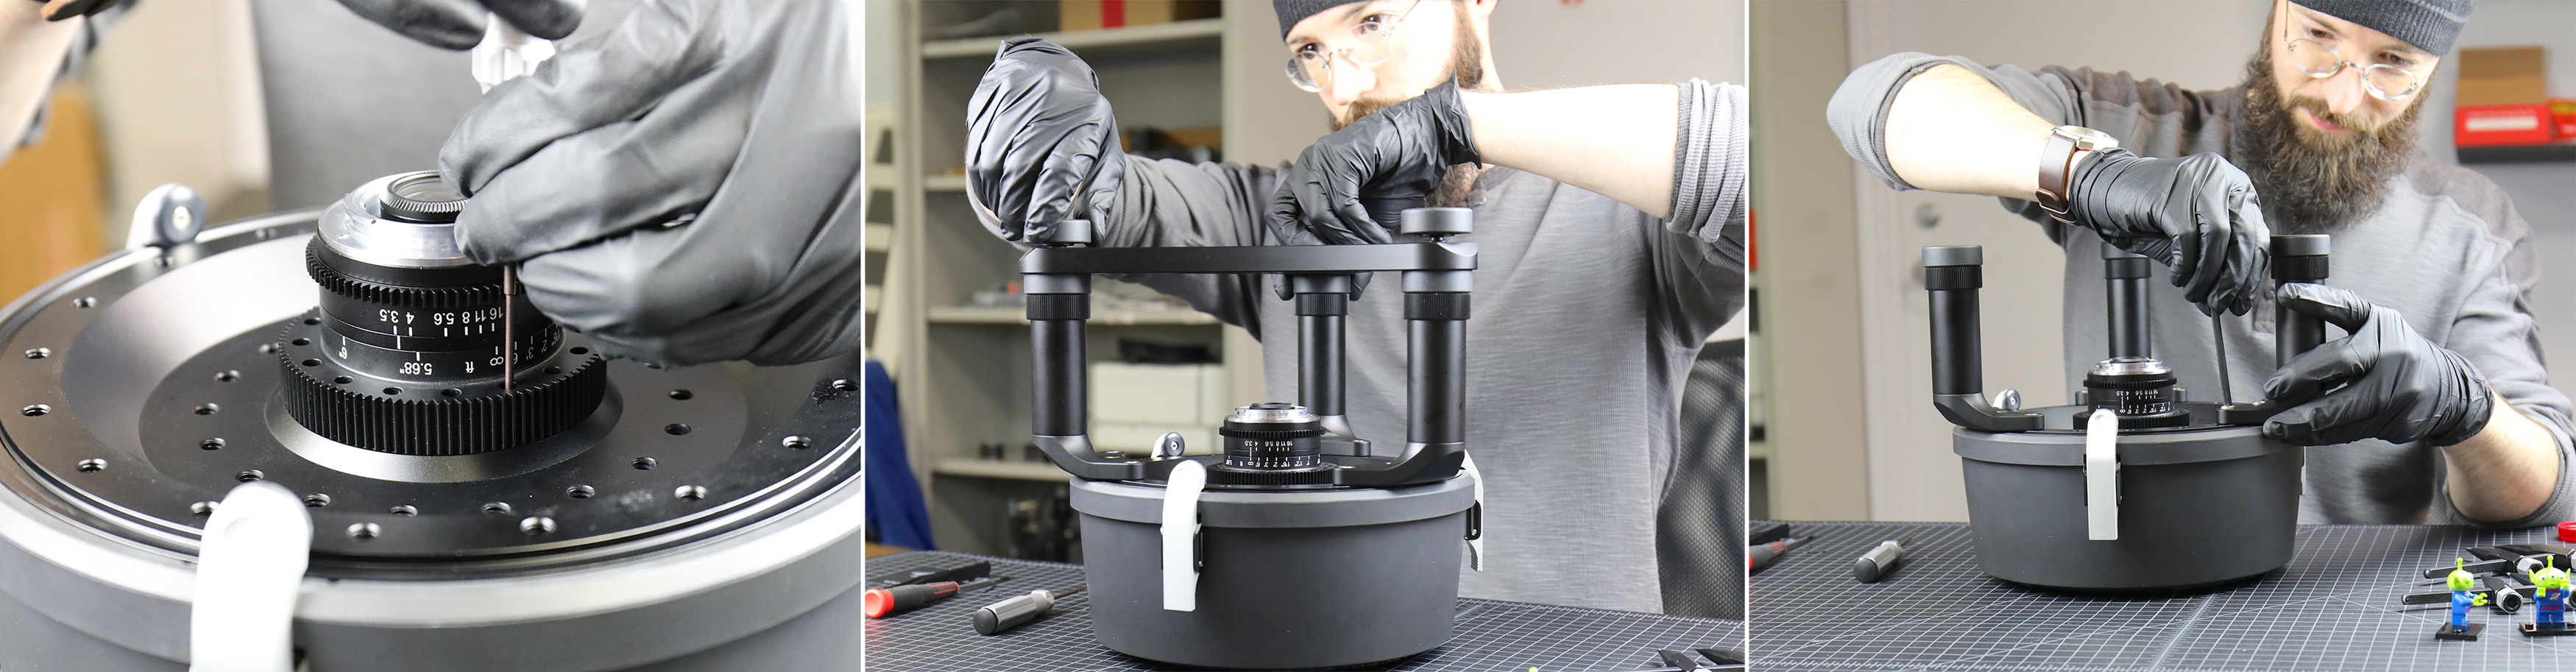
How do you tighten such a big ring? You temporarily put some big-ass screws in the locking slots to serve as handles. Once the ring is mounted, the front assembly gets put into its cap, which is the only reasonable way to hold it while we work on the back.
Now we can align and mount the rear assembly, the tripod legs, and finally the bottom platform.
With the legs in place, we turn it back over and put in a leverage screw for one last torque of the retaining ring. Then the ‘handle’ screw is removed and set screws placed in those three holes to keep the ring in place.

And assembly is done.

We’ll have to take the bottom platform off and fine tune the shims under the bayonet mount for infinity focus before we start taking pictures, but that’s about it.
For those of you who are curious, a smaller Sony camera (A7xxx) fits nicely protected within the legs. For larger cameras the bottom platform can be removed, the legs extended or removed, and various apparatus (rods, follow focus, aperture control, etc. ) mounted directly to the cheese plate.
This lens is one of two developed for C-4 Optics, so it likely won’t ever show up on our rental list. But it is a passion project of mine, so I wanted to show off some of the things I’m working on on the side. If you are looking for an ultra-wide, I’ve gone ahead and listed the widest lenses we have available for rental below.
| Lens | Angle of View |
| Canon 8-15mm f/4L Fisheye | 180 degrees |
| Sigma 8mm f/3.5 EX DG Fisheye | 180 degrees |
| Sigma 4.5mm f/2.8 EX DC HSM Fisheye (crop sensor) | 180 degrees |
| Nikon 10.5mm f/2.8G AF DX Fisheye | 180 degrees |
| Panasonic 8mm f/3.5 Fisheye | 180 degrees |
| Rokinon 8mm T3.8 Cine Fisheye (crop sensor) | 167 degrees |
| Canon 11-24mm f/4L | 126 degrees |
| Sigma 12-24mm f/4 DG HSM Art | 122 degrees |
| Sigma 8-16mm f/4.5-5.6 DC HSM (crop sensor) | 114 degrees |
| Olympus 7-14mm f/2.8 ED PRO | 114 degrees |
| Fuji XF 10-24mm f/4 R OIS | 110 degrees |
| Sony E 10-18mm f/4 OSS | 109 degrees |
| Panasonic/Leica 8-18mm f/2.8-4 ASPH | 107 degrees |
| Rokinon 10mm f/2.8 ED AS NCS CS (crop sensor) | 105 degrees |
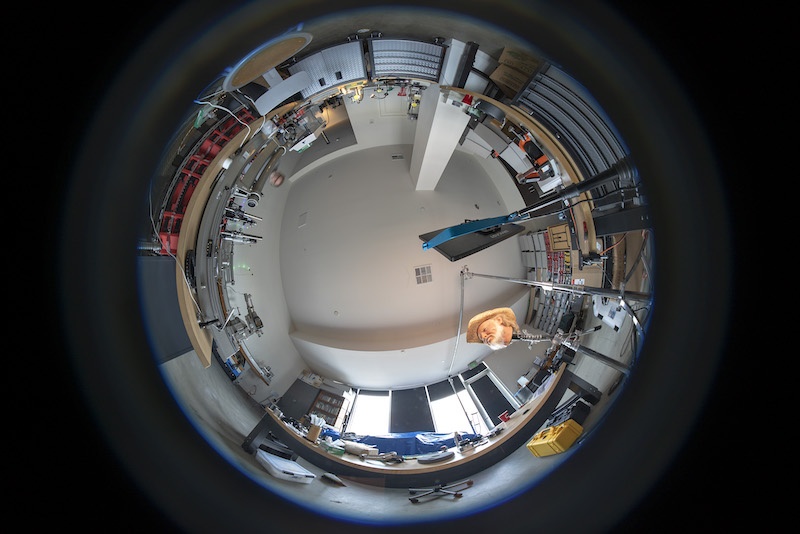
We’ve got some urgent things that are going to take up the next week, but we should have another post with images from the lens in 10 days or so. In the meantime, here is a quick teaser to give you an idea of how wide 270 degrees really is.

Roger Cicala, Aaron Closz, Brian Caldwell, and Wilfried Bittner
February, 2019

75 Comments
Andreas Werle ·
Cool!
geekyrocketguy ·
For other people who are wondering, my 5 minutes of Googling turned up two entities called C-4 Optics:
1) A Spanish eyeglasses company, and
2) A LensRentals April 1 joke from four years ago. I am genuinely impressed that they took their “I had fun abusing Zemax” lens design AND ACTUALLY PRODUCED IT. https://www.lensrentals.com/blog/2015/04/announcing-c-4-precision-optics/
Well done.
Astro Landscapes ·
YES IT’S THE FLYING SAUCER!!!
Personally, I’m looking forward to The Night Stalker…
Brenda ·
Most recent survey reveals that more than 75% individuals are engaged into web-based jobs. Internet world is becoming bigger and more beneficial and bringing plenty of make money online opportunities. Work from home on-line tasks are becoming poplar and improving individual’s everyday lives. Exactly why it is actually extremely popular? Mainly because it grants you to work from anywhere and anytime. You are able to get much more time to dedicate with your loved ones and can plan out tours for vacations. A lot of people are earning wonderful revenue of $42000 each week by utilizing the efficient and smart approaches. Performing right work in a right direction will definitely lead us towards becoming successful. You will start to get paid from the first day at the time you browse through our website. >>>>> PLU.SH/njexd
donpedro ·
I thought I had seen that diagram on this blog before!
Roger, did someone see that diagram and reach out, saying “you know, we could actually use that?” Or did it come to life some other way?
I’m also surprised a lens like this even needs focus adjustment. My Rokinon fisheye can be left at infinity for 99% of the time, so I’d imagine something like this would have even more DOF?
Roger Cicala ·
When we formed the company and were discussing what lens to make first, it was March, 2015. I thought it would be the ultimate thing to write this absolutely factual article that nobody was going to believe and publish it on April 1.
Khoshekh ·
Does that mean there’s a chance you’re going to make the night stalker too at some point? I mainly photograph plays and musicals so that’s the one I got excited for.
Roger Cicala ·
Not at a really soon point, no. It’s taken 3 years to get this one done.
Hendrik Müller ·
Hallo Roger and the other 3 C’s,
Your sense of humor is unsurpassed, not to mention the optical, engineering and manufacturing’s skills to create such a novelty even as a april’s fool. WOW
If only I had the funds, I would pay you full costs to create another one for me.
So, instead of meaningful money I can send you my meaningless congratulations and my best wishes, for your 2 companies and your private hobby.
regards from Switzerland
Hendrik
rocketride ·
Things get weird in Zemax* when you have HFOVs greater than 90 deg and some of the rays are not coming from ‘in front of the lens. I’ve only done camera lenses up to 190 deg. It hasn’t gotten manufactured, yet. OTOH I have done telescope eyepieces up to 110deg, which are in production.
*AFAIK, other software would handle it pretty much the same, so you’d still get that torus.
Brian Caldwell ·
I assume by “torus” you mean the weird edge of the front element. This is caused by the default method Zemax uses to square off element edges. Allowing the second surface to extend further back is a non-starter because it would become a concave hyper-hemisphere, which is strictly a NO-NO. Here is the actual shape of the front element, where all issues are cured by huge 45-degree chamfers:
https://uploads.disquscdn.com/images/fb639d6cb6537446b4edc1ee971d1879fdfea6fa4550c968032f860cb7c99f8e.png
rocketride ·
I know that. In order to get Zemax to correctly draw the lens, The semidiameter of R2 would have had to been extended enough to bring the point where the flat back plane meets the curve back past the edge of R3. It looks like you were already scary close to a full hemisphere there. I’ve forwarded this blog entry to pretty much everybody I work who would be interested.
Ed Magowan ·
You left out the step after tightening the retaining ring when you find the spacer that was SUPPOSED to go between the third and fourth lenses.
Alan B ·
“less distortion”
I’m not sure how to interpret that in this context.
Roger Cicala ·
There’s less distortion of the distortion?
Alan B ·
Ok. Is it even possible to de-fish a 270 degree field of view?
Roger Cicala ·
https://uploads.disquscdn.com/images/5d4fb093d1756e219737b74172f1148c7e2b1bca09ee7472995b7b37ae0d1ebb.jpg https://uploads.disquscdn.com/images/62ca3eae164eb436a18fe384cf30dfabb3d38707aab294878401bcb89cd5574e.jpg
Alan B ·
That is just amazing.
geekyrocketguy ·
Is that Hide the Pain Harold’s head on a stick?
Alan B ·
I’m thinking it’s the taxidermied head of someone who rented a RED and a set of Zeiss primes and took them to a color run at Burning Man.
Brian Caldwell ·
I call him Willie, and his sidekick is a cast skull I call Yorick. Its an amazingly lifelike wax head I bought from a colleague, who picked it up at a Hollywood curio shop, who in turn got it when the Autry Museum of the American West got rid of a bunch of stuff.
Really good wax figures are rare as hen’s teeth, and I’m extremely fortunate to have this one in my collection. Prior to finding Willie, I had searched for several years for a good wax head, but even items costing $thousands looked like crap.
Willie has great facial features and skin tone, wears a variety of hats and bandanas, and will stay absolutely still for months on end if need be. He’s not perfect, and has some damage to his right side, with most of his right ear missing and a big dig on his right cheek.
Here’s a closer view:
https://uploads.disquscdn.com/images/ffb3c9794e06dedea29c6936c7f8064283738364999ed11011f0d1e50b42d6cb.jpg
rocketride ·
As seen below, for that large a field, you’re either going to have fisheye distortion, or panoramic distortion. There is no way to map that in a rectilinear manner in a single continuous piece
Brian Caldwell ·
Less distortion relative to the ideal fisheye mapping, which is (Image Height) = (Focal Length) x (Semi Field Angle in Radians). Or y=f*theta for short. For comparison, rectilinear mapping is y=f*(tan(theta)). The 4.9mm Hyper Fisheye has less than 1 percent f-theta distortion. So, you’re description of “less distortion of the distortion” is pretty accurate!
Someone ·
What is a shape of a surface where in-focus objects are located (“object surface”) for this lens? Is it close to a sphere?
Brian Caldwell ·
I wrote an answer to this the other day, but I must have neglected to hit the “post” button.
For objects at infinity, which is roughly 2meters from the lens and further, everything in the 270-degree field of view is sharp. So, the object “plane” would be a sphere centered on the lens with a radius equal to the object distance. As you move in closer the ideal object plane starts to move away from the lens the further you go off-axis. A handy way to model this is to use a conic surface for the object plane.
Someone ·
Thanks for your reply!
Matt Grum ·
It’s all relative – if you are a fish I’m sure a rectilinear lenses would look distorted to you…
Not THAT Ross Cameron ·
Ooooohhhhh. Looking forward to seeing the photos – are you planning on making 2 in order to shoot back to back, and front to front… :~)
I went to find my ancient, 50-60 year-old Kenko 0.16x fisheye converter lens (http://dpanswers.com/content/rev_kenko_wa16.php) and it was hiding away, buried in the bottom of the lens box. It just doesn’t compare. But then it is just for fun. I mean, obviously this C-4 lens would only be used for serious work.
So Is Wilfried the silent 4th partner in C-4?
Roger Cicala ·
Wilfried’s amazing opto-mechanical design does indeed make him the 4th wheel of the bus.
MassimoTava ·
Dont keep us waiting for 10 days!
MassimoTava ·
Also, when will be be available to rent?
Razor512 ·
Are there any sample images taken with that lens?
Also, is it possible to give a lens like that auto focus and OIS? (With a decent camera attached, it could make a fun action camera to be helmet mounted while someone does some offroad biking :).
Zach Sutton Photography ·
We’re hoping to get some test lens with it in the next week or two, and will have a followup article when we get it all sorted 🙂
Ilya Zakharevich ·
From the sample photo, it may look as if your vignetting at 90° to the optical axis may be well-controlled! (How large is it?!) However, what is the reason for the blue-band near 135°? How can vignetting be color-specific without strong chromatic aberration?
Or are you correcting for CA in software too?
Without glued elements, my guts feeling is that it may be a bitch to cancel CA…
Roger Cicala ·
Ilya, I’m going to have to wait for Brian to come answer this part because he explained to me once about how it was color corrected, but I honestly don’t think I followed it and I SURE don’t remember it.
Brian Caldwell ·
Brandon is right – the blue band is a result of chromatic aberration of the pupil. However, this has no effect on bokeh.
The problem with discussing things like pupil aberrations is that they are so obscure that even many lens designers won’t really know what you’re talking about. In the case at hand, it may be more useful to think of the blue band as being caused by chromatic variation of vignetting, where the vignetting is created at the metal edge of the large front retainer ring.
If you look at a layout showing 135-degree chief rays (rays passing through the center of the iris) at three colors you will see a large separation of the colors at the first surface, but almost zero separation at the image plane:
https://uploads.disquscdn.com/images/fc375d38f51ccce02e012cad691cf8980ef00326a0b83cdd70ff1cc46f070990.png
All three colors make it through the first surface at 135-degrees off-axis. If you increase the semi field of view beyond 135 degrees red will get vignetted by the front lockring first, followed by green, and finally by blue. So, you wind up with a blue ring at the extreme edge of the image circle – beyond 270 degrees FFOV – that becomes more and more blue as you go further out, until finally blue gets cut off and you have black. Virtually all fisheye lenses behave this way.
The image inside the blue ring has extremely low chromatic aberration. From deep violet through deep red, lateral color never exceeds 10 microns at the image plane for. In fact, the glass types for 10 of the 12 lens elements were chosen for their abnormal partial dispersion properties specifically to keep lateral color as small as possible.
Brandon Dube ·
The blue band you can see at the bottom of the frame is due to chromatic aberration of the pupil. The pupils of such wide angle designs are very noncircular, and not of high quality. If you peer into the front of Canon’s 11-24L, you can watch the pupil distort, blur, and pick up chromatic aberration severely as you go into the corner of its field of view.
Then double its field of view, and here you are.
Ilya Zakharevich ·
IIUC, here you mean “pupil” in Pickwick sense: whatever apertures obscure rays for a particular source of light. (Somehow, I think of pupil only in paraxial approximation, where it does not jump to different planes depending on the source. ;-] The latter kind of pupil is visible only on bokeh circles?—?and chromatic aberration on it would make edges of bokeh colored.)
Very interesting! So “your” pupil at the extreme edge of view is a meniscus (intersection of two ovals). It should have a funny diffraction pattern! Are these patterns visible in photographic contexts?
Brandon Dube ·
When you see “stretched” looking bokeh from a large aperture wide-angle lens, that is an artifact of the pupil being poorly imaged off-axis.
Zach Sutton Photography ·
Also, the lens weighs over 25lbs, so I’d hate to see the support rig for someone who wanted to attach it to their helmet for offroad biking.
Remigiusz Modrzejewski ·
IBIS might work.
Matt Grum ·
IBIS would not work – pitching/yawing the lens would result in an image transform that can’t be matched by moving the sensor.
rocketride ·
And what are this hypothetical cyclist’s cervical vertebrae made of?
Razor512 ·
Doesn’t have to be much different, only takes a little mind over matter :).
entoman ·
My respect for you guys grows exponentially with every article I read here.
Michael - Visual Pursuit ·
You guys are batshit crazy – and I love you for that!
Ed Hassell ·
Thanks for this post. It is fascinating what goes into such a beast. However, you left off one lens from your list: the Irix 11mm f/4 rectilinear wide-angle lens — one that I hope, along with its 15mm sister — you will eventually put through your evaluation torture tests as you have done many others.
I got to shoot with the Nikon 6mm once. It belonged to NatGeo and was at Jorge Mora’s Nikon repair shop in Washington DC.
Julian ·
What I would love to see is some sample images taken with this lens…
Matt Grum ·
Can’t wait to see the skateboarding videos that get recorded with this thing 😉
Not THAT Ross Cameron ·
Skateboarding – pffffft. The best way to test this is with cat photos, or maybe as a reversing camera on a car, or perhaps attached to a smart phone with a selfie stick (and a crane to support it) ;~)
Wonder if LR will make a waterproof housing for underwater photos, although it might need somebody extra buoyancy….
I’ve got it – attach it to the roof of a car and drive around taking photos of the streets.
Or has a commercially available drone been made that can carry 25lbs+ payload?
OK, think I’ll stop before I jump the shark ;~)
Someone ·
Looks like you forgot Nikkor 8-15 Fisheye zoom https://www.lensrentals.com/rent/nikon-8-15mm-f3.5-4.5e-ed-af-s-fisheye
Alberto Azzoni ·
70 years ago the C3 was a world record holder bathyscaphe (-412m), now this really nice “piece of glass” looks like a porthole of that machine
https://www.google.com/search?q=c3+batiscafo&client=firefox-b-d&tbm=isch&source=iu&ictx=1&fir=-NMHPAnQb7KYjM%253A%252CP1Z7DJAYPQfoRM%252C_&usg=AI4_-kTludwyR6QPcxy4p_U4wpuUnnBn7Q&sa=X&ved=2ahUKEwj3o9OV3MrgAhXP6qQKHVFBAesQ9QEwAnoECAAQBA#imgrc=-NMHPAnQb7KYjM:
JoergenGeerds ·
I think you missed the HAL250 lens from Entaniya in your list of lenses, it is a similar “monster”, and comes with different mounts and configurations. We have a set of two, fitting both RED 8k and MFT, ready to rent if interested
Ryan Thomas ·
True that!
David Bateman ·
No, his list is for wide angle and fisheye lenses you can rent from them only.
A full list would be much much longer. My favorite is the cheap Fujinon 2.7mm f1.8 c-mount, that covers m43rds and is 185 degrees.
Roger Cicala ·
What David said.
Ognjen Golubovic ·
This is hands down the best blog post ever that I have read in my entire life. Its not only due to extremely interesting topic, but style as well, everything fits so perfectly.
You have my eternal respect.
Maxim Podtopelny ·
When you develop and produce insane optical design regardless of market demands, cost optimisations and other boring limitations but just for fun, it’s undeniably unquestionably The Best Job In The World
Maxim Podtopelny ·
Also I feel this question should be asked: will we see The Mark of the Beast and The Night Stalker in the future?
Roger Cicala ·
Maxim, not in the near future. It took 3 years to get this one produced and we haven’t gone past the optical designs on the others. Plus there’s the part about no money left. 🙂
Kelraz ·
Would absolutely rent this from you, probably 4-6 times a year. VR and full dome stuff.
Baconator ·
No beard cover, Aaron?
David Bateman ·
See if you can compare it to this CS mount lens:
https://www.bhphotovideo.com/c/product/1245295-REG/entaniya_ent280_280_deg_fisheye_lens_for.html/?ap=y&gclid=CjwKCAiAkrTjBRAoEiwAXpf9CUbxLy1znWYCXUNnI89-QAF2zar5HM1700F0ZCelYJpjtPSb1TQUYRoC5iEQAvD_BwE&lsft=BI%3A514&smp=Y
M12 lenses can actually work on m43rds cameras using a M12 to c-mount adapter and then c-mount to m43rds adapter. However, you have to use electronic shutter as M12 lenses will extend beyond the shutter, close to the sensor. Thes give crazy fisheye angles as well.
obican ·
I knew you weren’t kidding when you had published that article four years ago 😀
TheInfinityPoint ·
Fun fact: A 270 degree fisheye covers a solid angle of (sqrt(2) + 2)*pi steradians (4pi steradians for an entire sphere), which is 85.3% of all possible directions. As a comparison a ‘regular’ circular fisheye (180 degree coverage) only covers 2pi steradians, which is half a sphere, i.e. hemisphere.
Dragon ·
I have faith that some special person will rent this optic 🙂 (or maybe even buy it).
Claudia Muster ·
No optical adjustment mechanism?
Roger Cicala ·
There are some spacing adjustments, but in a fisheye like this you don’t adjust tilt.
Mike Fried ·
A few questions:
1) How do you protect the outer lens element from elements? I’d be pretty scared of messing up that huge outer lens element in a dusty, windy, salty, or rainy outdoor setting.
2) How might you mount this to a tripod? I’m guessing you have some system with the base plate.
3) Is the video reversed? It looks like you’re taking the lens apart, not putting it together.
This is really exciting. Thanks so much for sharing!
Roger Cicala ·
1) You don’t and we are.
2) Multiple ways, but other than the built-in tripod you’d generally use rods into either the cheees plate or base plate.
3)Yes it is.
rocketride ·
You don’t, that’s why the front element it only costs $5,000. Also, it was scary to manufacture (the element itself AND the entire assembly), it should be scary to use. ;<)
Brian Caldwell ·
Roger pretty much covered your questions, but I wanted to add a little about the lens cap that Wilfried designed. Its so sturdy that the lens could probably survive a 10-foot drop onto concrete. Here’s a photo of Wilfried *standing* on the lens cap as it rests on a scale. His feet cover most of the cap, so its a bit hard to see, but trust me its there! Admittedly, Wilfried is only a little more than half my weight, but still . . .
https://uploads.disquscdn.com/images/4a86a665ca546214ef3818665b4935e78e565599c71eb6298fd9842081e57269.png
Vladimir Gorbunov ·
Dear Roger, according to your comments under the various fisheye lenses, you’re not a huge fan of them. Then why choosing the extreme fisheye as your own project, instead of something like collapsible 24-400 mm F/2.0?
Roger Cicala ·
It wasn’t must my call. Brian is the designer, I looked more at potential markets. Part of it was we saw a unique niche for this. Part was knowing the price people were willing to pay for the Nikon 6mm fisheye. Part was what Brian wanted to tackle first.
dbarak ·
I’d like to see a lens with the camera inside it so it can capture an image that’s 306 degrees in all directions.
(I know, I know, that’s not possible.)