It is sometimes said that astrophotography is one of the most challenging types of photography out there. There are numerous technical problems to overcome, substantial initial investments, and a considerable chance of getting burnt out if you get too frustrated. Luckily enough people have attempted astrophotography to form a general idea about what the best way to get started is. I have personally found a passion for astrophotography, and I thought I’d share some tips on what you may need to know to get started in such a unique and exciting genre of photography.
Dealing with the Rotation of the Earth
The first problem that every astrophotographer will need to learn to deal with is the rotation of the earth. The light from the stars is very faint and will require long exposures to see. Exposures could easily range from 1 minute – 5 minutes long, and in time-lengths like that, it’s impossible to get sharp images without first measuring and counteracting the rotation of the Earth. The best way to deal with the rotation is by using a star tracker. Star trackers use a motor to spin your camera at the same rate as the Earth to cancel out the movement of the stars. There is no limitation to how advanced and expensive a star tracker can be, but for just starting there are many affordable options like the Skywatcher Star Adventurer or iOptron SkyTracker. While each system has its own calibration and method, the goal is to make sure the rotation axis of the mount is aligned with the star Polaris (north celestial pole).
There is an important caveat to purchasing affordable star trackers; they will not be able to handle large amounts of weight well (like a Sigma 150-600mm f/5-6.3 DG OS HSM Sports). To hold alignment, you will also need a sturdy tripod, perhaps even with added weight. Tracking the stars accurately is the bedrock of most good space images.
Often the “Rule of 500” or “Rule of 600” is brought up to suggest that you can take short exposures of the night sky without any trailing, and still produce images.
It suggests that your optimal exposure time follows the equation:
Shutter Speed (seconds)=500/(Focal Length * Crop Factor)
Yes, it is true if you expose for a short amount of time like the rule suggests there will be no trailing, however, you will get almost no light hitting your sensor. To produce good images we need as much light as possible. The rule of 500 is only a bandaid on the real problem.
Selecting a Lens
Assuming you have a stable tripod and star tracker to put your mount on, the next most important thing to decide is what lens you will use to capture images with. This is going to take a little introspection on your part because there is no correct focal length for astrophotography. You will have to decide what kind of images you want to make, and what kind of lenses will give you the focal length to produce those images. However, you will need to keep in mind some more caveats.
The first big issue is the limit of what your sky tracker can handle. You can’t expect an introductory level tracker like the Star Adventurer to handle a 500mm telephoto lens for long exposures; it just was not designed for that. Realistically the upper limit of what will be usable for a basic tracker is around 300mm. Of course, if you are willing to pay more money, there are other trackers out there that can handle a large telephoto lens, like the Orion Sirius, or SkyWatcher HEQ-5. This will come with added complexity and is probably beyond the range of just starting – but something to consider if you find passion in astrophotography.
The next big issue in lens selection is the amount of aberration in your lens. If you have ever tried imaging the stars before, you will probably have seen that they are very good at showing chromatic aberration (color fringing). The problem doesn’t just stop at color fringing though; you could see issues with astigmatism, spherical aberration, and many others. All of these things will lead to the stars in your images taking on weird shapes, instead of being the small points of light we expect.
There are some helpful tricks to avoiding lenses that will produce these artifacts. The first is to avoid zoom lenses as much as you can and only to use prime lenses. Prime lenses are designed to have excellent optical quality at a specific focal length, while zoom lenses tend to produce less image quality in favor of flexibility in focal length. The general rule of thumb is that prime lenses will produce sharper images over zoom lenses. The other helpful trick is to look for lenses from specific companies/lineups that are proven to be good. For example, the Sigma ART lineup with lenses like the 35mm f/1.4, 50mm f/1.4, and 135mm f/1.8 have been shown to produce great astro images. If you don’t want to pay so much for lenses the Rokinon lens lineup has also been well proven and beloved within the community. The Rokinon lenses will not offer you autofocus, but that doesn’t matter since autofocus struggles in low light. Some particular standouts from the Rokinon lineup are the 14mm f/2.8, the 24mm f/1.4, and especially the 135mm f/2.2. The Rokinon 135mm is perhaps the best value lens you can purchase to do astrophotography when starting.
Choosing a Camera
Believe it or not, the camera you choose is probably the least important part of the equation when you start shooting astrophotography, so long as the camera has a manual exposure mode. Of course, if you pay to get a top of the line DSLR, your raw images are going to be cleaner, have higher resolution, and better color reproduction than a more budget-friendly camera. The difference with astrophotography is that the picture taken with more exposure time is almost always better. If you aren’t familiar with the process of stacking images, consider familiarizing yourself with the process, since it is the key to processing astro-images. There is a common saying in astrophotography that “integration time is king.” The image that took five hours of exposure time to make will almost always be better than one which took five minutes, regardless of the camera.
Since the actual quality of the camera you pick is not terribly important, how do you decide which one to choose? My answer would be whichever camera is most accessible to use for long periods of time with the least effort.
In many cases, people who are starting astrophotography will sit with their intervalometer for every-single-exposure that they take. This gets old fast, and the act of wrangling an intervalometer around can shake your camera which will ruin your images. The way to get around this is to control your camera with a computer with only a simple USB cable. There are some very easy to use programs like BackyardEOS and BackyardNikon that will allow you to take images unattended, or even while sleeping. Not all cameras have great software support for astrophotography, so check ahead of time to see if your camera is capable. Canon and Nikon are the most supported manufacturers, so I would recommend sticking to them. There are some proven astro-cameras from each company like the Canon 6D, the Nikon D610, Nikon D5600, and plenty others.

Where to Go & Where to Look
Assuming now that you have a camera, a lens, a way to track the stars, and a way to control your camera for long exposures, where do you go to capture your pictures, and how will you know what to look for?
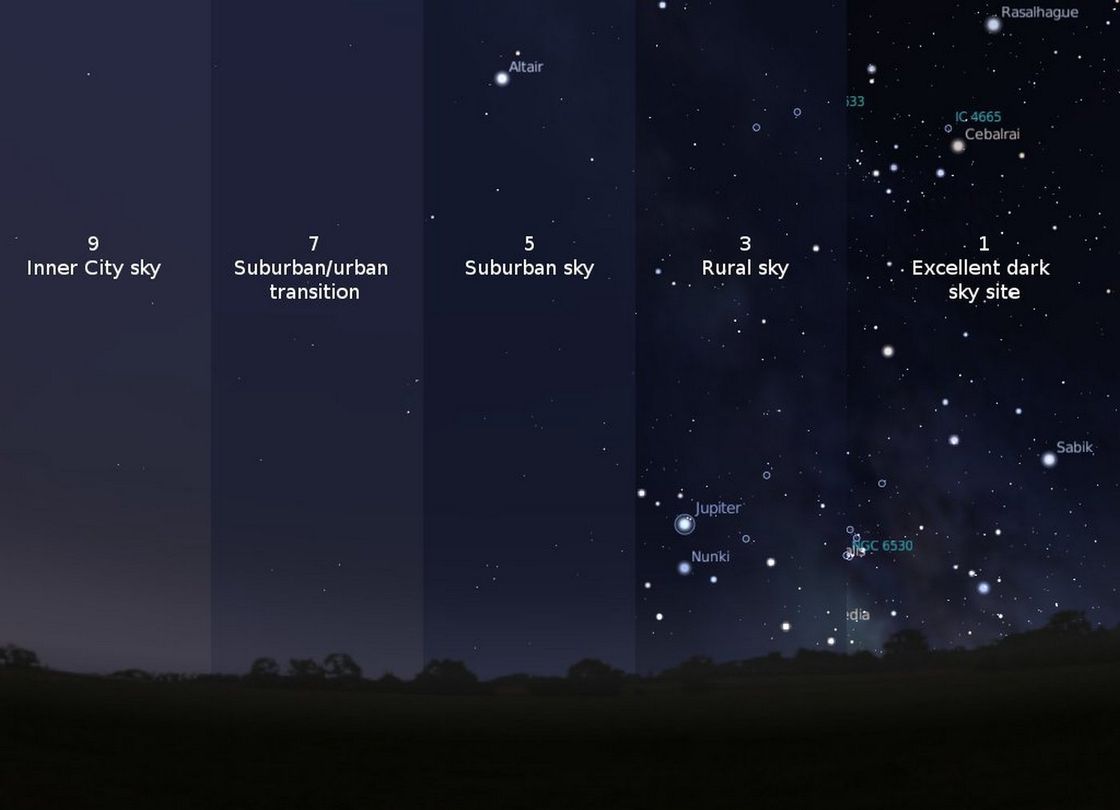
The best place to go to take your pictures is as far away from city lights as possible (within reason). The best way to figure this out is with a light pollution map.
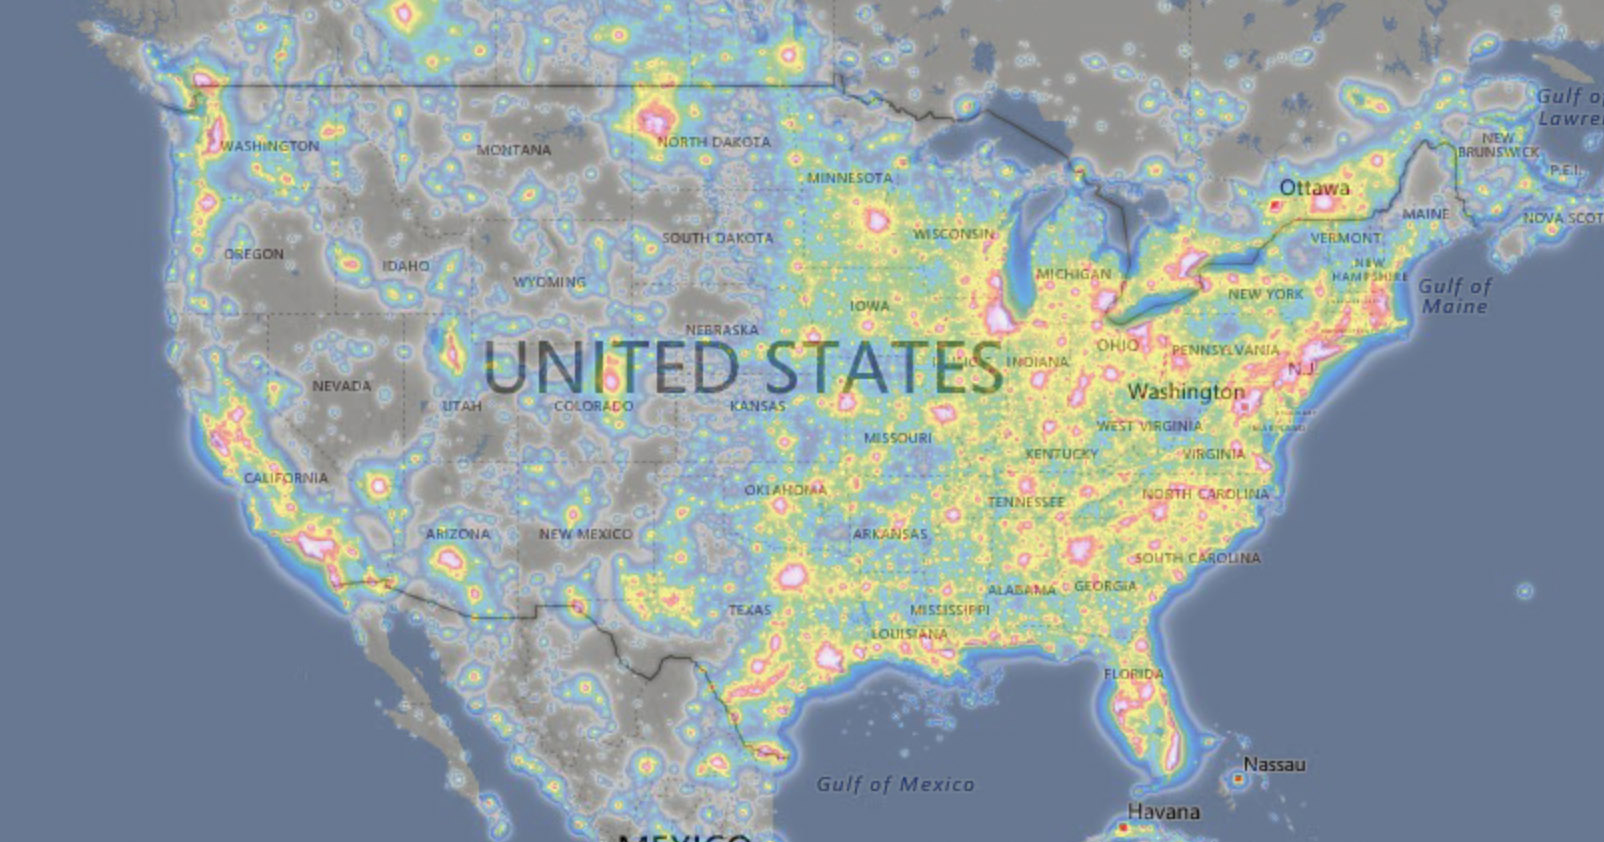
The boost in image quality you get from shooting in dark skies is incredible and cannot be overstated, and you’ll never regret driving that extra 20 minutes further to get away from the city lights.
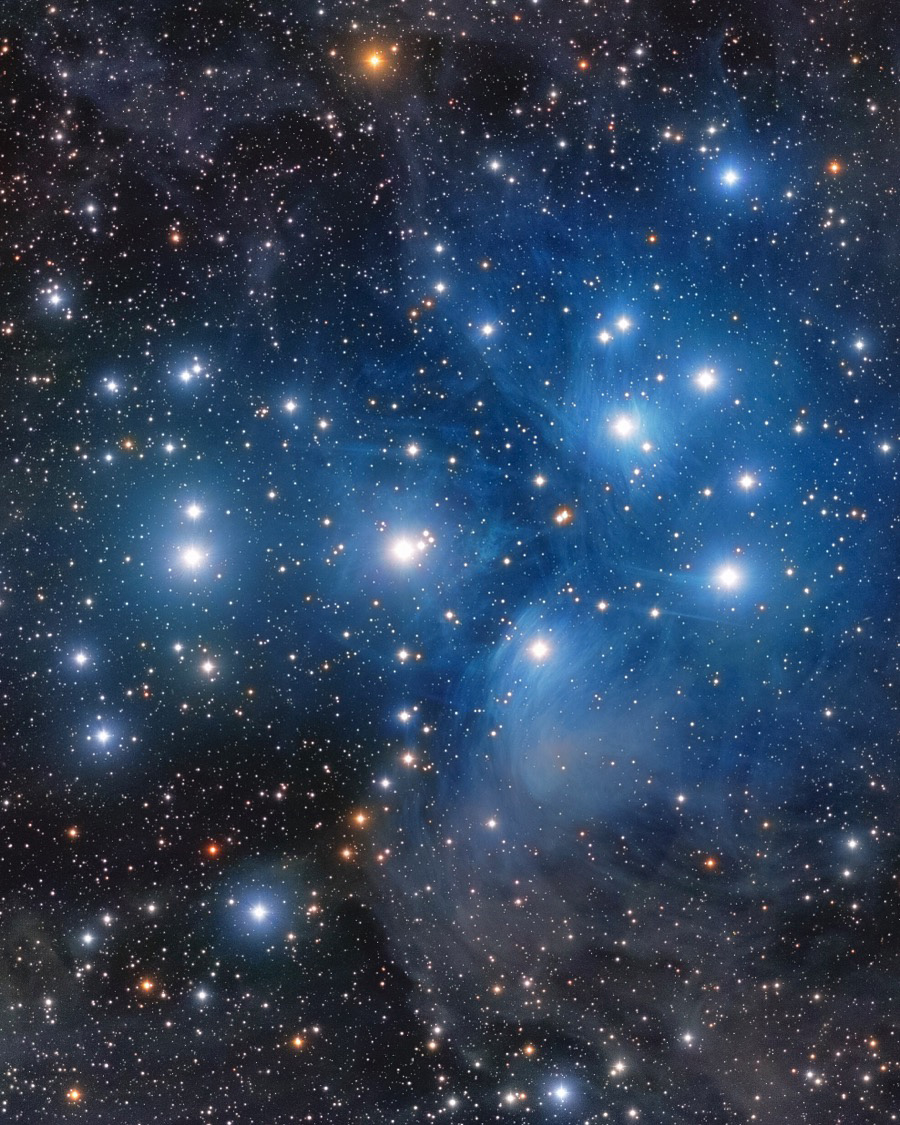
The best way to find out where to look in the sky is just by downloading a sky chart app to your phone (SkyGuide, Stellarium, etc.) or by downloading on to your computer. Use these charts to get familiar with the night sky, and learn where your imaging targets are. Some good ones to start on are M42, M31, M8, and M45.
It is essential to keep your expectations low for your first few attempts. Astrophotography is going to take you lots of practice to get down right, even when you are just starting. You might get disheartened or frustrated, but if you keep pushing through, then it will only serve to make your first image much more satisfying.

One final piece of information about your images that you should always keep in mind is a thing called the signal to noise ratio (SNR). SNR is nothing but a method of scaling the quality of an image. Basically:
SNR =Target Signal/ Noise Signal
Your target signal is, of course, the light from space which you want to make an image from, and the noise signal is any source of light or noise which you don’t want in your image. For example noise signal could be light pollution, camera noise, or light from the moon. What you need to be able to do as an astrophotographer is to find ways to maximize this to improve your image quality. You could increase your target signal with a faster lens, a longer exposure, or stacking more frames. You could decrease your noise signal by driving to a place with no light pollution on a new moon, or by choosing a camera body with less noise.
Once you have all your gear, this is perhaps the most important thing to keep in mind when taking pictures. Astrophotography in its most basic form is nothing but separating the light from space from all of the things which pollute it. As a process, it is very similar to panning for gold. You could fill a gold pan with dirt, pan for maybe five minutes, and find absolutely nothing. However, if you pan through hundreds of pounds of dirt, you have a good chance at separating the nugget from all the things you don’t care about. Similarly, if you go out and only take one thirty-second exposure, it is reasonable to expect that you will end up with mostly dirt in your pan.
Once you have all your gear up and running, you should try to image one thing for as long as you can until you get bored. Once you start, your threshold for getting bored imaging one thing will be extremely low. This is the pitfall for people who are beginning astrophotography. Over time your tolerance for sticking with one object will increase, and your images will improve significantly. And if you’re lucky, you might pull your images up on your computer, and see that you’ve struck gold.
If you have any questions feel free to comment below or contact me through my Instagram @astrofalls. For more information and tips on astrophotography, be sure to check some other resources like https://www.cloudynights.com and the astrophotography subreddit.

46 Comments
Zach Sutton Photography ·
Thank you for your insight, Bray! This deep space stuff completely blows my mind.
Bray Falls ·
Thanks, Zach!
Joey Miller ·
I see the D810/180mm notation, but what cameras/lenses did you use for the other shots? Would be nice to know what’s needed once someone gets more advanced.
Bray Falls ·
I use an orion ed80t-cf and SBIG ST8300m for most of my other images. Its a cooled monochrome camera that lends itself better to deep sky. When you do upgrade getting a dedicated astro cam like this is a very good idea.
Zach Sutton Photography ·
Interesting camera choice. As someone who has frequented the medium format world, I’ve seen never-ending arguments as to why CCD sensors are better from overly opinionated forum readers. Is there a particular reason why you choose the ST8300m over a DSLR or mirrorless system?
Ed Hassell ·
Cooled sensors have significantly less noise than non-cooled DSLR/MILC sensors. Monochrome sensors don’t have complex Beyer filters; rather, a color wheel is used to differentiate the color spectrum (and its filters can be customized for specific needs or effects). At the long exposures needed for astrophotography — often multiple hours and/or multiple shorter segments adding up to multiple hours — the extra resolution and control is more significant than the convenience factor of a DSLR or MILC body.
Zach Sutton Photography ·
Great insight, thank you Ed!
Bray Falls ·
Ed put it really nicely. The noise is far less in a cooled camera, especially for long exposures. The spatial resolution will also be greater. You will also get more sensitivity since 100% of the cameras pixels will be dedicated to any particular wavelength.
Joey Miller ·
Thanks for the info! What tracking mount are you using?
Ed Hassell ·
As if I don’t need another expensive hobby on which to go way overboard, I just ordered a William Optics RedCat 51 250mm f/4.9 scope/lens. Knowing that my eyes are bigger than my stomach, I’ll probably set my sights on a 25cm refractor or 40cm SC next month on an AP mount. (Serious about the RC51, not so serious about the oversized alternatives.).
Bray Falls ·
Yeah there’s no limit to how expensive it can get. I always try to live by “buy once cry once”.
Dave Hachey ·
You might consider joining an astronomy club near you. Perhaps they have an equatorial mount system for use by club members. Also, a lot of local expertise for someone just starting out.
https://www.astroleague.org...
Franck Mée ·
I notice you didn’t say a word about Pentax DSLRs. Their “astro-tracer” function (GPS needed, so easier with K-1 and K-3 II) makes it very easy to take long exposures without a rotating tripod mount.
Have you tried it? Why did you choose to not even speak about it?
DStraw ·
If they wrote about every camera every time, this wouldn’t be a blog, it’d be an encyclopedia. I’m sure Mr. Falls has his reasons for his recommendations.
Franck Mée ·
It’s not about “every camera every time”, but they’re talking about astrophotography and there’s one brand (and I think it’s the one and only) who has a dedicated function for it. It seems to me that’s the exact proper place to speak about it.
Bray Falls ·
The other issue with the Pentax function is that the other solutions to tracking provide upward mobility for upgrading your setup while the Pentax does not. I could spend extra money on a tracker and not have to worry about my ability to track if I switch out my camera, or decide to use a telescope. At 400-600mm it is incredibly unlikely that the sensor tilting would be accurate enough, and at that focal length reframing would have to be done many many times. The reason you can’t find any concrete tests of the function at these focal lengths is because the easier and better solution is to just track with a mount instead.
Colin ·
I have been shooting astro photos for about 3 years now and I learned what everyone else who does this learns….there are no shortcuts. The K1 and its astro function will not produce the kind of images necessary to compare with what has been shown here let alone what is possible with an entry level 300 dollar tracking mount. There is so so so much more to this then what you keep thinking you can do with the K1. https://astrobackyard.com/ here is where you start.
Arun Hegde ·
Franck: A GPS based tracker that simply moved the sensor of the camera as the astro-tracer does would have nowhere near the level of tracking accuracy needed to get images that come anywhere remotely close to what is being shown here. It might eliminate the need for a tracker for a ultra-wide angle Milky Way shot, but for images like this… don’t even bother.
Franck Mée ·
Have you tried it? Or are you guessing?
That’s the whole point, I think: there’s a manufacturer that has a dedicated function for astrophotography. If it’s good, it’s good to know; if it’s bad, it’s good to know too. And I don’t see any better place to speak about its qualities and shortcomings than that kind of blog post.
(I own a K-1 and gave it a quick test, pictures seemed sharp enough up to ~20 seconds with a 500 mm. But I don’t know the first thing about astro so I had no clue about what other settings to choose and what to do with the pictures apart from “it seems sharp”, so I’m curious about professional/enlightened test here.)
Arun Hegde ·
Franck… No, I haven’t tried it. But after two years of astrophotography, I don’t have to “guess”. I know what it takes. The kind of images you see here require hours of exposure; no tracker can track that long, so you are taking exposures a few minutes long and stacking them. There is simply no way to follow an object with a 500 mm telephoto that long by merely moving the sensor. And I took a look at the actual images posted on Amazon by people who have used it. It behaves as I would expect. Trailed stars on single images. Even if you could some how take multiple images with it, stacking software would have all kinds of problems. Better than nothing, but not a serious astro photography tool. And it is priced accordingly.
Franck Mée ·
“price accordingly”, well… It’s still the cheapest way to get the D810 sensor. 😉
Still, I don’t know if it’s a good sensor for that, maybe the 16-24 Mpx have a better s/r ratio?
Bray Falls ·
A d810 sensor isn’t required for good pictures. The thing that will really dictate SNR for a given lens is going to be its pixel size, read noise, and dark current noise. Bigger pixels will allow you to get more light and perhaps overcome worse noise effects. For example the A-7s has a full frame sensor but only 12MP, so it has much larger pixels and greater sensitivity. In the end though it mostly comes down to integration time.
Arun Hegde ·
The biggest advantage of the D810 sensor is its dynamic range at low ISO. This is less important for deep sky work. What you ultimately run into with DSLRs is the limitations of thermal noise which increases exponentially with temperature. For example, in spring and summer, any exposure above a minute or so will have thermal noise as the dominant component. You can overcome this to some extent by using a faster lens and putting more photons on the sensor in a shorter amount of time before the thermal noise builds up, but good ones are very expensive. Ultimately, there is limit to what can be realistically achieved with a DSLR and lens, and you eventually migrate to a dedicated astro set up (equatorial mount, imaging scope, guiding, cooled camera, filter wheel, laptop, dedicated software…). Lots of fun and frustration, and not very bank account friendly!
Bray Falls ·
That function has its own practical limitations, and it adds more complexity to taking the images. For example you could leave a tracker imaging one object for multiple hours while you go to sleep, but the Pentax would require you to reframe over and over again. It also likely does not have the accuracy required for medium-longer focal length long exposures on the order of minutes. Pentax will also lack the software support and lens selection of the other camera companies.
Ed Hassell ·
The Ricoh/Pentax O-GPS1 unit is limited to 5-minute exposures and lenses 135mm or less in focal length. It works best with wide-angle focal lengths; the longer the lens, the less effective it is. It’s a great tool; however, it has severe limitations — especially since the resulting images cannot be stacked as is very often done with deep-space photography. Moreover, noise increases dramatically with longer (multi-minute) exposures using DSLR and MILC bodies — something that is much less a problem with dedicated, cooled astrophotography sensors/cameras. Long exposures with astrophotography are 5 hours — not 5 minutes….
Arun Hegde ·
I’ve been doing deep sky astrophotography for getting on two years now. I can tell immediately that to get images of the depth that you’ve gotten requires an enormous amount of effort, skill, and equipment. An excellent mount, excellent optics, a cooled camera,very accurate polar alignment, perhaps a guiding set up, and lots of processing skill using DSS or (preferably) PixInsight and perhaps narrow band filters (which I suspect you used on at least some of your images).
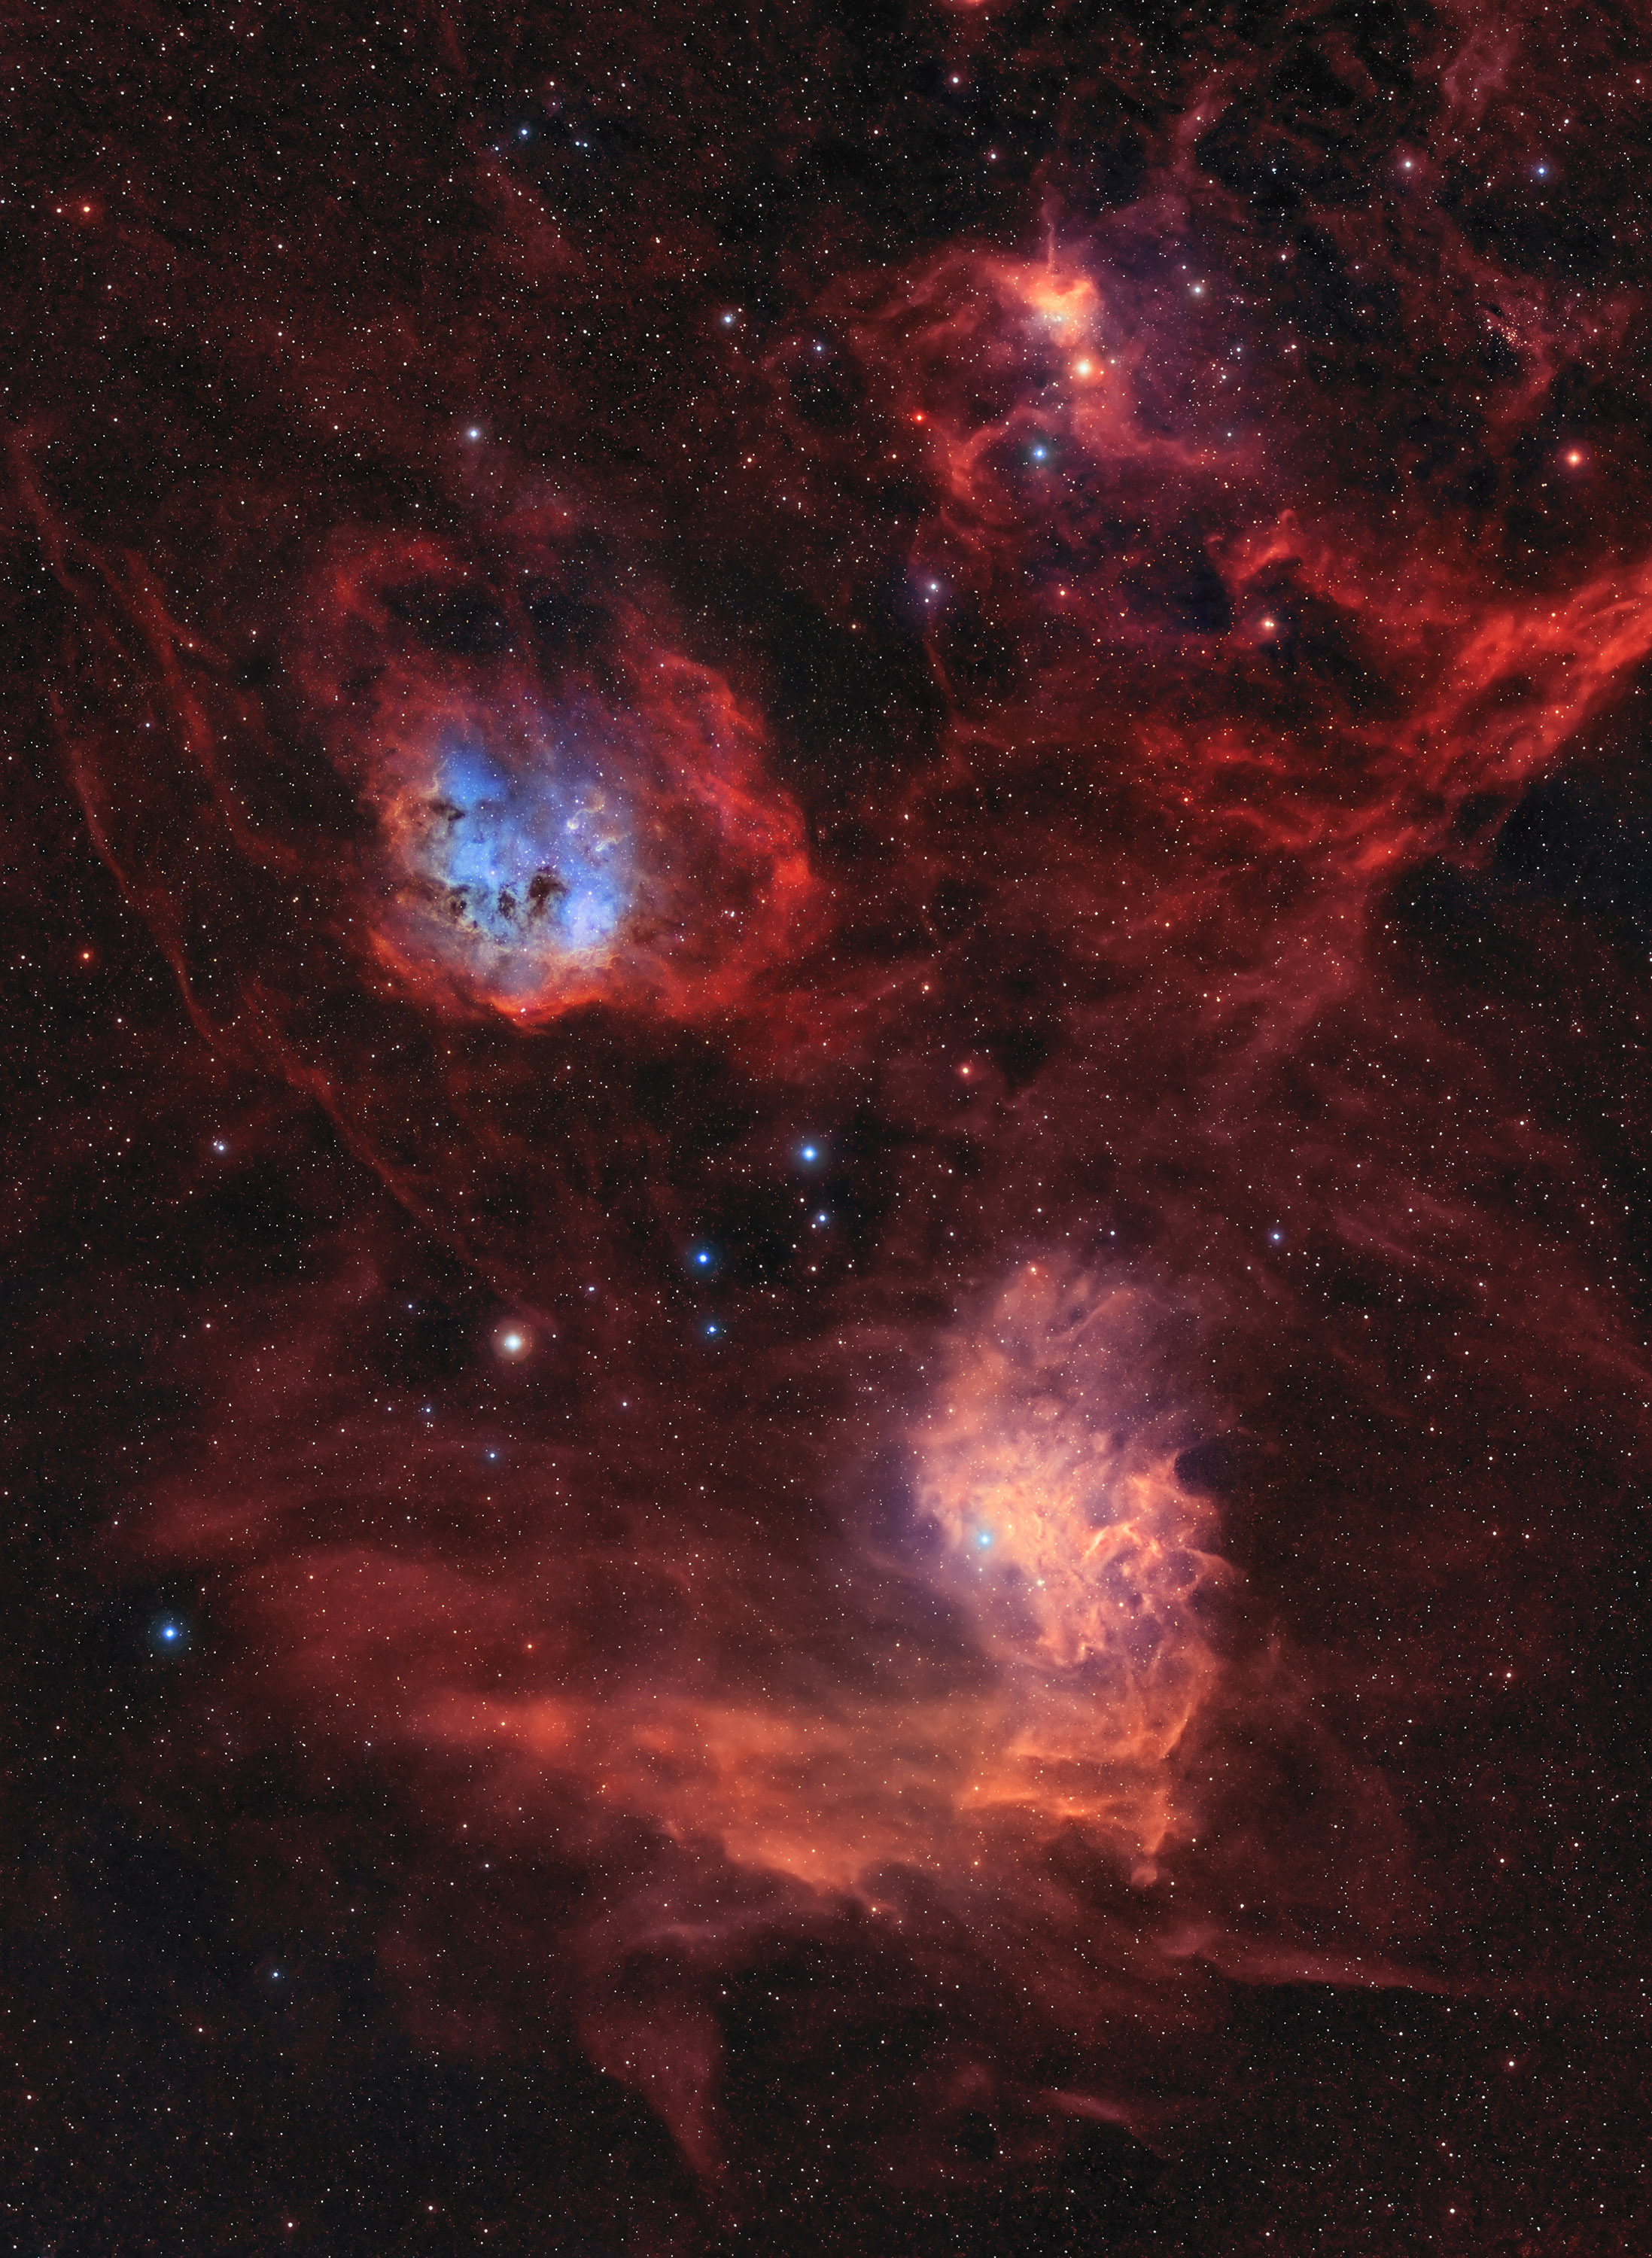
Your images are excellent, but I worry that you are setting very unrealistic expectations for someone starting out in the hobby. For example, the dust lanes below the Horsehead – with a DSLR, I have not been able to achieve that other than from a very dark site in Arizona, using a very good portable tracker (the Lightrack II). And the depth of red in the Horsehead would be extremely difficult to achieve with an unmodded camera. Again, your images are excellent, but my issue is with the expectations you are setting of what can be achieved in a reasonable amount of time and at reasonable cost.
Bray Falls ·
Thank you!
Honestly I think a lot of it will come down to image processing and the speed of the lens. I wasn’t able to touch on processing much here, but I know that it is possible to capture dust lanes around the horse head even from light polluted skies with enough integration time.
I do think a lens+camera+tracker combo can be had for a reasonable price. However I guess producing images in a reasonable time is quite subjective. Personally I think it’s reasonable to expect to have to drive several hours and spend a whole night on one image, but that might be a bad proposition to someone who hasn’t been shooting astro for as long as I have.
I did mention that producing an image that could be considered good would take several attempts so I don’t think I’ve set bad expectations.
The whole issue of being able to produce good images immediately is a really complex one I think. I’ve focused here mainly on gear and capture but the processing will play a huge role. Thanks for your comment!
Arun Hegde ·
Bray, as you said, it will come down to the speed of the lens especially with an uncooled camera. Roger Clark has done it, using a 300mm f/2.8.
http://www.clarkvision.com/galleries/gallery.all/web/horsehead.rclark.c11.22.2014.0J6A1680-1750-sugav70.f-bin4x4s.html
The issue with using a slower lens (I use a 400mm f/5.6) is that you just can’t get enough photons fast enough to over come the thermal noise in a single sub.
Another option for those wanting to get into the hobby is to contact and join a local astronomy club. Many of the larger ones would have the ability to piggy back a DSLR on a telescope on an already polar aligned and well tracked equatorial mount. That approach eliminates the need for a tracker at least until they know they are serious about this.
Neal G ·
Arun, you make a great point. Here’s my first attempt at a deep sky object (the Orion nebulae) which of course looks terrible. It’s going to take a lot more practice until I get anything good.
https://uploads.disquscdn.com/images/9fe9ea2c2ecccc6d2b57b1722693f50cfa8efba471a2471e420476f3689d211c.jpg
Arun Hegde ·
Neal, the important thing to remember is that you’ve been able to record something that your naked eyes cannot see. There are a lot of things that you need to do right to get a good image and doing any one of them wrong ruins your work. That’s where the challenge and reward lie. That’s also why I would suggest seeing if you can contact a local astronomy club – if they have a telescope you can piggy back your camera to, that considerably simplifies things. You can concentrate on focus accuracy and processing and eliminate the need for polar alignment and tracking.
Here are a couple of examples of what can be done with reasonable equipment: a camera tripod, an un modified 7D Mark II DSLR, a portable mount (Lightrack II), a 400mm f/5.6L lens, and a Polemaster camera for polar alignment. No auto guiding and no filters.
As Bray mentions, dark skies help immensely.
https://www.astrobin.com/383940/?nc=user
https://www.astrobin.com/384719/?nc=user
Brenda ·
Current survey demonstrates that over 75% individuals are active into internet based tasks. On-line world is simply becoming bigger and better and making a lot of money making opportunities. Work at home internet tasks are becoming poplar and transforming individual’s daily lives. Why it is actually widely used? This is because it enables you to work from anywhere and any time. You will enjoy much more time to spend with your family and can plan out journeys for vacations. A lot of people are making great revenue of $23000 each week by utilizing the effective and intelligent techniques. Carrying out right work in a right direction will always lead us towards success. You will start to earn from the 1st day once you see our site. >>>>> PLU.SH/njexd
l_d_allan ·
Does LensRentals have star trackers for rent? I didn’t find any, but perhaps I didn’t look properly.
IIRC, some years back I requested that LR handle star trackers, but the reply was they were too niche. Perhaps that’s changed since LR is much larger now than then?
It is possible to build a d.i.y. “barn door star tracker” …
https://makezine.com/2015/09/11/star-trackers-for-night-sky-photos/
Zach Sutton Photography ·
At this time, we don’t. Certainly I’m not the one in charge of what to rent, but I’ll take your note to customer support, and hopefully they’ll make the gear list at some point.
KeithB ·
Since the main point of the article is that getting images like this is a matter of technique and practice, renting a tracker for a short time may be of limited utility.
DrJon ·
A passing thought. A friend asked me for a shot of the Pleiades. I pointed out that anything I took with a camera+lens would be miles away from what you’d see online. So anyway after some thought I shot a bunch of images with a 300/2.8 (wide open). The rule of 500 really didn’t work as on a 50MP camera and I found a lot shorter time was required, even after assuming a 1.6x crop for the pixel density, to make nice round stars.
A couple of days later I was watching a lens review and saw the reviewer doing some astro shots and stacking them with Deep Sky Stacker. I noticed this seems to deal with rotation as well as movement in the X and Y axes. Anyway I upgraded the version I had (I was only one behind), processed the raw files into 16-bit TIFs and stacked them. The good news is the alignment is really good. The less good news is I was a bit short on images to achieve anything great, but still got a much better shot than previously.
So it seems an interesting experiment to try this an as alternative to buying a tracker (strictly I have a computerised telescope mount so I could do it that way too, but the weather lately made grabbing a tripod and going straight outside a better option on the day). Aim at a deep sky object, ideally with a camera with at least 14-bit raws, and shoot a lot of images at the slowest time you get round stars (plus mirror lockup). I plan to give it a go and aren’t claiming it would be good, just maybe a half-way house… (A bit like stacking images to blur water if you don’t have an ND with you. With the benefit you can ditch any images where something gets in the way, like a plane, without losing the whole thing.)
DrJon ·
I wrote a post but it disappeared, despite no links. I guess my post (which it still says is spam) in the compact camera thread with links is causing me issues still… Anyway teach me to keep a copy of stuff I take a while writing. Nice article!
Not THAT Ross Cameron ·
Hi Bray, many thanks for the intro piece to astrophotography. Glad to have the basics set out so I now know I don’t have the time or bank balance, other than maybe milky way shots :~)
BTW, as someone living in the antipodes, I’d suggest amending the point about alignment to just refer to North or Southern celestial pole, depending on whether one is located in the Northern or Southern Hemisphere. The internet is global :~)
Cheers
Carleton Foxx ·
Q1: Can I use the intervalometer on my Nikon?
Q2: What is a typical camera setting where you are? I would have no idea even where to start and it sounds like some people use pretty high ISOs.
Q3: What time do you usually get out to the location at which you’re shooting and how long do you usually stay? It seems like some astro people camp out overnight.
Q4: Snake boots?
xWidget ·
Not an expert at this but no one’s posted anything so here’s what I so far think is the best answers:
– Q1: Any intervalometer should be fine
– Q2: Somewhat higher ISO than you’d normally use. You want to combine (“stack”) the images and use an averaging algorithm to remove the noise, instead of relying on something like Lightroom’s noise reduction. That way you can take the same picture and average the noise across multiple photos where it should trend toward the correct middle value.
– Q3: Longer is better but you can probably get a good result out of a half hour if you already know what you’re doing and aren’t trying to shoot something super dark or small. For us that probably means like two hours doing it wrong and then a half hour doing it right.
– Q4: dunno
Ed Hassell ·
The nearest are Raleigh & Chapel Hill. I live in northeastern NC just south of the Great Dismal Swamp — the middle of nowhere. Plus I’m a nearly 70-y/o geek who never played football, making me a social outcast. Nope, no astronomy clubs here and none likely to be. (Was it Groucho Marx who quipped that he wouldn’t be a member of any club that would have him as a member?) But that’s okay. I’m really good at entertaining myself. My shiny new RedCat 51 arrives mid-April.
fpink3 ·
One “first level” hurdle for anyone interested in night sky photographs is image scale. The whole constellation of Orion, the Andromeda galaxy and the Ring nebula are very different sizes. Camera lens-suitable night-sky subjects can require a 35mm-equivalent of anywhere from 28 mm to 300mm (you can go even wider). If you have “one great prime lens”, it dictates the range of objects you can photograph. Some are too big, LOTS are too small. Many fine galaxy and planetary nebula images one may encounter are objects too small and dim for any camera lens. That’s the province of an astro-sensor sitting at the prime focus of a telescope.
Ben_Sherman ·
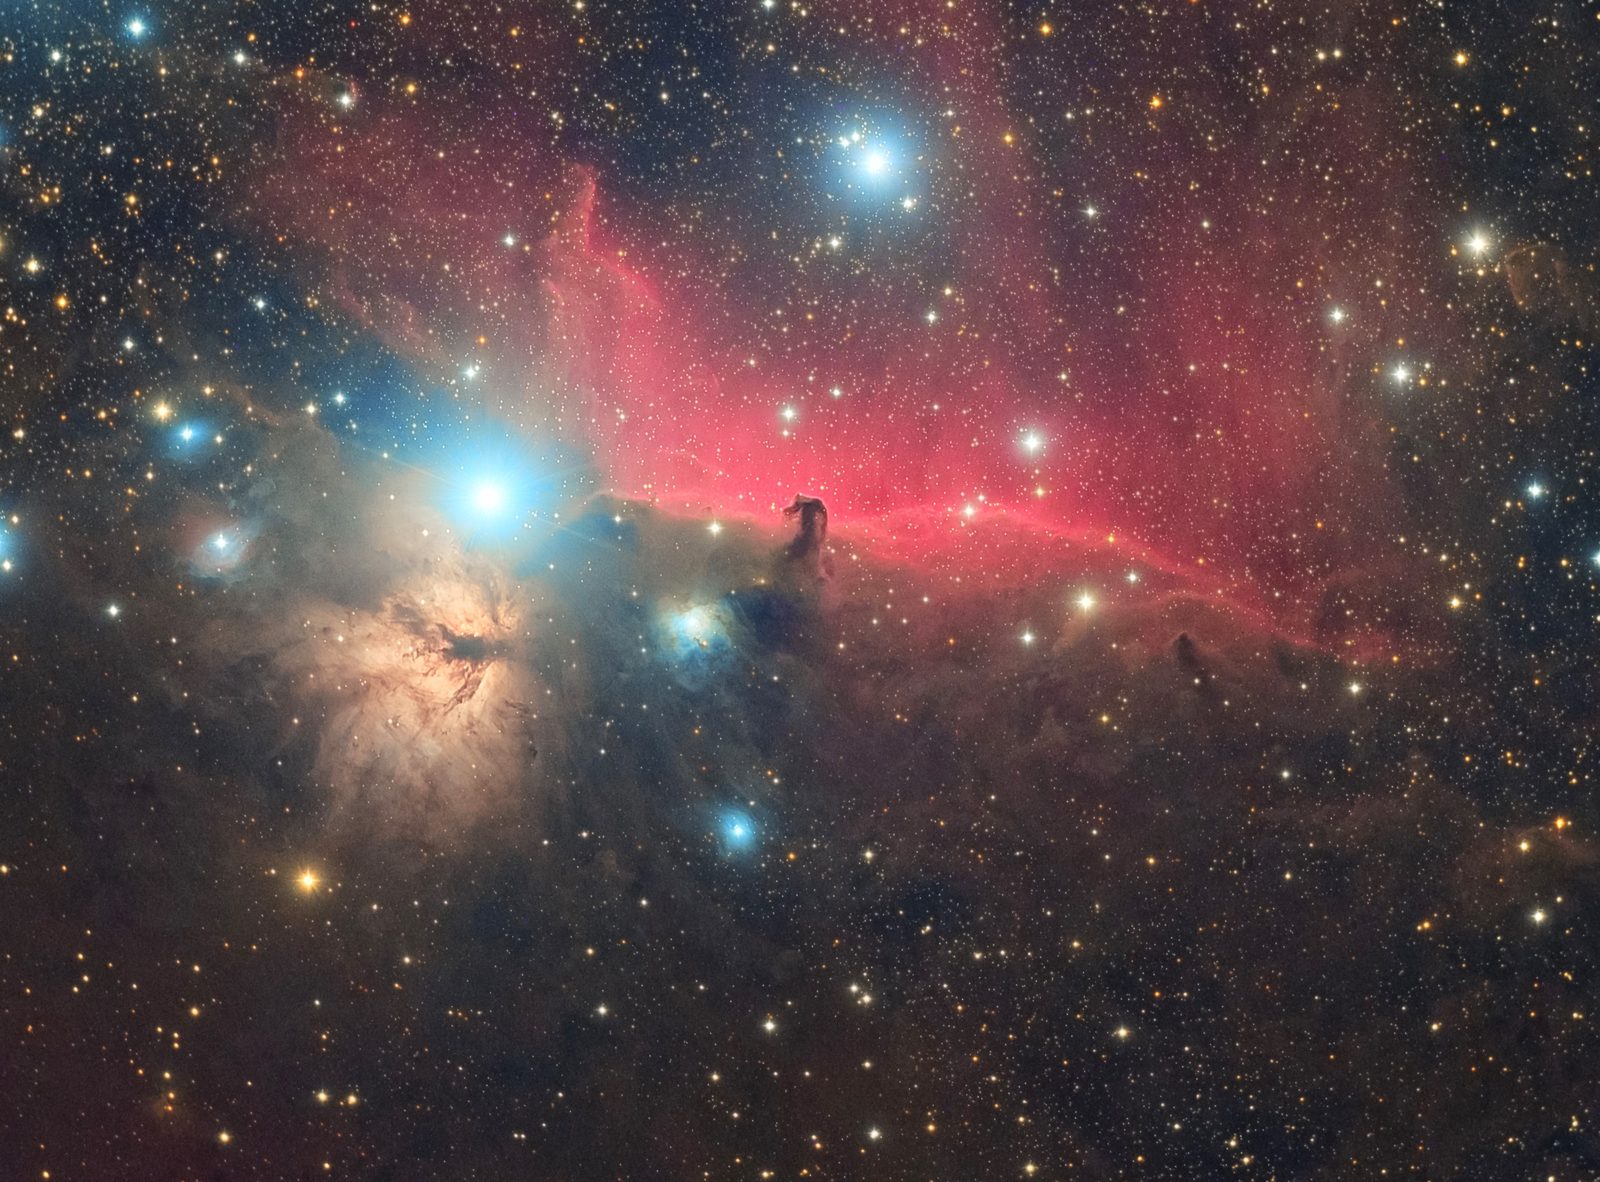
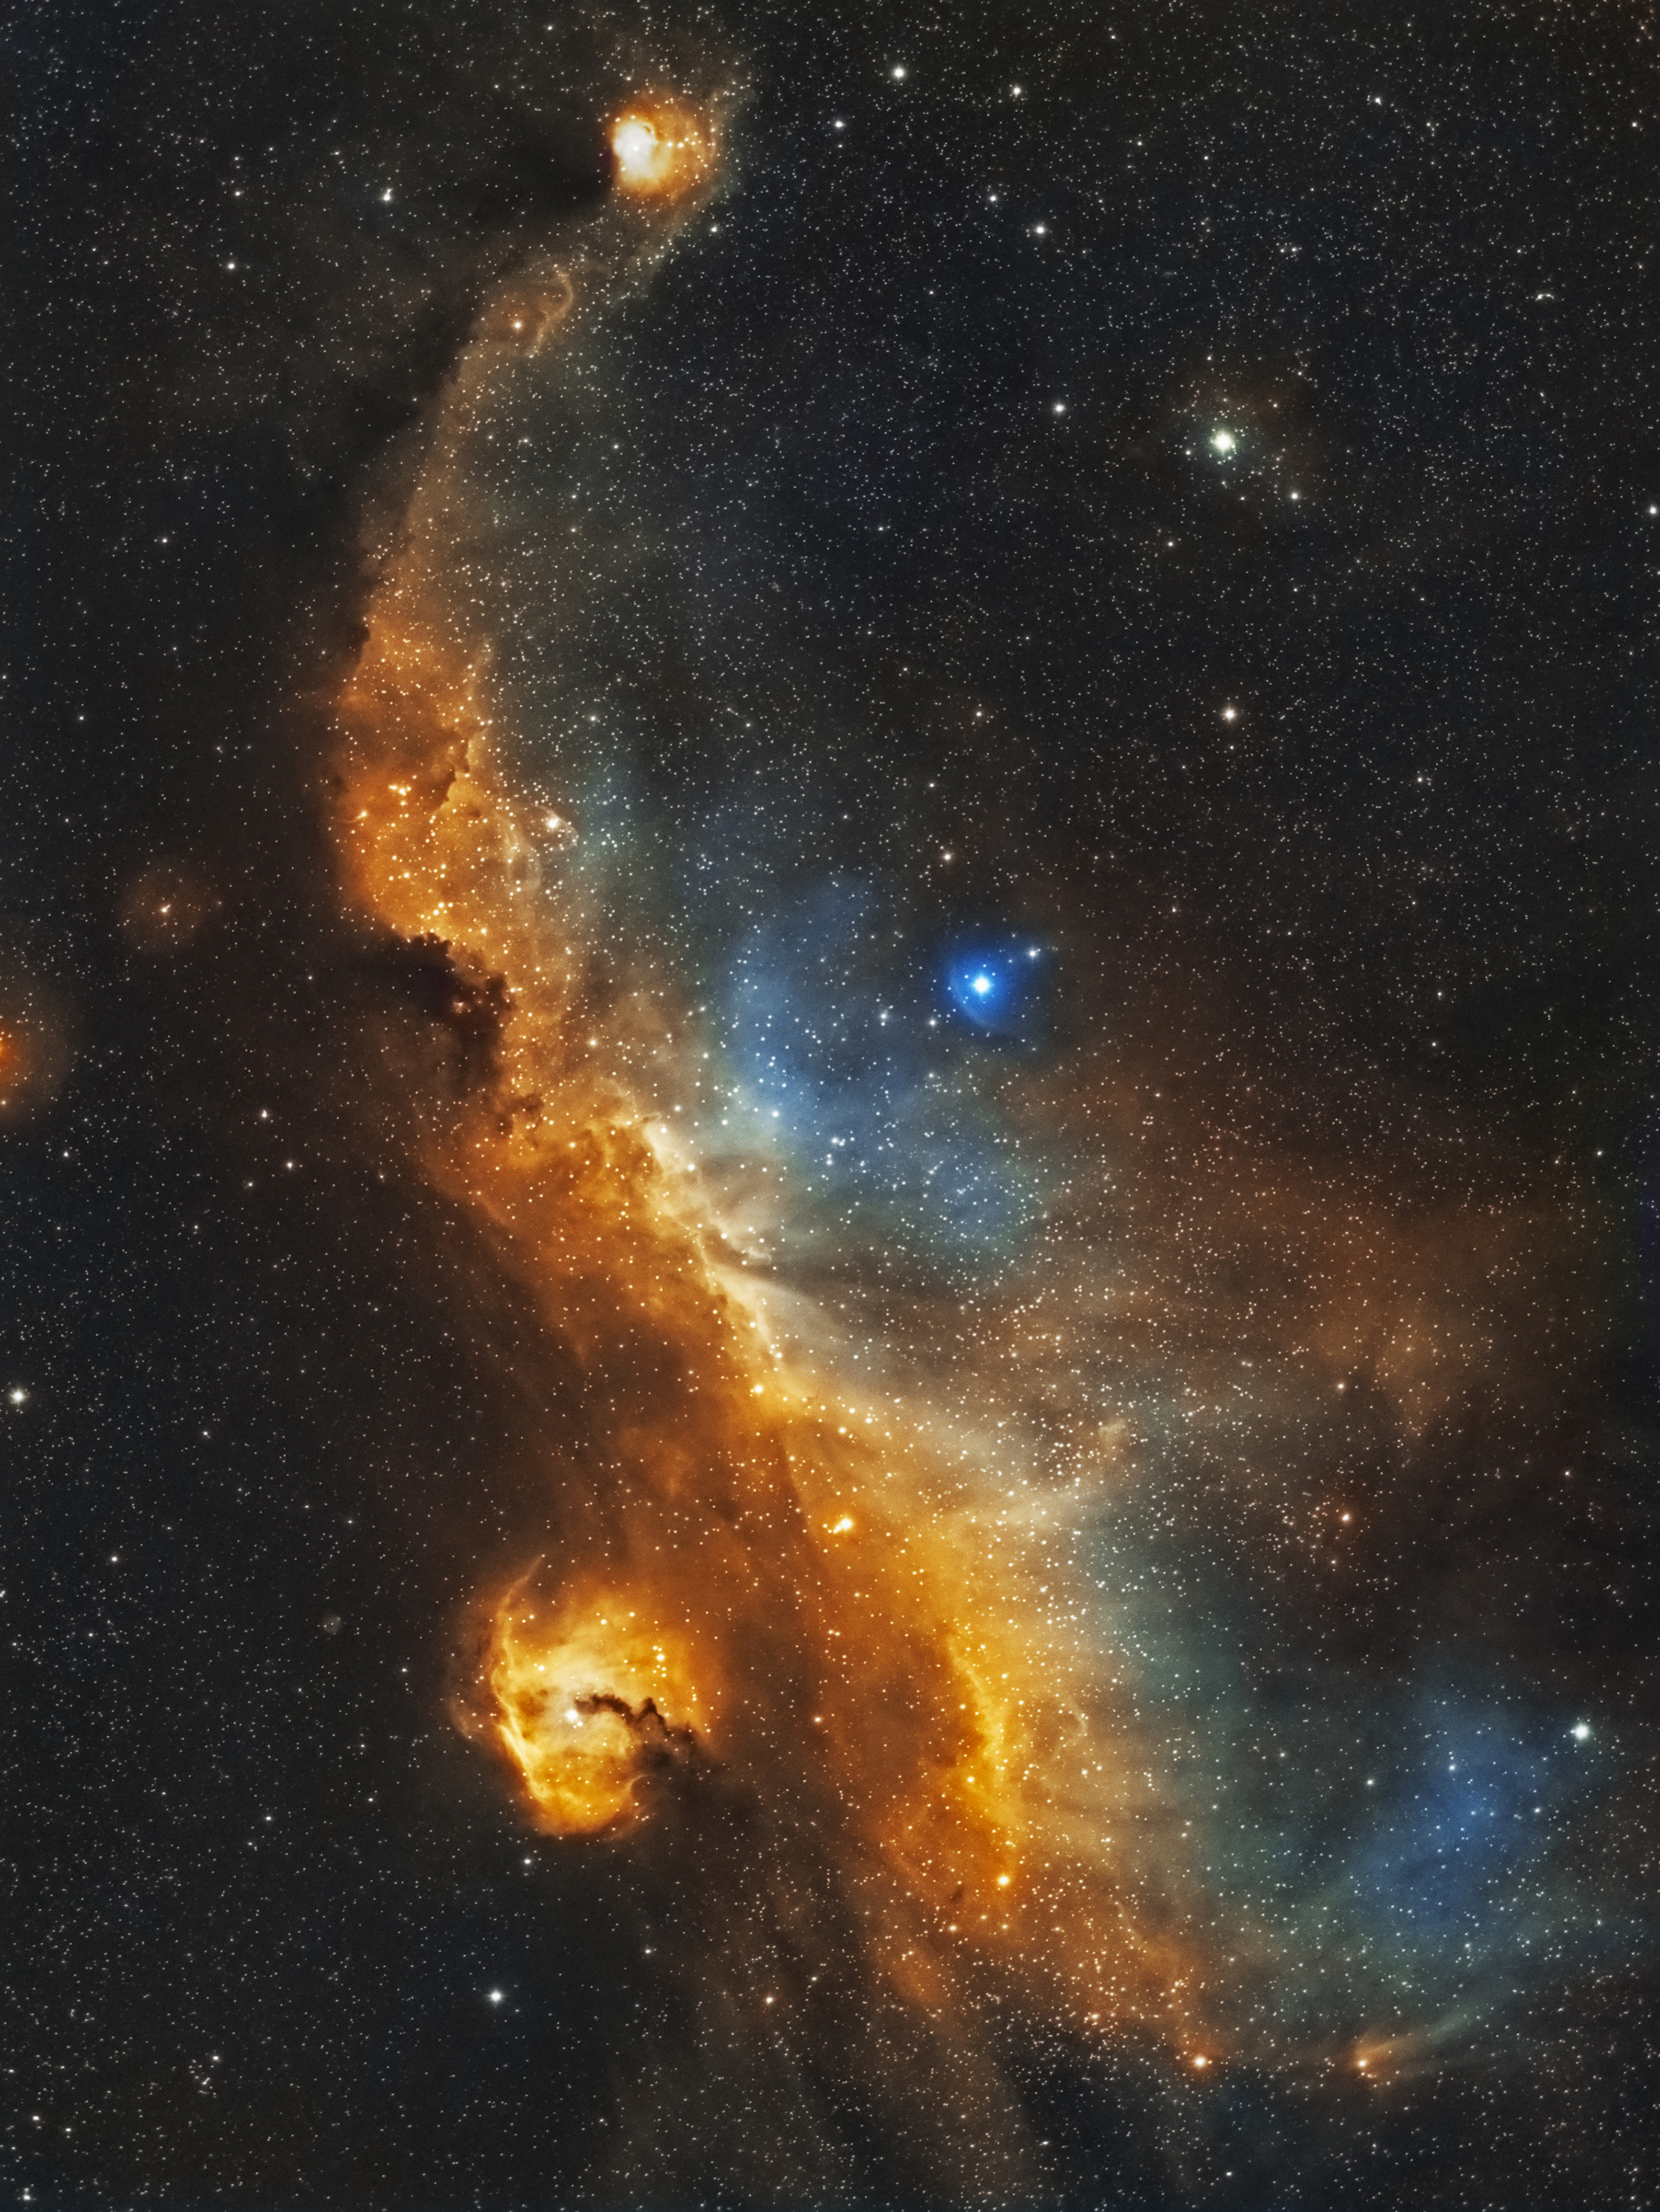
Hey great article. Isn’t that top image Horsehead Nebula? I’ve been reading a lot about astro photography lately. Well technically I just started with ‘astro photography’. I bought a Canon 6D and after reading https://www.photographytalk... picked up a star tracker. It’s the same brand you mention Skywatcher. But maybe you can help me out. I have been trying to polar align this thing and having difficultly. For one, what do you do when the North Star isn’t out or visible? Also is there an App that will polar align for you? Thanks in advance.
P.S. out of all the star trackers, which is considered the easiest to learn?
Mike Dunkel ·
Ok, I’m going to go ultrabasic. Are these pictures taken with a camera mounted to a star tracker, or does the camera look through a telescope mounted to a star tracker?
Colin ·
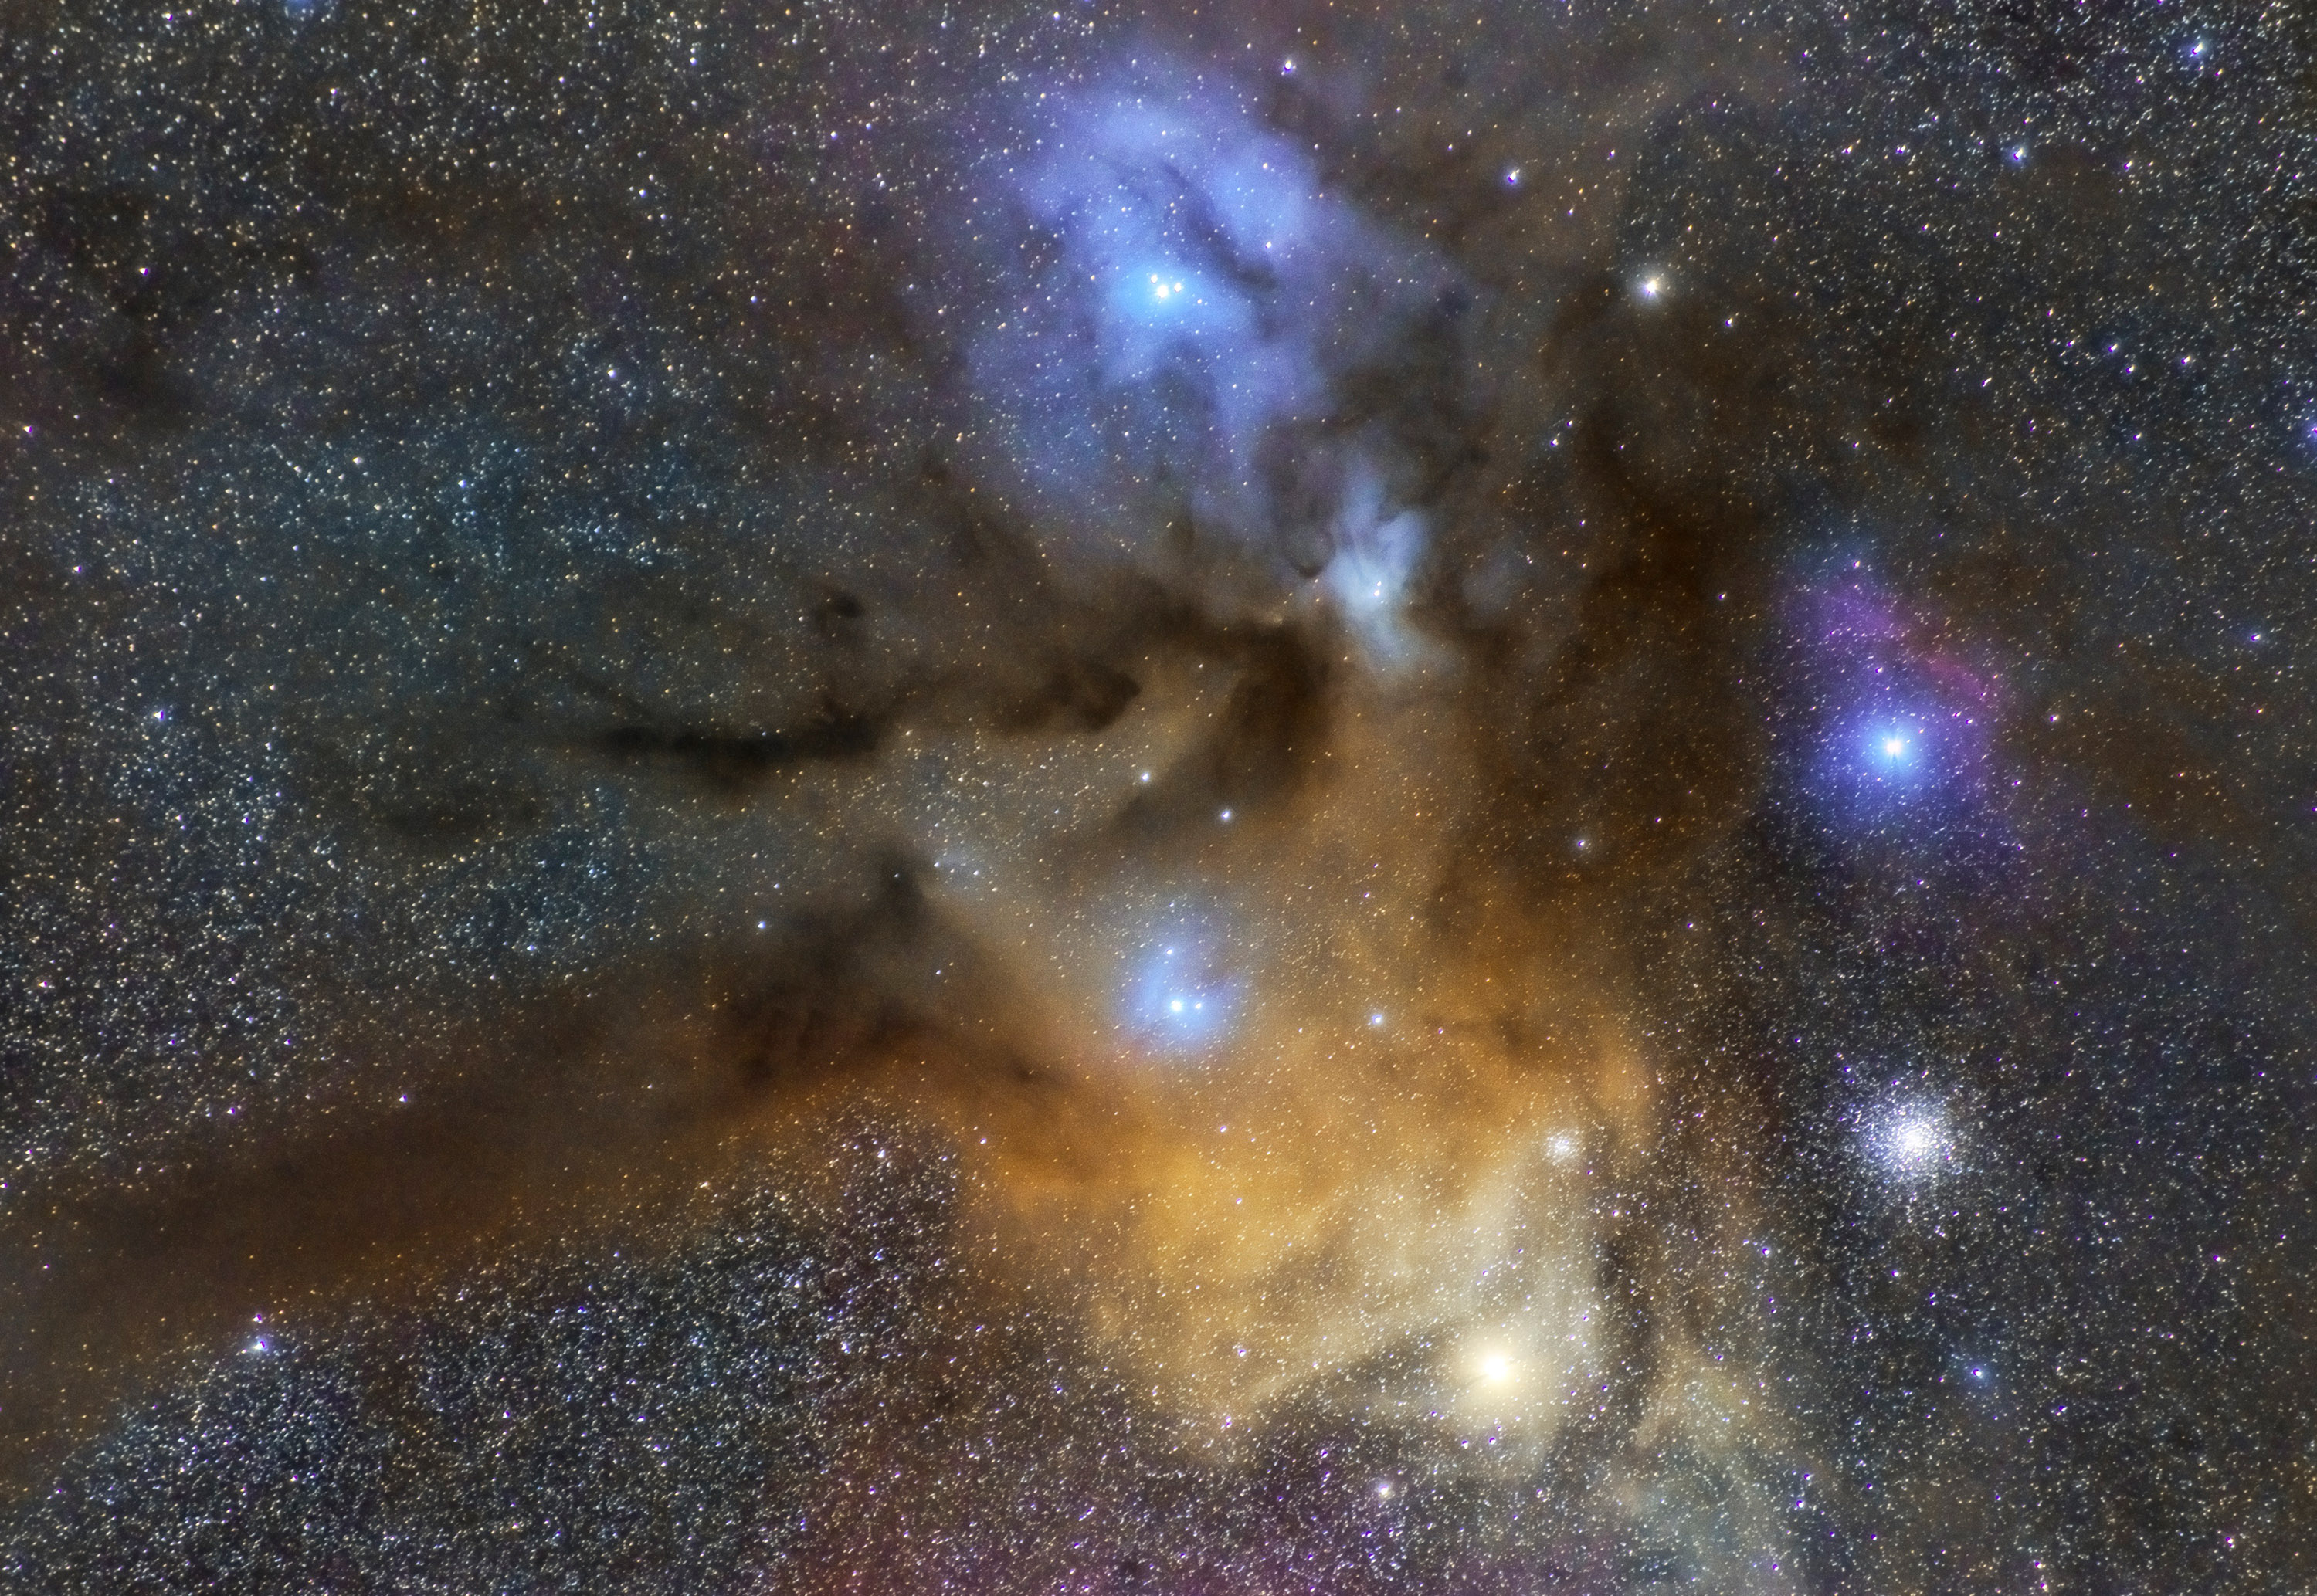
Hi! Can you tell us which nebula the second nebula image on this page is (right after Selecting a Lens)?
Thanks.
https://www.lensrentals.com...
Colin ·
Can you tell us which nebula this is (second one on the top)?
Thanks!
https://www.lensrentals.com...
Joseph Senese ·
Why wouldn’t the Star Adventurer work with a 500mm lens? You said it’s too heavy. They say the SA has an 11 pound payload. Let’s take the Canon EOS R @ 1.5 pounds and add the Canon RF 100-500mm lens @ 3 pounds. We’re only at 4.5 pounds. Not even half of the payload max. I would expect it to perform wonderful considering the math. I’ve been searching for examples but nobody seems to have a video on this lens for Astrophotography. Even if it fails, it would def make for a worthy review.