Lenses and Optics
Sony E Mount Lens Optical Bench Tests
It has taken a long time, the sacrifice of a couple of cameras and lenses, and a lot of soldering, but we have finally managed to rig up a powered Sony mount to our optical bench so that we can test the new full-frame Sony and Sony-Zeiss E-mount lenses.
For those of you who haven’t understood why there has been a problem, I’ll explain it for you. The optical bench tests lenses at infinity focus. Most lenses have a mechanical focusing ring. You set it to infinity, confirm it (because some lenses can actually focus past infinity, which screws up the test results), put them on the bench and test them. A few lenses are ‘focus-by-wire’; they are focused by the electric AF motor even when you turn the focusing ring manually. Most of these are no trouble either. You put them on the camera, focus to infinity, take them off and the focus stays where it last was.
Sony’s newer lenses (and some micro 4/3 lenses) are different. They are focused by an electromagnet. You can put them on the camera and focus to infinity, but when you take them off the camera the focusing group just falls back to wherever it wants to be, which is never infinity focus.
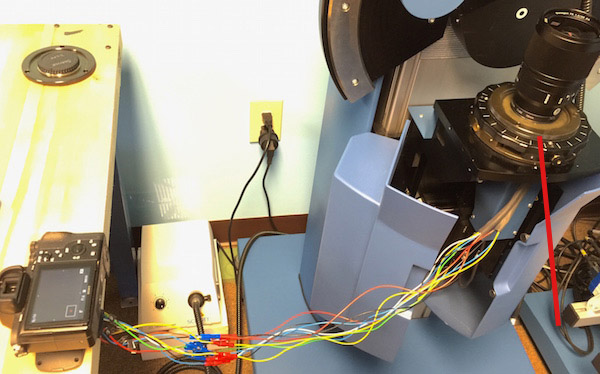
So in order to test Sony lenses on the optical bench we had to find a way to keep the lens hooked to the camera, but at the same time have it off the camera because it has to be mounted to the bench’s Sony test plate. Our solution isn’t particularly elegant, but it works. We took apart a random lens and camera to get a lens mount and camera mount. We modified one of the Optical Bench mounting plates so it contained a Sony camera mount. We then wired that to an empty lens mount. We place the test lens in the mounting plate (red line), put the empty lens mount into the camera, and we can control the lens focus by using the camera while the lens is on the optical bench.
Yeah, it looks crude. But this is version 3.0; the first two attempts were much cruder. Before you make fun remember we sacrificed an A7, an 18-200 lens, and a $900 optical test plate just to get you some numbers. OK, we really did it because it sounded fun and because nobody else in the Known Universe can test Sony lenses on an optical bench right now and we can. So there!
Remember This is Beta Testing
The goal and objective is to compare Sony lenses both to each other and to other E-mount lenses from Zeiss, Sigma, and whomever. But I know people are also going to compare them to Canon, Nikon, and other lenses. I want to emphasize that we’re learning as we go and I’m writing as we learn. So two months from now I may be writing one of those articles that tell you we’ve found an error in our technique or a better way to do it. I don’t think so, we’ve been experimenting for a while now, but that’s what happens when you do new things that nobody else is doing.
More importantly, there are some differences in the testing methods for the Sony-mount lenses compared to the Canon and Nikon mount tests we’ve been doing. We want to be as transparent as possible, so I’m going to identify all of those differences I can think of.
There is Glass in the Path
First, unlike most of the Canon and Nikon mount tests we’ve already done, we’ve added 2mm of optical glass to the testing path of these lenses. Why? Because we ran lots of trial tests and found that at least the first Sony lenses we tested performed much better with that amount of glass in the optical path. It made a big difference with the Sony lenses, while it did not make much difference for most of the Canon and Nikon lenses we tested. Why are Sony lenses more sensitive? My best guess, and it’s just a guess, is that their exit pupil is further to the rear than some of the other lenses. It’s also very possible that the shorter flange-to-sensor distance (18mm for Sony, 44mm for Canon) makes the lenses more sensitive to glass in the optical pathway. (For both of you who want to know we tested both 3 and 1mm and 2mm gave the best results.)
We ‘See’ Fewer Corners
With all of our other lenses the optical bench gives us a complete open circle. We test 4 quadrants and see results out to the edge of the frame (20mm of sensor distance) in all 4 directions. Our electronic Sony mount includes the rectangular light baffle that the Sony camera mount has. This means at certain rotations (top to bottom in camera terms) our view is cut off at roughly 15mm, the distance of the top or bottom of the sensor from the center. The result is our numbers for a Canon or Nikon lens measure each lens all the way to 8 edges (2 edges for each of 4 rotations). With the Sony lenses we only measure 6, the top and bottom are cut off. You can make an argument that this might make the variation appear slightly larger (there are few numbers in the mathematically average), or slightly smaller (we might not ‘see’ a bad corner) than it would be if we could measure all 4 corners. I think the only important point is that we should be conservative when making comparisons to Canon and Nikon tests. The tests are slightly different.
There May Be a Bigger Difference Between These Tests and Pictures You Take
We know that Sony ‘cooks the RAW’ at least a bit, doing some in-camera modifications to raw files. I don’t know exactly what or to what degree. They aren’t alone in this, it seems to be the wave of the future to do some in-camera correction for at least distortion. But it appears they are the only full-frame cameras to do in-camera RAW correction at this moment.
What that means, though, is that tests of just the lens without a camera body, like we’re doing here, may be quite a bit different than what comes out of the camera. For example, our tests of the FE 35mm f/1.4 ZA show a LOT more distortion than tests done on a camera body using Imatest or DxO optics; we show 4% distortion where most of the on-camera testing shows 1% or less. This probably means that the camera is processing the distortion out of the image. (It could also mean that the distortion is very different focused up close, where DxO and Imatest work, then at infinity, where the optical bench works.) Depending upon your point of view that may be good, bad, or make no difference to you at all.
The same thing may (or may not) apply to sharpening. If there’s a little sharpening going on in the raw image, then you may think “Roger you said that lens isn’t so sharp, but the RAW images look very sharp, and the report from this other site using Imatest says it’s very sharp, too”. To take it a step further, sharpening may be applied more to the corners and edges, or vignetting correction applied, or other stuff. (Again, I don’t know if it is or not.)
Because so many people struggle with this idea, I’ll repeat what I say over and over: I’m testing the lens alone. (You would not believe how many people ask what camera these tests are done on.) Other sites are testing the image that has been processed by the camera. Since you’re using the camera, their results will look more like your results and you’ll not see much of the distortion in your images. About 90% of you are going to think ‘why would I care’, and you’d be right. What comes out of the camera is more important.
But if you’re a lens geek like me, what the lens is actually providing TO the sensor is important, if only for esoteric reasons. Or maybe not just esoteric reasons. If the lens is inferior, but the image looks better from in-camera processing, you may not be able to manipulate the RAW as much as you would like, because it’s already been manipulated once. A lot of people are very excited about Sony uncompressed raw because they will be able to do more intense post-processing. But uncompressed doesn’t mean unmodified. If the raw is still modified before you get it, post-processing may still be somewhat limited.
Of course, the vast majority of photographers could care less, but then they probably don’t read this blog 🙂
Some Test Results
We have lots of Sony and Sony mount lenses to test and it’s going to take a while to get them all done. Today I’ll present 3 of the lenses many people have wanted to see: the Sony FE 35mm f/1.4 ZA, the Sony FE 55mm f/1.8 ZA, and the Sony FE 90mm f/2.8 Macro OSS. We’ll show you the MTF curves and copy-to-copy variation graphs for each, comparing them to some of the Canon and Nikon mount lenses we’ve tested. Again, please remember that testing techniques are slightly different for the Sony lenses as explained above.
Sony FE 35mm f/.4 ZA
(Note: this post originally published too early with an incorrect MTF graph for the Sony FE 35mm f/1.4 ZA lens. It has been corrected as of 4:20 pm CST. I apologize for the error, I was trying to get the post up as I was leaving for New York.)
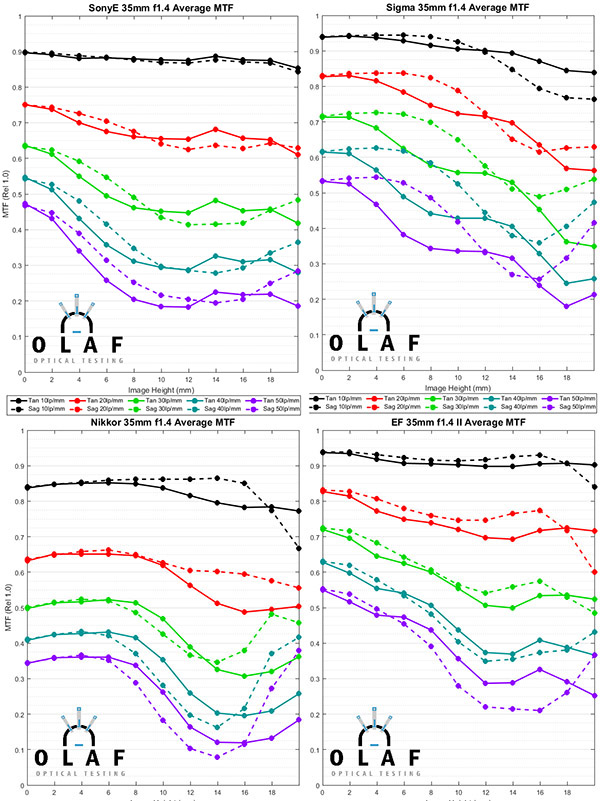
We’ll compare the Sony to several other 35mm lenses. The Sigma and Canon are amazingly good 35mm lenses. The Sony is better than the more average Nikon 35mm f/1.4. It’s certainly not quite as good as either the Canon or the Sigma as far as resolution goes.
- Roger Cicala and Aaron Closz, Olaf Optical Testing, 2015
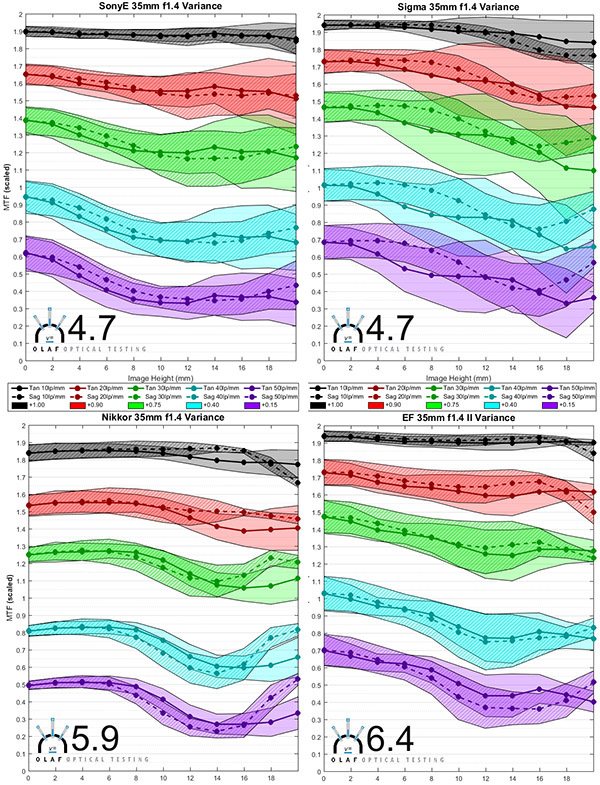
When we look at copy-to-copy variation, something we’ve long thought was the case becomes documented.
- Roger Cicala and Aaron Closz, Olaf Optical Testing, 2015
I’m going to avoid comparing the consistency numbers, because as we’ve mentioned the testing for the Sony lenses is a bit different. But the variation graphs show what our photographic experience with this lens has suggested. The FE 35mm f/1.4 ZA lenses are all over the place. It actually is a bit worse than the graphs look because a lot of the variance is WITHIN a copy, not just copy-to-copy. None of the 10 copies we tested had even corners. And I’ll editorialize and say that none of the dozens we’ve tested on Imatest had even corners either. If you use this lens for centered objects, you’ll be happy. If you want 4 sharp corners, it’s not likely to happen unless your standards for equal sharpness are pretty low.
Sony FE 55mm f/1.8 ZA
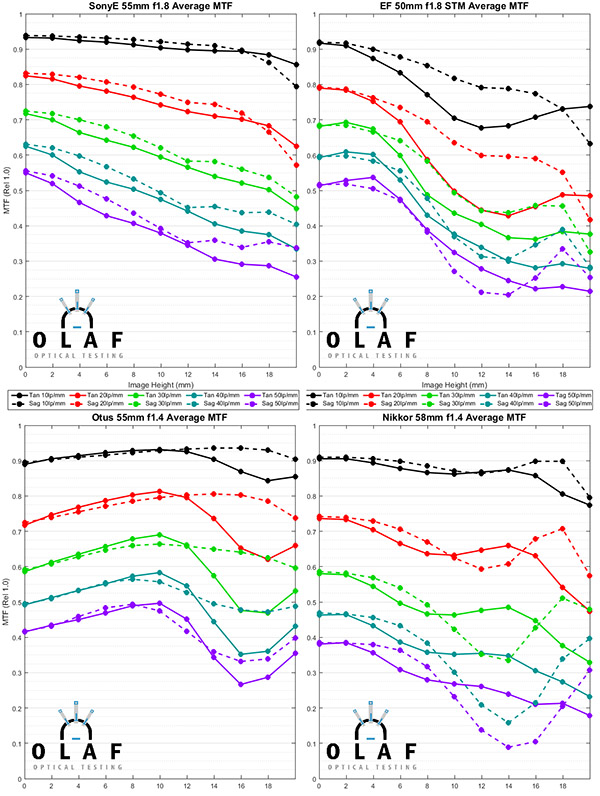
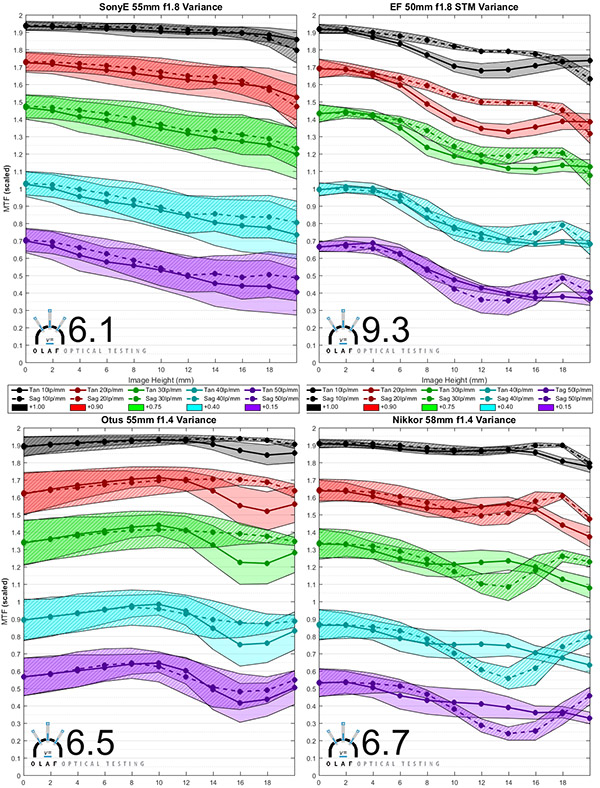
Going into these tests, I had expected the 55mm f/1.8 ZA to do better than the 35mm f/1.4 and it did. Compared to a sampling of other 50-something lenses, the Sony 55 does very well on the MTF charts. Its center resolution is superb and it maintains sharpness very well to the edges. The Nikkor 58mm and Zeiss Otus 55m lenses are being tested here at f/1.4, which gives the Sony lens a bit of an unfair advantage, but it’s still excellent and holding it’s own against the best lenses in this range at the very least.
- Roger Cicala and Aaron Closz, Olaf Optical Testing, 2015
The copy-to-copy variation graphs for the 55mm lens show it has a lot better consistency than the 35mm, too. There’s some variation, but it’s similar to most of the other 50ish lenses we’ve tested. The Canon 50mm f/1.8 is very much the exception, being the only 50mm lens we’ve tested that has almost no copy-to-copy variation.
- Roger Cicala and Aaron Closz, Olaf Optical Testing, 2015
Sony FE 90mm f/2.8 OSS Macro
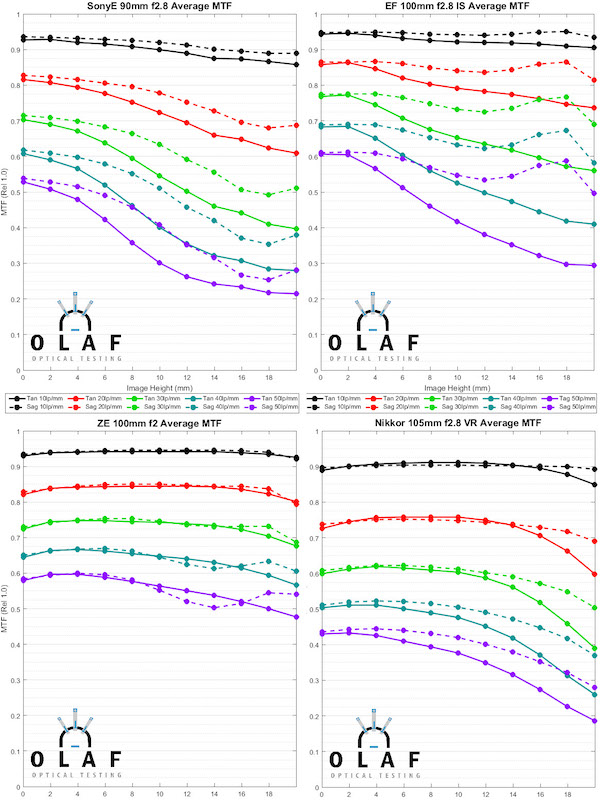
The FE 90mm Macro shows a good, not great MTF chart. It’s certainly not bad, but not something to get overly excited about. Remember, though, that Macro lenses often perform better close up, where they are designed to work, than at infinity focus, where this test is done. If you’re using this as a long portrait or short telephoto lens, these results should reflect what you see (other than if there’s sharpening done in RAW). At macro distances, it may perform differently.
- Roger Cicala and Aaron Closz, Olaf Optical Testing, 2015
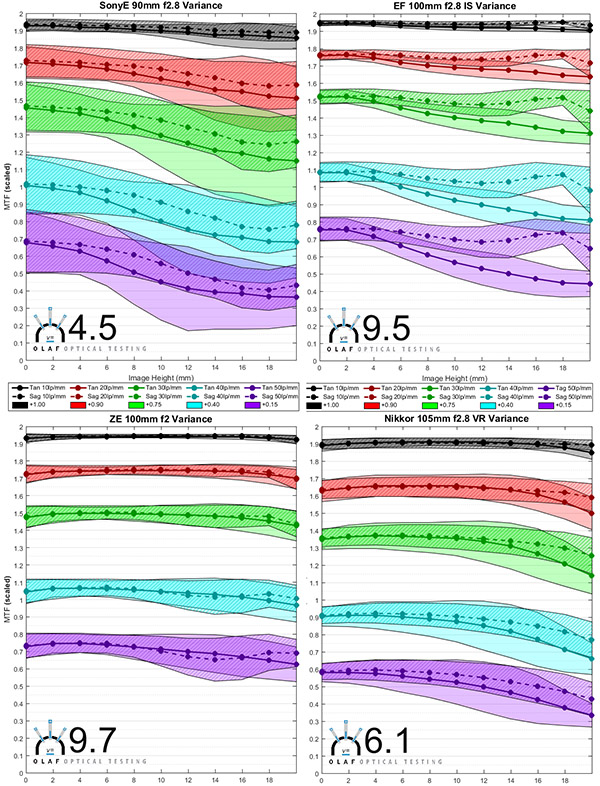
Things aren’t quite so good when we look at copy-to-copy variation, though. Medium focal length macro lenses are usually very consistent. In this case, the Sony has a lot of variation compared to the others. The type of variation we’re seeing is also quite different from the Sony FE 35mm f/1.4. That lens has a lot of corner variation in every copy, but the center remains is consistently sharp comparing one lens to another. With the Macro, there’s a lot of center variation and it’s not particularly worse in the corners. This suggests there is significant copy-to-copy variation in overall sharpness, rather than individual lenses have a bad corner.
Roger Cicala and Aaron Closz, Olaf Optical Testing, 2015
So What Can We Take Away Today?
Mostly we are just starting with FE lens testing. Over the next few weeks, we should get a good handle on how the Sony lenses compare to each other.
I think there’s no question we’ve seen support for what a lot of people are claiming: the 35mm f/1.4 ZA lens is very likely to have some tilt with one corner or side out of the plane of focus. Depending on what you photograph this may make no difference to you, or may be a huge issue. But I doubt sending copy after copy back is going to make much difference (you may trade a soft right upper corner for a slightly soft left side, etc.). We’ve taken a couple of these apart and there’s not a ton of optical adjustments that can be made: there are a set of shims behind the front group that can be modified a bit, but it’s a crude and very time-consuming adjustment, so I don’t think it’s generally going to be something that can be fixed.
The 55mm f/1.8 is really a good lens, very sharp and consistently made. The 90 mm f/2.8 is a decent lens, reasonably sharp, but there seems to be a fair bit of copy-to-copy variation in overall sharpness.
All that being said, these lenses may look better on-camera than on the optical bench because there seems to be at least some modification of files as the raw is written. We’ll get a better handle on that as we test more lenses. And let me emphasize, the only clear evidence we see for that is with distortion correction. There may be nothing more than that going on.
Roger Cicala and Aaron Closz
Lensrentals.com
October, 2015
Author: Roger Cicala
I’m Roger and I am the founder of Lensrentals.com. Hailed as one of the optic nerds here, I enjoy shooting collimated light through 30X microscope objectives in my spare time. When I do take real pictures I like using something different: a Medium format, or Pentax K1, or a Sony RX1R.
-
Damir ?olak
-
Roger Cicala
-
Damir ?olak
-
AaronClosz
-
François
-
Taki
-
AaronClosz
-
Taki
-
DrJon
-
Hakan
-
JohnDizzo
-
Lynn Allan
-
Taki Tsoni
-
Brandon
-
scott kirkpatrick
-
Andrew Dodd
-
Rob
-
Brandon
-
Xpanded
