Equipment
Four Studio Photography Techniques to Give a Try This Winter
For many of people, February is the slow month for their photography. Cold weather and gray skies generally shun away inspiration, leaving many of us waiting until the end of it before we’re back out there being creative.
That said, winter months can also be perfect for honing your studio skills, as it gives you more of an opportunity to be cooped inside, working methodically to help create something you may not have the patience for under normal circumstances. And sure, I understand, not everyone has access to studio space. But studios can be makeshift and still look great, and smaller studios can be rented in many cities for cheap. So to help encourage you to try some new studio techniques, I’ve put together four things you can try in the studio during these last weeks of winter. All the equipment mentioned below is 15% off for the rest of February, just use the code STUDIO15
Beauty & Portrait Photography
Probably the most obvious thing studios are used for – especially smaller studios – is for portrait photography. I’ve worked as a portrait photographer for a number of years, I’ve found a distinct love for working in the studio. Where with on location portrait work involves working with the elements (weather, sunlight, and scenery plays a huge role in the stylistic properties of the images), working in studio allows you to be scientific with your work, and allows you to shape your lighting with precision, while controlling all of the elements within the photos.
The largest challenge with studio photography is using studio lighting to shape your subjects. It’s not common to find great natural light photo studios, so you’re often left to having full control of your lighting.
In studio portrait photography is all about the small nuances that help develop your style. It allows you to expertly control light and can be challenging to those who aren’t experienced in the field. The biggest lesson I work to teach others when it comes to studio photography is to experiment and to mess up a whole bunch. No one photographer walks into the studio for the first time, and bats a thousand. However, listed below is a few of my recent photoshoots, with lighting diagrams and quick breakdowns that show you how to create images with a similar impactful style.
Beauty Photography
In a continuation to portrait photography, is beauty photography, which has a bit more of an expertise on what gear is commonly used in the studio. Whereas portrait photography has an infinity of possibilities, beauty has a bit more control over what gear is used.
For one, Macro lenses are beloved within beauty photography, as it allows you to maximize the ability to highlight specific details. For much of my work, I prefer the Canon 100mm f/2.8 Macro Lens or the Nikon 100mm Macro Lens. I also use nearly the same lighting techniques in all of my beauty work – clamshell lighting, with either a Beauty Dish or White Medium Umbrella above, and a bounce light system below. This gives a soft glow to the skin that is often seen in beauty work, and probably the most common type of lighting used in a traditional beauty photography shot. Below is a few examples of images I’ve created in the beauty field, with breakdowns highlighting the gear used and how I got the shot.
| Recommended Gear for Portrait & Beauty Photography |
|---|
|

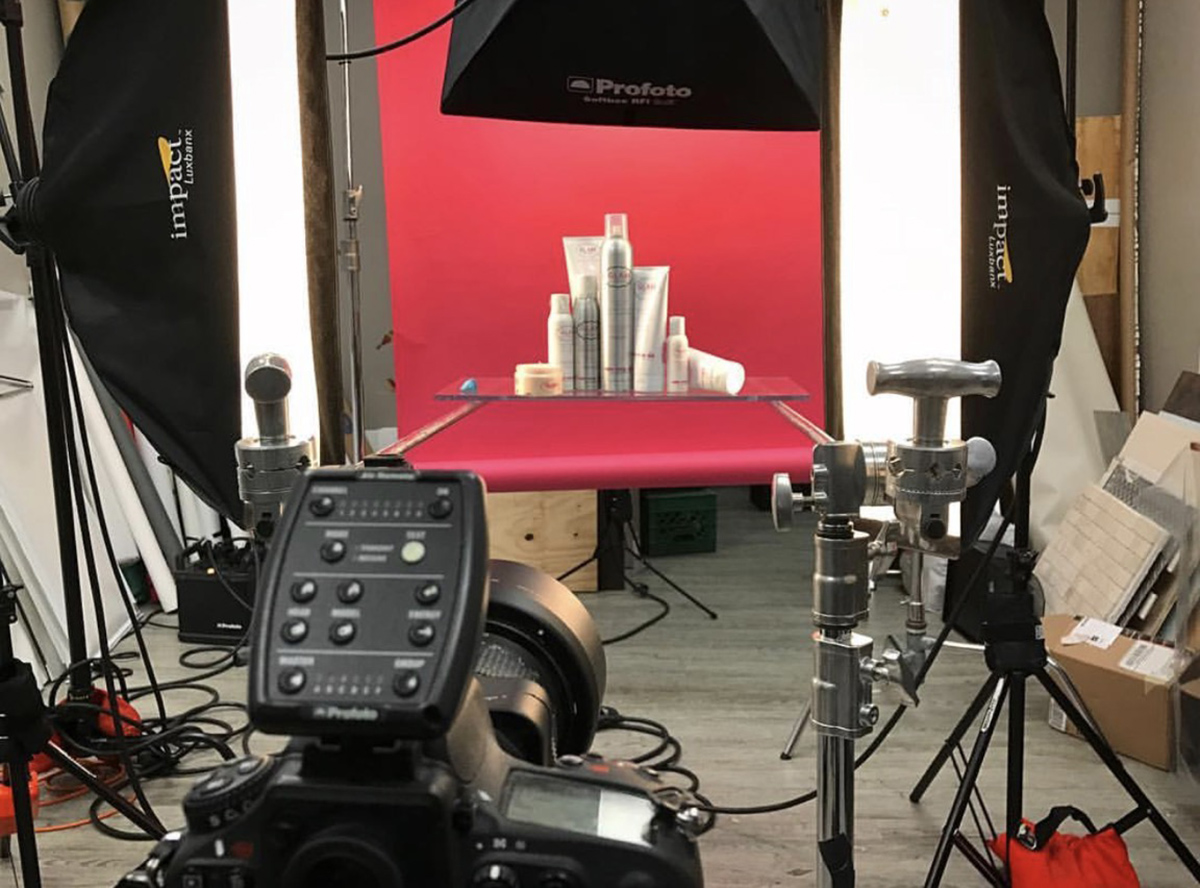
Product Photography
Information and Images provided by Yechiel Orgel.
Great product photography can take a long time to master, but the benefit of it is that you’re able to practice with little to no help from stylists or crew members. Where beauty work often takes a great model, makeup and hair team, product photography can be done through the use of household products you may already own – and patience.
That said, product photography certainly has it’s own unique challenges. For one, lighting product work can be tough. Much of the work takes a lot of precision and involves some technical tweaking to get right. For example, matte objects and reflective objects will be lit differently, and various colors will reflect and handle light in different ways. The best advice I can give those who are looking to try their hand at product photography is to be patient. Additionally, I’ve put together some other pieces of advice to give those who are seeking to try their hand at product photography.
The first piece of advice is to make sure to place your strobes at an angle to the object so that they will give gradual falloff on all sides. As you can see in my example photos and pulled back shots below, I often light my products with plenty of small diffusers to make sure I get the correct falloff that I’m trying to achieve. I never actually shoot with a direct strobe, because it will be more likely than not, cast hard shadows on the product, which will be far harder to remove in post production.
Additionally, my strobes often will have grids on them, to make shaping the light even easier. The size of each grid will depend entirely on the amount of light I need to use, as well as the scale of the object I’m lighting. That said, I usually stick to 10-degree and 20-degree grids.
As my instructor Don Gianniati always told me, it’s important to get a nice reflection from reflective objects. Reflections will add to the shot, and provide a nice contrast and gradient to help advertise and promote the product. Remember, the sole purpose of product photography is to make the product look valuable and enticing.
| Recommended Gear for Product Photography |
|---|
|

| About Yechiel Orgel |
|---|
| Yechiel Orgel is a New York City based commercial photographer who specializes in still-life, product and beverage photography. He is passionate about working with creative entrepreneurs to increase conversions of their products and services through unmatched image quality. His grasp of radiant lighting and dynamic composition bring a high level of distinction to his e-commerce advertising, web and catalog assignments. Yechiel is a true visionary who casts both extraordinary and everyday items in an ethereal light that illustrates their true appeal. You can see more of his work on his website and Instagram. |
Newborn Photography
Information and Images provided by Sabine Brandt
Newborn photography is my passion, and I’ve specialized in newborn photography for the last four years. Because shooting with newborn children can have its list of challenges, I usually I only shoot newborns in my studio, which is specially designed for newborn photography. I have everything I need there for a successful session and a room where mom and dad can relax while I work with their little one, while I work the tools I have available to great a beautiful image for them to cherish for years to come. I love working with studio lights, as it allows me to have consistent lighting through the day and from shoot to shoot.
Here are some tips for a successful newborn session: Keep your studio warm. Mine is set to about 85 degrees F. Since newborns are not yet able to regulate their body temperature yet, you want to make sure they are warm and comfortable. Additionally, I like to use a noise machine, playing some light white noise to help them sleep and feel comfortable.
When it comes to lighting, I often use big and soft lighting modifiers to help create a soft and painterly image of the newborn. My lighting choice is almost always the same – An Einstein studio strobe with a large octobox (usually 5ft in size or larger), positioned at 45 degrees from my subject. This creates a beautiful and elegant light that really helps compliment the subject matter. Below are a few of my images, as well as a brief description of the gear used and how it was positioned.
| Recommended Gear for Newborn Photography |
|---|
|

| About Sabine Brandt |
|---|
| Sabine Brandt is a newborn photographer based out of Alamogordo, New Mexico. She fell in love with newborn photography after having kids of her own and began photographing them as practice. Soon she became a full-fledged newborn photographer, and now also teaches newborn photography with her specialized workshops. You can see more of her work on her website and Instagram. |
Food Photography
Information and Images provided by Taylor Mathis
As an editorial food photographer, I’ve worked with countless restaurants and dishes with the sole purpose to make the food look appetizing and great. What might come as a surprise to make people is that I’m often working in incredibly small spaces, and without a team of food stylists to help plate and put together the food elements. Because of these fast pace situations, I’ve learned how to light and photograph dishes in incredibly short time frames.
My number one goto photography product is the Westcott Rapid Box Octa XL. The structure of the light itself is compact, but it’s able to provide some really big lighting. I use this light, and other lighting modifiers for 95% of my work, and often pair it with a full frame sensor and a macro lens – or for me, the Canon 5d Mark III and the Canon 100mm Macro 2.8L IS.
Additionally, I make sure that my camera is mounted on a tripod of some kind, and I’ll often have a wired remote attached – so that I am free to move elements of the food around with ease.
The goal of editorial food photography is to make the food look appetizing, not necessarily to show specific details of the food. So because of that, I’ll often shoot with a shallower depth of field, to add a stylistic nature to my images. Using big soft light and tight, detailed shots, I’m able to photograph food to look its best, and I’m often doing it in spaces no larger than 5ft x 5ft. Be sure to look through some of my BTS photos below to get an idea of how I photograph food.
| Recommended Gear for Food Photography |
|---|
|

| About Taylor Mathis |
|---|
| Taylor Mathis is a longtime food photographer and educator based out of Charlotte, North Carolina. As the son of the chef, Taylor learned how to photograph food through years of practice. You can see more of his work on his Instagram and learn more of his techniques through his e-book series called ‘Photographing Food’. |
Author: Zach Sutton
I’m Zach and I’m the editor and a frequent writer here at Lensrentals.com. I’m also a commercial beauty photographer in Los Angeles, CA, and offer educational workshops on photography and lighting all over North America.
