Teardowns and Disassembly
Taking Apart The Sony A7rIII – In Search of Better Weather Sealing
Lensrentals.com, 2018
Weather resistant – A term that consumers falsely define as ‘weatherproof’ and camera companies accurately define as ‘the warranty doesn’t cover water damage’. The Cynic’s Photography Dictionary
The Sony A7R III has been out for quite a while. Generally, it’s a superbly popular camera with excellent reviews. We were busy moving to a bigger office, and then catching up from moving when it was released, so doing a teardown wasn’t high on our list of things that needed doing. And the good folks at Kolarivision did an excellent teardown, so we didn’t feel any need to rush.
We’ve dealt with a number of water damaged A7 cameras in the past and have a bit more knowledge of where the leaks have occurred, so we wanted to look for ourselves. Plus, we wanted just see all the complicated goodness inside. Now that things have slowed down we decided to take a look.
This will end up being a useful post for those of you who need to venture out into the elements with your camera. Sony has, as they said, markedly improved the weather resistance on this camera. They also left a screaming ‘leak here’ gap in the sealing that you can probably address yourself.
Before we start, let’s look at the obvious openings. First is one of the things we’re enthusiastic about; the memory card door. Yeah, I know, we have no life. But the new design incorporates a latch which is a very good thing. The old design had you pushing on the leatherette over the door to open it which both stressed the hinges and wore out the leatherette.

Lensrentals.com, 2018
There’s also nice, thick weather sealing all around the inside of the door.
Lensrentals.com, 2016
I won’t show you the port doors; when they’re closed, they provide a tight seal. When they’re open, they don’t – because ports. You don’t need a tear down to see that.
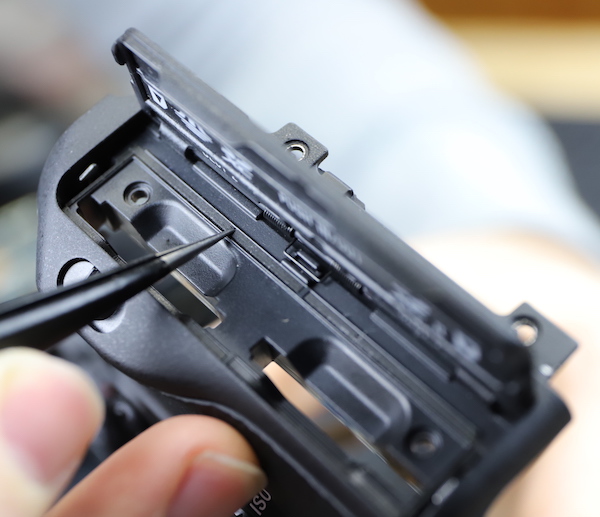
The battery door is remodeled and seems to have a bit of extra support which is a good thing. It has nice thick weather sealing (red line) everywhere but the latch and hinge area.
Lensrentals.com, 2018
The battery door is an area where we’ve seen leaks on the A7sII. And yes, we double checked, and there’s no seal on the camera side of the door. So significant improvements on the memory card door, but not on the battery door.
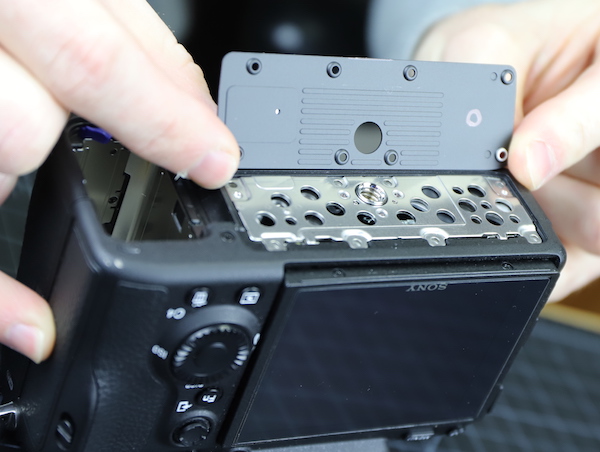
Let’s start with the bad part and get it out of the way, because other than that they’ve done a superb job sealing up this camera. We took out the screws holding the bottom makeup plate.
Lensrentals.com, 2018
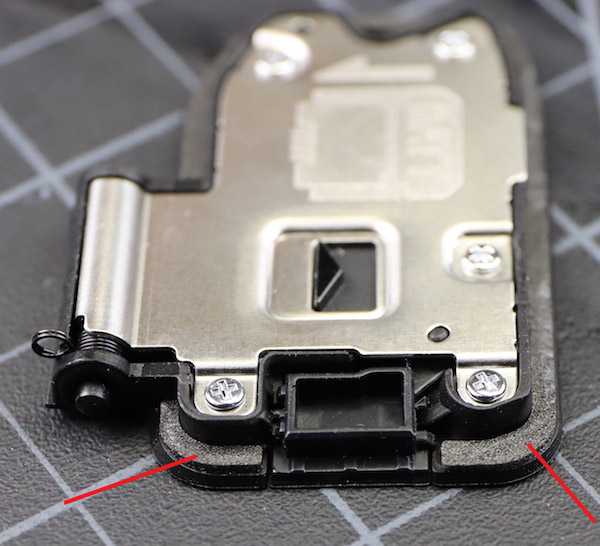
This is another area where we’ve seen leaking, so we expected some good weather sealing added around here. But, as is so often the case, our expectations were a down payment on disappointment. Alas, just plastic edges like the previous cameras. While plastic edges, tightly overlapping, can provide some water resistance, past experience assures us that the A7R series don’t. (That makes sense, they are neither tightly fitted nor do they have a large overlap.)
Lensrentals.com, 2018
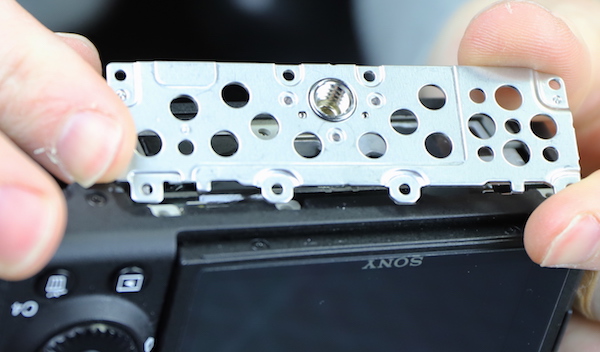
The metal tripod mounting plate lifts up next, it’s nice and sturdy with cheese-plate holes to keep it light and let the water flow unimpeded into the camera.
Lensrentals.com, 2018
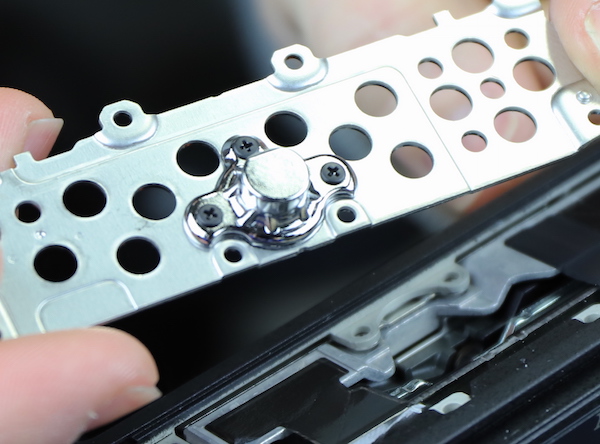
The actual tripod socket has good news and bad news. The good news: it’s a separate piece and therefore easy (and in theory inexpensive) to replace if needed. The bad news is the top is a thin pressed plate, and if your tripod has a slightly too-long screw, it will pop the top right off. Then the top rattles around inside the camera causing shorts and such. (Yes, we’ve seen it, and it’s not limited to Sony by any means. A lot of tripod sockets are made this way.)
Lensrentals.com, 2018
Never had this happen? Lucky you. If it ever does, I’d suggest following our simple steps to this point and shaking the piece out of the camera. No good can ever come of having a piece of metal rolling around in an electronic device. No good at all.
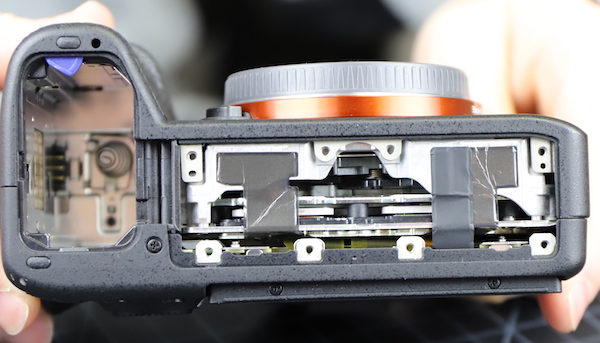
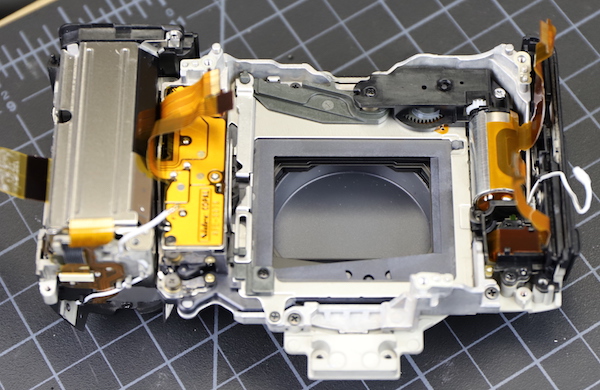
Speaking of where that metal piece could go let’s look at what’s under that metal plate.
Lensrentals.com, 2018
There are two black pieces of heat transfer tape. In between those you can see the flat plates of the sensor / IBIS assembly. The black above those is the imaging chamber and shutter assembly. So if that metal top gets popped off, or water comes in, this is The Highway to Hell, straight into the heart of the camera.
In case you can’t tell, I’m pretty unhappy with the bottom design of the Sony A7rIII. There’s absolutely no protection or improvement over the Sony A7rII. Now the case designers (and most of you) are probably aware that rain falls down from the sky onto the top of the camera. The repair people (like us) are aware that people set cameras down and puddles occur; also splashes go up, and sometimes cameras are held in portrait mode. In other words, a liquid will find your weakest point.
There’s good news coming, though, the rest of the disassembly shows careful and thorough water resistant measures. The A7R III bottom plate engineering team apparently didn’t get the memo, but I bet the A7s III will have some sealing down here.
Let’s Look at the Back Panel
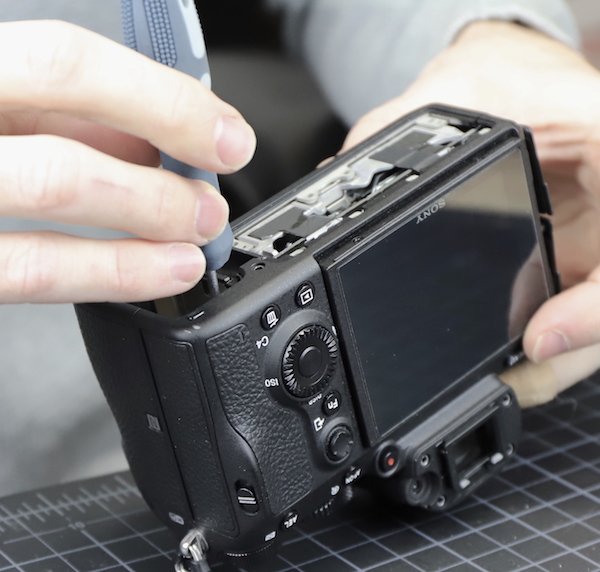
The next order of business is taking the back off. Right from the start, we could see some changes and improvements had been made. For one thing, the back panel is a single assembly in this camera; previously the LCD and viewfinder areas were separate. That’s a good thing for disassembly and a good thing for sealing.
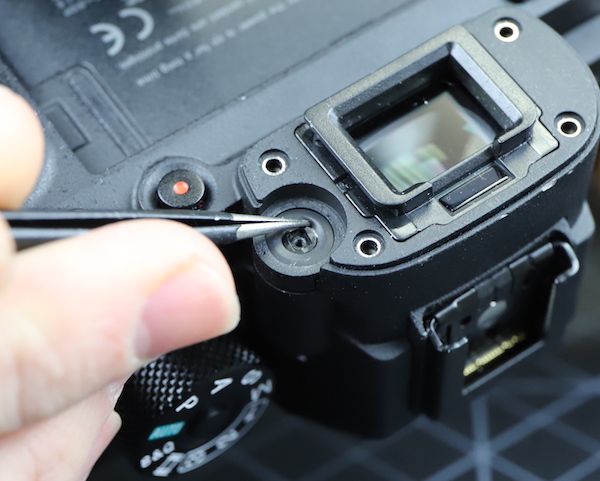
We removed the pop-off eyepiece and diopter adjustment wheel. There’s a very nice thick rubber seal under the wheel.
Lensrentals.com, 2018
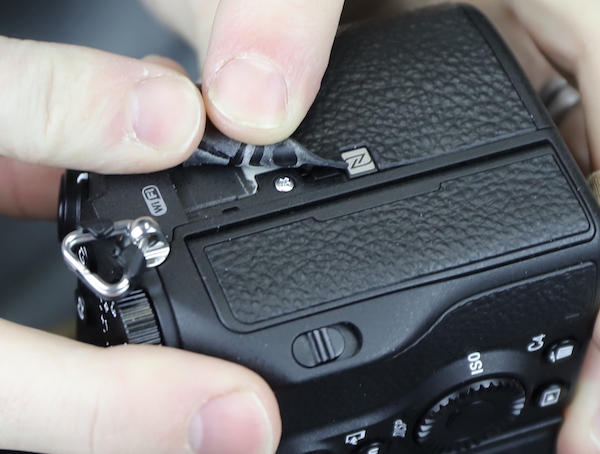
There are several visible back screws, but removing them didn’t let the back come off. Sony likes to include a secret screw or two in all their cameras, and this one is no exception. There’s a screw holding the back on at the top of the battery compartment.
Lensrentals.com, 2018
And in a new move for Sony, there are screws under the grip leatherette. This is normal in SLR cameras, but not so much in mirrorless.
Lensrentals.com, 2018
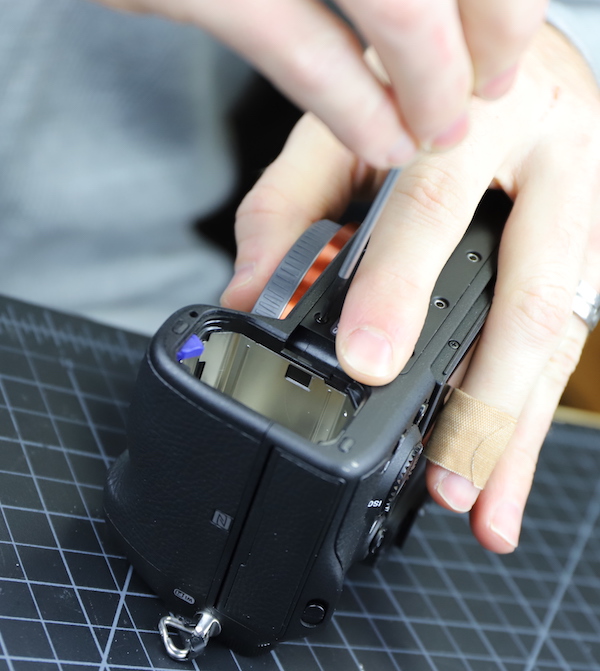
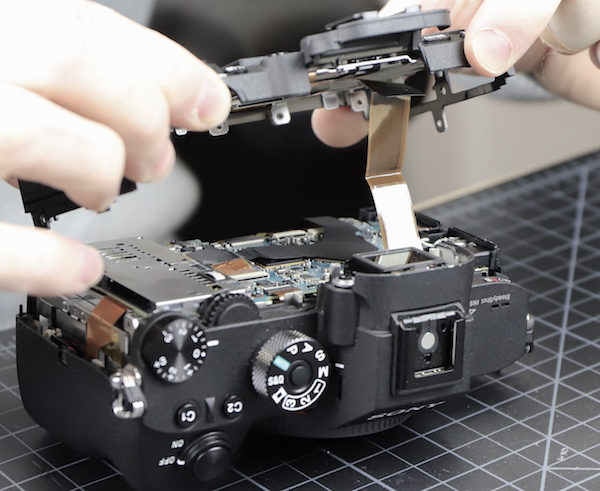
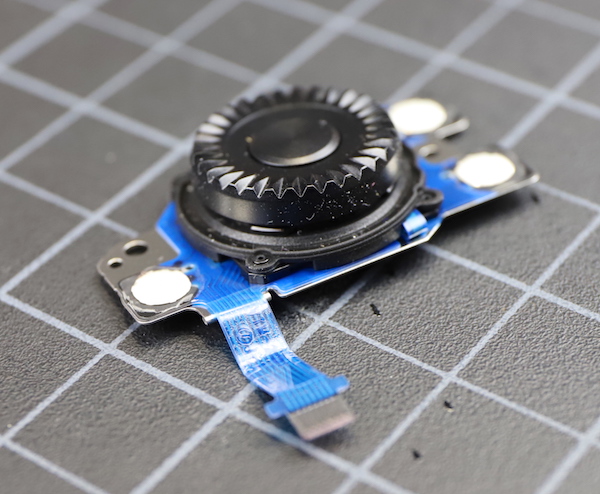
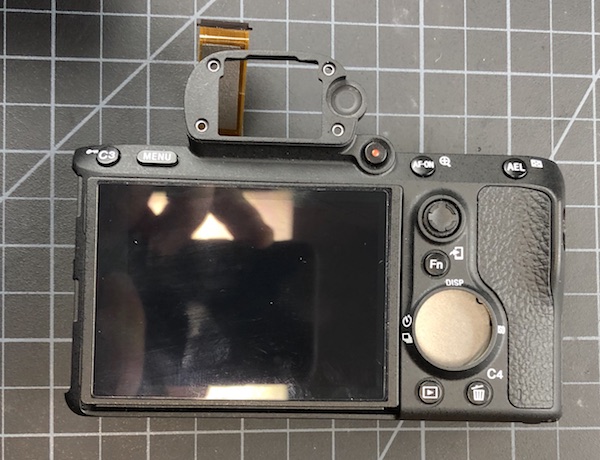
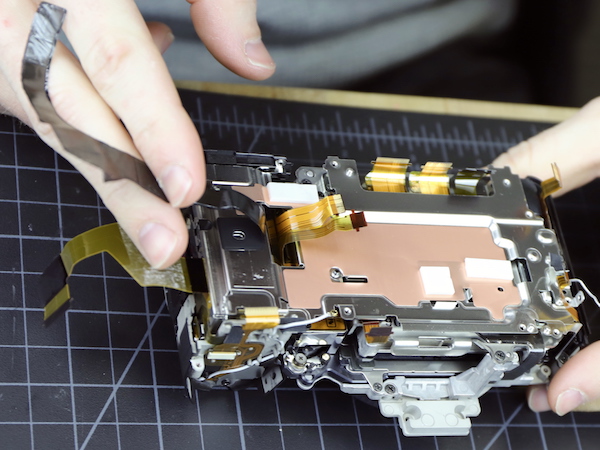
With all the screws finally removed the back comes off, with a long folded flex connecting the viewfinder and back-panel buttons to the main PCB.
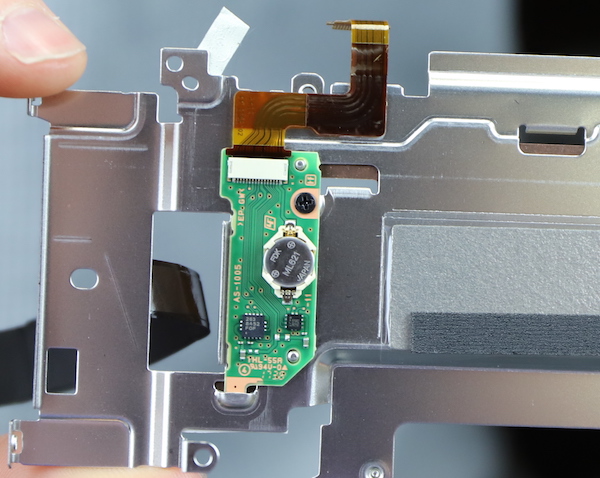
Lensrentals.com, 2018
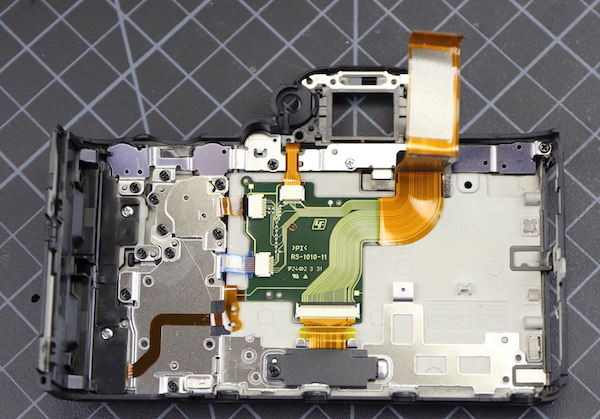
The inside of the back gives a better look at how many circuits are traveling through that one flex. But this is nice engineering, making things simple to repair or replace. (Note the metal covers screwed down on the left over the button assemblies; we’ll be looking under there in a minute.)
Lensrentals.com, 2016
Notice the gray piece at the bottom of the flex – that’s a weather seal protecting the opening where the flex travels to the LCD. It’s a nice thick piece of foam that should protect very well.

Lensrentals.com, 2018
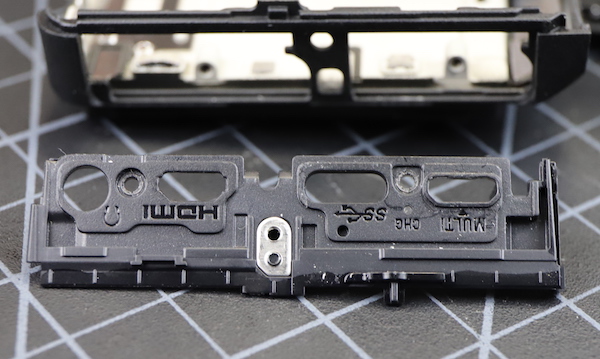
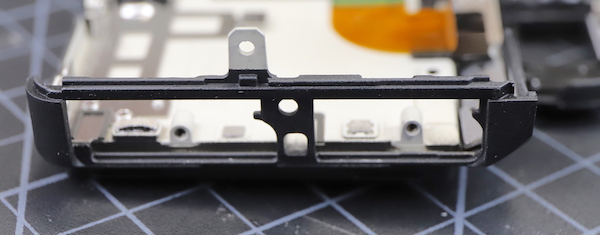
The I/O (input-output) port panel comes right out when the back is off. Note again there is no weather sealing around the panel or around the ports as they pass through the panel. So if you’re in bad weather don’t use the ports and make sure the caps are all closed. The caps are good weather protection, but they are the only weather protection in this area.
Lensrentals.com, 2016
Lensrentals.com, 2016
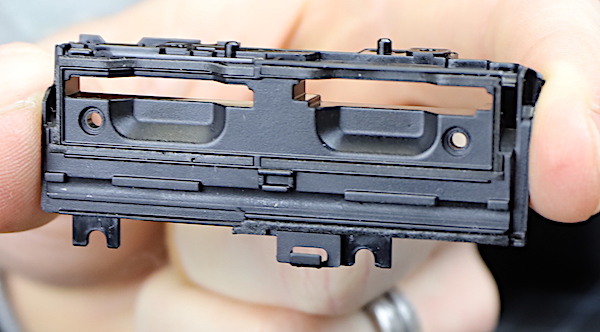
On the other side, the inner card door plate takes a little coaxing to snap out. You can see the thorough weather seals around the card slots. There is no sealing between the plate and the camera body, but the grip rubber overlaps that area, and it’s a pretty tight fit, as we mentioned.
Lensrentals.com, 2016
Removing those metal button assembly covers was a rather involved task; they’re all interlocking. I’m not going to show you the 27 color photos with circles and arrows and a paragraph explaining each step; I’ll just say don’t try it at home. Once we got them off, we could see a lot of care was taken in making the back of the camera weather resistant. The joystick button, for example, sets into the rubber cover that you actually touch. That cover is tightly placed in a rubber seal vulcanized to the back of the camera.

Lensrentals.com, 2018
Lensrentals.com, 2018
The scroll wheel does come all the way through the back cover but has rubber seals where it mounts, and they are held down very tightly. Again, I can’t see any water coming through here.
Lensrentals.com, 2018
We love the modular assembly of the dials, but it does allow one untoward possibility. If you get distracted while reassembling all those buttons and metal plates, you get to take everything apart and do it again.
Lensrentals.com, 2018
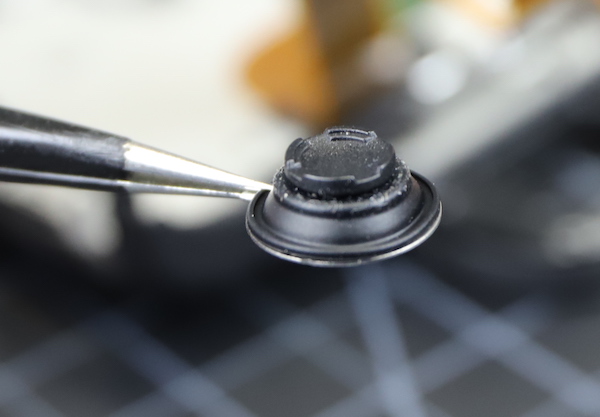
Even the small push buttons are entirely rubber sealed.

Lensrentals.com, 2018
Way back in the day, we took apart an A7R and remarked that it was amazing how simple and how few pieces it had compared to a DSLR. Let’s take a second just to look at the back panel assembly of the A7R III and see how much more complex it is. The entire A7R had 29 screws of three sizes. The back panel alone, on the A7R III has 21 screws of four sizes.
Lensrentals.com, 2018
Back to the Camera
Lensrentals.com, 2018
The piece that holds the viewfinder in the top assembly has complete sealing around the edges.
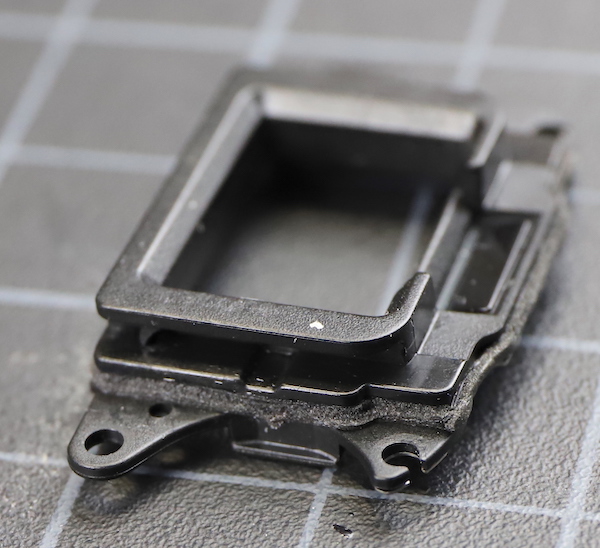
Lensrentals.com, 2018
As does the viewfinder itself.
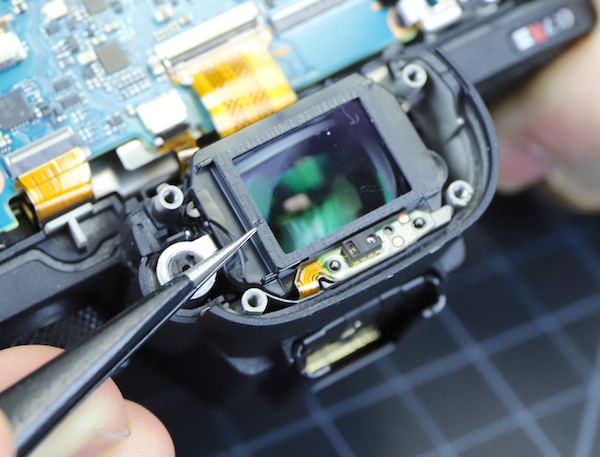
Lensrentals.com, 2018
With that covering piece removed, the viewfinder slides right out.
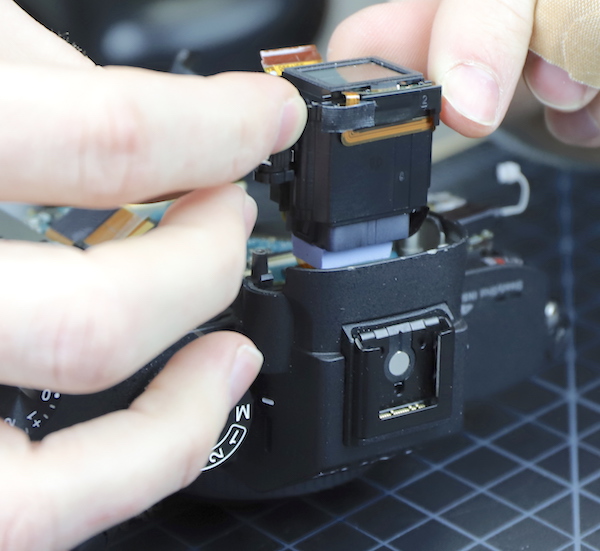
Lensrentals.com, 2018
The usual obvious screws and not-so-obvious screws were removed (one was down behind the viewfinder ) and the top assembly came off.
Lensrentals.com, 2018
There was impressive weather sealing around the scroll buttons. We didn’t disassemble the top further – it’s a pain to do and for repairs, the part is ‘the top assembly’. In retrospect this may have been a mistake; we didn’t look at how well the scroll wheels were sealed, just the area around them.
Lensrentals.com, 2018
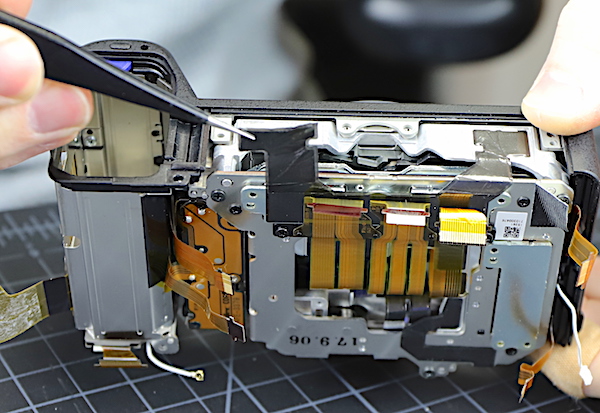
Next was the routine of unhooking flexes and removing screws to get the main board off.

Lensrentals.com, 2018
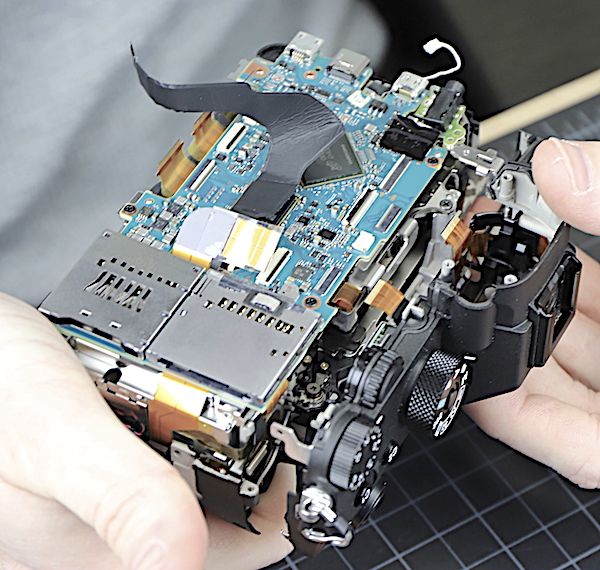
Back in the day of the A7R, we loved the simplicity and direct layout of Sony cameras. Whether it’s the increased complexity, or the addition of some ex-Nikon engineers to their team (Nikon cameras are marvelous things, but their engineers never take a straight path from A to B when they can find a way to wrap a wire around the entire camera twice) or just the fact that things are so much more complex, that elegant layout is long gone. Here we have flexes going in every direction, including one that is about 7 inches long winding up from below through a slot in the board and taking four turns and giving off a tributary before it plugs in.

Lensrentals.com, 2018
Of course, it makes no difference in how well the camera works, but the newer Sony cameras are starting to look like their software menus – complex and what you’re looking for isn’t readily apparent.
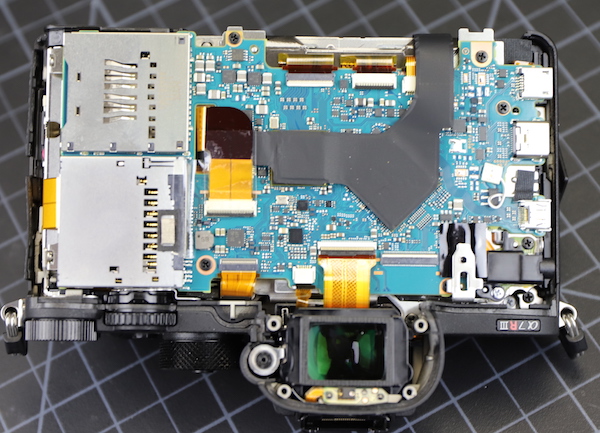
A look at the main board shows that, with the exception of the microphone jack, all the ports are soldered to the board, so if you tug on one a bit too hard, you get to buy a new main board. Same with the memory card readers. I get this – it allows this all to be assembled by machine, but mainboard replacements are a lot pricier than a port or card subassembly replacement.
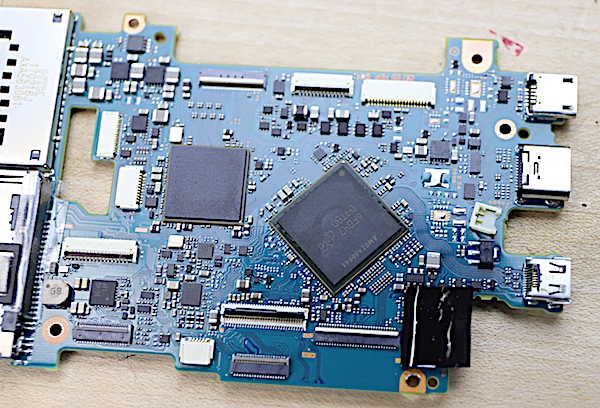
Lensrentals.com, 2018
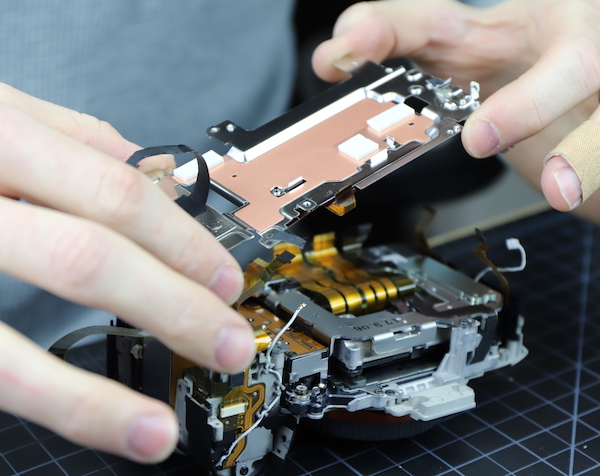
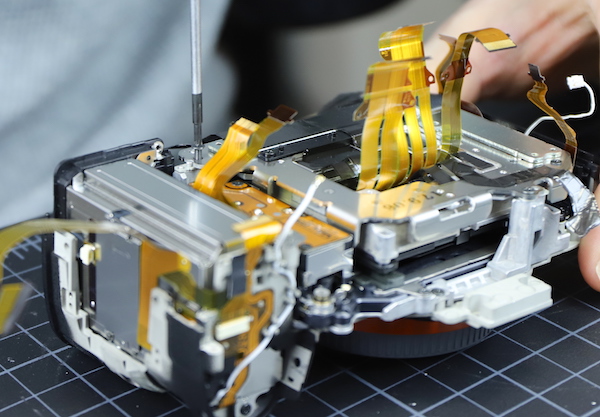
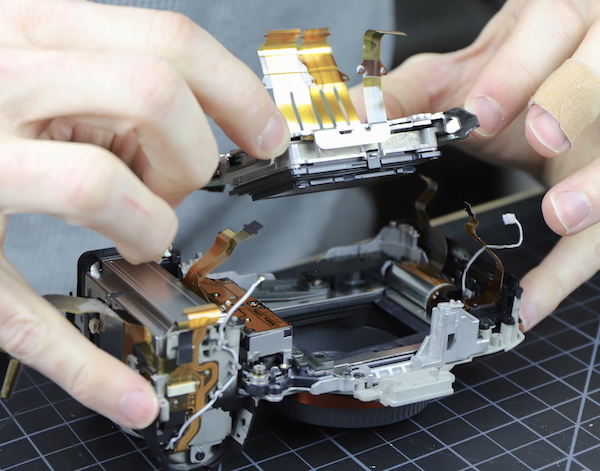
Now that the board is off, we’re really close to the working parts of the camera. You can see a shiny copper shield, as long as Aaron holds The FlexRiver out of the way. We’re looking at the back of the sensor / IBIS assembly, and you can see, almost straight down from Aaron’s thumb, one of the three mounting points of the assembly to the chassis.
Lensrentals.com, 2018
Here’s a close-up of the mount. Each of the three points is shimmed to align the sensor with the lens mount, so there’s hopefully no tilt between the two. This shim is .45 mm.
Lensrentals.com, 2018
The shield plate comes off next.
Lensrentals.com, 2018
Underneath it is the date-time-menu save battery. I think it’s safe to say you won’t be replacing it at home when it goes dead.
Lensrentals.com, 2018
Now we have a direct look at the back of the sensor / IBIS assembly. Looking at the flexes gives you an idea of the amount of information transfer that’s going on. There’s some heat transfer tape going over to the camera chassis since that amount of transfer is undoubtedly going generate a bunch of heat.
Lensrentals.com, 2018
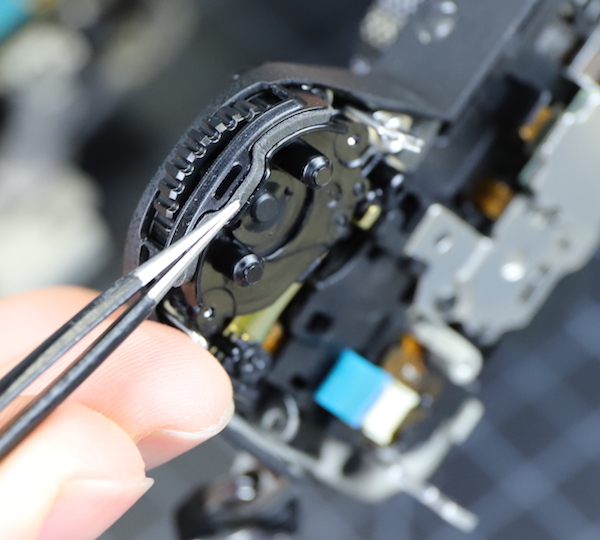
For those of you who like to keep up with who makes what, a close up of the shutter assembly.
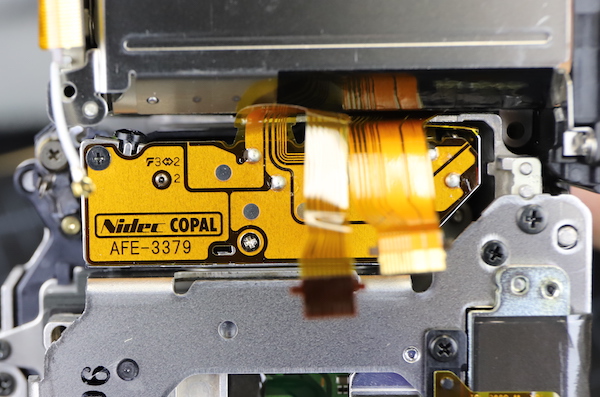
Lensrentals.com, 2018
Now it’s time to take out the three screws that hold the sensor assembly to the chassis. Note to those of you following along at home: make sure you keep the shims identified by location. This set ranged from .45mm to .05mm. If you put them back wrong, your pictures will be crooked.
Lensrentals.com, 2018
A closeup gives you an idea of how thick the shims are.
Lensrentals.com 2018
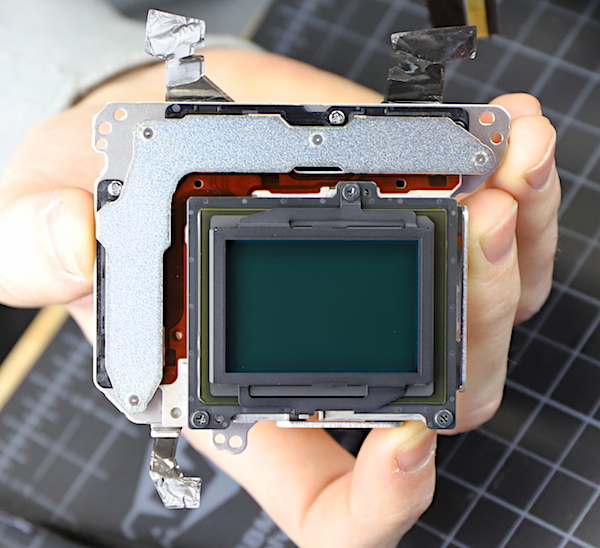
Once the screws are out the sensor / IBIS assembly lifts right off.
Lensrentals.com, 2018
The actual sensor is dwarfed by the stabilizing system behind it.
Lensrentals.com, 2018
From the side, you can see the two main stabilizer plates which travel in offset arcs so the sensor can be moved in any direction.
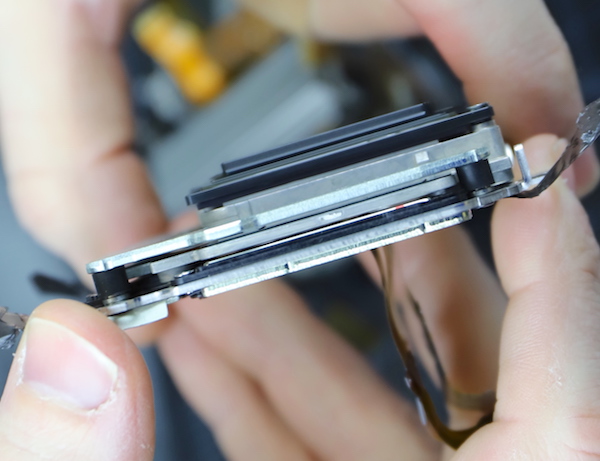
Lensrentals.com, 2018
The amount of sensor movement that an IBIS has always surprises me. I mentally picture it moving a fraction of a mm, but the range is far greater than that.
Lensrentals.com 2018
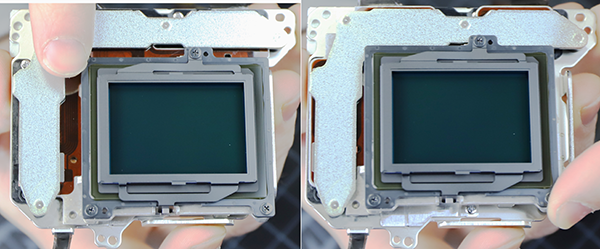
What’s left on the table is the back of the front, with a sensors-eye view of the back of the camera cap.
Lensrentals.com 2018
We actually did disassemble the battery compartment, which has several sensors in it, but it’s boring, and this post has gone on long enough. We’ve seen what we came to see.
So What Did We Learn Today?
Sony spoke truly. Except for the bottom this camera has thorough and extensive weather sealing, as good as any camera I’ve seen. (Before you Pentax guys start, I have not taken apart a Pentax so it may be completely sealed in a super glue matrix for all I know.)
That being said, the bottom of the camera is not protected worth a damn. If you’re out in a sprinkle or shower, this probably doesn’t matter; water hits the top first. But if you’re in severe weather, near surf, or might set your camera down where someone might spill something, you need to be aware of that. If I knew I was heading out in such conditions, honestly I’d tape up the bottom of the camera or encase it in plastic taped all around the body. Yeah, battery changes will be a pain, but the new battery is supposed to last a lot longer.
The water challenge test done by the good guys at Imaging Resource provides further evidence that this is so. They expressed some concern about the top right-hand dial, and while we saw good seals under the dial, we didn’t disassembly the dial itself.
And, of course, the port covers have to be snapped shut to keep water out. If you’re out in weather and just have to use a port, then you’d better do what I do and put the camera in a plastic bag. It’s not how great is the weather sealing at the weather sealed places. It’s how bad is the weather sealing at the most unsealed places.
One thing I would like to emphasize for the fun of it. The difference in complexity between the A7R and the A7R III is really quite amazing. If you have a minute, go over to that old blog post and do a quick comparison.
Roger Cicala and Aaron Closz
Lensrentals.com
February, 2018
Author: Roger Cicala
I’m Roger and I am the founder of Lensrentals.com. Hailed as one of the optic nerds here, I enjoy shooting collimated light through 30X microscope objectives in my spare time. When I do take real pictures I like using something different: a Medium format, or Pentax K1, or a Sony RX1R.
