Geek Articles
The Great 400mm Teardown Comparison. Part II – The Sony 400mm f2.8 G
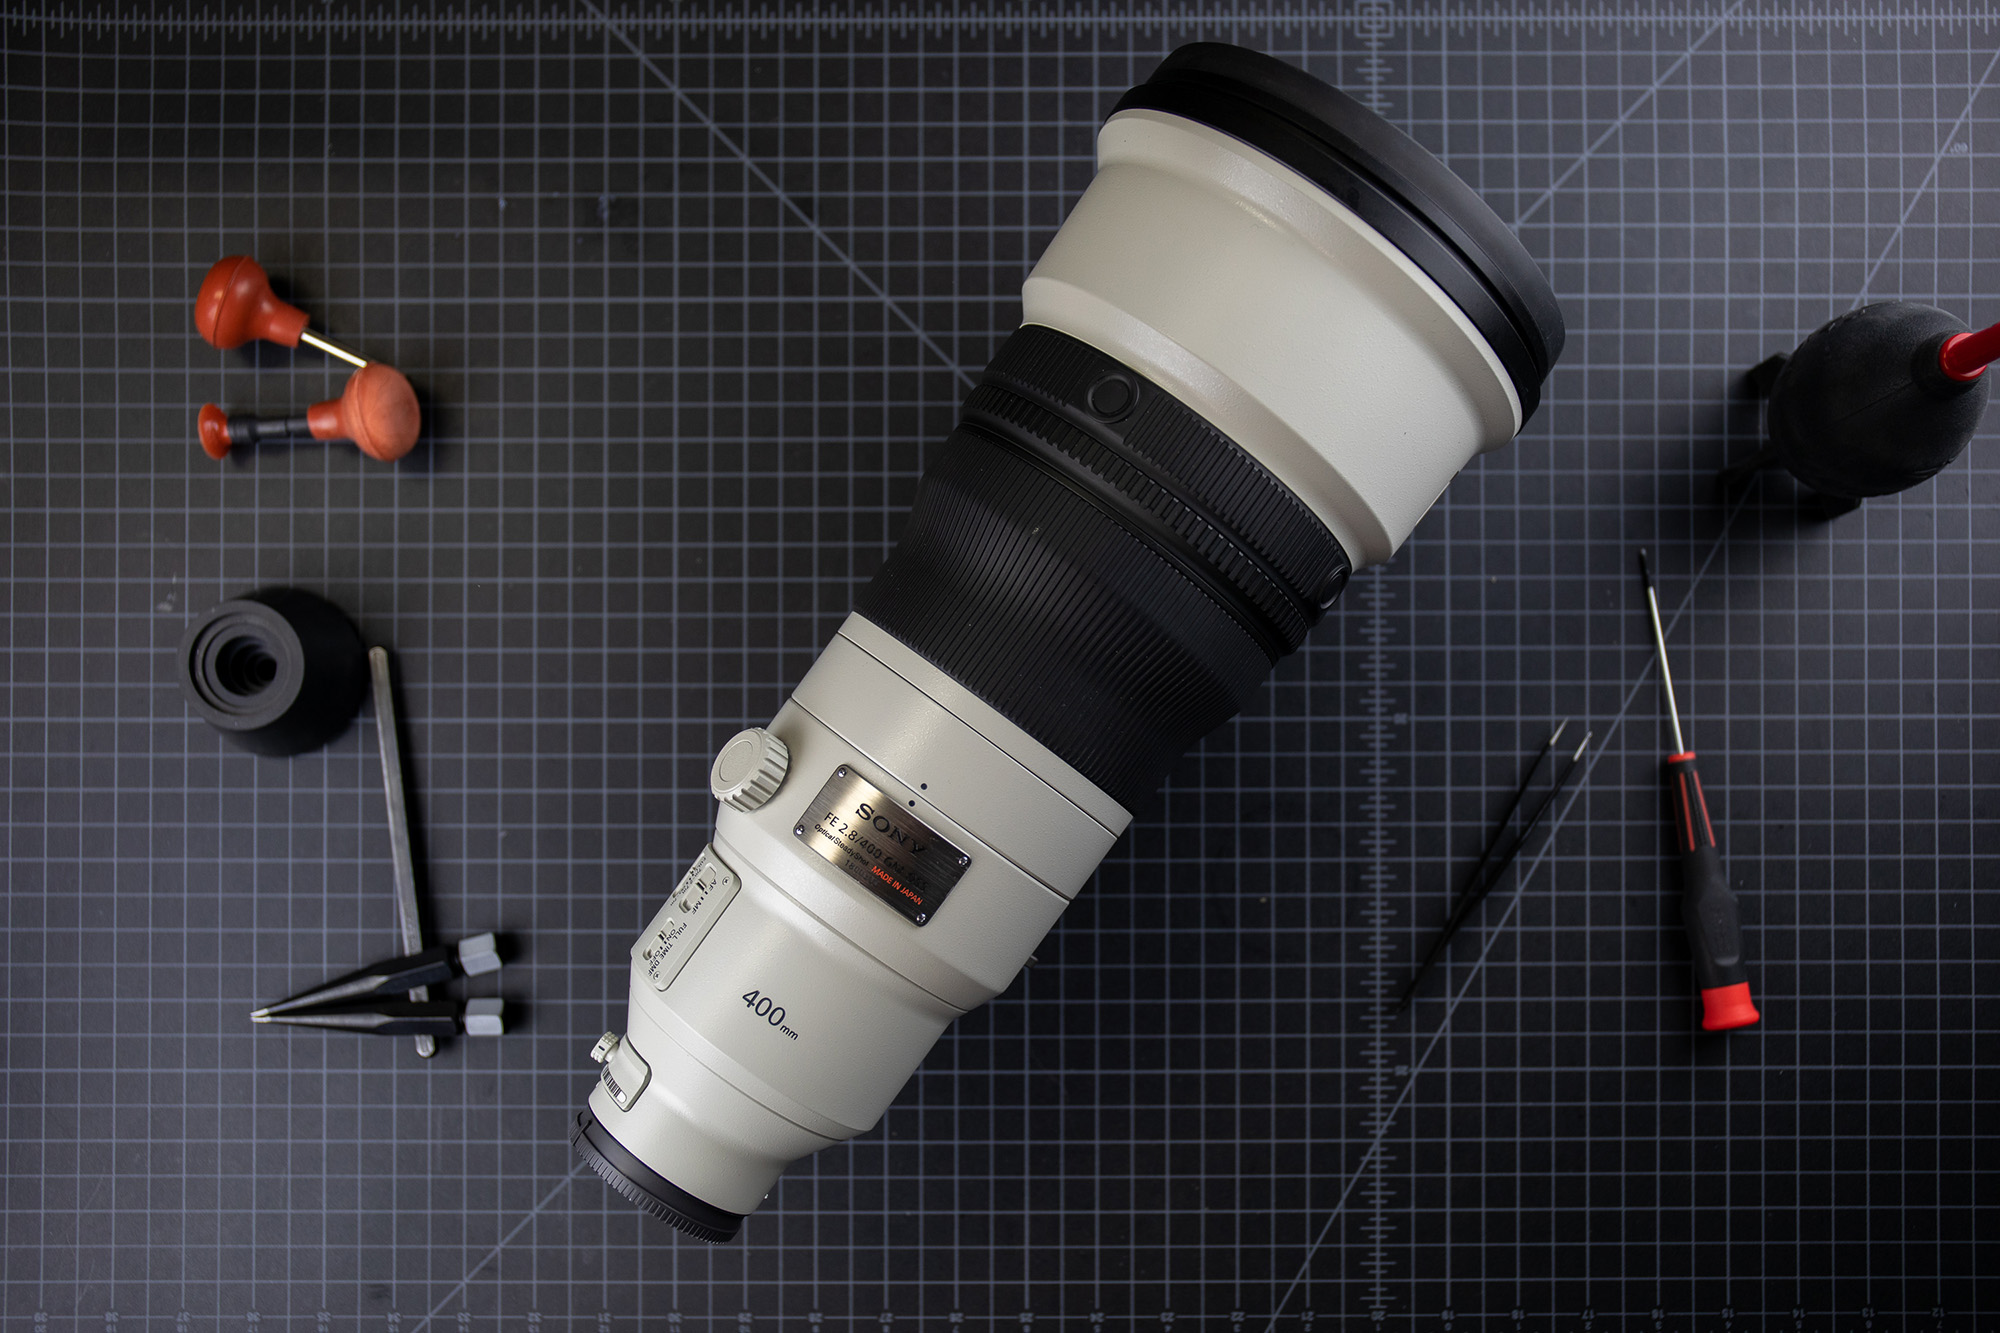
In which you will not only learn how good the construction of Sony’s new flagship is, but also everything you wanted to know about Kubu.
As I mentioned last week, we usually don’t write up super-telephoto teardowns, but the release of two remarkably lightweight 400mm f/2.8 lenses seemed like a great opportunity to do a comparison. In previous teardowns, Sony optomechanical engineering has steadily improved (with the horrid exception of the 70-200mm f/2.8 GM). From descriptions, at least, it sounds like the Sony FE 400mm f/2.8GM OSS is state-of-the-art and we were eager to look inside.
The lens diagram suggests the same overall method that Canon 400mm f2.8L IS III used; smaller elements move towards the rear of the lens. Plus, Sony won the battle of most fluorite elements 3 to 2 over Canon. That does beg the interesting question about where Sony sourced their fluorite elements. Sony doesn’t make fluorite glass, and Canon has long been the one lens company that grows and polishes large fluorite in-house. There are other manufacturers of fluorite lenses, but they have generally been limited to small lenses, such as in microscopes and telescope viewfinders.
I was eager to see inside this big Sony lens for several reasons. First, some Sony engineers had been very eager for me to do so; they would only have been that eager if they were quite certain I’d be impressed. Second, by all reports the lens is optically superb, and yet doesn’t cost more than the Canon lens; that’s a pleasant surprise from the company who usually charges a good 10% more. Third, this is obviously a flagship lens for Sony, hoping to leverage into the professional sports market. I assume they’ve thrown everything they have into making it excellent.
As always, I’ll put my expectations out on the front end. I think this lens will be excellent; near to Canon’s build quality if not matching it. The Sony people are very comfortable about it. They’ve had plenty of time, now, to work the kinks out of their mechanical designs. Plus Sony has been very open about wanting to attract more professional photographers to use their equipment. Professionals want sturdy gear and Sony took a beating from professionals about the 70-200 f/2.8 GM. They won’t cut corners this time around.
The Tripod Ring
Tripod rings are a great start to looking at a supertelephoto’s engineering. They are actually complex, need to function smoothly, and take a lot of abuse.
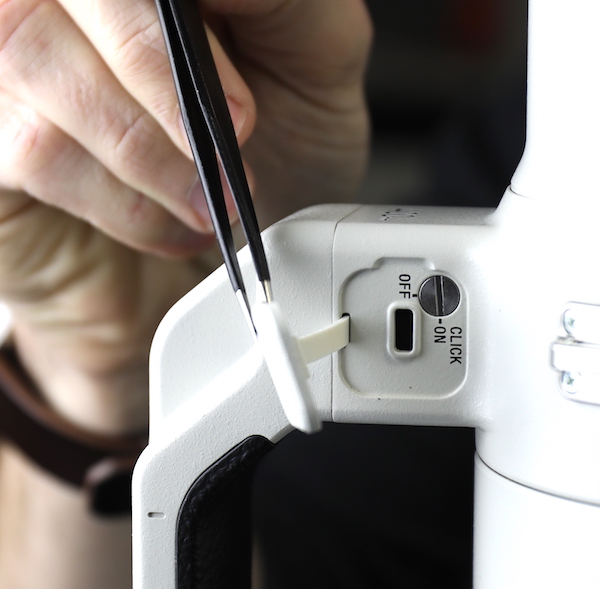
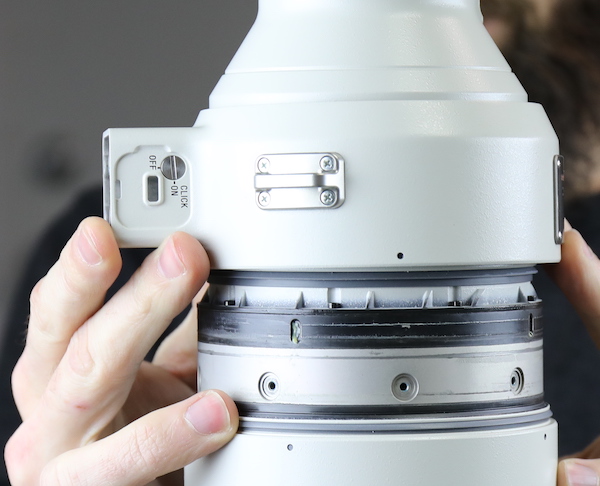
Sony starts off with an original thing that I like: you can turn the rotational clicks of the tripod ring on or off. I like the clicks myself, but I’m sure others will prefer turning them off. I’ve never been a fan of Sony’s push-through plastic covers on cameras, and doubt I will be here either, but that’s just a cover.
Lensrentals.com, 2018
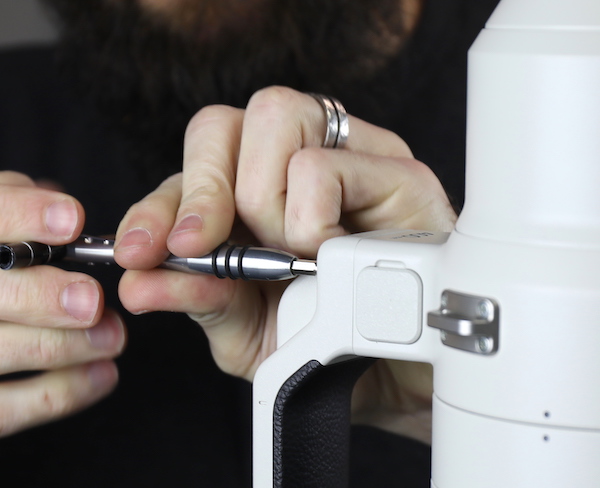
The tripod foot comes off in the usual fashion, removing four bolts.
Lensrentals.com, 2018
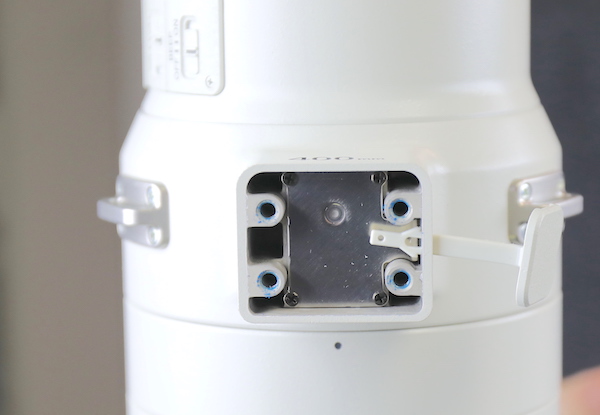
With the foot off we can see Sony’s pressure plate, a single piece as opposed to Canon’s two-piece plate.
Lensrentals.com, 2018
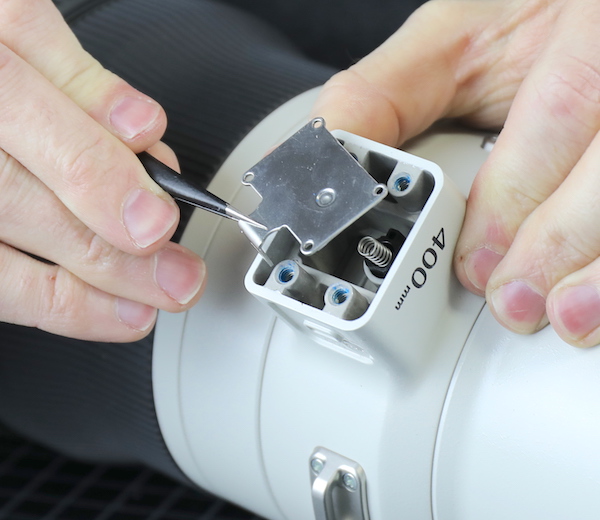
Removing the plate shows a single piece of metal with a dimple to put pressure on the spring. It’s not nearly as robust as Canon’s version that we saw in part one of this comparison. The 70-200 f/2.8 GM has left me probably overreacting to Sony’s habit of using thin metal plates, but in this case, I can’t see it mattering at all.
Lensrentals.com, 2018
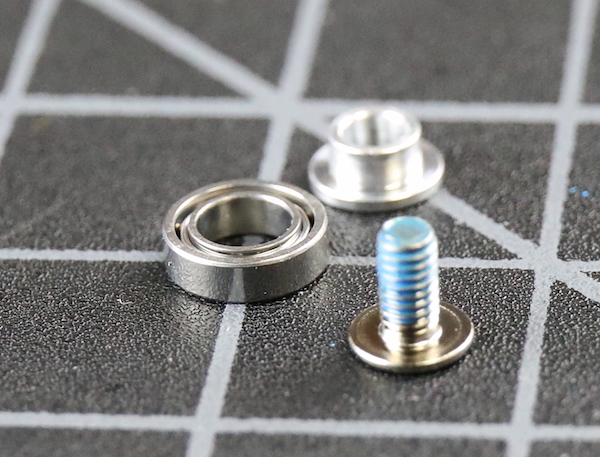
Just like with the Canon tripod ring, next, you remove eight sets of screw-axle-roller bearings that the tripod rotates on. These appear sturdy and well made, just about identical to Canon’s version.
Lensrentals.com, 2018
After that, the tripod ring slides up off the barrel. As with the Canon I give kudos for making it this way, it’s much easier should you need to clean grit out of, or relubricate the tripod ring.
Lensrentals.com, 2018
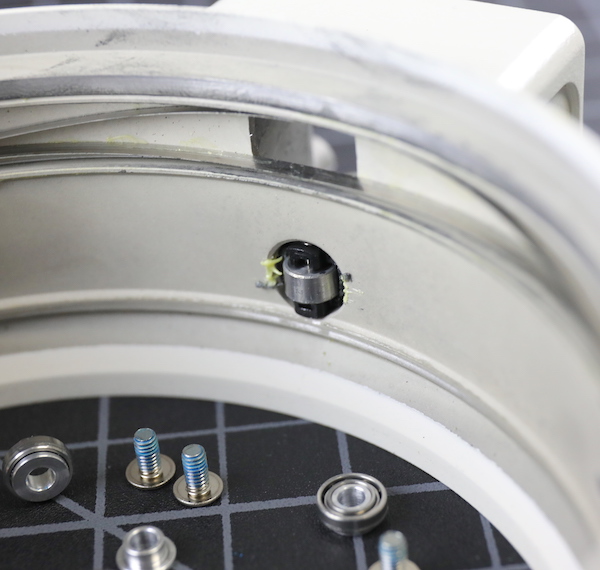
Looking inside the barrel we can see the click-roller pressed into the barrel. Again, the assembly isn’t quite as robust but it probably will never fail. And you do get to turn off the clicking if you want. (You could remove the spring and declick the Canon, but turning a knob on the Sony is certainly easier.)
Lensrentals.com, 2018
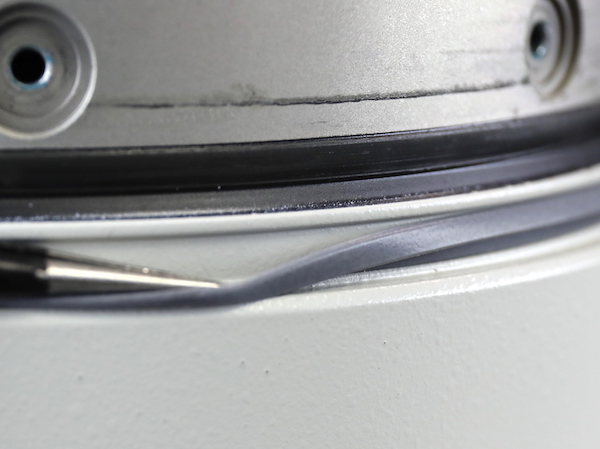
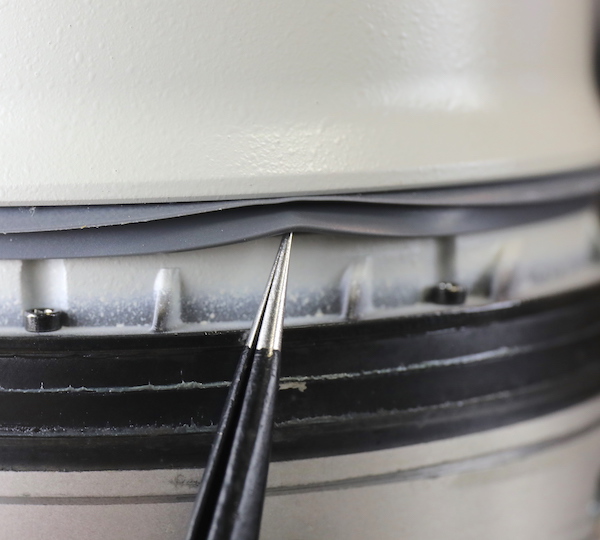
Once we have the tripod ring off we see hefty rubber seals above and below. As I mentioned in the Canon teardown, grit getting into the tripod ring ruins the smooth feeling when turning it, and these are good seals.
Lenserentals.com, 2018
Lenserentals.com, 2018
Like the Canon 400mm f/2.8 IS III, the Sony uses a replaceable standard filter for the drop-in filter assembly. In Sony’s case, they are 40.5mm which may be a bit more difficult to find than the Canon 52mm.
Opening Up the Back
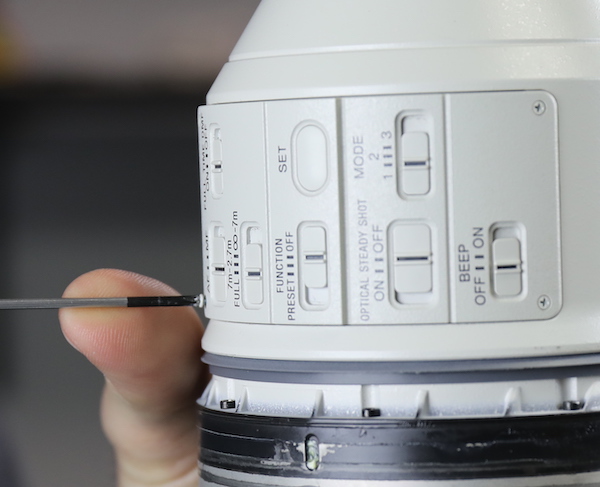
The Sony lens has a larger switch panel than the Canon, and we felt it best to open it and see where flexes were going before taking off the bayonet mount.
Lenserentals.com, 2018
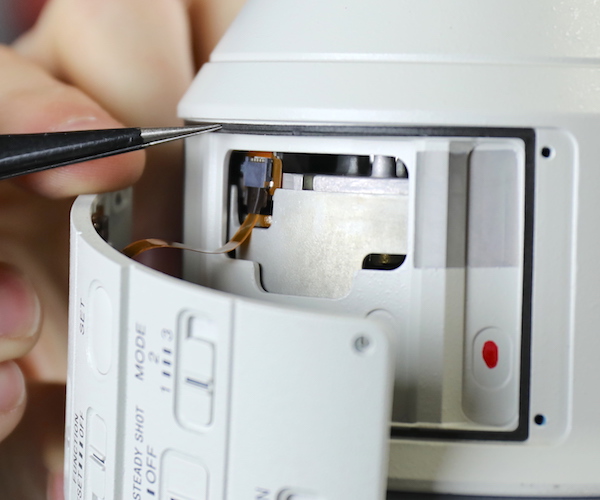
Once the screws are out, we see a nice rubber weather seal and a very neat single flex leading from the panel into the lens.
Lenserentals.com, 2018
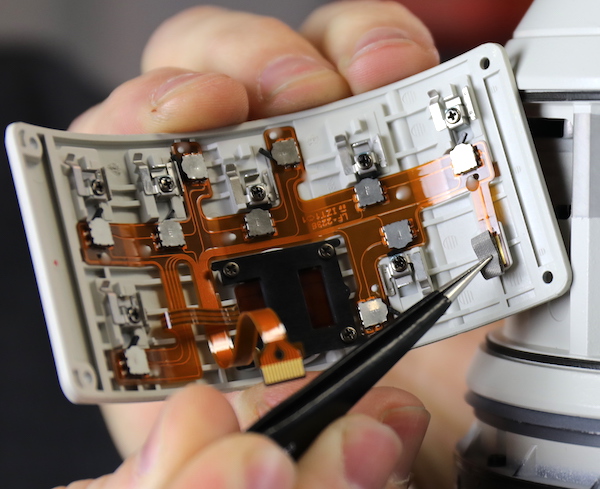
The switches are all neatly laid out with a grounding pad over on one side.
Lenserentals.com, 2018
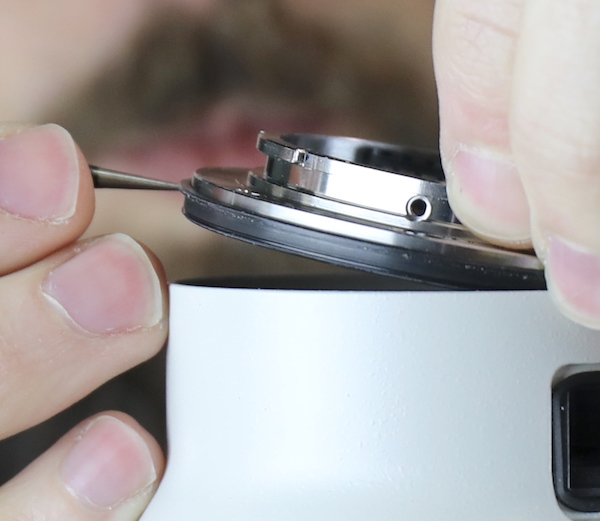
After removing the usual screws the bayonet mount, with a robust rubber weather seal comes out. It doesn’t show, but the Sony is one of the very few Supertelephotos that uses a flex from the bayonet electronics rather than soldered wires. I always whine about wires, so let me give props here.
Lenserentals.com, 2018
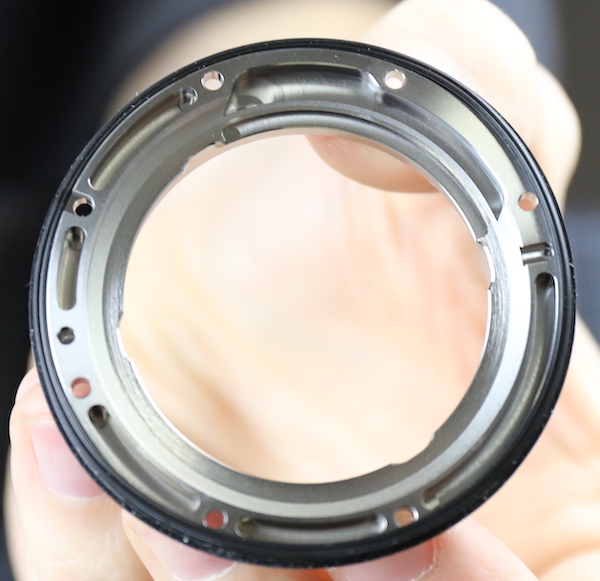
We didn’t need to remove the bayonet, unhooking the electronics would have let us remove it along with the rear outer barrel, but I wanted a look at it, Sony’s metal work has been a weak point in some other lenses. The bayonet mount itself is thick and robust, which was what I wanted to see. This is heavy-duty. And there are not four, but seven mount screws.
Lenserentals.com, 2018
As an aside, there are no ‘infinity’ shims under the mount, which most Sony lenses have. So either this is shimmed elsewhere or handled in a different manner. (We saw no markings to indicate variable thickness mounts as Canon uses, but perhaps handled electronically or shimmed elsewhere.)
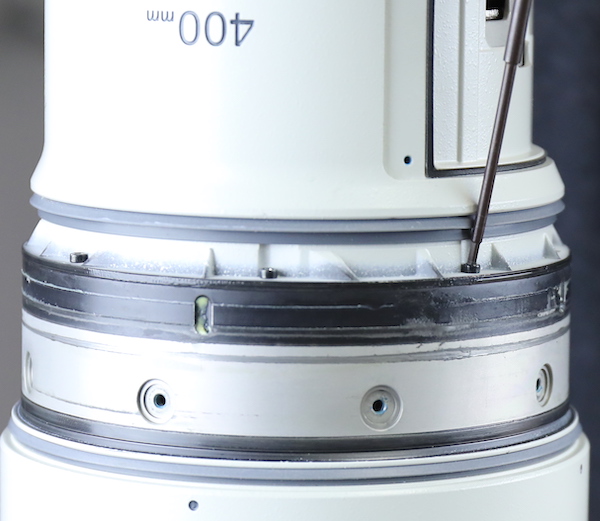
To remove the rear outer barrel, we unbolted 8 large hex bolts.
Lensrentals.com, 2018
With those out, the external barrel slides off.
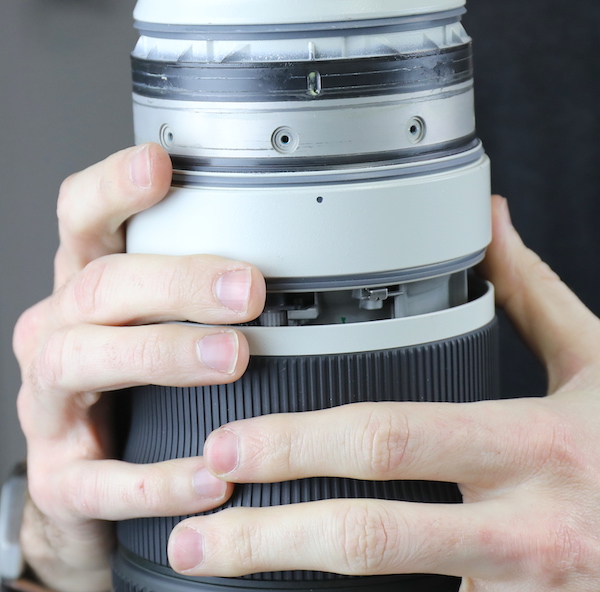
Lensrentals.com, 2018
And gets set to the side. Another rubber weather seal is visible at the bottom. (We didn’t have to take out the drop-in filter holder on this lens.)
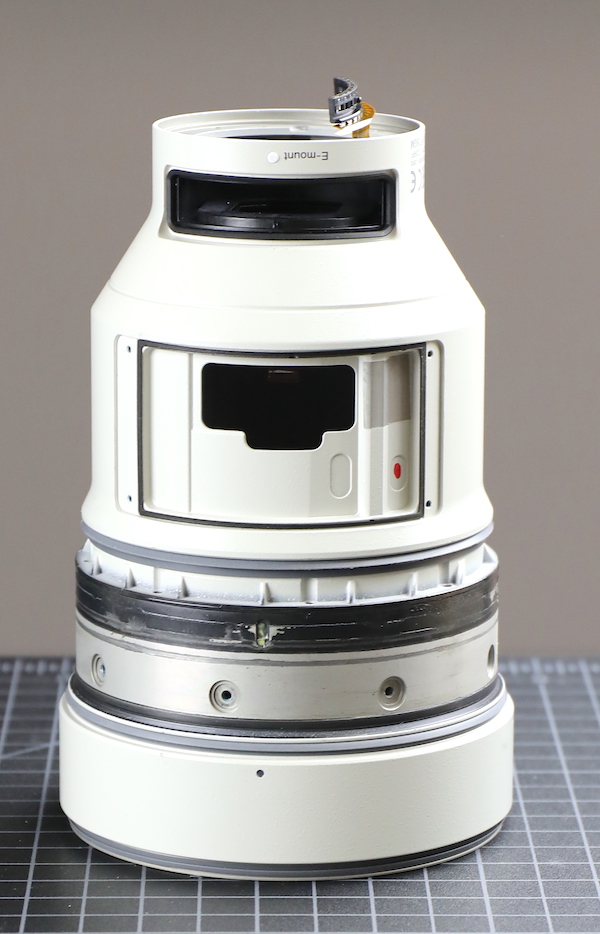
Lensrentals.com, 2018
With the outer barrel and bayonet removed we can look at the PCB with its various flex connectors.
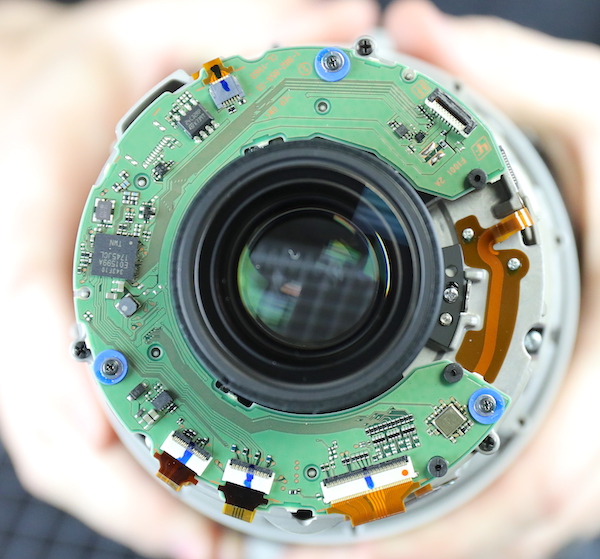
Lensrentals.com, 2018
The inner rear barrel looks very similar to the Canon 400mm f/2.8 IS III. I’m not a metallurgist but the magnesium alloy looks and feels the same. Notice the assembly at the bottom right near the focus ring, we’re going to look at that in a second.
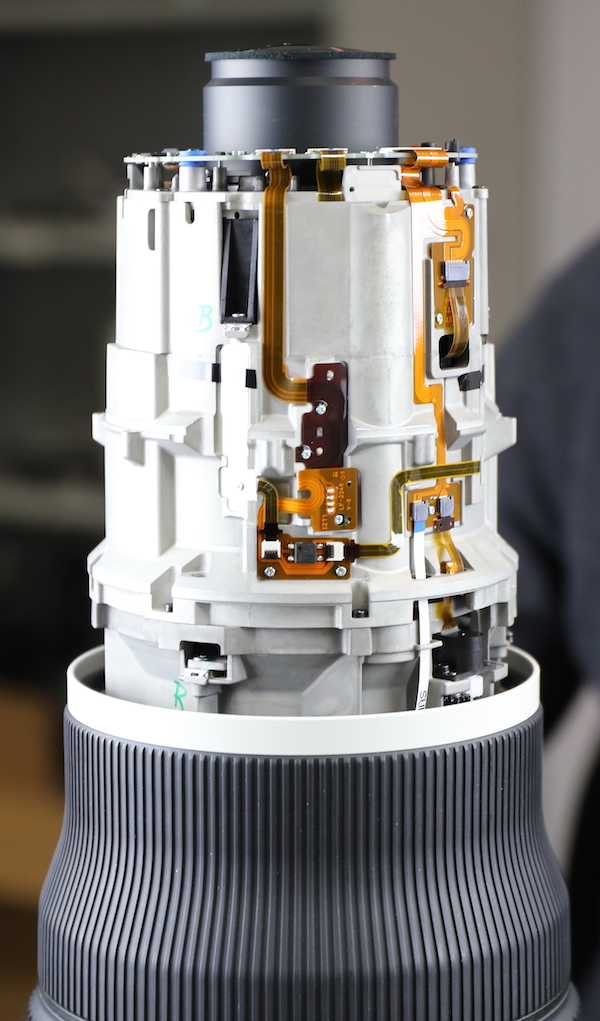
Lensrentals.com, 2018
This is the focusing mechanism. The focusing barrel has nylon teeth on its inner surface. When you rotate it, it turns a series of gears and eventually an electronic actuator that sends the focusing signal. At this point, we can’t tell if there are additional focus sensors. It works fine, but there’s something a bit comical about turning that huge barrel to just rotate these tiny gears. If you’ve read much of my stuff you know I’m generally not a nylon gear fan, but these have almost no pressure on them so they shouldn’t wear out.
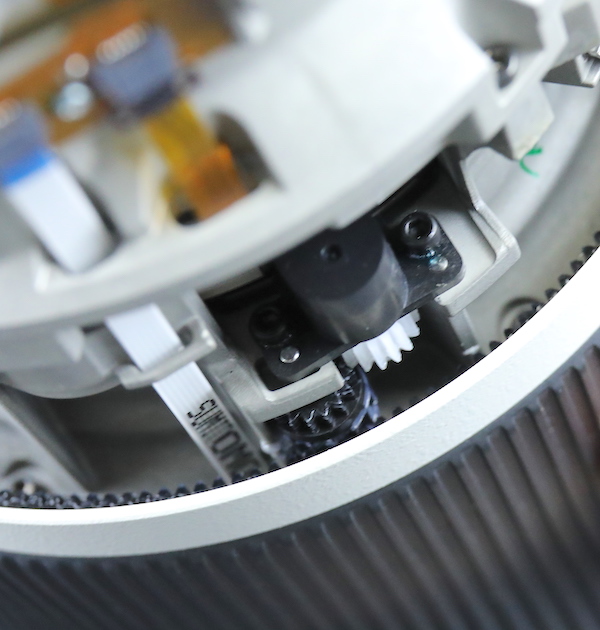
Lensrentals.com, 2018
Remember up above when I mentioned no shim under the bayonet mount? Looking around the inner barrel we see a lot of shims. As shims go, these are nice; three individual shims at each level that are externally accessible. Again, I’m not a shim fan. When you have the choice of ‘infinitely adjustable’ versus 0.1, 0.2, 0.4 adjustments, give me infinite every time. But if you’re going to use shims, this is the way to do it. (And most manufacturers still use shims.)
Editorial comment: The second or third post in the comments section, because Sonyfanism, will be something about shims are the same forever and therefore better. I will go ahead and say you’ve never unglued a glued-in eccentric collar. That’s forever, too, and still infinitely adjustable. Nor have you ever opened up a lens to fish out a shim that’s come loose and is floating around inside the lens and then tried to figure out where it was supposed to go. Nor have you ever given up an optical adjustment or hand-made a 0.05mm shim because 0.1mm wasn’t enough and 0.2mm was too much.
Anyway, here are some close-ups of a couple of shim adjustments, the first is probably a spacer set for the rear group (we’ll look into that more later).
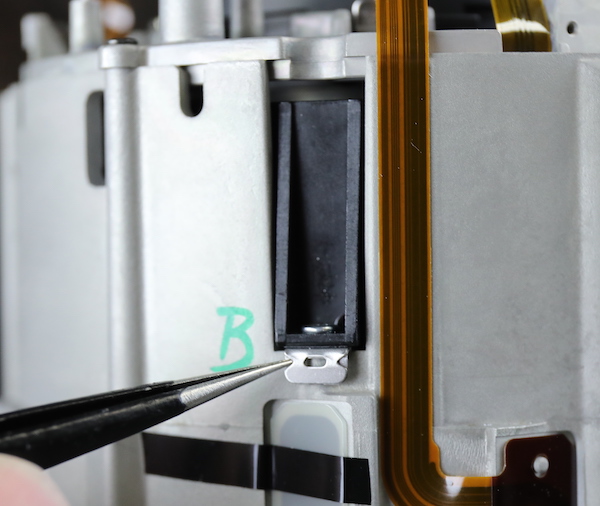
Lensrentals.com, 2018
The second is probably a fixed element near the aperture. You can see these are all meant to be adjusted without needing to disassemble the barrel. The letter codes written on the barrel are probably shim thickness at each location. This is logically and nicely laid out and engineered.
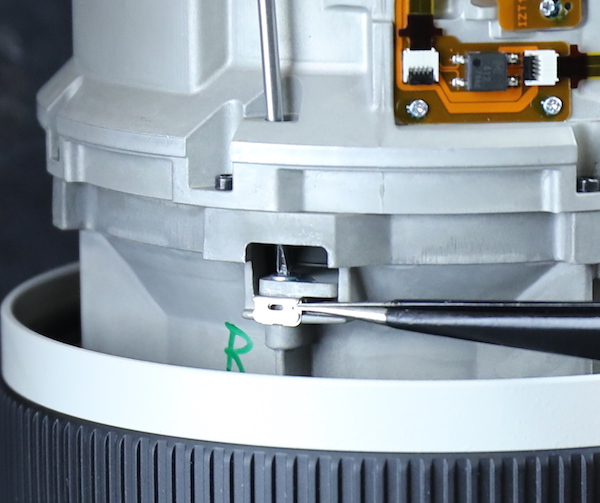
Lensrentals.com, 2018
Looking at the inner rear barrel, it’s obvious a lot of care was taken in laying out the flex runs. They all pass through grooves and slots. They’re all held down with double-sided tape but also screwed into the barrel at spots.
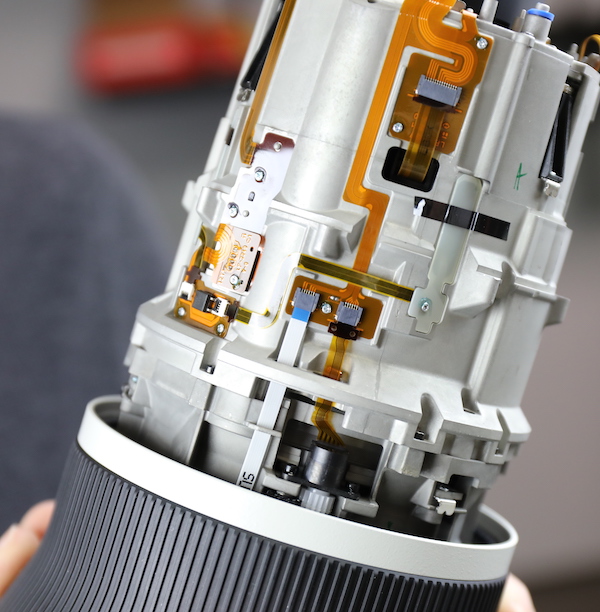
Lensrentals.com, 2018
And in a couple of places, there are plastic guards over flex connections and runs.
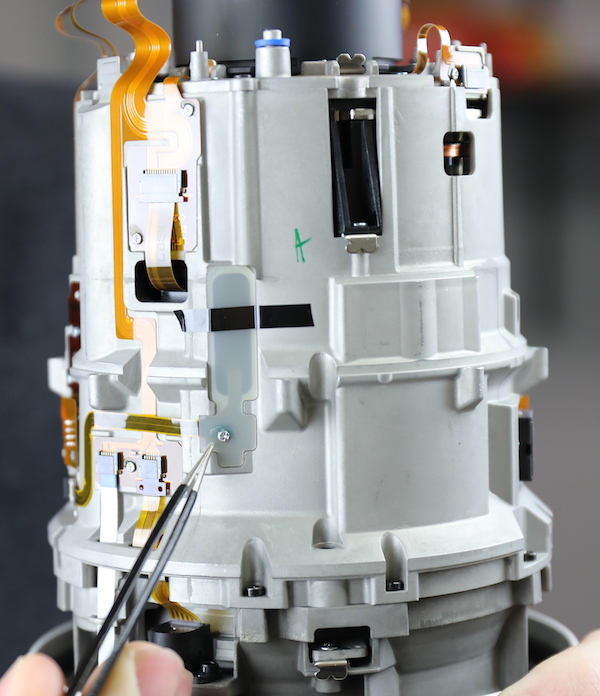
Lensrentals.com, 2018
Anyway, it’s time to take off the focus ring, which looks like it will be pretty straightforward. Peeling up the ring (it’s held down with double-sided tape) shows us the usual screw-post-roller system holding the ring in place. Here we go, fanboys, double-sided tape on the Sony, friction molding on the Canon. I predict 1,602 comments about which is clearly better. Myself, I have no clue, they both work fine.
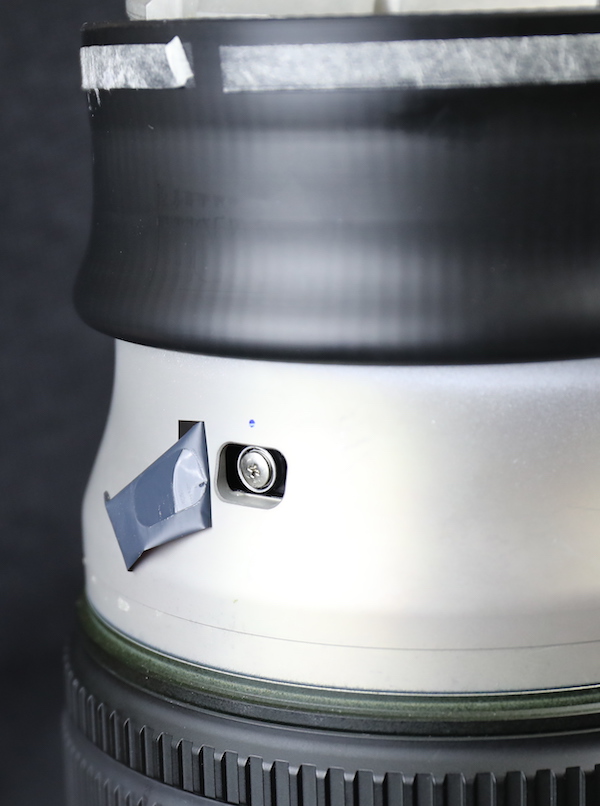
Lensrentals.com, 2018
Which, when removed, look just like all the other screw-post-roller setups we’ve seen in both lenses.
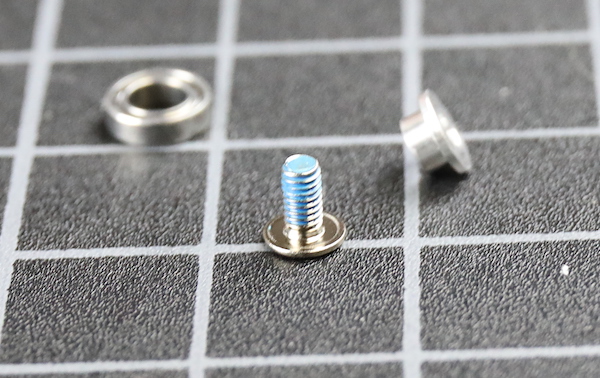
Lensrentals.com, 2018
With the rollers removed the focus barrel slides off.
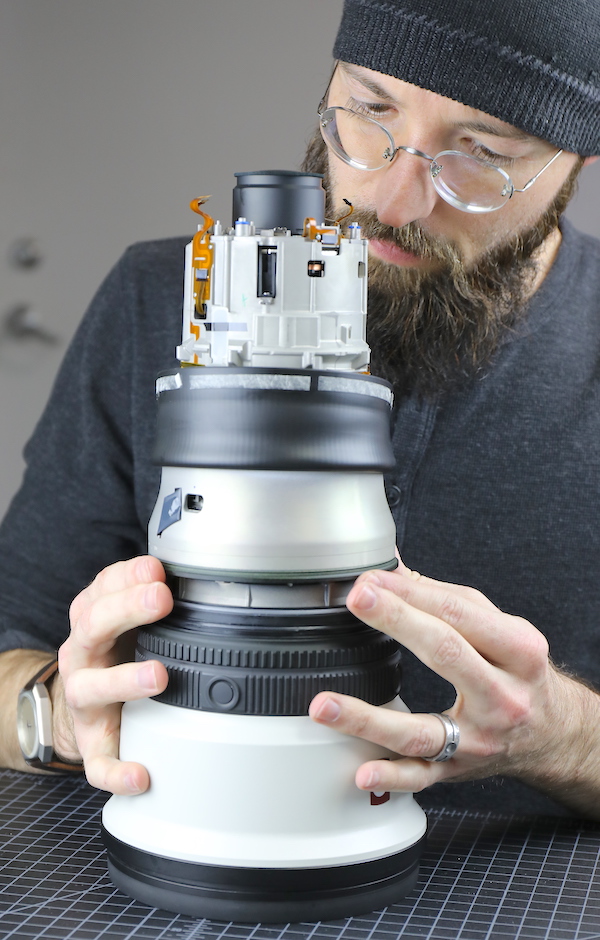
Lensrentals.com, 2018
There’s not much to see inside the barrel except the gear ring that drives the focus-sensor gear train.
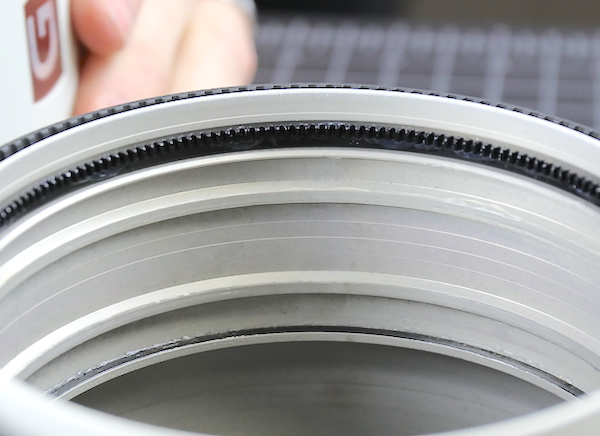
Lensrentals.com, 2018
When we looked at the rest of the inner barrel, both of us immediately laugh out loud. If you look closely, you’ll see the long white flex cable is smartly held by passing through two slots, and near the bottom by a metal clip.
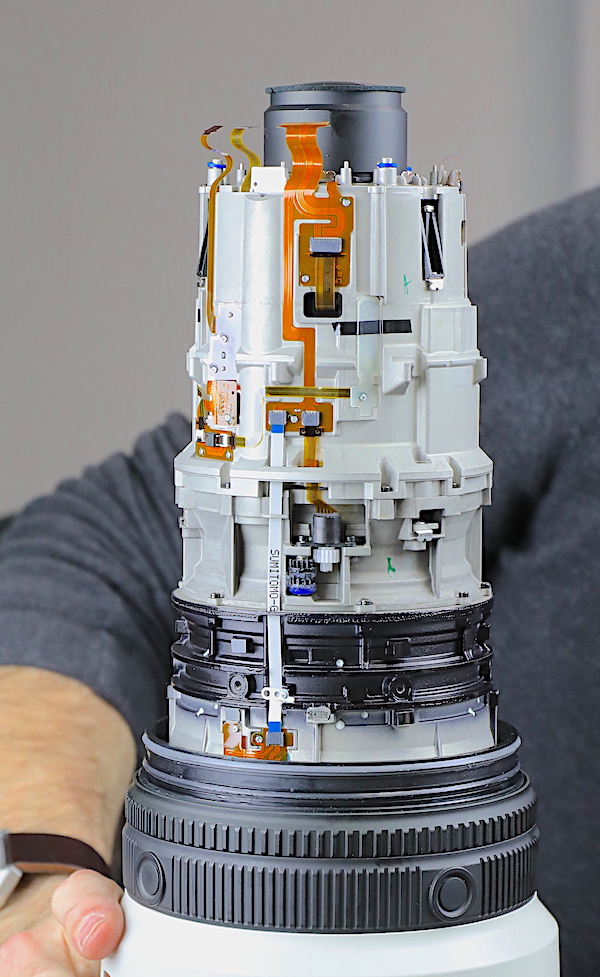
Lensrentals.com, 2018
Sony, being smart and frugal, repurposed a sensor shim to use as a clip. I laughed, but I admire it; it’s perfect for the job. I hope the engineer who realized they already had a zillion shims that would fit perfectly and didn’t need to CAD a new part got a bonus.
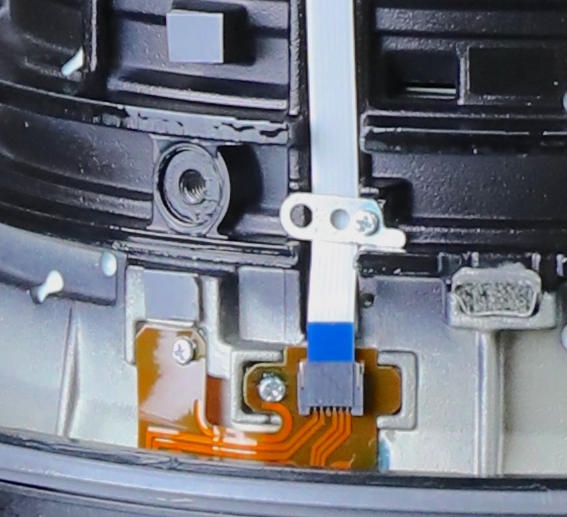
Lensrentals.com, 2018
With the focus barrel off, we can get a close-up of the focusing gears and actuator.
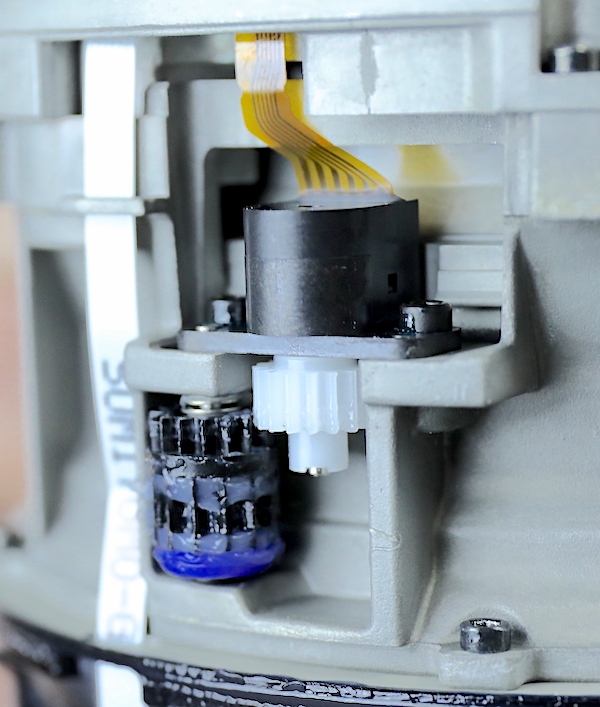
Lensrentals.com, 2018
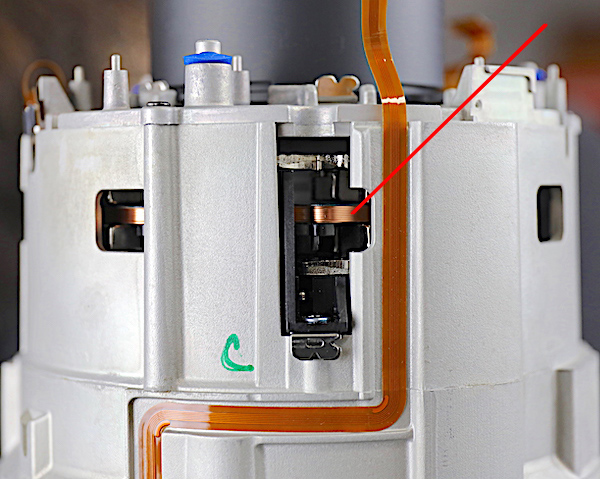
We also can peek in and see the large electromagnetic coils for the optical stabilizing unit.
Lensrentals.com, 2018
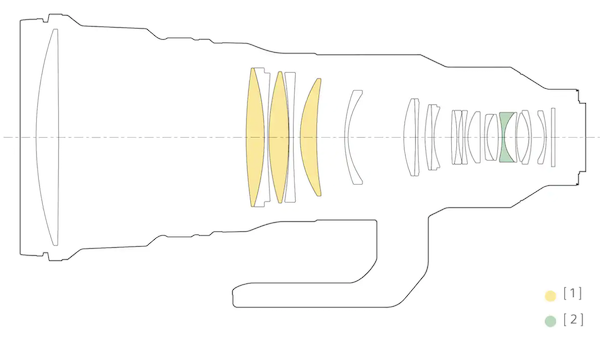
To get a better look at the stabilizer, we’ll need to remove the rear groups. That’s a fair bit of glass in one assembly. Here’s a lens diagram to give you some concept.
Sony Imaging
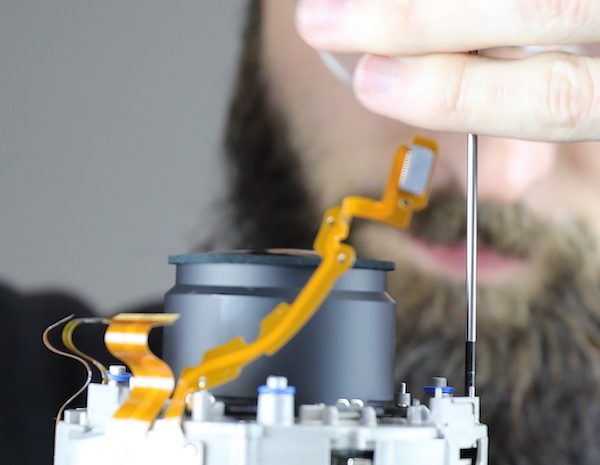
The rear PCB was held on by three screws (you can see the blue rubber bumpers where it was mounted). After taking that off, the rear group screws can be removed.
Lensrentals.com, 2018
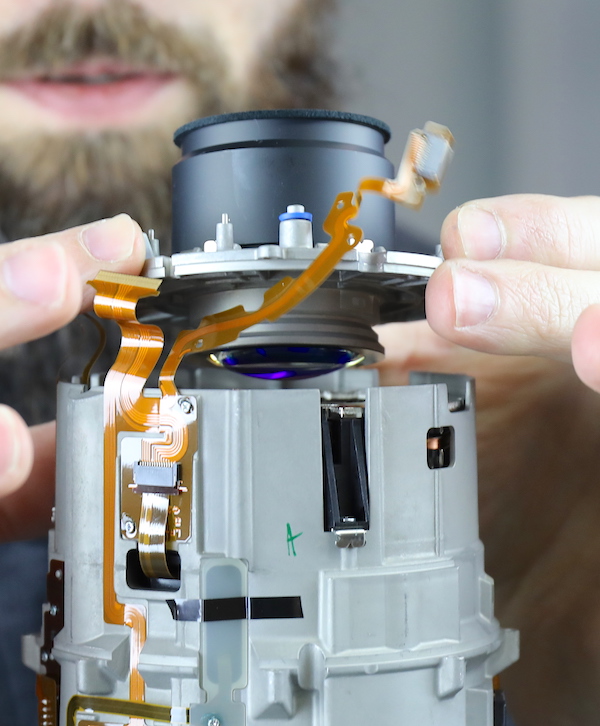
And the fairly hefty rear optical assembly lifted off. You should be able to look at the curve of that element coming out and see on the lens diagram what has just been removed.
Lensrentals.com, 2018
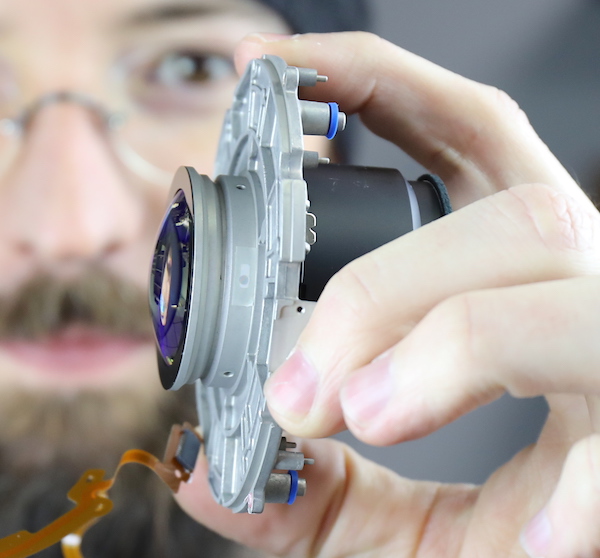
Below is another look at this group. If you notice, between Aaron’s fingers there’s the end of another shim poking out between the plates. There are two three-shim groups, possibly one group for spacing and one for tilt. It’s also possible centering is done at one or the other group.
And there’s a slight chance, that they are actually centering of one element on top of another centering element. We will sacrifice to Kubu* and light candles to St. Bernardino Siena** that it is not so. (Read the *: for probably the first time you’ll learn something from one of my posts.)
Tamron used to make some lenses with that arrangement. That can give you some really powerful optical adjustment capabilities. It also takes for-damn-ever to adjust. We used to tag-team those optical adjustments and usually got it right after about 1,000 attempts. But I don’t think this is double centering, and we’re not going to find that out today.
Lensrentals.com, 2018
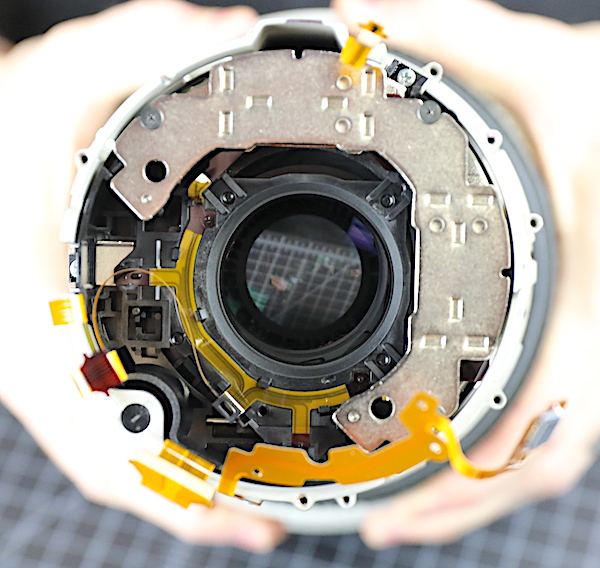
With the rear group out, we can look down onto the optics of the stabilizer unit.
Lensrentals.com, 2018
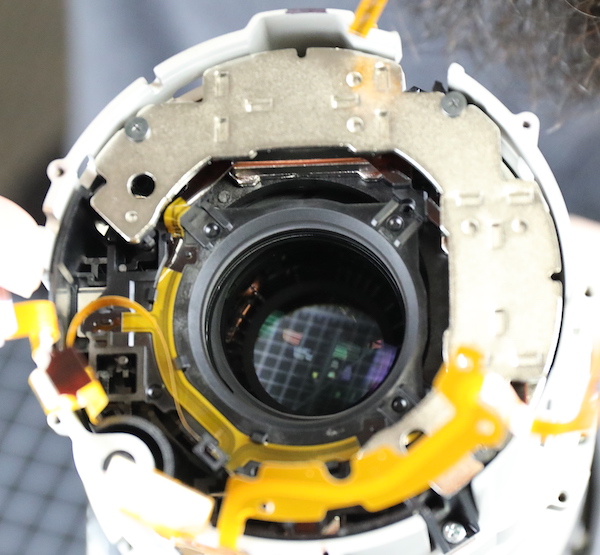
And Arron gives you an idea of how far that element can move when stabilizing.
Lensrentals.com, 2018
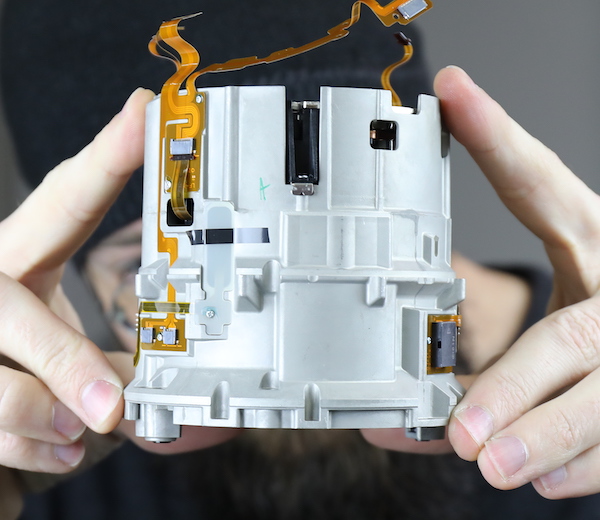
After removing another set of barrel screws and peeling off some flexes, we can take the rear inner barrel off. Now we can tell that the shim adjustments we saw earlier were for the IS unit, not the rear group. You can also see a flex diving into the aperture assembly, which is right in front of the IS unit. We won’t get to see it in this teardown since that would mean removing the IS unit and/or focusing group and we weren’t feeling that cocky today.
Lensrentals.com, 2018
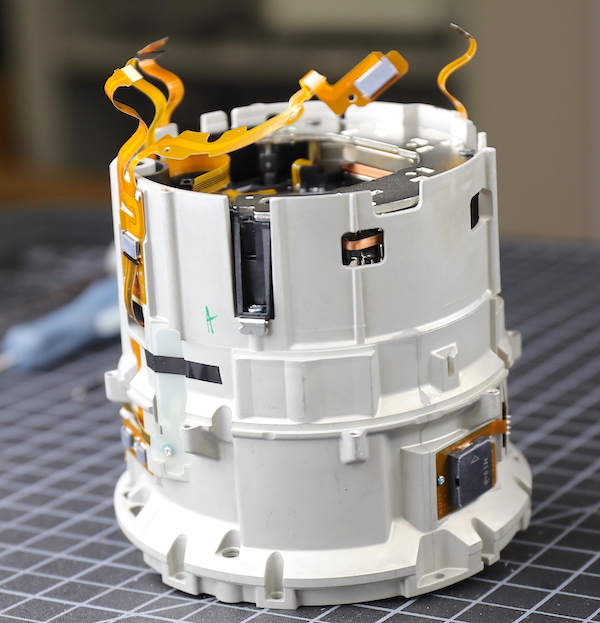
Here is another shot of the top assembly, just because I like showing how thick the stabilizer unit is. You can see the metal plate that is the top, the copper electromagnets in the center, and the shim adjustments for the IS unit at the bottom of the black slot in the barrel.
Lensrentals.com, 2018
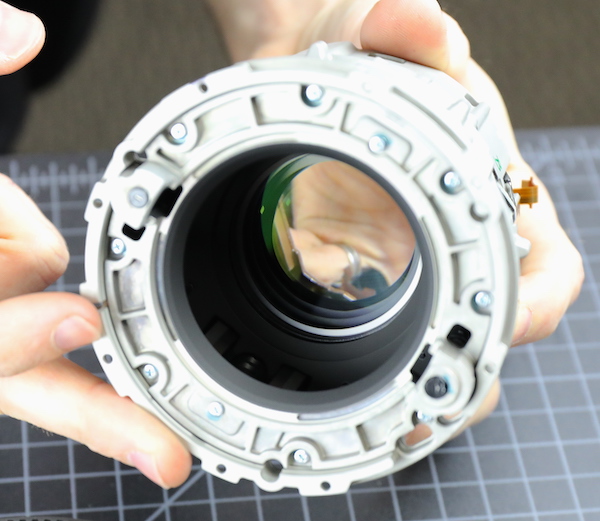
And looking up from below, see there’s some air space in the barrel. Up to this point, the glass has been packed pretty tight.
Lensrentals.com, 2018
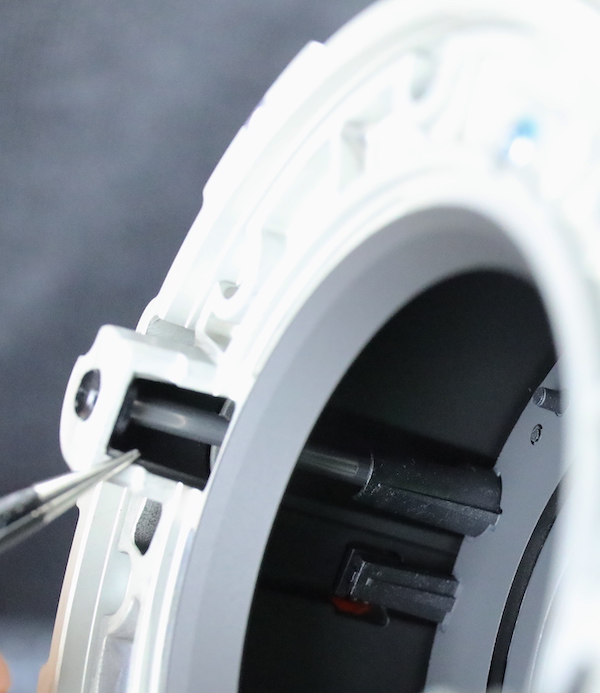
The empty space is where the focusing elements move. With them backed up towards the IS unit, you can see one of the rods the focusing group slides along.
Lensrentals.com, 2018
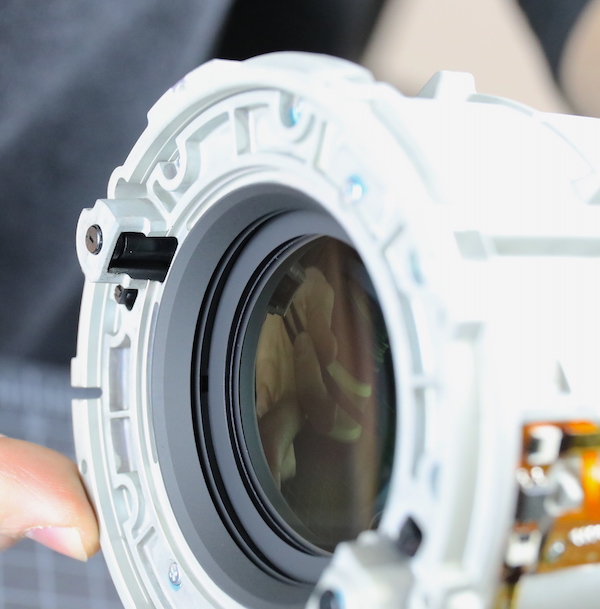
And here are the elements at a full-forward movement.
Lensrentals.com, 2018
Rotating the barrel around you can see the linear focusing motor.
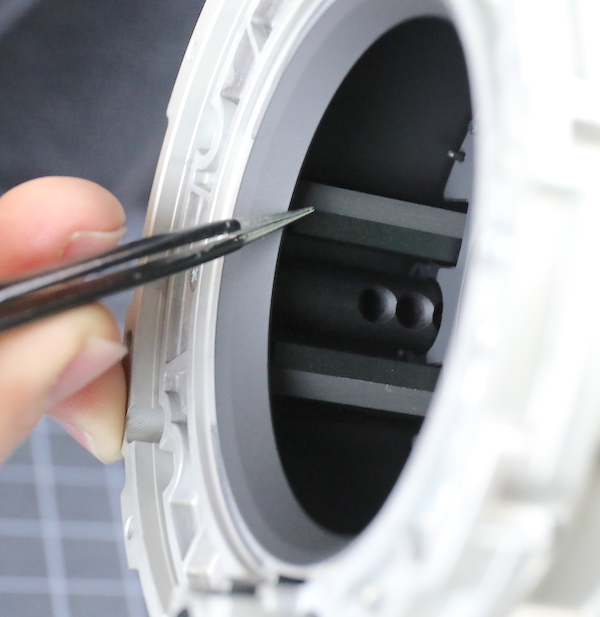
Lensrentals.com, 2018
As we would expect for what is now a 4th generation or so linear motor, designed to move that big beast of a lens, this is larger looks more robust than LMs we’ve seen in the past. No obvious glue holding things together, and there are two sliding rods to minimize lens tilt during focusing.
Editorial Note: I see a lot of people who don’t let the fact that they have no clue keep them from stating with absolute certainty which type of motor (linear or ring) is superior. Historically, LMs have been less reliable, but those growing pains seem to be over and reliability seems good on newer lenses (post-Sony 70-200 f/2.8 GM). LMs are faster in the lab with minimal load, but how that interprets with various loads in different directions I absolutely do not know. Oh, and neither do you. Because if you’re commenting on it, you aren’t under nondisclosure, and if you aren’t under nondisclosure, then you don’t know.
Looking up into the front barrel, we see the first of the front fixed elements. It might not show from the picture, but this is a strongly concave surface. Both of you who are interested can scroll back up to the lens diagram and pick it out; the one sitting by itself to the mount side of the fluorite groups.
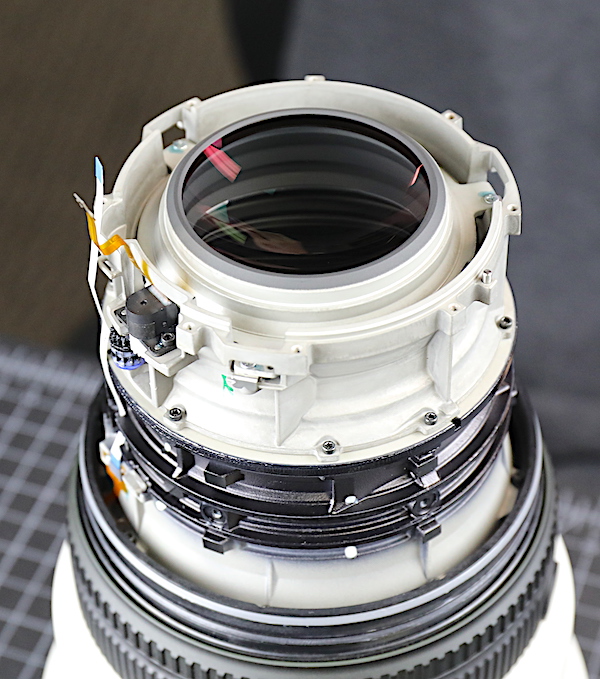
Lensrentals.com, 2018
This mid barrel can also be removed easily. (Note the mounting peg to the right to make sure you line up the barrels properly during reassembly.)
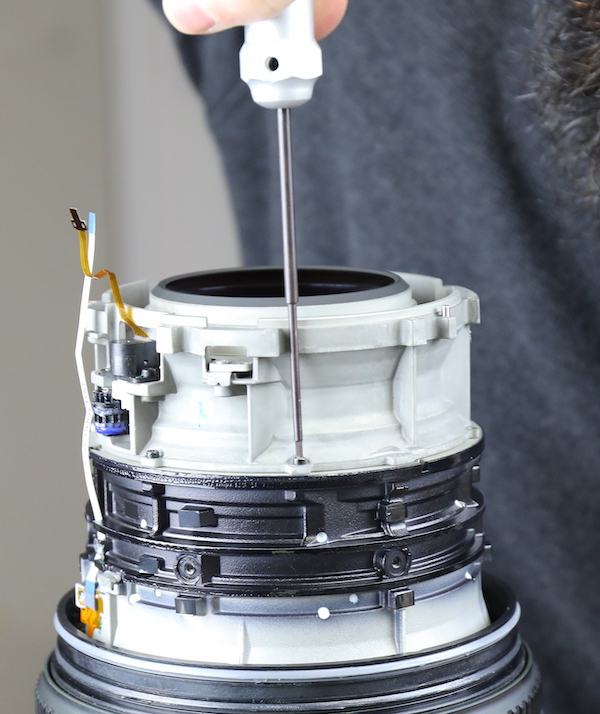
Lensrentals.com, 2018
With a little care to let the white flex slide through its slots without getting hung up.
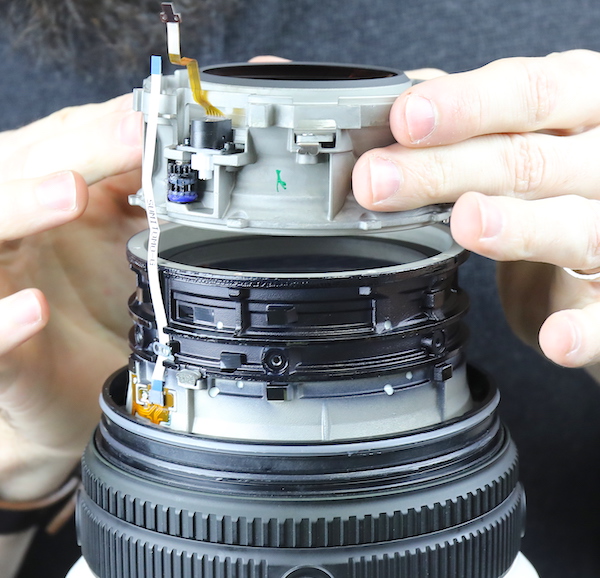
Lensrentals.com, 2018
We can now see the other element in this barrel. If I counted right, this should be the rearmost fluorite group.
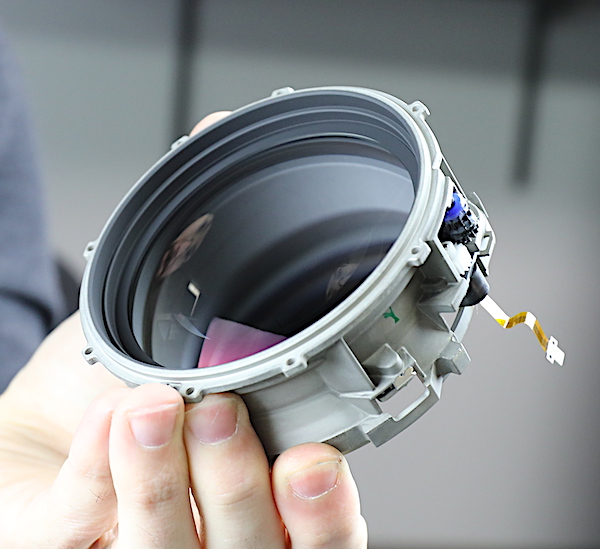
Lensrentals.com, 2018
And finally, a look into the front barrel. There are two groups, each a fluorite-glass cemented group.
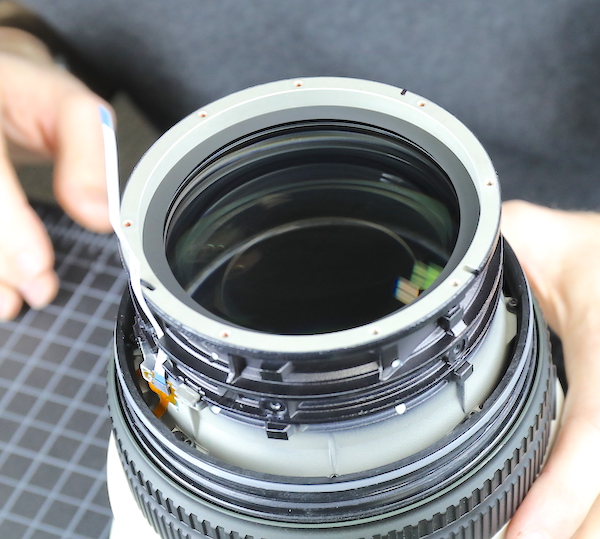
Lensrentals.com, 2018
Our working knowledge of fluorite elements is a little better than ‘not glass,’ but we’re not world experts on cleaning them, so this seemed an excellent place to stop before I put a thumbprint on something we didn’t want to clean off.
So What Did We Learn Today?
Really, not a lot. The Sony 400mm f/2.8 G is exactly what we expected; a very solidly built lens that is everything construction-wise you would hope for in a big beast of a super telephoto that costs $12,000. It has excellent weather sealing, heavy-duty engineering between the barrel segments, a very solid chassis, and components that all appear up to the task.
Let’s be clear; I did this to start our in-house repair manual and look for weak spots in the mechanicals. I didn’t test it optically or electronically and hadn’t a clue if it’s the best telephoto optics ever made, or if the electronics will start smoking after 40 hours of use. But everything I saw today gives me confidence in the build quality.
I’ve been very willing to call Sony out on poorly engineered products in the past, whether it was poorly constructed linear focus motors, weak barrel construction in the 70-200 f/2.8 GM, or weather sealing gaps in cameras. So take my word on it: the Sony 400mm f/2.8 G has construction equal to any similar lens on the market. It gets my seal of engineering approval.
Comparing it to the Canon 400mm f/2.8 IS III, there are really only minor differences I can see, none of which are significant. I like the Sony feature that allows you to turn off tripod rotation clicking. I don’t like the plastic cover they put over it. (It will seal out weather just fine, but those Sony ‘plastic arrow’ cover inserts tear off frequently and often.)
I’ll call this one a draw, and a draw is a win for Sony. Canon has been doing this for a long, long time; this is, I think their 8th generation of 400mm f/2.8 lens. It’s Sony’s first and to have made a product equal to the gold standard of engineering is an amazing feat.
Roger Cicala and Aaron Closz
Lenrentals.com
January 2019 (all y’all surprised I got the year right, aren’t you?)
• Kubu was Mesopotamian God of Glassmaking. From the British Museum translation of cuneiform tablets on the instruction for glassmakers:
You regularly perform libation offerings before the Kubu-images. On the day when you plan to place the glass in the kiln, you make a sheep sacrifice before the Kubu-images, you place juniper incense on the censer, you pour out a libation of honey and liquid butter, and then only, you make a fire in the hearth of the kiln and place the glass in the kiln… https://www.cmog.org/article/origins-glassmaking
I’ve talked to Aaron about starting said rituals before every teardown.

Sumerian statuettes from Tel Asmir, Iraq, c 2700 BC. Neither is Kubu, but y’all never read the articles before commenting anyway. And they look cool. Credit unknown.
** St. Bernardino Siena was the Patron Saint of Venetian Glassmakers. As far as I know, he didn’t have a clue about how to make glass, though.
If you don’t know anything about the history of glass but want to know, here you go.
Author: Roger Cicala
I’m Roger and I am the founder of Lensrentals.com. Hailed as one of the optic nerds here, I enjoy shooting collimated light through 30X microscope objectives in my spare time. When I do take real pictures I like using something different: a Medium format, or Pentax K1, or a Sony RX1R.
-
Tom239
-
Andre Berthet
-
QuietOC
-
Jeff Allen
-
Jeff Allen
-
Emiko
-
Alice
-
helium phix
-
Naomi
-
Lillian
-
Dan Colle
-
Adam Fo
-
Adam Fo
-
Adam Fo
-
Adam Fo
-
Thelma
-
Whitley Barbosa
-
Heather Bahringer
-
Sggs
-
Milda Thatch
-
Roger Cicala
-
Sggs
-
GulliNL
-
disqus_zRNn7uy75m
-
Michael Ogle
-
Scott
-
DrJon
-
Athanasius Kirchner
-
Athanasius Kirchner
