The Great 400mm Teardown Comparison. Part II – The Sony 400mm f2.8 G
In which you will not only learn how good the construction of Sony’s new flagship is, but also everything you wanted to know about Kubu.
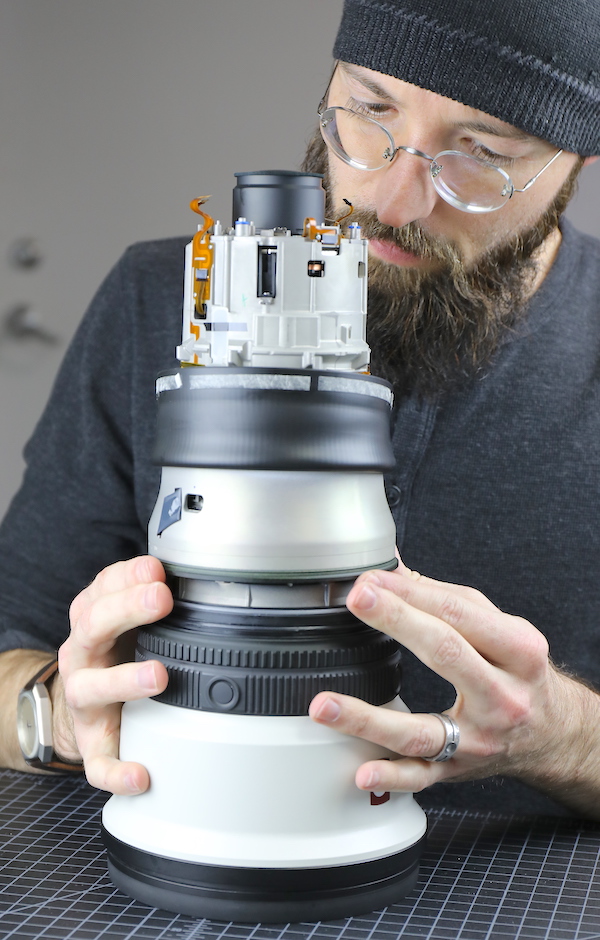
As I mentioned last week, we usually don’t write up super-telephoto teardowns, but the release of two remarkably lightweight 400mm f/2.8 lenses seemed like a great opportunity to do a comparison. In previous teardowns, Sony optomechanical engineering has steadily improved (with the horrid exception of the 70-200mm f/2.8 GM). From descriptions, at least, it sounds like the Sony FE 400mm f/2.8GM OSS is state-of-the-art and we were eager to look inside.
The lens diagram suggests the same overall method that Canon 400mm f2.8L IS III used; smaller elements move towards the rear of the lens. Plus, Sony won the battle of most fluorite elements 3 to 2 over Canon. That does beg the interesting question about where Sony sourced their fluorite elements. Sony doesn’t make fluorite glass, and Canon has long been the one lens company that grows and polishes large fluorite in-house. There are other manufacturers of fluorite lenses, but they have generally been limited to small lenses, such as in microscopes and telescope viewfinders.
I was eager to see inside this big Sony lens for several reasons. First, some Sony engineers had been very eager for me to do so; they would only have been that eager if they were quite certain I’d be impressed. Second, by all reports the lens is optically superb, and yet doesn’t cost more than the Canon lens; that’s a pleasant surprise from the company who usually charges a good 10% more. Third, this is obviously a flagship lens for Sony, hoping to leverage into the professional sports market. I assume they’ve thrown everything they have into making it excellent.
As always, I’ll put my expectations out on the front end. I think this lens will be excellent; near to Canon’s build quality if not matching it. The Sony people are very comfortable about it. They’ve had plenty of time, now, to work the kinks out of their mechanical designs. Plus Sony has been very open about wanting to attract more professional photographers to use their equipment. Professionals want sturdy gear and Sony took a beating from professionals about the 70-200 f/2.8 GM. They won’t cut corners this time around.
The Tripod Ring
Tripod rings are a great start to looking at a supertelephoto’s engineering. They are actually complex, need to function smoothly, and take a lot of abuse.
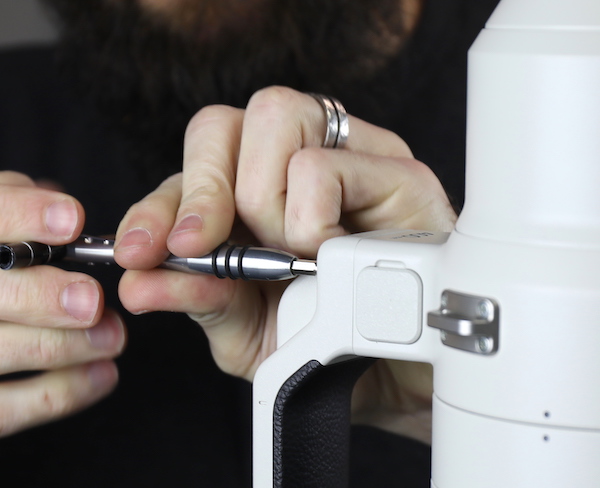
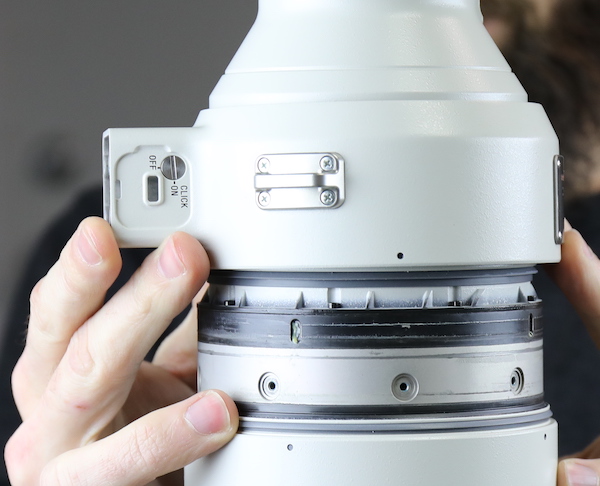
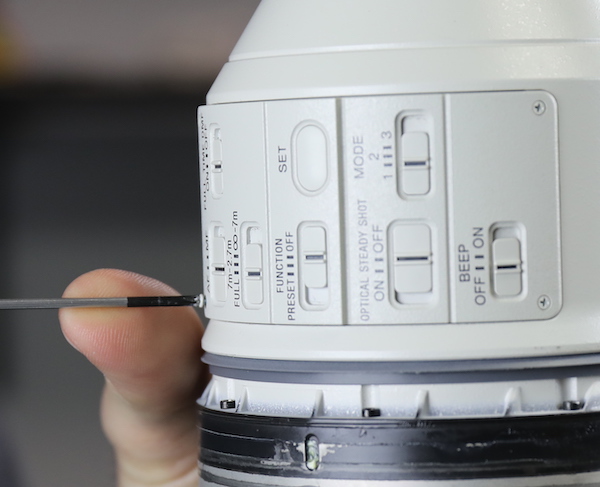
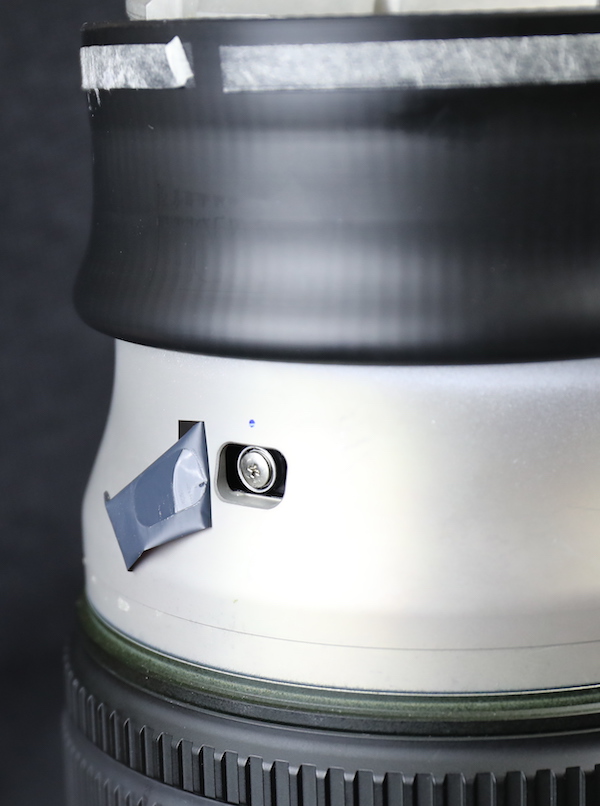
Sony starts off with an original thing that I like: you can turn the rotational clicks of the tripod ring on or off. I like the clicks myself, but I’m sure others will prefer turning them off. I’ve never been a fan of Sony’s push-through plastic covers on cameras, and doubt I will be here either, but that’s just a cover.

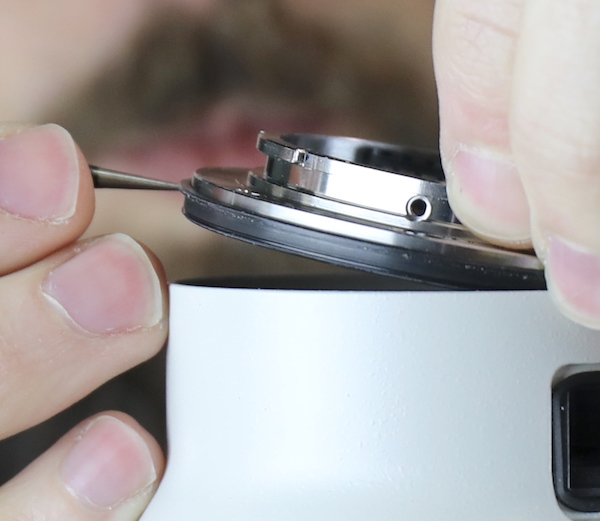
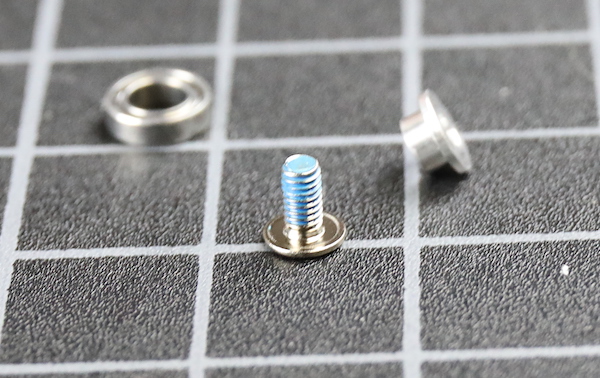
The tripod foot comes off in the usual fashion, removing four bolts.
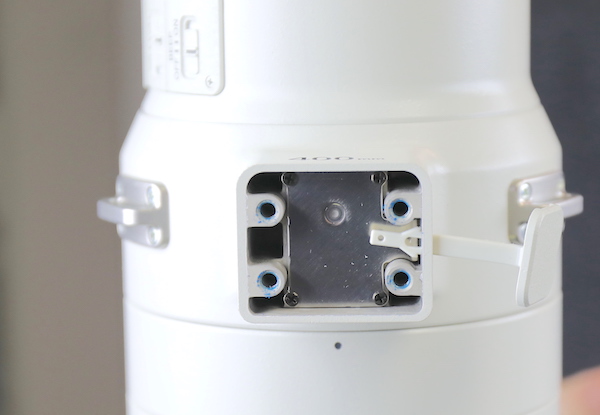
With the foot off we can see Sony’s pressure plate, a single piece as opposed to Canon’s two-piece plate.
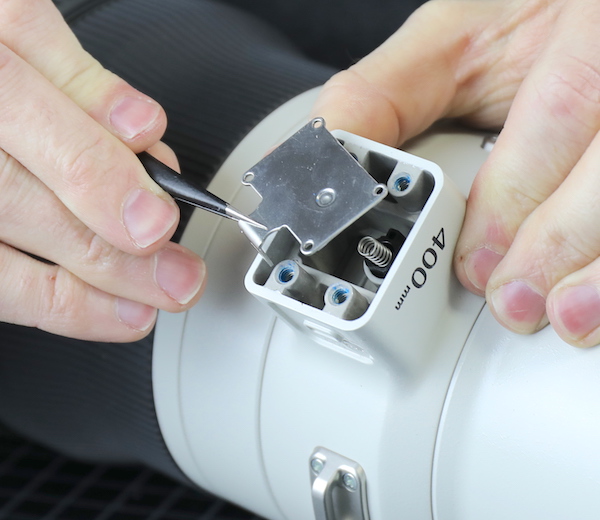
Removing the plate shows a single piece of metal with a dimple to put pressure on the spring. It’s not nearly as robust as Canon’s version that we saw in part one of this comparison. The 70-200 f/2.8 GM has left me probably overreacting to Sony’s habit of using thin metal plates, but in this case, I can’t see it mattering at all.
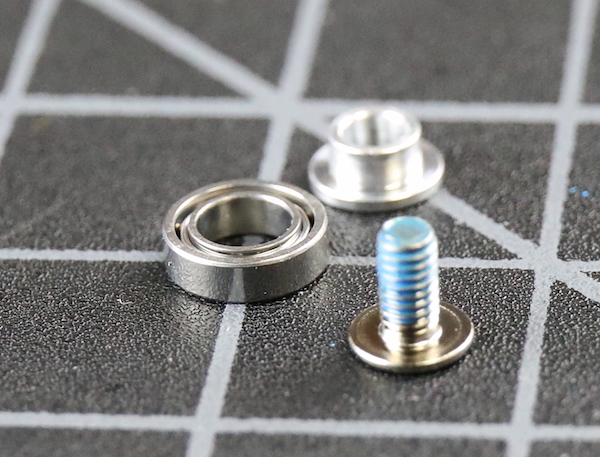
Just like with the Canon tripod ring, next, you remove eight sets of screw-axle-roller bearings that the tripod rotates on. These appear sturdy and well made, just about identical to Canon’s version.
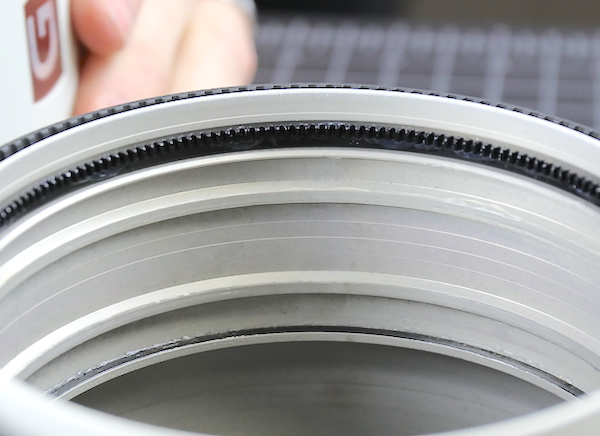
After that, the tripod ring slides up off the barrel. As with the Canon I give kudos for making it this way, it’s much easier should you need to clean grit out of, or relubricate the tripod ring.
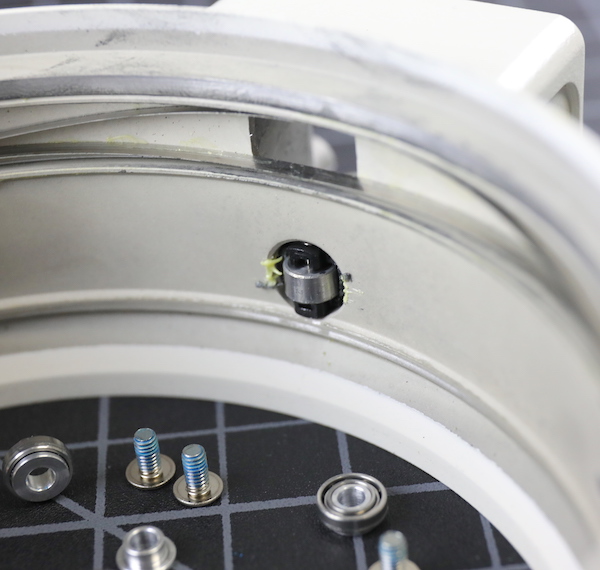
Looking inside the barrel we can see the click-roller pressed into the barrel. Again, the assembly isn’t quite as robust but it probably will never fail. And you do get to turn off the clicking if you want. (You could remove the spring and declick the Canon, but turning a knob on the Sony is certainly easier.)
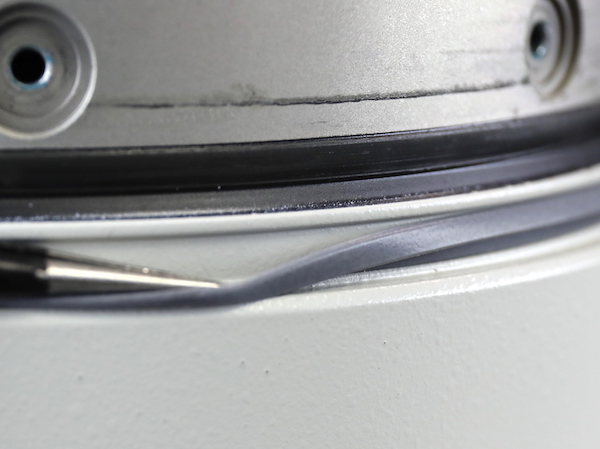
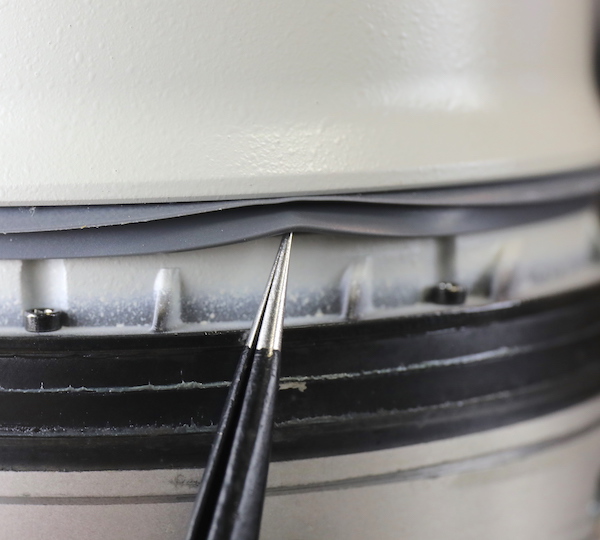
Once we have the tripod ring off we see hefty rubber seals above and below. As I mentioned in the Canon teardown, grit getting into the tripod ring ruins the smooth feeling when turning it, and these are good seals.
Like the Canon 400mm f/2.8 IS III, the Sony uses a replaceable standard filter for the drop-in filter assembly. In Sony’s case, they are 40.5mm which may be a bit more difficult to find than the Canon 52mm.
Opening Up the Back
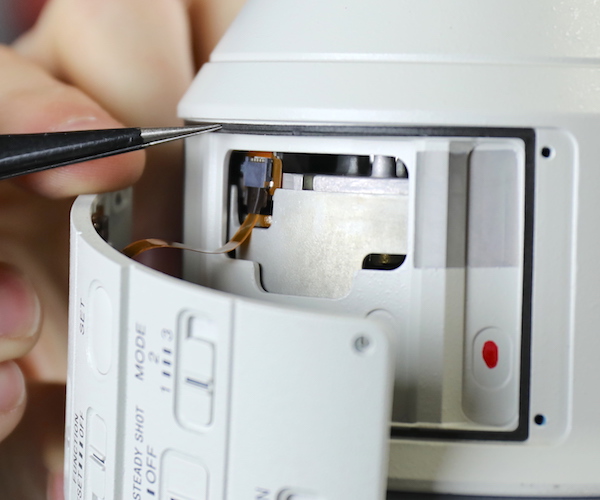
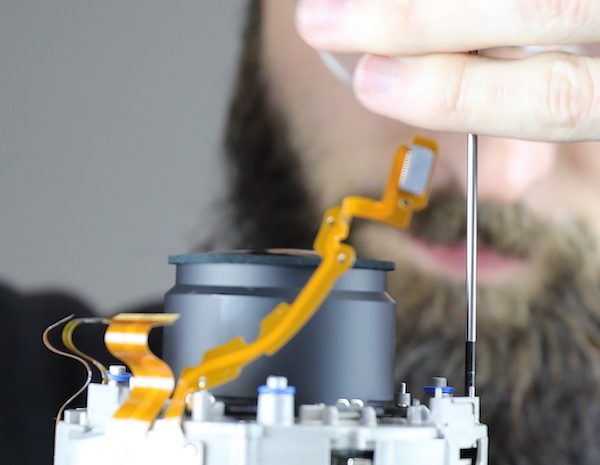
The Sony lens has a larger switch panel than the Canon, and we felt it best to open it and see where flexes were going before taking off the bayonet mount.
Once the screws are out, we see a nice rubber weather seal and a very neat single flex leading from the panel into the lens.
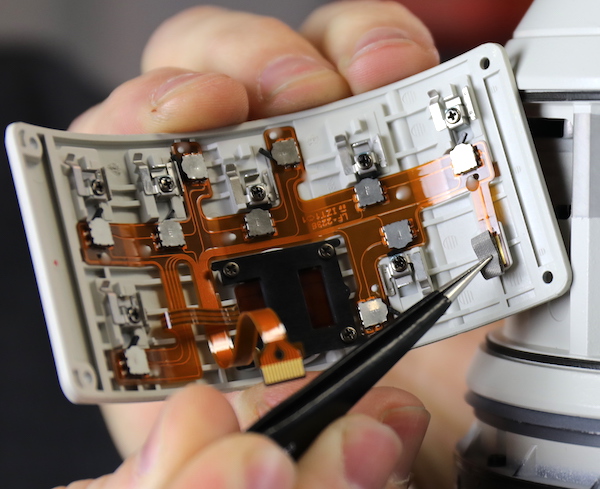
The switches are all neatly laid out with a grounding pad over on one side.
After removing the usual screws the bayonet mount, with a robust rubber weather seal comes out. It doesn’t show, but the Sony is one of the very few Supertelephotos that uses a flex from the bayonet electronics rather than soldered wires. I always whine about wires, so let me give props here.
We didn’t need to remove the bayonet, unhooking the electronics would have let us remove it along with the rear outer barrel, but I wanted a look at it, Sony’s metal work has been a weak point in some other lenses. The bayonet mount itself is thick and robust, which was what I wanted to see. This is heavy-duty. And there are not four, but seven mount screws.
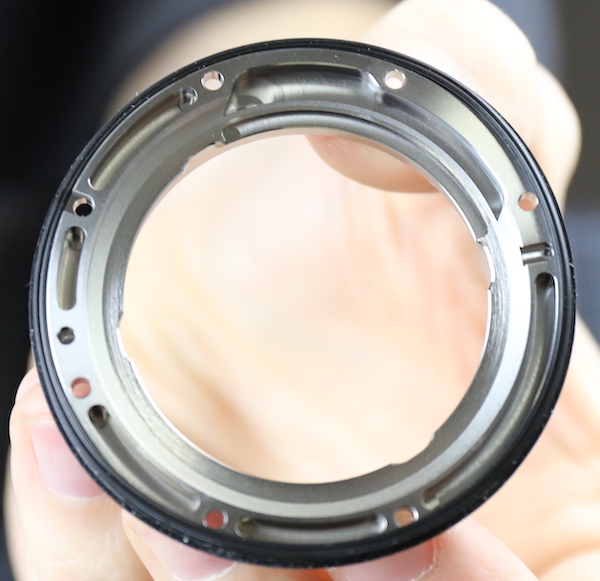
As an aside, there are no ‘infinity’ shims under the mount, which most Sony lenses have. So either this is shimmed elsewhere or handled in a different manner. (We saw no markings to indicate variable thickness mounts as Canon uses, but perhaps handled electronically or shimmed elsewhere.)
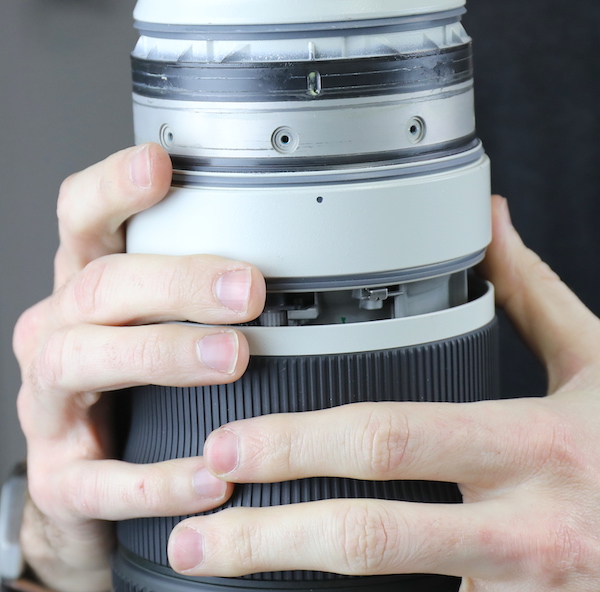
To remove the rear outer barrel, we unbolted 8 large hex bolts.
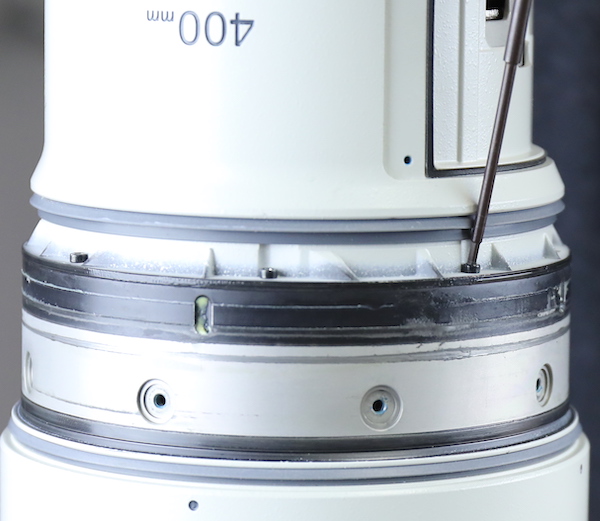
With those out, the external barrel slides off.
And gets set to the side. Another rubber weather seal is visible at the bottom. (We didn’t have to take out the drop-in filter holder on this lens.)
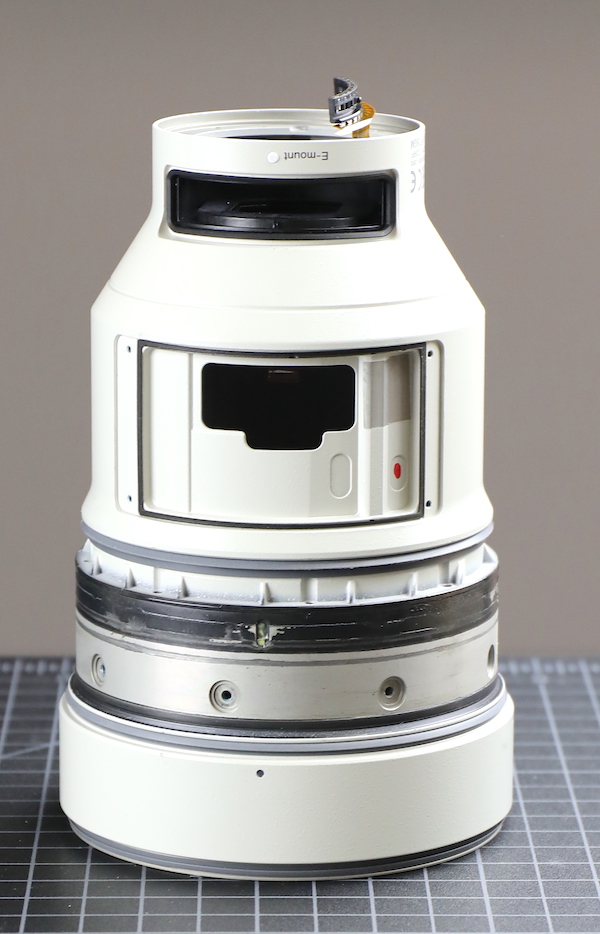
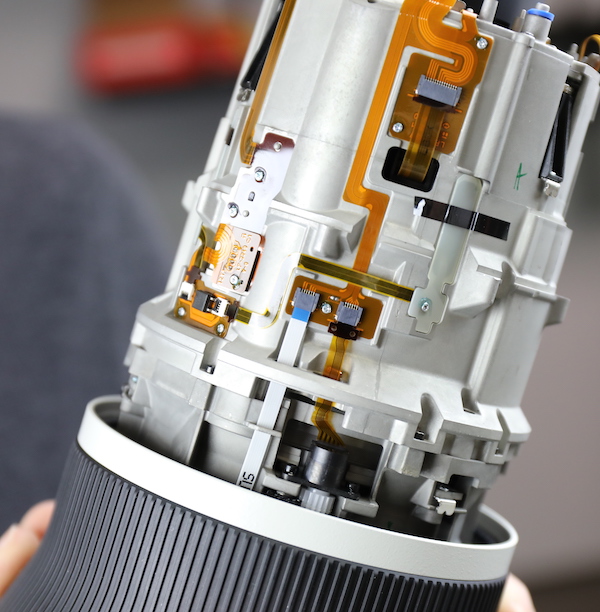
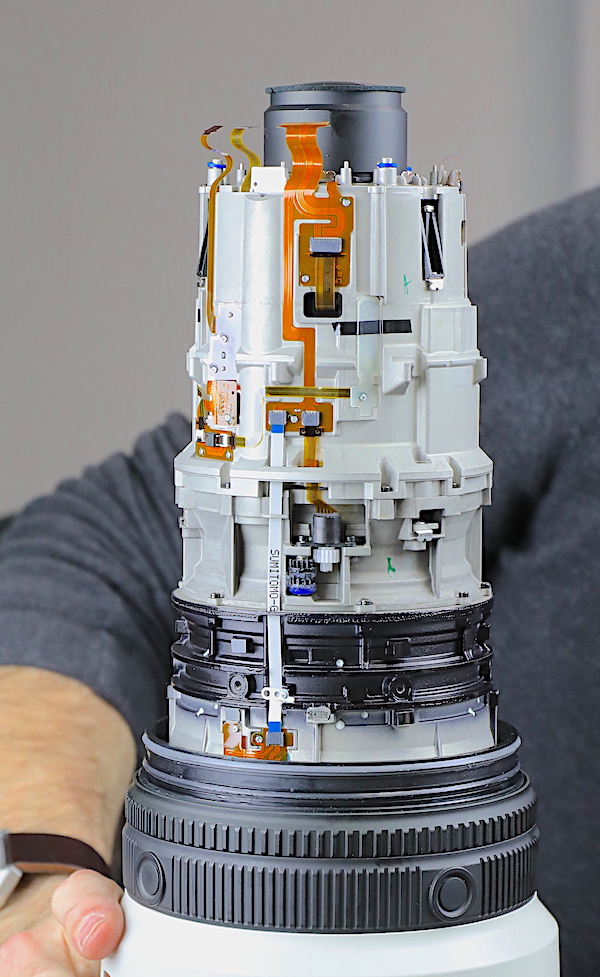
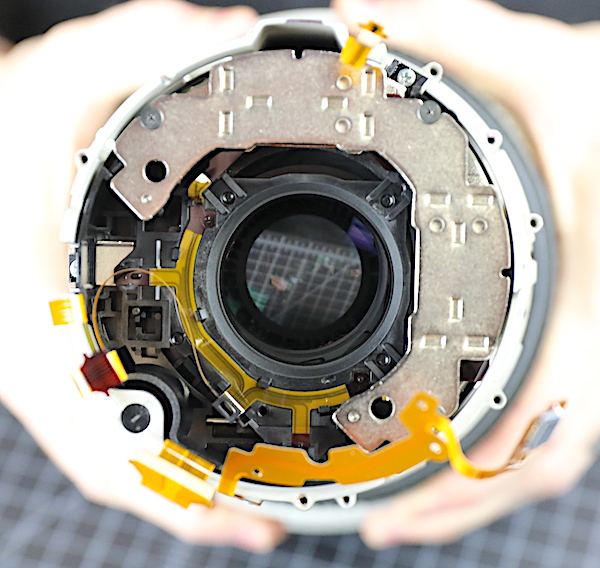
With the outer barrel and bayonet removed we can look at the PCB with its various flex connectors.
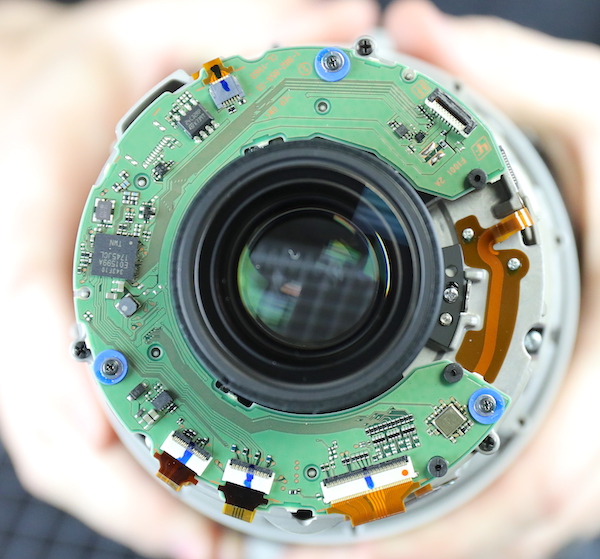
The inner rear barrel looks very similar to the Canon 400mm f/2.8 IS III. I’m not a metallurgist but the magnesium alloy looks and feels the same. Notice the assembly at the bottom right near the focus ring, we’re going to look at that in a second.
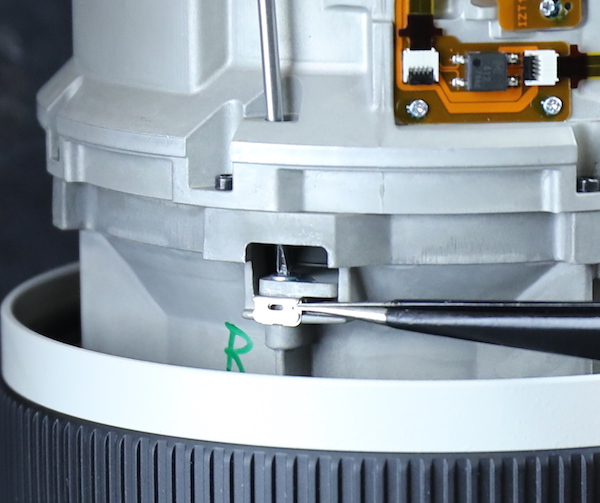
This is the focusing mechanism. The focusing barrel has nylon teeth on its inner surface. When you rotate it, it turns a series of gears and eventually an electronic actuator that sends the focusing signal. At this point, we can’t tell if there are additional focus sensors. It works fine, but there’s something a bit comical about turning that huge barrel to just rotate these tiny gears. If you’ve read much of my stuff you know I’m generally not a nylon gear fan, but these have almost no pressure on them so they shouldn’t wear out.

Remember up above when I mentioned no shim under the bayonet mount? Looking around the inner barrel we see a lot of shims. As shims go, these are nice; three individual shims at each level that are externally accessible. Again, I’m not a shim fan. When you have the choice of ‘infinitely adjustable’ versus 0.1, 0.2, 0.4 adjustments, give me infinite every time. But if you’re going to use shims, this is the way to do it. (And most manufacturers still use shims.)
Editorial comment: The second or third post in the comments section, because Sonyfanism, will be something about shims are the same forever and therefore better. I will go ahead and say you’ve never unglued a glued-in eccentric collar. That’s forever, too, and still infinitely adjustable. Nor have you ever opened up a lens to fish out a shim that’s come loose and is floating around inside the lens and then tried to figure out where it was supposed to go. Nor have you ever given up an optical adjustment or hand-made a 0.05mm shim because 0.1mm wasn’t enough and 0.2mm was too much.
Anyway, here are some close-ups of a couple of shim adjustments, the first is probably a spacer set for the rear group (we’ll look into that more later).
The second is probably a fixed element near the aperture. You can see these are all meant to be adjusted without needing to disassemble the barrel. The letter codes written on the barrel are probably shim thickness at each location. This is logically and nicely laid out and engineered.
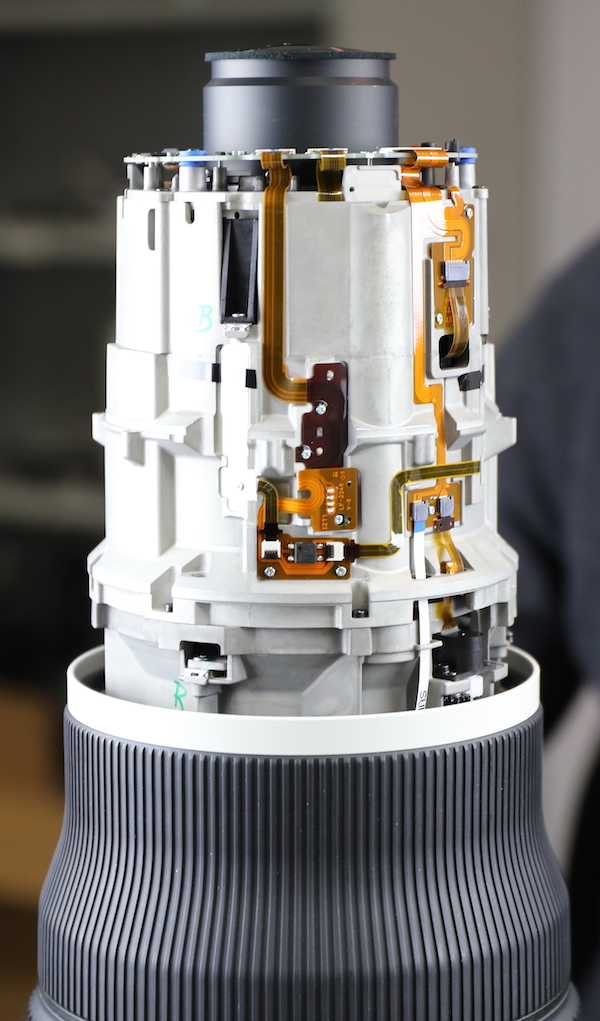
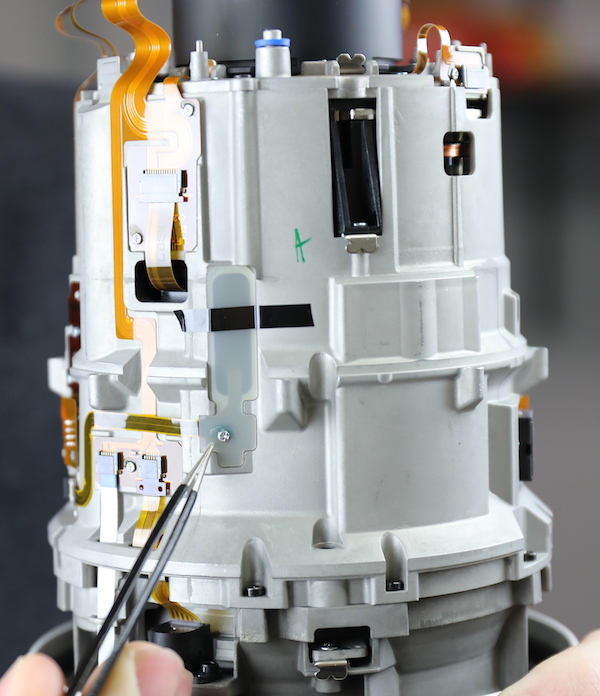
Looking at the inner rear barrel, it’s obvious a lot of care was taken in laying out the flex runs. They all pass through grooves and slots. They’re all held down with double-sided tape but also screwed into the barrel at spots.
And in a couple of places, there are plastic guards over flex connections and runs.
Anyway, it’s time to take off the focus ring, which looks like it will be pretty straightforward. Peeling up the ring (it’s held down with double-sided tape) shows us the usual screw-post-roller system holding the ring in place. Here we go, fanboys, double-sided tape on the Sony, friction molding on the Canon. I predict 1,602 comments about which is clearly better. Myself, I have no clue, they both work fine.
Which, when removed, look just like all the other screw-post-roller setups we’ve seen in both lenses.
With the rollers removed the focus barrel slides off.
There’s not much to see inside the barrel except the gear ring that drives the focus-sensor gear train.
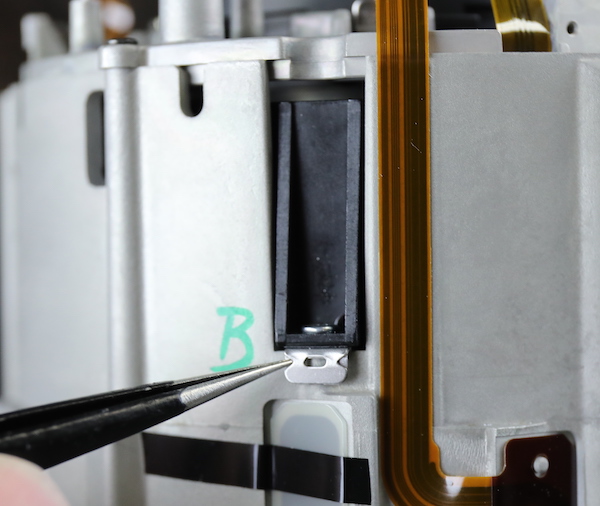
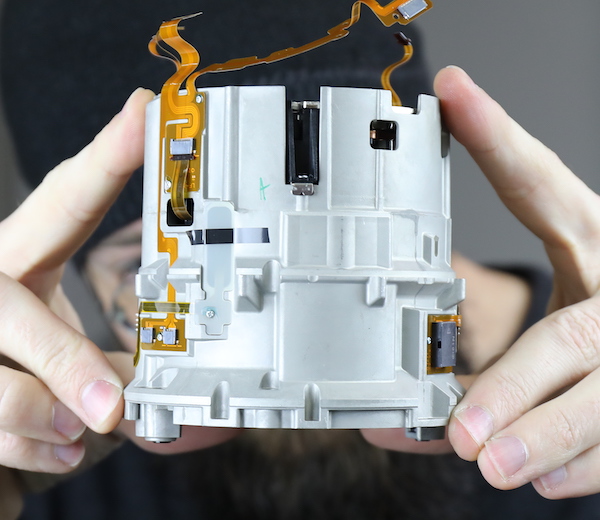
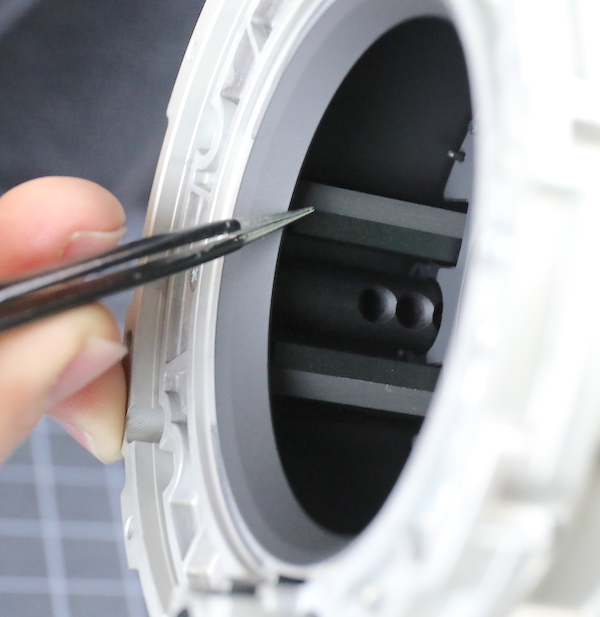
When we looked at the rest of the inner barrel, both of us immediately laugh out loud. If you look closely, you’ll see the long white flex cable is smartly held by passing through two slots, and near the bottom by a metal clip.
Sony, being smart and frugal, repurposed a sensor shim to use as a clip. I laughed, but I admire it; it’s perfect for the job. I hope the engineer who realized they already had a zillion shims that would fit perfectly and didn’t need to CAD a new part got a bonus.
With the focus barrel off, we can get a close-up of the focusing gears and actuator.
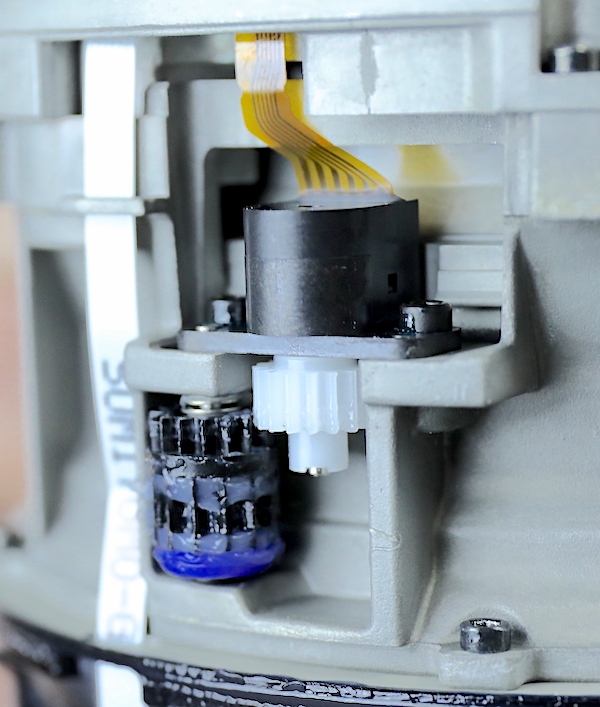
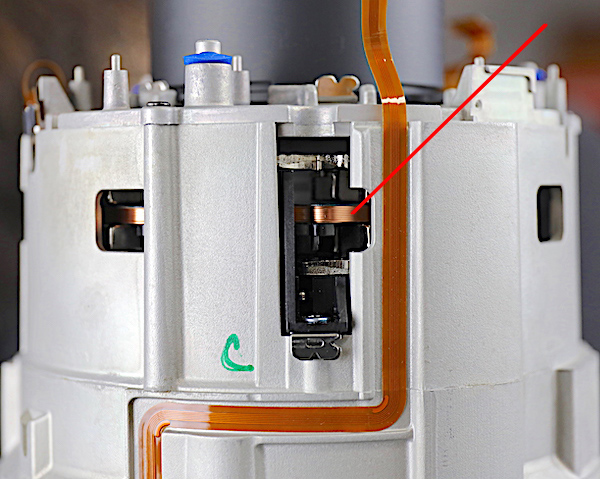
We also can peek in and see the large electromagnetic coils for the optical stabilizing unit.
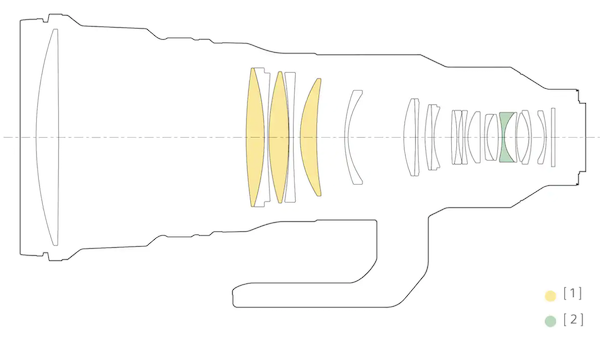
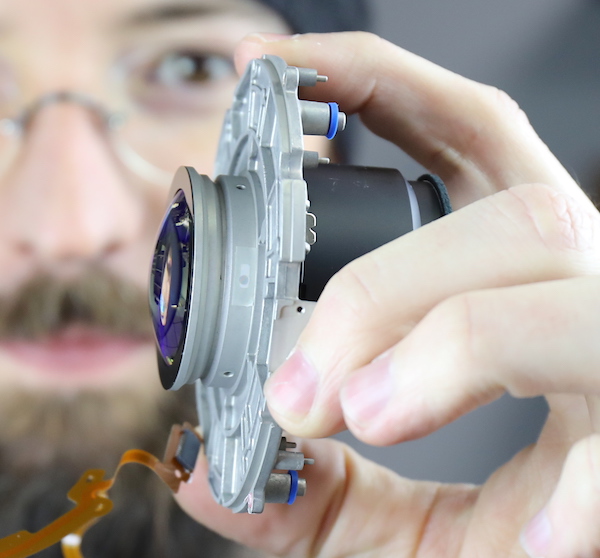
To get a better look at the stabilizer, we’ll need to remove the rear groups. That’s a fair bit of glass in one assembly. Here’s a lens diagram to give you some concept.
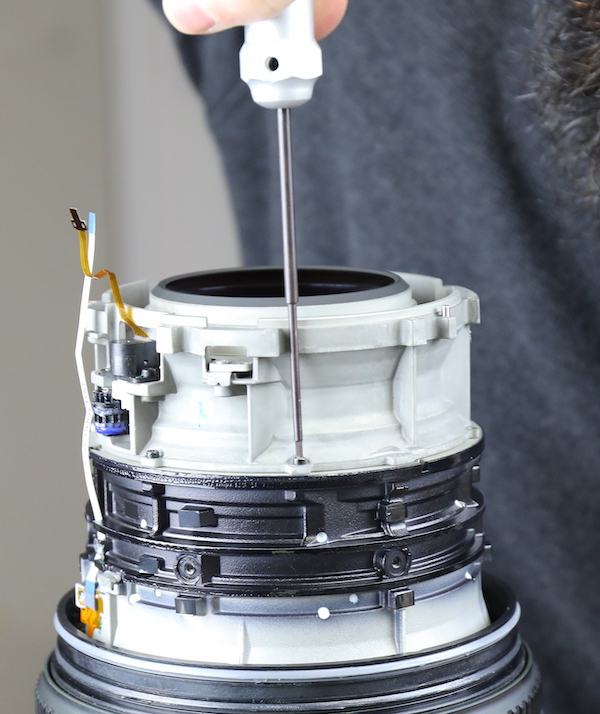
The rear PCB was held on by three screws (you can see the blue rubber bumpers where it was mounted). After taking that off, the rear group screws can be removed.
And the fairly hefty rear optical assembly lifted off. You should be able to look at the curve of that element coming out and see on the lens diagram what has just been removed.
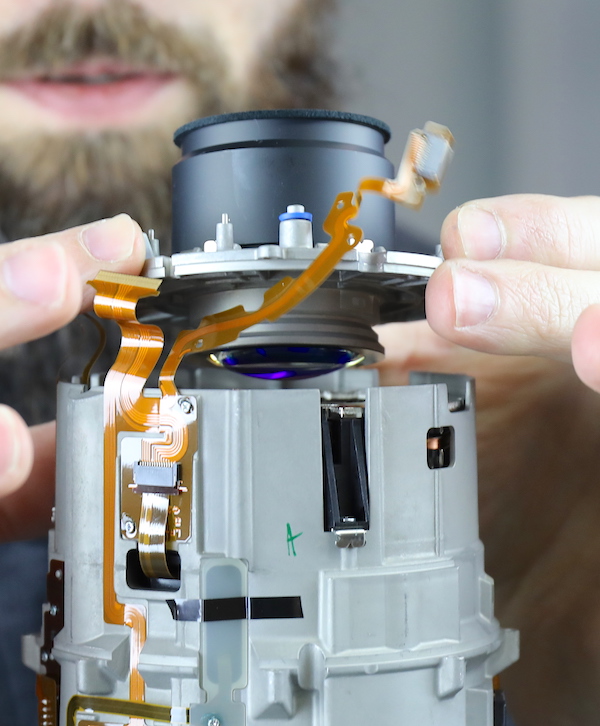
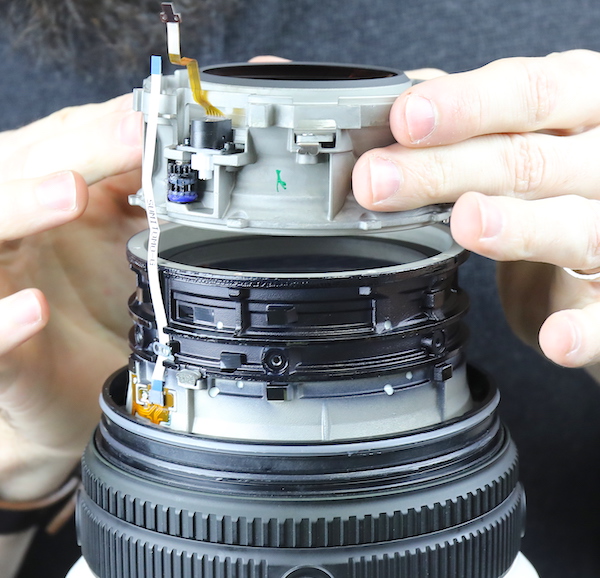
Below is another look at this group. If you notice, between Aaron’s fingers there’s the end of another shim poking out between the plates. There are two three-shim groups, possibly one group for spacing and one for tilt. It’s also possible centering is done at one or the other group.
And there’s a slight chance, that they are actually centering of one element on top of another centering element. We will sacrifice to Kubu* and light candles to St. Bernardino Siena** that it is not so. (Read the *: for probably the first time you’ll learn something from one of my posts.)
Tamron used to make some lenses with that arrangement. That can give you some really powerful optical adjustment capabilities. It also takes for-damn-ever to adjust. We used to tag-team those optical adjustments and usually got it right after about 1,000 attempts. But I don’t think this is double centering, and we’re not going to find that out today.
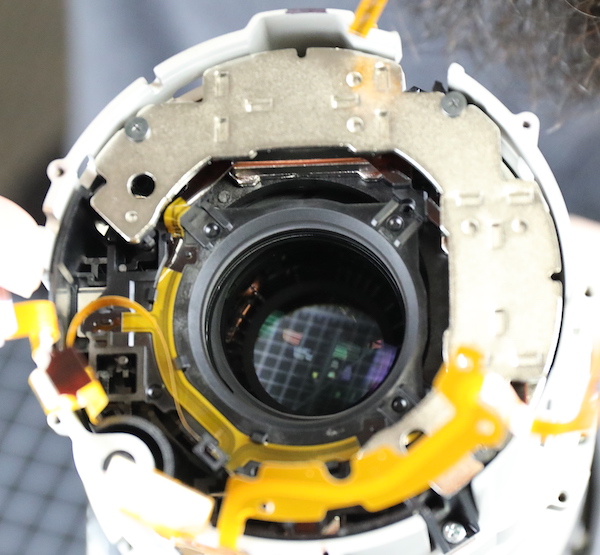
With the rear group out, we can look down onto the optics of the stabilizer unit.
And Arron gives you an idea of how far that element can move when stabilizing.
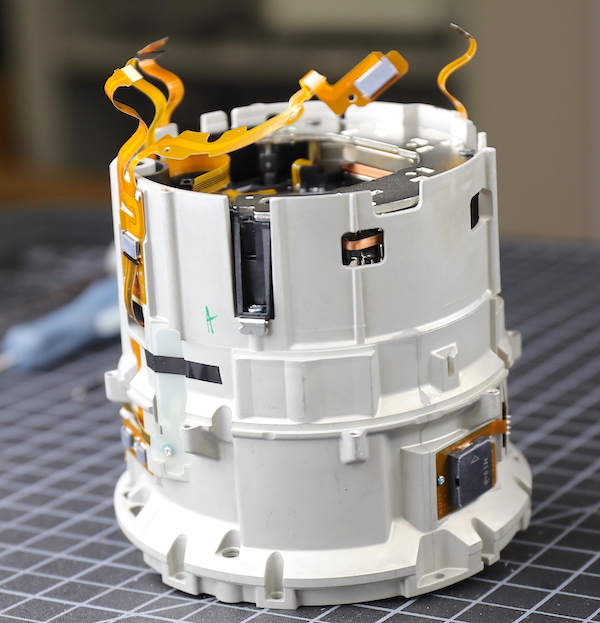
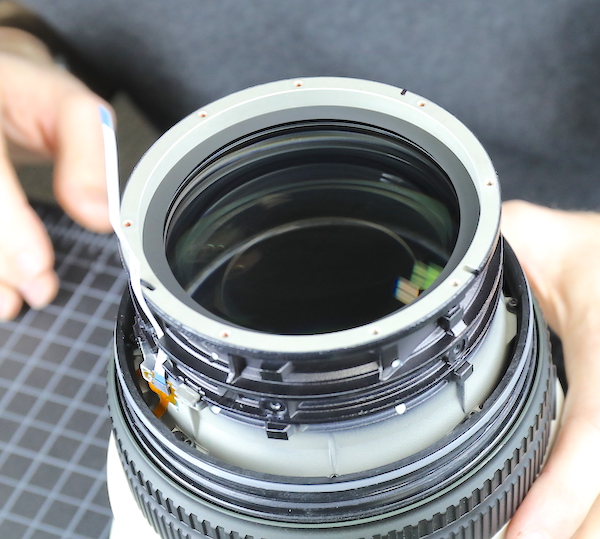
After removing another set of barrel screws and peeling off some flexes, we can take the rear inner barrel off. Now we can tell that the shim adjustments we saw earlier were for the IS unit, not the rear group. You can also see a flex diving into the aperture assembly, which is right in front of the IS unit. We won’t get to see it in this teardown since that would mean removing the IS unit and/or focusing group and we weren’t feeling that cocky today.
Here is another shot of the top assembly, just because I like showing how thick the stabilizer unit is. You can see the metal plate that is the top, the copper electromagnets in the center, and the shim adjustments for the IS unit at the bottom of the black slot in the barrel.
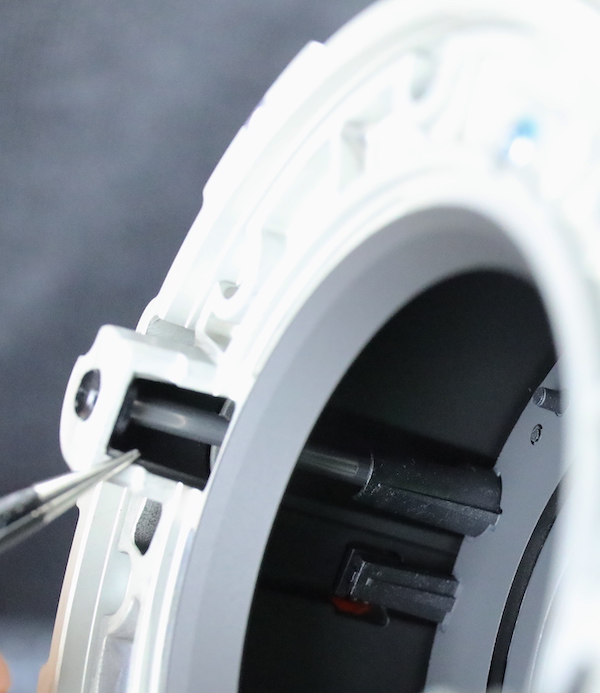
And looking up from below, see there’s some air space in the barrel. Up to this point, the glass has been packed pretty tight.
The empty space is where the focusing elements move. With them backed up towards the IS unit, you can see one of the rods the focusing group slides along.
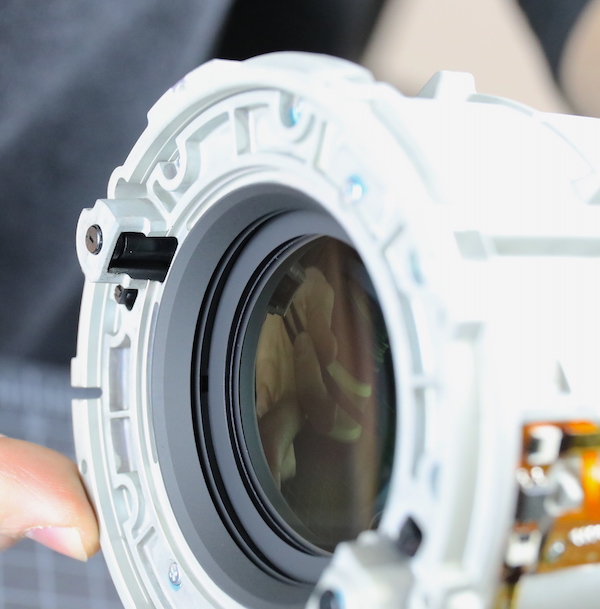
And here are the elements at a full-forward movement.
Rotating the barrel around you can see the linear focusing motor.
As we would expect for what is now a 4th generation or so linear motor, designed to move that big beast of a lens, this is larger looks more robust than LMs we’ve seen in the past. No obvious glue holding things together, and there are two sliding rods to minimize lens tilt during focusing.
Editorial Note: I see a lot of people who don’t let the fact that they have no clue keep them from stating with absolute certainty which type of motor (linear or ring) is superior. Historically, LMs have been less reliable, but those growing pains seem to be over and reliability seems good on newer lenses (post-Sony 70-200 f/2.8 GM). LMs are faster in the lab with minimal load, but how that interprets with various loads in different directions I absolutely do not know. Oh, and neither do you. Because if you’re commenting on it, you aren’t under nondisclosure, and if you aren’t under nondisclosure, then you don’t know.
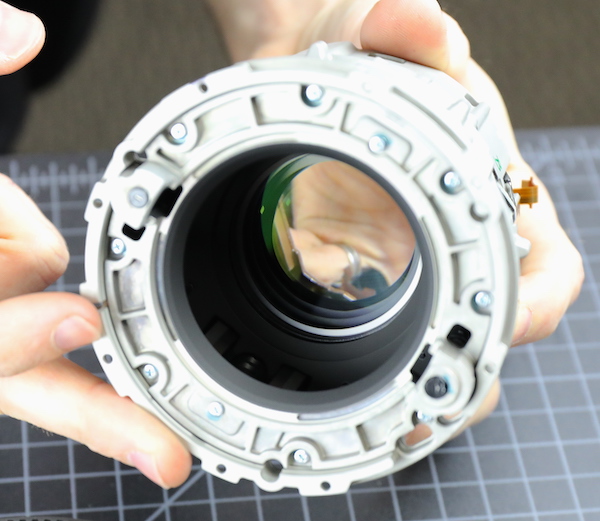
Looking up into the front barrel, we see the first of the front fixed elements. It might not show from the picture, but this is a strongly concave surface. Both of you who are interested can scroll back up to the lens diagram and pick it out; the one sitting by itself to the mount side of the fluorite groups.
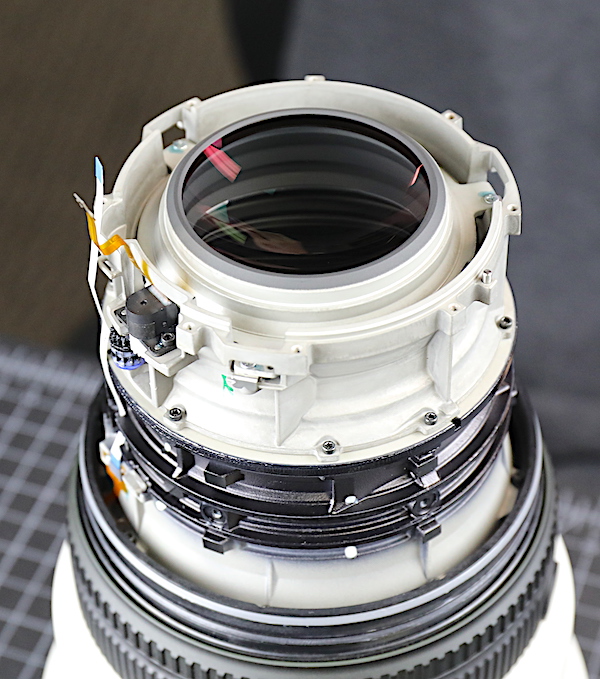
This mid barrel can also be removed easily. (Note the mounting peg to the right to make sure you line up the barrels properly during reassembly.)
With a little care to let the white flex slide through its slots without getting hung up.
We can now see the other element in this barrel. If I counted right, this should be the rearmost fluorite group.
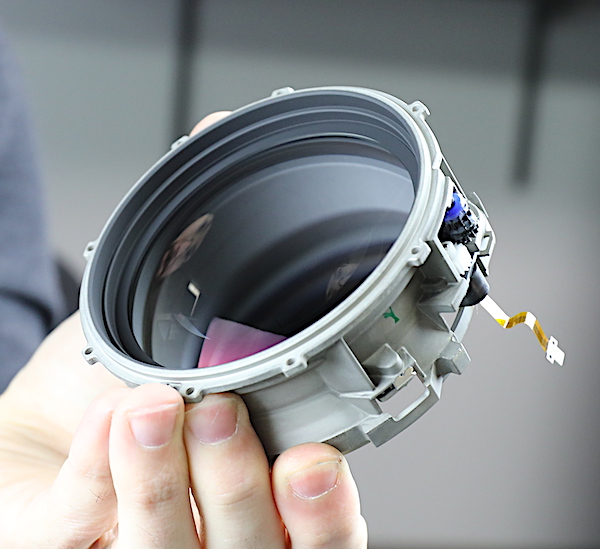
And finally, a look into the front barrel. There are two groups, each a fluorite-glass cemented group.
Our working knowledge of fluorite elements is a little better than ‘not glass,’ but we’re not world experts on cleaning them, so this seemed an excellent place to stop before I put a thumbprint on something we didn’t want to clean off.
So What Did We Learn Today?
Really, not a lot. The Sony 400mm f/2.8 G is exactly what we expected; a very solidly built lens that is everything construction-wise you would hope for in a big beast of a super telephoto that costs $12,000. It has excellent weather sealing, heavy-duty engineering between the barrel segments, a very solid chassis, and components that all appear up to the task.
Let’s be clear; I did this to start our in-house repair manual and look for weak spots in the mechanicals. I didn’t test it optically or electronically and hadn’t a clue if it’s the best telephoto optics ever made, or if the electronics will start smoking after 40 hours of use. But everything I saw today gives me confidence in the build quality.
I’ve been very willing to call Sony out on poorly engineered products in the past, whether it was poorly constructed linear focus motors, weak barrel construction in the 70-200 f/2.8 GM, or weather sealing gaps in cameras. So take my word on it: the Sony 400mm f/2.8 G has construction equal to any similar lens on the market. It gets my seal of engineering approval.
Comparing it to the Canon 400mm f/2.8 IS III, there are really only minor differences I can see, none of which are significant. I like the Sony feature that allows you to turn off tripod rotation clicking. I don’t like the plastic cover they put over it. (It will seal out weather just fine, but those Sony ‘plastic arrow’ cover inserts tear off frequently and often.)
I’ll call this one a draw, and a draw is a win for Sony. Canon has been doing this for a long, long time; this is, I think their 8th generation of 400mm f/2.8 lens. It’s Sony’s first and to have made a product equal to the gold standard of engineering is an amazing feat.
Roger Cicala and Aaron Closz
Lenrentals.com
January 2019 (all y’all surprised I got the year right, aren’t you?)
• Kubu was Mesopotamian God of Glassmaking. From the British Museum translation of cuneiform tablets on the instruction for glassmakers:
You regularly perform libation offerings before the Kubu-images. On the day when you plan to place the glass in the kiln, you make a sheep sacrifice before the Kubu-images, you place juniper incense on the censer, you pour out a libation of honey and liquid butter, and then only, you make a fire in the hearth of the kiln and place the glass in the kiln… https://www.cmog.org/article/origins-glassmaking
I’ve talked to Aaron about starting said rituals before every teardown.

** St. Bernardino Siena was the Patron Saint of Venetian Glassmakers. As far as I know, he didn’t have a clue about how to make glass, though.
If you don’t know anything about the history of glass but want to know, here you go.
60 Comments
DV ·
Great teardown, love seeing the innards of these.
“I’ll call this one a draw, and a draw is a win for Sony. Canon has been doing this for a long time; this is, I think they’re 8th generation of 400mm f/2.8 lens. It’s Sony’s first.”
While it may be the first 400 f/2.8 for Sony, it’s not a surprise to me that they can build a fine supertele. With the 500 f/4 G and the previous Minolta supertelephotos (300 SSM carried over to Sony, 300 f/2.8 /4 HS, 400 f/4.5 HS, 600 f/4 HS and their non-HS versions) which were, by all accounts, equivalent in optical and mechanical build quality to their contemporaries. So this isn’t much of a surprise to me, as Sony (and Minolta before them) were more than capable of building this kind of optic. It was a will problem, not a way problem. 400 f/2.8s appeal to a very specific market (sports) while wildlife shooters prefer something longer and Sony/Minolta always had more traction with the latter than the former. Now that Sony actually wants to compete in the sports market with the a9, they don’t have a choice, this lens is on the minimum equipment list. At least they managed to stick the landing.
This is, however, the first time Sony managed to do it while costing the same or less than Canon. 🙂 Took them long enough!
Very annoyed that they didn’t keep the 42mm rear filter size from A-mount. All Sony (and Minolta) teles up to this point used an interchangeable 42mm filter and tray. I guess E-mount means a break, but it would have been nice to be able to use an adapted lens and the native lens while retaining accessories.
Bob Newman ·
“I’ll call this one a draw, and a draw is a win for Sony. Canon has been doing this for a long time; this is, I think they’re 8th generation of 400mm f/2.8 lens. It’s Sony’s first.”
I’m not sure, in fact it really is ‘Sony’s first’. Rather, it’s Minolta’s third or so. KM is till OEMing lenses to Sony, and from the internal and external look of it, I’d think this is one of them.
Andre Yew ·
Very interesting teardown! More please.
Since Nikon is making fluorite lenses now too, I guess there’s got to be another source of them. Or maybe they figured out how to grow it themselves?
ITN ·
Nikon also sell fluorite (Calcium Fluoride):
https://www.nikon.com/products/glass/lineup/materials/caf2/index.htm
I suppose there is no reason they wouldn’t sell the material to Sony, or anyone actually given that they market their optical materials on the web. They also are closely collaborating on Sony in other areas so it would be logical that Sony might get theirs from Nikon.
For a long time Nikon have made a lens that uses fluorite (the 105mm UV Nikkor, today it’s sold on a different name), but today they also make lenses that use fluorite for normal photography applications.
Adam Fo ·
Nikon were using small CaF2 crystals well before Canon because they were used in microscope production.
Whilst the UV Nikkors and Zeiss UV specialist lenses have long used fluorite crystal elements ( and both have been into space with NASA), fluorite glass is used in modern Nikkors with the FL designation
Andreas Werle ·
Sony the frugal company and soo huge fluorite elements! 🙂 Thanks, Roger and Aaron to show us these beautiful pieces of “not-glass”.
More please.
Romano ·
About **: are you sure? Not an expert but I think the patron of Murano’s glassmakers in St. Niccolò, not St. Bernardino da Siena… (Well, neither was able to make glass, I suppose, so the point stands)
Roger Cicala ·
I’m not at all sure, but I think St. Bernardino got replaced by St. Niccolo later on.
disqus_1cPsPnzvHl ·
roger_cicala already read
Dan Colle ·
Definitely San Nicolò, Roger. San Bernardino da Siena is rather considered the patron of graphic designers and advertising professionals, since he was the creator of the medieval IHS trigram “logo”.
J.L. Williams ·
I needed these articles exactly as much as I need to know how many grocery bags a Ferrari Monza will hold, and for exactly the same reason. But I love them anyway, for exactly the same reason. A bit disappointed that Sony no longer uses the Southern Fairy Tale Ring, though…
Roger Cicala ·
Thank God. I mean Kubu. We have a lot of those, and have finally found a use for them that they are capable of handling. https://uploads.disquscdn.com/images/633953a743c3dbef2fb4e4ce8df624f5c89bcb390bf981813f6141ec11c1d869.jpg
Milda Thatch ·
There are plenty of work at home opportunities that already available. And, in today’s world, there are more work opportunities online, and this emerging trend is anticipated to keep going nicely ahead. Who would not really want to work-at-home on a part-time basis and gain 1000s of dollars on a monthly basis? This is an offer most people cannot or do not ignore. So,now I am going to tell you an incredible working at home job opportunity from which you are able to get between 5000 dollars to 10000 dollars per month. This is what i do… ====> NICEST WORK!!!
Heather Bahringer ·
Exploring all across the globe is a delightful and intriguing dream. We work all day long in our office to convert this dream into reality. Still how many actually able to earn? We bring to you, this amazing on line opportunity created in a way that it can help you to generate great money. Do the job daily and give your work few hrs and make money nearly $43000 weekly. It gives you opportunity to work from anywhere with extremely flexible time and able to devote some quality time with your loved ones. The time has come to change your life and bring growth and happiness. Now go and check, impressive things waiting for you >>> SUPERB OPPORTUNITY!!!
Whitley Barbosa ·
Travelling all around the world is an enjoyable and fascinating dream. We work twenty four hours a day in our company to convert this dream into reality. Still how many actually able to earn? We bring to you, this awesome web-based job opportunity created in a way that it helps you to receive a nice income. Do the job everyday and give your work handful of hrs and earn as much as $20000 every single week. It provides you chance to work from anywhere with flexible time and spend some quality time with your loved ones. It is time to change your life and bring growth and prosperity. Right now go and take a look at, awesome things waiting for you >>> SUPERB OPPORTUNITY!!!
Thelma ·
Opportunity never knocks the door twice, It really is needed to make maximum use of the opportunity. A career which gives you complete flexibility to work from home. Job opportunity that is online and you just need to spend a small amount of time into the work. This is not like scams you will see on website that claims to make you wealthy and later turned out to be some fraud selling schemes. It is real and authentic. You can easily start and it also get you very good incomes. Be your own boss and allocate a lot more valuable time with your loved ones and can make approximately $44000 each and every month. It is time for you to visit this opportunity and change your life forever >>>>>>>>>>>>> https://bit.ly/2FBDESS
Adam Fo ·
Rodger, how about a tear down of the Nikon D850 ?
It may be the last, and best, of it’s kind.
Roger Cicala ·
Adam, I’ve just got too many irons in the fire right now. Plus I bet there are wires and solder and I’m not in the mood for wires and solder.
Lillian ·
Make extra profit on weekly basis… It’s fantastic part-time work opportunity for everybody… Best thing about it is that you can work from your couch at home and start earning from $100-$2k at the end of every week … Apply now and get your first payment by the end of this week…> https://lxcesse.tumblr.com
Naomi ·
Get more income weekly… It’s a valuable part-time work opportunity for everyone… The best part about it is that you can do this job from your home and start getting 100-2000 bucks each week … Start now and have your first check by the end of this week…> http://goodlove41.pw/rqEaqV
helium phix ·
Thank you for the virus. Just what my computer needed.
Alice ·
I actually make about $6,000-$8,000 monthly via internet. It is enough to comfortably replace my old jobs earnings, especially considering I only work about 20 hours in one week from home.I lost my job after doing work for the same organization for a long time, I required reliable income, I was not researching for the “get rich quick” home packages you can see online. Those are usually pyramid schemes or stuff in which you have to sell to your friends and family members. I actually needed an authentic way to earn a living for me and my family. The greatest benefit of working on-line is that I am always home with the little kids, I save lots of money. Honestly,it is actually simpler than you would believe, all you need to do is fill out a simple form to get front line access to the Home Profit System . I got the instructions kit and within a few weeks I was making over $4,000 per month. The instructions are pretty simple, you don’t have to be a computer whiz, but you should know how to use the net. If you can fill up forms and surf web sites, you can do it quite easily, You don’t need to sell anything and no one needs to purchase anything. It’s as easy as being on Facebook or twitter.Here’s how to begin==> http://shortaz.com/qR7H6
Emiko ·
I actually earn about $6,000-$8,000 each month over the internet. It is actually enough to easily replace my previous jobs earnings, especially considering I just work about 20 hour per week from home.I lost my job after working for the same organization for a long time, I needed trustworthy earnings, I was not researching for the “get rich quick” home packages you see online. Those are usually pyramid schemes or stuff where you need to sell to your friends and relatives. I just wanted a reliable method to earn a living for me and my family members. The most interesting part of working on-line is that I am always home with the little kids, I save a good amount of money. Honestly,it is actually simpler than you would think, all you need to do is fill out a very simple form to get front line access to the Home Profit System . You don’t have to be a computer whiz, but you should be aware how to use the net. If you can fill up forms and surf websites, you can do it easily, You don’t even have to sell anything at all and no one has to purchase anything. It’s as simple as being on Facebook.Here’s how to start>>> PLEASE SEE
OhWeh ·
A fine article, Thanks! FYI: Kowa uses big Fluorite lenses in their spotting scopes.
Roger Cicala ·
Thank you, that is good to know.
Andre Yew ·
I believe Kowa’s fluorite are from Canon Optron, as is Takahashi’s (they make 100mm-aperture telescopes with fluorite elements). There are actually plenty of telescopes using fluorite elements, and many source them from Canon, but Zeiss have also made some in the past and I can’t imagine Zeiss getting optical material from Canon, but maybe they did?
This post on Cloudy Nights, an astronomy forum, lists many of them, and these are relatively large optical elements: https://www.cloudynights.com/topic/504418-fluorite-refractors/#entry6656321
The numbers on the scope names generally refer to their aperture diameter in millimeters, to give you an idea of how big the elements are.
DrJon ·
Roland Christen (of AP) certainly did 167mm telescopes using fluorite (but usually as the centre element in an oil-spaced triplet – see my links in a post somewhere above).
Adam Fo ·
Zeiss own Schott Glass AG. Their website claims they grow the largest CaF2 crystals in the world at 100 kg and widths of 35cm. They are also the largest producer.
2blueherring3 ·
I bought a nikkor 400mm 2.8e fl from you. What are we, chopped liver?
Roger Cicala ·
You are cutting edge technology of the year it was released, and still excellent optics by any standards. I would say that any 400mm f/2.8 out there is so sharp that optical differentiation is at most hair-splitting. But lighter is lighter.
2blueherring3 ·
I looked but didn’t see the actual weight for the lens. Wonder what the differential really is? Looks great…
Someone ·
Nikkor 400/2.8 FL 3800g
Sony 400/2.8 2895g
The difference is almost 1kg.
Franz Graphstill ·
At a recent Sony mirrorless road-show, I tried the lens I was interested in (the 85mm GM), then had a play with this beast – I got to shoot the 400mm f/2.8 on an A9, and loved it. One of the other photographers was working with a model, and I got pixel-sharp images of her, hand-held, from 15m away. Superb lens.
That said, I had a serious ache in my left shoulder (I think a slight muscle tear) for a week afterwards – even though it’s light for a 400mm f/2.8, it’s still a big heavy lens.
I’d love to buy one, but I think I’d be smarter to rent from you.
Thank you for the tear-down – it’s nice to know that it’s as beautiful on the inside as on the outside.
Jay Philip Williams ·
I don’t know if I would say necessarily that this is Sony’s first 400mm f/2.8. They bought Minolta and no doubt have some of Minolta’s excellent engineers, and Minolta had pro-level glass (300mm f/2.8, 400 f/2.8, 500mm f/4, and 600mm f/4, among several other very nice lenses).
Very interesting article. Thanks.
Roger Cicala ·
I don’t disagree, and have to walk around this a bit, but the original Minolta group, while absorbed, is but a small fraction (if that) of Sony’s lens design section. Certainly they got some expertise and patents, but I don’t think they have used them much. There were some Minolta characteristics that we never saw outside of the alpha lenses.
Athanasius Kirchner ·
Such as…? Minolta always seemed to do their own thing, and I’d love to know more of their weird quirks.
DrJon ·
I thought Konica Minolta kept most of the lens engineers and still design lenses…? They certainly file patents for lens designs.
QuietOC ·
Minolta never offered a 400mm F2.8. They had an AF 400mm F4.5 HS APO G in 1995, and an earlier MF 400mm F5.6 APO in 1976.
Ilya Snopchenko ·
Love your sense of humor.
Stefanie Daniella ·
Fast 400mm F2.8 super-tele-lenses AF great wide open @ F2.8 in low light for F2.8 to F8 on OVF dSLRs for stills image capture
and
likewise, with FE400mm F2.8 widest open aperture (brightest aperture possible):
Sony FF Live-View mirrorless digital cameras, like A9, should AF at F2.8 for low light F2.8 to F8, too; albeit, with Live View Display: (camera exposure) Settings Effect Settings = OFF. (no live exposure preview effect in EVF at all).
For folks wishing to use their FE400mm F2.8 on their Sony Live-View mirrorless digital cameras, like A9, WITH live exposure preview effect ON, in EVF for AF low light F4 to F8, may find the lens may no longer AF at all, so should opt for only F2.8-F3.5 for AF sake, or just use their LV camera WITHOUT live exposure preview effect in EVF on at all.
The new Sony FE400mm F2.8 may have nice optics, comparable to Canon’s new EF400mm F2.8L IS III USM; but Sony FE Lenses operate without benefits of how Canon EF Super-Tele-Lenses work with Canon’s own FF Live-View digital camera, like EOS R.
EOS R is designed with an ExpSIM Live-View AF system capable of AF in low light with optimal apertures (need not be only “widest brightest only” apertures) for F2.8-F11 with Live Aperture Exposure Simulation (F1-F90 on EOS R) = “live exposure preview effect” (on or off; makes no difference at all) specifically for stills image capture.
It will be very interesting when actual comparisons are made with “similar live view AF” stills image capture scenarios (with or without “live exposure preview effect” (on vs off), in very low-light*; as none were done in 2018, side-by-side, in any web reviews.
*very low light, such that one cannot see via OVF on dSLRs
obican ·
Roger Cicala (from Lensrentals.com) says the Sony 400/2.8 GM has Sony won the battle of rare glass filters over Canon with 40.5mm to 52mm.
DrJon ·
Talking about adjusting optics and fluorite elements made me think of a couple of recent posts by Roland Christen…
On Fluorite:
https://groups.yahoo.com/neo/groups/ap-ug/conversations/messages/77792
“If you touch the edge of a fluorite element accidentally to a hard metal surface you may see an instant line develop across the surface, which eventually propagates thru the material and leaves you with two very nice cleaved pieces.”
(Presumably never possible in a shipped lens as will always be in a metal ring with some other glass.)
Tweaking the lens:
https://groups.yahoo.com/neo/groups/ap-ug/conversations/topics/77367?reverse=1
BTW I joined the waiting list for one of these on 12th December 2000 (yes, three zeros) and it should ship next week… and people complain how long it takes some photo lenses to appear… 🙂
Andre Yew ·
Wow, that second article about tweaking the lens, even rotating lens elements to correct astigmatism is amazing! Thanks! In some ways, astronomy is way ahead of photography (eg. always working at the diffraction limit, and using magnifications that make even the sturdiest photo tripods show shudder) but the photo industry is so much larger than astronomy that the economies of scale make a lot of things accessible in the photo world. Apparently, it’s thought that the big camera and lens companies have first pick of the glass coming off a line because of the volume they buy at, so telescope makers have to make do with the leftovers. And the number of elements and ED and Super ED elements, along with aspherics, used in relatively modestly priced photo lenses made in large quantities would make telescope makers envious.
DrJon ·
Premium Refracting Telescope makers are able to pay more than lens manufacturers and can have as good glass as they want. My (probably about UKP3600 landed) 92mm refractor tube has three lenses. My 300/2.8 has 17. Only one had the head of the company spend several hours polishing and adjusting the lens elements though…
Andre Yew ·
The economies of scale between a Canikon 300/2.8 and an Astro Physics OTA has got to differ by at least 100x if not more, so their prices are pretty hard to compare.
DrJon ·
Yes, but my point is they can still get the very best glass, you just go to a glass company and buy the best stuff. They don’t get leftovers at all. I quote from Roland:
“On the other hand, the high end SD (Super-ED) glass such as FPL53, FPL55 and FCD100 are inherently high grade because they are delicate glasses to produce and must be very carefully annealed in order to prevent breakage and de-vitrification during melting. In all the years that we used this type of glass in our triplet lenses we have not seen any internal defects or variations of refractive index.”
disqus_zRNn7uy75m ·
disqus_JqeE7F3maD but
Adam Fo ·
I doubt the Sony element is fluorite crystal. Fluorite glass which is a mix, is used by Nikon supplied by their own glass division. Schott is the biggest grower of fluorite crystal and supply fluorite glass to Zeiss so they be a source for this lens or Ohara in Japan.
Due to it being stronger, less likely to bloom, and easier to work with Canon switched to fluorite glass for larger elements some time back.
Colin ·
Excellent article.
A minor correction: “Nor have you ever given up an optical adjustment or hand-made a 0.05mm shim because 0.1mm wasn’t enough and 0.2mm was too much.”
Should be:
Nor have you ever given up an optical adjustment or hand-made a 0.15mm shim because 0.1mm wasn’t enough and 0.2mm was too much.
Athanasius Kirchner ·
Not if you stack the 0.1 and 0.05mm shims together 😉 It took me a little to figure it out.
Scott ·
Thanks for the teardown, very informative! I think the only thing that could make this lens better would be if you could, you know, actually buy it anywhere!
Michael Ogle ·
When I was last in Iceland, I saw Sony folks on the beach collecting Icelandic Feldspar.
GulliNL ·
Always inspiring. I’ve almost mustered the courage to take apart my 13 year old 18-50 kitlens I got with my first DLSR! I’ve always been wondering about what kind of shims and collars they have used.
Also, the sass is strong in this one;
“Sumerian statuettes from Tel Asmir … Neither is Kubu, but y’all never read the articles before commenting anyway. And they look cool.”
Sggs ·
Mr Cicala, thanks for your brilliants posts. I will ask you, plase, a little more: I presume that you have dehumidified storage for the lenses you rent, but your costumers dont. How you deal with the moisture in the lens, when they came back? When traveling, jungle, etc, I use to put my lenses on the sun. Very frequently the present a “cloud” that desapears after a time but the lenses get very hot. Does it damage the lens? Old manual lenses I get afraid for the lubrification of the diafragm and the coating. Modern lenses also of the af motor and the is. My 24-70 2.8 sony always get humidity and is very hard to take off. The 70-200 and 12-24 are easier. A old canon 85 f1.2 manual gets so hot that I cant handle and still take some time to “dry”. I use a hair dryer in the evening on the lenses but tha gives little help. See, is not working in the rain, but on boats or walking in the tropical forest. It seems useless for me to keep silica on the bags. Do you have a tip?
Thanks
Sggs
Roger Cicala ·
Sggs,
I’m not sure I really do. We see a lot of condensation on arrival from transportation temperature changes, I think. It is often hot and very humid in Memphis where we are based, the opposite in the plane’s cargo bay. It almost always clears up in a couple of hours in a temperate environment.
What you deal with, especially jungle atmosphere, is probably much more chronic. The sun is not a bad thing in limits, but I would not want my lenses to get ‘very hot’ and absolutely would not want any telephoto with fluorite glass to get even hot. We do use a lot of silica bags, and there was a company that made slightly larger lens rear caps that were meant to hold a silica pouch behind a screen. It actually worked pretty well. Silica bags are easy to dry out and ‘recharge’ in the sun and use over and over again.
Roger
Sggs ·
That bigger lens cap is a wonderfull idea and may be a “do yourself” solution, as I can adapt a normal cap. Thanks a lot!
Jeff Allen ·
You can bet Sony engineers took both Canon & Nikon 400mm f2.8 lenses apart (the same for all the G Master lenses). This maybe their first attempt but they learnt from Canon 7th attempt so I would not be so quick to give them a big credit. Yes they still need to design & build their own but it helps if someone else has done the ground-work.
Jeff Allen ·
We have a Canon EF 1200mm f5.6L USM a monster of lens we bought in the 1980s, the inside of this lens is equally well made. It was rumoured that Canon only ever made two or three of these lenses every year and due to the cost discontinued production in the late 1980s. My point is Canon have a long history of engineering firsts in optics and in solid engineering so if it aint broke, dont fix it means the EF 400 f2.8L is about as good as it gets but equally means others can see how they have achieved it.
Andre Berthet ·
Thank you Roger for a very interesting Sony 400mm teardown demonstration. However, I have some reservations. Having worked a long time in the semi-conductor industry I was curious to know if you use some kind of Cleanroom environment (at least class 10000 or better) to work on these lenses? I don’t think taking the risk of trapping dust particles (lint, hair, dandruff, fly etc..) inside the lens is a good idea. If this lens has many seals, it is to prevent contamination to get inside. Therefore, I am surprised to see Aaron’s beard exposed and him handling the assemblies with bare hands. I would expect that wearing a basic cleanroom garment, a beard cover, hair net, and gloves should be “De rigueur” when doing this kind of work. For me a lens costing $12,000.00 demands major consideration, except for you guys it may be just a write-off.
May Kubu and San Bernardino da Siena be with you!
Tom239 ·
“Because if you’re commenting on it, you aren’t under nondisclosure, and if you aren’t under nondisclosure, then you don’t know.”
I love it. This is a modern take on chapter 56 of the Tao Te Ching.