Equipment
Teardown of the Canon EOS R Mirrorless Camera
I’ve wanted to look inside the new Canon and Nikon mirrorless cameras since the moment they were announced, so I’m probably more excited about this than you guys are. I’m really not sure what to expect. Early on, when we took apart a Sony A7R, we were struck by how clean and straightforward mirrorless cameras were compared to DSLRs. Later, we took apart an A7RIII and found that increased capabilities led to increased complexity, although still not as complex inside as a DSLR.
So we expected things not to be too complicated – no mirror box, optical prisms, off-sensor AF system, etc. We hope Canon cameras to have clean, even elegant, engineering; like the 5D IV teardown shows. We haven’t done a Nikon SLR teardown in quite a while (the D7000 was the last one), but their camera engineering is pretty similar to Canon’s, although being Nikon they still like to leave some soldered-wire connections here and there. So we figured that the new Canon and Nikon mirrorless full-frame cameras would be more straightforward than their SLR cameras, and perhaps Nikon set down the soldering gun and slowly stepped away.
But really we had no idea how things would look inside, if we might see some cool new engineering, what the weather resistance would be like, etc. So we took apart both a Canon EOS-R and a Nikon Z7 just to have a look around. (The Z will get written up as soon as I can get to it.)
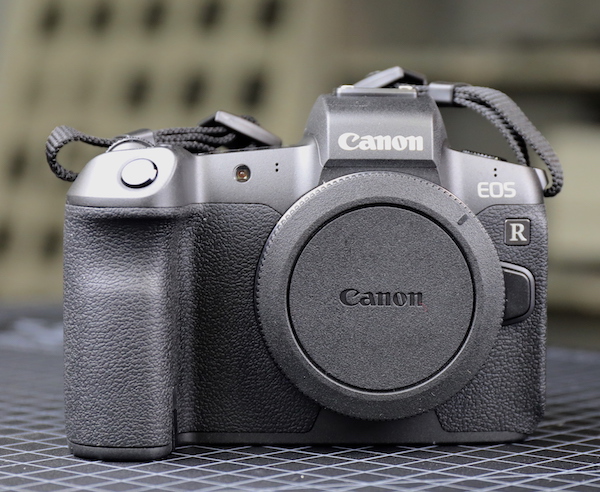
The EOS-R
Lensrentals.com, 2018
The Outside
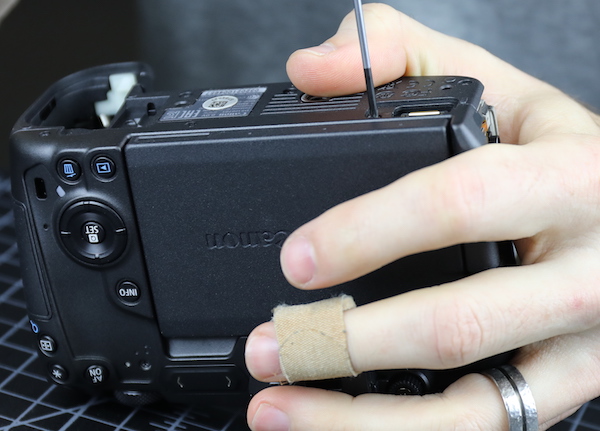
Since this is a brand new camera to us, we started by removing all the grip rubber so we could see where most of the screws were. It’s worth noting that Canon seems to have new grip adhesive tape; it was both easier to remove and retained its stickiness for replacement better than what we’ve seen before. Important news for the none of you that intend to repair your cameras at home, but we like it.
Lensrentals.com, 2018
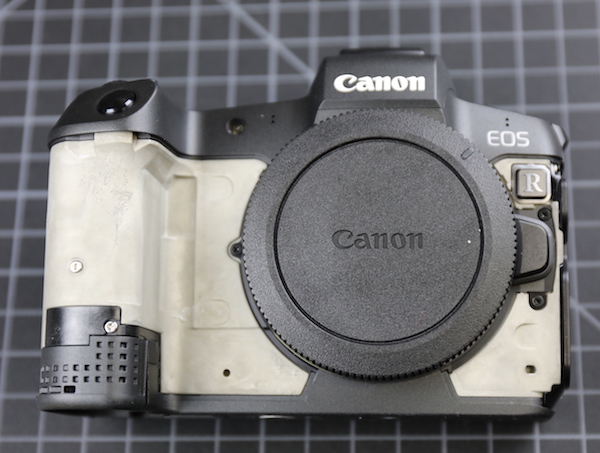
Now the camera looks kind of like your dog shaved down for summer. I kind of like it, though. If I get one, I may just take the grips off. The shell, BTW, seems to be a polycarbonate with a slightly rough surface. It would grip nicely.
Lensrentals.com, 2018
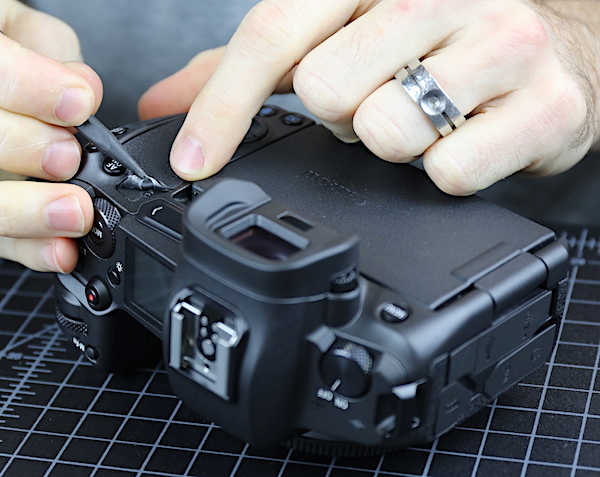
The rubber around the viewfinder is actually screwed into place. Good news for those of you who, like me, sometimes find yourself wondering when the viewfinder rubber came off. Bad news for those of you who like to take it off on purpose for some reason or other.
Lensrentals.com, 2018
Lensrentals.com, 2018
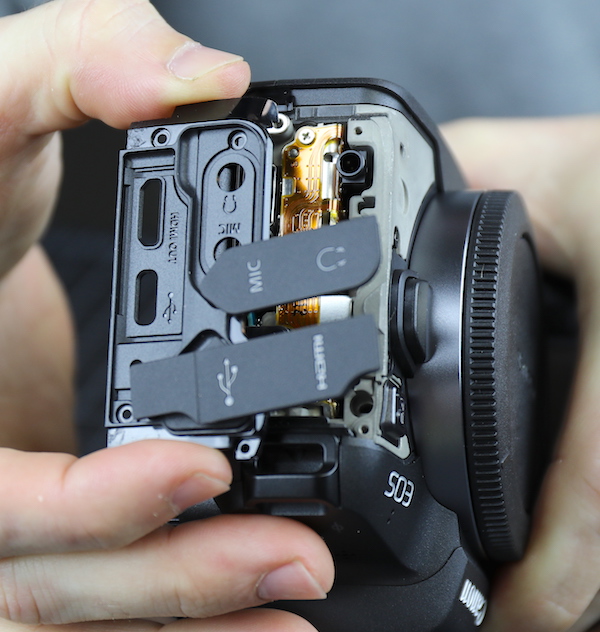
Next, we went to the side to remove the I/O port covers. This is held on by four screws; removing those lets it slide right off.

Lensrentals.com, 2018
Lensrentals.com, 2018
With the cover off we see a very nice flex along the I/O ports. Why ‘nice’ you ask? Because that means that some or all of the I/O ports are not soldered to the main PCB. We have to replace a lot of main PCBs because someone jerked a cable, pulling an I/O port off of the board.

Lensrentals.com, 2018
Next, we remove all the visible screws around the body.
Lensrentals.com, 2018
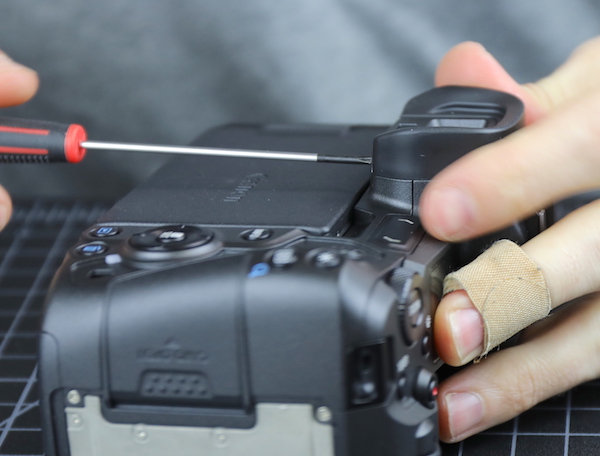
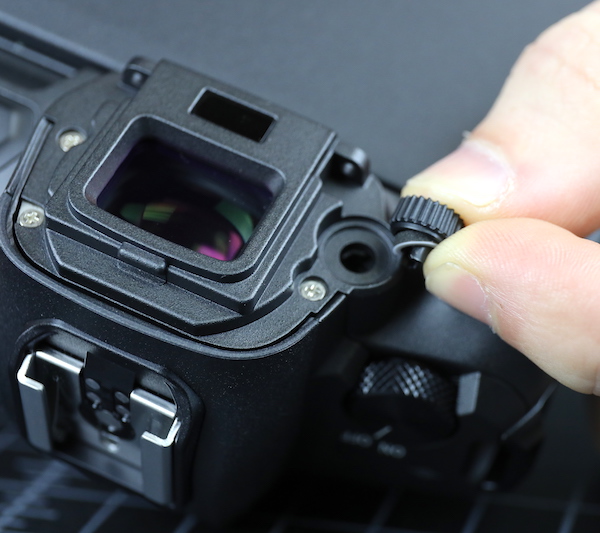
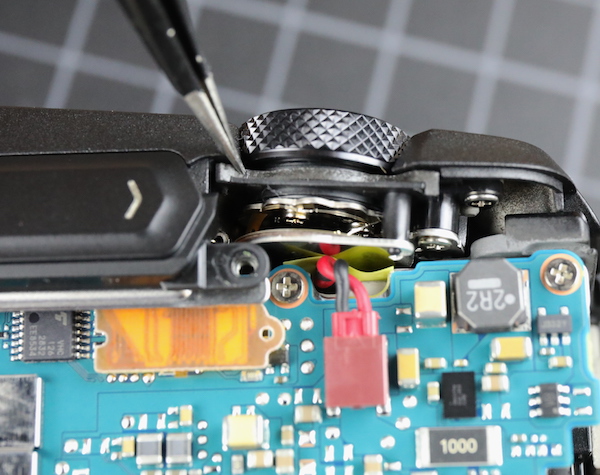
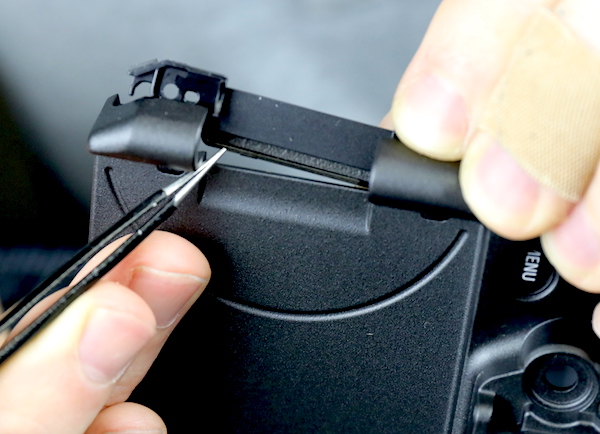
And the diopter adjustment from the viewfinder.
Lensrentals.com, 2018
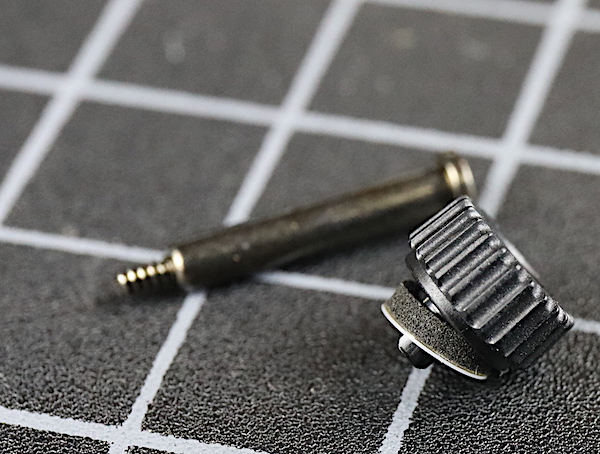
There is a nice thick weather seal under the diopter adjustment knob. For those who want to skip ahead, the knobs and dials are all weather sealed nicely, but not much else. As long as it only rains on your knobs and dials, though, you should be fine.
Lensrentals.com, 2018
Opening the Case
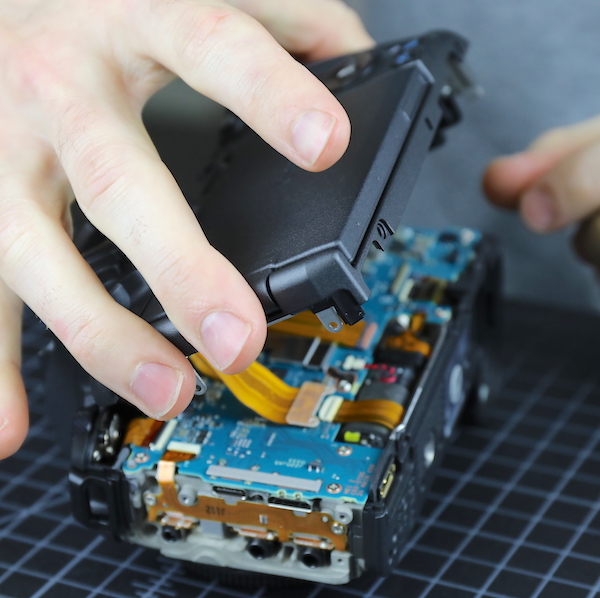
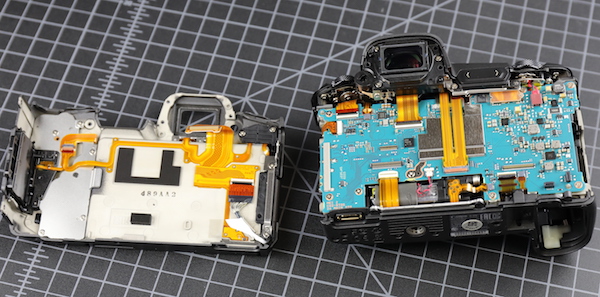
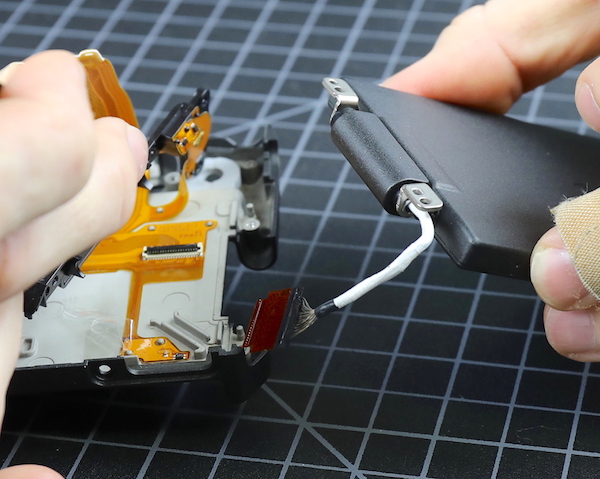
With all the screws out, the back assembly can be removed, LCD and all, after the flexes between it and the main PCB are detached.
Lensrentals.com, 2018
At a glance, this looks much like a Canon SLR: the back assembly containing the LCD and controls, the main PCB with neatly laid out flexes.
Lensrentals.com, 2018
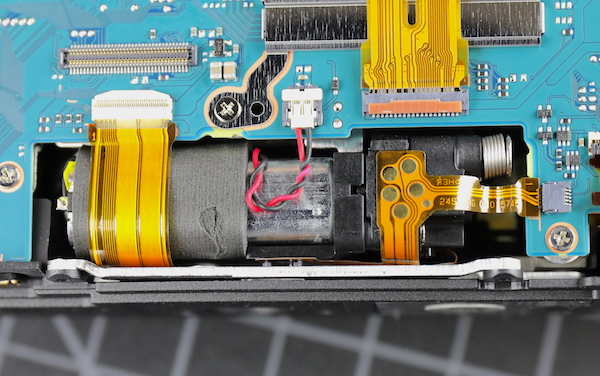
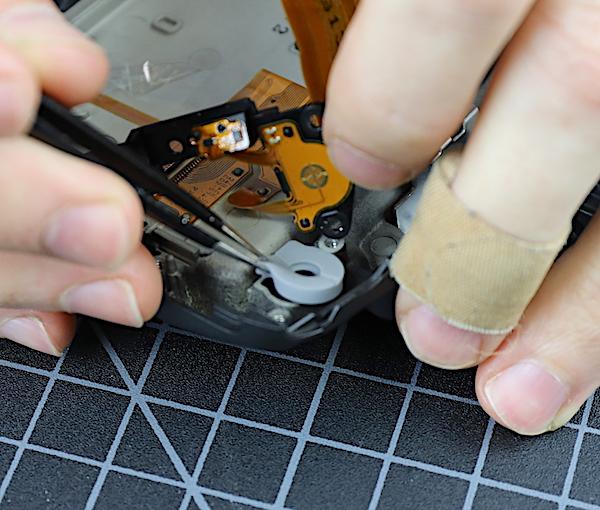
Looking closer, there are some apparent differences. First among these is that the shutter motor and electronics are at the bottom of the camera, underneath the shutter box. In a Canon DSLR, it’s generally to one side.

Lensrentals.com, 2018
Here’s a close up of the shutter motor for those into such things.
Lensrentals.com, 2018
I should also show there’s weather sealing below each of the top dials. As you can see to the right of that, though, the rest of the body depends on a plastic overlap to keep stuff out, there are no gaskets.
Lensrentals.com, 2018
The Back and LCD Assembly
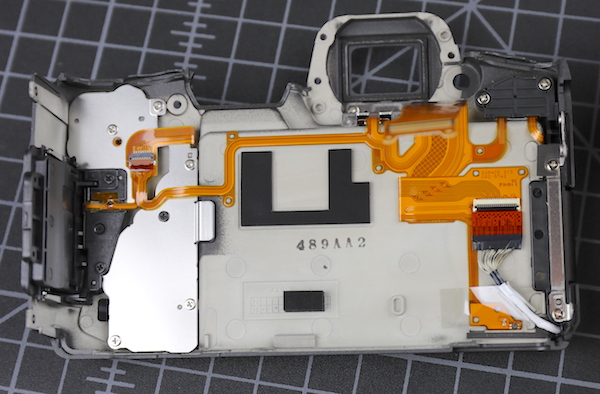
The back panel looks like the rear panel from any camera with a hinged LCD. There’s shielding over the controls (left in the picture below) and connections are going out to the LCD.
Lensrentals.com, 2018
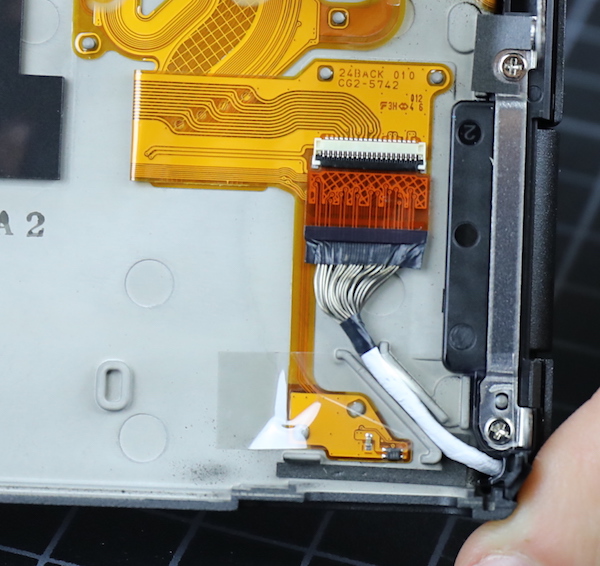
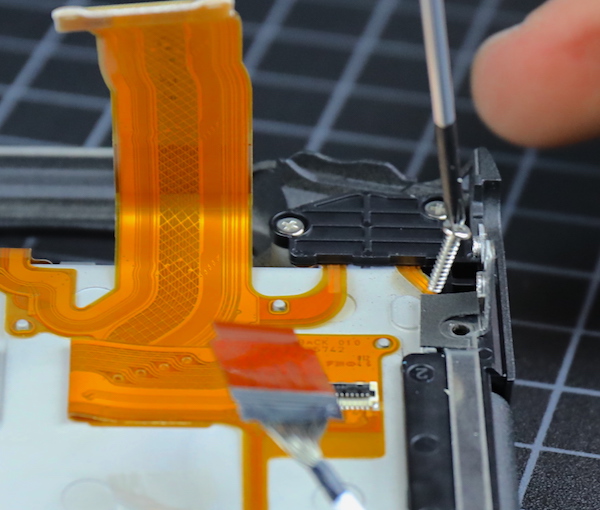
One thing that caught our attention immediately was the LCD attachment. You can see it seems only held down by two screws and a metal clamp. This could be great (LCD change is a common repair) unless it’s weak (making LCD replacement a more common repair).
Lensrentals.com, 2018
The bracket looks pretty robust, though, and the screws holding it down are the largest in the camera by far.
Lensrentals.com, 2018
The bottom line is it makes LCD replacement something takes minutes, not hours.
Lensrentals.com, 2018
And the bracing and weather sealing around the bracket are excellent and sturdy.
Lensrentals.com, 2018
While we were back here, we removed the shielding to look at the weather sealing around the buttons. Again, thick and excellent.
Lensrentals.com, 2018
Other Subassemblies
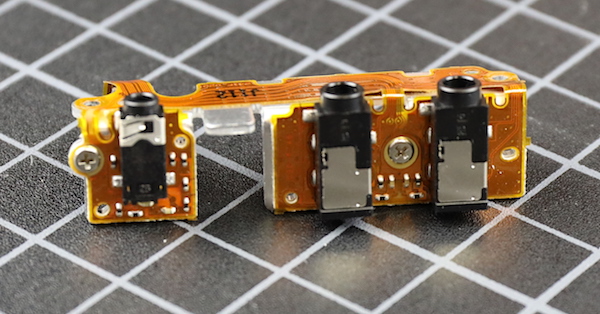
We’d already unfastened all the screws and disconnected flexes, so we slid out the I/O subassembly.

Lensrentals.com, 2018
I was a little disappointed, but not surprised, that it contained only the RCA-type plugs. Better than nothing, of course, but the HDMI plug is the one that rips off the board most frequently, at least in our experience.
Lensrentals.com, 2018
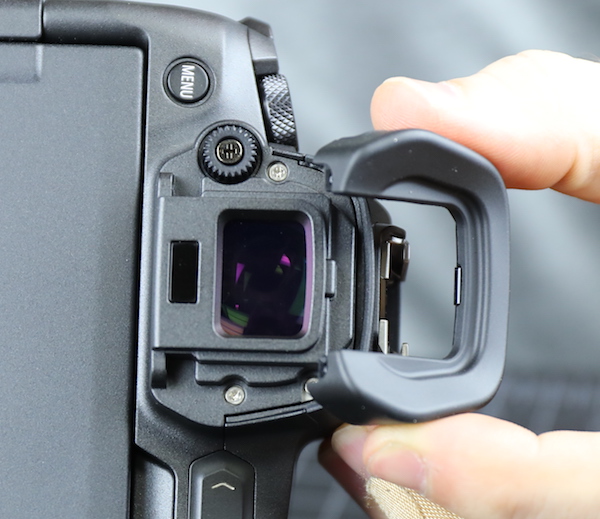
Similarly, the EVF had already been disconnected so it could slide right out.
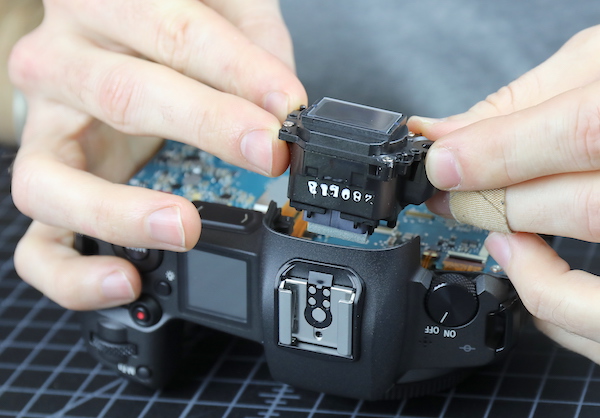
Lensrentals.com, 2018
Finally, the top assembly was removed (there were two more screws internally holding this on).
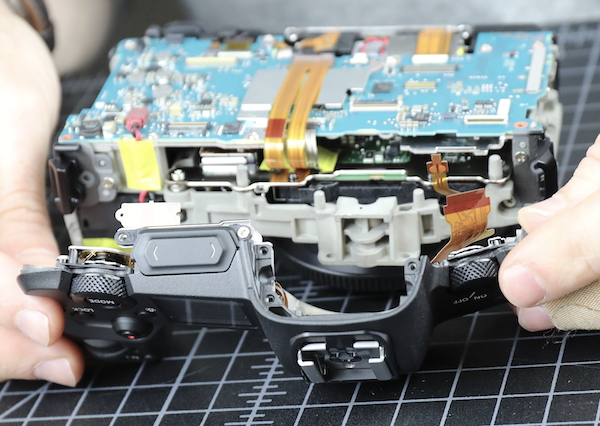
Lensrentals.com, 2018
The top assembly has a lot of electronics and connections: EVF, various selectors and switches, the top LCD, and the touch bar. From a repair standpoint the top assembly is a single part; if anything in there breaks, you replace the whole thing. It can be disassembled but it’s very time consuming, and there’s no reason to. I will note, because the photo is small, that there is no weather-sealing foam along the edges. Plastic-to-plastic contact is all the weather sealing there is.
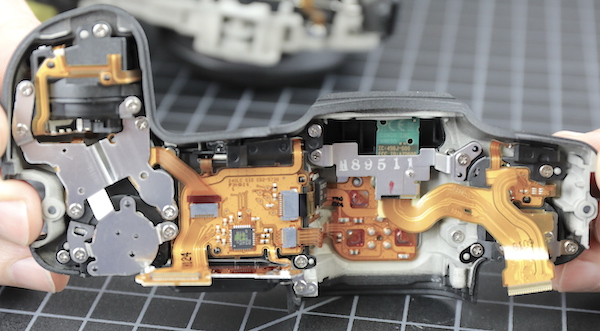
Lensrentals.com, 2018
Main Body
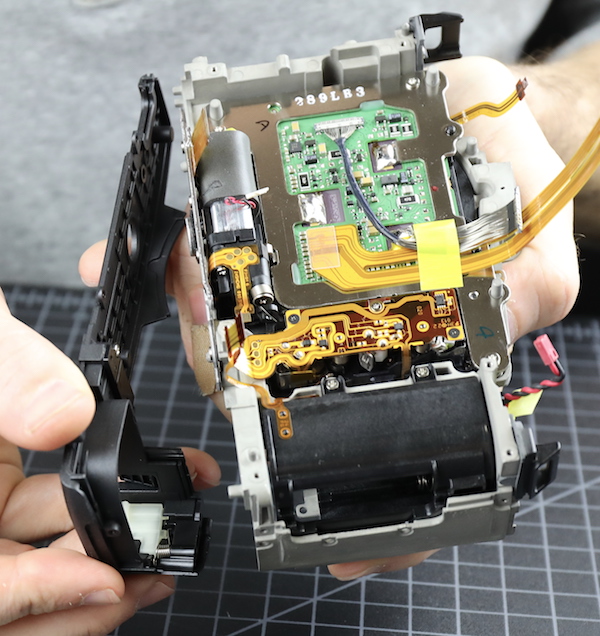
With all the subassemblies removed, Aaron just had to remove the half dozen screws to take off the main PCB.
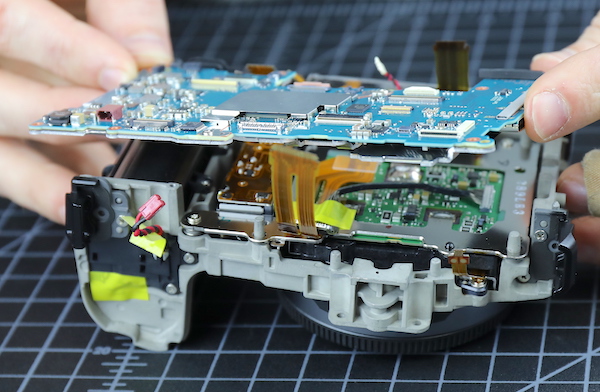
Lensrentals.com, 2018
You can see a small electrical shield on the surface of the board in the image above; there’s more significant shielding underneath.
Lensrentals.com, 2018
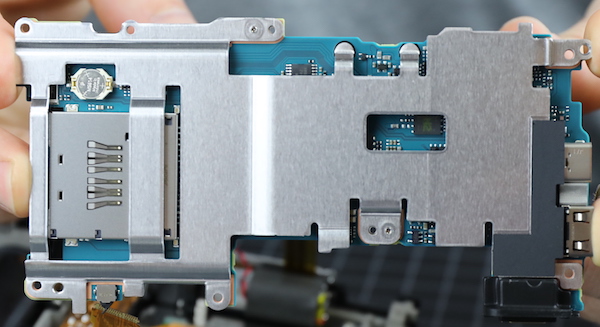
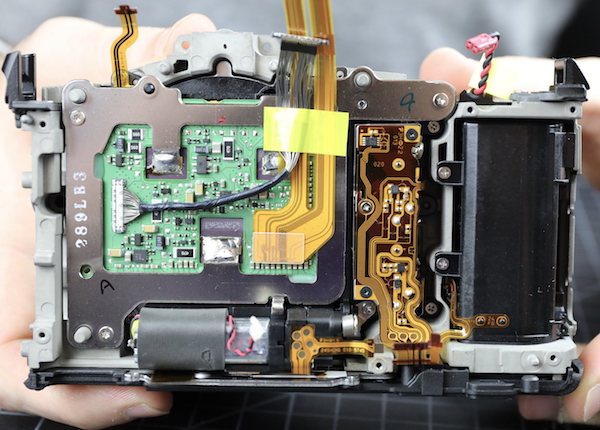
With the shields removed we can see the PCB is not particularly dense.
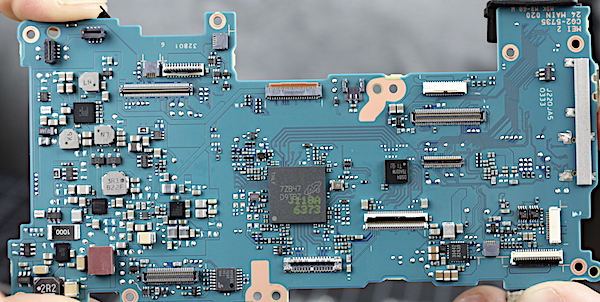
Lensrentals.com, 2018
The inner side shows the SD card slot soldered to the board. Repair guys hate this since a broken card slot means replacing the entire board, but SD card slots are certainly more reliable than CF slots. Soldering the SD assembly to the board is the way it’s usually done.
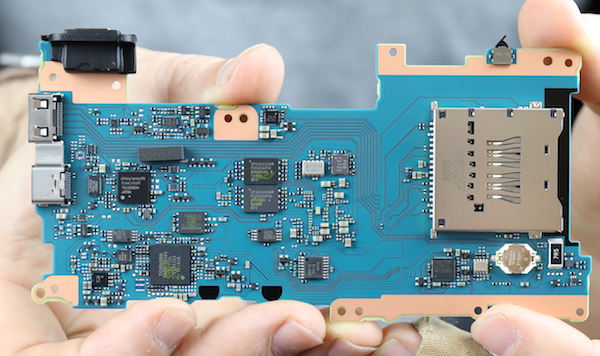
Lensrentals.com, 2018
With the PCB removed, all that’s left to see is the image sensor’s board (green), the shutter mechanism below it, and the battery box (black). Like all mirrorless cameras, the EOS-R is simpler than an SLR.
Lensrentals.com, 2018
If you look carefully at the aluminum frame over the image sensor, you’ll notice 3 Torx (star) screw heads, two along the left side, one in the upper right. These are the sensor adjustment screws. During assembly, the image sensor is adjusted so that it is perfectly (in theory) aligned with the lens mount.
Each of these screws is spring-loaded. They are loosened and tightened during the adjustment process to align the sensor and lens mount to be within a few microns of parallel. We don’t have the automated equipment to do this adjustment (we can do it, but it involves hours of trial and error) so we aren’t going to do any further disassembly of the sensor plate.

Lensrentals.com, 2018
The last piece to take off is the bottom plate.
Lensrentals.com, 2018
While there was no weather sealing around the edges of the plate, but there is some at the tripod mount.
Lensrentals.com, 2018
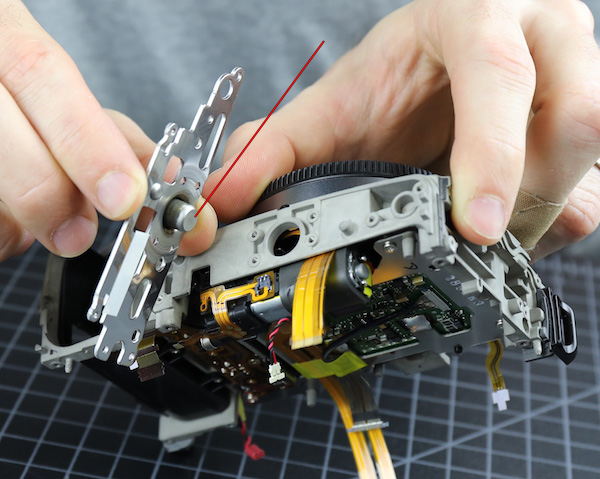
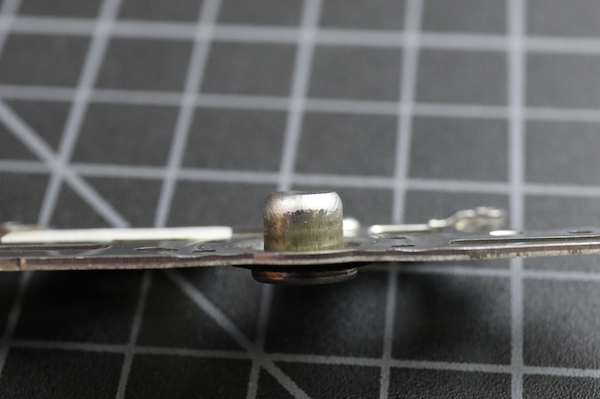
The tripod mounting plate comes off next, and there’s an important detail here. The tripod screw inserts into a pressed out cup (red arrow).
Lensrentals.com, 2018
We like long cups because a long tripod plate screw (and they vary in length) can pop the top of a short cup out, leaving a free-floating piece of metal inside your camera. Free-floating metal inside your camera is a bad thing. A very bad thing. This one is nice and long and I can’t imagine a problem occurring.
Lensrentals.com, 2018
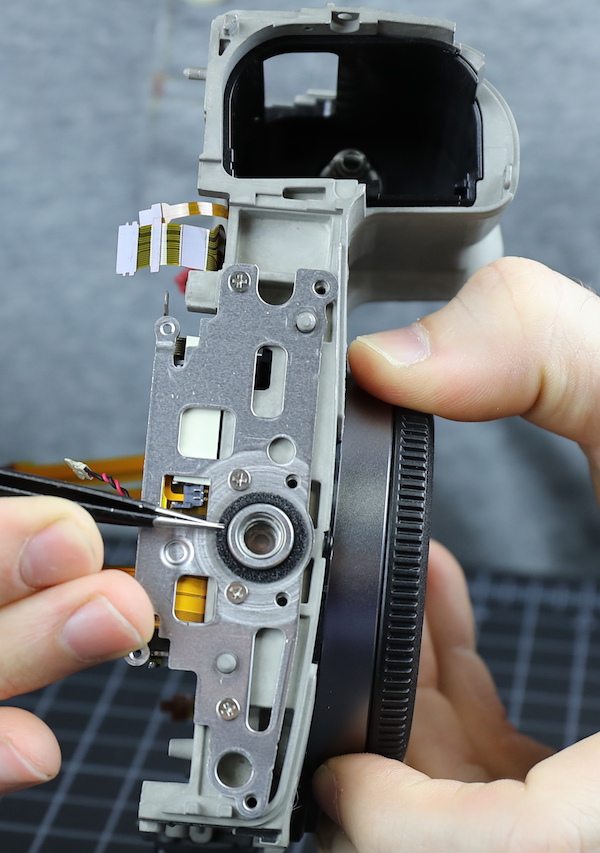
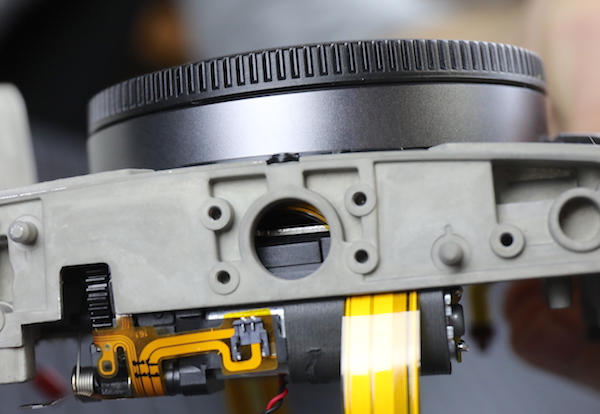
Here is the socket in the camera that the tripod cup sits in. The aluminum plate that you see crossing the hole is the sensor frame. You can see this would be a bad place to have a piece of metal floating around in. Not to mention a bad place to have a hole open to the environment.
Lensrentals.com, 2018
Before we start putting things back together, we’ll show you a front view of the stripped down camera. I’ll mention that I like that auto-close shutter feature a lot.

Lensrentals.com, 2018
Summary
It was rather a boring disassembly, really, about what we should expect for Canon doing a Canon 6D Mark II quality mirrorless camera. It’s neatly laid out and nicely engineered inside. One thing that struck me is that it’s not very crowded inside there, or as we like to say ‘they left a lot of air inside’.
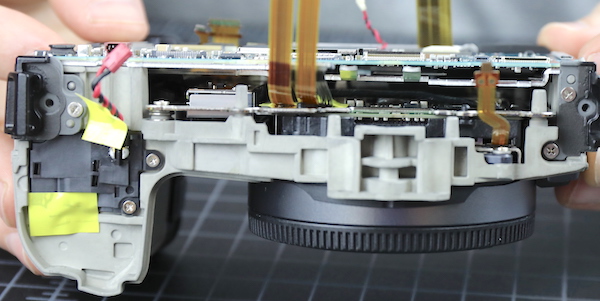
This view that I haven’t shown you yet, kind of illustrates that; there’s a pretty big gap between the circuit boards and the image sensor. If you look back at the Sony A7R III teardown (or the Nikon Z teardown to come) you’ll notice there’s not that much space inside; it’s taken up by the IBIS system which is big and thick.
Lensrentals.com, 2018
Do I think future Rs are going to have IBIS? No, I don’t. Canon has been very clear that they think lens stabilization is superior. The space is probably just a matter of ergonomics and perhaps heat diffusion. But there’s certainly room for it.
Speaking of the Sony A7RIII, it’s taken a bit of internet trashing for its lack of weather sealing. Throw no stones from your glass house, oh Canon shooters. The Canon EOS-R is just about the same; well-sealed buttons and dials, not much else. That means, I think, that it will be fine in a misty rain for a while, but don’t get it saturated and don’t set it somewhere wet.
You can make an argument that tightly fitted plastic shells are good weather sealing. Then again, you can argue that weather sealing means waterproof. Lots of people do that on the way to finding out the warranty doesn’t cover water damage.
The Canon EOS-R sells currently for $2299. It’s very close in build quality and weather sealing to the Canon 6D II which sells for about $1600. So for $600 you get the R mount, cool new slider bar thingie, a bit better (we assume) processing and four more megapixels. That actually sounds fairly reasonable to me.
Reason also suggests Canon is working the kinks out with a (fairly) reasonably priced camera before they come out with a mirrorless pro-level camera. But being reasonable never got anybody anywhere on the internet. The internet is filled with people pretending they’re moving from one brand to another as they justify the choices they’ve already made. So I will, in internet fashion, do some click-bait brand comparison.
The Sony A7r III can be had for a bit under $3,000, has equal build quality, a better native lens selection, more megapixels, etc. My opinion is it’s a better camera (not necessarily system) for the money. It should be; we’re comparing the first generation to a fourth generation.
The Nikon Z6 (comparable to the Canon EOS-R) is $2150 while the Nikon Z7 (comparable to the Sony A7RIII, at least in megapixels) runs a touch over $3,500. I’ll make more build quality comparison’s when I’ve taken a Z apart.
So, which would I buy, right now? None of the above; I don’t know enough yet, and I try very hard to avoid Generation 1 technology. If you forced me into a corner and said: “if you made your living with a camera, what would you shoot today?” I’d say either a Sony with a lot of adapted lenses or an SLR.
That’s today, and that’s my logical answer. Tomorrow (tomorrow being a couple of years) I will absolutely be shooting a mirrorless camera, but I have no idea yet which one. Of course, those of you who know me very well know I won’t be able to stand it, and I’ll ignore my own advice and get one of these in a month or two; and almost certainly decide it was the wrong one a month or two after that.
Roger Cicala and Aaron Closz
Lensrentals.com
October, 2018
Author: Roger Cicala
I’m Roger and I am the founder of Lensrentals.com. Hailed as one of the optic nerds here, I enjoy shooting collimated light through 30X microscope objectives in my spare time. When I do take real pictures I like using something different: a Medium format, or Pentax K1, or a Sony RX1R.
-
mtnman1984
-
yukosteel
-
dkphotoman723
-
dkphotoman723
-
Roger Cicala
-
hugh crawford
-
Mugatu
-
Em Bee
-
Alec Kinnear
-
Alec Kinnear
-
Bruce Campbell
-
Roger Cicala
-
Em Bee
-
Em Bee
-
Nikooles
-
Nikooles
-
Kirk Durston
-
hugh crawford
-
pest
-
pest
-
Turk Turkleton
-
Turk Turkleton
-
Roger Cicala
-
Roger Cicala
-
hugh crawford
-
Daniel Taylor
-
Kirk Durston
-
Em Bee
-
Nikooles
-
Ada
